Here’s a quick overview of the steps you need to take to put Front Door in front of an Azure Web App. In this case, the web app runs a WordPress site.
Step 1: DNS
Suppose you deployed the Web App and its name is gebawptest.azurewebsites.net and you want to reach the site via wp.baeke.info. Traffic will flow like this:
user types wp.baeke.info ---CNAME to xyz.azurefd.net--> Front Door --- connects to gebawptest.azurewebsites.net using wp.baeke.info host header
It’s clear that later, in Front Door, you will have to specify the host header (wp.baeke.info in this case). More on that later…
If you have worked with Azure Web App before, you probably know you need to configure the host header sent by the browser as a custom domain on the web app. Something like this:
Custom domain in Azure Web App (no https configured – hence the red warning)
In this case, we do not want to resolve wp.baeke.info to the web app but to Front Door. To make the custom domain assignment work (because the web app will verify the custom name), add the following TXT record to DNS:
TXT awverify.wp gebawptest.azurewebsites.net
For example in CloudFlare:
awverify txt record in CloudFlare DNS
With the above TXT record, I could easily add wp.baeke.info as a custom domain to the gebawptest.azurewebsites.net web app.
Note: wp.baeke.info is a CNAME to your Front Door domain (see below)
Step 2: Front Door
My Front Door designer looks like this:
Front Door designer
When you create a Front Door, you need to give it a name. In my case that is gebafd.azurefd.net. With wp.baeke.info as a CNAME for gebafd.azurefd.net, you can easily add wp.baeke.info as an additional Frontend host.
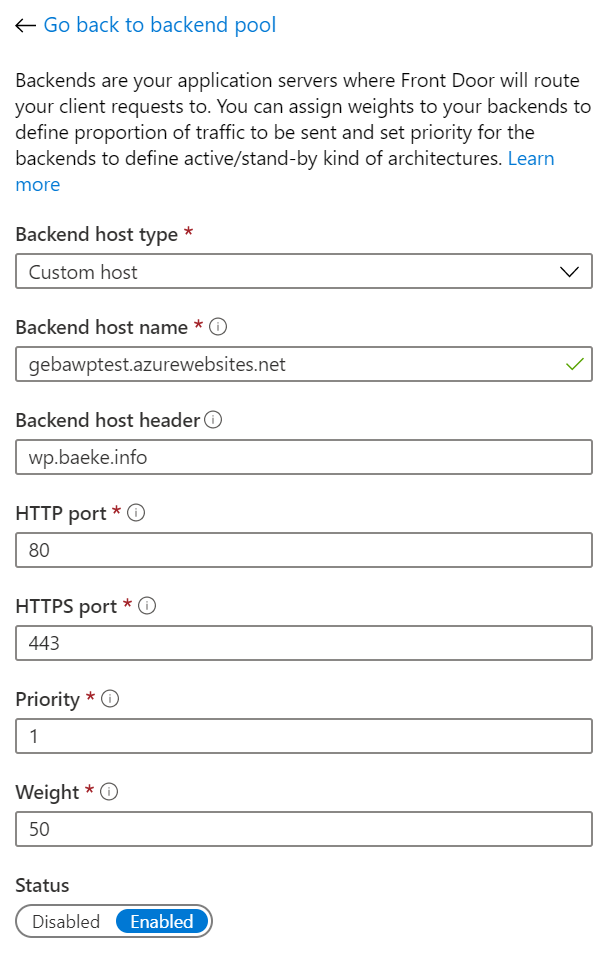
The backend pool is the Azure Web App. It’s configured as follows:
Front Door backend host (only one in the pool); could also have used the Azure App Service backend type
You should connect to the web app using its original name but send wp.baeke.info as the host header. This allows Front Door to connect to the web app correctly.
The last part of the Front Door config is a simple rule that connects the frontend wp.baeke.info to the backend pool using HTTP only.
Step 3: WordPress config
With the default Azure WordPress templates, you do not need to modify anything because wp-config.php contains the following settings:
In a previous post I talked about k3sup, a tool to easily install k3s on any system available over SSH. If you don’t know what k3s is, it’s a lightweight version of Kubernetes. It also runs on ARMv7 and ARM64 processors. That means it’s also compatible with a Raspberry Pi.
If I am not mistaken, Civo is the first cloud provider that offers a managed k3s service. Just like the other Civo services it is very easy to use. At this point in time, the service is in beta and you need to be accepted to participate.
Deploying the cluster
The cluster can be deployed via the portal, CLI or the REST API. Portal deployment is very simple:
set a name
set the size of the nodes
set the number of nodes
Creating a new cluster
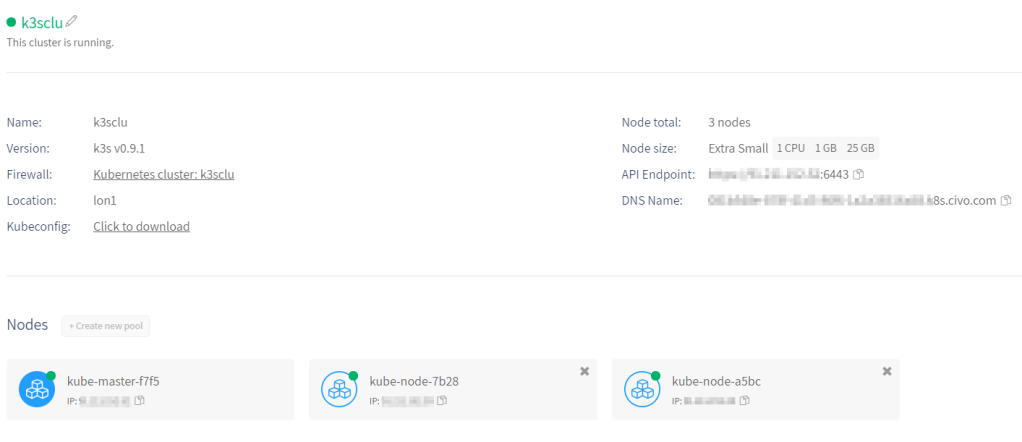
After deployment, you will see the cluster as follows:
Yes, a deployed cluster
Marketplace
Kubernetes on Civo comes with a marketplace of Kubernetes apps to install during or after cluster deployment. By default, Traefik is selected but you can add other apps. I added Helm for instance:
My installed apps plus a view on the marketplace
Getting your Kubeconfig
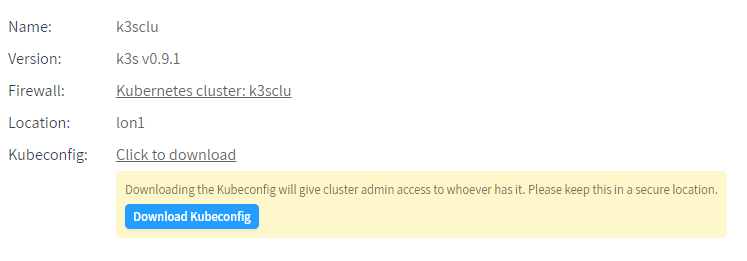
You can use the portal to grab the Kubeconfig file:
Downloading Kubeconfig
Then, in your shell, set the KUBECONFIG environment variable to the path where you downloaded the file. Alternatively, you can use the Civo CLI to obtain the Kubeconfig file.
Deploying an application
Let’s install my image classifier app to the cluster and expose it via Traefik. Let’s look at the Traefik service in the cluster:
Traefik service in the cluster
If you look closely, you will see that the Traefik service is exposed on each node. Currently, there is no integration with Civo’s load balancers. You do get a DNS name that uses round robin over the IP addresses of the nodes. The DNS name is something like 232b548e-897f-41d3-86f6-1a2a38516a58.k8s.civo.com.
Let’s install and expose my image classifier with the following basic YAML:
In the above YAML, replace IPADDRESS with one of the IP addresses of your nodes. With a little help of nip.io, that name will resolve to the IP address that you specify.
The result:
Creepy but it works!
Conclusion
This was just a quick look at Civo’s Kubernetes service. It is easy to install and comes with an easy to use marketplace to quickly get started. In a relatively short time, they were able to get this up and running quickly. I am sure it will rapidly evolve into a great contender to the other managed Kubernetes services out there.
k3sup is a utility created by Alex Ellis to easily deploy k3s to any local or remote VM. In this post, I am giving the tool a try on a Civo cloud Ubuntu VM. You can of course pick any cloud provider you want or use a local system.
Deploying a VM on Civo Cloud
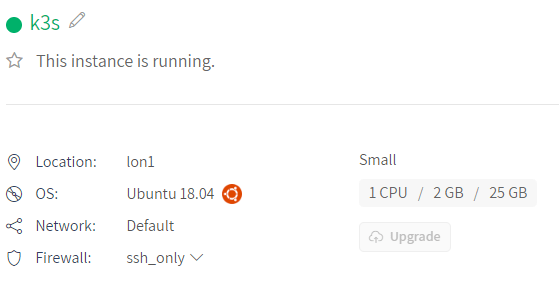
There’s not much to say here. Civo cloud is super simple to use and deploys VMs very fast. Just get an account and launch a new instance. Make sure you can access the VM over SSH. I deployed a simple Ubuntu 18.04 VM with 2 GBs of RAM:
VM deployed on Civo Cloud
Note: make sure you enable SSH via private/public key pair; use ssh-keygen to create the key pair and upload the contents of id_rsa.pub to Civo (SSH Keys section)
After deployment, check that you can access the VM with ssh chosen-user@IP-of-VM
Getting k3sup
On my Windows box, I used the Ubuntu shell to install k3sup:
curl -sLS https://get.k3sup.dev | sh
sudo install k3sup /usr/local/bin/
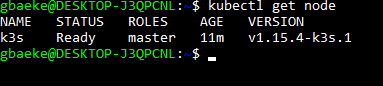
This means you can now use kubectl to interact with k3s. Just make sure kubectl knows where to find your kubeconfig file with (in my case in /home/gbaeke):
export KUBECONFIG=/home/gbaeke/kubeconfig
Before continuing, make sure your cloud VM allows access to TCP port 6443!
Now you can run something like kubectl get nodes:
kubectl running in Ubuntu shell on laptop to access k3s on remote VM
Installing applications
k3sup allows you to install the following applications to k3s via k3sup app install:
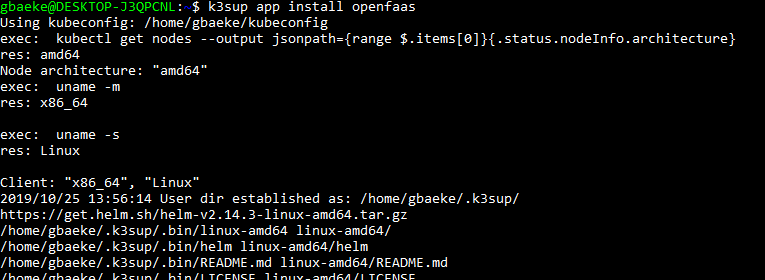
To install OpenFaas, just run k3sup app install openfaas. And off it goes….
Installing OpenFaas via k3sup
To install other applications, just use YAML files or any other method you prefer. It’s still Kubernetes! 😊
Conclusion
This was just a quick post (or note to self 😊) about k3sup which allows you to install k3s to any VM over SSH. It really is a great and simple to use tool so highly recommended. Note that Civo has a k3s service as well which is currently in beta. That service makes it easy to provision k3s from the Civo portal, similar to how you deploy AKS or GKE!
In a previous post, we installed Weaveworks Flux. Flux synchronizes the contents of a git repository with your Kubernetes cluster. Flux can easily be installed via a Helm chart. As an example, we installed Traefik by adding the following yaml to the synced repository:
It does not matter where you put this file because Flux scans the complete repository. I added the file to a folder called traefik.
If you look more closely at the YAML file, you’ll notice its kind is HelmRelease. You need an operator that can handle this type of file, which is this one. In the previous post, we installed the custom resource definition and the operator manually.
Adding a custom application
Now it’s time to add our own application. You do not need to use Helm packages or the Helm operator to install applications. Regular yaml will do just fine.
The application we will deploy needs a Redis backend. Let’s deploy that first. Add the following yaml file to your repository:
After committing this file, wait a moment or run fluxctl sync. When you run kubectl get pods for the default namespace, you should see the Redis pod:
Redis is running — yay!!!
Now it’s time to add the application. I will use an image, based on the following code: https://github.com/gbaeke/realtime-go (httponly branch because master contains code to automatically request a certificate with Let’s Encrypt). I pushed the image to Docker Hub as gbaeke/fluxapp:1.0.0. Now let’s deploy the app with the following yaml:
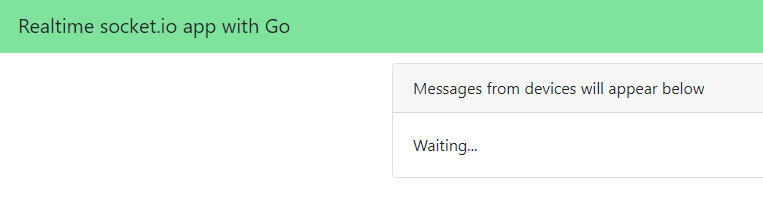
In the above yaml, replace IP in the Ingress specification to the IP of the external load balancer used by your Ingress Controller. Once you add the yaml to the git repository and you run fluxctl sync the application should be deployed. You see the following page when you browse to http://realtime.IP.xip.io:
Web app deployed via Flux and standard yaml
Great, v1.0.0 of the app is deployed using the gbaeke/fluxapp:1.0.0 image. But what if I have a new version of the image and the yaml specification does not change? Read on…
Upgrading the application
If you have been following along, you can now run the following command:
fluxctl list-workloads -a
This will list all workloads on the cluster, including the ones that were not installed by Flux. If you check the list, none of the workloads are automated. When a workload is automated, it can automatically upgrade the application when a new image appears. Let’s try to automate the fluxapp. To do so, you can either add annotations to your yaml or use fluxctl. Let’s use the yaml approach by adding the following to our deployment:
Note: Flux only works with immutable tags; do not use latest
After committing the file and running fluxctl sync, you can run fluxctl list-workloads -a again. The deployment should now be automated:
fluxapp is now automated
Now let’s see what happens when we add a new version of the image with tag 1.0.1. That image uses a different header color to show the difference. Flux monitors the repository for changes. When it detects a new version of the image that matches the semver filter, it will modify the deployment. Let’s check with fluxctl list-workloads -a:
new image deployed
And here’s the new color:
New color in version 1.0.1. Exciting! 😊
But wait… what about the git repo?
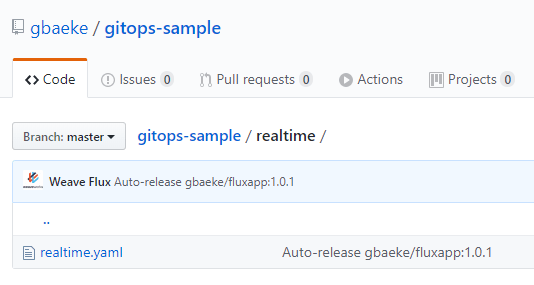
With the configuration of a deploy key, Flux has access to the git repository. When a deployment is automated and the image is changed, that change is also reflected in the git repo:
Weave Flux updated the realtime yaml file
In the yaml, version 1.0.1 is now used:
Flux updated the yaml file
What if I don’t like this release? With fluxctl, you can rollback to a previous version like so:
Rolling back a release – will also update the git repo
Although this works, the deployment will be updated to 1.0.1 again since it is automated. To avoid that, first lock the deployment (or workload) and then force the release of the old image:
In your yaml, there will be an additional annotation: fluxcd.io/locked: ‘true’ and the image will be set to 1.0.0.
Conclusion
In this post, we looked at deploying and updating an application via Flux automation. You only need a couple of annotations to make this work. This was just a simple example. For an example with dev, staging and production branches and promotion from staging to production, be sure to look at https://github.com/fluxcd/helm-operator-get-started as well.
If you have ever deployed applications to Kubernetes or other platforms, you are probably used to the following approach:
developers check in code which triggers CI (continuous integration) and eventually results in deployable artifacts
a release process deploys the artifacts to one or more environments such as a development and a production environment
In the case of Kubernetes, the artifact is usually a combination of a container image and a Helm chart. The release process then authenticates to the Kubernetes cluster and deploys the artifacts. Although this approach works, I have always found this deployment process overly complicated with many release pipelines configured to trigger on specific conditions.
What if you could store your entire cluster configuration in a git repository as the single source of truth and use simple git operations (is there such a thing? 😁) to change your configuration? Obviously, you would need some extra tooling that synchronizes the configuration with the cluster, which is exactly what Weaveworks Flux is designed to do. Also check the Flux git repo.
In this post, we will run through a simple example to illustrate the functionality. We will do the following over two posts:
Post one:
Create a git repo for our configuration
Install Flux and use the git repo as our configuration source
Install an Ingress Controller with a Helm chart
Post two:
Install an application using standard YAML (including ingress definition)
Update the application automatically when a new version of the application image is available
Let’s get started!
Create a git repository
To keep things simple, make sure you have an account on GitHub and create a new repository. You can also clone my demo repository. To clone it, use the following command:
Note: if you clone my repo and use it in later steps, the resources I defined will get created automatically; if you want to follow the steps, use your own empty repo
Install Flux
Flux needs to be installed on Kubernetes, so make sure you have a cluster at your disposal. In this post, I use Azure Kubernetes Services (AKS). Make sure kubectl points to that cluster. If you have kubectl installed, obtain the credentials to the cluster with the Azure CLI and then run kubectl get nodes or kubectl cluster-info to make sure you are connected to the right cluster.
az aks get-credentials -n CLUSTER_NAME -g RESOURCE_GROUP
It is easy to install Flux with Helm and in this post, I will use Helm v3 which is currently in beta. You will need to install Helm v3 on your system. I installed it in Windows 10’s Ubuntu shell. Use the following command to download and unpack it:
curl -sSL "https://get.helm.sh/helm-v3.0.0-beta.3-linux-amd64.tar.gz" | tar xvz
This results in a folder linux-amd64 which contains the helm executable. Make the file executable with chmod +x and copy it to your path as helmv3. Next, run helmv3. You should see the help text:
The Kubernetes package manager

Common actions for Helm:

- helm search:    search for charts
- helm fetch:     download a chart to your local directory to view
- helm install:   upload the chart to Kubernetes
- helm list:      list releases of charts
...
Now you are ready to install Flux. First, add the FLux Helm repository to allow helmv3 to find the chart:
The above command upgrades Flux but installs it if it is missing (-i). The chart to install is fluxcd/flux. With –wait, we wait until the installation is finished. We will not go into the first two –set options for now. The last option defines the git repository Flux should use to sync the configuration to the cluster. Currently, Flux supports one repository. Because we use a public repository, Flux can easily read its contents. At times, Flux needs to update the git repository. To support that, you can add a deploy key to the repository. First, install the fluxctl tool:
curl -sL https://fluxcd.io/install | sh
export PATH=$PATH:$HOME/.fluxcd/bin
Now run the following commands to obtain the public key to use as deploy key:
Copy and paste this key as a deploy key for your github repo:
git repo deploy key
Phew… Flux should now be installed on your cluster. Time to install some applications to the cluster from the git repo.
Note: Flux also supports private repos; it just so happens I used a public one here
Install an Ingress Controller
Let’s try to install Traefik via its Helm chart. Since I am not using traditional CD with pipelines that run helm commands, we will need something else. Luckily, there’s a Flux Helm Operator that allows us to declaratively install Helm charts. The Helm Operator installs a Helm chart when it detects a custom resource definition (CRD) of type helm.fluxcd.io/v1. Let’s first create the CRD for Helm v3:
Just add the above YAML to the GitHub repository. I added it to the ingress folder:
traefik.yaml added to the GitHub repo
If you wait a while, or run fluxctl sync, the repo gets synced and the resources created. When the helm.fluxcd.io/v1 object is created, the Helm Operator will install the chart in the default namespace. Traefik will be exposed via an Azure Load Balancer. You can check the release with the following command:
kubectl get helmreleases.helm.fluxcd.io

NAME      RELEASE   STATUS     MESSAGE                  AGE
traefik   traefik   deployed   helm install succeeded   15m
Also check that the Traefik pod is created in the default namespace (only 1 replica; the default):
kubectl get po

NAME                       READY   STATUS    RESTARTS   AGE
traefik-86f4c5f9c9-gcxdb   1/1     Running   0          21m
Also check the public IP of Traefik:
kubectl get svc

NAME                TYPE           CLUSTER-IP     EXTERNAL-IP
traefik             LoadBalancer   10.0.8.59      41.44.245.234
We will later use that IP when we define the ingress for our web application.
Conclusion
In this post, you learned a tiny bit about GitOps with WeaveWorks Flux. The concept is simple enough: store your cluster config in a git repo as the single source of truth and use git operations to initiate (or rollback) cluster operations. To start, we simply installed Traefik via the Flux Helm Operator. In a later post, we will add an application and look at image management. There’s much more you can do so stay tuned!
In today’s post, we will take a quick look at Azure Kubernetes Service (AKS) metrics and alerts for Azure Monitor. Out of the box, Microsoft offers two ways to obtain metrics:
Metrics that can easily be used with Azure Monitor to generate alerts; these metrics are written to the Azure Monitor metrics store
Metrics forwarded to Log Analytics; with Log Analytics queries (KQL), you can generate alerts as well
In this post, we will briefly look at the metrics in the Azure Monitor metrics store. In the past, the AKS metrics in the metrics store were pretty basic:
Basic Azure Monitor metrics for AKS
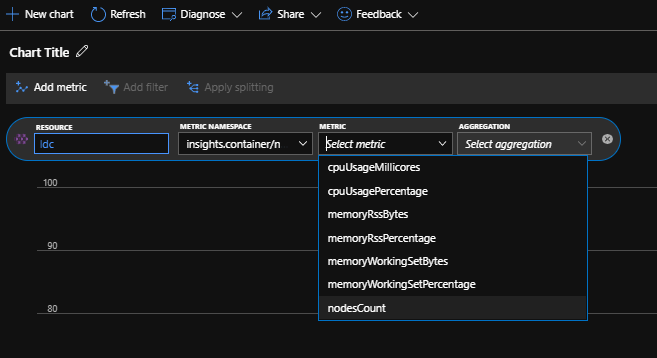
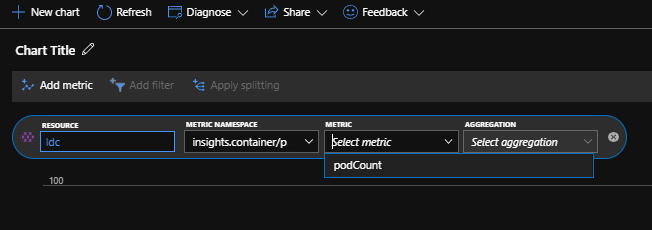
Some time ago however, support for additional metrics was introduced:
When the metrics are enabled, it is easy to visualize them from the Metrics pane. Note that metrics can be split. The screenshot below shows the nodes count, split in Ready and NotReady:
Pretty uneventful… 2 nodes in ready state
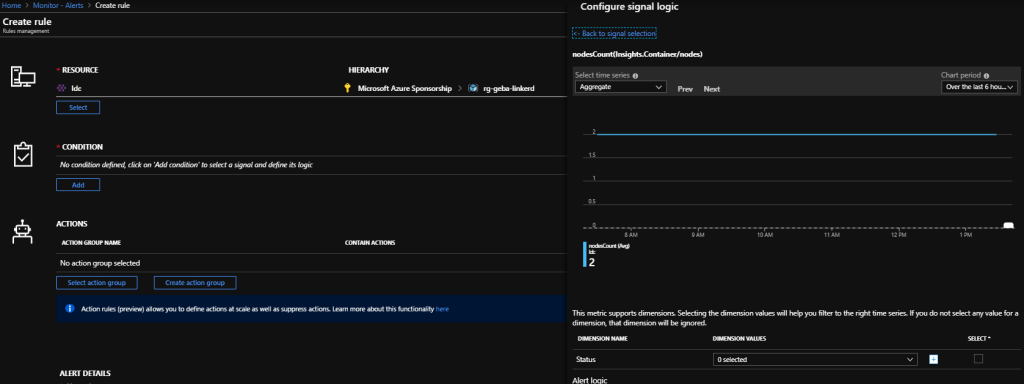
To generate an alert based on the above metrics, a new alert rule can be generated. Although the New alert rule link is greyed out, you can create the alert from Azure Monitor:
Creating a alert on node count from Azure Monitor
And of course, when this fires you will see this in Azure Monitor:
A few days ago, I had to map the domain inity.io to a Netlify domain. If you have only worked with DNS once in your life, you probably know about these two types of records:
CNAME: a CNAME record maps a name to another name; I can, for instance, create a CNAME record that maps http://www.inity.io to somedomain.netlify.com
With that knowledge in your bag, it would seem that a CNAME record is the way to map inity.io to somedomain.netlify.com. Sadly, that is not the case because CNAMEs cannot coexist with other records for the domain. In the case of the root or apex domain, there are existing records for the root domain such as the NS records.
If your DNS provider supports ALIAS records, you are in luck. From a high level, an ALIAS record works like a CNAME record although there are several lower level differences we won’t all go into.
Since I use namecheap.com and they support ALIAS records, it was easy to map inity.io to somedomain.netlify.com:
Namecheap ALIAS record
The ALIAS record only supports a 1 or 5 minute TTL. The host is @ which represents the root domain. Notice I also redirect http://www.inity.io to the Netlify domain with a regular CNAME.
What does dig say?
Let’s look at what dig returns for both the ALIAS and CNAME record. Here’s the dig output for ALIAS (with some lines removed):
λ geba:~  dig inity.io


;; ANSWER SECTION:
inity.io.               300     IN      A       167.99.129.42
The authoritative server does all the work here and returns the IP address directly to you. That does not happen for the CNAME:
λ geba:~  dig www.inity.io

;; ANSWER SECTION:
www.inity.io.           1799    IN      CNAME   optimistic-panini-9caddc.netlify.com.
optimistic-panini-9caddc.netlify.com. 20 IN A   167.99.129.42
Some more work needs to be done here since you get back the CNAME record which then needs to be resolved to the IP address.
What about Azure and Front Door?
If you work with Front Door and want to map the root or apex domain to a Front Door frontend such as my.azurefd.net, the same issue arises. The Microsoft docs contain a good article explaining the concepts: https://docs.microsoft.com/en-us/azure/frontdoor/front-door-how-to-onboard-apex-domain. From that document, you will learn that Azure DNS also supports “aliases” with an easy dropdown list to select your Front Door frontend host. If you want to use SSL for the frontend host, you will need to bring your own certificate because automatic certificates are not supported with APEX domains.
Note that you do not have to use Azure DNS. An ALIAS record at NameCheap or other providers would work equally well. CloudFlare also supports APEX domains via CNAME Flattening. Just don’t use GoDaddy. 😲
A while ago, I blogged about Linkerd 2.x. In that post, I used a simple calculator API, reachable via an Azure Load Balancer. When you look at that traffic in Linkerd, you see the following:
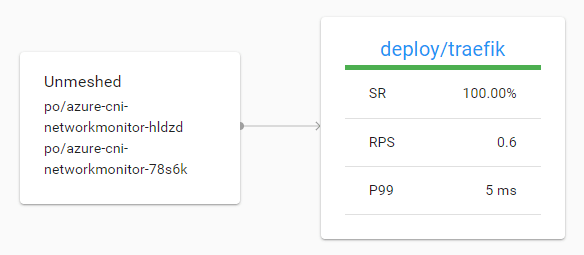
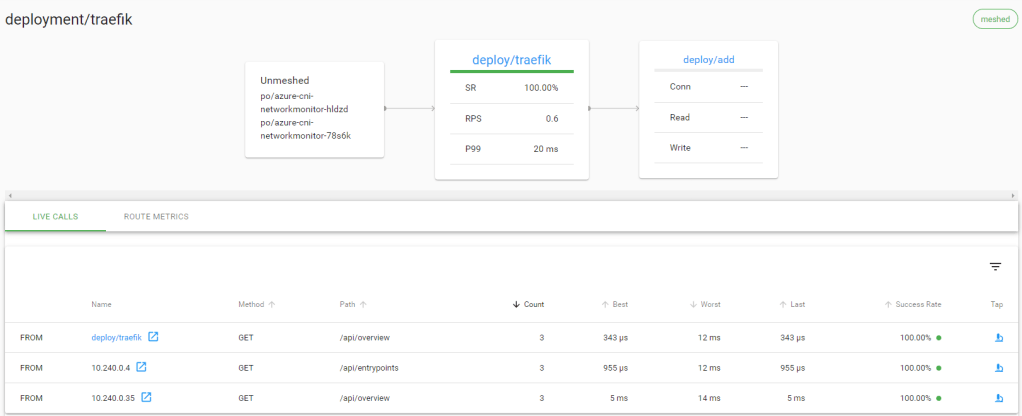
Incoming load balancer traffic to a meshed deployment (in this case Traefik 2.0)
Above, you do not see this is Azure Load Balancer traffic. The traffic reaches the meshed service via the Azure CNI pods.
In this post, we will install Traefik 2.0, mesh the Traefik deployment and make the calculator service reachable via Traefik and the new IngressRoute. Let’s get started!
Install Traefik 2.0
We will install Traefik 2.0 with http support only. There’s an excellent blog that covers the installation over here. In short, you do the following:
deploy prerequisites such as custom resource definitions (CRDs), ClusterRole, ClusterRoleBinding, ServiceAccount
deploy Traefik 2.0: it’s just a Kubernetes deployment
deploy a service to expose the Traefik HTTP endpoint via a Load Balancer; I used an Azure Load Balancer automatically deployed via Azure Kubernetes Service (AKS)
deploy a service to expose the Traefik admin endpoint via an IngressRoute
Here are the prerequisites for easy copy and pasting:
Here’s the service to expose Traefik’s web endpoint. This is different from the post I referred to because that post used DigitalOcean. I am using Azure here.
The above service definition will give you a public IP. Traffic destined to port 80 on that IP goes to the Traefik pods on port 8000.
Now we can expose the Traefik admin interface via Traefik itself. Note that I am not using any security here. Check the original post for basic auth config via middleware.
Traefik’s admin site is first exposed as a ClusterIP service on port 8080. Next, an object of kind IngressRoute is defined, which is new for Traefik 2.0. You don’t need to create standard Ingress objects and configure Traefik with custom annotations. This new approach is cleaner. Of course, substitute the host with a host that points to the public IP of the load balancer. Or use the IP address with the xip.io domain. If your IP would be 1.1.1.1 then you could use something like admin.1.1.1.1.xip.io. That name automatically resolves to the IP in the name.
Let’s see if we can reach the admin interface:
The new Traefik 2 admin UI
Traefik 2.0 is now installed in a basic way and working properly. We exposed the admin interface but now it is time to expose the calculator API.
Exposing the calculator API
The API is deployed as 5 pods in the add namespace:
Calculator API exposed
The API is exposed as a service of type ClusterIP with only an internal Kubernetes IP. To expose it via Traefik, we create the following object in the add namespace:
I am using xip.io above. Change 1.1.1.1 to the public IP of Traefik’s Azure Load Balancer. The add-svc that exposes the calculator API on port 80 is exposed via Traefik. We can easily call the service via:
curl http://calc.1.1.1.1.xip.io/add/10/10

20
Great! But what is that calcheader middleware? Middlewares modify the requests and responses to and from Traefik 2.0. There are all sorts of middelwares as explained here. You can set headers, configure authentication, perform rate limiting and much much more. In this case we create the following middleware object in the add namespace:
This middleware adds a header to the request before it comes in to Traefik. The header overrides the destination and sets it to the internal DNS name of the add-svc service that exposes the calculator API. This requirement is documented by Linkerd here.
Meshing the Traefik deployment
Because we want to mesh Traefik to get Linkerd metrics and more, we need to inject the Linkerd proxy in the Traefik pods. In my case, Traefik is deployed in the default namespace so the command below can be used:
Make sure you run the command on a system with the linkerd executable in your path and kubectl homed to the cluster that has Linkerd installed.
Checking the traffic in the Linkerd dashboard
With some traffic generated, this is what you should see when you check the meshed deployment that runs the calculator API (deploy/add):
Both the traffic generator (add-cli) and Traefik are meshed which results in a more detailed view of the traffic
If you are wondering what these services are and do, check this post. In the above diagram, we can clearly see we are receiving traffic to the calculator API from Traefik. When I click on Traefik, I see the following:
A view on the meshed Traefik deployment
From the above, we see Traefik receives traffic via the Azure Load Balancer and that it forwards traffic to the calculator service. The live calls are coming from the admin UI which refreshes regularly.
In Grafana, we can get more information about the Traefik deployment:
Linkerd metrics for Traefik in the Grafana dashboard that comes with LinkerdMore metrics
Conclusion
This was just a brief look at both Traefik 2 and “meshing” Traefik with Linkerd. There is much more to say and I have much more to explore. Hopefully, this can get you started!
In the previous blog post, I talked about the OAuth client credentials flow and how to implement it with Azure Active Directory. At the end of the post, I briefly talked about the need to validate the token in either your application or an intermediary layer. In this post, we will take a look at Azure API Management as that intermediary layer.
Remember that we obtained a token for a specific resource. In this case, the resource is an Azure AD application (App Registration) that represents our API. I will call it the API app from now on. The API app has the following app id: 06b2a484-141c-42d3-9d73-32bec5910b06. In our token, the app id is in the aud (audience) claim.
To verify that our client has access rights to the API, we created an application role on the API app called invokeRole. That role should be in the roles claim of the token. If it is not, the client has no access.
We also want to pass the client application id as a header to our backend API. We can use the azp claim for this purpose. That claim will be extracted by API management and passed as a header.
To validate the API connection, we will check for both the aud and the roles claims. If the aud or the invokeRole claim is not present, we reject the call. Let’s take a look how that works.
Configuring the API in API Management
I deployed an Azure API Management instance in the Development tier (any tier will do). I created a simple API with just one GET operation that can add numbers:
Calc API with one operation – amaaaaaazing
At the All Operations level, the API has the following inbound policy defined:
The validate-jwt does what it says. It validates a JWT (JSON Web Token) passed via the HTTP Authorization header. If the validation fails, a 401 code is returned. The openid-config element sets the URL to the openid configuration of our tenant. You can browse to that URL to see its content. It is open to anyone. Information in that document is used to validate the JWT.
Note: in the openid config URL you can use the domain name of your tenant instead of the tenant ID
In the audiences section we specify we want that specific value in the aud claim. It is the app id of our API app. In the required-claims section we check that the roles claim contains the invokeRole.
Testing the API
With the validate-jwt policy present, we need a valid token to test the API. We can simply use curl to get the token:
curl -d 'grant_type=client_credentials&client_id=f1f695cb-2d00-4c0f-84a5-437282f3f3fd&client_secret=SECRET&audience=api%3A%2F%2F06b2a484-141c-42d3-9d73-32bec5910b06&scope=api%3A%2F%2F06b2a484-141c-42d3-9d73-32bec5910b06%2F.default' -X POST 'https://login.microsoftonline.com/019486dd-8ffb-45a9-9232-4132babb1324/oauth2/v2.0/token'
The result of this call is the access token. In API Management, we can use the access token to test the API:
Testing the API with the token added to the Authorization header (after the word Bearer)
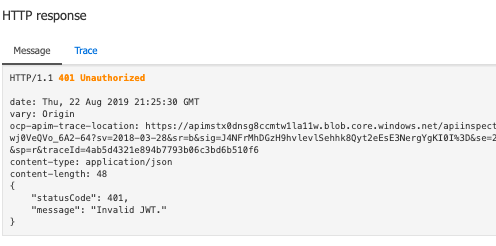
If the token is invalid, the following response is received:
Oops! Something wrong with the JWT!
Retrieving a claim and set the value as a header
To retrieve the azp claim and set it as a header, just add the set-header policy AFTER the validate-jwt policy (in API design; all operations):
Oh, this is so readable! Well not really but it does extract the azp claim from the token and sets the client header to that value. When you test the API and trace the backend call, the header will be shown in the trace. It is up to the backend API to process it.
If you want, you can remove the Authorization header and not send it to the backend.
Conclusion
When you protect APIs with OAuth, you can perform the validation at the API Management layer. Azure API Management can do this very easily with the validate-jwt policy. You can extract claims from the policy and set them as headers so that the backend can handle them without having to know anything about OAuth. Happy coding!
I often get questions about protecting applications like APIs using OAuth. I guess you know the drill:
you have to obtain a token (typically a JWT or JSON Web Token)
the client submits the token to your backend (via a Authorization HTTP header)
the token needs to be verified (do you trust it?)
you need to grab some fields from the token to use in your application (claims).
When the client is a daemon or some server side process, you can use the client credentials grant flow to obtain the token from Azure AD. The flow works as follows:
OAuth Client Credentials Flow (image from Microsoft docs)
The client contacts the Azure AD token endpoint to obtain a token. The client request contains a client ID and client secret to properly authenticate to Azure AD as a known application. The token endpoint returns the token. In this post, I only focus on the access token which is used to access the resource web API. The client uses the access token in the Authorization header of requests to the API.
Let’s see how this works. Oh, and by the way, this flow should be done with Azure AD. Azure AD B2C does not support this type of flow (yet).
Create a client application in Azure AD
In Azure AD, create a new App Registration. This can be a standard app registration for Web APIs. You do not need a redirect URL or configure public clients or implicit grants.
Standard run of the mill app registration
In Certificates & secrets, create a client secret and write it down. It will not be shown anymore when you later come back to this page:
Yes, I set it to Never Expire!
From the Overview page, note the application ID (also client ID). You will need that later to request a token.
Why do we even create this application? It represents the client application that will call your APIs. With this application, you control the secret that the client application uses but also the access rights to the APIs as we will see later. The client application will request a token, specifying the client ID and the client secret. Let’s now create another application that represents the backend API.
Create an API application in Azure AD
This is another App Registration, just like the app registration for the client. In this case, it represents the API. Its settings are a bit different though. There is no need to specify redirect URIs or other settings in the Authentication setting. There is also no need for a client secret. We do want to use the Expose an API page though:
Expose API page
Make sure you get the application ID URI. In the example above, it is api://06b2a484-141c-42d3-9d73-32bec5910b06 but you can change that to something more descriptive.
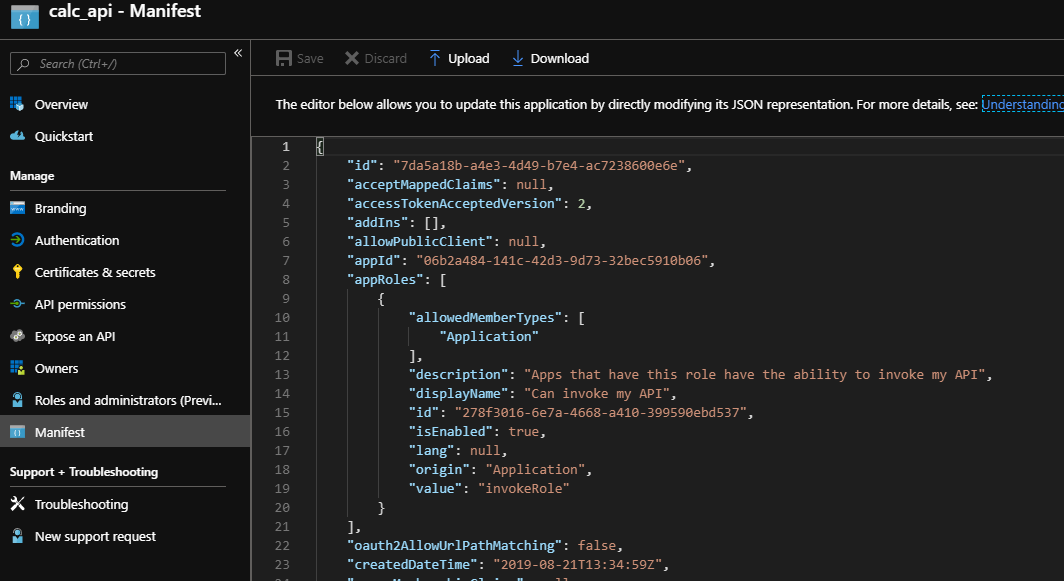
When you use the client credentials grant, you do not use user scopes. As such, the Scopes defined by this API list is empty. Instead, you want to use application roles which are defined in the manifest:
Application role in the manifest
There is one role here called invokeRole. You need to generate a GUID manually and use that as the id. Make sure allowedMemberTypes contains Application.
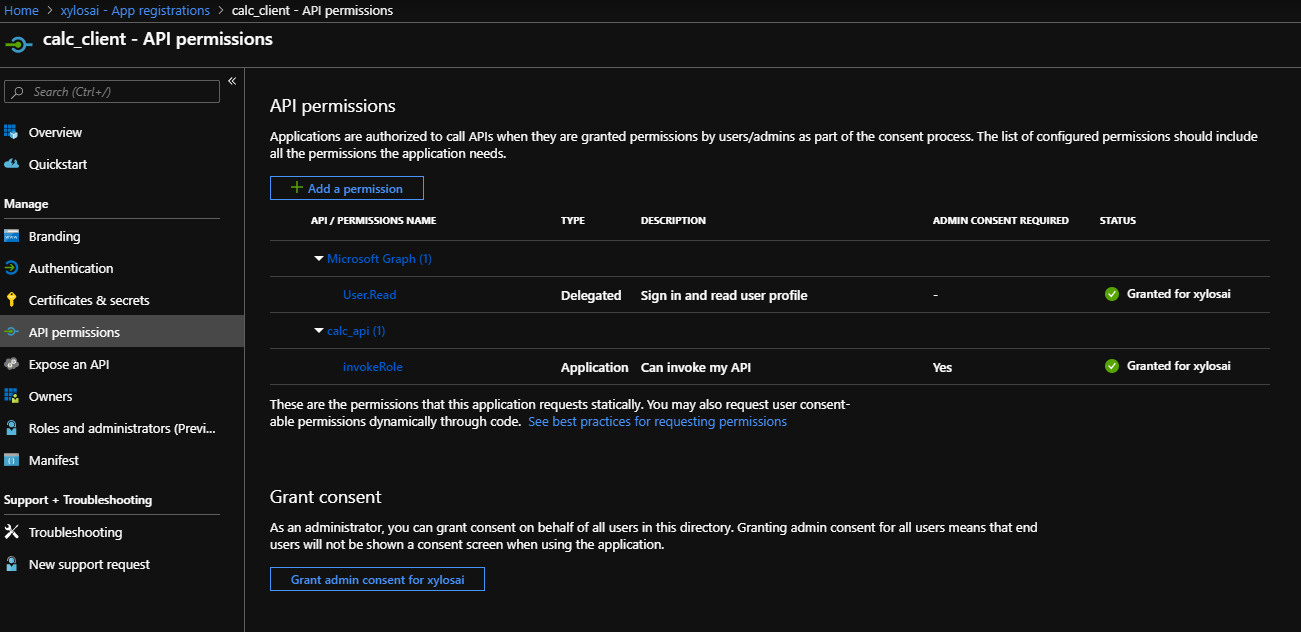
Great! But now we need to grant the client the right to obtain a token for one or more of the roles. You do that in the client application, in API Permissions:
Client application is granted access to the invokeRole application role of the API application
To grant the permission, just click Add a permission, select My APIs, click your API and select the role:
Selecting the role
Delegated permissions is greyed out because there are no user scopes. Application permissions is active because we defined an application role on the API application.
Obtaining a token
The server-side application only needs to do one call to the token endpoint to obtain the access token. Here is an example call with curl:
curl -d "grant_type=client_credentials&client_id=f1f695cb-2d00-4c0f-84a5-437282f3f3fd&client_secret=SECRET&audience=api%3A%2F%2F06b2a484-141c-42d3-9d73-32bec5910b06&scope=api%3A%2F%2F06b2a484-141c-42d3-9d73-32bec5910b06%2F.default" -X POST "https://login.microsoftonline.com/019486dd-8ffb-45a9-9232-4132babb1324/oauth2/v2.0/token"
Ouch, lots of gibberish here. Let’s break it down:
the POST needs to send URL encoded data in the body; curl’s -d takes care of that but you need to perform the URL encoding yourself
grant_type: client_credentials to indicate you want to use this flow
client_id: the application ID of the client app registration in Azure AD
client_secret: URL encoded secret that you generated when you created the client app registration
audience: the resource you want an access token for; it is the URL encoding of api://06b2a484-141c-42d3-9d73-32bec5910b06 as set in Expose an API
scope: this one is a bit special; for the v2 endpoint that we use here it needs to be api://06b2a484-141c-42d3-9d73-32bec5910b06/.default (but URL encoded); the scope (or roles) that the client application has access to will be included in the token
The POST goes to the Azure AD v2.0 token endpoint. There is also a v1 endpoint which would require other fields. See the Microsoft docs for more info. Note that I also updated the application manifests to issue v2 tokens via the accessTokenAcceptedVersion field (set to 2).
The result of the call only results in an access token (no refresh token in the client credentials flow). Something like below with the token shortened:
Note that the invokeRole is present because the client application was granted access to that role. We also know the application ID that represents the API, which is in the aud field. The azp field contains the application ID of the client application.
Great, we can now use this token to call our API. The raw HTTP request would be in this form.
GET https://somehost/calc/v1/add/1/1 HTTP/1.1
Host: somehost
Authorization: Bearer eyJ0e...
Of course, your application needs to verify the token somehow. This can be done in your application or in an intermediate layer such as API Management. We will take a look at how to do this with API Management in a later post.
Conclusion
Authentication, authorization and, on a broader scale, identity can be very challenging. Technically though, a flow such as the client credentials flow, is fairly simple to implement once you have done it a few times. Hopefully, if you are/were struggling with this type of flow, this post has given you some pointers!


























 baeke.info