A while back I wrote about building an AI agent server with AG-UI and the Microsoft Agent Framework. That post walked through what AG-UI is, how you stand up a small agent server, and how a web client talks to it. Quick recap before we move on:
- AG-UI is a protocol between a frontend and an agent backend. The agent emits a stream of typed events —
RUN_STARTED,TEXT_MESSAGE_START/CONTENT/END,TOOL_CALL_*,RUN_FINISHED— over Server-Sent Events. The UI decides how to render them. - The runtime sits between the browser and the agent. In the previous post (and again here) that runtime is CopilotKit: the browser talks to a Next.js route, that route forwards to the agent over
HttpAgent, and CopilotKit handles the SSE wire format on both ends. - The agent itself is small: an HTTP endpoint that takes a message history and streams AG-UI events back. Last time I built it with Microsoft Agent Framework. The principle is the same regardless of framework — what matters is that the events on the wire are AG-UI.
In the previous post the agent ran as a plain Python service. That’s fine for a demo, but the obvious next question is: where do you actually run this thing? You need a host that gives you a stable HTTPS endpoint, sane authentication, autoscale, telemetry, and ideally something that knows it’s running an agent and not a generic web app.
That brings us to Microsoft Foundry hosted agents.
What are Foundry hosted agents?
Microsoft Foundry (the Azure AI platform formerly known as Azure AI Foundry) has a feature called hosted agents. You bring a container image, your agent server, and Foundry runs it behind a managed endpoint inside your Foundry project. Foundry handles:
- The public or private HTTPS endpoint, scoped under your project
- Entra ID authentication on that endpoint
- A managed identity inside the container so the agent can call Azure OpenAI without secrets; your code can use
DefaultAzureCredential()to pick it up - Auto-injection of
FOUNDRY_PROJECT_ENDPOINTandAPPLICATIONINSIGHTS_CONNECTION_STRINGinto the container’s environment - Telemetry into Application Insights
What you provide is the container and a small manifest that tells Foundry which protocol the agent speaks, how much CPU/memory it needs, and which model deployment to bind. There is no agent SDK you must adopt — Foundry only cares that your container exposes the right HTTP contract.
Note that this post used the new version of hosted agents, announced on April 22nd 2026. The previous version ran on Azure Container Apps. It is unclear what this new version runs on but now your agents run in MicroVMs with one MicroVM per session. A MicroVM can have its own state such as files saved to the MicroVMs filesystem.
Two protocols: Responses vs. Invocations
To interact with Foundry hosted agents you speak one of two protocols, and the choice matters:
- Responses protocol: Foundry uses the well know OpenAI Responses protocol. It owns conversation history and can store it server-side on the platform
- Invocations protocol. Foundry transport-only for the request body. Each request is a
POST /invocationsto your container, your agent owns the turn end-to-end, and you stream whatever response format you like — including SSE. You manage state. In this post, with CopilotKit, state is managed on the client.
For an AG-UI agent, Invocations is the one you want. AG-UI is itself an SSE event stream with its own well-defined event shapes. Invocations lets the AG-UI bytes flow through Foundry untouched. The browser sends a turn, Foundry routes it to your container, your agent emits AG-UI events, and the runtime/browser consumes them.
Foundry hosted agents always work with sessions, regardless of protocol. In a chat-based app like the one we are building, you would not want each turn in a conversation be handled by a new session. Our client will set a session id per conversation. By passing the session id at each call to the invocations endpoint, we are assured that sessions are not created at every turn.
⚠️ You cannot simply choose your endpoints freely. With AG-UI for example, you typically choose the endpoint yourself (e.g. /chat). Not so with Foundry Hosted Agents!
What we will build?
The diagram below shows what we will build end-to-end:
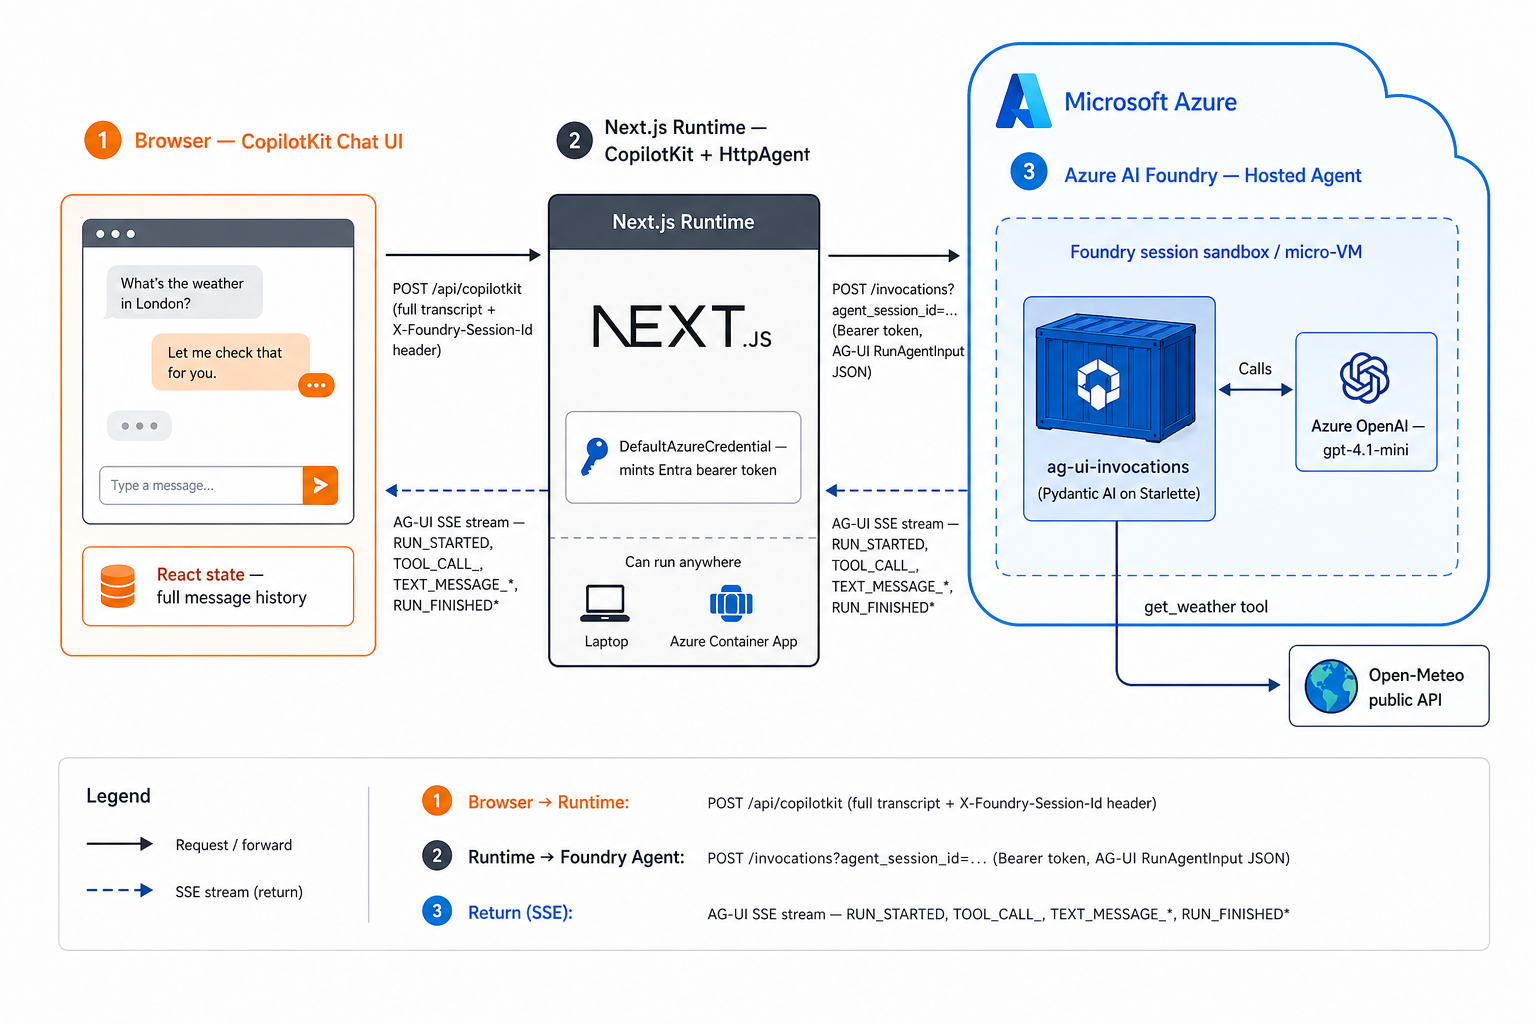
There is not a lot of difference with the previous post. The main difference is the agent that runs as a Microsoft Foundry hosted agents and that the runtime connects to the invocations endpoint exposed by that agent.
Check https://github.com/gbaeke/hostedagentv2 for the source code. It is best to follow the README if you want to deploy this yourself, accompanied by the explanations in this post.
Writing the agent
Here is the entire agent loop for this sample (paraphrased from src/ag-ui-invocations/main.py):
from azure.ai.agentserver.invocations import InvocationAgentServerHostfrom pydantic_ai import Agentfrom pydantic_ai.ag_ui import handle_ag_ui_requestagent = Agent(model, instructions="You are a helpful assistant. ...")@agent.tool_plainasync def get_weather(location: str) -> dict: ... # call Open-Meteo, return dictapp = InvocationAgentServerHost()@app.invoke_handlerasync def handle_invoke(request, ): return await handle_ag_ui_request(agent, request)if __name__ == "__main__": app.run()
Three libraries do the heavy lifting:
azure-ai-agentserver-invocations— a thin Starlette host that exposesPOST /invocationson port 8088. Every call from the CopilotKit runtime will be handled by this host.pydantic-ai— defines theAgent, the model binding, and the@agent.tool_plaindecorator for toolspydantic_ai.ag_ui.handle_ag_ui_request— translates a Pydantic AI agent run into an AG-UI SSE stream.
Authentication to Azure OpenAI is DefaultAzureCredential → bearer token for https://ai.azure.com/.default. No API keys, no AOAI endpoint env var — the AOAI base URL is derived by stripping the path off FOUNDRY_PROJECT_ENDPOINT.
The container needs nothing exotic — python:3.12-slim, pip install -r requirements.txt, CMD ["python", "main.py"], expose 8088. The full Dockerfile is six lines.
In summary, this is a simple agent with a weather tool written with Pydantic AI. Pydantic AI supports AG-UI out of the box. With a few extra lines of code, the AG-UI event stream is wired to the invocations endpoint. Nothing more, nothing less…
⚠️ Important: this agent is based on a Microsoft sample and then edited to wire up a weather tool. See Microsoft Learn for more information on how to create the sample, including the Bicep to deploy all required Azure resources, with azd ai agent init. I used this sample:
Make sure you use the latest version of azd. If you are using an old version, you might use the older version of Microsoft Foundry hosted agents!
Publishing to Foundry
Two manifests describe the agent to Foundry. They look similar; their audiences differ.
agent.yaml is the runtime ContainerAgent spec read by Foundry itself. It’s hard-coded:
kind: hostedname: ag-ui-invocationsprotocols: - protocol: invocations version: 1.0.0resources: cpu: "0.25" memory: 0.5Gienvironment_variables: - name: AZURE_AI_MODEL_DEPLOYMENT_NAME value: gpt-4.1-mini
agent.manifest.yaml is the template azd reads to drive deployment. It uses {{AZURE_AI_MODEL_DEPLOYMENT_NAME}} placeholders that azd substitutes at deploy time. FOUNDRY_PROJECT_ENDPOINT and APPLICATIONINSIGHTS_CONNECTION_STRING are not declared here — Foundry injects them into the container automatically. Declaring them would shadow the platform values.
What you need on the Foundry side before azd up:
- A Foundry project (the unit that owns agents, model deployments, and connections).
- A model deployment — here,
gpt-4.1-mini, declared inazure.yamlunderservices.ag-ui-invocations.config.deployments. azd creates it on first provision. - An Azure Container Registry connection on the project. Hosted agents pull their image from ACR. The Bicep in
infra/creates one if you don’t bring your own. - An identity with
Cognitive Services OpenAI User(or equivalent) on the AOAI account, so the container’s managed identity can call the model.
The full deploy is one command:
azd up
That provisions the resources, builds the image with remoteBuild: true (azd ships the build to ACR rather than building locally), pushes it, and registers the agent with Foundry. After it returns, the agent is live at:
https://<account>.services.ai.azure.com/api/projects/<project>/agents/ag-ui-invocations/endpoint/protocols/invocations?api-version=v1
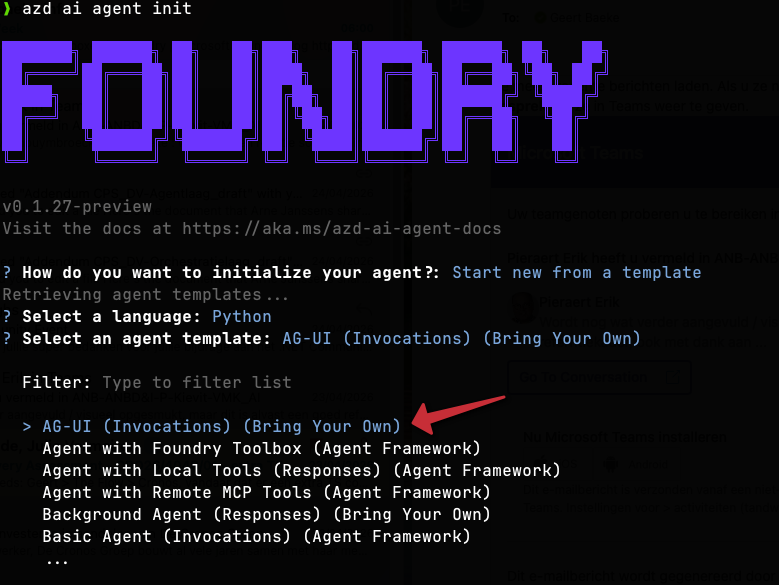
Full details with step-by-step generic instructions can be found on Microsoft Learn. If you want to create the AG-UI example, use the AG-UI (Invocations) (Bring Your Own) template.
The web client
The web app is a small Next.js 14 App Router project under web/. Two pieces matter:
app/api/copilotkit/route.tsruns CopilotRuntime server-side. CopilotRuntime is the runtime layer — it accepts a request from the browser and forwards it to the Foundry agent overHttpAgent:
  const runtime = new CopilotRuntime({
    agents: {
      ag_ui_invocations: new HttpAgent({ url: agentUrl, headers }),
    },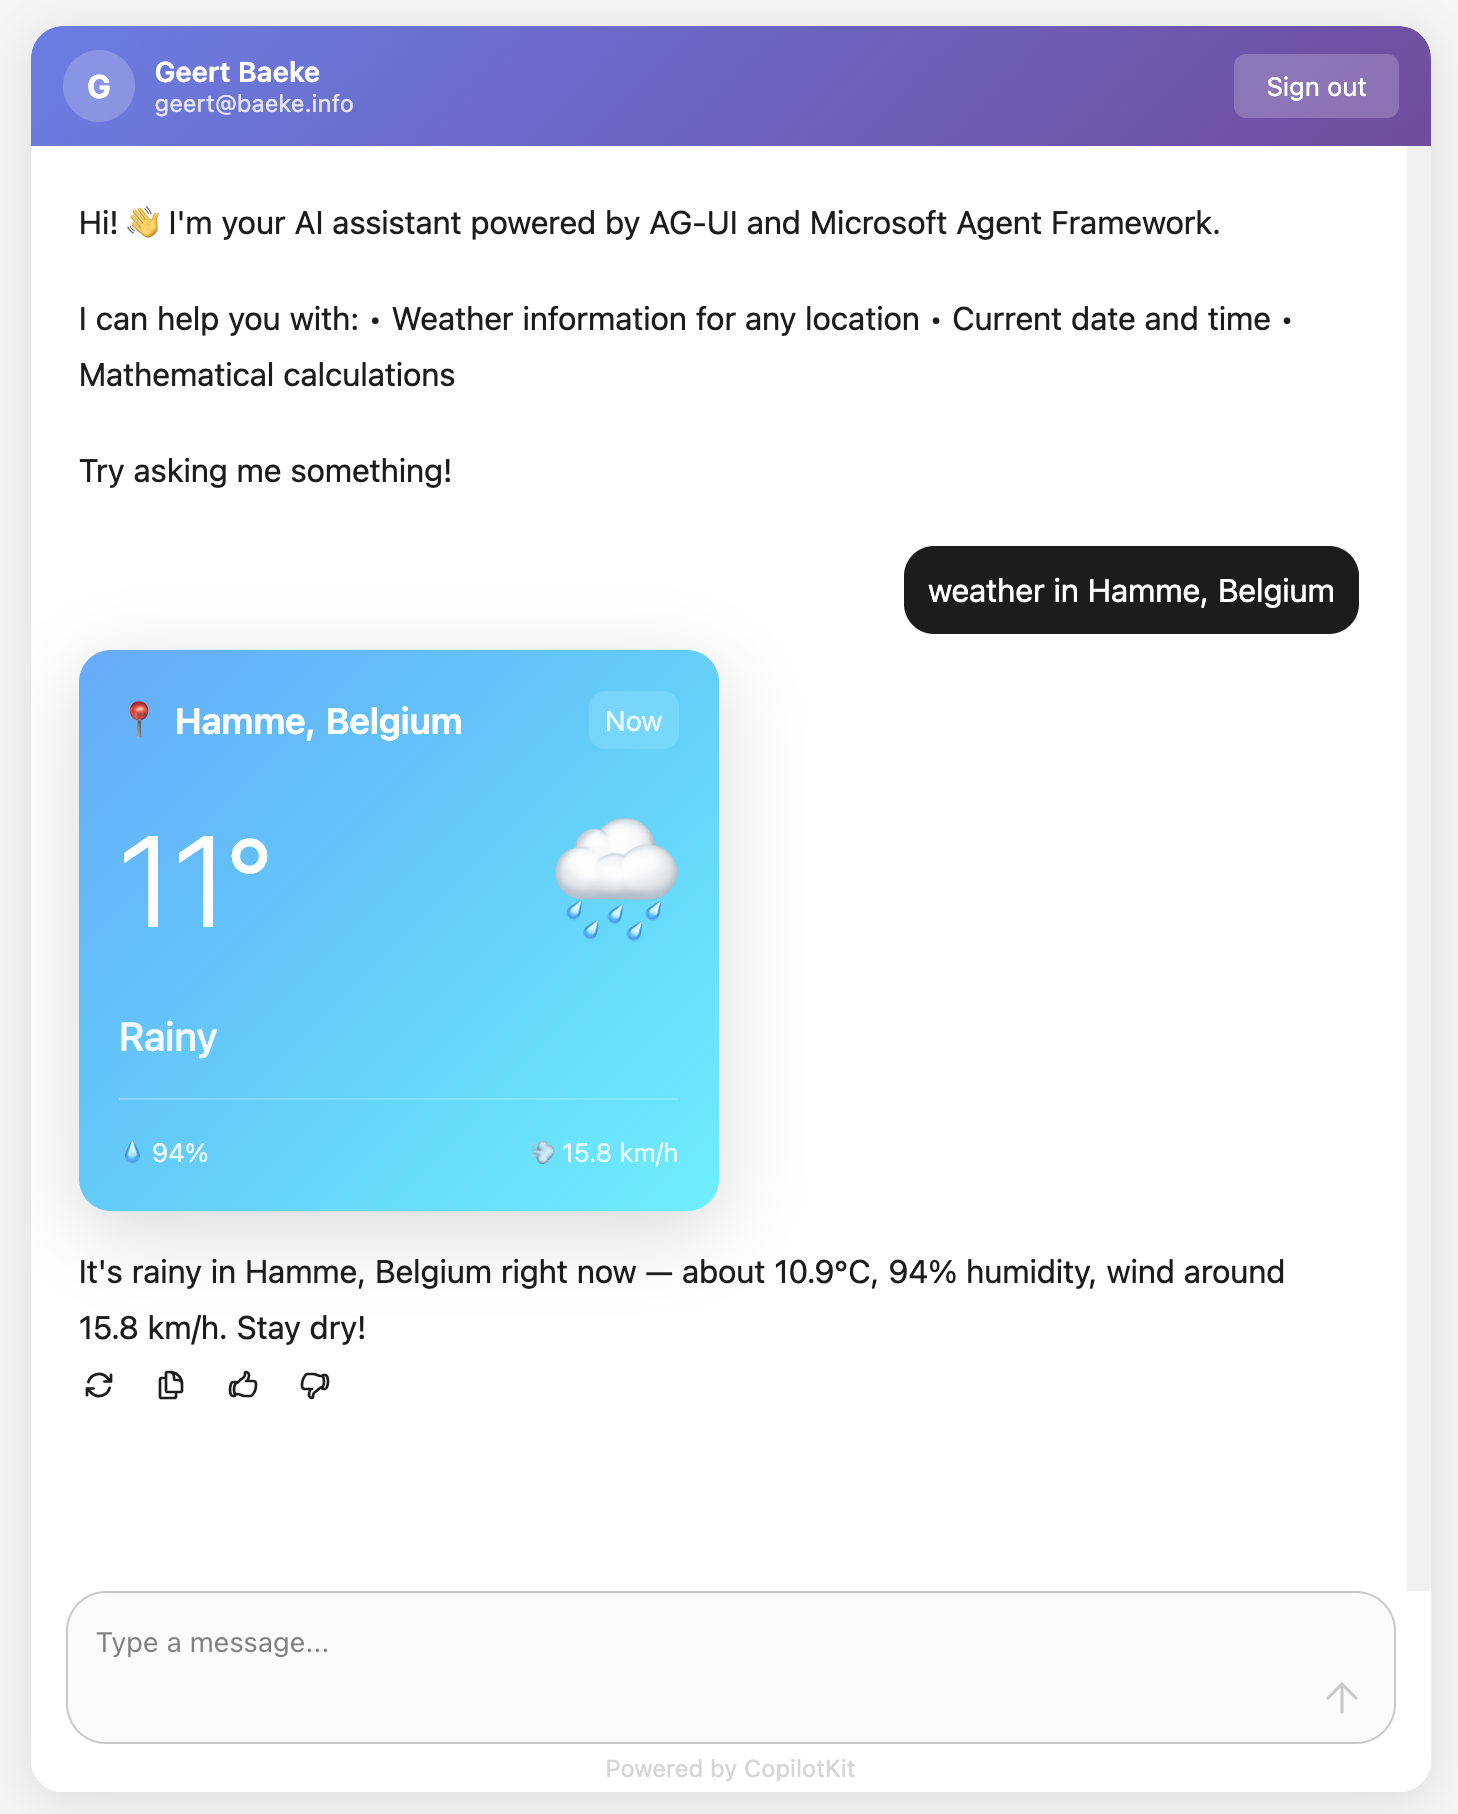
});app/page.tsxrenders<CopilotChat>and registers a render-onlyuseCopilotAction({ name: "get_weather", available: "frontend", render }). CopilotKit intercepts the agent’sget_weathertool call by name and draws aWeatherCardinstead of dumping JSON into the chat.
The interesting bit is how the runtime authenticates to the Foundry-hosted agent. The browser doesn’t hold any credentials. Authentication happens server-side in the Next.js route, with Entra ID:
const credential = new DefaultAzureCredential();const token = await credential.getToken("https://ai.azure.com/.default");return { Authorization: `Bearer ${token.token}`, "Foundry-Features": "HostedAgents=V1Preview",};
In this example, we do not care about user authentication. DefaultAzureCredential() is simply used by the CopilotKit runtime to authenticate to the Foundry hosted agent.
Two more wiring details worth flagging:
- The route appends
agent_session_id=<uuid>to the agent URL. The UUID is generated once per browser tab inapp/providers.tsxand passed via<CopilotKit headers={{ "X-Foundry-Session-Id": ... }}>. Same tab → same Foundry sandbox until idle. Page refresh → new sandbox. - No history is stored anywhere. The browser keeps the message array in React state and replays the full transcript on every turn. Runtime, agent, and Azure OpenAI are all stateless. A page refresh loses the conversation. If you want durable history, that’s where the Responses protocol comes in — but then you’re not on AG-UI anymore, and that’s a different post.
What does it look like?
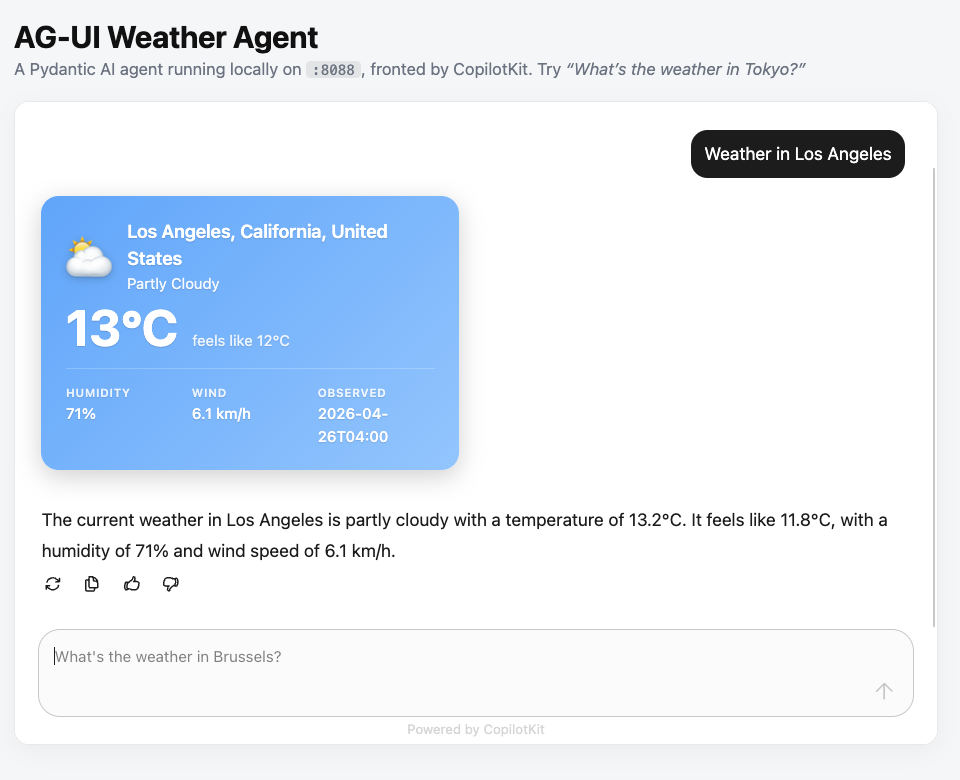
The web client is a simple Next.js app that uses the CopilotKit React components:
By default, you can check what is going on under the hood. For example, the screenshot below shows how the AG-UI events can be inspected:
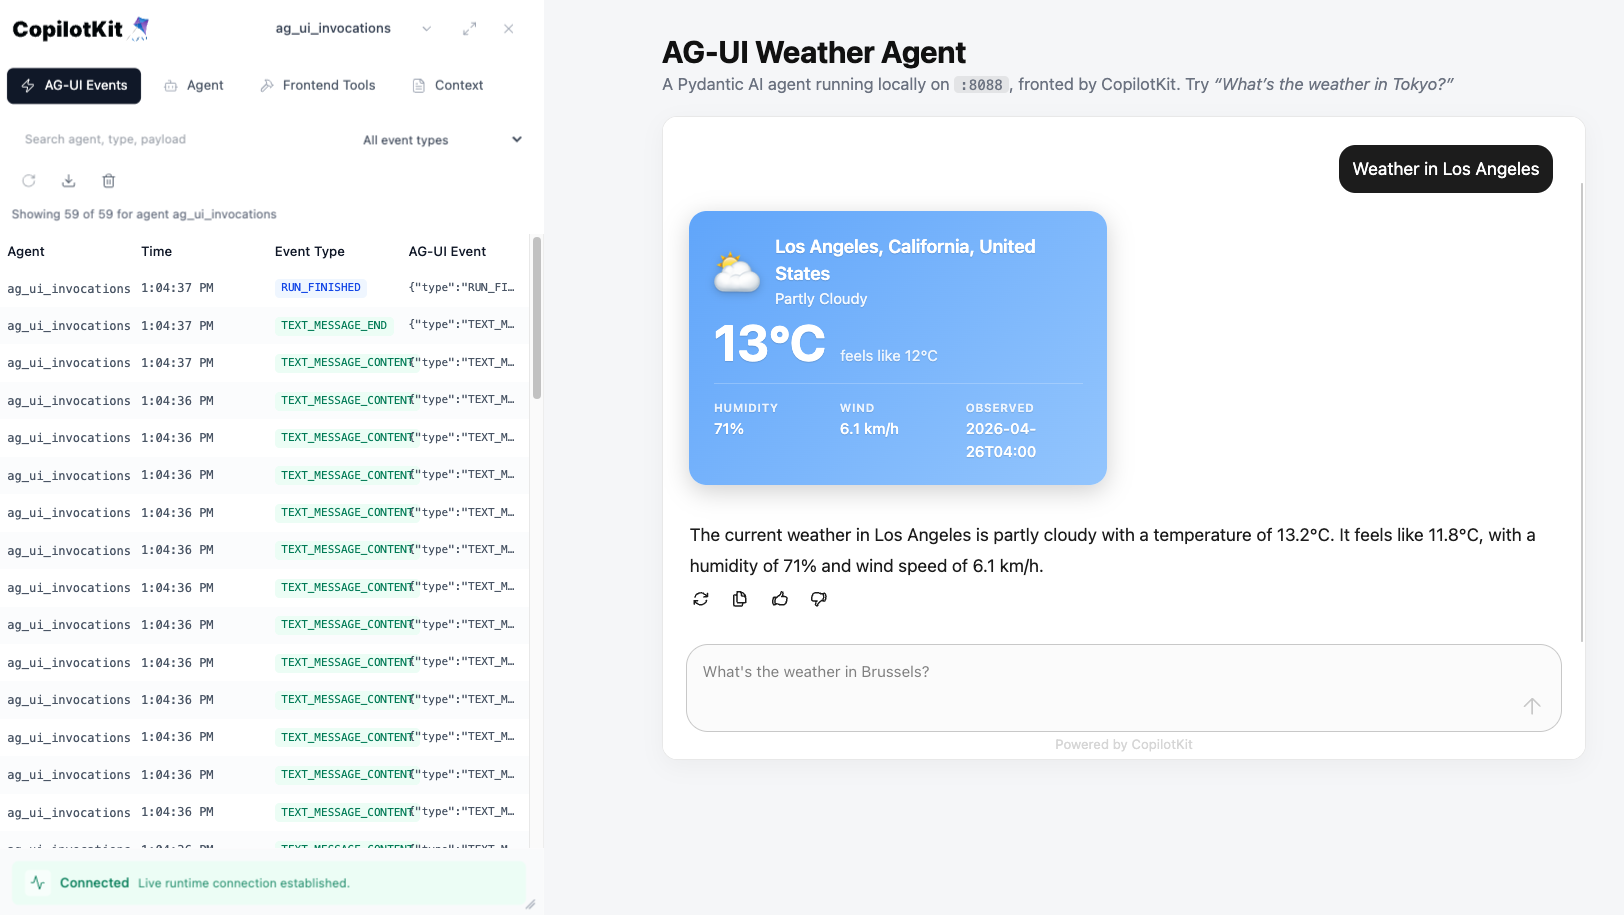
As noted above, this application connects to the CopilotKit runtime. The runtime connects to the agent with Entra ID.
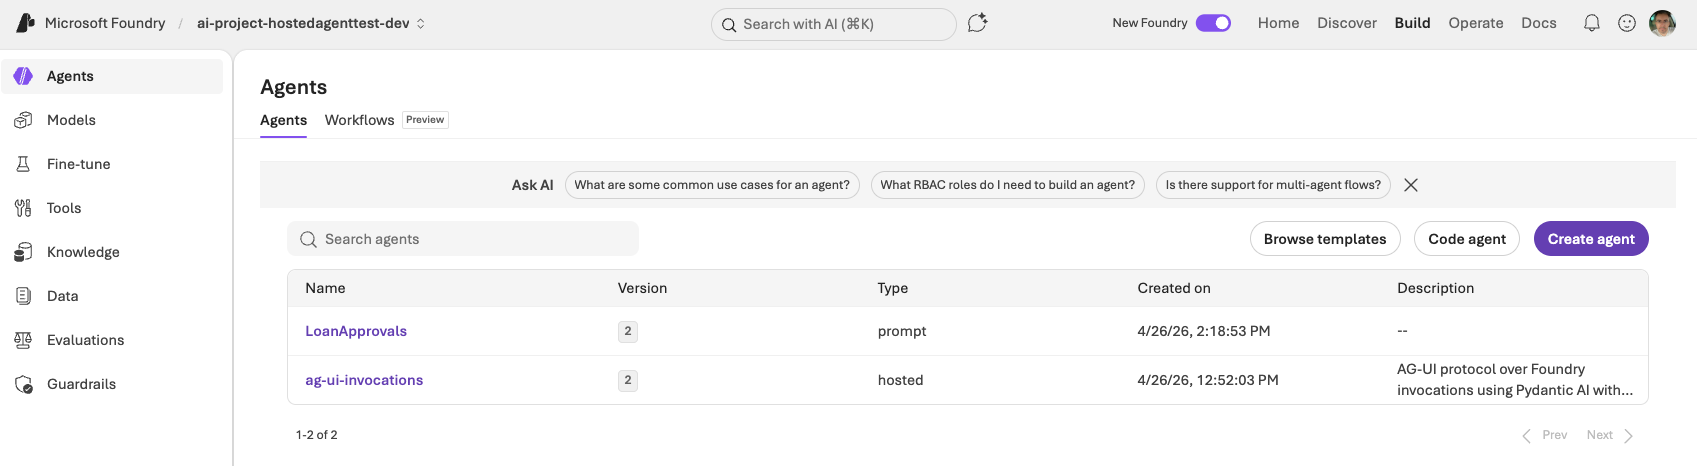
In Microsoft Foundry, the deployed agent shows up in the list of agents next to other types such as prompt agents:
When you open the hosted agent, you see:
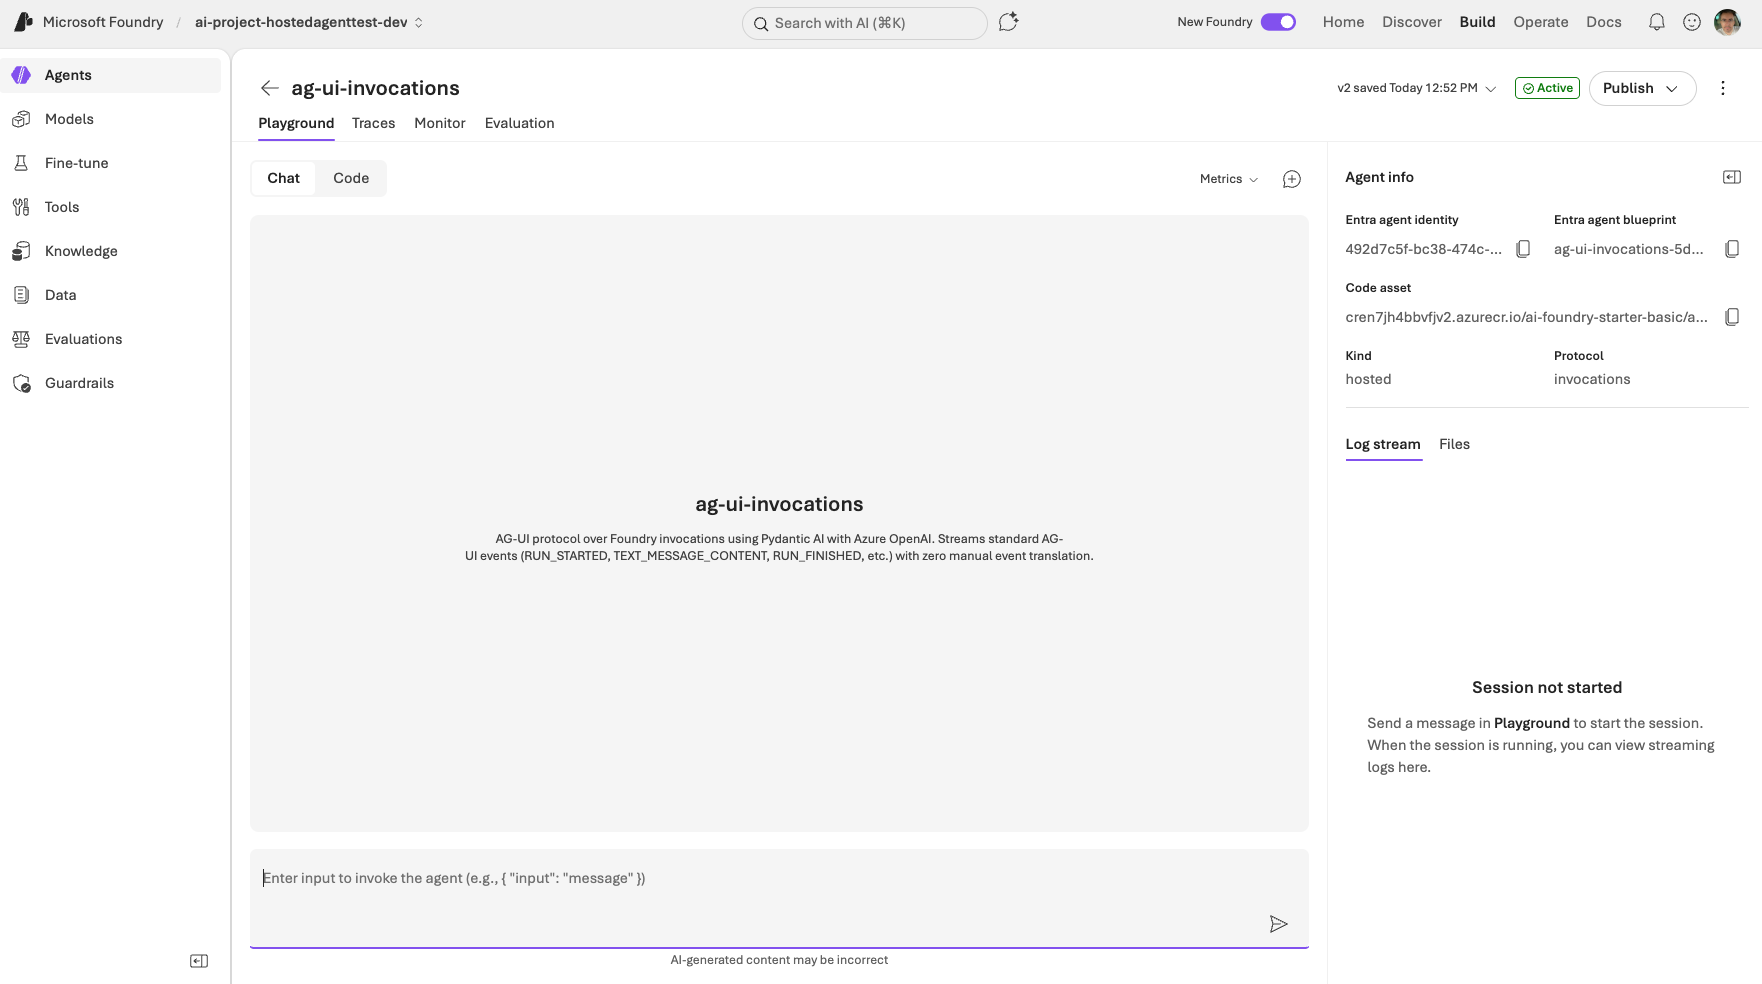
The playground user interface does not make too much sense because this agent requires a payload that works with the invocations protocol. The protocol is shown in the upper right part of the screen.
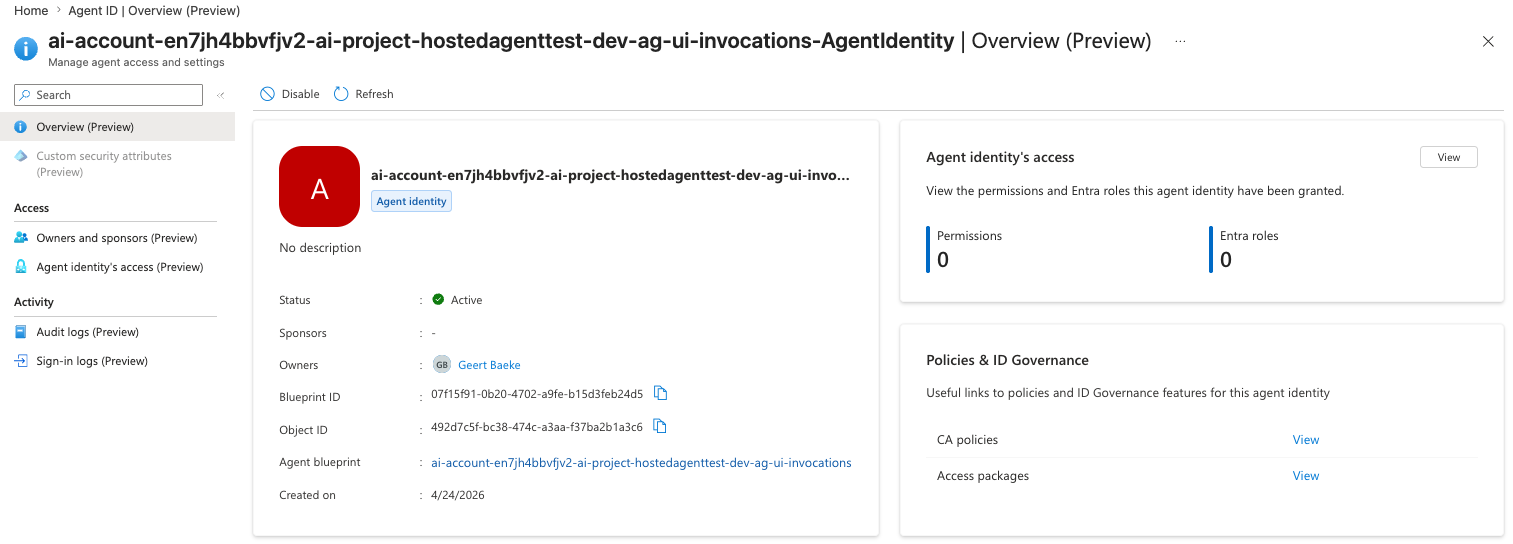
Note that every agent has an identity. This identity was granted the Azure AI User role on both resource and project level. The agent uses this identity to connect to the model (gpt-4.1-mini) for inference.

You can find these identities in Entra ID via the Microsoft Entra admin center:
When you run this agent, you get out of the box telemetry. For example, sessions:
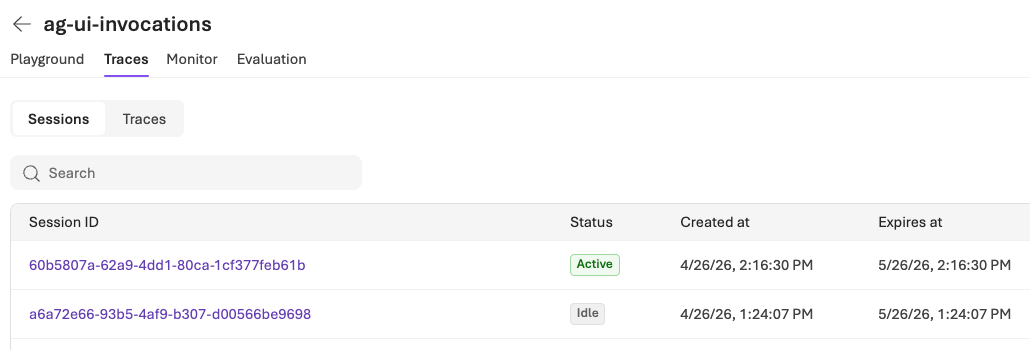
One session is still active. Without activity a session goes to idle after 15 minutes. Remember that we set a session id per conversation to not have a session per conversation turn.
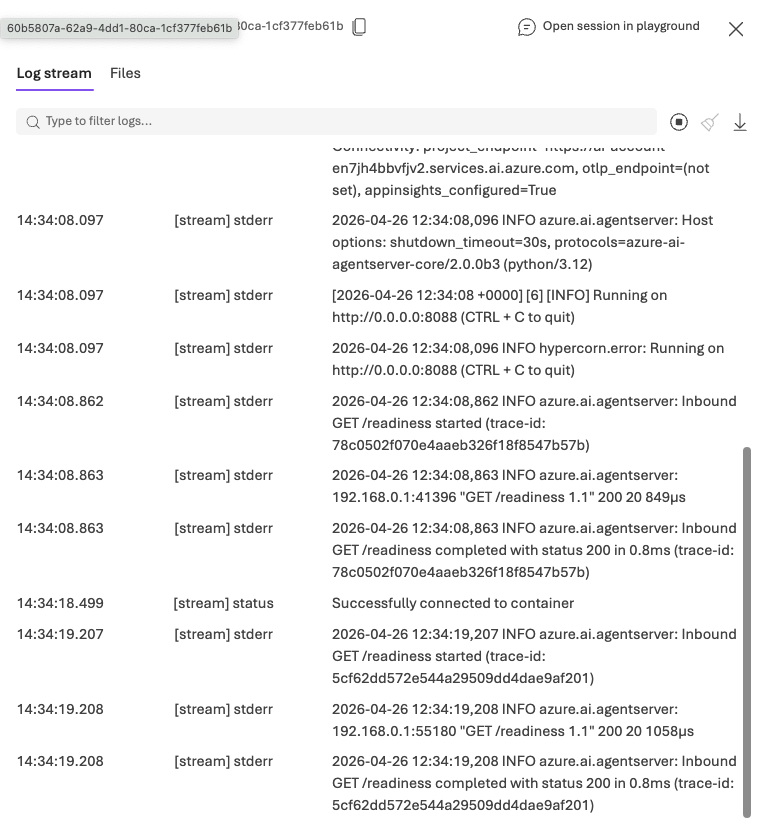
The session contains the log stream of the agent:
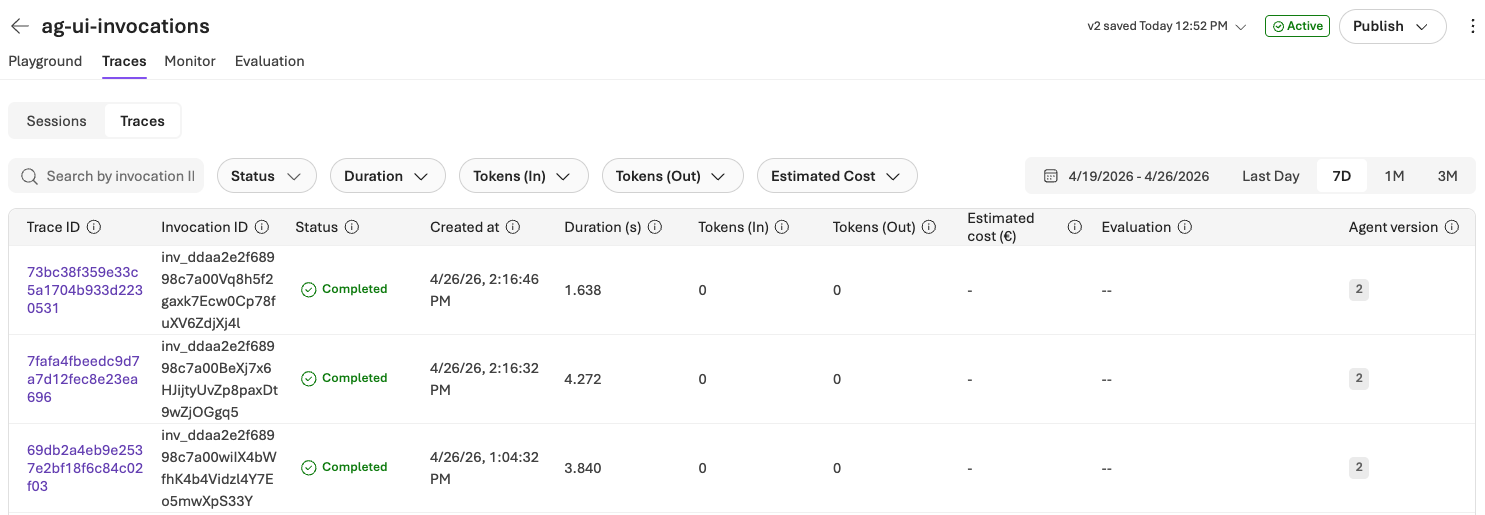
We also get traces:
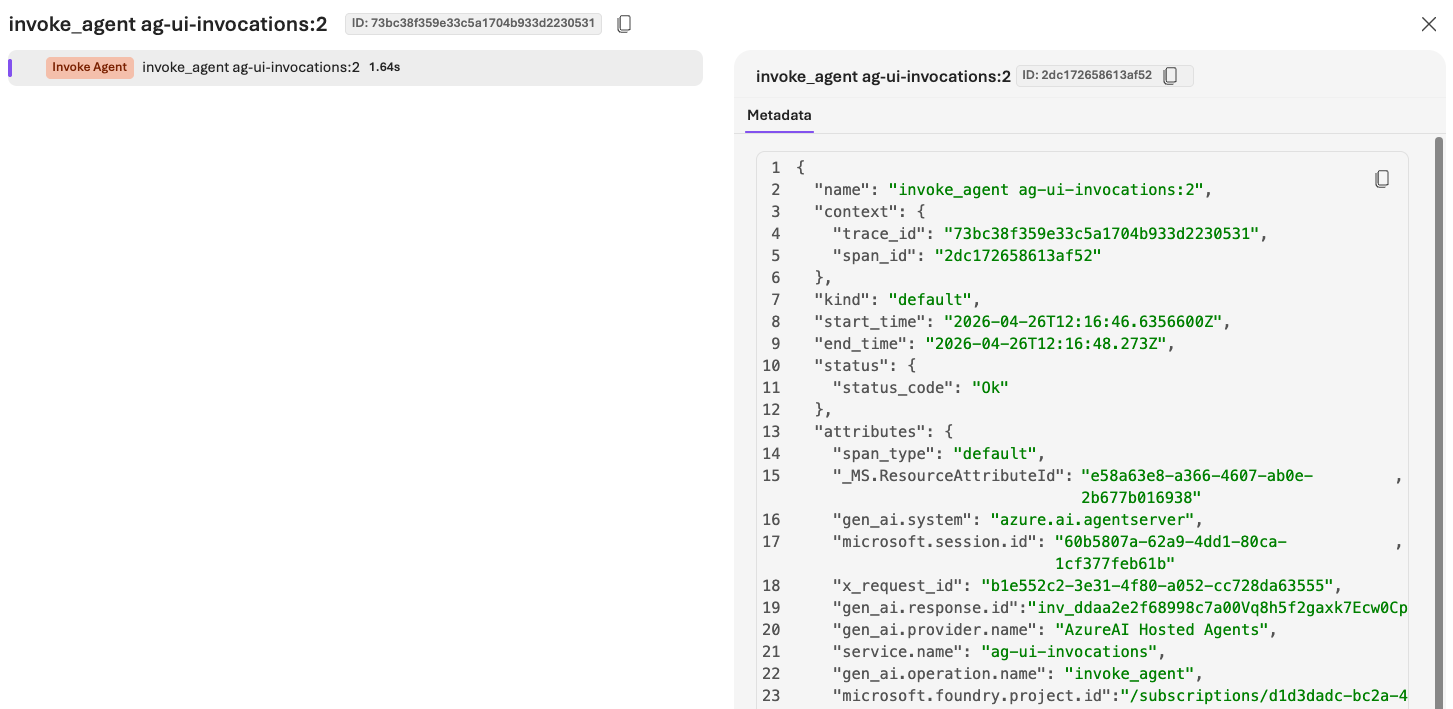
Traces for the invocations protocol are not very useful out of the box:
Wrapping up
The shape of the system hasn’t changed since the previous post: browser → runtime → agent → model. What changed is where the agent lives. By dropping the same kind of AG-UI agent into a Foundry hosted agent with Invocations protocol a container image and two short manifests, you get a managed, Entra-authenticated endpoint with telemetry and session affinity, without giving up the AG-UI event stream the UI already knows how to consume.
There is still much to learn about Microsoft Foundry hosted agents. This post was written a few days after the release of the second, MicroVM-based, version of it. If you spot any errors or things are unclear, drop a comment!