Building an AI Agent Server with AG-UI and Microsoft Agent Framework

In this post, I want to talk about the Python backend I built for an AG-UI demo project. It is part of a larger project that also includes a frontend that uses CopilotKit:

This post discusses the Python AG-UI server that is built with Microsoft Agent Framework.

All code is on GitHub: https://github.com/gbaeke/agui. Most of the code for this demo was written with GitHub Copilot with the help of Microsoft Docs MCP and Context7. 🤷

What is AG-UI?

Before we dive into the code, let’s talk about AG-UI. AG-UI is a standardized protocol for building AI agent interfaces. Think of it as a common language that lets your frontend talk to any backend agent that supports it, no matter what technology you use.

The protocol gives you some nice features out of the box:

  • Remote Agent Hosting: deploy your agents as web services (e.g. FastAPI)
  • Real-time Streaming: stream responses using Server-Sent Events (SSE)
  • Standardized Communication: consistent message format for reliable interactions (e.g. tool started, tool arguments, tool end, …)
  • Thread Management: keep conversation context across multiple requests

Why does this matter? Well, without a standard like AG-UI, every frontend needs custom code to talk to different backends. With AG-UI, you build your frontend once and it works with any AG-UI compatible backend. The same goes for backends – build it once and any AG-UI client can use it.

Under the hood, AG-UI uses simple HTTP POST requests for sending messages and Server-Sent Events (SSE) for streaming responses back. It’s not complicated, but it’s standardized. And that’s the point.

AG-UI has many more features than the ones discussed in this post. Check https://docs.ag-ui.com/introduction for the full picture.

Microsoft Agent Framework

Now, you could implement AG-UI from scratch but that’s a lot of work. This is where Microsoft Agent Framework comes in. It’s a Python (and C#) framework that makes building AI agents really easy.

The framework handles the heavy lifting when it comes to agent building:

  • Managing chat with LLMs like Azure OpenAI
  • Function calling (tools)
  • Streaming responses
  • Multi-turn conversations
  • And a lot more

The key concept is the ChatAgent. You give it:

  1. chat client (like Azure OpenAI)
  2. Instructions (the system prompt)
  3. Tools (functions the agent can call)

And you’re done. The agent knows how to talk to the LLM, when to call tools, and how to stream responses back.

What’s nice about Agent Framework is that it integrates with AG-UI out of the box, similar to other frameworks like LangGraph, Google ADK and others. You write your agent code and expose it via AG-UI with basically one line of code. The framework translates everything automatically – your agent’s responses become AG-UI events, tool calls get streamed correctly, etc…

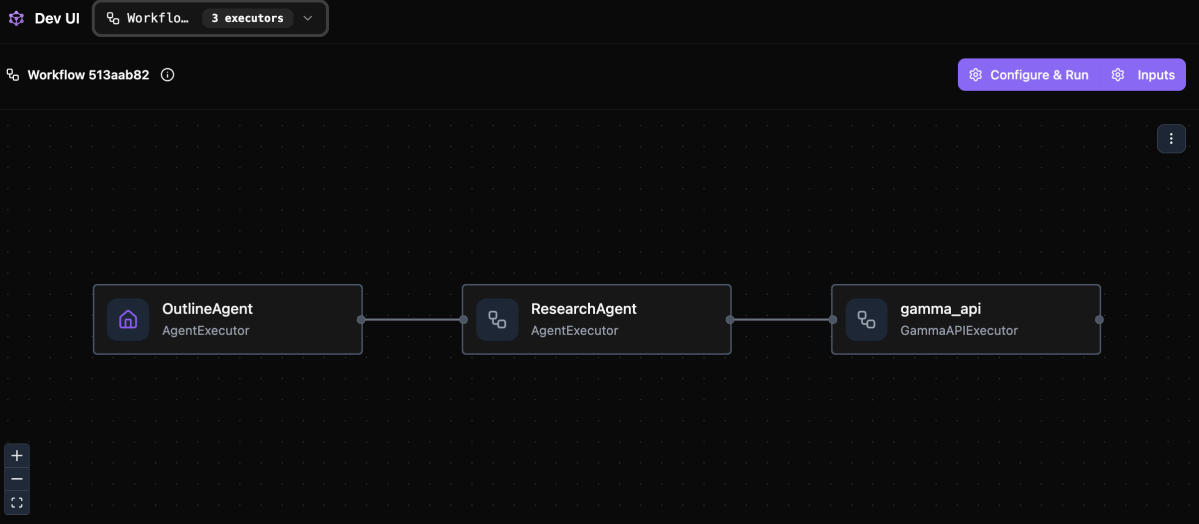
The integration with Microsoft Agent Framework was announced on the blog of CopilotKit, the team behind AG-UI. The blog included the diagram below to illustrate the capabilities:

From https://www.copilotkit.ai/blog/microsoft-agent-framework-is-now-ag-ui-compatible

The Code

Let’s look at how this actually works in practice. The code is pretty simple. Most of the code is Microsoft Agent Framework code. AG-UI gets exposed with one line of code.

The Server (server.py)

The main server file is really short:

import uvicorn
from api import app
from config import SERVER_HOST, SERVER_PORT

def main():
    print(f"🚀 Starting AG-UI server at http://{SERVER_HOST}:{SERVER_PORT}")
    uvicorn.run(app, host=SERVER_HOST, port=SERVER_PORT)

if __name__ == "__main__":
    main()

That’s it. We run a FastAPI server on port 8888. The interesting part is in api/app.py:

from fastapi import FastAPI
from agent_framework.ag_ui.fastapi import add_agent_framework_fastapi_endpoint
from agents.main_agent import agent

app = FastAPI(title="AG-UI Demo Server")

# This single line exposes your agent via AG-UI protocol
add_agent_framework_fastapi_endpoint(app, agent, "/")

See that add_agent_framework_fastapi_endpoint() call? That’s all you need. This function from Agent Framework takes your agent and exposes it as an AG-UI endpoint. It handles HTTP requests, SSE streaming, protocol translation – everything.

You just pass in your FastAPI app, your agent, and the route path. Done.

The Main Agent (agents/main_agent.py)

Here’s where we define the actual agent with standard Microsoft Agent Framework abstractions:

from agent_framework import ChatAgent
from agent_framework.azure import AzureOpenAIChatClient
from azure.identity import DefaultAzureCredential
from config import AZURE_OPENAI_ENDPOINT, AZURE_OPENAI_DEPLOYMENT_NAME
from tools import get_weather, get_current_time, calculate, bedtime_story_tool

# Create Azure OpenAI chat client
chat_client = AzureOpenAIChatClient(
    credential=DefaultAzureCredential(),
    endpoint=AZURE_OPENAI_ENDPOINT,
    deployment_name=AZURE_OPENAI_DEPLOYMENT_NAME,
)

# Create the AI agent with tools
agent = ChatAgent(
    name="AGUIAssistant",
    instructions="You are a helpful assistant with access to tools...",
    chat_client=chat_client,
    tools=[get_weather, get_current_time, calculate, bedtime_story_tool],
)

This is the heart of the backend. We create a ChatAgent with:

  1. A name: “AGUIAssistant”
  2. Instructions: the system prompt that tells the agent how to behave
  3. A chat clientAzureOpenAIChatClient that handles communication with Azure OpenAI
  4. Tools: a list of functions the agent can call

The code implements a few toy tools and a sub-agent to illustrate how AG-UI handels tool calls. The tools are discussed below:

The Tools (tools/)

In Agent Framework, tools can be Python functions with a decorator:

from agent_framework import ai_function
import httpx
import json

@ai_function(description="Get the current weather for a location")
def get_weather(location: str) -> str:
    """Get real weather information for a location using Open-Meteo API."""
    # Step 1: Geocode the location
    geocode_url = "https://geocoding-api.open-meteo.com/v1/search"
    # ... make HTTP request ...
    
    # Step 2: Get weather data
    weather_url = "https://api.open-meteo.com/v1/forecast"
    # ... make HTTP request ...
    
    # Return JSON string
    return json.dumps({
        "location": resolved_name,
        "temperature": current["temperature_2m"],
        "condition": condition,
        # ...
    })

The @ai_function decorator tells Agent Framework “this is a tool the LLM can use”. The framework automatically:

  • Generates a schema from the function signature
  • Makes it available to the LLM
  • Handles calling the function when needed
  • Passes the result back to the LLM

You just write normal Python code. The function takes typed parameters (location: str) and returns a string. Agent Framework does the rest.

The weather tool calls the Open-Meteo API to get real weather data. In an AG-UI compatible client, you can intercept the tool result and visualize it any way you want before the LLM generates an answer from the tool result:

React client with CopilotKit

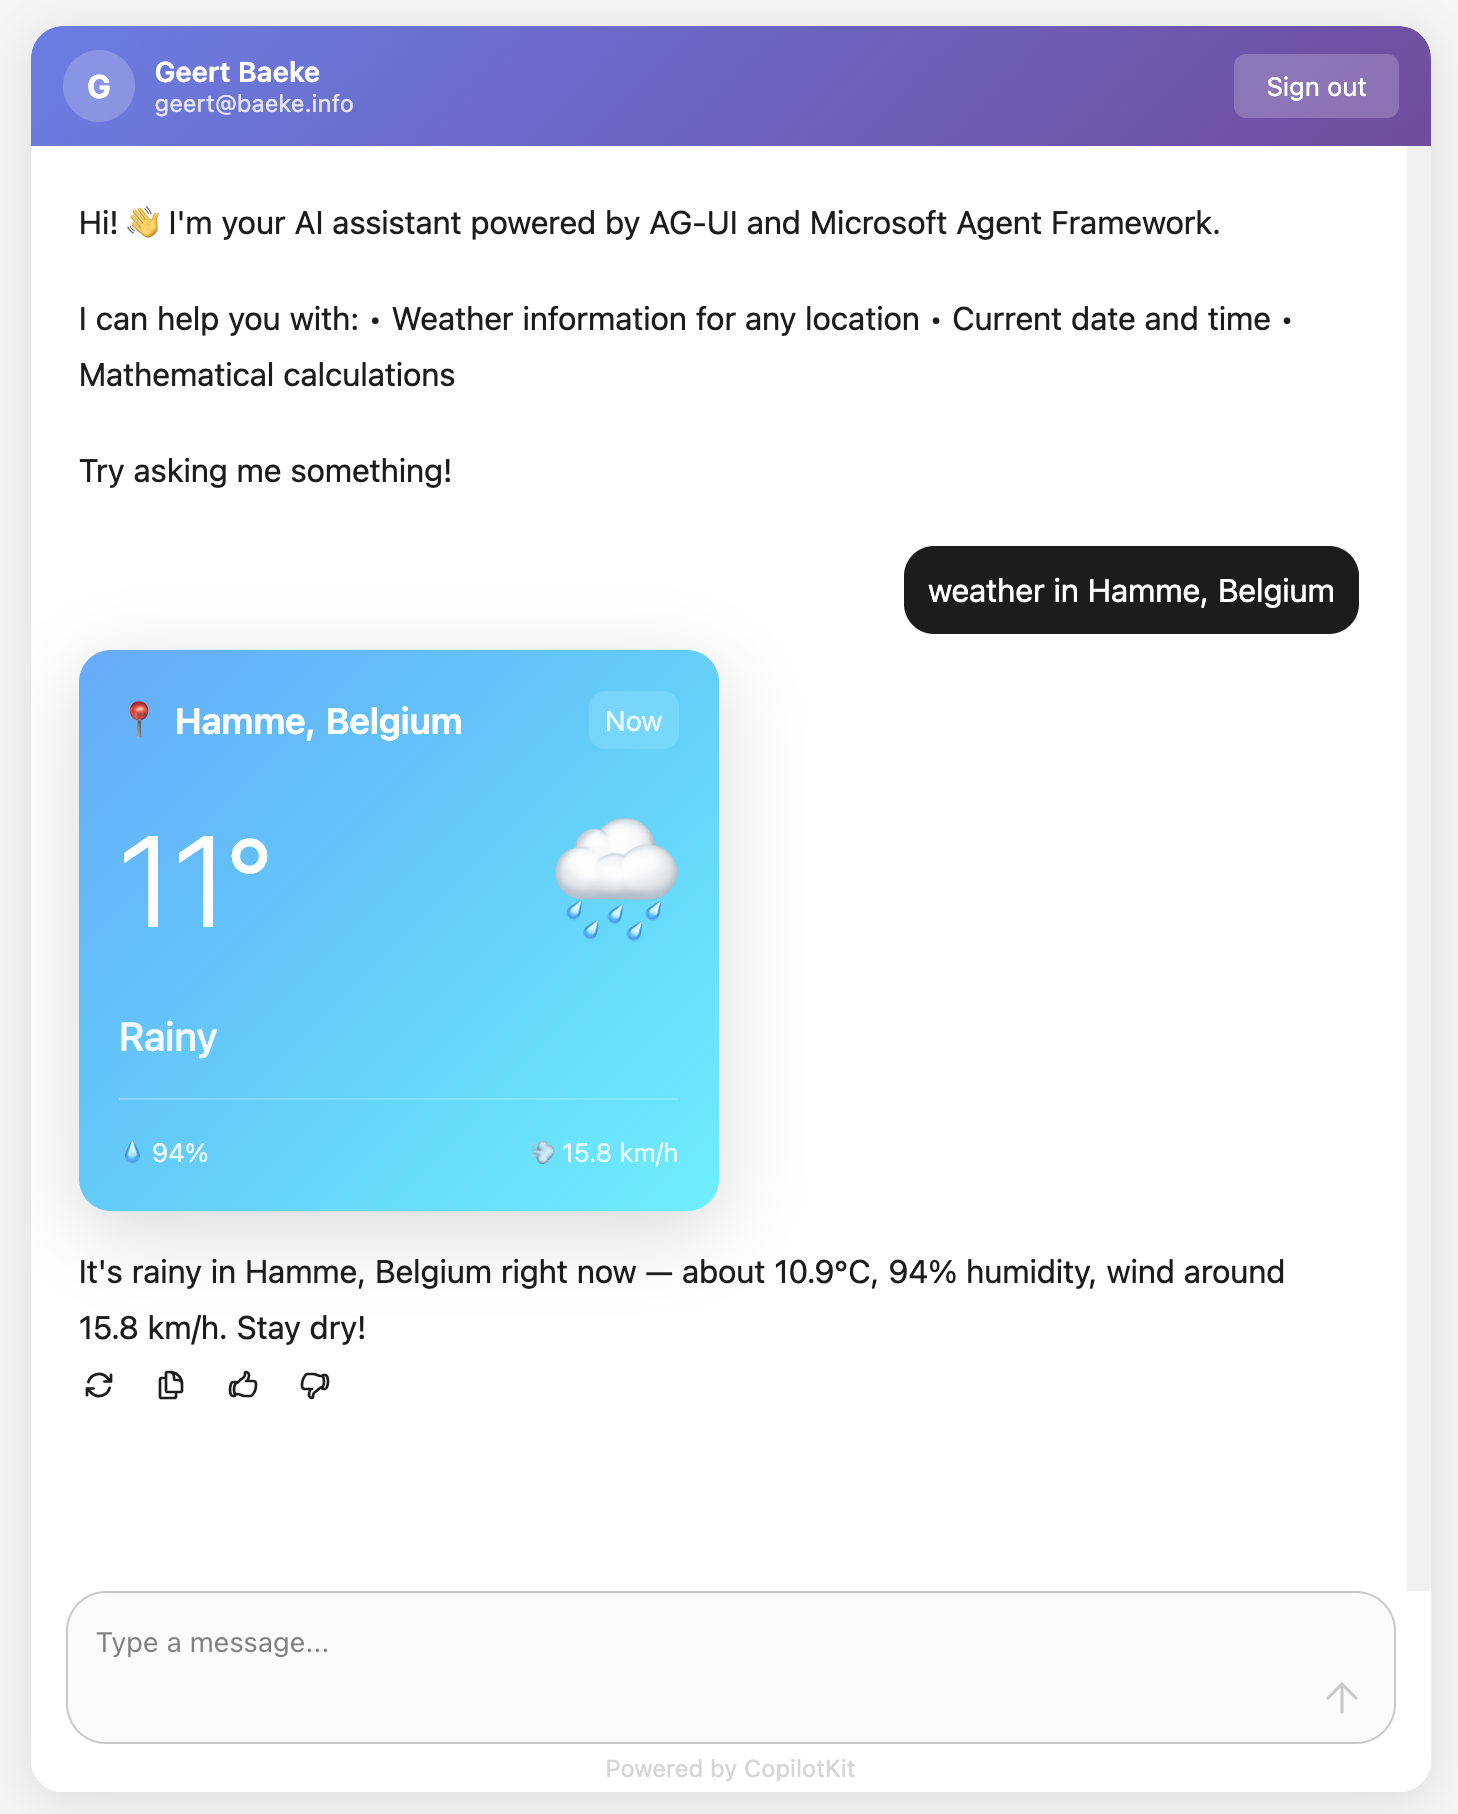
Above, when the user asks for weather information, AG-UI events inform the client that a tool call has started and ended. It also streams the tool result back to the client which uses a custom component to render the information. This happens before the chat client generates the answer based on the tool result.

The Subagent (tools/storyteller.py)

This is where it gets interesting. In Agent Framework, a ChatAgent can become a tool with .as_tool():

from agent_framework import ChatAgent
from agent_framework.azure import AzureOpenAIChatClient

# Create a specialized agent for bedtime stories
bedtime_story_agent = ChatAgent(
    name="BedTimeStoryTeller",
    description="A creative storyteller that writes engaging bedtime stories",
    instructions="""You are a gentle and creative bedtime story teller.
When given a topic, create a short, soothing bedtime story for children.
Your stories should be 3-5 paragraphs long, calming, and end peacefully.""",
    chat_client=chat_client,
)

# Convert the agent to a tool
bedtime_story_tool = bedtime_story_agent.as_tool(
    name="tell_bedtime_story",
    description="Generate a calming bedtime story based on a theme",
    arg_name="theme",
    arg_description="The theme for the story (e.g., 'a brave rabbit')",
)

This creates a subagent – another ChatAgent with different instructions. When the main agent needs to tell a bedtime story, it calls tell_bedtime_story which delegates to the subagent.

Why is this useful? Because you can give each agent specialized instructions. The main agent handles general questions and decides which tool to use. The storyteller agent focuses only on creating good stories. Clean separation of concerns.

The subagent has its own chat client and can have its own tools too if you want. It’s a full agent, just exposed as a tool.

And because it is a tool, you can render it with the standard AG-UI tool events:

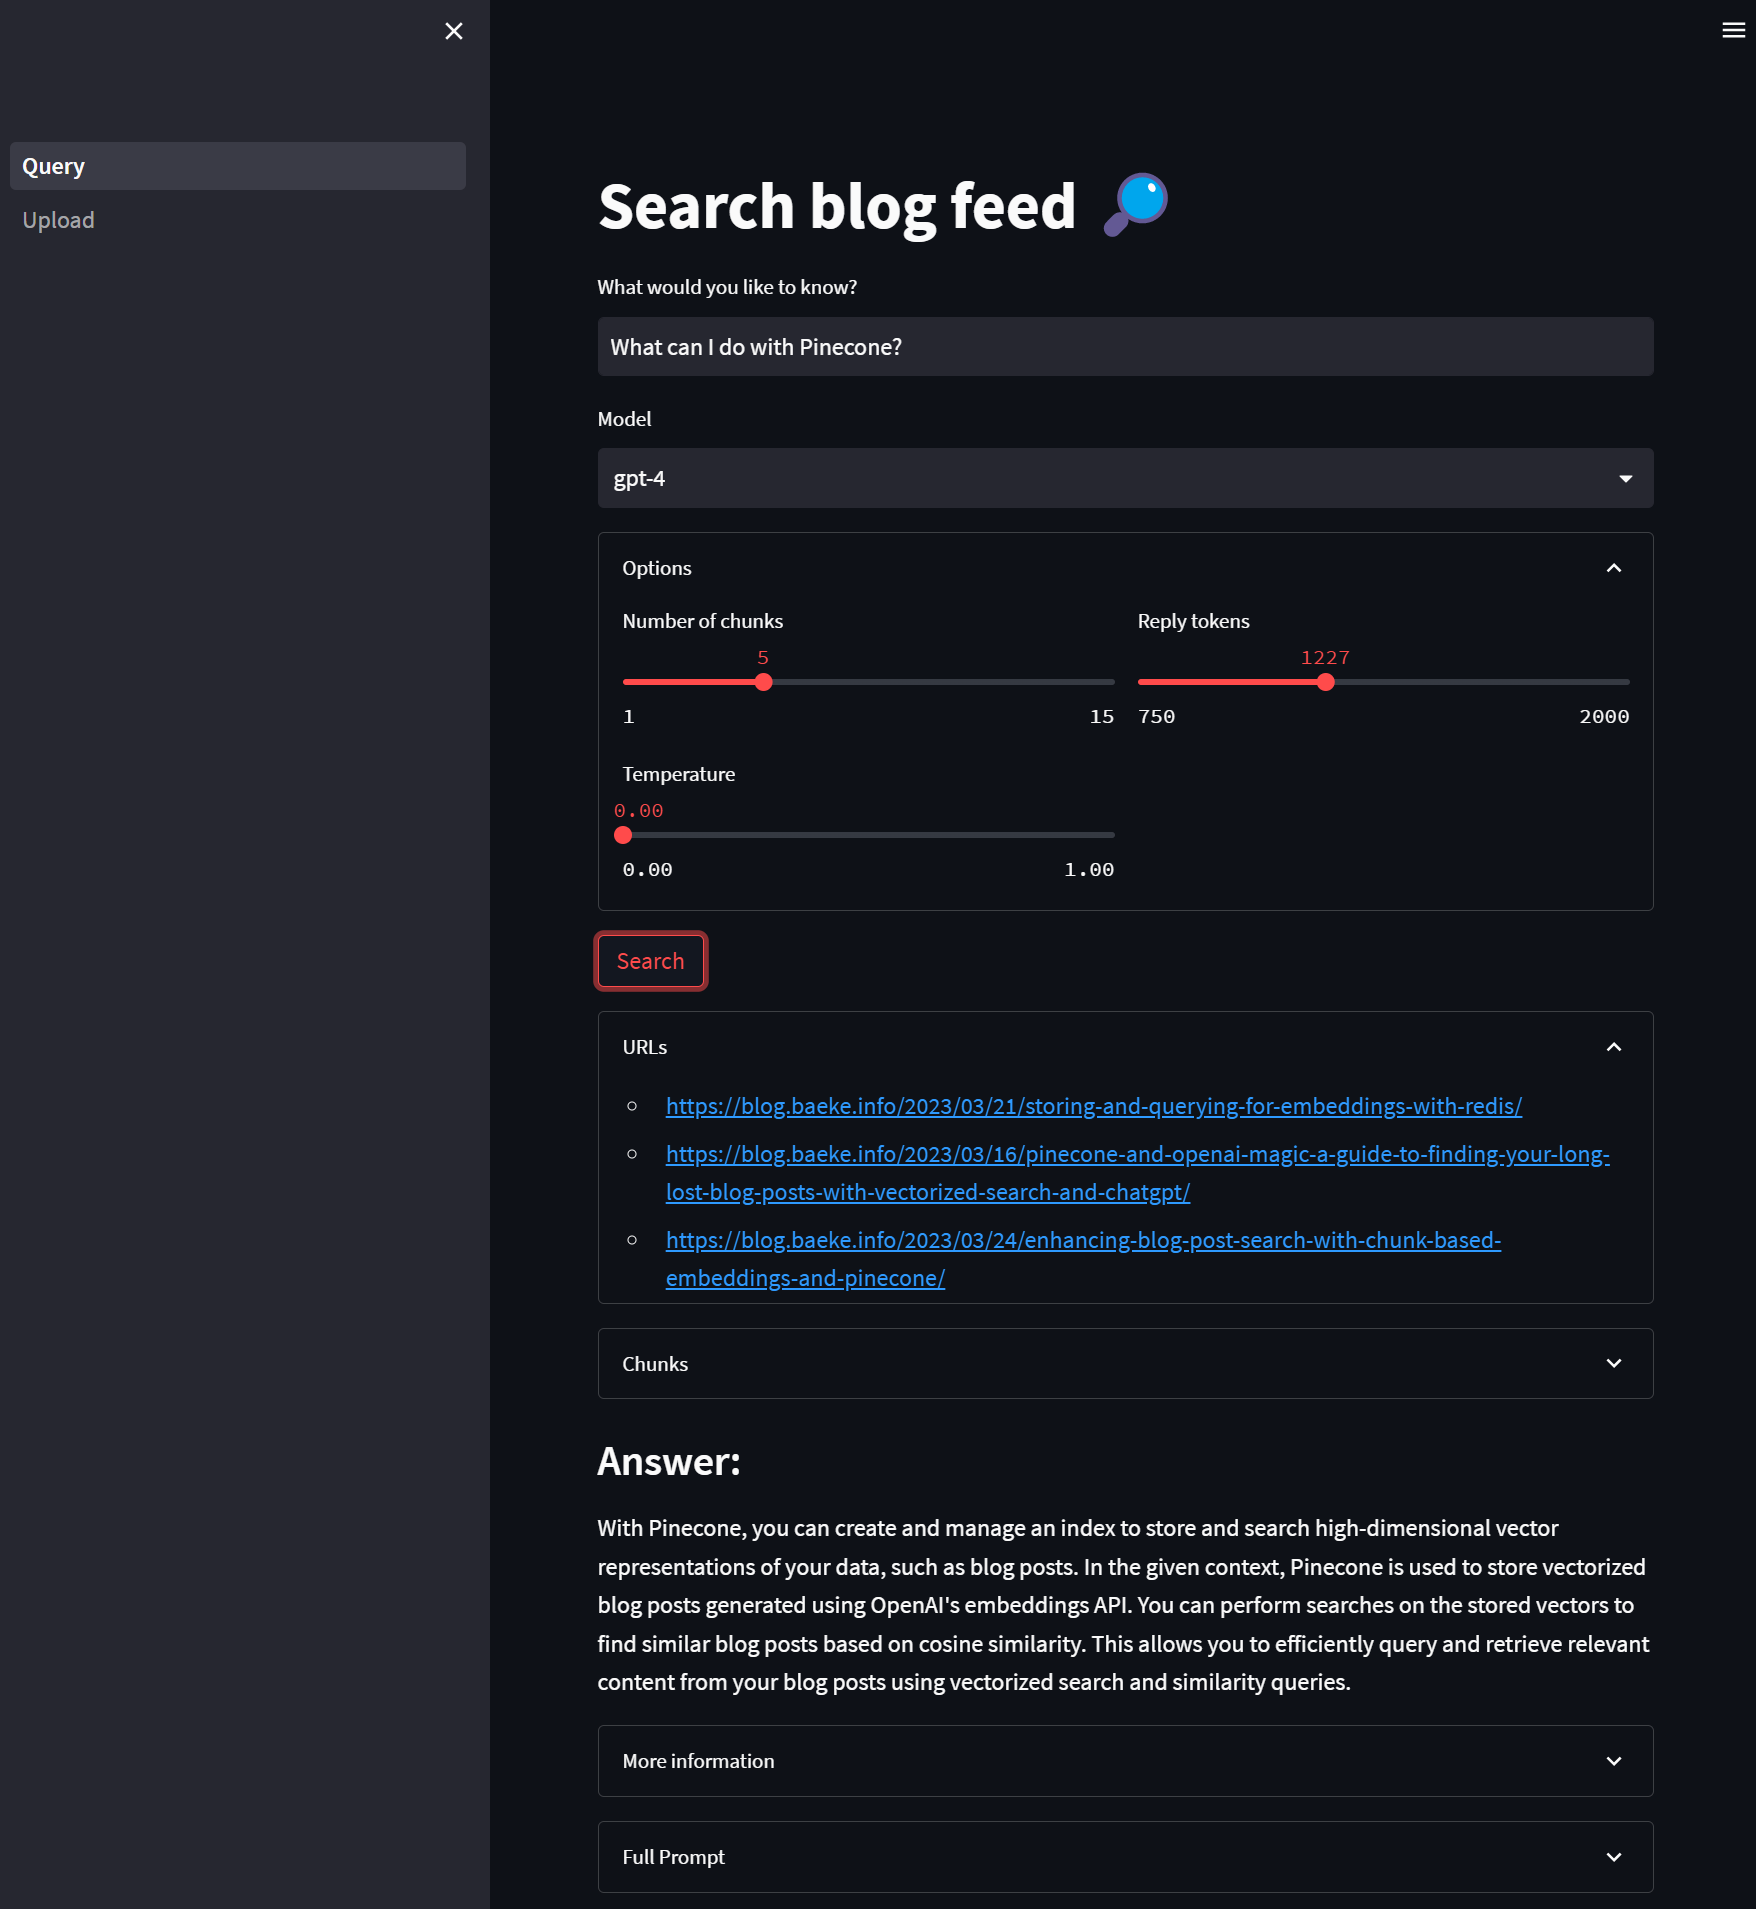
Testing with a client

In src/backend there is a Python client client_raw.py. When you run that client against the server and invoke a tool, you will see something like below:

AG-UI client in Python

This client simply uses httpx to talk the AG-UI server and inspects and renders the AG-UI events as they come in.

Why This Works

Let me tell you what I like about this setup:

Separation of concerns: The frontend doesn’t know about Python, Azure OpenAI, or any backend details. It just speaks AG-UI. You could swap the backend for a C# implementation or something else entirely – the frontend wouldn’t care. Besides of course the handling of specific tool calls.

Standard protocol: Because we use AG-UI, any AG-UI client can talk to this backend. We use CopilotKit in the frontend but you could use anything that speaks AG-UI. Take the Python client as an example.

Framework handles complexity: Streaming, tool calls, conversation history, protocol translation – Agent Framework does all of this. You just write business logic.

Easy to extend: Want a new tool? Write a function with @ai_function. Want a specialized agent? Create a ChatAgent and call .as_tool(). That’s it.

The AG-UI documentation explains that the protocol supports 7 different features including human-in-the-loop, generative UI, and shared state. Our simple backend gets all of these capabilities because Agent Framework implements the protocol.

Note that there are many more capabilities. Check the AG-UI interactive Dojo to find out: https://dojo.ag-ui.com/microsoft-agent-framework-python

Wrap Up

This is a simple but powerful pattern for building AI agent backends. You write minimal code and get a lot of functionality. AG-UI gives you a standard way to expose your agent, and Microsoft Agent Framework handles the implementation details.

If you want to try this yourself, the code is in the repo. You’ll need an Azure OpenAI deployment and follow the OAuth setup. After that, just run the code as instructed in the repo README!

The beauty is in the simplicity. Sometimes the best code is the code you don’t have to write.

Creating presentations with Microsoft Agent Framework and GAMMA API

Introduction

Imagine automating the creation of professional presentations through a coordinated series of intelligent agents. In this blog post, we’ll explore how to build a workflow that combines research, outline generation, content creation, and design, all orchestrated through the Microsoft Agent Framework.

We’ll build a practical example that generates presentations using:

  • Azure OpenAI Responses API for agent creation
  • Microsoft Agent Framework Workflows for orchestration
  • Tavily Search API for concurrent web research
  • GAMMA API for stunning presentation generation (In October 2025, this API was in beta)

By the end, you’ll understand how to leverage these tools to create end-to-end workflows that tackle complex, multi-step tasks.


What is Microsoft Agent Framework?

The Microsoft Agent Framework is a new, modern framework for building intelligent automation systems powered by AI agents. It enables you to create agents and workflows that blend AI reasoning with structured business processes.

Agents vs. Workflows: Understanding the Difference

Before diving into workflows, it’s important to understand how agents and workflows complement each other:

  • AI Agents are LLM-powered systems that make dynamic decisions based on context. They have access to tools and can reason through problems, but the steps they take are determined by the model at runtime.
Agent (from Microsoft Learn)
  • Workflows, on the other hand, are predefined sequences of operations with explicit control flow. They define exactly how data flows from one step to the next. Workflows can contain agents as components, orchestrating them alongside other executors and services.
Workflow (from Microsoft Learn)

Think of it this way:

  • An agent is like an expert consultant who decides how to solve a problem
  • workflow is like a project manager who coordinates multiple specialists in a structured process

The framework provides the tools to do both and to combine them in interesting ways.


Creating an Agent with Azure OpenAI Responses API

Let’s start by understanding how to create individual agents before we orchestrate them into workflows.

The Azure OpenAI Responses API is Azure’s version of the OpenAI Responses API . It’s the successor to the chat completion APIs and supports structured outputs, tool calling, stateful interactions and hosted tools.

Note: Azure OpenAI Responses API does not support the native web search tool. We will use Tavily to support web searches.

Here’s how to create a simple agent in Agent Framework, based on the Responses API:

import asyncio
import os
from dotenv import load_dotenv
from agent_framework.azure import AzureOpenAIResponsesClient
from azure.identity import AzureCliCredential

# Load environment variables from .env
load_dotenv()

async def main():
    # Create a client
    client = AzureOpenAIResponsesClient(
        endpoint=os.getenv("AZURE_OPENAI_ENDPOINT"),
        api_key=os.getenv("AZURE_OPENAI_API_KEY"),
        deployment_name=os.getenv("AZURE_OPENAI_DEPLOYMENT", "gpt-4o")
    )
    
    # Create an agent
    agent = client.create_agent(
        name="OutlineAgent",
        instructions="Based on the user's request, you create an outline for a presentation.",
    )
    
    # Run the agent
    result = await agent.run("Create an outline for a presentation about Python")
    print(result.text)

if __name__ == "__main__":
    asyncio.run(main())

Note: this is just one type of agent you can create with Agent Framework. Some of the other supported types are chat completion agents and Azure AI Foundry Agents. See Microsoft Learn for more information. We could have used these agents as well.

Agents with Function Tools

Agents become truly useful when equipped with function tools—custom Python functions that agents can call to accomplish tasks. In Agent Framework, you can use the optional @ai_function decorator to provide a meaningful description to the LLM using the function. An alternative is to use a docstring. The framework will automatically convert the Python functions to tools the LLM understands.

from agent_framework import ai_function
from typing import Annotated
from pydantic import Field

@ai_function(
    name="search_web",
    description="Search the web for information"
)
async def search_web(
    queries: Annotated[list[str], Field(description="List of search queries")]
) -> str:
    # Implementation here
    pass

Once defined, you pass these tools to your agent:

agent = client.create_agent(
    name="ResearchAgent",
    instructions="You research and create content for slides.",
    tools=[search_web]  # Register the tool
)

Now the agent can autonomously decide to call search_web when it needs information! In the agent instructions, you can tell the agent how and when to use the tool if needed.

In the example discussed further in this post, both the outline agent and research agent use the search function to build the slide content.

Structured Output with Pydantic

For predictable, structured responses, the framework supports structured output with Pydantic models:

from pydantic import BaseModel, Field
from typing import List, Annotated

class OutlineResponse(BaseModel):
    title: str
    number_of_slides: Annotated[int, Field(default=5)]
    slide_titles: List[str]
    audience: Annotated[str, Field(default="general")]

agent = client.create_agent(
    name="OutlineAgent",
    instructions="Create a presentation outline.",
    response_format=OutlineResponse  # Enforce this structure
)

The agent’s response will automatically be validated and parsed as an OutlineResponse object: type-safe and predictable. This feature is supported by the underlying Responses API with its support for structured outputs.

We use structured outputs extensively in the example code discussed below.


Understanding Workflows: Orchestrating Agents at Scale

Now that we understand agents, let’s see how to compose them into workflows.

A workflow is built from four key components:

  1. Executors – The individual processing nodes (agents, custom logic, integrations)
  2. Edges – Connections defining data flow between executors
  3. Workflows – The orchestrator that manages execution and routing
  4. Events – Real-time observability into execution

Agent Framework can visualize workflows in different ways. One option is to use the DevUI:

DevUI with a sequential workflow ready to run

To run the workflow, simply click Configure & Run and provide your input. The steps in the workflow will light up when they are doing work.

For more information about Dev UI see the Agent Framework repository on GitHub.

Building a Workflow with WorkflowBuilder

After defining the executors, you use WorkflowBuilder to build a workflow:

from agent_framework import WorkflowBuilder

workflow = (
    WorkflowBuilder()
    .set_start_executor(outline_agent)          # First step
    .add_edge(outline_agent, research_agent)    # Data flows here
    .add_edge(research_agent, gamma_executor)   # Final step
    .build()
)

# serve workflow with Dev UI
serve(entities=[workflow], port=8093, auto_open=True)

This creates a linear, sequential flow where:

  1. Input → outline_agent produces an outline
  2. Outline → research_agent researches and creates slide content
  3. Slide content → gamma_executor generates the presentation

Note that the first two steps are simply Azure Responses API agents (AgentExecutors). The third step is a custom executor inheriting from the Executor class.

The workflow is served with Dev UI, which results in a browser opening the Dev UI interface as shown in the screenshot above.

Input and Output Between Nodes

Understanding data flow in the workflow is crucial. Each executor (agents or custom) receives input and must send output to the next executor. Below is a custom executor created from a Python function. You can also create executors from a Python class:

@executor(id="some executor id")
async def handle_input(self, message: str, ctx: WorkflowContext) -> None:
    # Process the input
    result = do_some_work(message)
    
    # Send output to next executor(s)
    ctx.send_message(result)

For agents specifically, they receive messages and produce AgentExecutorResponse objects automatically. You do not have to write code that sends the output of an agent to the next node.

Custom Executors for Complex Logic

Sometimes you need logic beyond agent reasoning. Custom executors handle this. Below is a class-based executor versus a fuction-based executor above:

from agent_framework import Executor, handler, WorkflowContext

class GammaAPIExecutor(Executor):
    def __init__(self, id: str = "gamma_api"):
        super().__init__(id=id)

    @handler
    async def call_gamma_api(
        self, response: AgentExecutorResponse, ctx: WorkflowContext
    ) -> None:
        # Extract data from agent response
        slide_content = response.agent_run_response.text
        
        # Call external API
        api_response = requests.post(
            "https://api.gamma.app/generations",
            json=payload
        )
        
        # Yield final output
        await ctx.yield_output({"status": "success", "pdf_url": pdf_url})

Custom executors are perfect for:

  • Calling external APIs
  • Data transformation and validation
  • Conditional routing logic
  • Long-running operations like polling

We will use a custom executor to call the GAMMA API to create a presentation based on the output of the previous agent nodes.

Using Sequential Orchestration

The simplest types of workflow process tasks one after another, each building on the previous result. This is ideal for pipelines where each step depends on prior outputs.

Input → Agent A → Agent B → Agent C → Output

Use sequential when:

  • Steps have dependencies
  • Later steps need data from earlier ones
  • You want controlled, predictable execution flow

Other types of workflow orchestration are discussed on Microsoft Learn. We will use a sequential workflow in the example below.


The Presentation Workflow in Action

Now let’s see how all these concepts come together in our actual implementation.

Architecture Overview

Our workflow follows this flow:

Step 1: Outline Agent

This is an agent with a web search tool. The agent generates a search query relevant to the user input and decides on a presentation title and a list of slide titles:

outline_agent = AzureOpenAIResponsesClient(
    endpoint=endpoint,
    api_key=api_key,
    deployment_name=deployment_name
).create_agent(
    name="OutlineAgent",
    instructions="""
        Based on the user's request, you create an outline for a presentation.
        Before you generate the outline, use the 'search_web' tool to research 
        the topic thoroughly with ONE query.
        Base the outline on the research findings.
    """,
    tools=[search_web],
    response_format=OutlineResponse,
    middleware=[logging_function_middleware]
)

  • Input: User’s presentation request sent to the agent as a user message

Processing:

  • Calls search_web to research the topic
  • Generates a structured outline with title and slide titles

OutputOutlineResponse object with titlenumber_of_slidesslide_titles, and audience

If the user specifies the number of slides and audience, this will be reflected in the reponses.

Note: this agent uses middleware to log the use of the search_web tool.

Step 2: Research Agent

The research agent takes the presentation title and slides from the previous step and does research on the web for each slide:

research_agent = AzureOpenAIResponsesClient(
    endpoint=endpoint,
    api_key=api_key,
    deployment_name=deployment_name
).create_agent(
    name="ResearchAgent",
    instructions="""
        You research and create content for slides.
        Generate one web search query for each slide title.
        Keep in mind the target audience when generating queries.
        Next, use the 'search_web' tool ONCE passing in the queries all at once.

        Use the result from the queries to generate content for each slide.
        Content for slides should be limited to 100 words max with three main bullet points.
    """,
    tools=[search_web],
    response_format=ResearchResponse,
    middleware=[logging_function_middleware]
)

Input: The OutlineResponse from the outline agent is automatically sent as a user message. This message will contain the JSON output from the previous step.

Processing:

  • Generates one search queries per slide
  • Calls search_web with all queries concurrently (crucial for performance!)
  • Creates 100-word slide content with bullet points. It’s best to keep slide content concise for best results.

OutputResearchResponse object with slide content for each slide

Why Concurrency Matters: The Search Tool

To speed up research, the search_web function uses AsyncTavilyClient for concurrent searching:

from tavily import AsyncTavilyClient

tavily_client = AsyncTavilyClient(TAVILY_API_KEY)

@ai_function(
    name="search_web",
    description="Search the web for multiple topics using Tavily"
)
async def search_web(
    queries: Annotated[list[str], Field(description="List of search queries")]
) -> str:
    logger.info(f"SEARCH - Performing web searches for {len(queries)} queries")
    
    async def _search_single_query(query: str) -> dict:
        try:
            logger.info(f'SEARCH - "{query}" - Searching')
            # AsyncTavilyClient.search() is awaitable
            response = await tavily_client.search(
                query=query,
                search_depth="advanced",
                max_results=5,
            )
            return {"query": query, "results": response.get("results", [])}
        except Exception as e:
            logger.error(f'SEARCH - "{query}" - {str(e)}')
            return {"query": query, "results": [], "error": str(e)}
    
    # Run all searches concurrently!
    tasks = [_search_single_query(query) for query in queries]
    search_results = await asyncio.gather(*tasks)
    
    # Aggregate and return
    aggregated = {r["query"]: r["results"] for r in search_results}
    return json.dumps({"results": aggregated})

Key insight: By using AsyncTavilyClient instead of the synchronous TavilyClient, we enable concurrent execution. All queries run in parallel, dramatically reducing total execution time.

To learn more about Tavily, check their website. They have a generous free tier which I almost exhausted creating this example! 😊

Step 3: Custom Gamma Executor

Step three does not need an agent. It uses the output of the agents to call the GAMMA API:

class GammaAPIExecutor(Executor):
    @handler
    async def call_gamma_api(
        self, response: AgentExecutorResponse, ctx: WorkflowContext
    ) -> None:
        # Extract slide content
        slide_content = response.agent_run_response.text
        response_json = json.loads(slide_content)
        
        logger.info(f'GAMMA - "{title}" - Slides: {number_of_slides}')
        
        # Call Gamma API
        api_response = requests.post(
            f"{GAMMA_API_BASE_URL}/generations",
            headers=headers,
            json=payload,
            timeout=30,
        )
        
        generation_id = data.get("id") or data.get("generationId")
        logger.info(f'GAMMA - POST /generations {api_response.status_code}')
        
        # Poll for completion
        completed_data = await self._poll_for_completion(generation_id)
        
        # Download PDF
        pdf_path = self._download_pdf(completed_data.get("exportUrl"))
        
        logger.info(f'GAMMA - Presentation completed')
        await ctx.yield_output(f"PDF saved to: {pdf_path}")

Input: The ResearchResponse from the research agent (slide content)

Processing:

  • Calls GAMMA API to generate presentation
  • Polls for completion (generation is asynchronous)
  • Downloads resulting PDF
  • The presentation is also available in Gamma for easy editing:
Presentation available in Gamma after creation with the workflow

Output: Success message with PDF path and presentation in Gamma.


Running the example

The workflow code is on GitHub in the gamma folder: https://github.com/gbaeke/maf/tree/main/gamma

In that folder, check https://github.com/gbaeke/maf/blob/main/gamma/SETUP_GUIDE.md for setup instructions.

Deploying a multi-agent solution with MCP and A2A to Azure Container Apps

In previous posts, we discussed multi-agent scenarios, how A2A servers work (here and here) and how to deploy the infrastructure to host a multi-agent application on Azure with Azure Container Apps and AI Foundry.

In this post, we will take a look at deploying the different components of the solution as containers in Azure Container Apps. This is what we will build:

Multi-agent solution with MCP and A2A

There are four main components:

ComponentDescription
Conversation AgentPresents a chat interface to the user. Built with Chainlit and Semantic Kernel. Uses an OpenAI model. This could be switched to an Azure OpenAI model easily.

The agent uses two tools, rag and web, hosted by the MCP server.
MCP Tools ServerMCP server built with Python FastMCP. It exposes two tools, web and rag. The tools use an A2A client to interact with the A2A servers for the web and rag agents.

Not exposed to the Internet. Used to demonstrate MCP and A2A together. We could have called the A2A servers directly from the conversation agent without MCP.
A2A Server for Foundry Agent (does RAG)This agent uses an Azure AI Foundry Agent with a hosted file-based RAG tool to provide answers about Contoso products.

Not exposed to the Internet. Communicates privately with the Azure AI Foundry project.
A2A Server for OpenAI Agent (does web searches)This agent uses an OpenAI Agent SDK agent with the hosted web search tool.

Not exposed to the Internet. Communicates over the Internet with the OpenAI backend. This could easily be replaced with an Azure AI Foundry Agent that uses Bing Search. As this is an example about A2A, using a different technology makes more sense. 😊

Before delving into the four different components, it is important to know that the mcp, web and rag containers do not use their internal ingresses to communicate over TLS. That means that the mcp container for example, will talk to the web container using http://ca-web instead of something like https://ca-web.internal.ACA_environment_default_domain.

There is something to be said for using messaging to facilitate communication between agents. They are a form of microservices after all. In this example however, all communication is synchronous and uses HTTP.

This is a technical example that could be implemented in a single in-process agent with two tools. However, the emphasis is on multi-agent communication across process boundaries with Google’s Agent2Agent protocol.

Let’s gets started with the Conversation Agent!

Conversation Agent

The conversation agent maintains a conversation with the end user and keeps track of chat history. The agent, written in Semantic Kernel, has two tools:

  • web-search: uses the OpenAI Agent A2A server to search the web via OpenAI’s hosted web search tool
  • rag-search: uses the Azure AI Foundry A2A server to search for Contoso projects via a hosted RAG tool

The user interface to the agent is provided by Chainlit:

Chainlit UI

Above, I asked for information about a project. The agent is configured to use the rag-search tool to find project information. Under the hood, an A2A Server that wraps an Azure AI Foundry Agent is used to obtain this information. Via a filter, Chainlit supports visualizing when tools are called as can be seen at the top of the screen. It basically has hooks into the kernel object that gets created by Semantic Kernel.

The code for this Chainlit-hosted agent is on GitHub. The code in main.py uses an environment variable, MCP_SERVER_URL, that contains the address of the MCP server. As discussed above this will be http://containername/mcp (e.g., http://ca-mcp/mcp).

Following the typical Semantic Kernel approach, a kernel is created . Here is a snippet of code:

# Create the Semantic Kernel
        kernel = Kernel()
        
        # Add AI service to kernel
        ai_service = OpenAIChatCompletion(ai_model_id="gpt-4o")
        kernel.add_service(ai_service)
        logger.debug("Kernel and AI service initialized successfully")
        
        # Add MCP tools plugin to kernel (uses global client)
        tools_plugin = MCPToolsPlugin()
        kernel.add_plugin(tools_plugin, plugin_name="mcp_tools")
        logger.debug("MCP tools plugin added to kernel")

Note that we are not using Semantic Kernel’s built-in support for remote MCP servers that use streamable HTTP. Instead, we create a plugin via the MCPToolsPlugin class. That class defines two kernel functions, rag_search and web_search. In such a function, you can do what you want. I did not have to use MCP and could have called the A2A servers directly using the A2A client.

In our functions, we do use the MCP client from FastMCP to call the appropriate tool on the MCP server. The call to the A2A servers is implemented in the MCP server’s tools.

⚠️ This approach was chosen to illustrate that even if your framework does not natively support MCP, under the hood this is always LLM function calling. Kernel functions in Semantic Kernel are simply an abstraction on top of function calling. If you use Semantic Kernel’s native support for MCP, the tools on the MCP server would automatically be created as kernel functions. This native support requires much less code.

Now that we have the conversation agent up and running with Chainlit and Semantic Kernel, let’s look at the MCP server.

MCP Server

The conversation agent uses an MCP client (from the FastMCP library) to call tools hosted by the MCP server. This illustrates the separation of tool implementation from agent implementation.

The MCP server is implemented in main.py. In its most basic form, an MCP server with a few tools is really simple. This MCP server just defines two tools: a web tool and a rag tool.

The web tool looks like this:

@mcp.tool()
async def web_tool(query: str) -> str:
    """
    Perform a web search for the given query.
    
    Args:
        query: The search query to perform
        
    Returns:
        Search results as a string
    """
    logger.info(f"Web tool called with query: {query}")
    logger.info(f"Using web A2A agent at: {WEB_A2A_BASE_URL}")
    
    try:
        return await _send_a2a_message(query, WEB_A2A_BASE_URL)
    except Exception as e:
        logger.error(f"Error performing web search: {e}")
        return f"Error performing web search: {str(e)}"

This tool only does one thing: send a message to the A2A server on the address in WEB_A2A_BASE_URL. In Azure Container Apps, this URL is http://ca-web. The rag tool is implemented in a similar way. You can check the code of the _send_a2a_message function on GitHub.

⚠️ The addresses of the A2A servers are supplied to the mcp container app via environment variables WEB_A2A_BASE_URL and RAG_A2A_BASE_URL.

We now have the following implemented:

conversation --tool call--> MCP Server --run tool--> A2A Server

All traffic is synchronous and over http (not https)! Everything depends on the correct tool call being made by the conversation agent and the agents in the A2A servers. The rest is just plumbing! No magic! 😊

A2A Servers

You can check my earlier posts about A2A servers for background information:

It is important to note that the A2A server (rag) uses Azure AI Foundry. To authenticate to AI Foundry, we need to use a managed identity.

The rag container needs the following environment variables:

  • RAG_A2A_BASE_URL: required to set the correct url in the agent card
  • INTERNAL_PORT: port to run on (e.g., 80)
  • FOUNDRY_PROJECT: url to the Foundry project (e.g., https://FOUNDRY-RESOURCE.services.ai.azure.com/api/projects/FOUNDRY-PROJECT
  • ASSISTANT_ID: id of the agent you want to use; needs to exist in Foundry project
  • CLIENT_ID: the client id of the user assigned managed identity; this identity is created in the Bicep script; a role is assigned as well

During deployment of the container apps, a managed identity (that has the client id above) is assigned to the container. In the A2A server code that contains the code to talk to Foundry, this identity is used as follows:

if client_id:
            logger.info(f"Using ManagedIdentityCredential with client ID: {client_id}")
            credential = ManagedIdentityCredential(client_id=client_id)
        else:
            logger.info("Using DefaultAzureCredential")
            credential = DefaultAzureCredential()

This allows for the use of the Azure CLI identity when the rag agent is running on you local machine. Full code is in Agent_Executor.py.

⚠️ If you run the rag A2A server on your local machine, ensure you allow your IP address in the firewall settings of the Azure AI Foundry resource.

Full code for the A2A servers:

Deployment

To make it easy to deploy the containers to the Azure Container Apps environment (discussed in previous post), use the following script: https://github.com/gbaeke/multi_agent_aca/blob/main/deploy_containers.sh

At the top of the script, change the variables to match your environment:

ACR_NAME="SHORT_ACR_NAME"
ACR_URL="SHORT_ACR_NAME.azurecr.io"
RESOURCE_GROUP="RESOURCE_GROUP"
CONTAINER_APP_ENV="CONTAINER_APP_ENV_NAME"
MANAGED_IDENTITY="MANAGED_IDENTITY_NAME"

To deploy, simply run deploy_containers.sh --to-build conversation,mcp,web,rag. This does the following:

  • Builds and pushes the four containers using an ACR Task (no local Docker required)
  • Deploys the four containers with appropriate secrets and environment variables; serets are read from a .env file

Ensure that you have this .env in the same folder with the following values:

OPENAI_API_KEY="your_openai_api_key_here"
# Replace with your actual OpenAI API key

FOUNDRY_PROJECT="your_foundry_project_url"
# The URL of the Foundry project endpoint you're connecting to
# Find it in the properties of the AI Foundry project

ASSISTANT_ID="your_assistant_id_here"
# The unique ID of the agent you're referencing

This should deploy the four containers as shown below:

conversation, mcp, web and rag containers

Now grab the ingress URL (aka Application Url) of the conversation container:

Application URL (ingress URL) to the conversation app

Paste that URL in your browser. Hopefully the Chainlit UI is shown. If not, check the following:

  • Chainlit container has the MCP_SERVER_URL set to http://ca-mcp/mcp and also has you OpenAI key in OPENAI_API_KEY
  • MCP container has the WEB_A2A_BASE_URL and RAG_A2A_BASE_URL url set to http://ca-web and http://ca-rag
  • Web container has WEB_A2A_BASE_URL set to http://ca-web and also has an OPENAI_API_KEY
  • Rag container has RAG_A2A_BASE_URL set to http://ca-rag and has environment variables set to use the Azure AI Foundry agent; also check the managed identity of the container has access rights to AI Foundry

Normally these should all be set by both the Bicep and the container deployment script.

Wrapping Up

If you’ve made it this far and tried to implement this yourself, you’ve likely realized how much effort it takes to get everything up and running. About 99% of the work is infrastructure and plumbing; only 1% is actual agent code. In more complex agentic applications, the ratio may shift slightly, but infrastructure will still dominate the effort.

We have not even touched on things like logging, metrics, tracing the end-to-end communication path, load balancing, saving agent state and much, much more.

This brings me back to a key point from an earlier post:


If you can build your multi-agent solution in-process, or use an agent PaaS like Azure AI Foundry, do it.


Only choose the approach I described above when no other viable option exists or when you’re building larger solutions where multiple teams develop agents that must coexist within the same system.

Using tasks with streaming in Google Agent2Agent (A2A)

In a previous post we created a simple A2A agent that uses synchronous message exchange. An A2A client sends a message and the A2A server, via the Agent Executor, responds with a message.

But what if you have a longer running task to perform and you want to inform the client that the task in ongoing? In that case, you can enable streaming on the A2A server and use a task that streams updates and the final result to the client.

The sequence diagram illustrates the flow of messages. It is based on the streaming example in the A2A specification.

A2A tasks with streaming updates

In this case, the A2A client needs to perform a streaming request which is sent to the /message/stream endpoint of the A2A server. The code in the AgentExecutor will need to create a task and provide updates to the client at regular intervals.

⚠️ If you want to skip directly to the code, check out the example on GitHub.

Let’s get into the details in the following order:

  • Writing an agent that provides updates while it is doing work: I will use the OpenAI Agents SDK with its support for agent hooks
  • Writing an AgentExecutor that accepts a message, creates a task and provides updates to the client
  • Updating the A2A Server to support streaming
  • Updating the A2A Client to support streaming

AI Agent that provides updates

Although streaming updates is an integral part of A2A, the agent that does the actual work needs to provide feedback about its progress. That work is up to you, the developer.

In my example, I use an agent created with the OpenAI Agents SDK. This SDK supports AgentHooks that execute at certain events:

  • Agent started/finished
  • Tool call started/finished

The agent class in agent.py on GitHub uses an asyncio queue to emit both the hook events and the agent’s reponse to the caller. The A2A AgentExecutor uses the invoke_stream() method which returns an AsyncGenerator.

You can run python agent.py independently. This should result in the following:

The agent has a tool that returns the current date. The hooks emit the events as shown above followed by the final result.

We can now use this agent from the AgentExecutor and stream the events and final result from the agent to the A2A Client.

AgentExecutor Tasks and Streaming

Instead of simply returning a message to the A2A client, we now need to initiate a long-running task that sends intermediate updates to the client.. Under the hood this uses SSE (Server Sent Events) between the A2A Client and A2A Server.

The file agent_executor.py on GitHub contains the code that makes this happen. Let’s step through it:

message_text = context.get_user_input()  # helper method to extract the user input from the context
        logger.info(f"Message text: {message_text}")

        task = context.current_task
        if not task:
            task = new_task(context.message)
            await event_queue.enqueue_event(task)

Above, we extract the user’s input from the incoming message and we check if the context already contains a task. If not, we create the task and we queue it. This informs the client a task was created and that sse can be used to obtain intermediate results.

Now that we have a task (a new or existing one), the following code is used:

updater = TaskUpdater(event_queue, task.id, task.contextId)
async for event in self.agent.invoke_stream(message_text):
    if event.event_type == StreamEventType.RESPONSE:
        # send the result as an artifact
        await updater.add_artifact(
            [Part(root=TextPart(text=event.data['response']))],
            name='calculator_result',
        )

        await updater.complete()
            
    else:
        await updater.update_status(
        TaskState.working,
        new_agent_text_message(
            event.data.get('message', ''),
            task.contextId,
            task.id,
        ),
    )

We first create a TaskUpdater instance that has the event queue, current task Id and contextId. The task updater is used to provide status updates, complete or even cancel a task.

We then call invoke_stream(query) on our agent and grab the events it emits. If we get a event type of RESPONSE, we create an artifact with the agent response as text and mask the task as complete. In all other cases, we send a status event with updater.update_status(). A status update contains a task state (working in this case) and a message about the state. The message we send is part of the event that is emitted from invoke_stream() and includes things like agent started, tool started, etc…

So in short, to send streaming updates:

  • Ensure your agents emit events of some sort
  • Use those events in the AgentExecutor and create a task that sends intermediate updates until the agent has finished

However, our work is not finished. The A2A Server needs to be updated to support streaming.

A2A Server streaming support

The A2A server code in is main.py on GitHub. To support streaming, we need to update the capabilities of the server:

capabilities = AgentCapabilities(streaming=True, pushNotifications=True)

⚠️ pushNotifications=True is not required for streaming. I include it here to show that sending a push notification to a web hook is also an option.

That’s it! The A2A Server now supports streaming. Easy! 😊

Streaming with the A2A Client

Instead of sending a message to the non-streaming endpoint, the client should now use the streaming endpoint. Here is the code to do that (check test_client.py for the full code):

message_payload = Message(
            role=Role.user,
            messageId=str(uuid.uuid4()),
            parts=[Part(root=TextPart(text=question))],
        )
        streaming_request = SendStreamingMessageRequest(
            id=str(uuid.uuid4()),
            params=MessageSendParams(
                message=message_payload,
            ),
        )
        print("Sending message")

        stream_response = client.send_message_streaming(streaming_request)

To send to the streaming endpoint, the SendStreamingMessageRequest() function is your friend, together with client.send_message_streaming()

We can now grab the responses as they come in:

async for chunk in stream_response:
            # Only print status updates and text responses
            chunk_dict = chunk.model_dump(mode='json', exclude_none=True)
            
            if 'result' in chunk_dict:
                result = chunk_dict['result']
                
                # Handle status updates
                if result.get('kind') == 'status-update':
                    status = result.get('status', {})
                    state = status.get('state', 'unknown')
                    
                    if 'message' in status:
                        message = status['message']
                        if 'parts' in message:
                            for part in message['parts']:
                                if part.get('kind') == 'text':
                                    print(f"[{state.upper()}] {part.get('text', '')}")
                    else:
                        print(f"[{state.upper()}]")
                
                # Handle artifact updates (contain actual responses)
                elif result.get('kind') == 'artifact-update':
                    artifact = result.get('artifact', {})
                    if 'parts' in artifact:
                        for part in artifact['parts']:
                            if part.get('kind') == 'text':
                                print(f"[RESPONSE] {part.get('text', '')}")
                
                # Handle initial task submission
                elif result.get('kind') == 'task':
                    print(f"[TASK SUBMITTED] ID: {result.get('id', 'unknown')}")
                    
                # Handle final completion
                elif result.get('final') is True:
                    print("[TASK COMPLETED]")

This code checks the the type of content coming in:

  • status-update: when AgentExecutor sends a status update
  • artifact-update: when AgentExecutor sends an artifact with the agent’s response
  • task: when tasks are submitted and completed

Running the client and asking what today’s date is, results in the following response:

Streaming is working as intended! But what if you use a client that does not support streaming? That actually works and results in a full response with the agent’s answer in the result field. You would also get a history field that contains the initial user question, including all the task updates.

Here’s a snippet of that result:

{
  "id": "...",
  "jsonrpc": "2.0",
  "result": {
    "artifacts": [
      {
        "artifactId": "...",
        "name": "calculator_result",
        "parts": [
          {
            "kind": "text",
            "text": "Today's date is July 13, 2025."
          }
        ]
      }
    ],
    "contextId": "...",
    "history": [
      {
        "role": "user",
        "parts": [
          {
            "kind": "text",
            "text": "What is today's date?"
          }
        ]
      },
      {
        "role": "agent",
        "parts": [
          {
            "kind": "text",
            "text": "Agent 'CalculatorAgent' is starting..."
          }
        ]
      }
    ],
    "id": "...",
    "kind": "task",
    "status": {
      "state": "completed"
    }
  }
}

Wrapping up

You have now seen how to run longer running tasks and provide updates along the way via streaming. As long as your agent code provides status updates, the AgentExecutor can create a task and provide task updates and the task result to the A2A Server which uses SSE to send them to the A2A Client.

In an upcoming post, we will take a look at running a multi-agent solution in the Azure cloud.

Building a chatbot in Azure that works with your data

When I talk to customers about Azure OpenAI, I am often asked how to build a chatbot that uses your own data in the simplest way possible while still allowing for some customization. In Azure, there are a few solutions. We will look at one of the solutions in this post.

Note: don’t feel like reading? Check the video at the bottom of this post to see all this in action.

The easiest solution is “Bring your own data”, also called “Azure OpenAI on your data”. See Microsoft Learn for more information. Right from Azure AI Studio, you can add data from a blob storage container or directly upload your data. In the end, the data ends up in Azure Cognitive Search, which is then linked to the Chat playground as shown in the image below:

Bring your own data in Chat Playground (part of Azure AI Studio)

The following file types are supported: txt, md, html, Word, PowerPoint, PDF. Above, I added a few PDF files with job descriptions. The standard upload procedure works well for small documents. For larger documents, you should use the data preparation script. It will chunk documents into smaller pieces. The chunk size and overlap can be set in a config.json file. This is similar to what you can do with LangChain’s loaders and text splitters. In fact, you can use LangChain’s abstractions instead of the data preparation script but I have not tried this myself yet. See https://python.langchain.com/docs/integrations/vectorstores/azuresearch for more information. If I find the time, I will report on my findings in another blog post.

Right from the playground, you can click a button to deploy the bot to a new web app (Azure App Services):

The same bot in an Azure Web App

Although it is very easy to create the bot, there are a couple of things to note here:

  • The solution requires Azure Cognitive Search which is an extra cost. The minimum cost is around 70 euros per month. There are open-source solutions you can use for free or SaaS solutions that provide a free option (e.g., Pinecone). Azure OpenAI on your data only supports Azure Cognitive Search for now although technically, Microsoft could open this up to other stores.
  • Azure Cognitive Search is somewhat more complex than (some) vector databases such as Pinecone or Chroma. If you want to use other search engines/vector databases, I recommend using LangChain in combination with something like Chainlit to create your prototype. Of course, that means you will have to write more code. No more wizards for you! 😃
  • The source code for the web app is at https://github.com/microsoft/sample-app-aoai-chatGPT. Although the code is not super complex, Python tools such as Streamlit and Chainlit make it much easier to create a prototype from scratch. Note that the web app is protected with Azure Active Directory by default and that it authenticates to Cognitive Search and Azure OpenAI using API keys set as environment variables. This is all automatically configured for you!
  • Azure Cognitive Search integration is part of the Azure OpenAI API version 2023-06-01 and depends on a dataSources field in the JSON body sent to the Azure OpenAI API. Check the source code here. I would have preferred the API to stay aligned with the OpenAI APIs and retrieve extra content as a separate step.

With all this being said, if all you need for your demo is the web app generated by the Chat playground’s Deploy button, this is one of the quickest ways to get there!

To see the entire experience in action, check out the video below or click this link: https://www.youtube.com/watch?v=gySeOggsz-w.

Enhancing Semantic Search with a Streamlit UI

In a previous blog post, we discussed two Python programs, upload_vectors.py and search_vectors.py. These programs were used to create and search vectors, respectively. The upload_vectors.py script created vectors from chunks of a larger text and stored them in Pinecone, while the search_vectors.py script enabled semantic search on the text. In this blog post, we will discuss how to create a user interface (UI) for these two programs using Streamlit.

🚀 I kickstarted the Streamlit app by handing over the text-based version to ChatGPT and asking it to work its magic ✨💻. Yes, it was that easy! Afterwards, I made several manual changes to make it look the way I wanted.

Pinecone, Vectors, Embeddings, and Semantic Search: What’s all that about?

Pinecone is a vector database service that allows for easy storage and retrieval of high-dimensional vectors. It is optimized for similarity search, which makes it a perfect fit for tasks like semantic search. Our script stores vectors in Pinecone by parsing an RSS feed, chunking the blog posts, and creating the vectors with OpenAI’s embedding APIs.

Vectors are mathematical representations of data in the form of an array of numbers. In our case, we use vectors to represent chunks of text retrieved from blog posts. These vectors are generated using a process called embedding, which is a way of representing complex data, like text, in a lower-dimensional space while preserving the essential information.

Semantic search is a type of search that goes beyond keyword matching to understand the meaning and context of the query. By using vector embeddings, we can compare the similarity between queries and stored texts to find the most relevant results. Pinecone does that search for us and simply returns a number of matching chunks (pieces of text).

What is Streamlit?

Streamlit is a Python library that makes it easy to create custom web apps for machine learning and data science projects. You can build interactive UIs with minimal code, allowing you to focus on the core logic of your application.

Here’s an example of creating an extremely simple Streamlit app:

import streamlit as st

st.title('Hello, Streamlit!')
st.write('This is a simple Streamlit app.')

This code would generate a web app with a title and a text output. You can also create more complex UIs with user input, like sliders, text inputs, and buttons.

Creating a Streamlit UI for Semantic Search

Now let’s examine the provided code for creating a Streamlit UI for the search_vectors.py program. The code can be broken down into the following sections:

  1. Import necessary libraries and check environment variables.
  2. Set up the tokenizer and define the tiktoken_len function.
  3. Create the UI elements, including the title, text input, dropdown, sliders, and buttons.
  4. Define the main search functionality that is triggered when the user clicks the “Search” button.

Here is the full code:

import os
import pinecone
import openai
import tiktoken
import streamlit as st

# check environment variables
if os.getenv('PINECONE_API_KEY') is None:
    st.error("PINECONE_API_KEY not set. Please set this environment variable and restart the app.")
if os.getenv('PINECONE_ENVIRONMENT') is None:
    st.error("PINECONE_ENVIRONMENT not set. Please set this environment variable and restart the app.")
if os.getenv('OPENAI_API_KEY') is None:
    st.error("OPENAI_API_KEY not set. Please set this environment variable and restart the app.")

# use cl100k_base tokenizer for gpt-3.5-turbo and gpt-4
tokenizer = tiktoken.get_encoding('cl100k_base')


def tiktoken_len(text):
    tokens = tokenizer.encode(
        text,
        disallowed_special=()
    )
    return len(tokens)

# create a title for the app
st.title("Search blog feed 🔎")

# create a text input for the user query
your_query = st.text_input("What would you like to know?")
model = st.selectbox("Model", ["gpt-3.5-turbo", "gpt-4"])

with st.expander("Options"):

    max_chunks = 5
    if model == "gpt-4":
        max_chunks = 15

    max_reply_tokens = 1250
    if model == "gpt-4":
        max_reply_tokens = 2000

    col1, col2 = st.columns(2)

    # model dropdown
    with col1:
        chunks = st.slider("Number of chunks", 1, max_chunks, 5)
        temperature = st.slider("Temperature", 0.0, 1.0, 0.0)

    with col2:
        reply_tokens = st.slider("Reply tokens", 750, max_reply_tokens, 750)
    

# create a submit button
if st.button("Search"):
    # get the Pinecone API key and environment
    pinecone_api = os.getenv('PINECONE_API_KEY')
    pinecone_env = os.getenv('PINECONE_ENVIRONMENT')

    pinecone.init(api_key=pinecone_api, environment=pinecone_env)

    # set index
    index = pinecone.Index('blog-index')


    # vectorize your query with openai
    try:
        query_vector = openai.Embedding.create(
            input=your_query,
            model="text-embedding-ada-002"
        )["data"][0]["embedding"]
    except Exception as e:
        st.error(f"Error calling OpenAI Embedding API: {e}")
        st.stop()

    # search for the most similar vector in Pinecone
    search_response = index.query(
        top_k=chunks,
        vector=query_vector,
        include_metadata=True)

    # create a list of urls from search_response['matches']['metadata']['url']
    urls = [item["metadata"]['url'] for item in search_response['matches']]

    # make urls unique
    urls = list(set(urls))

    # create a list of texts from search_response['matches']['metadata']['text']
    chunk_texts = [item["metadata"]['text'] for item in search_response['matches']]

    # combine texts into one string to insert in prompt
    all_chunks = "\n".join(chunk_texts)

    # show urls of the chunks
    with st.expander("URLs", expanded=True):
        for url in urls:
            st.markdown(f"* {url}")
    

    with st.expander("Chunks"):
        for i, t in enumerate(chunk_texts):
            # remove newlines from chunk
            tokens = tiktoken_len(t)
            t = t.replace("\n", " ")
            st.write("Chunk ", i, "(Tokens: ", tokens, ") - ", t[:50] + "...")
    with st.spinner("Summarizing..."):
        try:
            prompt = f"""Answer the following query based on the context below ---: {your_query}
                                                        Do not answer beyond this context!
                                                        ---
                                                        {all_chunks}"""


            # openai chatgpt with article as context
            # chat api is cheaper than gpt: 0.002 / 1000 tokens
            response = openai.ChatCompletion.create(
                model=model,
                messages=[
                    { "role": "system", "content":  "You are a truthful assistant!" },
                    { "role": "user", "content": prompt }
                ],
                temperature=temperature,
                max_tokens=max_reply_tokens
            )

            st.markdown("### Answer:")
            st.write(response.choices[0]['message']['content'])

            with st.expander("More information"):
                st.write("Query: ", your_query)
                st.write("Full Response: ", response)

            with st.expander("Full Prompt"):
                st.write(prompt)

            st.balloons()
        except Exception as e:
            st.error(f"Error with OpenAI Completion: {e}")

A closer look

The code first imports the necessary libraries and checks if the required environment variables are set, displaying an error message if they are not. The libraries you need are in requirements.txt on GitHub. You can install them with:

pip3 install -r requirements.txt

ℹ️ I recommend using a Python virtual environment when you install these dependencies; see poetry (just one example)

The tiktoken_len function calculates the token length of a given text using the tokenizer. This is used to display the tokens of each chunk of text we set to the ChatCompletion API. Depending on the model, 4096 or 8192 tokens are supported.

The UI is built using Streamlit functions, such as st.title, st.text_input, st.selectbox, and st.columns. These functions create various UI elements that the user can interact with to input their query and set search parameters. If you look at the code, you will see how easy it is to add those elements.

With the UI elements, you can set:

  • the number of text chunks to return from Pinecone and to forward to the ChatCompletion API (using st.slider)
  • the number of tokens to reply with (using st.slider)
  • the model: gpt-3.5-turbo or gpt-4 (ensure you have access to the gpt-4 API)
  • the temperature (using st-slider)

The options are shown in two columns with st.columns.

The main search functionality is triggered when the user clicks the “Search” button. The code then vectorizes the query, searches for the most similar vectors in Pinecone, and displays the URLs and chunks found. Finally, the selected model is used to generate an answer based on the chunks found and the user’s query. Often, gpt-4 will provide the best answer. It seems to be able to better understand all the chunks of text thrown at it.

Running the code

To run the code you need the following:

  • A Pinecode API key and environment
  • An OpenAI API key

It is easiest to run the code with Docker. If you have it installed, run the following command:

docker run -p 8501:8501 -e OPENAI_API_KEY="YOURKEY" \
    -e PINECONE_API_KEY="YOURKEY" \
    -e PINECONE_ENVIRONMENT="YOURENV" gbaeke/blogsearch

The gbaeke/blogsearch image is available on Docker Hub. You can also build your own with the Dockerfile provided on GitHub.

After running the image, go to http://localhost:8501 and first use the Upload page to create your Pinecode index and store vectors in it. You can use my blog’s feed or any other feed. You can experiment with the chunk size and chunk overlap.

Upload to Pinecone

You can add multiple RSS feeds one-by-one as long as you turn off Recreate index before each new upload. After you have populated the index, use the Search page to start searching:

Searching

Above, we ask what we can do with Pinecone and let gpt-4 do the answering. The similarity search will search for 5 similar items and return them. We show the original URLs these results come from. In the Chunks section, you can see the original chunks because they are also in Pinecone as metadata. After the answer, you can find the full JSON returned by the ChatCompletion API and the full prompt we sent to that API.

Conclusion

In this blog post, we showed you how to create a Streamlit UI for the search_vectors.py script we talked about in a previous post. Streamlit allows you to easily build interactive web applications for your machine learning and data science projects. We also created a UI to upload posts to Pinecone. The full program allows you to add as much data as you want and query that data with semantic search, summarized and synthesized by the GPT model of choice. Give it a try and let me know what you think.

Storing and querying for embeddings with Redis

In a previous post, we wrote about using vectorized search and cosine similarity to quickly query a database of blog posts and retrieve the most relevant content to a natural language query. This is achieved using OpenAI’s embeddings API, Pinecone (a vector database), and OpenAI ChatCompletions. For reference, here’s the rough architecture:

Vectorized search with Pinecone

The steps above do the following:

  1. A console app retrieves blog post URLs from an RSS feed and reads all the posts one by one
  2. For each post, create an embedding with OpenAI which results in a vector of 1536 dimensions to store in Pinecone
  3. After the embedding is created, store the embedding in a Pinecone index; we created the index from the Pinecone portal
  4. A web app asks the user for a query (e.g., “How do I create a chat bot?”) and creates an embedding for the query
  5. Perform a vectorized search, finding the closest post vectors to the query vector using cosine similarity and keep the one with the highest score
  6. Use the ChatCompletion API and submit the same query but add the highest scoring post as context to the user question. The post text is injected into the prompt

ℹ️ See Pinecone and OpenAI magic: A guide to finding your long lost blog posts with vectorized search and ChatGPT – baeke.info for more information.

We can replace Pinecone with Redis, a popular open-source, in-memory data store that can be used as a database, cache, and message broker. Redis is well-suited for this task as it can also store vector representations of our blog posts and has the capability to perform vector queries efficiently.

You can easily run Redis with Docker for local development. In addition, Redis is available in Azure, although you will need the Enterprise version. Only Azure Cache for Redis Enterprise supports the RediSearch functionality and that’s what we need here! Note that the Enterprise version is quite costly.

By leveraging Redis for vector storage and querying, we can harness its high performance, flexibility, and reliability in our solution while maintaining the core functionality of quickly querying and retrieving the most relevant blog post content using vectorized search and similarity queries.

ℹ️ The code below shows snippets. Full samples (yes, samples 😀) are on GitHub: check upload_vectors_redis.py to upload posts to a local Redis instance and search_vectors_redis.py to test the query functionality.

Run Redis with Docker

If you have Docker on your machine, use the following command:

docker run --name redis-stack-server -p 6380:6379 redis/redis-stack-server:latest

ℹ️ I already had another instance of Redis running on port 6379 so I mapped port 6380 on localhost to port 6379 of the redis-stack-server container.

If you want a GUI to explore your Redis instance, install RedisInsight. The screenshot below shows the blog posts after uploading them as Redis hashes.

RedisInsight in action

Let’s look at creating the hashes next!

Storing post data in Redis hashes

We will create several Redis hashes, one for each post. Hashes are records structured as collections of field-value pairs. Each hash we store, has the following fields:

  • url: url to the blog post
  • embedding: embedding of the blog post (a vector), created with the OpenAI embeddings API and the text-embedding-ada-002 model

We need the URL to retrieve the entire post after a closest match has been found. In Pinecone, the URL would be metadata to the vector. In Redis, it’s just a field in a hash, just like the vector itself.

In RedisInsight, a hash is shown as below:

Redis hash for post 0 with url and embedding fields

The embedding field in the hash has no special properties. The vector is simply stored as a series of bytes. To store the urls and embeddings of posts, we can use the following code:

import redis
import openai
import os
import requests
from bs4 import BeautifulSoup
import feedparser


# OpenAI API key
openai.api_key = os.getenv('OPENAI_API_KEY')

# Redis connection details
redis_host = os.getenv('REDIS_HOST')
redis_port = os.getenv('REDIS_PORT')
redis_password = os.getenv('REDIS_PASSWORD')

# Connect to the Redis server
conn = redis.Redis(host=redis_host, port=redis_port, password=redis_password, encoding='utf-8', decode_responses=True)

# URL of the RSS feed to parse
url = 'https://atomic-temporary-16150886.wpcomstaging.com/feed/'

# Parse the RSS feed with feedparser
feed = feedparser.parse(url)

p = conn.pipeline(transaction=False)
for i, entry in enumerate(feed.entries[:50]):
    # report progress
    print("Create embedding and save for entry ", i, " of ", entries)

    r = requests.get(entry.link)
    soup = BeautifulSoup(r.text, 'html.parser')
    article = soup.find('div', {'class': 'entry-content'}).text

    # vectorize with OpenAI text-emebdding-ada-002
    embedding = openai.Embedding.create(
        input=article,
        model="text-embedding-ada-002"
    )

    # print the embedding (length = 1536)
    vector = embedding["data"][0]["embedding"]

    # convert to numpy array and bytes
    vector = np.array(vector).astype(np.float32).tobytes()

    # Create a new hash with url and embedding
    post_hash = {
        "url": entry.link,
        "embedding": vector
    }

    # create hash
    conn.hset(name=f"post:{i}", mapping=post_hash)

p.execute()

In the above code, note the following:

  • The OpenAI embeddings API returns a JSON document that contains the embedding for each post; the embedding is retrieved with vector = embedding["data"][0]["embedding"]
  • The resulting vector is converted to bytes with vector = np.array(vector).astype(np.float32).tobytes(); serializing the vector this way is required to store the vector in the Redis hash
  • the Redis hset command is used to store the field-value pairs (these pairs are in a Python dictionary called post_hash) with a key that is prefixed with post: followed by the document number. The prefix will be used later by the search index we will create

Now we have our post information in Redis hashes, we want to use RediSearch functionality to match an input query with one or more of our posts. RediSearch supports vector similarity semantic search. For such a search to work, we will need to create an index that knows there is a vector field. On such indexes, we can perform vector similarity searches.

Creating an index

To create an index with Python code, check the code below:

import redis
from redis.commands.search.field import VectorField, TextField
from redis.commands.search.query import Query
from redis.commands.search.indexDefinition import IndexDefinition, IndexType

# Redis connection details
redis_host = os.getenv('REDIS_HOST')
redis_port = os.getenv('REDIS_PORT')
redis_password = os.getenv('REDIS_PASSWORD')

# Connect to the Redis server
conn = redis.Redis(host=redis_host, port=redis_port, password=redis_password, encoding='utf-8', decode_responses=True)


SCHEMA = [
    TextField("url"),
    VectorField("embedding", "HNSW", {"TYPE": "FLOAT32", "DIM": 1536, "DISTANCE_METRIC": "COSINE"}),
]

# Create the index
try:
    conn.ft("posts").create_index(fields=SCHEMA, definition=IndexDefinition(prefix=["post:"], index_type=IndexType.HASH))
except Exception as e:
    print("Index already exists")


When creating an index, you define the fields to index based on a schema. Above, we include both the text field (url) and the vector field (embedding). The VectorField class is used to construct the vector field and takes several parameters:

  • Name: the name of the field (“embedding” here but could be anything)
  • Algorithm: “FLAT” or “HNSW”; use “FLAT” when search quality is of high priority and search speed is less important; “HNSW” gives you faster querying; for more information see this article
  • Attributes: a Python dictionary that specifies the data type, the number of dimensions of the vector (1536 for text-embedding-ada-002) and the distance metric; here we use COSINE for cosine similarity, which is recommended by OpenAI with their embedding model

ℹ️ It’s important to get the dimensions right or your index will fail to build properly. It will not be immediately clear that it failed, unless you run FT.INFO <indexname> with redis-cli.

With the schema out of the way, we can now create the index with:

conn.ft("posts").create_index(fields=SCHEMA, definition=IndexDefinition(prefix=["post:"], index_type=IndexType.HASH))

The index we create is called posts. We index the fields defined in SCHEMA and only index hashes with a key prefix of post:. The hashes we created earlier, all have this prefix. With the index created and our existing hashes, the index should be populated with them. Ensure you can see that in RedisInsight:

posts index populated with hashes that were added earlier

Redis vector queries

With the hashes and the index created, we can now perform a similarity search. We will ask the user for a query string (use natural language) and then check the posts that are similar to the query string. The query string will need to be vectorized as well. We will return several post and rank them.

import numpy as np
from redis.commands.search.query import Query
import redis
import openai
import os

openai.api_key = os.getenv('OPENAI_API_KEY')

def search_vectors(query_vector, client, top_k=5):
    base_query = "*=>[KNN 5 @embedding $vector AS vector_score]"
    query = Query(base_query).return_fields("url", "vector_score").sort_by("vector_score").dialect(2)    

    try:
        results = client.ft("posts").search(query, query_params={"vector": query_vector})
    except Exception as e:
        print("Error calling Redis search: ", e)
        return None

    return results

# Redis connection details
redis_host = os.getenv('REDIS_HOST')
redis_port = os.getenv('REDIS_PORT')
redis_password = os.getenv('REDIS_PASSWORD')

# Connect to the Redis server
conn = redis.Redis(host=redis_host, port=redis_port, password=redis_password, encoding='utf-8', decode_responses=True)

if conn.ping():
    print("Connected to Redis")

# Enter a query
query = input("Enter your query: ")

# Vectorize the query using OpenAI's text-embedding-ada-002 model
print("Vectorizing query...")
embedding = openai.Embedding.create(input=query, model="text-embedding-ada-002")
query_vector = embedding["data"][0]["embedding"]

# Convert the vector to a numpy array
query_vector = np.array(query_vector).astype(np.float32).tobytes()

# Perform the similarity search
print("Searching for similar posts...")
results = search_vectors(query_vector, conn)

if results:
    print(f"Found {results.total} results:")
    for i, post in enumerate(results.docs):
        score = 1 - float(post.vector_score)
        print(f"\t{i}. {post.url} (Score: {round(score ,3) })")
else:
    print("No results found")

In the above code, the following happens:

  • Set OpenAI API key: needed to create the embedding for the query typed by the user
  • Connect to Redis based on the environment variables and check the connection with ping().
  • Ask the user for a query
  • Create the embedding from the query string and convert the array to bytes
  • Call the search_vectors function with the vectorized query string and Redis connection as parameters

The search_vectors function uses RediSearch capabilities to query over our hashes and calculate the 5 nearest neighbors to our query vector. Querying is explained in detail in the Redis documentation but it can be a bit dense. You start with the base query:

 base_query = "*=>[KNN 5 @embedding $vector AS vector_score]"

This is just a string with the query format that Redis expects to pass to the Query class in the next step. We are looking for the 5 nearest neighbors of $vector in the embedding fields of the hashes. You use @ to denote the embedding field and $ to denote the vector we will pass in later. That vector is our vectorized query string. With AS vector_score, we add the score to later rank the results from high to low.

The actual query is built with the Query class (one line):

query = Query(base_query).return_fields("url", "vector_score").sort_by("vector_score").dialect(2)    

We return the url and the vector_score and sort on this score. Dialect is just the version of the query language. Here we use dialect 2 as that matches the query syntax. Using an earlier dialect would not work here.

Of course, this still does not pass the query vector to the query. That only happens when we run the query in Redis with:

results = client.ft("posts").search(query, query_params={"vector": query_vector})

The above code performs a search query on the posts index. In the call to the search method, we pass the query we built earlier and a list of query parameters. We only have one parameter, the vector parameter ($vector in base_query) and the value for this parameter is the embedding created from the user query string.

When I query for bot, I get the following results:

Our 5 query results

The results are ranked with the closest match first. We could use that match to grab the post from the URL and send the query to OpenAI ChatCompletion API to answer the question more precisely. For better results, use a better query like “How do I build a chat bot in Python with OpenAI?”. To get an idea of how to do that, check my previous post.

Conclusion

In this post we discussed storing embeddings in Redis and querying embeddings with a similarity search. If you combine this with my previous post, you can use Redis instead of Pinecone as the vector database and query engine. This can be useful for Azure customers because Azure has Azure Cache for Redis Enterprise, a fully managed service that supports the functionality discussed in this post. In addition, it is useful for local development purposes because you can easily run Redis with Docker.

Pinecone and OpenAI magic: A guide to finding your long lost blog posts with vectorized search and ChatGPT

Searching through a large database of blog posts can be a daunting task, especially if there are thousands of articles. However, using vectorized search and cosine similarity, you can quickly query your blog posts and retrieve the most relevant content.

In this blog post, we’ll show you how to query a list of blog posts (from this blog) using a combination of vectorized search with cosine similarity and OpenAI ChatCompletions. We’ll be using OpenAI’s embeddings API to vectorize the blog post articles and Pinecone, a vector database, to store and query the vectors. We’ll also show you how to retrieve the contents of the article, create a prompt using the ChatCompletion API, and return the result to a web page.

ℹ️ Sample code is on GitHub: https://github.com/gbaeke/gpt-vectors

ℹ️ If you want an introduction to embeddings and cosine similarity, watch the video on YouTube by Part Time Larry.

Setting Up Pinecone

Before we can start querying our blog posts, we need to set up Pinecone. Pinecone is a vector database that makes it easy to store and query high-dimensional data. It’s perfect for our use case since we’ll be working with high-dimensional vectors.

ℹ️ Using a vector database is not strictly required. The GitHub repo contains app.py, which uses scikit-learn to create the vectors and perform a cosine similarity search. Many other approaches are possible. Pinecone just makes storing and querying the vectors super easy.

ℹ️ If you want more information about Pinecone and the concept of a vector database, watch this introduction video.

First, we’ll need to create an account with Pinecone and get the API key and environment name. In the Pinecone UI, you will find these as shown below. There will be a Show Key and Copy Key button in the Actions section next to the key.

Key and environment for Pinecone

Once we have an API key and the environment, we can use the Pinecone Python library to create and use indexes. Install the Pinecone library with pip install pinecone-client.

Although you can create a Pinecone index from code, we will create the index in the Pinecone portal. Go to Indexes and select Create Index. Create the index using cosine as metric and 1536 dimensions:

blog-index in Pinecone

The embedding model we will use to create the vectors, text-embedding-ada-002, outputs vectors with 1536 dimensions. For more info see OpenAI’s blog post of December 15, 2022.

To use the Pinecode index from code, look at the snippet below:

import pinecone

pinecone_api = "<your_api_key>"
pinecone_env = "<your_environment>"

pinecone.init(api_key=pinecone_api, environment=pinecone_env)

index = pinecone.Index('blog-index')

We create an instance of the Index class with the name “blog-index” and store this in index. This index will be used to store our blog post vectors or to perform searches on.

Vectorizing Blog Posts with OpenAI’s Embeddings API

Next, we’ll need to vectorize our blog post articles. We’ll be using OpenAI’s embeddings API to do this. The embeddings API takes a piece of text and returns a high-dimensional vector representation of that text. Here’s an example of how to do that for one article or string:

import openai

openai.api_key = "<your_api_key>"

article = "Some text from a blog post"

vector = openai.Embedding.create(
    input=article,
    model="text-embedding-ada-002"
)["data"][0]["embedding"]

We create a vector representation of our blog post article by calling the Embedding class’s create method. We pass in the article text as input and the text-embedding-ada-002 model, which is a pre-trained language model that can generate high-quality embeddings.

Storing Vectors in Pinecone

Once we have the vector representations of our blog post articles, we can store them in Pinecone. Instead of storing vector per vector, we can use upsert to store a list of vectors. The code below uses the feed of this blog to grab the URLs for 50 posts, every post is vectorized and the vector is added to a Python list of tuples, as expected by the upsert method. The list is then added to Pinecone at once. The tuple that Pinecone expects is:

(id, vector, metadata dictionary)

e.g. (0, vector for post 1, {"url": url to post 1}

Here is the code that uploads the first 50 posts of baeke.info to Pinecone. You need to set the Pinecone key and environment and the OpenAI key as environment variables. The code uses feedparser to grab the blog feed, and BeatifulSoup to parse the retrieved HTML. The code serves as an example only. It is not very robust when it comes to error checking etc…

import feedparser
import os
import pinecone
import numpy as np
import openai
import requests
from bs4 import BeautifulSoup

# OpenAI API key
openai.api_key = os.getenv('OPENAI_API_KEY')

# get the Pinecone API key and environment
pinecone_api = os.getenv('PINECONE_API_KEY')
pinecone_env = os.getenv('PINECONE_ENVIRONMENT')

pinecone.init(api_key=pinecone_api, environment=pinecone_env)

# set index; must exist
index = pinecone.Index('blog-index')

# URL of the RSS feed to parse
url = 'https://atomic-temporary-16150886.wpcomstaging.com/feed/'

# Parse the RSS feed with feedparser
feed = feedparser.parse(url)

# get number of entries in feed
entries = len(feed.entries)
print("Number of entries: ", entries)

post_texts = []
pinecone_vectors = []
for i, entry in enumerate(feed.entries[:50]):
    # report progress
    print("Processing entry ", i, " of ", entries)

    r = requests.get(entry.link)
    soup = BeautifulSoup(r.text, 'html.parser')
    article = soup.find('div', {'class': 'entry-content'}).text

    # vectorize with OpenAI text-emebdding-ada-002
    embedding = openai.Embedding.create(
        input=article,
        model="text-embedding-ada-002"
    )

    # print the embedding (length = 1536)
    vector = embedding["data"][0]["embedding"]

    # append tuple to pinecone_vectors list
    pinecone_vectors.append((str(i), vector, {"url": entry.link}))

# all vectors can be upserted to pinecode in one go
upsert_response = index.upsert(vectors=pinecone_vectors)

print("Vector upload complete.")

Querying Vectors with Pinecone

Now that we have stored our blog post vectors in Pinecone, we can start querying them. We’ll use cosine similarity to find the closest matching blog post. Here is some code that does just that:

query_vector = <vector representation of query>  # vector created with OpenAI as well

search_response = index.query(
    top_k=5,
    vector=query_vector,
    include_metadata=True
)

url = get_highest_score_url(search_response['matches'])

def get_highest_score_url(items):
    highest_score_item = max(items, key=lambda item: item["score"])

    if highest_score_item["score"] > 0.8:
        return highest_score_item["metadata"]['url']
    else:
        return ""

We create a vector representation of our query (you don’t see that here but it’s the same code used to vectorize the blog posts) and pass it to the query method of the Pinecone Index class. We set top_k=5 to retrieve the top 5 matching blog posts. We also set include_metadata=True to include the metadata associated with each vector in our response. That way, we also have the URL of the top 5 matching posts.

The query method returns a dictionary that contains a matches key. The matches value is a list of dictionaries, with each dictionary representing a matching blog post. The score key in each dictionary represents the cosine similarity score between the query vector and the blog post vector. We use the get_highest_score_url function to find the blog post with the highest cosine similarity score.

The function contains some code to only return the highest scoring URL if the score is > 0.8. It’s of course up to you to accept lower matching results. There is a potential for the vector query to deliver an article that’s not highly relevant which results in an irrelevant context for the OpenAI ChatCompletion API call we will do later.

Retrieving the Contents of the Blog Post

Once we have the URL of the closest matching blog post, we can retrieve the contents of the article using the Python requests library and the BeautifulSoup library.

import requests
from bs4 import BeautifulSoup

r = requests.get(url)
soup = BeautifulSoup(r.text, 'html.parser')

article = soup.find('div', {'class': 'entry-content'}).text

We send a GET request to the URL of the closest matching blog post and retrieve the HTML content. We use the BeautifulSoup library to parse the HTML and extract the contents of the <div> element with the class “entry-content”.

Creating a Prompt for the ChatCompletion API

Now that we have the contents of the blog post, we can create a prompt for the ChatCompletion API. The crucial part here is that our OpenAI query should include the blog post we just retrieved!

response = openai.ChatCompletion.create(
    model="gpt-3.5-turbo",
    messages=[
        { "role": "system", "content": "You are a polite assistant" },
        { "role": "user", "content": "Based on the article below, answer the following question: " + your_query +
            "\nAnswer as follows:" +
            "\nHere is the answer directly from the article:" +
            "\nHere is the answer from other sources:" +
             "\n---\n" + article }
           
    ],
    temperature=0,
    max_tokens=200
)

response_text=f"\n{response.choices[0]['message']['content']}"

We use the ChatCompletion API with the gpt-3.5-turbo model to ask our question. This is the same as using ChatGPT on the web with that model. At this point in time, the GPT-4 model was not available yet.

Instead of one prompt, we send a number of dictionaries in a messages list. The first item in the list sets the system message. The second item is the actual user question. We ask to answer the question based on the blog post we stored in the article variable and we provide some instructions on how to answer. We add the contents of the article to our query.

If the article is long, you run the risk of using too many tokens. If that happens, the ChatCompletion call will fail. You can use the tiktoken library to count the tokens and prevent the call to happen in the first place. Or you can catch the exception and tell the user. In the above code, there is no error handling. We only include the core code that’s required.

Returning the Result to a Web Page

If you are running the search code in an HTTP handler as the result of the user typing a query in a web page, you can return the result to the caller:

return jsonify({
    'url': url,
    'response': response_text
})

The full example, including an HTML page and Flask code can be found on GitHub.

The result could look like this:

Query results in the closest URL using vectorized search and ChatGPT answering the question based on the contents the URL points at

Conclusion

Using vectorized search and cosine similarity, we can quickly query a database of blog posts and retrieve the most relevant post. By combining OpenAI’s embeddings API, Pinecone, and the ChatCompletion API, we can create a powerful tool for searching and retrieving blog post content using natural language.

Note that there are some potential issues as well. The code we show is merely a starting point:

  • Limitations of cosine similarity: it does not take into account all properties of the vectors, which can lead to misleading results
  • Prompt engineering: the prompt we use works but there might be prompts that just work better. Experimentation with different prompts is crucial!
  • Embeddings: OpenAI embeddings are trained on a large corpus of text, which may not be representative of the domain-specific language in the posts
  • Performance might not be sufficient if the size of the database grows large. For my blog, that’s not really an issue. 😀

Step-by-Step Guide: How to Build Your Own Chatbot with the ChatGPT API

In this blog post, we will be discussing how to build your own chat bot using the ChatGPT API. It’s worth mentioning that we will be using the OpenAI APIs directly and not the Azure OpenAI APIs, and the code will be written in Python. A crucial aspect of creating a chat bot is maintaining context in the conversation, which we will achieve by storing and sending previous messages to the API at each request. If you are just starting with AI and chat bots, this post will guide you through the step-by-step process of building your own simple chat bot using the ChatGPT API.

Python setup

Ensure Python is installed. I am using version 3.10.8. For editing code, I am using Visual Studio code as the editor. For the text-based chat bot, you will need the following Python packages:

  • openai: make sure the version is 0.27.0 or higher; earlier versions do not support the ChatCompletion APIs
  • tiktoken: a library to count the number of tokens of your chat bot messages

Install the above packages with your package manager. For example: pip install openai.

All code can be found on GitHub.

Getting an account at OpenAI

We will write a text-based chat bot that asks for user input indefinitely. The first thing you need to do is sign up for API access at https://platform.openai.com/signup. Access is not free but for personal use, while writing and testing the chat bot, the price will be very low. Here is a screenshot from my account:

Oh no, $0.13 dollars

When you have your account, generate an API key from https://platform.openai.com/account/api-keys. Click the Create new secret key button and store the key somewhere.

Writing the bot

Now create a new Python file called app.py and add the following lines:

import os
import openai
import tiktoken

openai.api_key = os.getenv("OPENAI_KEY")

We already discussed the openai and tiktoken libraries. We will also use the builtin os library to read environment variables.

In the last line, we read the environment variable OPENAI_KEY. If you use Linux, in your shell, use the following command to store the OpenAI key in an environment variable: export OPENAI_KEY=your-OpenAI-key. We use this approach to avoid storing the API key in your code and accidentally uploading it to GitHub.

To implement the core chat functionality, we will use a Python class. I was following a Udemy course about ChatGPT and it used a similar approach, which I liked. By the way, I can highly recommend that course. Check it out here.

Let’s start with the class constructor:

class ChatBot:

    def __init__(self, message):
        self.messages = [
            { "role": "system", "content": message }
        ]

In the constructor, we define a messages list and set the first item in that list to a configurable dictionary: { "role": "system", "content": message }. In the ChatGPT API calls, the messages list provides context to the API because it contains all the previous messages. With this initial system message, we can instruct the API to behave in a certain way. For example, later in the code, you will find this code to create an instance of the ChatBot class:

bot = ChatBot("You are an assistant that always answers correctly. If not sure, say 'I don't know'.")

But you could also do:

bot = ChatBot("You are an assistant that always answers wrongly.Always contradict the user")

In practice, ChatGPT does not follow the system instruction to strongly. User messages are more important. So it could be that, after some back and forth, the answers will not follow the system instruction anymore.

Let’s continue with another method in the class, the chat method:

def chat(self):
        prompt = input("You: ")
        
        self.messages.append(
            { "role": "user", "content": prompt}
        )
        
        response = openai.ChatCompletion.create(
            model="gpt-3.5-turbo",
            messages = self.messages,
            temperature = 0.8
        )
        
        answer = response.choices[0]['message']['content']
        
        print(answer)
        
        self.messages.append(
           { "role": "assistant", "content": answer} 
        )

        tokens = self.num_tokens_from_messages(self.messages)
        print(f"Total tokens: {tokens}")

        if tokens > 4000:
            print("WARNING: Number of tokens exceeds 4000. Truncating messages.")
            self.messages = self.messages[2:]

The chat method is where the action happens. It does the following:

  • It prompts the user to enter some input.
  • The user’s input is stored in a dictionary as a message with a “user” role and appended to a list of messages called self.messages. If this is the first input, we now have two messages in the list, a system message and a user message.
  • It then creates a response using OpenAI’s gpt-3.5-turbo model, passing in the self.messages list and a temperature of 0.8 as parameters. We use the ChatCompletion API versus the Completion API that you use with other models such as text-davinci-003.
  • The generated response is stored in a variable named answer. The full response contains a lot of information. We are only interested in the first response (there is only one) and grab the content.
  • The answer is printed to the console.
  • The answer is also added to the self.messages list as a message with an “assistant” role. If this is the first input, we now have three messages in the list: a system message, the first user message (the input) and the assistant’s response.
  • The total number of tokens in the self.messages list is computed using a separate function called num_tokens_from_messages() and printed to the console.
  • If the number of tokens exceeds 4000, a warning message is printed and the self.messages list is truncated to remove the first two messages. We will talk about these tokens later.

It’s important to realize we are using the Chat completions here. You can find more information about Chat completions here.

If you did not quite get how the text response gets extracted, here is an example of a full response from the Chat completion API:

{
 'id': 'chatcmpl-6p9XYPYSTTRi0xEviKjjilqrWU2Ve',
 'object': 'chat.completion',
 'created': 1677649420,
 'model': 'gpt-3.5-turbo',
 'usage': {'prompt_tokens': 56, 'completion_tokens': 31, 'total_tokens': 87},
 'choices': [
   {
    'message': {
      'role': 'assistant',
      'content': 'The 2020 World Series was played in Arlington, Texas at the Globe Life Field, which was the new home stadium for the Texas Rangers.'},
    'finish_reason': 'stop',
    'index': 0
   }
  ]
}

The response is indeed in choices[0][‘message’][‘content’].

To make this rudimentary chat bot work, we will repeatedly call the chat method like so:

bot = ChatBot("You are an assistant that always answers correctly. If not sure, say 'I don't know'.")
    while True:
        bot.chat()

Every time you input a question, the API answers and both the question and answer is added to the messages list. Of course, that makes the messages list grow larger and larger, up to a point where it gets to large. The question is: “What is too large?”. Let’s answer that in the next section.

Counting tokens

A language model does not work with text as humans do. Instead, they use tokens. It’s not important how this exactly works but it is important to know that you get billed based on these tokens. You pay per token.

In addition, the model we use here (gpt-3.5-turbo) has a maximum limit of 4096 tokens. This might change in the future. With our code, we cannot keep adding messages to the messages list because, eventually, we will pass the limit and the API call will fail.

To have an idea about the tokens in our messages list, we have this function:

def num_tokens_from_messages(self, messages, model="gpt-3.5-turbo"):
        try:
            encoding = tiktoken.encoding_for_model(model)
        except KeyError:
            encoding = tiktoken.get_encoding("cl100k_base")
        if model == "gpt-3.5-turbo":  # note: future models may deviate from this
            num_tokens = 0
            for message in messages:
                num_tokens += 4  # every message follows <im_start>{role/name}\n{content}<im_end>\n
                for key, value in message.items():
                    num_tokens += len(encoding.encode(value))
                    if key == "name":  # if there's a name, the role is omitted
                        num_tokens += -1  # role is always required and always 1 token
            num_tokens += 2  # every reply is primed with <im_start>assistant
            return num_tokens
        else:
            raise NotImplementedError(f"""num_tokens_from_messages() is not presently implemented for model {model}.""")

The above function comes from the OpenAI cookbook on GitHub. In my code, the function is used to count tokens in the messages list and, if the number of tokens is above a certain limit, we remove the first two messages from the list. The code also prints the tokens so you now how many you will be sending to the API.

The function contains references to <im_start> and <im_end>. This is ChatML and is discussed here. Because you use the ChatCompletion API, you do not have to worry about this. You just use the messages list and the API will transform it all to ChatML. But when you count tokens, ChatML needs to be taken into account for the total token count.

Note that Microsoft examples for Azure OpenAI, do use ChatML in the prompt, in combination with the default Completion APIs. See Microsoft Learn for more information. You will quickly see that using the ChatCompletion API with the messages list is much simpler.

To see, and download, the full code, see GitHub.

Running the code

To run the code, just run app.py. On my system, I need to use python3 app.py. I set the system message to You are an assistant that always answers wrongly. Contradict the user. 😀

Here’s an example conversation:

Although, at the start, the responses follow the system message, the assistant starts to correct itself and answers correctly. As stated, user messages eventually carry more weight.

Summary

In this post, we discussed how to build a chat bot using the ChatGPT API and Python. We went through the setup process, created an OpenAI account, and wrote the chat bot code using the OpenAI API. The bot used the ChatCompletion API and maintained context in the conversation by storing and sending previous messages to the API at each request. We also discussed counting tokens and truncating the message list to avoid exceeding the maximum token limit for the model. The full code is available on GitHub, and we provided an example conversation between the bot and the user. The post aimed to guide both beginning developers and beginners in AI and chat bot development through the step-by-step process of building their chat bot using the ChatGPT API and keep it as simple as possible.

Hope you liked it!