Simple Azure AD Authentication in a single page application (SPA)

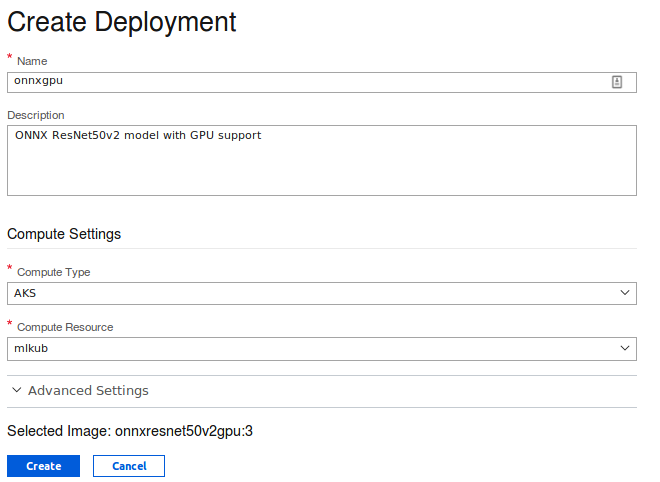
Adding Azure AD integration to a website is often confusing if you are just getting started. Let’s face it, not everybody has the opportunity to dig deep into such topics. For https://deploy.baeke.info, I wanted to enable Azure AD authentication so that only a select group of users in our AD tenant can call the back-end webhooks exposed by webhookd. The architecture of the application looks like this:

Client to webhook

The process is as follows:

  • Load the client from https://deploy.baeke.info
  • Client obtains a token from Azure Active Directory; the user will have to authenticate; in our case that means that a second factor needs to be provided as well
  • When the user performs an action that invokes a webhook, the call is sent to API Management
  • API Management verifies the token and passes the request to webhookd over https with basic authentication
  • The response is received by API Management which passes it unmodified to the client

I know you are an observing reader that is probably thinking: “why not present the token to webhookd?”. That’s possible but then I did not have a reason to use API Management! 😉

Before we begin you might want to get some background information about what we are going to do. Take a look at this excellent Youtube video that explains topics such a OAuth 2.0 and OpenID Connect in an easy to understand format:

Create an application in Azure AD

The first step is to create a new application registration. You can do this from https://aad.portal.azure.com. In Azure Active Directory, select App registrations or use the new App registrations (Preview) experience.

For single page applications (SPAs), the application type should be Web app / API. As the App ID URI and Home page URL, I used https://deploy.baeke.info.

In my app, a user will authenticate to Azure AD with a Login button. Clicking that button brings the user to a Microsoft hosted page that asks for credentials:

Providing user credentials

Naturally, this implies that the authentication process, when finished, needs to find its way back to the application. In that process, it will also bring along the obtained authentication token. To configure this, specify the Reply URLs. If you also develop on your local machine, include the local URL of the app as well:

Reply URLs of the registered app

For a SPA, you need to set an additional option in the application manifest (via the Manifest button):

"oauth2AllowImplicitFlow": true

This implicit flow is well explained in the above video and also here.

This is basically all you have to do for this specific application. In other cases, you might want to grant access from this application to other applications such as an API. Take a look at this post for more information about calling the Graph API or your own API.

We will just present the token obtained by the client to API Management. In turn, API Management will verify the token. If it does not pass the verification steps, a 401 error will be returned. We will look at API Management in a later post.

A bit of client code

Just browse to https://deploy.baeke.info and view the source. Authentication is performed with ADAL for Javascript. ADAL stands for the Active Directory Authentication Library. The library is loaded with from the CDN.

This is a simple Vue application so we have a Vue instance for data and methods. In that Vue instance data, authContext is setup via a call to new AuthenticationContext. The clientId is the Application ID of the registered app we created above:

authContext: new AuthenticationContext({ 
clientId: '1fc9093e-8a95-44f8-b524-45c5d460b0d8',
postLogoutRedirectUri: window.location
})

To authenticate, the Login button’s click handler calls authContext.login(). The login method uses a redirect. It is also possible to use a pop-up window by setting popUp: true in the object passed to new AuthenticationContext() above. Personally, I do not like that approach though.

In the created lifecycle hook of the Vue instance, there is some code that handles the callback. When not in the callback, getCachedUser() is used to check if the user is logged in. If she is, the token is obtained via acquireToken() and stored in the token variable of the Vue instance. The acquireToken() method allows the application to obtain tokens silently without prompting the user again. The first parameter of acquireToken is the same application ID of the registered app.

Note that the token (an ID token) is not encrypted. You can paste the token in https://jwt.ms and look inside. Here’s an example (click to navigate):

Calling the back-end API

In this application, the calls go to API Management. Here is an example of a call with axios:

axios.post('https://geba.azure-api.net/rg/create?rg='                             + this.createrg.rg , null, this.getAxiosConfig(this.token)) 
.then(function(result) {
console.log("Got response...")
self.response = result.data;
})
.catch(function(error) {
console.log("Error calling webhook: " + error)
})
...

The third parameter is a call to getAxiosConfig that passes the token. getAxiosConfig uses the token to create the Authorization header:

getAxiosConfig: function(token) { 
const config = {
headers: {
"authorization": "bearer " + token
}
}
return config
}

As discussed earlier, the call goes to API Management which will verify the token before allowing a call to webhookd.

Conclusion

With the source of https://deploy.baeke.info and this post, it should be fairly straightforward to enable Azure AD Authentication in a simple single page web application. Note that the code is kept as simple as possible and does not cover any edge cases. In a next post, we will take a look at API Management.

Azure Front Door in front of a static website

In the previous post, I wrote about hosting a simple static website on an Azure Storage Account. To enable a custom URL such as https://geertbaeke.wordpress.com, you can add Azure CDN. If you use the Verizon Premium tier, you can configure rules such as a http to https redirect rule. This is similar to hosting static sites in an Amazon S3 bucket with Amazon CloudFront although it needs to be said that the http to https redirect is way simpler to configure there.

On Twitter, Karim Vaes reminded me of the Azure Front Door service, which is currently in preview. The tagline of the Azure Front Door service is clear: “scalable and secure entry point for fast delivery of your global applications”.

Azure Front Door Service Preview

The Front Door service is quite advanced and has features like global HTTP load balancing with instant failover, SSL offload, application acceleration and even application firewalling and DDoS protection. The price is lower that the Verizon Premium tier of Azure CDN. Please note that preview pricing is in effect at this moment.

Configuring a Front Door with the portal is very easy with the Front Door Designer. The screenshot below shows the designer for the same website as the previous post but for a different URL:

Front Door Designer

During deployment, you create a name that ends in azurefd.net (here geba.azurefd.net). Afterwards you can add a custom name like deploy.baeke.info in the above example. Similar to the Azure CDN, Front Door will give you a Digicert issued certificate if you enable HTTPS and choose Front Door managed:

Front Door managed SSL certificate

Naturally, the backend pool will refer to the https endpoint of the static website of your Azure Storage Account. I only have one such endpoint, but I could easily add another copy and start load balancing between the two.

In the routing rule, be sure you select the frontend host that matches the custom domain name you set up in the frontend hosts section:

Routing rule

It is still not as easy as in CloudFront to redirect http to https. For my needs, I can allow both http and https to Front Door and redirect in the browser:

if(window.location.href.substr(0,5) !== 'https'){
window.location.href = window.location.href.replace('http', 'https');
}

Not as clean as I would like it but it does the job for now. I can now access https://deploy.baeke.info via Front Door!

Static site hosting on Azure Storage with a custom domain and TLS

A while ago, I blogged about webhookd. It is an application, written in Go, that can easily convert a folder structure with shell scripts into webhooks. With the help of CertMagic, I modified the application to support Let’s Encrypt certificates. The application is hosted on an Azure Linux VM that uses a managed identity to easily allow scripts that use the Azure CLI to access my Azure subscription.

I also wrote a very simple Vue.js front-end application that can call these webhooks. It’s just an index.html, a 404.html and some CSS. The web page uses Azure AD authentication to an intermediary Azure Function that acts as some sort of proxy to the webhookd server.

Since a few weeks, Azure supports hosting static sites in an Azure Storage Account. Let’s take a look at how simple it is to host your files there and attach a custom DNS name and certificate via Azure CDN.

Enable static content on Storage Account

In your Azure Storage General Purpose v2 account, simply navigate to Static website, enable the feature and type the name of your index and error document:

When you click Save, the endpoint is shown. You will also notice the $web link to the identically named container. You will need to upload your files to that container using the portal, Storage Explorer or even the Azure CLI. With the Azure CLI, you can use this command:

az storage blob upload \
--container-name mystoragecontainer \
--name blobName \
--file ~/path/to/local/file

Custom domain and certificate

It’s great that I can access my site right away, but I want to use https://azdeploy.baeke.info instead of that name. To do that, create a CDN endpoint. In the storage account settings, find the Azure CDN option and create a new CDN profile and endpoint.

Important: in the settings, set the origin hostname to the primary endpoint you were given when you enabled the static website on the storage account

When the profile and endpoint is created, you can open it in the Azure Portal:

In your case, the custom domains list will still be empty at this point. You will have an new endpoint hostname (ending in azureedge.net) that gets its content from the origin hostname. You can browse to the endpoint hostname now as well.

Although the endpoint hostname is a bit better, I want to browse to this website with a custom domain name. Before we enable that, create a CNAME record in your DNS zone that maps to the endpoint hostname. In my case, in my CloudFlare DNS settings, I added a CNAME that maps azdeploy.baeke.info to gebastatic.azureedge.net. When that is finished, click + Custom Domain to add, well, your custom domain.

The only thing left to do is to add a certificate for your custom domain. Although you can add your own certificate, Azure CDN can also provide a certificate and completely automate the certificate management. Just make sure that your created the CNAME correctly and you should be good to go:

Custom certificate via Azure CDN

Above, I enabled the custom domain HTTPS feature and chose CDN Managed. Although it took a while for the certificate to be issued and copied to all points of presence (POPs), the process was flawless. The certificate is issued by Digicert:

Azure CDN certificate issued by Digicert

Some loose ends?

Great! I can now browse to https://azdeploy.baeke.info securely. Sadly, when you choose the Standard Microsoft CDN tier as the content delivery network, http to https redirection is not supported. The error when you browse to the http endpoint is definitely not pretty:

Users will probably think there is an error of some sorts. If you switch the CDN to Verizon Premium, you can create a redirection rule with the rules engine:

Premium Verizon Redirect Rule

When you add the above rule to the rules engine, it takes a few hours before it becomes active. Having to wait that long feels awkward in the age of instant gratification!

Conclusion

Being able to host your static website in Azure Storage greatly simplifies hosting both simple static websites as more advanced single page applications or SPAs. The CDN feature, including its automatic certificate management feature, adds additional flexibility.

Running a GoCV application in a container

In earlier posts (like here and here) I mentioned GoCV. GoCV allows you to use the popular OpenCV library from your Go programs. To avoid installing OpenCV and having to compile it from source, a container that runs your GoCV app can be beneficial. This post provides information about doing just that.

The following GitHub repository, https://github.com/denismakogon/gocv-alpine, contains all you need to get started. It’s for OpenCV 3.4.2 so you will run into issues when you want to use OpenCV 4.0. The pull request, https://github.com/denismakogon/gocv-alpine/pull/7, contains the update to 4.0 but it has not been merged yet. I used the proposed changes in the pull request to build two containers:

  • the build container: gbaeke/gocv-4.0.0-build
  • the run container: gbaeke/gocv-4.0.0-run

They are over on Docker Hub, ready for use. To actually use the above images in a typical two-step build, I used the following Dockerfile:

FROM gbaeke/gocv-4.0.0-build as build       
RUN go get -u -d gocv.io/x/gocv
RUN go get -u -d github.com/disintegration/imaging
RUN go get -u -d github.com/gbaeke/emotion
RUN cd $GOPATH/src/github.com/gbaeke/emotion && go build -o $GOPATH/bin/emo ./main.go

FROM gbaeke/gocv-4.0.0-run
COPY --from=build /go/bin/emo /emo
ADD haarcascade_frontalface_default.xml /

ENTRYPOINT ["/emo"]

The above Dockerfile uses the webcam emotion detection program from https://github.com/gbaeke/emotion. To run it on a Linux system, use the following command:

docker run -it --rm --device=/dev/video0 --env SCOREURI="YOUR-SCORE-URI" --env VIDEO=0 gbaeke/emo

The SCOREURI environment variable needs to refer to the score URI offered by the ONNX FER+ container as discussed in Detecting Emotions with FER+. With VIDEO=0 the GUI window that shows the webcam video stream is turned off (required). Detected emotions will be logged to the console.

To be able to use the actual webcam of the host, the –device flag is used to map /dev/video0 from the host to the container. That works well on a Linux host and was tested on a laptop running Ubuntu 16.04.

Using the Microsoft Face API to detect emotions in photos and video

⚠️ IMPORTANT: the Face API container was retired early 2021. The container image is not available anymore.

In a previous post, I blogged about detecting emotions with the ONNX FER+ model. As an alternative, you can use cloud models hosted by major cloud providers such as Microsoft, Amazon and Google. Besides those, there are many other services to choose from.

To detect facial emotions with Azure, there is a Face API in two flavours:

  • Cloud: API calls are sent to a cloud-hosted endpoint in the selected deployment region
  • Container: API calls are sent to a container that you deploy anywhere, including the edge (e.g. IoT Edge device)

To use the container version, you need to request access via this link. In another blog post, I already used the Text Analytics container to detect sentiment in a piece of text.

Note that the container version is not free and needs to be configured with an API key. The API key is obtained by deploying the Face API in the cloud. Doing so generates a primary and secondary key. Be aware that the Face API container, like the Text Analytics container, needs connectivity to the cloud to ensure proper billing. It cannot be used in completely offline scenarios. In short, no matter the flavour you use, you need to deploy the Face API. It will appear in the portal as shown below:

Deployed Face API (part of Cognitive Services)

Using the API is a simple matter. An image can be delivered to the API in two ways:

  • Link: just provide a URL to an image
  • Octet-stream: POST binary data (the image’s bytes) to the API

In the Go example you can find on GitHub, the second approach is used. You simply open the image file (e.g. a jpg or png) and pass the byte array to the endpoint. The endpoint is in the following form for emotion detection:

https://westeurope.api.cognitive.microsoft.com/face/v1.0/detect?returnFaceAttributes=emotion

Instead of emotion, you can ask for other attributes or a combination of attributes: age, gender, headPose, smile, facialHair, glasses, emotion, hair, makeup, occlusion, accessories, blur, exposure and noise. You simply add them together with +’s (e.g. emotion+age+gender). When you add attributes, the cost per call will increase slightly as will the response time. With the additional attributes, the Face API is much more useful than the simple FER+ model. The Face API has several additional features such as storing and comparing faces. Check out the documentation for full details.

To detect emotion in a video, the sample at https://github.com/gbaeke/emotion/blob/master/main.go contains some commented out code in the import section and around line 100 so you can use the Face API via the github.com/gbaeke/emotion/faceapi/msface package’s GetEmotion() function instead of the GetEmotion() function in the code. Because we have the full webcam image and face in an OpenCV mat, some extra code is needed to serialize it to a byte stream in a format the Face API understands:

encodedImage, _ := gocv.IMEncode(gocv.JPEGFileExt, face)       
emotion, err = msface.GetEmotion(bytes.NewReader(encodedImage))

In the above example, the face region detected by OpenCV is encoded to a JPG format as a byte slice. The byte slice is simply converted to an io.Reader and handed to the GetEmotion() function in the msface package.

When you use the Face API to detect emotions in a video stream from a webcam (or a video file), you will be hitting the API quite hard. You will surely need the standard tier of the API which allows you to do 10 transactions per second. To add face and emotion detection to video, the solution discussed in Detecting Emotions in FER+ is a better option.

Detecting emotions with FER+

In an earlier post, I discussed classifying images with the ResNet50v2 model. Azure Machine Learning Service was used to create a container image that used the ONNX ResNet50v2 model and the ONNX Runtime for scoring.

Continuing on that theme, I created a container image that uses the ONNX FER+ model that can detect emotions in an image. The container image also uses the ONNX Runtime for scoring.

You might wonder why you would want to detect emotions this way when there are many services available that can do this for you with a simple API call! You could use Microsoft’s Face API or Amazon’s Rekognition for example. While those services are easy to use and provide additional features, they do come at a cost. If all you need is basic detection of emotions, using this FER+ container is sufficient and cost effective.

Azure Face API (image from Microsoft website)

A notebook to create the image and deploy a container to Azure Container Instances (ACI) can be found here. The notebook uses the Azure Machine Learning SDK to register the model to an Azure Machine Learning workspace, build a container image from that model and deploy the container to ACI. The scoring script score.py is shown below.

score.py

The model expects an 64×64 gray scale image of a face in an array with the following dimensions: [1][1][64][64]. The output is JSON with a results array that contains the probabilities for each emotion and a time field with the inference time.

The emotion probabilities are in this order:

0: "neutral", 1: "happy", 2: "surprise", 3: "sadness", 4: "anger", 5: "disgust", 6: "fear", 7: "contempt

To actually capture the emotions, I wrote a small demo program in Go that uses OpenCV (via GoCV). You can find it on GitHub: https://github.com/gbaeke/emotion. You will need to install OpenCV and GoCV. Find the instructions here: https://gocv.io/getting-started/linux/. There are similar instructions for Mac and Windows but I have not tried those

The program is still a little rough around the edges but it does the trick. The scoring URI is hard coded to http://localhost:5002/score. With Docker installed, use the following command to install the scoring container:

 docker run -d -p 5002:5001 gbaeke/onnxferplus

Have fun with it!

ResNet50v2 classification in Go with a local container

To quickly go to the code, go here. Otherwise, keep reading…

In a previous blog post, I wrote about classifying images with the ResNet50v2 model from the ONNX Model Zoo. In that post, the container ran on a Kubernetes cluster with GPU nodes. The nodes had an NVIDIA v100 GPU. The actual classification was done with a simple Python script with help from Keras and Numpy. Each inference took around 25 milliseconds.

In this post, we will do two things:

  • run the scoring container (CPU) on a local machine that runs Docker
  • perform the scoring (classification) in Go

Installing the scoring container locally

I pushed the scoring container with the ONNX ResNet50v2 image to the following location: https://cloud.docker.com/u/gbaeke/repository/docker/gbaeke/onnxresnet50v2. Run the container with the following command:

docker run -d -p 5001:5001 gbaeke/onnxresnet50

The container will be pulled and started. The scoring URI is on http://localhost:5001/score.

Note that in the previous post, Azure Machine Learning deployed two containers: the scoring container (the one described above) and a front-end container. In that scenario, the front-end container handles the HTTP POST requests (optionally with SSL) and route the request to the actual scoring container.

The scoring container accepts the same payload as the front-end container. That means it can be used on its own, as we are doing now.

Note that you can also use IoT Edge, as explained in an earlier post. That actually shows how easy it is to push AI models to the edge and use them locally, befitting your business case.

Scoring with Go

To actually classify images, I wrote a small Go program to do just that. Although there are some scientific libraries for Go, they are not really needed in this case. That means we do have to create the 4D tensor payload and interpret the softmax result manually. If you check the code, you will see that is not awfully difficult.

The code can be found in the following GitHub repository: https://github.com/gbaeke/resnet-score.

Remember that this model expects the input as a 4D tensor with the following dimensions:

  • dimension 0: batch (we only send one image here)
  • dimension 1: channels (one for each; RGB)
  • dimension 2: height
  • dimension 3: width

The 4D tensor needs to be serialized to JSON in a field called data. We send that data with HTTP POST to the scoring URI at http://localhost:5001/score.

The response from the container will be JSON with two fields: a result field with the 1000 softmax values and a time field with the inference time. We can use the following two structs for marshaling and unmarshaling

Input and output of the model

Note that this model expects pictures to be scaled to 224 by 224 as reflected by the height and width dimensions of the uint8 array. The rest of the code is summarized below:

  • read the image; the path of the image is passed to the code via the -image command line parameter
  • the image is resized with the github.com/disintegration/imaging package (linear method)
  • the 4D tensor is populated by iterating over all pixels of the image, extracting r,g and b and placing them in the BCHW array; note that the r,g and b values are uint16 and scaled to fit in a uint8
  • construct the input which is a struct of type InputData
  • marshal the InputData struct to JSON
  • POST the JSON to the local scoring URI
  • read the HTTP response and unmarshal the response in a struct of type OutputData
  • find the highest probability in the result and note the index where it was found
  • read the 1000 ImageNet categories from imagenet_class_index.json and marshal the JSON into a map of string arrays
  • print the category using the index with the highest probability and the map

What happens when we score the image below?

What is this thing?

Running the code gives the following result:

$ ./class -image images/cassette.jpg

Highest prob is 0.9981583952903748 at 481 (inference time: 0.3309464454650879 )
Probably [n02978881 cassette

The inference time is 1/3 of a second on my older Linux laptop with a dual-core i7.

Try it yourself by running the container and the class program. Download it from here (Linux).

Recognizing images with Azure Machine Learning and the ONNX ResNet50v2 model

Featured image from: https://medium.com/comet-app/review-of-deep-learning-algorithms-for-object-detection-c1f3d437b852

In a previous post, I discussed the creation of a container image that uses the ResNet50v2 model for image classification. If you want to perform tasks such as localization or segmentation, there are other models that serve that purpose. The image was built with GPU support. Adding GPU support was pretty easy:

  • Use the enable_gpu flag in the Azure Machine Learning SDK or check the GPU box in the Azure Portal; the service will build an image that supports NVIDIA cuda
  • Add GPU support in your score.py file and/or conda dependencies file (scoring script uses the ONNX runtime, so we added the onnxruntime-gpu package)

In this post, we will deploy the image to a Kubernetes cluster with GPU nodes. We will use Azure Kubernetes Service (AKS) for this purpose. Check my previous post if you want to use NVIDIA V100 GPUs. In this post, I use hosts with one V100 GPU.

To get started, make sure you have the Kubernetes cluster deployed and that you followed the steps in my previous post to create the GPU container image. Make sure you attached the cluster to the workspace’s compute.

Deploy image to Kubernetes

Click the container image you created from the previous post and deploy it to the Kubernetes cluster you attached to the workspace by clicking + Create Deployment:

Starting the deployment from the image in the workspace

The Create Deployment screen is shown. Select AKS as deployment target and select the Kubernetes cluster you attached. Then press Create.

Azure Machine Learning now deploys the containers to Kubernetes. Note that I said containers in plural. In addition to the scoring container, another frontend container is added as well. You send your requests to the front-end container using HTTP POST. The front-end container talks to the scoring container over TCP port 5001 and passes the result back. The front-end container can be configured with certificates to support SSL.

Check the deployment and wait until it is healthy. We did not specify advanced settings during deployment so the default settings were chosen. Click the deployment to see the settings:

Deployment settings including authentication keys and scoring URI

As you can see, the deployment has authentication enabled. When you send your HTTP POST request to the scoring URI, make sure you pass an authentication header like so: bearer primary-or-secondary-key. The primary and secondary key are in the settings above. You can regenerate those keys at any time.

Checking the deployment

From the Azure Cloud Shell, issue the following commands in order to list the pods deployed to your Kubernetes cluster:

  • az aks list -o table
  • az aks get-credentials -g RESOURCEGROUP -n CLUSTERNAME
  • kubectl get pods
Listing the deployed pods

Azure Machine Learning has deployed three front-ends (default; can be changed via Advanced Settings during deployment) and one scoring container. Let’s check the container with: kubectl get pod onnxgpu-5d6c65789b-rnc56 -o yaml. Replace the container name with yours. In the output, you should find the following:

resources:
limits:
nvidia.com/gpu: "1"
requests:
cpu: 100m
memory: 500m
nvidia.com/gpu: "1"

The above allows the pod to use the GPU on the host. The nvidia drivers on the host are mapped to the pod with a volume:

volumeMounts:
- mountPath: /usr/local/nvidia
name: nvidia

Great! We did not have to bother with doing this ourselves. Let’s now try to recognize an image by sending requests to the front-end pods.

Recognizing images

To recognize an image, we need to POST a JSON payload to the scoring URI. The scoring URI can be found in the deployment properties in the workspace. In my case, the URI is:

http://23.97.218.34/api/v1/service/onnxgpu/score

The JSON payload needs to be in the below format:

{"data": [[[[143.06100463867188, 130.22100830078125, 122.31999969482422, ... ]]]]} 

The data field is a multi-dimensional array, serialized to JSON. The shape of the array is (1,3,224,224). The dimensions correspond to the batch size, channels (RGB), height and width.

You only have to read an image and put the pixel values in the array! Easy right? Well, as usual the answer is: “it depends”! The easiest way to do it, according to me, is with Python and a collection of helper packages. The code is in the following GitHub gist: https://gist.github.com/gbaeke/b25849f3813e9eb984ee691659d1d05a. You need to run the code on a machine with Python 3 installed. Make sure you also install Keras and NumPy (pip3 install keras / pip3 install numpy). The code uses two images, cat.jpg and car.jpg but you can use your own. When I run the code, I get the following result:

Using TensorFlow backend.
channels_last
Loading and preprocessing image… cat.jpg
Array shape (224, 224, 3)
Array shape afer moveaxis: (3, 224, 224)
Array shape after expand_dims (1, 3, 224, 224)
prediction time (as measured by the scoring container) 0.025304794311523438
Probably a: Egyptian_cat 0.9460222125053406
Loading and preprocessing image… car.jpg
Array shape (224, 224, 3)
Array shape afer moveaxis: (3, 224, 224)
Array shape after expand_dims (1, 3, 224, 224)
prediction time (as measured by the scoring container) 0.02526378631591797
Probably a: sports_car 0.948998749256134

It takes about 25 milliseconds to classify an image, or 40 images/second. By increasing the number of GPUs and scoring containers (we only deployed one), we can easily scale out the solution.

With a bit of help from Keras and NumPy, the code does the following:

  • check the image format reported by the keras back-end: it reports channels_last which means that, by default, the RGB channels are the last dimensions of the image array
  • load the image; the resulting array has a (224,224,3) shape
  • our container expects the channels_first format; we use moveaxis to move the last axis to the front; the array now has a (3,224,224) shape
  • our container expects a first dimension with a batch size; we use expand_dims to end up with a (1,3,224,224) shape
  • we convert the 4D array to a list and construct the JSON payload
  • we send the payload to the scoring URI and pass an authorization header
  • we get a JSON response with two fields: result and time; we print the inference time as reported by the container
  • from keras.applications.resnet50, we use the decode_predictions class to process the result field; result contains the 1000 values computed by the softmax function in the container; decode_predictions knows the categories and returns the first five
  • we print the name and probability of the category with the highest probability (item 0)

What happens when you use a scoring container that uses the CPU? In that case, you could run the container in Azure Container Instances (ACI). Using ACI is much less costly! In ACI with the default setting of 0.1 CPU, it will take around 2 seconds to score an image. Ouch! With a full CPU (in ACI), the scoring time goes down to around 180-220ms per image. To achieve better results, simply increase the number of CPUs. On the Standard_NC6s_v3 Kubernetes node with 6 cores, scoring time with CPU hovers around 60ms.

Conclusion

In this post, you have seen how Azure Machine Learning makes it straightforward to deploy GPU scoring images to a Kubernetes cluster with GPU nodes. The service automatically configures the resource requests for the GPU and maps the NVIDIA drivers to the scoring container. The only thing left to do is to start scoring images with the service. We have seen how easy that is with a bit of help from Keras and NumPy. In practice, always start with CPU scoring and scale out that solution to match your requirements. But if you do need GPUs for scoring, Azure Machine Learning makes it pretty easy to do so!

Creating a GPU container image for scoring with Azure Machine Learning

In a previous post, I discussed how you can add an existing Kubernetes cluster to an Azure Machine Learning workspace. Adding an existing cluster is necessary when the workspace does not support auto creation of a cluster. That is the case when you want to use the Standard_NC6s_v3 virtual machine image. I also used a container for scoring pictures with the ResNet50v2 model from the ONNX Model Zoo. Now we will take a look at actually creating that container image with GPU support. Note that in many cases, inference with CPUs is more than sufficient but the GPU case is more interesting to look at!

To get started, you need an Azure subscription with an Azure Machine Learning workspace. Take a look here for instructions.

Once you have a workspace, there are a few steps to take. If you look at the diagram at the top of this post, we will perform the steps starting from Register and manage your model:

  • Register model: we will add the Resnet50v2 model from the ONNX Model Zoo; we are using this existing model instead of our own; ResNet50v2 can recognize pictures in 1000 categories
  • Create container image: from the model in the workspace, we create a container image with GPU support
  • Deploy container image: from the image in the workspace, we deploy the image to compute that supports GPUs

Machine Learning SDK

The Azure Machine Learning service has a Machine Learning SDK for Python. All the steps discussed above can be performed with code. You can find an example of the Python code to use in the following Jupyter notebook hosted on Azure Notebooks: https://gebaml-geba.notebooks.azure.com/j/notebooks/ONNXResnet.ipynb. Note that the Azure Notebooks service is still in preview and a bit rough around the edges. The Machine Learning SDK is available by default in Azure Notebooks.

At the beginning of the notebook, we import azureml.core which allows you to check the version of the SDK (among other things):

Registering the model

First, we download the model to the notebook project. In the notebook, the urllib module is used to download the compressed version of the ResNet50v2 model. The tarball is untarred in resnet50v2/resnet50v2.onnx. You should see the model as a complex function with, in this case, millions of parameters (weights). The input to the function are the pixels of your picture (their red, green and blue values). The output of the function is a category: cat, guitar, …

Now that we have the model, we need to add it to the workspace, which means we also have to authenticate. Create a file called config.json with the following contents:

{
"subscription_id": "your Azure subscription ID", "resource_group": "your Azure ML resource group",
"workspace_name": "your Azure ML workspace name"
}

With the Workspace class from azureml.core we authenticate to Azure and grab a reference to the workspace with the ws variable. The Workspace.from_config() function searches for the config.json file.

Now we can finally register the model in the workspace using Model.register:

The above is the same as adding a model using the Azure Portal. You might hit file upload limits in the portal so adding the model via code is the better approach. Your model is now registered in the workspace:

Creating a GPU container image from the model

Now that we have the model, we can create the container image. The model will be included in the image which will add about 100MB to its size. The container image in Azure Machine Learning is created from four settings/artifacts:

  • model: registered in the workspace
  • score file: a file score.py with an init() and run() function; helper functions can also be included
  • dependency file: used to indicate the Python modules that need to be installed in the image (see https://conda.io/docs/)
  • GPU support: set to True or False

You will find the score file in the notebook. It was copied from a Microsoft supplied sample. If you do not have some experience with Machine Learning and neural networks (in this case), it will be difficult to create this from scratch. The ResNet50v2 model expects a 4-dimensional tensor with the following dimensions:

  • 0: batch (1 when you send 1 image)
  • 1: channels (3 channels for red, green and blue; RGB)
  • 2: height (224 pixels)
  • 3: width (224 pixels)

For inference, you will actually send the above data in a JSON payload as the data field. The preprocess() function in score.py grabs the data field and converts it to a NumPy array. The data is then normalized by dividing each pixel by 255, subtracting the mean values (of each channel) and dividing by the standard deviation (of each channel) . The normalized data is then sent to the model which outputs an array with 1000 probabilities that sum to 1 (via a softmax function).

Why are there a thousand probabilities? The model was trained on a thousand different categories of images and for each of these categories, a probability is output. After inference we will need a list of these categories so we can find the one that matches with our uploaded image and that has the highest probability!

This particular score.py file uses the ONNX runtime for inference. To enable GPU support, make sure you include the onnxruntime-gpu package in your conda dependencies as shown below:

With score.py and myenv.yml, the container image with GPU support can be created. Note that we are specifying the score.py file, the conda file and the model. GPU support is enabled as well via enable_gpu=True.

The code above should result in the following image in your workspace (after several minutes of building):

In the background, this image is stored in the container registry that got created when you deployed the Azure Machine Learning workspace. You are now ready for the third step, deploying the image to compute that supports GPUs (for instance Kubernetes). That step, together with some code to actually recognize images, will be for another post. In that post, we will also compare CPU to GPU speed.

Conclusion

In this post, we looked at creating a scoring (inference) container image with GPU support. Instead of creating and using our own model, we used the ResNet50v2 model from the ONNX Model Zoo. The model file, together with a score.py file and conda dependency file was used to build a container image. Azure Machine Learning builds the container image for you and stores it in a container registry. Although Azure Machine Learning takes care of most of the infrastructure work, you still need to know how to write the scoring file. In this post, the scoring file uses the ONNX runtime but you can use other runtimes or frameworks such as TensorFlow or MXNET.


Attaching Kubernetes clusters with NVIDIA V100 GPUs to Azure Machine Learning Service

Azure Machine Learning Service allows you to easily deploy compute for training and inference via a machine learning workspace. Although one of the compute types is Kubernetes, the workspace is a bit picky about the node VM sizes. I wanted to use two Standard_NC6s_v3 instances with NVIDIA Tesla V100 GPUs but that was not allowed. Other GPU instances, such as the Standard_NC6 type (K80 GPU) can be deployed from the workspace.

Luckily, you can deploy clusters on your own and then attach the cluster to your Azure Machine Learning workspace. You can create the cluster with the below command. Make sure you ask for a quota increase that allows 12 cores of Standard_NC6s_v3.

az aks create -g RESOURCE_GROUP --generate-ssh-keys --node-vm-size Standard_NC6s_v3 --node-count 2 --disable-rbac --name NAME --admin-username azureuser --kubernetes-version 1.11.5

Before I ran the above command, I created an Azure Machine Learning workspace to a resource group called ml-rg. The above command was run with RESOURCE_GROUP set to ml-rg and NAME set to mlkub. After a few minutes, you should have your cluster up and running. Be mindful of the price of this cluster. GPU instances are not cheap!

Now we can Add Compute to the workspace. In your workspace, navigate to Compute and use the + Add Compute button. Complete the form as below. The compute name does not need to match the cluster name.

After a while, the Kubernetes cluster should be attached:

Manually deployed cluster attached

Note that detaching a cluster does not remove it. Be sure to remove the cluster manually!

You can now deploy container images to the cluster that take advantage of the GPU of each node. When you a deploy an image marked as a GPU image, Azure Machine Learning takes care of all the parameters that allow your container to use the GPU on the Kubernetes node.

The screenshot below shows a deployment of an image that can be used for inference. It uses an ONNX ResNet50v2 model.

Deployment of container for scoring (inference; ResNet50v2)

With the below picture of a cat, the model used by the container guesses it is an Egyptian Cat (it’s not but it is close) with close to 94% certainty.

Egyptian Cat (not)

Using your own compute with the Azure Machine Learning service is very easy to do. The more interesting and somewhat more complicated parts such as the creation of the inference container that supports GPUs is something I will discuss in a later post. In a follow-up post, I will also discuss how you send image data to the scoring container.