In my previous blog post, I looked at Azure API Management in combination with private APIs hosted on Kubernetes. The APIs were exposed via Traefik and an internal load balancer. To make that scenario work, the Azure API Management premium SKU is required, which is quite costly.
This post describes another approach where the APIs are exposed on the public Internet via an Ingress Controller that requires HTTPS in addition to restricting the API caller to the IP address of the Azure API Management instance. Something like this:
Internet client -> Azure API Management --> Ingress Controller (with IP whitelisting per ingress) --> API service (Kubernetes) --> API pods (Kubernetes, part of a Deployment)
Let’s see how this works, shall we?
API Management
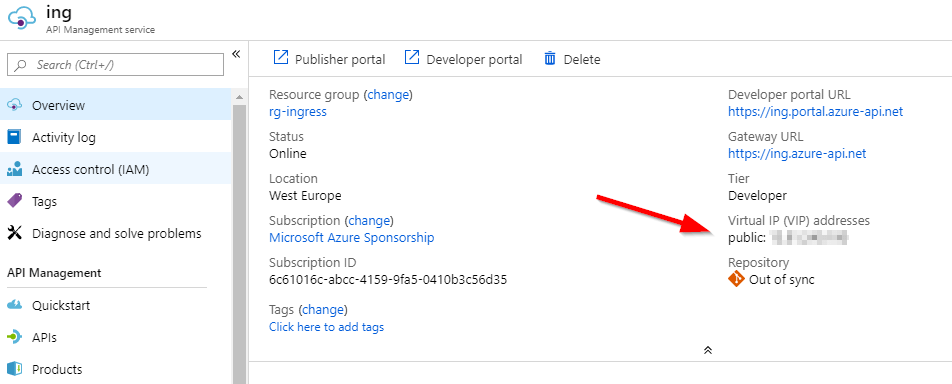
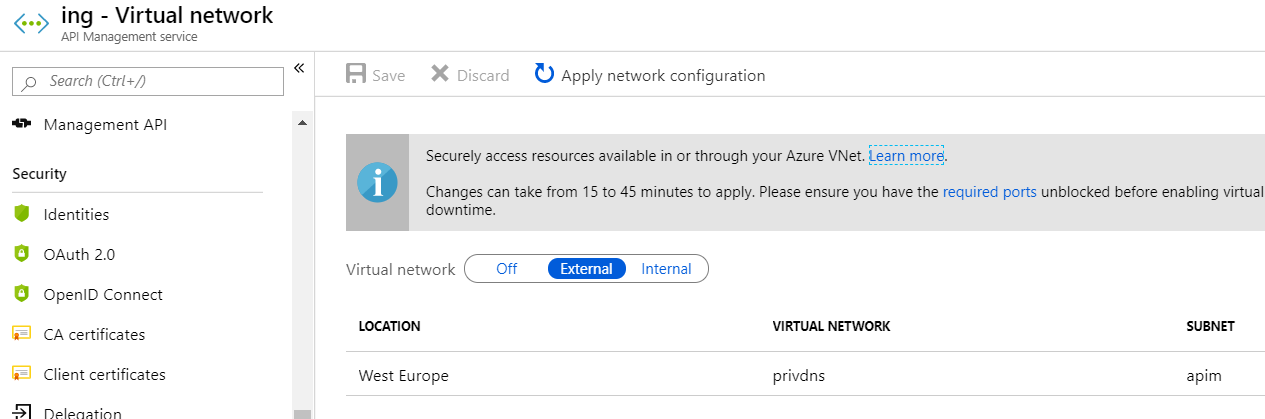
Deploy Azure API management from the portal. In this case, you can use the other SKUs such as Basic and Standard. Note the IP address of the Azure API Management instance on the Overview page:
IP address of API Management
Ingress Controller
As usual, let’s use Traefik. When you have Helm installed, use the following command:
Note the use of externalTrafficPolicy=Local. This lets Traefik know the IP address of the actual caller, which is required because we want to restrict access to the IP address of API Management.
Ingress object
When your API is deployed via a deployment and a service of type ClusterIP, use the following ingress definition:
The above ingress object, exposes the internal service func via Traefik. The whitelist-source-range annotation is used to limit access to this resource to the IP address of Azure API Management. Replace YOURIP with that IP address. Obviously, replace the host api.domain.com with a host that resolves to the external IP of the load balancer that provides access to Traefik. The Let’s Encrypt configuration automatically provisions a valid certificate to the service.
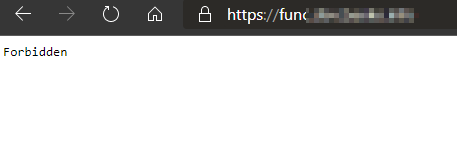
When I navigate to the API on my local computer, the following happens:
No access to the API if the request does not come from API management
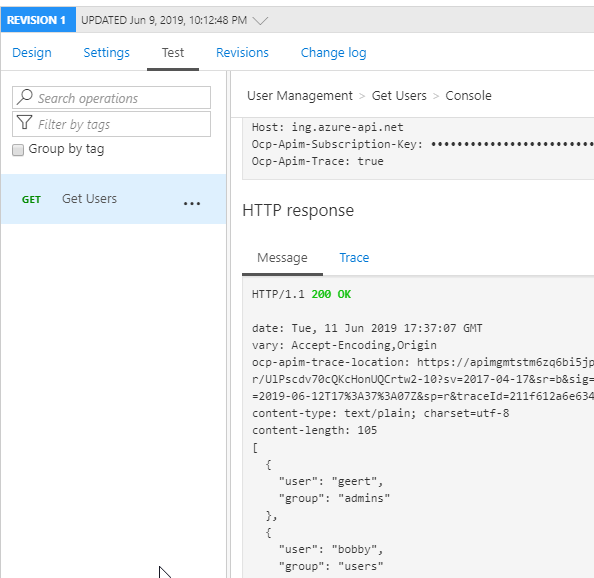
When I test the API from API Management (after setting the back-end correctly):
API management can call the back-end API
Conclusion
What do you do when you do not want to spend money on the premium SKU? The answer is clear: use the lower SKUs if possible and restrict access to the back-end APIs with other means such as IP whitelisting. Other possibilities include using some form of authentication such as basic authentication etc…
You have decided to host your APIs in Kubernetes in combination with an API management solution? You are surely not the only one! In an Azure context, one way of doing this is combining Azure API Management and Azure Kubernetes Service (AKS). This post describes one of the ways to get this done. We will use the following services:
Virtual Network: AKS will use advanced networking and Azure CNI
Private DNS: to host a private DNS zone (private.baeke.info) ; note that private DNS is in public preview
AKS: deployed in a subnet of the virtual network
Traefik: Ingress Controller deployed on AKS, configured to use an internal load balancer in a dedicated subnet of the virtual network
Azure API Management: with virtual network integration which requires Developer or Premium; note that Premium comes at a hefty price though
Let’s take it step by step but note that this post does not contain all the detailed steps. I might do a video later with more details. Check the YouTube channel for more information.
We will setup something like this:
Consumer --> Azure API Management public IP --> ILB (in private VNET) --> Traefik (in Kubernetes) --> API (in Kubernetes - ClusterIP service in front of a deployment)
Virtual Network
Create a virtual network in a resource group. We will add a private DNS zone to this network. You should not add resources such as virtual machines to this virtual network before you add the private DNS zone.
I will call my network privdns and add a few subnets (besides default):
aks: used by AKS
traefik: for the internal load balancer (ILB) and the front-end IP addresses
apim: to give API management access to the virtual network
Private DNS
Add a private DNS zone to the virtual network with Azure CLI:
az network dns zone create -g rg-ingress -n private.baeke.info --zone-type Private --resolution-vnets privdns
You can now add records to this private DNS zone:
az network dns record-set a add-record \
   -g rg-ingress \
   -z private.baeke.info \
   -n test \
   -a 1.1.1.1
To test name resolution, deploy a small Linux virtual machine and ping test.private.baeke.info:
Testing the private DNS zone
Update for June 27th, 2019: the above commands use the old API; please see https://docs.microsoft.com/en-us/azure/dns/private-dns-getstarted-cli for the new syntax to create a zone and to link it to an existing VNET; these zones should be viewable in the portal via Private DNS Zones:
Private DNS zones in the portal
Azure Kubernetes Service
Deploy AKS and use advanced networking. Use the aks subnet when asked. Each node you deploy will get 30 IP address in the subnet:
First IP addresses of one of the nodes
Traefik
To expose the APIs over an internal IP we will use ingress objects, which require an Ingress Controller. Traefik is just one of the choices available. Any Ingress Controller will work.
Instead of using ingresses, you could also expose your APIs via services of type LoadBalancer and use an internal load balancer. The latter approach would require one IP per API where the ingress approach only requires one IP in total. That IP resolves to Traefik which uses the host header to route to the APIs.
We will install Traefik with Helm. Check my previous post for more info about Traefik and Helm. In this case, I will download and untar the Helm chart and modify values.yaml. To download and untar the Helm chart use the following command:
helm fetch stable/traefik --untar
You will now have a traefik folder, which contains values.yaml. Modify values.yaml as follows:
Changes to values.yaml
This will instruct Helm to add the above annotations to the Traefik service object. It instructs the Azure cloud integration components to use an internal load balancer. In addition, the load balancer should be created in the traefik subnet. Make sure that your AKS service principal has the RBAC role on the virtual network to perform this operation.
Now you can install Traefik on AKS. Make sure you are in the traefik folder where the Helm chart was untarred:
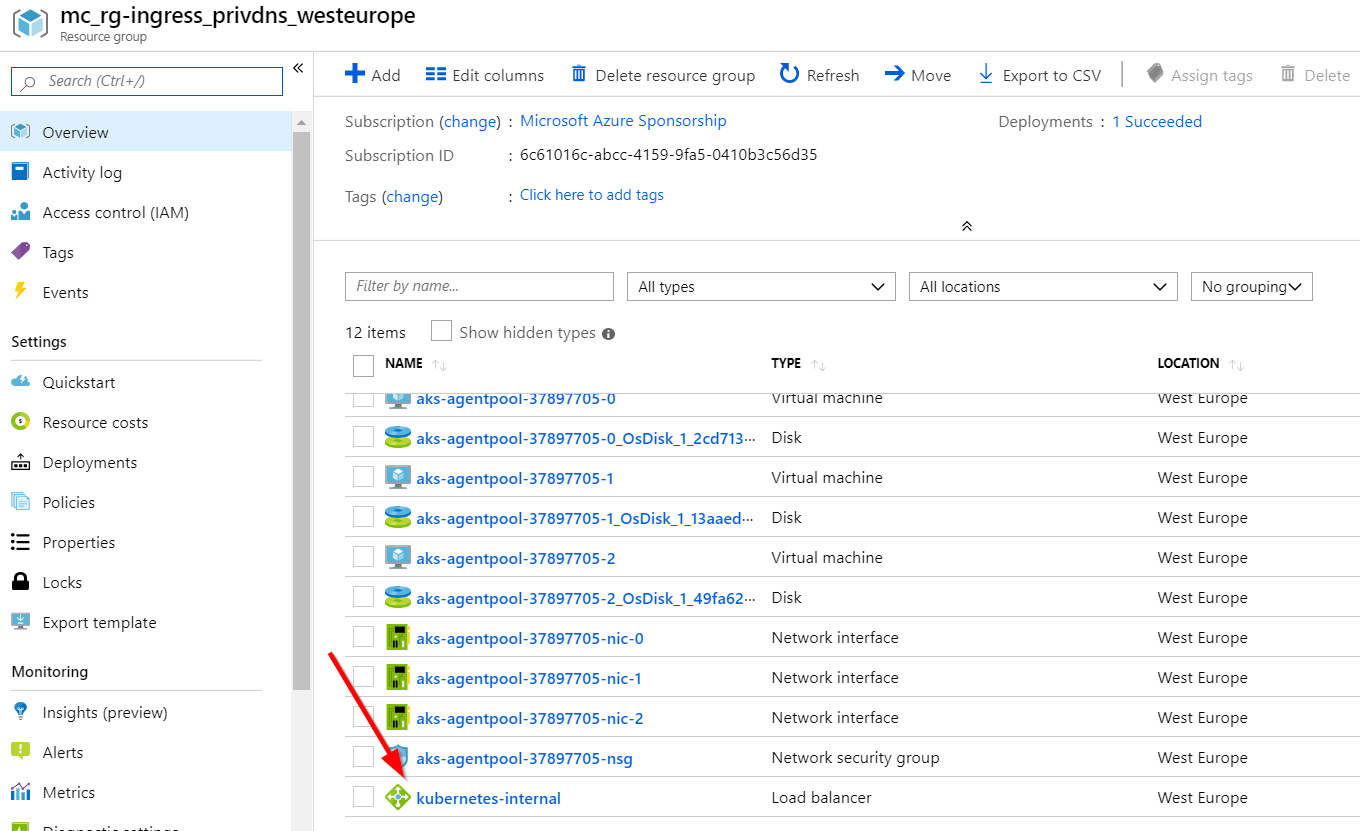
When the installation is finished, there should be an internal load balancer in the resource group that is behind your AKS cluster:
ILB deployed
The result of kubectl get svc -n kube-system should result in something like:
EXTERNAL-IP is the front-end IP on the ILB for the traefik service
We can now reach Treafik on the virtual network and create an A record that resolves to this IP. The func.private.baeke.info I will use later, resolves to the above IP.
Azure API Management
Deploy API Management from the portal. API Management will need access to the virtual network which means we need a version (SKU) that has virtual network support. This is needed simply because the APIs are not exposed on the public Internet.
For testing, use the Developer SKU. In production, you should use the Premium SKU although it is very expensive. Microsoft should really make the virtual network integration part of every SKU since it is such a common scenario! Come on Microsoft, you know it’s the right thing to do! 😉
API Management virtual network integration
Above, API Management is configured to use the apim subnet of the virtual network. It will also be able to resolve private DNS names via this integration. Note that configuring the network integration takes quite some time.
Deploy a service and ingress
I deployed the following sample API with a simple deployment and service. Save this as func.yaml and run kubectl apply -f func.yaml. You will end up with two pods running a super simple and stupid API plus a service object of type ClusterIP, which is only reachable inside Kubernetes:
Notice I used func.private.baeke.info! Naturally, that name should resolve to the IP address on the ILB that routes to Traefik.
Testing the API from API Management
In API Management, I created an API that uses func.private.baeke.info as the backend. Yes, I know, the API name is bad. It’s just a sample ok? 😎
API with backend func.private.baeke.info
Let’s test the GET operation I created:
Great success! API management can reach the Kubernetes-hosted API via Traefik
Conclusion
In this post, we looked at one way to expose Kubernetes-hosted APIs to the outside world via Azure API Management. The traffic flow is as follows:
Consumer --> Azure API Management public IP --> ILB (in private VNET) --> Traefik (in Kubernetes) --> API (in Kubernetes - ClusterIP service in front of a deployment)
Because we have to use host names in ingress definitions, we added a private DNS zone to the virtual network. We can create multiple A records, one for each API, and provide access to these APIs with ingress objects.
As stated above, you can also expose each API via an internal load balancer. In that case, you do not need an Ingress Controller such as Traefik. Alternatively, you could also replace Azure API Management with a solution such as Kong. I have used Kong in the past and it is quite good! The choice for one or the other will depend on several factors such as cost, features, ease of use, support, etc…
A while ago, the Azure DevOps blog posted an update about multi-stage YAML pipelines. The concept is straightforward: define both your build (CI) and release (CD) pipelines in a YAML file and stick that file in your source code repository.
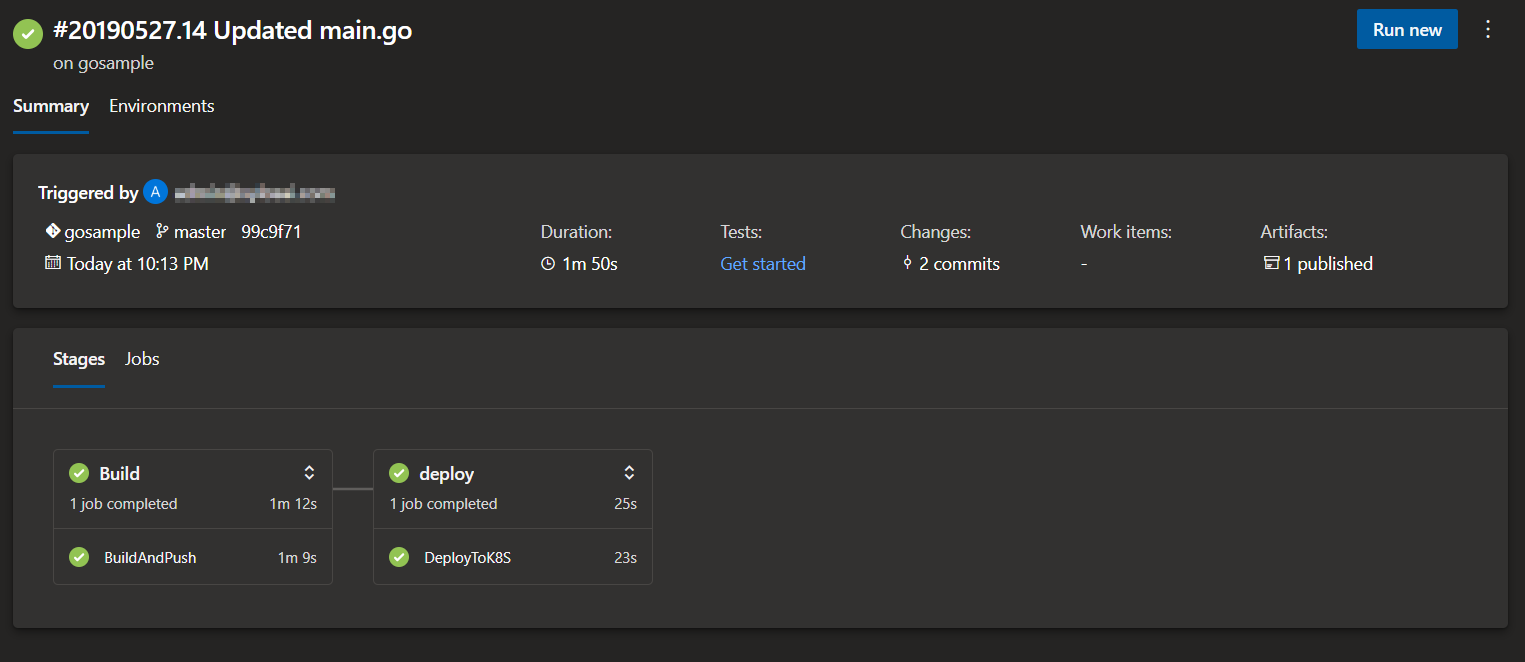
In this post, we will look at a simple build and release pipeline that builds a container, pushes it to ACR, deploys it to Kubernetes linked to an environment. Something like this:
Two stages in the pipeline – build and deploy (as simple as it can get, almost)
Note: I used a simple go app, a Dockerfile and a Kubernetes manifest as source files, check them out here.
Note: there is also a video version 😉
Note: if you start from a repository without manifests and azure-pipelines.yaml, the pipeline build wizard will propose Deploy to Azure Kubernetes Service. The wizard that follows will ask you some questions but in the end you will end up with a configured environment, the necessary service connections to AKS and ACR and even a service.yaml and deployment.yaml with the bare minimum to deploy your container!
“Show me the YAML!!!”
The file, azure-pipelines.yaml contains the two stages. Check out the first stage (plus trigger and variables) below:
The pipeline runs on a commit to the master branch. The variables imageName and registry are referenced later using $(imageName) and $(registry). Replace REGNAME with the name of your Azure Container Registry.
It’s a multi-stage pipeline, so we start with stages: and then define the first stage build. That stage has one job which consists of two steps:
Docker task (v2): build a Docker image based on the Dockerfile in the source code repository and push it to the container registry called ACR; ACR is a reference to a service connection defined in the project settings
PublishPipelineArtifact: the source code repository contains Kubernetes deployment manifests in YAML format in the manifests folder; the contents of that folder is published as a pipeline artifact, to be picked up in a later stage
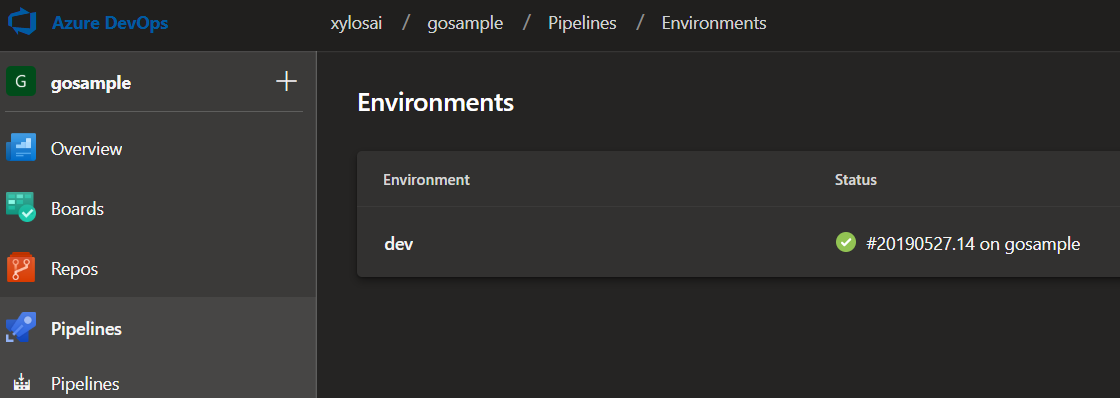
The second stage uses a deployment job (quite new; see this). In a deployment job, you can specify an environment to link to. In the above job, the environment is called dev. In Azure DevOps, the environment is shown as below:
dev environment
The environment functionality has Kubernetes integration which is pretty neat. You can drill down to the deployed objects such as deployments and services:
Kubernetes deployment in an Azure DevOps environment
The deployment has two tasks:
DownloadPipelineArtifact: download the artifact published in the first stage to $(System.ArtifactsDirectory)/manifests
KubernetesManifest: this task can deploy Kubernetes manifests; it uses an AKS service connection that was created during creation of the environment; a service account was created in a specific namespace and with access rights to that namespace only; the manifests property will look for an image name in the Kubernetes YAML files and append the tag which is the build id here
Note that the release stage will actually download the pipeline artifact automatically. The explicit DownloadPipelineArtifact task gives additional control over the download location.
The KubernetesManifest task is relatively new at the time of this writing (end of May 2019). Its image substitution functionality could be enough in many cases, without having to revert to Helm or manual text substitution tasks. There is more to this task than what I have described here. Check out the docs for more info.
Conclusion
If you are just starting out building CI/CD pipelines in YAML, you will probably have a hard time getting uses to the schema. I know I had! 😡 In the end though, doing it this way with the pipeline stored in source control will pay off in the long run. After some time, you will have built up a useful library of these pipelines to quickly get up and running in new projects. Recommended!!! 😉🚀🚀🚀
We will install Traefik with Helm and I assume the cluster has rbac enabled. If you deploy clusters with AKS, that is the default although you can turn it off. With rbac enabled, you need to install the server-side component of Helm, tiller, using the following commands:
The above command uses Helm to install the stable/traefik chart. Note that the chart is maintained by the community and not by the folks at Traefik. Traefik itself is exposed via a service of type LoadBalancer, which results in a public IP address. Use kubectl get svc traefik -n kube-system to check. There are ways to make sure the service uses a static IP but that is not discussed in this post. Check out this doc for AKS. The other settings do the following:
ssl.enabled: yes, SSL 😉
ssl.enforced: redirect to https when user uses http
acme.enabled: enable Let’s Encrypt
acme.email: set the e-mail address to use with Let’s Encrypt; you will get certificate expiry mails on that address
onHostRule: issue certificates based on the host setting in the ingress definition
acme.challengeType: method used by Let’s Encrypt to issue the certificate; use this one for regular certs; use DNS verification for wildcard certs
acme.staging: set to false to issue fully trusted certs; beware of rate limiting
dashboard.enabled: enable the Traefik dashboard; you can expose the service via an ingress object as well
Note: to specify a specific version of Traefik, use the imageTag parameter as part of –set; for instance imageTag=1.7.12
When the installation is finished, run the following commands:
# check installation
helm ls

# check traefik service
kubectl get svc traefik --namespace kube-system -w
The first command should show that Traefik is installed. The second command returns the traefik service, which we configured with serviceType LoadBalancer. The external IP of the service will be pending for a while. When you have an address and you browse it, you should get a 404. Result from curl -v below:
 Rebuilt URL to: http://IP/
 Trying 137.117.140.116…
 Connected to 137.117.140.116 (IP) port 80 (#0)
 GET / HTTP/1.1
 Host: IP
 User-Agent: curl/7.47.0
 Accept: /
 < HTTP/1.1 404 Not Found
 < Content-Type: text/plain; charset=utf-8
 < Vary: Accept-Encoding
 < X-Content-Type-Options: nosniff
 < Date: Fri, 24 May 2019 17:00:29 GMT
 < Content-Length: 19
 <
 404 page not found
Next, install nginx just to have a simple website to securely publish. Yes I know, kubectl run… 🤷
kubectl run nginx --image nginx --expose --port 80
The above command installs nginx but also creates an nginx service of type ClusterIP. We can expose that service via an ingress definition:
Replace your.domain.com with a host that resolves to the external IP address of the Traefik service. The annotation is not technically required if Traefik is the only Ingress Controller in your cluster. I prefer being explicit though. Save the above contents to a file and then run:
kubectl apply -f yourfile.yaml
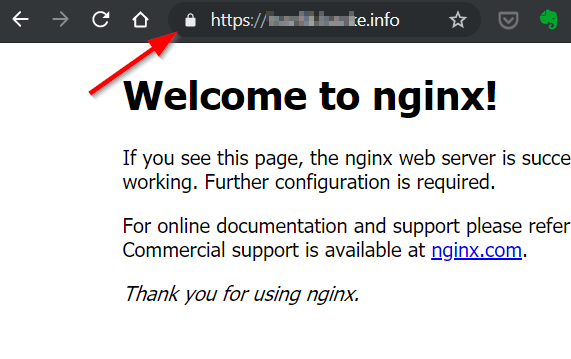
Now browse to whatever you used as domain. The result should be:
Yes… nginx exposed via Traefik and a Let’s Encrypt certificate
To expose the Traefik dashboard, use the yaml below. Note that we explicitly installed the dashboard by setting dashboard.enabled to true.
Put the above contents in a file and create the ingress object in the same namespace as the traefik-dashboard service. Use kubectl apply -f yourfile.yaml -n kube-system. You should then be able to access the dashboard with the host name you provided:
Traefik dashboard
Note: if you do not want to mess with DNS records that map to the IP address of the Ingress Controller, just use a xip.io address. In the ingress object’s host setting, use something like web.w.x.y.z.xip.io where web is just something you choose and w.x.y.z is the IP address of the Ingress Controller. Traefik will also request a certificate for such a name. For more information, check xip.io. Simple for testing purposes!
Now that the public preview of Windows containers on AKS is available, let’s look at the basics. You need a couple of things to get started, including a couple of subscription-wide settings. I recommend using a subscription that is not used to roll out production AKS clusters. Make sure the Azure CLI (az) is homed to the subscription. Use Azure Cloud Shell to make your life easier:
Install the aks-preview extension
Register the Windows preview feature
Check that the feature is active; this will take a few minutes
Register the Microsoft.ContainerService resource provider again (only if the Windows preview feature is active)
The following commands make the above happen:
az extension add --name aks-preview

az feature register --name WindowsPreview --namespace Microsoft.ContainerService

az feature list -o table --query "[?contains(name, 'Microsoft.ContainerService/WindowsPreview')].{Name:name,State:properties.state}"

az provider register --namespace Microsoft.ContainerService
With that out of the way, deploy a new AKS cluster:
Replace RESOURCEGROUP with an ARM resource group and replace APASSWORDHERE with a complex password. If you have ever deployed clusters that support multiple node pools with virtual machine scale sets, the above command will be very familiar. The only real difference here is –windows-admin-password and –windows-admin-username which are required to deploy the Windows hosts that will run your containers.
You can use the Windows user name and password to RDP into the Kubernetes nodes. You will need to deploy a jump host that has a route to the Kubernetes virtual network to make this happen as the Kubernetes hosts are not exposed with a public IP address. As they shouldn’t… 😉
Note that you need to deploy a node pool with Linux first (as in the above command). That is why the number of nodes has been set to the minimum. You cannot delete this node pool after adding a Windows node pool.
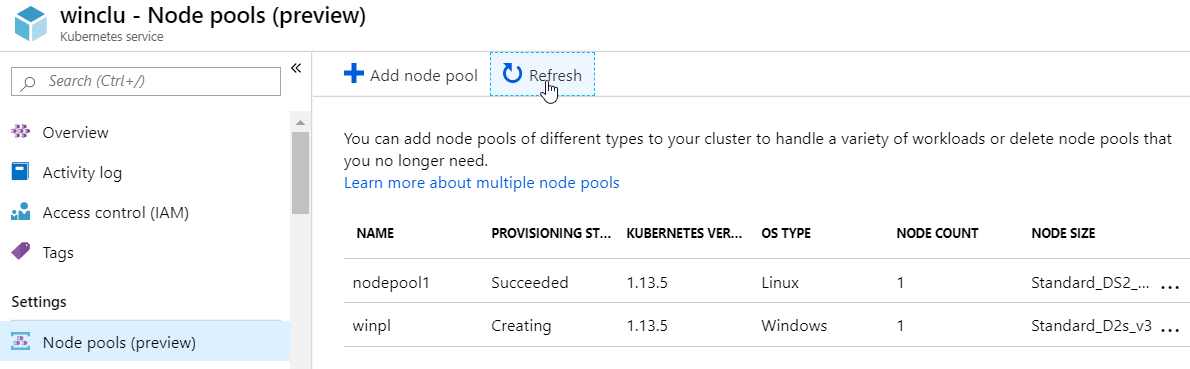
After deployment, you will see the cluster in the portal with the Linux node pool with one node:
node pool with one node
When you click Add node pool, you will be able to select the OS type of a new pool:
Both Linux and Windows as OS type for the node pool
We will add a Windows node pool via the CLI. The node pool will use the Standard_D2s_v3 virtual machine size by default, which is also the recommended minimum.
az aks nodepool add \
     --resource-group RESOURCEGROUP \
     --cluster-name winclu \
     --os-type Windows \
     --name winpl \
     --node-count 1 \
     --kubernetes-version 1.13.5
Note: the name of the Windows node pool cannot be longer than 6 characters
The node pool is now being added and will soon be ready:
windows node pool being added
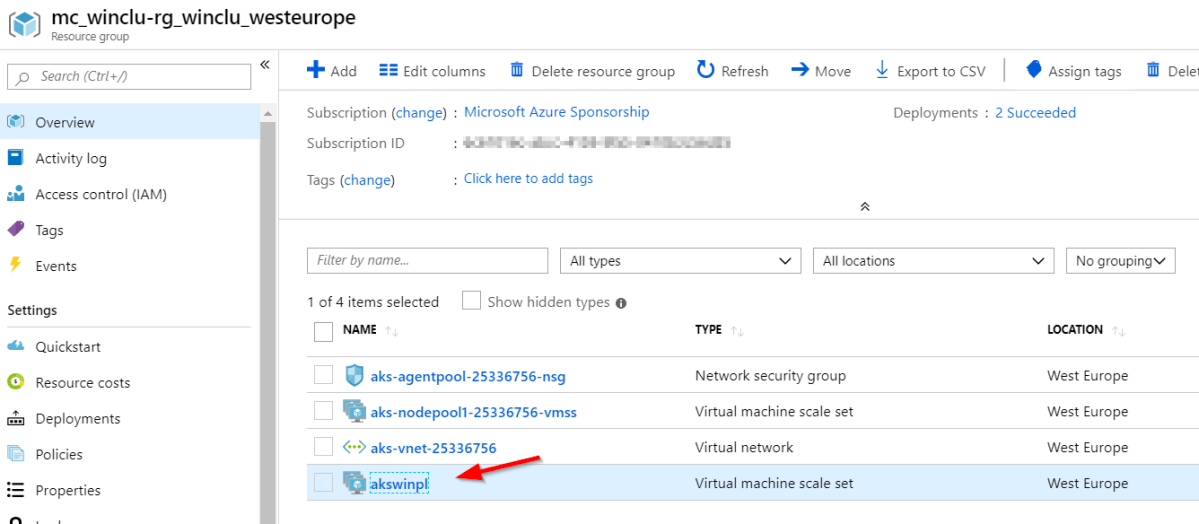
When ready, you will see an additional scale set in the resource group that backs this AKS deployment:
additional scale set for the Windows node pool
We can now schedule pods on the Windows node pool. You can schedule a pod on a Windows node by adding a nodeSelector to the pod spec:
nodeSelector:
  "beta.kubernetes.io/os": windows
To try this, let’s deploy a Windows version of my realtime-go app with the following command. The gist contains the YAML required to deploy the app and a service. It uses the gbaeke/realtime-go-win image on Docker Hub. The base image is mcr.microsoft.com/windows/nanoserver:1809. You need to use the 1809 version because the hosts use 1809 as well. With Hyper-V isolation, the kernel match would not be required.
This should deploy the app but sadly, it will error out. It needs a running redis server. Let’s deploy that the quick and dirty way (command on one line below):
I realize it’s ugly with the override but it does the trick. The above command creates a deployment called redis that sets the nodeSelector to target Linux nodes. It also creates a service of type ClusterIP that exposes port 6379. The ClusterIP allows the realtime-go-win container to connect to redis over the Kubernetes network. Now delete the realtime-go container and recreate it:
Note that I could not get DNS resolution to work in the Windows container. Normally, the realtime-go container should be able to find the redis service via the name redis or the complete FQDN of redis.default.svc.cluster.local. Because that did not work, the code in the realtime-go-win container was modified to use environment variables injected by Kubernetes:
Deploying an AKS cluster with both Linux and Windows node pools is a simple matter. Because you can now deploy both Windows and Linux containers, you have some additional work to make sure Windows containers go to Windows hosts and Linux containers to Linux hosts. Using a nodeSelector is an easy way to do that. There are other methods as well such as node taints. Sadly, I had an issue with Kubernetes DNS in the Windows container so I switched to injected environment variables.
As explained on https://github.com/rancher/rio, Rancher Rio is a MicroPaaS that can be layered on top of any standard Kubernetes cluster. It makes it easier to deploy, scale, version and expose services. In this post, we will take a quick look at some of its basic capabilities.
To follow along, make sure you have a Kubernetes cluster running. I deployed a standard AKS cluster with three nodes. In your shell (I used Ubuntu Bash on Windows), install Rio:
curl -sfL https://get.rio.io | sh -
After installation, check the version of Rio with:
rio --version
rio version v0.1.1-rc1 (cdb75cf1)
With v0.1.1 there was an issue with deploying the registry component. v0.1.1-rc1 fixes that.
Make sure you have kubectl installed and that its context points to the cluster in which you want to deploy Rio. If that is the case, just run the following command:
rio install
The above command will install a bunch of components in the rio-system namespace. After a while, running kubectl get po -n rio-system should show the list below:
Rio installed
Rio will install Istio and expose a service mesh gateway via a service of type load balancer. With AKS, this will result in an Azure load balancer that sends traffic to the service mesh gateway. When you deploy Rio services, you can automatically get a DNS name that will resolve to the external IP of the Azure load balancer.
Let’s install such a Rio service. We will use the following application: https://github.com/gbaeke/realtime-go. Instead of the master branch, we will deploy the httponly branch. The repo contains a Dockerfile with a two-stage build that results in a web application that displays messages published to redis in real time. Before we deploy the application, deploy redis with the following command:
kubectl run redis --image redis --port 6379 --expose
Now deploy the realtime-go app with Rio:
rio run -p 8080/http -n realtime --build-branch httponly --env REDISHOST=redis:6379 https://github.com/gbaeke/realtime-go.git
Rio makes it easy to deploy the application because it will pull the specified branch of the git repo and build the container image based on the Dockerfile. The above command also sets an environment variable that is used by the realtime-go code to find the redis host.
When the build is finished, the image is stored in the internal registry. You can check builds with rio builds. Get the build logs with rio build logsimagename. For example:
rio build logs default/realtime:7acdc6dfed59c1b93f2def1a84376a880aac9f5d
The result would be something like:
build logs
The rio run command results in a deployed service. Run rio ps to check this:
rio ps displays the deployed service
Notice that you also get a URL which is publicly accessible over SSL via a Let’s Encrypt certificate:
Application on public endpoint using a staging Let’s Encrypt cert
Just for fun, you can publish a message to the redis channel that this app checks for:
The above commands should display the message in the web app:
Great success!!!
To check the logs of the deployed service, run rio logs servicename. The result should be:
Logs from the realtime-go service
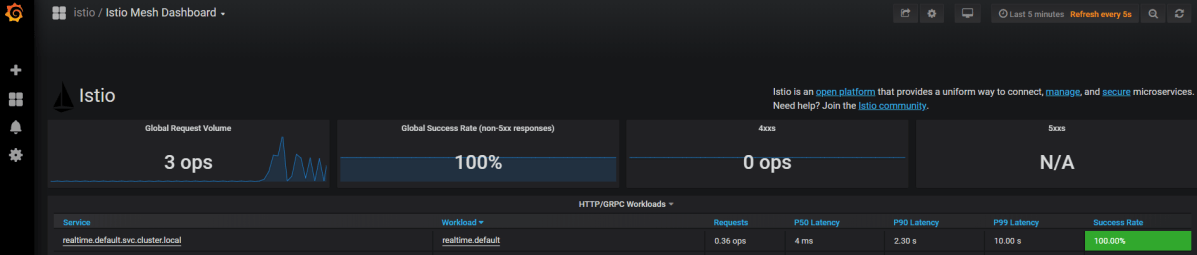
When you run rio –system ps you will see the rio system services. One of the services is Grafana, which contains Istio dashboards. Grab the URL of that service to access the dashboards:
One of the Istio dashboards
Even in this early version, Rio works quite well. It is very simple to install and it takes the grunt work out of deploying services on Kubernetes. Going from source code repository to a published service is just a single command, which is a bit similar to OpenShift. Highly recommended to give it a go when you have some time!
A longer time ago, I wrote a post about draft. Draft is a tool to streamline your Kubernetes development experience. It basically automates, based on your code, the creation of a container image, storing the image in a registry and installing a container based on that image using a Helm chart. Draft is meant to be used during the development process while you are still messing around with your code. It is not meant as a deployment mechanism in production.
The typical workflow is the following:
in the folder with your source files, run draft create
to build, push and install the container run draft up; in the background a Helm chart is used
to see the logs and connect to the app in your container over an SSH tunnel, run draft connect
modify your code and run draft up again
rinse and repeat…
Let’s take a look at how it works in a bit more detail, shall we?
Prerequisites
Naturally, you need a Kubernetes cluster with kubectl, the Kubernetes cli, configured to use that cluster.
Next, install Helm on your system and install Tiller, the server-side component of Helm on the cluster. Full installation instructions are here. If your cluster uses rbac, check out how to configure the proper service account and role binding. Run helm init to initialize Helm locally and install Tiller at the same time.
Now install draft on your system. Check out the quickstart for installation instructions. Run draftinit to initialize it.
Getting some source code
Let’s use a small Go program to play with draft. You can use the realtime-go repository. Clone it to your system and checkout the httponly branch:
You will need a redis server as a back-end for the realtime server. Let’s install that the quick and dirty way:
kubectl run redis --image=redis --replicas=1
kubectl expose deploy/redis –port 6379
Running draft create
In the realtime-go folder, run draft create. You should get the following output:
draft create output
The command tries to detect the language and it found several. In this case, because there is no pack for Coq (what is that? 😉) and HTML, it used Go. Knowing the language, draft creates a simple Dockerfile if there is no such file in the folder:
FROM golang
ENV PORT 8080
EXPOSE 8080

WORKDIR /go/src/app
COPY . .

RUN go get -d -v ./...
RUN go install -v ./...

CMD ["app"]
Usually, I do not use the Dockerfile created by draft. If there already is a Dockerfile in the folder, draft will use that one. That’s what happened in our case because the folder contains a 2-stage Dockerfile.
Draft created some other files as well:
draft.toml: configuration file (more info); can be used to create environments like staging and production with different settings such as the Kubernetes namespace to deploy to or the Dockerfile to use
draft.tasks.toml: run commands before or after you deploy your container with draft (more info); we could have used this to install and remove the redis container
.draftignore: yes, to ignore stuff
Draft also created a charts folder that contains the Helm chart that draft will use to deploy your container. It can be modified to suit your particular needs as we will see later.
Helm charts folder and a partial view on the deployment.yaml file in the chart
Setting the container registry
In older versions of draft, the source files were compressed and sent to a sever-side component that created the container. At present though, the container is built locally and then pushed to a registry of your choice. If you want to use Azure Container Registry (ACR), run the following commands (set and login):
draft config set registry REGISTRYNAME.azurecr.io
az acr login -n REGISTRYNAME
Note that you need the Azure CLI for the last command. You also need to set the subscription to the one that contains the registry you reference.
With this configuration, you need Docker on your system. Docker will build and push the container. If you want to build in the cloud, you can use ACR Build Tasks. To do that, use these commands:
draft config set container-builder acrbuild
draft config set registry REGISTRYNAME.azurecr.io
draft config set resource-group-name RESOURCEGROUPNAME
Make sure your are logged in to the subscription (az login) and login to ACR as well before continuing. In this example, I used ACR build tasks.
Note: because ACR build tasks do not cache intermediate layers, this approach can lead to longer build times; when the image is small as in this case, doing a local build and push is preferred!
Running draft up
We are now ready to run draft up. Let’s do so and see what happens:
results of draft up
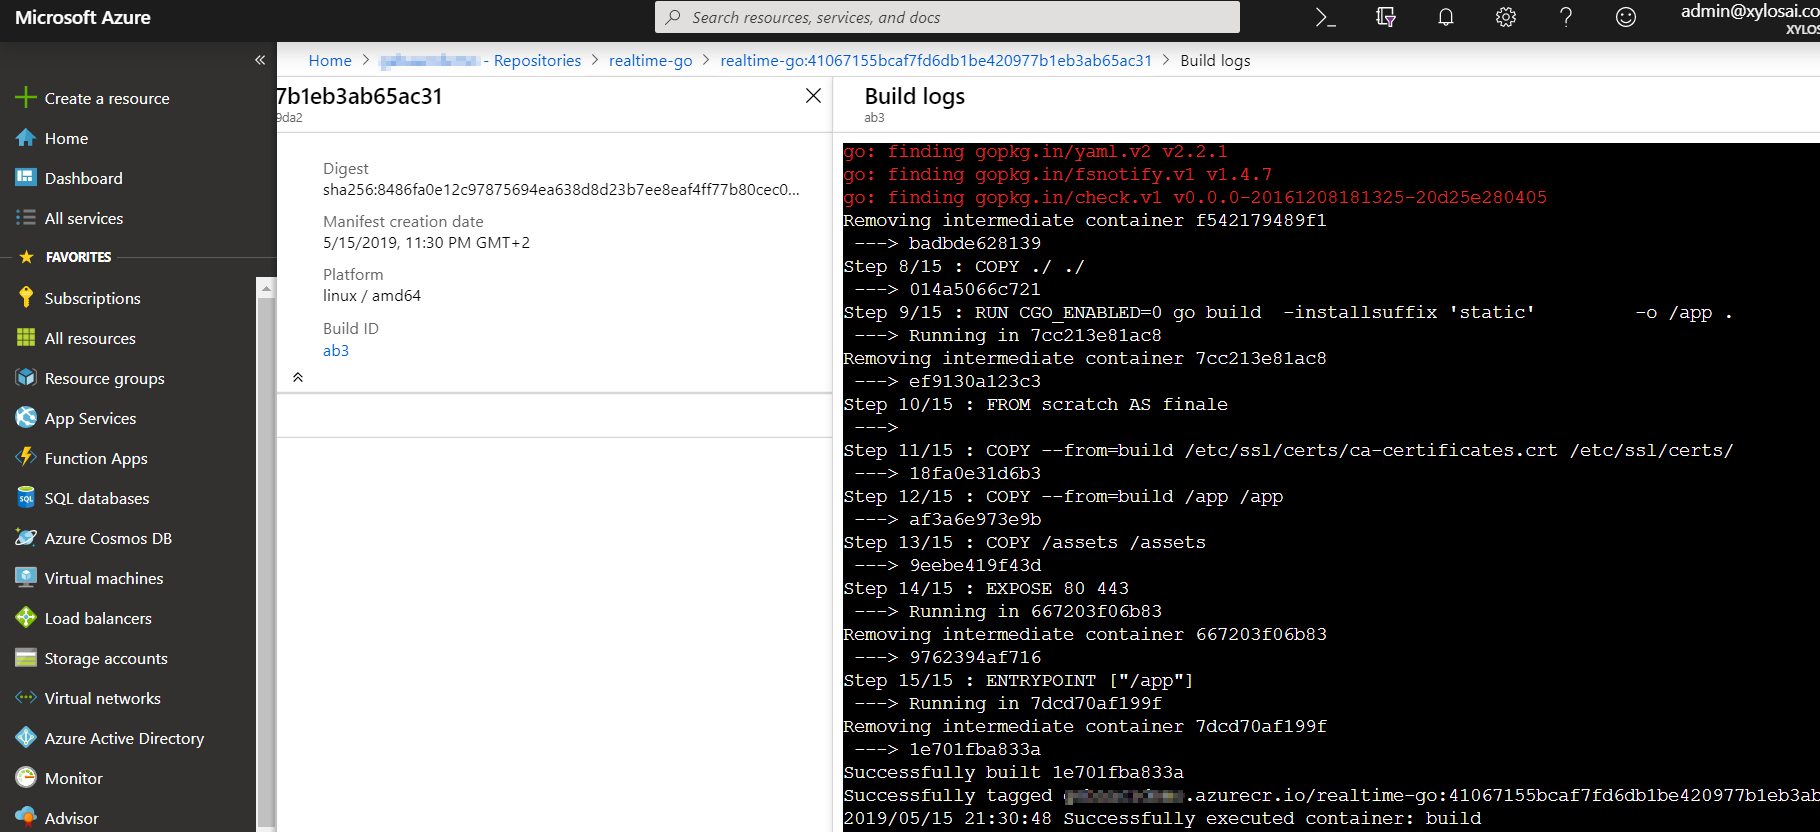
YES!!!! Draft built the container image and released it. Run helm ls to check the release. It did not have to push the image because it was built in ACR and pushed from there. Let’s check the ACR build logs in the portal (you can also use the draft logs command):
acr build log for the 2-stage Docker build
Fixing issues
Although the container is properly deployed (check it with helm ls), if you run kubectl get pods you will notice an error:
container error
In this case, the container errors out because it cannot find the redis host, which is a dependency. We can tell the container to look for redis via a REDISHOST environment variable. You can add it to deployment.yaml in the chart like so:
environment variable in deployment.yaml
After this change, just run draft up again and hope for the best!
Running draft connect
With the realtime-go container up and running, run draft connect:
output of draft connect
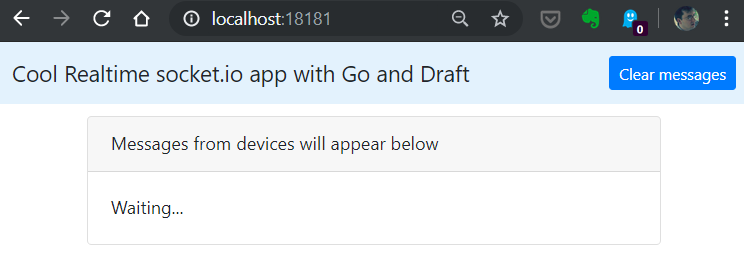
This maps a local port on your system to the remote port over an ssh tunnel. In addition, it streams the logs from the container. You can now connect to http://localhost:18181 (or whatever port you’ll get):
Great success! The app is running
If you want a public IP for your service, you can modify the Helm chart. In values.yaml, set service.type to LoadBalancer instead of ClusterIP and run draft up again. You can verify the external IP by running kubectl get svc.
Conclusion
Working with draft while your are working on one or more containers and still hacking away at your code really is smooth sailing. If you are not using it yet, give it a go and see if you like it. I bet you will!
In an earlier post, I discussed the combination of Azure Firewall and Azure Kubernetes Service (AKS) to secure ingress and egress AKS traffic.
A few days ago, Microsoft added documentation that describes the ports and URLs to allow when you route traffic through Azure Firewall or a virtual appliance. Some of the allowed ports and addresses are required for the operation of the cluster, while some others are optional. It’s highly recommended to allow the optional ports and addresses though.
The top of the document mentions registering an additional feature called AKSLockingDownEgressPreview:
az feature register --name AKSLockingDownEgressPreview --namespace Microsoft.ContainerService
The document is not very clear on what the feature does but the comments contain the following:
The feature registration tells the cluster to only pull core system images from container image repositories housed in the Microsoft Container Registry (MCR). Otherwise, clusters could try to pull container images for the core components from external repositories. There is some additional routing that also occurs for the cluster to do this. The list of ports and addresses are then what's required for you to permit when the egress traffic is restricted. You can't simply limit the egress traffic to only those address without the feature being enabled for the cluster.
In summary, to limit egress traffic, use Azure Firewall or a Network Virtual Appliance, allow the listed ports and URLs AND register the AKSLockingDownEgressPreview feature.
In this post, we will take a look at creating a simple machine learning model for text classification and deploying it as a container with Azure Machine Learning service. This post is not intended to discuss the finer details of creating a text classification model. In fact, we will use the Keras library and its Reuters newswire dataset to create a simple dense neural network. You can find many online examples based on this dataset. For further information, be sure to check out and buy 👍 Deep Learning with Python by François Chollet, the creator of Keras and now at Google. It contains a section that explains using this dataset in much more detail!
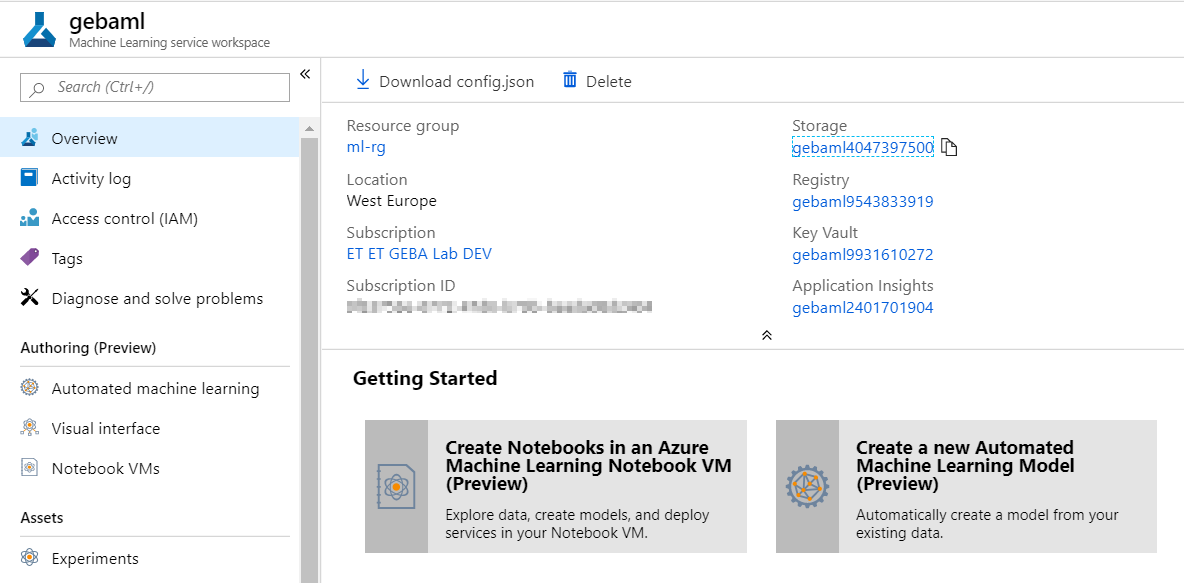
Together with the workspace, you also get a storage account, a key vault, application insights and a container registry. In later steps, we will create a container and store it in this registry. That all happens behind the scenes though. You will just write a few simple lines of code to make that happen!
Note the Authoring (Preview) section! These were added just before Build 2019 started. For now, we will not use them.
Azure Notebooks
To create the model and interact with the workspace, we will use a free Jupyter notebook in Azure Notebooks. At this point in time (8 May 2019), Azure Notebooks is still in preview. To get started, find the link below in the Overview section of the Machine Learning service workspace:
When you open the notebook, you will see the following first four cells:
Getting the dataset
It’s always simple if a prepared dataset is handed to you like in the above example. Above, you simply use the reuters class of keras.datasets and use the load_data method to get the data and directly assign it to variables to hold the train and test data plus labels.
In this case, the data consists of newswires with a corresponding label that indicates the category of the newswire (e.g. an earnings call newswire). There are 46 categories in this dataset. In the real world, you would have the newswire in text format. In this case, the newswire has already been converted (preprocessed) for you in an array of integers, with each integer corresponding to a word in a dictionary.
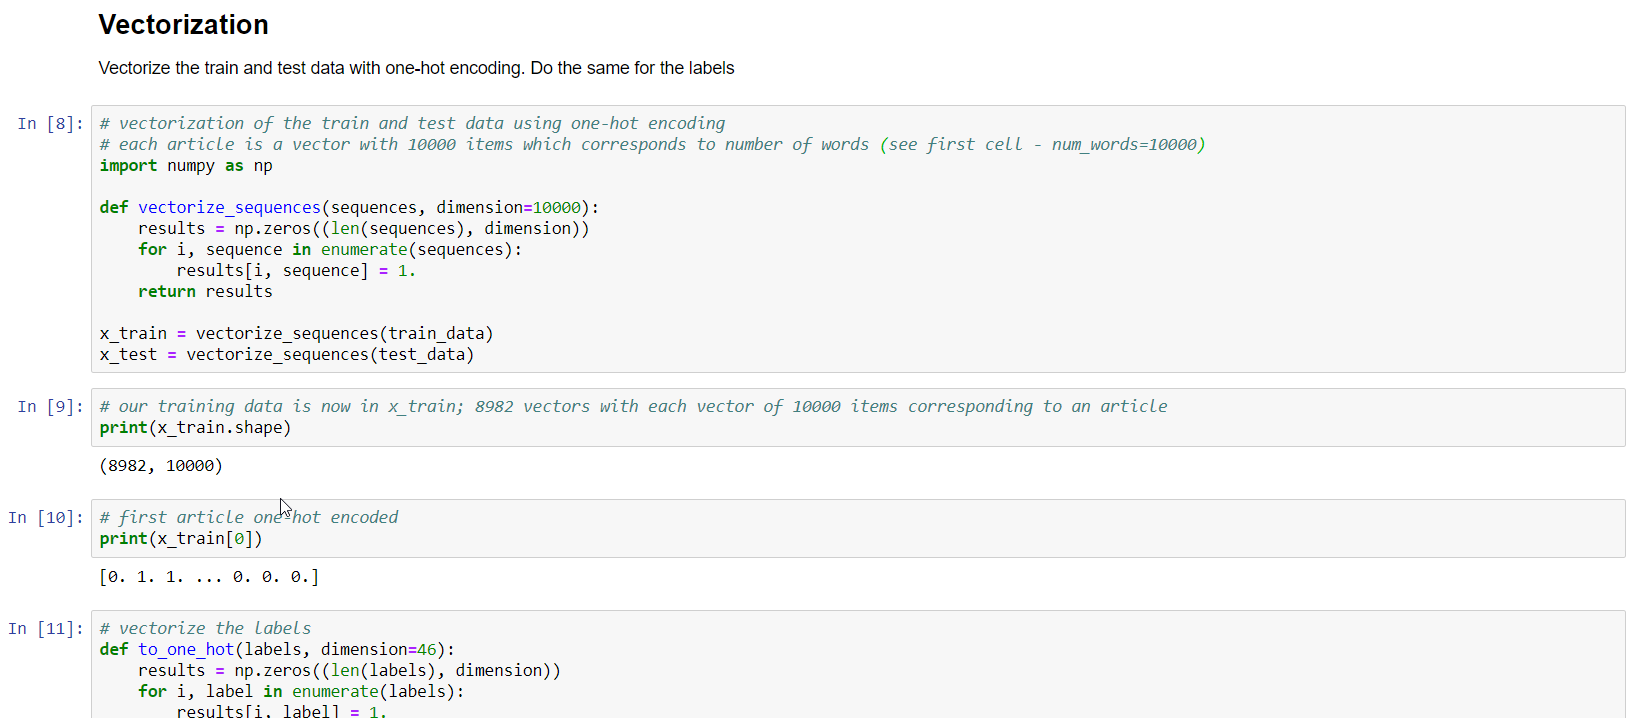
A bit further in the notebook, you will find a Vectorization section:
Vectorization
In this section, the train and test data is vectorized using a one-hot encoding method. Because we specified, in the very first cell of the notebook, to only use the 10000 most important words each article can be converted to a vector with 10000 values. Each value is either 1 or 0, indicating the word is in the text or not.
This bag-of-words approach is one of the ways to represent text in a data structure that can be used in a machine learning model. Besides vectorizing the training and test samples, the categories are also one-hot encoded.
Now the dense neural network model can be created:
Dense neural net with Keras
The above code defines a very simple dense neural network. A dense neural network is not necessarily the best type but that’s ok for this post. The specifics are not that important. Just note that the nn variable is our model. We will use this variable later when we convert the model to the ONNX format.
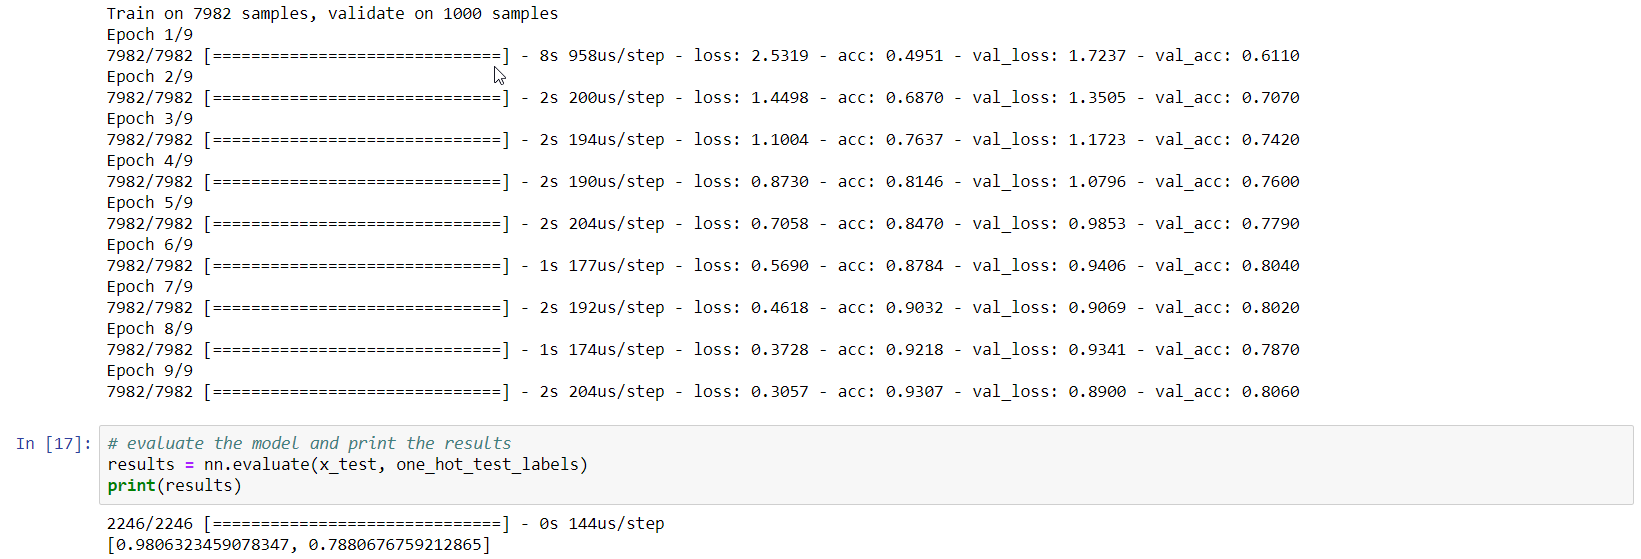
The last cell (16 above) does the actual training in 9 epochs. Training will be fast because the dataset is relatively small and the neural network is simple. Using the Azure Notebooks compute is sufficient. After 9 epochs, this is the result:
Training result
Not exactly earth-shattering: 78% accuracy on the test set!
Saving the model in ONNX format
ONNX is an open format to store deep learning models. When your model is in that format, you can use the ONNX runtime for inference.
Converting the Keras model to ONNX is easy with the onnxmltools:
Converting the Keras model to ONNX
The result of the above code is a file called reuters.onnx in your notebook project.
Predict with the ONNX model
Let’s try to predict the category of the first newswire in the test set. Its real label is 3, which means it’s a newswire about an earnings call (earn class):
Inferencing with the ONNX model
We will use similar code later in score.py, a file that will be used in a container we will create to expose the model as an API. The code is pretty simple: start an inference session based on the reuters.onnx file, grab the input and output and use run to predict. The resulting array is the output of the softmax layer and we use argmax to extract the category with the highest probability.
Saving the model to the workspace
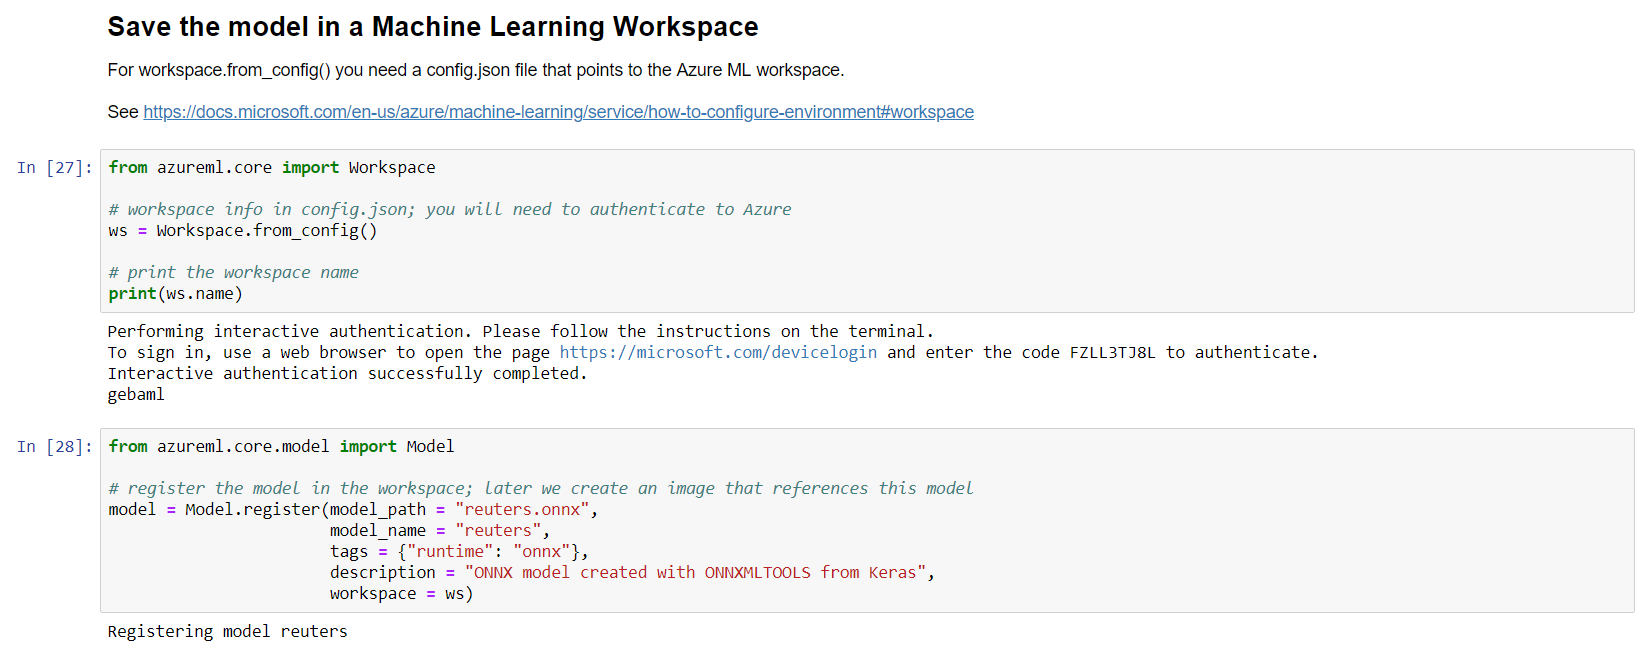
With the model in reuters.onnx, we can add it to the workspace:
Saving the model in the workspace
You will need a file in your Azure Notebook project called config.json with the following contents:
With that file in place, when you run cell 27 (see above), you will need to authenticate to Azure to be able to interact with the workspace. The code is pretty self-explanatory: the reuters.onnx model will be added to the workspace:
Models added to the workspace
As you can see, you can save multiple versions of the model. This happens automatically when you save a model with the same name.
Creating the scoring container image
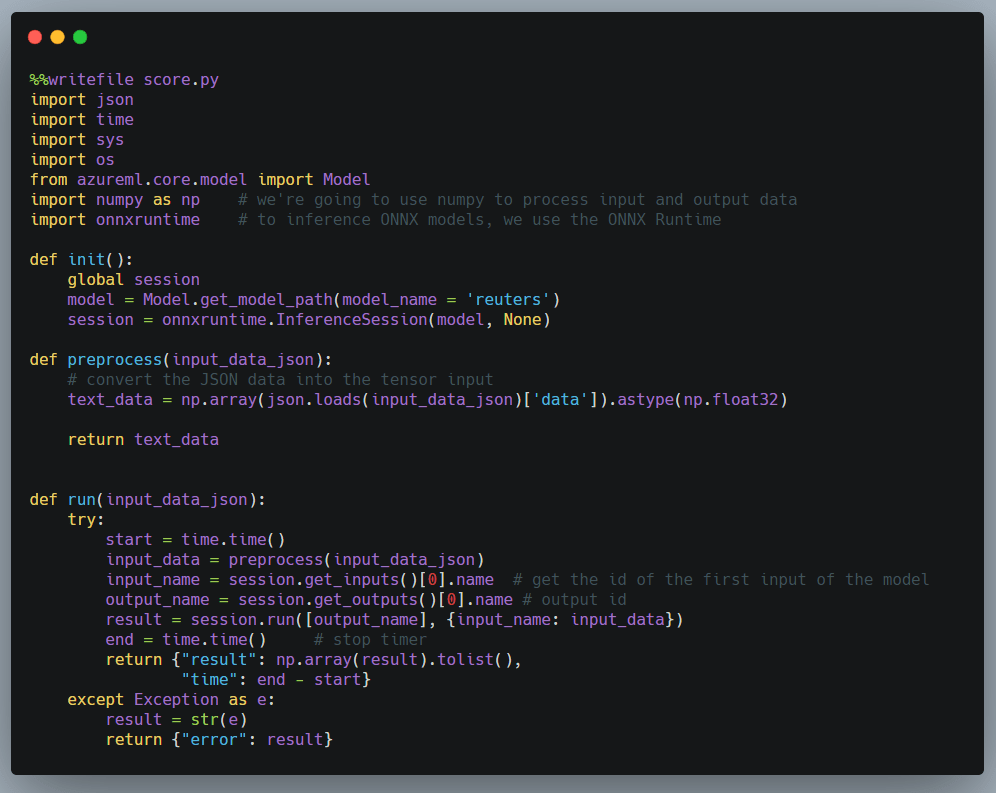
The scoring (or inference) container image is used to expose an API to predict categories of newswires. Obviously, you will need to give some instructions how scoring needs to be done. This is done via score.py:
score.py
The code is similar to the code we wrote earlier to test the ONNX model. score.py needs an init() and run() function. The other functions are helper functions. In init(), we need to grab a reference to the ONNX model. The ONNX model file will be placed in the container during the build process. Next, we start an InferenceSession via the ONNX runtime. In run(), the code is similar to our earlier example. It predicts via session.run and returns the result as JSON. We do not have to worry about the rest of the code that runs the API. That is handled by Machine Learning service.
Note: using ONNX is not a requirement; we could have persisted and used the native Keras model for instance
In this post, we only need score.py since we do not train our model via Azure Machine learning service. If you train a model with the service, you would create a train.py file to instruct how training should be done based on data in a storage account for instance. You would also provision compute resources for training. In our case, that is not required so we train, save and export the model directly from the notebook.
Training and scoring with Machine Learning service
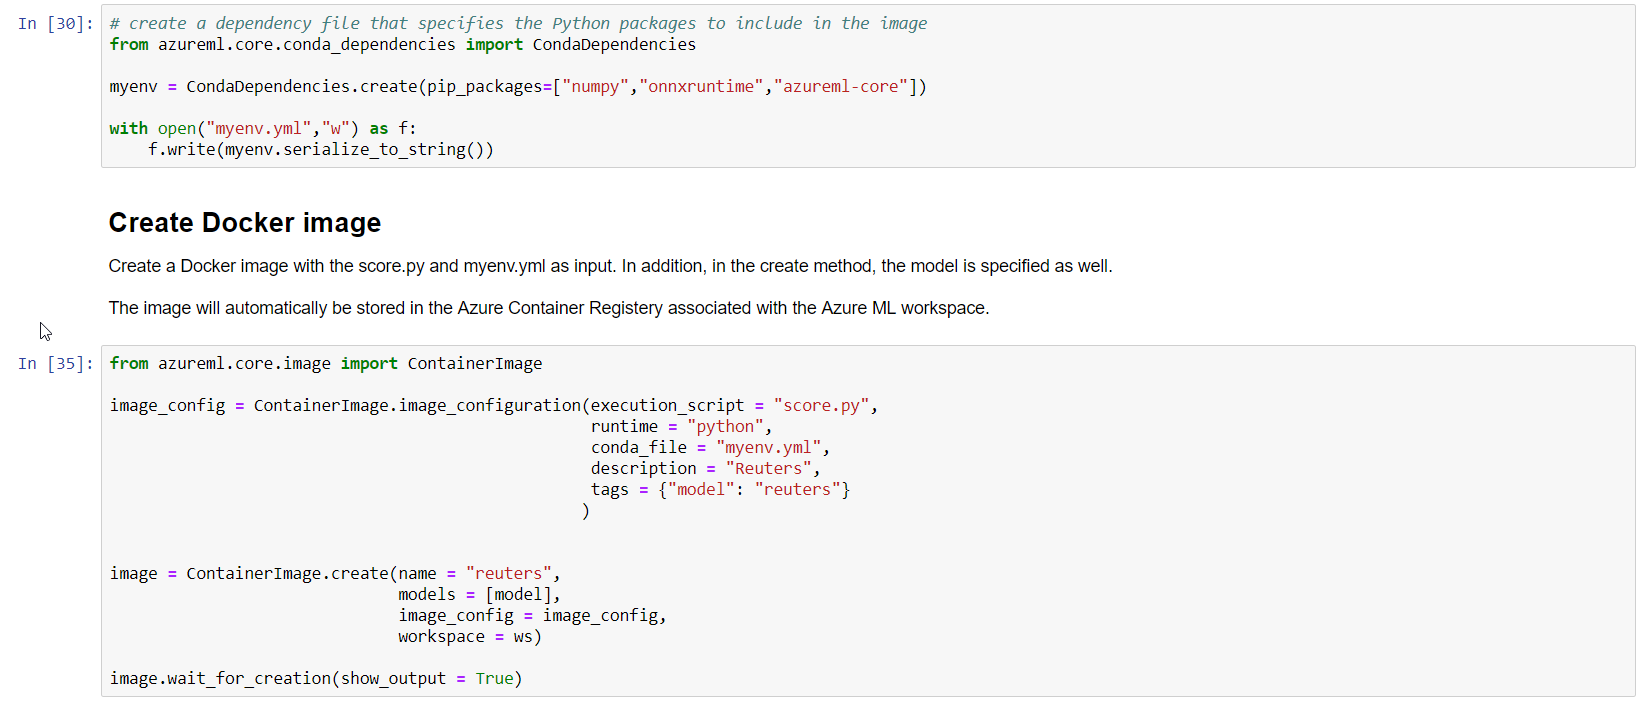
Now we need to create an environment file to indicate the required Python packages and start the image build process:
Create an environment yml file via the API and build the container
The build process is handled by the service and makes sure the model file is in the container, in addition to score.py and myenv.yml. The result is a fully functional container that exposes an API that takes an input (a newswire) and outputs an array of probabilities. Of course, it is up to you to define what the input and output should be. In this case, you are expected to provide a one-hot encoded article as input.
The container image will be listed in the workspace, potentially multiple versions of it:
Container images for the reuters ONNX model
Deploy to Azure Container Instances
When the image is ready, you can deploy it via the Machine Learning service to Azure Container Instances (ACI) or Azure Kubernetes Service (AKS). To deploy to ACI:
Deploying to ACI
When the deployment is finished, the deployment will be listed:
Deployment (ACI)
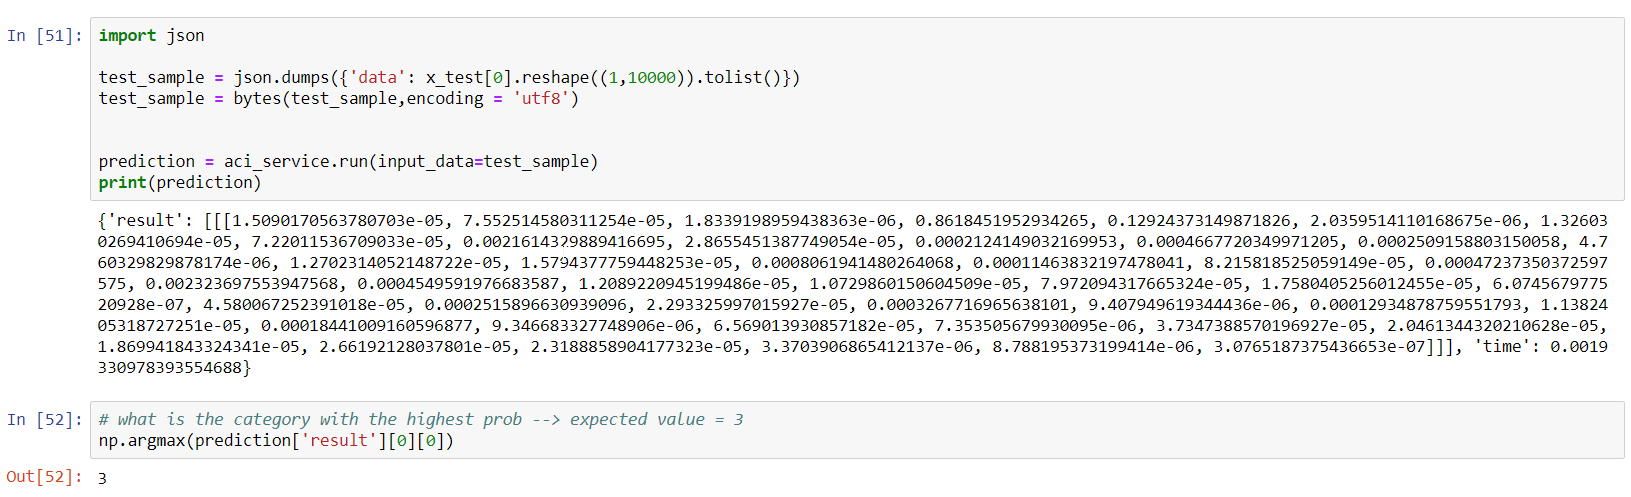
When you click on the deployment, the scoring URI will be shown (e.g. http://IPADDRESS:80/score). You can now use Postman or any other method to score an article. To quickly test the service from the notebook:
Testing the service
The helper method run of aci_service will post the JSON in test_sample to the service. It knows the scoring URI from the deployment earlier.
Conclusion
Containerizing a machine learning model and exposing it as an API is made surprisingly simple with Azure Machine learning service. It saves time so you can focus on the hard work of creating a model that performs well in the field. In this post, we used a sample dataset and a simple dense neural network to illustrate how you can build such a model, convert it to ONNX format and use the ONNX runtime for scoring.
Deploying Azure Kubernetes Service (AKS) is, like most other Kubernetes-as-a-service offerings such as those from DigitalOcean and Google, very straightforward. It’s either a few clicks in the portal or one or two command lines and you are finished.
Using these services properly and in a secure fashion is another matter though. I am often asked how to secure access to the cluster and its applications. In addition, customers also want visibility and control of incoming and outgoing traffic. Combining Azure Firewall with AKS is one way of achieving those objectives.
This post will take a look at the combination of Azure Firewall and AKS. It is inspired by this post by Dennis Zielke. In that post, Dennis provides all the necessary Azure CLI commands to get to the following setup:
In what follows, I will keep referring to the subnet names and IP addresses as in the above diagram.
Azure Firewall
Azure Firewall is a stateful firewall, provided as a service with built-in high availability. You deploy it in a subnet of a virtual network. The subnet should have the name AzureFirewallSubnet. The firewall will get two IP addresses:
Internal IP: the first IP address in the subnet (here 10.0.3.4)
Public IP: a public IP address; in the above setup we will use it to provide access to a Kubernetes Ingress controller via a DNAT rule
As in the physical world, you will need to instruct systems to route traffic through the firewall. In Azure, this is done via a route table. The following route table was created:
Route table
In (1) a route to 0.0.0.0/0 is defined that routes to the private IP of the firewall. The route will be used when no other route applies! The route table is associated with just the aks-5-subnet (2), which is the subnet where AKS (with advanced networking) is deployed. It’s important to note that now, all external traffic originating from the Kubernetes cluster passes through the firewall.
When you compare Azure Firewall to the Network Virtual Appliances (NVAs) from vendors such as CheckPoint, you will notice that the capabilities are somewhat limited. On the flip side though, Azure Firewall is super simple to deploy when compared with a highly available NVA setup.
Before we look at the firewall rules, let’s take a look at the Kubernetes Ingress Controller.
Kubernetes Ingress Controller
In this example, I will deploy nginx-ingress as an Ingress Controller. It will provide access to HTTP-based workloads running in the cluster and it can route to various workloads based on the URL. I will deploy the nginx-ingress with Helm.
Think of an nginx-ingress as a reverse proxy. It receives http requests, looks at the hostname and path (e.g. mydomain.com/api/user) and routes the request to the appropriate Kubernetes service (e.g. the user service).
Normally, the nginx-ingress service is accessed via an Azure external load balancer. Behind the scenes, this is the result of the service object having spec.type set to the value LoadBalancer. If we want external traffic to nginx-ingress to pass through the firewall, we will need to tell Kubernetes to create an internal load balancer via an annotation. Let’s do that with Helm. First, you will need to install tiller, the server-side component of Helm. Use the following procedure from the Microsoft documentation:
The second command installs nginx-ingress in the ingress namespace. The two –set parameters add the following annotations to the service object (yes I know, the Helm annotation parameters are ugly 🤢):
This ensures an internal load balancer gets created. It gets created in the mc-* resource group that backs your AKS deployment:
Internal load balancer created by the Kubernetes cloud integration components
Note that Kubernetes creates the load balancer, including the rules and probes for port 80 and 443 as defined in the service object that comes with the Helm chart. The load balancer is created in the ing-4-subnet as instructed by the service annotation. Its private IP address is 10.0.4.4 as in the diagram at the top of this post
DNAT Rule to Load Balancer
To provide access to internal resources, Azure Firewall uses DNAT rules which stands for destination network address translation. The concept is simple: traffic to the firewall’s public IP on some port can be forwarded to an internal IP on the same or another port. In our case, traffic to the firewall’s public IP on port 80 and 443 is forwarded to the internal load balancer’s private IP on port 80 and 443. The load balancer will forward the request to nginx-ingress:
DNAT rule forwarding port 80 and 443 traffic to the internal load balancer
If the installation of nginx-ingress was successful, you should end up at the default back-end when you go to http://firewallPublicIP.
nginx-ingress default backend when browsing to public IP of firewall
If you configured Log Analytics and installed the Azure Firewall solution, you can look at the firewall logs. DNAT actions are logged and can be inspected:
Firewall logs via Log Analytics
Application and Network Rules
Azure Firewall application rules are rules that allow or deny outgoing HTTP/HTTPS traffic based on the URL. The following rules were defined:
Application rules
The above rules allow http and https traffic to destinations such as docker.io, cloudflare and more.
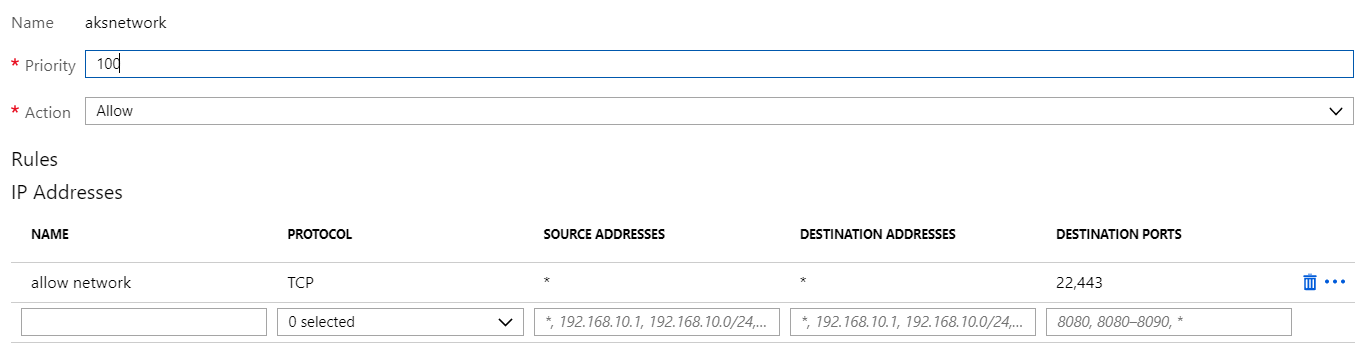
Note that another Azure Firewall rule type, network rules, are evaluated first. If a match is found, rule evaluation is stopped. Suppose you have these network rules:
Network rules
The above network rule allows port 22 and 443 for all sources and destinations. This means that Kubernetes can actually connect to any https-enabled site on the default port, regardless of the defined application rules. See rule processing for more information.
Threat Intelligence
This feature alerts on and/or denies network traffic coming from known bad IP addresses or domains. You can track this via Log Analytics:
Threat Intelligence Alerts and Denies on Azure Firewall
Above, you see denied port scans, traffic from botnets or brute force credentials attacks all being blocked by Azure Firewall. This feature is currently in preview.
Best Practices
The AKS documentation has a best practices section that discusses networking. It contains useful information about the networking model (Kubenet vs Azure CNI), ingresses and WAF. It does not, at this point in time (May 2019), desicribe how to use Azure Firewall with AKS. It would be great if that were added in the near future.
Here are a couple of key points to think about:
WAF (Web Application Firewall): Azure Firewall threat intelligence is not WAF; to enable WAF, there are several options:
you can use cloud-native WAFs such as TwistLock (WAF is one of the features of this product; it also provides firewall and vulnerability assessment)
remote access to Kubernetes API: today, the API server is exposed via a public IP address; having the API server on a local IP will be available soon
remote access to Kubernetes hosts using SSH: only allow SSH on the private IP addresses; use a bastion host to enable connectivity
Conclusion
Azure Kubernetes Service (AKS) can be combined with Azure Firewall to control network traffic to and from your Kubernetes cluster. Log Analytics provides the dashboard and logs to report and alert on traffic patterns. Features such as threat intelligence provide an extra layer of defense. For HTTP/HTTPS workloads (so most workloads), you should complement the deployment with a WAF such as Azure Application Gateway or 3rd party.
































 baeke.info