I recently gave a talk at TechTrain, a monthly event in Mechelen (Belgium), hosted by Cronos. The talk is called “GitOps with Kubernetes: a better way to deploy” and is an introduction to GitOps with Weaveworks Flux as an example.
You can find a re-recording of the presentation on Youtube:
If you have followed my blog a little, you have seen a few posts about GitOps with Flux CD. This time, I am taking a look at Argo CD which, like Flux CD, is a GitOps tool to deploy applications from manifests in a git repository.
Don’t want to read this whole thing?
Here’s the video version of this post
There are several differences between the two tools:
At first glance, Flux appears to use a single git repo for your cluster where Argo immediately introduces the concept of apps. Each app can be connected to a different git repo. However Flux can also use multiple git repositories in the same cluster. See https://github.com/fluxcd/multi-tenancy for more information
Flux has the concept of workloads which can be automated. This means that image repositories are scanned for updates. When an update is available (say from tag v1.0.0 to v1.0.1), Flux will update your application based on filters you specify. As far as I can see, Argo requires you to drive the update from your CI process, which might be preferred.
By default, Argo deploys an administrative UI (next to a CLI) with a full view on your deployment and its dependencies
Argo supports RBAC and integrates with external identity providers (e.g. Azure Active Directory)
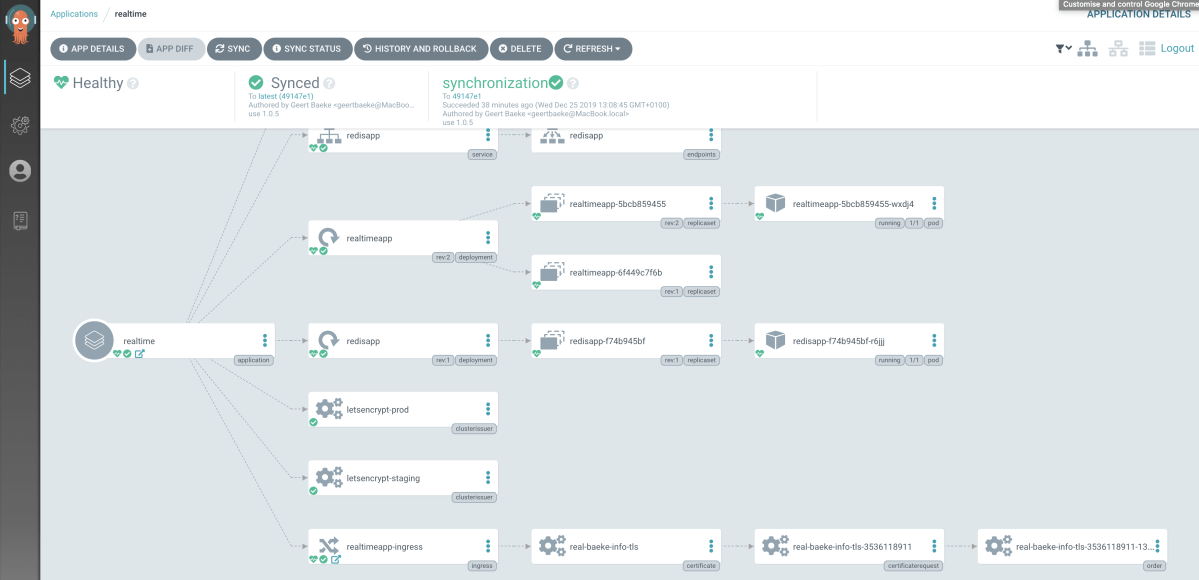
The Argo CD admin interface is shown below:
Argo CD admin interface… not too shabby
Let’s take a look at how to deploy Argo and deploy the app you see above. The app is deployed using a single yaml file. Nothing fancy yet such as kustomize or jsonnet.
Deployment
The getting started guide is pretty clear, so do have a look over there as well. To install, just run (with a deployed Kubernetes cluster and kubectl pointing at the cluster):
Next, install the CLI. On a Mac, that is simple (with Homebrew):
brew tap argoproj/tap

brew install argoproj/tap/argocd
You will need access to the API server, which is not exposed over the Internet by default. For testing, port forwarding is easiest. In a separate shell, run the following command:
You can now connect to https://localhost:8080 to get to the UI. You will need the admin password by running:
kubectl get pods -n argocd -l app.kubernetes.io/name=argocd-server -o name | cut -d'/' -f 2
You can now login to the UI with the user admin and the displayed password. You should also login from the CLI and change the password with the following commands:
Great! You are all set now to deploy an application.
Deploying an application
We will deploy an application that has a couple of dependencies. Normally, you would install those dependencies with Argo CD as well but since I am using a cluster that has these dependencies installed via Azure DevOps, I will just list what you need (Helm commands):
To know more about these dependencies and use an Azure DevOps YAML pipeline to deploy them, see this post. If you want, you can skip the externaldns installation and create a DNS record yourself that resolves to the public IP address of Nginx Ingress. If you do not want to use an Azure static IP address, you can remove the loadBalancerIP parameter from the first command.
The manifests we will deploy with Argo CD can be found in the following public git repository: https://github.com/gbaeke/argo-demo. The application is in three YAML files:
Two YAML files that create a certificate cluster issuer based on custom resource definitions (CRDs) from cert-manager
realtime.yaml: Redis deployment, Redis service (ClusterIP), realtime web app deployment (based on this), realtime web app service (ClusterIP), ingress resource for https://real.baeke.info (record automatically created by externaldns)
It’s best that you fork my repo and modify realtime.yaml’s ingress resource with your own DNS name.
Create the Argo app
Now you can create the Argo app based on my forked repo. I used the following command with my original repo:
The command above creates an app called realtime based on the specified repo. The app should use the manifests folder and apply (kubectl apply) all the manifests in that folder. The manifests are deployed to the cluster that Argo CD runs in. Note that you can run Argo CD in one cluster and deploy to totally different clusters.
The above command does not configure the repository to be synced automatically, although that is an option. To sync manually, use the following command:
argocd app sync realtime
The application should now be synced and viewable in the UI:
Not Secure because we use Let’s Encrypt staging for this app
Set up auto-sync
Let’s set up this app to automatically sync with the repo (default = every 3 minutes). This can be done from both the CLI and the UI. Let’s do it from the UI. Click on the app and then click App Details. You will find a Sync Policy in the app details where you can enable auto-sync
Setting up auto-sync from the UI
You can now make changes to the git repo like changing the image tag for gbaeke/fluxapp (yes, I used this image with the Flux posts as well 😊 ) to 1.0.6 and wait for the sync to happen. Or sync manually from the CLI or the UI.
Conclusion
This was a quick tour of Argo CD. There is much more you can do but the above should get you started quickly. I must say I quite like the solution and am eager to see what the collaboration of Flux CD, Argo CD and Amazon comes up with in the future.
When you have to deploy an application to multiple environments like dev, test and production there are many solutions available to you. You can manually deploy the app (Nooooooo! 😉), use a CI/CD system like Azure DevOps and its release pipelines (with or without Helm) or maybe even a “GitOps” approach where deployments are driven by a tool such as Flux or Argo based on a git repository.
In the latter case, you probably want to use a configuration management tool like Kustomize for environment management. Instead of explaining what it does, let’s take a look at an example. Suppose I have an app that can be deployed with the following yaml files:
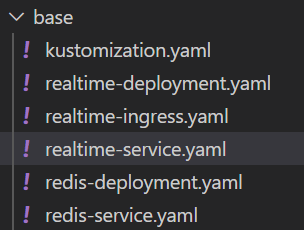
redis-deployment.yaml: simple deployment of Redis
redis-service.yaml: service to connect to Redis on port 6379 (Cluster IP)
realtime-deployment.yaml: application that uses the socket.io library to display real-time updates coming from a Redis channel
realtime-service.yaml: service to connect to the socket.io application on port 80 (Cluster IP)
realtime-ingress.yaml: ingress resource that defines the hostname and TLS certificate for the socket.io application (works with nginx ingress controller)
Let’s call this collection of files the base and put them all in a folder:
Base files for the application
Now I would like to modify these files just a bit, to install them in a dev namespace called realtime-dev. In the ingress definition I want to change the name of the host to realdev.baeke.info instead of real.baeke.info for production. We can use Kustomize to reach that goal.
In the base folder, we can add a kustomization.yaml file like so:
This lists all the resources we would like to deploy.
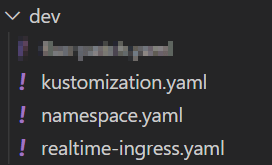
Now we can create a folder for our patches. The patches define the changes to the base. Create a folder called dev (next to base). We will add the following files (one file blurred because it’s not relevant to this post):
The namespace: realtime-dev ensures that our base resource definitions are updated with that namespace. In resources, we ensure that namespace gets created. The file namespace.yaml contains the following:
Note that we also use certmanager here to issue a certificate to use on the ingress. For dev environments, it is better to use the Let’s Encrypt staging issuer instead of the production issuer.
We are now ready to generate the manifests for the dev environment. From the parent folder of base and dev, run the following command:
kubectl kustomize dev
The above command generates the patched manifests like so:
Note that namespace realtime-dev is used everywhere and that the Ingress resource uses realdev.baeke.info. The original Ingress resource looked like below:
As you can see, Kustomize has updated the host in tls: and rules: and also modified the secret name (which will be created by certmanager).
You have probably seen that Kustomize is integrated with kubectl. It’s also available as a standalone executable.
To directly apply the patched manifests to your cluster, run kubectl apply -k dev. The result:
namespace/realtime-dev created
service/realtime created
service/redis created
deployment.apps/realtime created
deployment.apps/redis created
ingress.extensions/realtime-ingress created
In another post, we will look at using Kustomize with Flux. Stay tuned!
If you do any sort of development, you often have to deal with secrets. There are many ways to deal with secrets, one of them is retrieving the secrets from a secure system from your own code. When your application runs on Kubernetes and your code (or 3rd party code) cannot be configured to retrieve the secrets directly, you have several options. This post looks at one such solution: Azure Key Vault to Kubernetes from Sparebanken Vest, Norway.
In short, the solution connects to Azure Key Vault and does one of two things:
Create a regular Kubernetes secret with the controller
Inject the secrets in the pod with the Env Injector
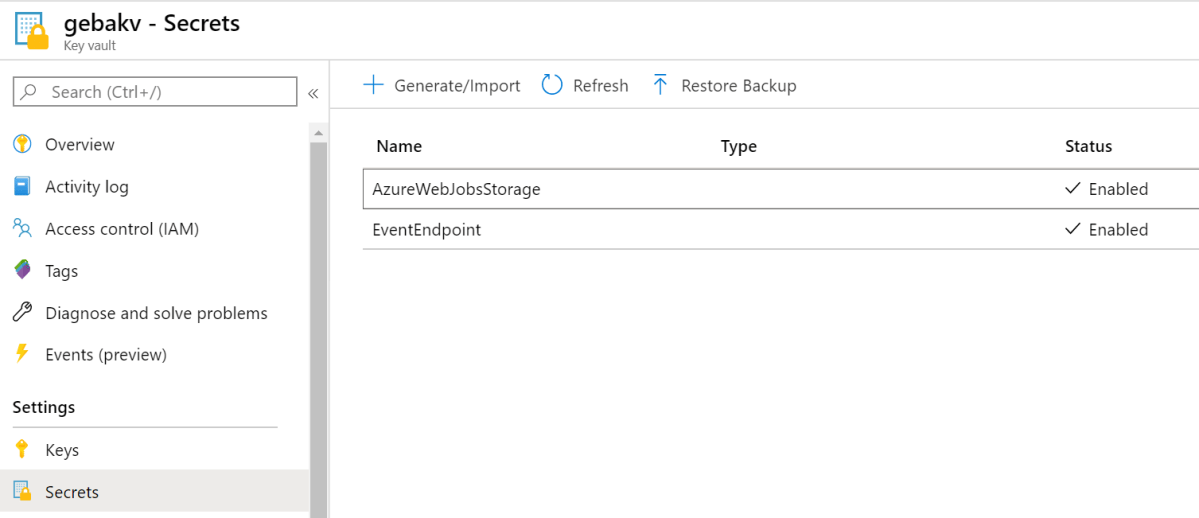
In my scenario, I just wanted regular secrets to use in a KEDA project that processes IoT Hub messages. The following secrets were required:
Connection string to a storage account: AzureWebJobsStorage
Connection string to IoT Hub’s event hub: EventEndpoint
In the YAML that deploys the pods that are scaled by KEDA, the secrets are referenced as follows:
Because the YAML above is deployed with Flux from a git repo, we need to get the secrets from an external system. That external system in this case, is Azure Key Vault.
To make this work, we first need to install the controller that makes this happen. This is very easy to do with the Helm chart. By default, this Helm chart will work well on Azure Kubernetes Service as long as you give the AKS security principal read access to Key Vault:
Access policies in Key Vault (azure-cli-2019-… is the AKS service principal here)
Next, define the secrets in Key Vault:
Secrets in Key Vault
With the access policies in place and the secrets defined in Key Vault, the controller installed by the Helm chart can do its work with the following YAML:
The above YAML defines two objects of kind AzureKeyVaultSecret. In each object we specify the Key Vault secret to read (vault) and the Kubernetes secret to create (output). The above YAML results in two Kubernetes secrets:
Two regular secrets
When you look inside such a secret, you will see:
Inside the secret
To double check the secret, just do echo RW5K… | base64 -d to see the decoded secret and that it matches the secret stored in Key Vault. You can now reference the secret with ValueFrom as shown earlier in this post.
Conclusion
If you want to turn Azure Key Vault secrets into regular Kubernetes secrets for use in your manifests, give the solution from Sparebanken Vest a go. It is very easy to use. If you do not want regular Kubernetes secrets, opt for the Env Injector instead, which injects the environment variables directly in your pod.
If you have ever deployed applications to Kubernetes or other platforms, you are probably used to the following approach:
developers check in code which triggers CI (continuous integration) and eventually results in deployable artifacts
a release process deploys the artifacts to one or more environments such as a development and a production environment
In the case of Kubernetes, the artifact is usually a combination of a container image and a Helm chart. The release process then authenticates to the Kubernetes cluster and deploys the artifacts. Although this approach works, I have always found this deployment process overly complicated with many release pipelines configured to trigger on specific conditions.
What if you could store your entire cluster configuration in a git repository as the single source of truth and use simple git operations (is there such a thing? 😁) to change your configuration? Obviously, you would need some extra tooling that synchronizes the configuration with the cluster, which is exactly what Weaveworks Flux is designed to do. Also check the Flux git repo.
In this post, we will run through a simple example to illustrate the functionality. We will do the following over two posts:
Post one:
Create a git repo for our configuration
Install Flux and use the git repo as our configuration source
Install an Ingress Controller with a Helm chart
Post two:
Install an application using standard YAML (including ingress definition)
Update the application automatically when a new version of the application image is available
Let’s get started!
Create a git repository
To keep things simple, make sure you have an account on GitHub and create a new repository. You can also clone my demo repository. To clone it, use the following command:
Note: if you clone my repo and use it in later steps, the resources I defined will get created automatically; if you want to follow the steps, use your own empty repo
Install Flux
Flux needs to be installed on Kubernetes, so make sure you have a cluster at your disposal. In this post, I use Azure Kubernetes Services (AKS). Make sure kubectl points to that cluster. If you have kubectl installed, obtain the credentials to the cluster with the Azure CLI and then run kubectl get nodes or kubectl cluster-info to make sure you are connected to the right cluster.
az aks get-credentials -n CLUSTER_NAME -g RESOURCE_GROUP
It is easy to install Flux with Helm and in this post, I will use Helm v3 which is currently in beta. You will need to install Helm v3 on your system. I installed it in Windows 10’s Ubuntu shell. Use the following command to download and unpack it:
curl -sSL "https://get.helm.sh/helm-v3.0.0-beta.3-linux-amd64.tar.gz" | tar xvz
This results in a folder linux-amd64 which contains the helm executable. Make the file executable with chmod +x and copy it to your path as helmv3. Next, run helmv3. You should see the help text:
The Kubernetes package manager

Common actions for Helm:

- helm search:    search for charts
- helm fetch:     download a chart to your local directory to view
- helm install:   upload the chart to Kubernetes
- helm list:      list releases of charts
...
Now you are ready to install Flux. First, add the FLux Helm repository to allow helmv3 to find the chart:
The above command upgrades Flux but installs it if it is missing (-i). The chart to install is fluxcd/flux. With –wait, we wait until the installation is finished. We will not go into the first two –set options for now. The last option defines the git repository Flux should use to sync the configuration to the cluster. Currently, Flux supports one repository. Because we use a public repository, Flux can easily read its contents. At times, Flux needs to update the git repository. To support that, you can add a deploy key to the repository. First, install the fluxctl tool:
curl -sL https://fluxcd.io/install | sh
export PATH=$PATH:$HOME/.fluxcd/bin
Now run the following commands to obtain the public key to use as deploy key:
Copy and paste this key as a deploy key for your github repo:
git repo deploy key
Phew… Flux should now be installed on your cluster. Time to install some applications to the cluster from the git repo.
Note: Flux also supports private repos; it just so happens I used a public one here
Install an Ingress Controller
Let’s try to install Traefik via its Helm chart. Since I am not using traditional CD with pipelines that run helm commands, we will need something else. Luckily, there’s a Flux Helm Operator that allows us to declaratively install Helm charts. The Helm Operator installs a Helm chart when it detects a custom resource definition (CRD) of type helm.fluxcd.io/v1. Let’s first create the CRD for Helm v3:
Just add the above YAML to the GitHub repository. I added it to the ingress folder:
traefik.yaml added to the GitHub repo
If you wait a while, or run fluxctl sync, the repo gets synced and the resources created. When the helm.fluxcd.io/v1 object is created, the Helm Operator will install the chart in the default namespace. Traefik will be exposed via an Azure Load Balancer. You can check the release with the following command:
kubectl get helmreleases.helm.fluxcd.io

NAME      RELEASE   STATUS     MESSAGE                  AGE
traefik   traefik   deployed   helm install succeeded   15m
Also check that the Traefik pod is created in the default namespace (only 1 replica; the default):
kubectl get po

NAME                       READY   STATUS    RESTARTS   AGE
traefik-86f4c5f9c9-gcxdb   1/1     Running   0          21m
Also check the public IP of Traefik:
kubectl get svc

NAME                TYPE           CLUSTER-IP     EXTERNAL-IP
traefik             LoadBalancer   10.0.8.59      41.44.245.234
We will later use that IP when we define the ingress for our web application.
Conclusion
In this post, you learned a tiny bit about GitOps with WeaveWorks Flux. The concept is simple enough: store your cluster config in a git repo as the single source of truth and use git operations to initiate (or rollback) cluster operations. To start, we simply installed Traefik via the Flux Helm Operator. In a later post, we will add an application and look at image management. There’s much more you can do so stay tuned!
When you need to access Azure Storage (or other Azure resources) from a container in AKS (Kubernetes on Azure), you have many options. You can put credentials in your code (nooooo!), pass credentials via environment variables, use Kubernetes secrets, obtain secrets from Key Vault and so on. Usually, the credentials are keys but you can also connect to a Storage Account with an Azure AD account. Instead of a regular account, you can use a managed identity that you set up specifically for the purpose of accessing the storage account or a specific container.
A managed identity is created as an Azure resource and will appear in the resource group where it was created:
User assigned managed identity
This managed identity can be created from the Azure Portal but also with the Azure CLI:
az identity create -g storage-aad-rg -n demo-pod-id -o json
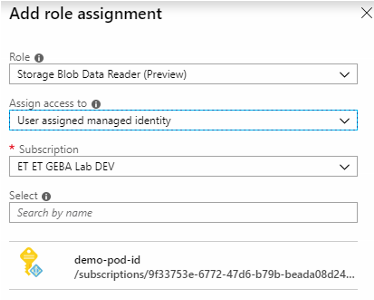
The managed identity can subsequently be granted access rights, for instance, on a storage account. Storage accounts now also support Azure AD accounts (in preview). You can assign roles such as Blob Data Reader, Blob Data Contributor and Blob Data Owner. The screenshot below shows the managed identity getting the Blob Data Reader role on the entire storage account:
Granting the managed identity access to a storage account
When you want to use this specific identity from a Kubernetes pod, you can use the aad-pod-identity project. Note that this is an open source project and that it is not quite finished. The project’s README contains all the instructions you need but here are the highlights:
Deploy the infrastructure required to support managed identities in pods; these are the MIC and NMI containers plus some custom resource definitions (CRDs)
Assign the AKS service principle the role of Managed Identity Operator over the scope of the managed identity created above (you would use the resource id of the managed identity in the scope such as /subscriptions/YOURSUBID/resourcegroups/YOURRESOURCEGROUP/providers/Microsoft.ManagedIdentity/userAssignedIdentities/YOURMANAGEDIDENTITY
Define the pod identity via the AzureIdentity custom resource definition (CRD); in the YAML file you will refer to the managed identity by its resource id (/subscr…) and client id
Define the identity binding via the AzureIdentityBinding custom resource definition (CRD); in the YAML file you will setup a selector that you will use later in a pod definition to associate the managed identity with the pod; I defined a selector called myapp
Here is the identity definition (uses one of the CRDs defined earlier):
Note that the installation of the infrastructure containers depends on RBAC being enabled or not. To check if RBAC is enabled on your AKS cluster, you can use https://resources.azure.com and search for your cluster. Check for the enableRBAC. In my cluster, RBAC was enabled:
Yep, RBAC enabled so make sure you use the RBAC YAML files
With everything configured, we can spin up a container with a label that matches the selector defined earlier:
Save the above to a file called ubuntu.yaml and use kubectl apply -f ubuntu.yaml to launch the pod. The pod will keep running because of the forever while loop. The pod can use the managed identity because of the aadpodidbinding label of myapp. Next, get a shell to the container:
kubectl exec -it ubuntu /bin/bash
To check if it works, we have to know how to obtain an access token (which is a JWT or JSON Web Token). We can obtain it via curl. First use apt-get update and then use apt-get install curl to install it. Then issue the following command to obtain a token for https://azure.storage.com:
TIP: if you are not very familiar with curl, use https://curlbuilder.com. As a precaution, do not paste your access token in the command builder.
The request to 169.254.169.254 goes to the Azure Instance Metadata Service which provides, among other things, an API to obtain a token. The result will be in the following form:
{"access_token":"THE ACTUAL ACCESS TOKEN","refresh_token":"", "expires_in":"28800","expires_on":"1549083688","not_before":"1549054588","resource":"https://storage.azure.com/","token_type":"Bearer"
Note that many of the SDKs that Microsoft provides, have support for managed identities baked in. That means that the SDK takes care of calling the Instance Metadata Service for you and presents you a token to use in subsequent calls to Azure APIs.
Now that you have the access token, you can use it in a request to the storage account, for instance to list containers:
curl -XGET -H 'Authorization: Bearer THE ACTUAL ACCESS TOKEN' -H 'x-ms-version: 2017-11-09' -H "Content-type: application/json" 'https://storageaadgeba.blob.core.windows.net/?comp=list
The result of the call is some XML with the container names. I only had a container called test:
OMG… XML
Wrap up
You have seen how to bind an Azure managed identity to a Kubernetes pod running on AKS. The aad-pod-identity project provides the necessary infrastructure and resources to bind the identity to a pod using a label in its YAML file. From there, you can work with the managed identity as you would on a virtual machine, calling the Instance Metadata Service to obtain the token (a JWT). Once you have the token, you can include it in REST calls to the Azure APIs by adding an authorization header. In this post we have used the storage APIs as an example.
Note that Microsoft has AKS Pod Identity marked as in development on the updates site. I am not aware if this is based on the aad-pod-identity project but it does mean that the feature will become an official part of AKS pretty soon!
Yesterday, I decided to try out DigitalOcean’s Kubernetes. As always with DigitalOcean, the solution is straightforward and easy to use.
Similarly to Azure, their managed Kubernetes product is free. You only pay for the compute of the agent nodes, persistent block storage and load balancers. The minimum price is 10$ per month for a single-node cluster with a 2GB and 1 vCPU node (s-1vcpu-2gb). Not bad at all!
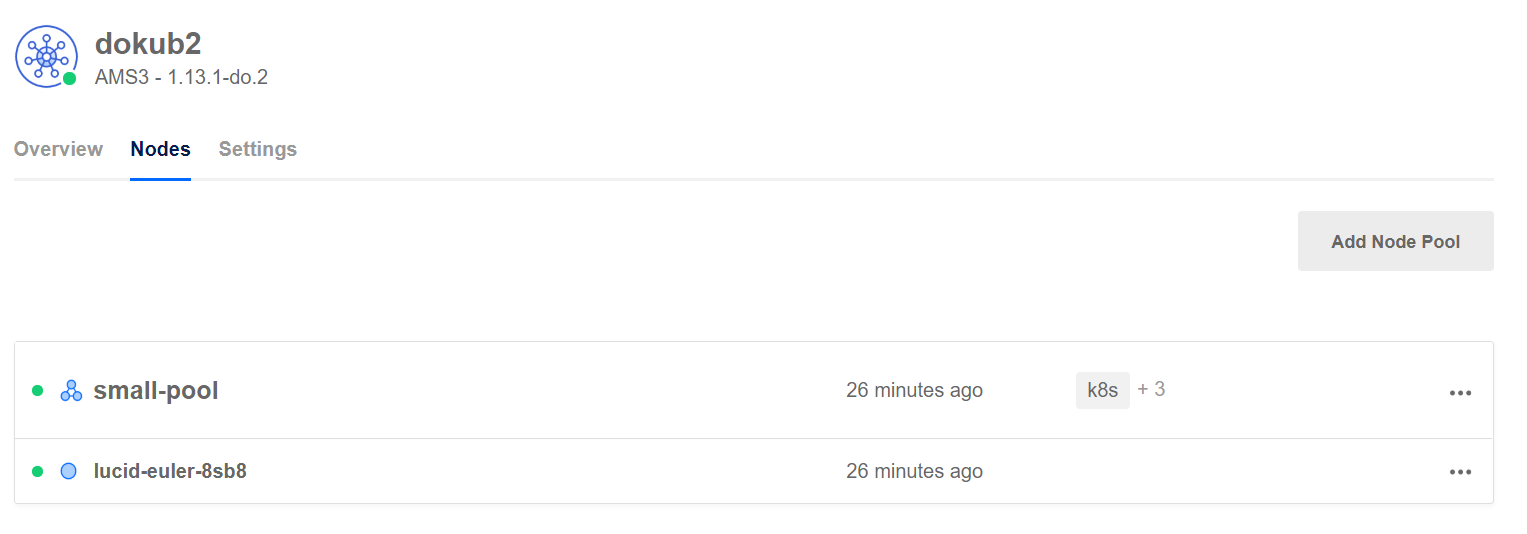
At the moment, the product is in limited availability. The screenshot below shows a cluster in the UI:
Kubernetes cluster with one node pool and one node in the pool
Multiple node pools are supported, a feature that is coming soon to Azure’s AKS as well.
My cluster has one pod deployed, exposed via a service of type LoadBalancer. That results in the provisioning of a DigitalOcean load balancer:
DigitalOcean LoadBalancer
Naturally, you will want to automate this deployment. DigitalOcean has an API and CLI but I used Terraform to deploy the cluster. You need to obtain a personal access token for DigitalOcean and use that in conjunction with the DigitalOcean provider. Full details can be found on GitHub: https://github.com/gbaeke/kubernetes-do. Note that this is a basic example but it shows how easy it is to stand up a managed Kubernetes cluster on a cloud platform and not break the bank
In my Twitter feed, I often come across Pulumi so I decided to try it out. Pulumi is an Infrastructure as Code solution that allows you to use familiar development languages such as JavaScript, Python and Go. The idea is that you define your infrastructure in the language that you prefer, versus some domain specific language. When ready, you merely use pulumi up to deploy your resources (and pulumi update, pulumi destroy, etc…). The screenshot below shows the deployment of an Azure resource group, storage account, file share and a container group on Azure Container Instances. The file share is mapped as a volume to one of the containers in the container group:
Deploying infrastructure with pulumi up
Installation is extremely straightforward. I chose to write the code in JavaScript as I had all the tools already installed on my Windows box. It is also more polished than the Go option (for now). I installed Pulumi per their instructions over at https://pulumi.io/quickstart/install.html.
Next, I used their cloud console to create a new project. Eventually, you will need to run a pulumi new command on your local machine. The cloud console will provide you with the command to use which is handy when you are just getting started. The cloud console provides a great overview of all your activities:
Nice and green (because I did not include the failed ones 😉)
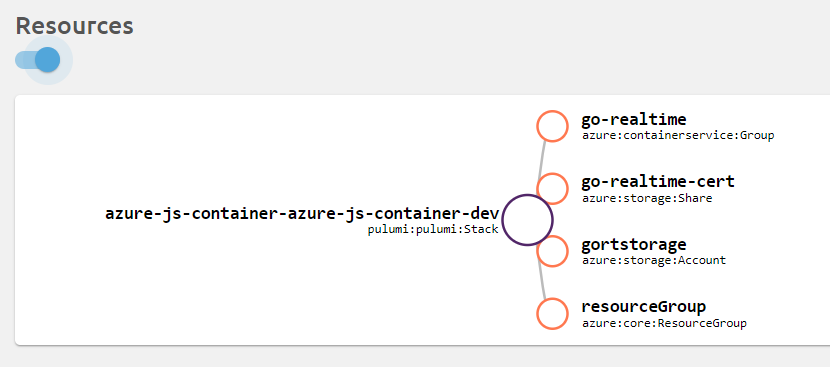
In Resources, you can obtain a graph of the deployed resources:
The above code creates the resource group, storage account and file share. It is so straightforward that there is no need to explain it, especially if you know how it works with ARM. The simplicity of just referring to properties of resources you just created is awesome!
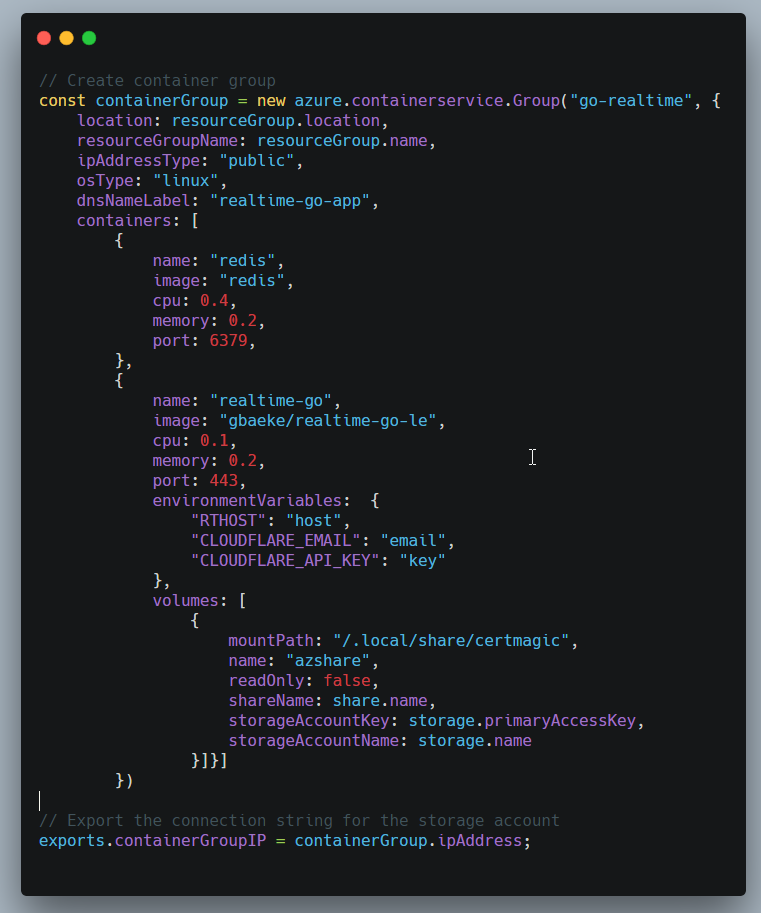
Next, we create a container group with two containers:
Creating the container group
If you have ever created a container group with a YAML file or ARM template, the above code will be very familiar. It defines a DNS label for the group and sets the type to Linux (ACI also supports Windows). Then two containers are added. The realtime-go container uses CertMagic to obtain Let’s Encrypt certificates. The certificates should be stored in persistent storage and that is what the Azure File Share is used for. It is mounted on /.local/share/certmagic because that is where the files will be placed in a scratch container.
I did run into a small issue with the container group. The realtime-go container should expose both port 80 and 443 but the port setting is a single numeric value. In YAML or ARM, multiple ports can be specified which makes total sense. Pulumi has another cross-cloud option to deploy containers which might do the trick.
All in all, I am pleasantly surprised with Pulumi. It’s definitely worth a more in-depth investigation!
In the previous blog post, I discussed adding SSL to webhookd. In this post, I will briefly show how to use this solution to deploy Azure resources.
To run webhookd, I deployed a small Standard_B1s machine (1GB RAM, 1 vCPU) with a system assigned managed identity. After deployment, information about the managed identity is available via the Identity link.
Code running on a machine with a managed identity needs to do something specific to obtain information about the identity like a token. With curl, you would issue the following command:
The response would be JSON that contains a field called access_token. You could parse out the access_token and then use the token in a call to the Azure Resource Manager APIs. You would use the token in the autorization header. Full details about acquiring these tokens can be found here. On that page, you will find details about acquiring the token with Go, JavaScript and several other languages.
Because we are using webhookd and shell scripts, the Azure CLI is the ideal way to create Azure resources. The Azure CLI can easily authenticate with the managed identity using a simple command: az login –identity. Here’s a shell script that uses it to create a virtual machine:
echo "Creating the resource group...`az group create -n $rg -l westeurope`"
echo "Creating the vm...`az vm create --no-wait --size Standard_B1s --resource-group $rg --name $vmname --image win2016datacenter --admin-username azureuser --admin-password $pw`"
The script expects three parameters: rg, vmname and pw. We can pass these parameters as HTTP query parameters. If the above script would be in the ./scripts/vm folder as create.sh, I could do the following call to webhookd:
curl --user api -XPOST "https://<public_server_dns>/vm/create?vmname=myvm&rg=myrg&pw=Abcdefg$$$$!!!!"
The response to the above call would contain the output from the three az commands. The az login command would output the following:
Notice the user object, which clearly indicates we are using a system-assigned managed identity. In my case, the managed identity has the contributor role on an Azure subscription used for testing. With that role, the shell script has the required access rights to deploy the virtual machine.
As you can see, it is very easy to use webhookd to deploy Azure resources if the Azure virtual machine that runs webhookd has a managed identity with the required access rights.