So you want a chat bot to talk to your SharePoint data?

It’s a common request we hear from clients: “We want a chatbot that can interact with our data in SharePoint!” The idea is compelling â€“ instead of relying on traditional search methods or sifting through hundreds of pages and documents, users could simply ask the bot a question and receive an instant, accurate answer. It promises to be a much more efficient and user-friendly experience.

The appeal is clear:

  • Improved user experience
  • Time savings
  • Increased productivity

But how easy is it to implement a chatbot for SharePoint and what are some of the challenges? Let’s try and find out.

The easy way: Copilot Studio

I have talked about Copilot Studio in previous blog posts. One of the features of Copilot Studio is generative answers. With generative answers, your copilot can find and present information for different sources like web sites or SharePoint data. The high level steps to work with SharePoint data are below:

  • Configure your copilot to use Microsoft Entra ID authentication
  • In the Create generative answers node, in the Data sources field, add the SharePoint URLs you want to work with

From a high level, this is all you need to start asking questions. One advantage of using this feature is that the SharePoint data is accessed on behalf of the user. When generative answers searches for SharePoint data, it only returns information that the user has access to.

It is important to note that the search relies on a call to the Graph API search endpoint (https://graph.microsoft.com/v1.0/search/query) and that only the top three results that come back from this call are used. Generative answers only works with files up to 3MB in size. It is possible that the search returns documents that are larger than 3MB. They would not be processed. If all results are above 3MB, generative answers will return an empty response.

In addition, the user’s question is rewritten to only send the main keywords to the search. The type of search is a keyword search. It is not a similarity search based on vectors.

Note: the type of search will change when Microsoft enables Semantic Index for Copilot for your tenant. Other limitations, like the 3MB size limit, will be removed as well.

Pros:

  • easy to configure (UI)
  • uses only documents the user has access to (Entra ID integration)
  • no need to create a pipeline to process SharePoint data; simply point at SharePoint URLs đŸ”Ĩ
  • an LLM is used “under the hood”; there is no need to setup an Azure OpenAI instance

Cons:

  • uses keyword search which can result in less relevant results
  • does not use vector search and/or semantic reranking (e.g., like in Azure AI Search)
  • number of search results that can provide context is not configurable (maximum 3)
  • documents are not chunked; search can not retrieve relevant pieces of text from a document
  • maximum size is 3MB; if the document is highly relevant to answer the user’s query, it might be dropped because of its size

Although your mileage may vary, the limitations make it hard to build a chat bot that provides relevant and qualitative answers. What can we do to fix that?

Copilot Studio with Azure OpenAI on your data

Copilot Studio has integration with Azure OpenAI on your data. Azure OpenAI on your data makes it easy to create an Azure AI Search index based on your documents. Such an index creates chunks of larger documents and uses vectors to match a user’s query to similar chunks. Such queries usually result in more relevant pieces of text from multiple documents. In addition to vector search, you can combine vector search with keyword search and optionally rerank the search results semantically. In most cases, you want these advanced search options because relevant context is key for the LLM to work with!

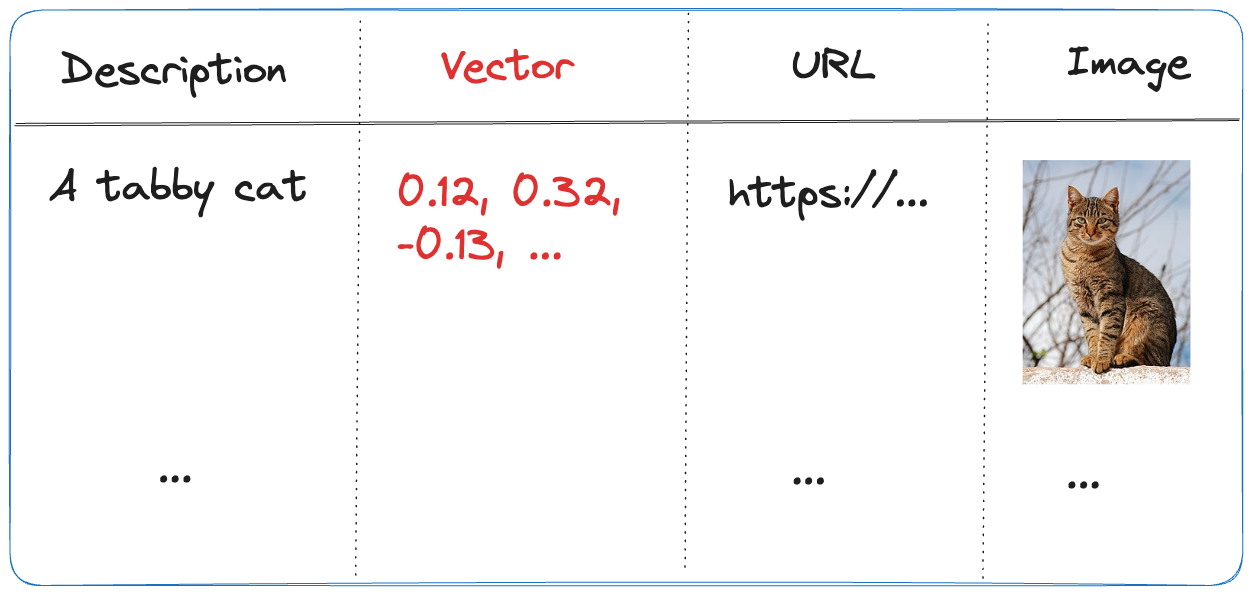
The diagram below shows the big picture:

Using AI Search to query documents with vectors

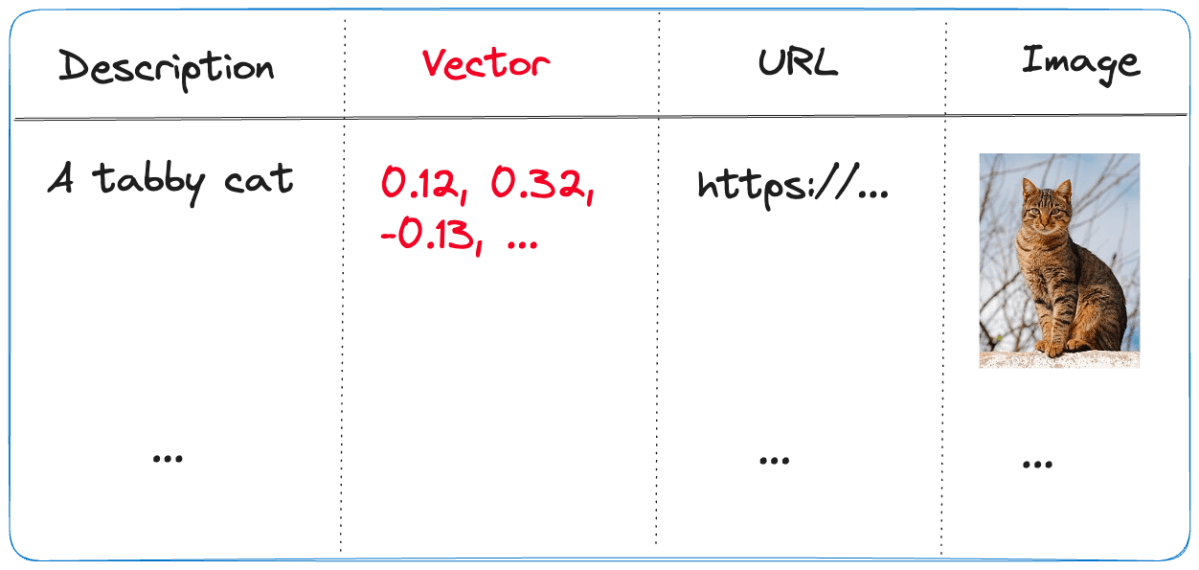
The diagram above shows documents in a storage account (not SharePoint, we will get to that). With Azure OpenAI on your data, you simply point to the storage account, allowing Azure AI Search to build an index that contains one or more document chunks per document. The index contains the text in the chunk and a vector of that text. Via the Azure OpenAI APIs, chat applications (including Copilot Studio) can send user questions to the service together with information about the index that contains relevant content. Behind the scenes, the API searches for similar chunks and uses them in the prompt to answer the user’s question. You can configure the number of chunks that should be put in the prompt. The number is only limited by the OpenAI model’s context limit (8k, 16k, 32k or 128k tokens).

You do not need to write code to create this index. Azure OpenAI on your data provides a wizard to create the index. The image below shows the wizard in Azure AI Studio (https://ai.azure.com):

Azure OpenAI add your data

Above, instead of pointing to a storage account, I selected the Upload files/folder feature. This allows you to upload files to a storage account first, and then create the index from that storage account.

Azure OpenAI on your data is great, but there is this one tiny issue: there is no easy way to point it to your SharePoint data!

It would be fantastic if SharePoint was a supported datasource. However, it is important to realise that SharePoint is not a simple datasource:

  • What credentials are used to create the index?
  • How do you ensure that queries use only the data the user has access to?
  • How do you keep the SharePoint data in sync with the Azure AI Search index? And not just the data, the ACLs (access control lists) too.
  • What SharePoint data do you support? Just documents? List items? Web pages?

The question now becomes: “How do you get SharePoint data into AI Search to improve search results?” Let’s find out.

Creating an AI Search index with SharePoint data

Azure AI Search offers support for SharePoint as a data source. However, it’s important to note that this feature is currently in preview and has been in that state for an extended period of time. Additionally, there are several limitations associated with this functionality:

  • SharePoint .ASPX site content is not supported.
  • Permissions are not automatically ingested into the index. To enable security trimming, you will need to add permission-related information to the index manually, which is a non-trivial task.

In the official documentation, Microsoft clearly states that if you require SharePoint content indexing in a production environment, you should consider creating a custom connector that utilizes SharePoint webhooks in conjunction with the Microsoft Graph API to export data to an Azure Blob container. Subsequently, you can leverage the Azure Blob indexer to index the exported content. This approach essentially means that you are responsible for developing and maintaining your own custom solution.

Note: we do not follow the approach with webhooks because of its limitations

What to do?

When developing chat applications that leverage retrieval-augmented generation (RAG) with SharePoint data, we typically use a Logic App or custom job to process the SharePoint data in bulk. This Logic App or job ingests various types of content, including documents and site pages.

To maintain data integrity and ensure that the system remains up-to-date, we also utilize a separate Logic App or job that monitors for changes within the SharePoint environment and updates the index accordingly.

However, implementing this solution in a production environment is not a trivial task, as there are numerous factors to consider:

  • Logic Apps have limitations when it comes to processing large volumes of data. Custom code can be used as a workaround.
  • Determining the appropriate account credentials for retrieving the data securely.
  • Identifying the types of changes to monitor: file modifications, additions, deletions, metadata updates, access control list (ACL) changes, and more.
  • Ensuring that the index is updated correctly based on the detected changes.
  • Implementing a mechanism to completely rebuild the index when the data chunking strategy changes, typically involving the creation of a new index and updating the bot to utilize the new index. Index aliases can be helpful in this regard.

In summary, building a custom solution to index SharePoint data for chat applications with RAG capabilities is a complex undertaking that requires careful consideration of various technical and operational aspects.

Security trimming

Azure AI Search does not provide document-level permissions. There is also no concept of user authentication. This means that you have to add security information to an Azure AI Search index yourself and, in code, ensure that AI Search only returns results that the logged on user has access to.

Full details are here with the gist of it below:

  • add a security field of type collection of strings to your index; the field should allow filtering
  • in that field, store group Ids (e.g., Entra ID group oid’s) in the array
  • while creating the index, retrieve the group Ids that have at least read access to the document you are indexing; add each group Id to the security field

When you query the index, retrieve the logged on user’s list of groups. In your query, use a filter like the one below:

{
"filter":"group_ids/any(g:search.in(g, 'group_id1, group_id2'))"
}

Above, group_ids is the security field and group_id1 etc… are the groups the user belongs to.

For more detailed steps and example C# code, see https://learn.microsoft.com/en-us/azure/search/search-security-trimming-for-azure-search-with-aad.

If you want changes in ACLs in SharePoint to be reflected in your index as quickly as possible, you need a process to update the security field in your index that is triggered by ACL changes.

Conclusion

Crafting a chat bot that seamlessly works with SharePoint data to deliver precise answers is no simple feat. Should you manage to obtain satisfactory outcomes leveraging generative responses within Copilot Studio, it’s advisable to proceed with that route. Even if you do not use Copilot Studio, you can use Graph API search within custom code.

If you want more accurate search results and switch to Azure AI Search, be mindful that establishing and maintaining the Azure AI Search index, encompassing both SharePoint data and access control lists, can be quite involved.

It seems Microsoft is relying on the upcoming Semantic Index capability to tackle these hurdles, potentially in combination with Copilot for Microsoft 365. When Semantic Index ultimately becomes available, executing a search through the Graph API could potentially fulfill your requirements.

Embedding flows created with Microsoft Prompt Flow in your own applications

A while ago, I wrote about creating your first Prompt Flow in Visual Studio Code. In this post, we will embed such a flow in a Python application built with Streamlit. The application allows you to search for images based on a description. Check the screenshot below:

Streamlit app to search for images based on a description

There are a few things we need to make this work:

  • An index in Azure AI Search that contains descriptions of images, a vector of these descriptions and a link to the image
  • A flow in Prompt Flow that takes a description as input and returns the image link or the entire image as output
  • A Python application (the Streamlit app above) that uses the flow to return an image based on the description

Let’s look at each component in turn.

Azure AI Search Index

Azure AI Search is a search index that supports keyword search, vector search and semantic reranking. You can combine keyword and vector search in what is called a hybrid search. The hybrid search results can optionally be reranked further using a state-of-the-art semantic reranker.

The index we use is represented below:

Index in Azure AI Search
  • Description: contains the description of the image; the image description was generated with the gpt-4-vision model and is larger than just a few words
  • URL: the link to the actual image; the image is not stored in the index, it’s just shown for reference
  • Vector: vector generated by the Azure OpenAI embedding model; it generates 1536 floating point numbers that represent the meaning of the description

Using vectors and vector search allows us to search not just for cat but also for words like kat (in Dutch) or even feline creature.

The flow we will create in Prompt Flow uses the Azure AI Search index to find the URL based on the description. However, because Azure AI Search might return images that are not relevant, we also use a GPT model to make the final call about what image to return.

Flow

In Prompt Flow in Visual Studio Code, we will create the flow below:

Flow we will embed in the Streamlit app

It all starts from the input node:

Input node

The flow takes one input: description. In order to search for this description, we need to convert it to a vector. Note that we could skip this and just do a text search. However, that will not get us the best results.

To embed the input, we use the embedding node:

Embedding node

The embedding node uses a connection called open_ai_connection. This connection contains connection information to an Azure OpenAI resource that hosts the embedding model. The model deployment’s name is embedding. The input to the embedding node is the description from the input. The output is a vector:

Output of embedding node

Now that we have the embedding, we can use a Vector DB Lookup node to perform a vector search in Azure AI Search:

Azure AI Search

Above, we use another connection (acs-geba) that holds the credentials to connect to the Azure AI Search resource. We specify the following to perform the search:

  • index name to search: images-sdk here
  • what text to put in the text_field: the description from the input; this search will be a hybrid search; we search with both text and a vector
  • vector field: the name of the field that holds the vector (textVector field in the images-sdk index)
  • search_params: here we specify the fields we want to return in the search results; name, description and url
  • vector to find similar vectors for: the output from the embedding node
  • the number of similar items to return: top_k is 3

The result of the search node is shown below:

Search results

The result contains three entries from the search index. The first result is the closest to the description from our input node. In this case, we could just take the first result and be done with it. But what if we get results that do not match the description?

To make the final judgement about what picture to return, let’s add an LLM node:

LLM Node

The LLM node uses the same OpenAI connection and is configured to use the chat completions API with the gpt-4 model. We want this node to return proper JSON by setting the response_format to json_object. We also need a prompt, which is a ninja2 template best_image.jinja2:

system:
You return the url to an image that best matches the user's question. Use the provided context to select the image. Return the URL in JSON like so:
{ "url": "the_url_from_search" }

Only return an image when the user question matches the context. If not found, return JSON with the url empty like { "url": "" }

user question:
{{description}}

context : {{search_results}}

The template above sets the system prompt and specifically asks to return JSON. With the response format set to JSON, the word JSON (in uppercase) needs to be in the prompt or you will get an error.

The prompt defines two parameters:

  • description: we connect the description from the input to this parameter
  • search_results: we connect the results from the aisearch node to this parameter

In the screenshot above, you can see this mapping being made. It’s all done in the UI, no code required.

When this node returns an output, it will be in the JSON format we specified. However, that does still not mean that the URL will be correct. The model might still return an incorrect url, although we try to mitigate that in the prompt.

Below is an example of the LLM output when the description is cat:

Model picked the cat picture

Now that we have the URL, I want the flow to output two values:

  • the URL: the URL as a string, not wrapped in JSON
  • the base-64 representation of the image that can we used directly in an HTML IMG tag

We use two Python tools for this and bring the results to the output node. Python tools use custom Python code:

Setting the output

The code in get_image is below:

from promptflow import tool
import json, base64, requests

def url_to_base64(image_url):
    response = requests.get(image_url)
    return 'data:image/jpg;base64,' + base64.b64encode(response.content).decode('utf-8')

@tool
def my_python_tool(image_json: str) -> str:
    url = json.loads(image_json)["url"]

    if url:
        base64_string = url_to_base64(url)
    else:
        base64_string = url_to_base64("https://placehold.co/400/jpg?text=No+image")

    return base64_string

The node executes the function that is marked with the @tool decorator and sends it the output from the LLM node. The code grabs the url and downloads and transforms the image to its base64 representation. You can see how the output from the LLM node is mapped to the image_json parameter below:

linking the function parameter to the LLM output

The code in get_url is similar. It just extracts the url as a string from the input JSON coming from the url.

The output node is the following:

Output node

The output has two properties: data (the base64-encoded image) and the url to the image. Later, in the Python code that uses this flow, the output will be a Python dict with a data and url entry.

Using the flow in your application

Although you can host this flow as an API using either an Azure Machine Learning endpoint or a Docker container, we will simply embed the flow in our Python application and call it like a regular Python function.

Here is the code, which uses Streamlit for the UI:

from promptflow import load_flow
import streamlit as st

# load Prompt Flow from parent folder
flow_path = "../."
f = load_flow(flow_path)

# Streamlit UI
st.title('Search for an image')

# User input
user_query = st.text_input('Enter your query and press enter:')

if user_query:
    # extract url from dict and wrap in img tag
    flow_result = f(description=user_query)
    image = flow_result["data"]
    url = flow_result["url"]

    img_tag = f'<a href="{url}"><img src="{image}" alt="image" width="300"></a>'
     
    # just use markdown to display the image
    st.markdown(f"🌆 Image URL: {url}")
    st.markdown(img_tag, unsafe_allow_html=True)

To load the flow in your Python app as a function:

  • import load_flow from the promptflow module
  • set a path to your flow (relative or absolute): here we load the flow that is in the parent directory that contains flow.dag.yaml.
  • use load_flow to create the function: above the function is called f

When the user enters the query, you can simply use f(description="user's query...") to obtain the output. The output is a Python dict with a data and url entry.

In Streamlit, we can use markdown to display HTML directly using unsafe_allow_html=True. The HTML is simply an <img> tag with the src attribute set to the base64 representation of the image.

Connections

Note that the flow on my system uses two connections: one to connect to OpenAI and one to connect to Azure AI Search. By default, Prompt Flow stores these connections in a SQLite database in the .promptflow folder of your home folder. This means that the Streamlit app work on my machine but will not work anywhere else.

To solve this, you can override the connections in your app. See https://github.com/microsoft/promptflow/blob/main/examples/tutorials/get-started/flow-as-function.ipynb for more information about these overrides.

Conclusion

Embedding a flow as a function in a Python app is one of the easiest ways to use a flow in your applications. Although we used a straightforward Streamlit app here, you could build a FastAPI server that provides endpoints to multiple flows from one API. Such an API can easily be hosted as a container on Container Apps or Kubernetes as part of a larger application.

Give it a try and let me know what you think! 😉

Using Azure Database for PostgreSQL as a vector store

When we build LLM applications, there is always a recurring question: “What vector store will we use?”. In Azure, there are several native solutions. Some of them were discussed in previous posts.

  • Azure Cognitive Search: supports vector search but also hybrid search with semantic reranking as discussed here
  • Azure Redis Cache Enterprise: check my blog post
  • Azure Cosmos DB for MongoDB Core: see Microsoft Learn

In addition to the above, you can of course host your own vector database in a container such as Qdrant or others. You can install these on any service that supports containers such as App Service, Container Instances, Container Apps, or Kubernetes.

Using PostgreSQL

If you are familiar with Azure Database for PostgreSQL flexible servers, you can use it as a vector store, as long as you install the vector extension. This extension can be enabled in all compute tiers. I installed PostgreSQL and set the compute tier to Burstable with size Standard_B1ms (1 vCore, 2GB). This is great for testing and will cost around 20 euros per month with 32GB of storage. For production use, the monthly cost will start from about 150 euros at the lowest General Purpose tier.

PostrgreSQL flexible server with lowest compute tier

After deployment, you need to enable the vector extension. In Server Parameters, search for azure.extensions and select VECTOR from the list. Then click Save.

VECTOR extension added

When done, grab the connection details from the Connect pane:

Connection details

In pgAdmin, register the server with the above details. Connect to the server and create a database. Ensure you configure the firewall settings in Azure to allow your IP address to connect to the server.

Database creation in pgAdmin

Inside the database, go to Extensions and add the vector extension:

vector extension added to the database

Note: in the code below, we will use LangChain. LangChain will try to enable the vector extension if it is not enabled

Note: if you do not want to install pgAdmin, you can create the database from the Azure Portal or use the Azure CLI.

Working with the vector store

Although you can create and query tables that contain vectors with plain SQL, we will use LangChain as a higher-level library that takes care of many of the details for us.

Take a look at the following Python code that creates a few embeddings (vectors) and then uses RAG (retrieval augmented generation) to answer a question with OpenAI’s text-davinci-003 model.

Note: the code is on Github as well

import os
import getpass

# read from .env file
from dotenv import load_dotenv
load_dotenv()

from langchain.embeddings.openai import OpenAIEmbeddings
from langchain.text_splitter import CharacterTextSplitter
from langchain.vectorstores import PGVector
from langchain.document_loaders import TextLoader
from langchain.chains import RetrievalQA
from langchain.llms import OpenAI


loader = TextLoader("./state_of_the_union.txt")
documents = loader.load()
text_splitter = CharacterTextSplitter(chunk_size=1000, chunk_overlap=0)
docs = text_splitter.split_documents(documents)

embeddings = OpenAIEmbeddings()


pgpassword = os.getenv("PGPASSWORD", "")
if not pgpassword:
    pgpassword = getpass.getpass("Enter pgpassword: ")

CONNECTION_STRING = f"postgresql+psycopg2://pgadmin:{pgpassword}@pg-vec-geba.postgres.database.azure.com:5432/pgvector"

COLLECTION_NAME = "state_of_the_union_test"

# if you run this code more than once, you will duplicated vectors
# no upserts
db = PGVector.from_documents(
    embedding=embeddings,
    documents=docs,
    collection_name=COLLECTION_NAME,
    connection_string=CONNECTION_STRING
)

retriever = db.as_retriever()

query = "What did the president say about Ketanji Brown Jackson"

# LLM will default to text-davinci-003 because we are using a completion endpoint
# versus a chat endpoint
qa = RetrievalQA.from_chain_type(llm=OpenAI(), chain_type="stuff", retriever=retriever)

answer = qa.run(query)

print(answer)

The code above requires a .env file with the following content:

OPENAI_API_KEY=OPENAI_API_KEY
PGPASSWORD=PASSWORD_TO_POSTGRES

You will also need the State of the Union text file from here.

Before running the code, install the following packages:

pip install pgvector
pip install openai
pip install psycopg2-binary
pip install tiktoken

The code does the following:

  • Import required libraries: important here is the PGVector import
  • Loads the text file and splits it into chunks: chunking strategy is not too important here; just use chunks of 1000 characters
  • Create an instance of type OpenAIEmbeddings, later used to create a vector per chunk for storage in PostgreSQL; it will also be used when doing queries with a retrieval QA chain (see below); uses text-embedding-ada-002 embedding model
  • Construct the connection string for later use and set a collection name: collections are a way to store vectors together; the collections you create are kept in a table and each vector references the collection
  • Create an instance of PGVector with PGVector.from_documents: this will create/use tables to hold the collection(s) and vectors for you; all chunks will be vectorized and stored in a table; we will take a look at those tables in a moment; in a real application, you would reference existing tables and another process would create/update the vectors
  • Create a retriever (qa) from the PGVector instance for use in a retrieval QA chain
  • Run a query and print the answer: the qa.run (query) line does the n-nearest neighbor vector search in PostgreSQL (via the retriever), creates a meta-prompt with the relevant context, and returns the OpenAI model response in one step

In the PostgreSQL database, the above code creates two tables:

Tables created by LangChain to store the vectors

The collection table contains the collections you create from code. Each collection has a unique ID. The embedding table contains the vectors. Each vector has a unique ID and belongs to a collection. The fields of the embedding table are:

  • uuid: unique ID of the vector
  • collection_id: collection ID referencing the collection table
  • embedding: a field of type vector that stores the embedding (1536 dimensions)
  • document: the chunk of text that was vectorized
  • cmetadata: a JSON field with a link to the source file
  • custom_id: an id that is unique for each run

Note that when you run the sample Python code multiple times, you will have duplicated content. In a real application, you should avoid that. The process that creates and stores the vectors will typically be separate from the process that queries them.

âš ī¸ Important: Today, LangChain cannot search over all vectors in all collections. You always need to specify the collection to search. If you do need to search over all vectors, you can use SQL statements instead.

The search has the following properties:

  • Distance strategy: cosine similarity; the pgvector extension also supports L2 distance and inner product; the code above uses the text-embedding-ada-002 embeddings model by default; with that model, you should use cosine similarity; LangChain uses cosine similarity as the default for PGVector so that’s a match! 👏
  • Exact nearest neighbor search: although this provides perfect recall, it can get slow when there are many vectors because the entire table is scanned; the extension supports the creation of indexes to perform an approximate nearest neighbor search using IVFFLat or HNSW; see pgvector on GitHub for more details and also this article from Crunchy Data.

Note: most other vector databases use HNSW as the index type (e.g., Azure Cognitive Search, Qdrant, …); unlike IVFFLat you can create this index without having any vectors in your database table; at the time of writing (end of September 2023), the version of the vector extension on Azure was 0.4.1 and did not support HNSW; HNSW requires version 0.5.0 or higher

Conclusion

Azure Database for PostgreSQL with the vector extension is an interesting alternative to other vector database solutions in Azure. This is especially the case when PostgreSQL is your database of choice! In this post, we have shown how LangChain supports it with a simple example. If you do not use LangChain or other libraries, you can simply use SQL statements to create and search indexes as documented here.

The drawback of using PostgreSQL is that you need to know a bit more about exact and approximate nearest neighbor searches and the different index mechanisms. That’s actually a good thing if you want to create production applications with good performance. For a simple POC with not a lot of data, you can skip all of this and perform exact searches.

Besides the free tier of Azure Cognitive Search, the configuration above is the service with the lowest cost for POCs that need vector search. On top of that, the cheapest PostgreSQL option has more storage than Cognitive Search’s free tier (32GB vs. 50MB). Adding more storage is easy and relatively cheap as well. Give it a go and tell me what you think!

Use Azure OpenAI Add your data vector search from code

In the previous post, we looked at using Azure OpenAI Add your data from the Azure OpenAI Chat Playground. It is an easy-to-follow wizard to add documents to a storage account and start asking questions about them. From the playground, you can deploy a chat app to an Azure web app and you are good to go. The vector search is performed by an Azure Cognitive Search resource via an index that includes a vector next to other fields such as the actual content, the original URL, etc…

In this post, we will look at using this index from code and build a chat app using the Python Streamlit library.

All code can be found here: https://github.com/gbaeke/azure-cog-search

Requirements

You need an Azure Cognitive Search resource with an index that supports vector search. Use this post to create one. Besides Azure Cognitive Search, you will need Azure OpenAI deployed with both gpt-4 (or 3.5) and the text-embedding-ada-002 embedding model. The embedding model is required to support vector search. In Europe, use France Central as the region.

Next, you need Python installed. I use Python 3.11.4 64-bit on an M1 Mac. You will need to install the following libraries with pip:

  • streamlit
  • requests

You do not need the OpenAI library because we will use the Azure OpenAI REST APIs to be able to use the extension that enables the Add your data feature.

Configuration

We need several configuration settings. The can be divided into two big blocks:

  • Azure Cognitive Search settings: name of the resource, access key, index name, columns, type of search (vector), and more…
  • Azure OpenAI settings: name of the model (e.g., gpt-4), OpenAI access key, embedding model, and more…

You should create a .env file with the following content:

AZURE_SEARCH_SERVICE = "AZURE_COG_SEARCH_SHORT_NAME"
AZURE_SEARCH_INDEX = "INDEX_NAME"
AZURE_SEARCH_KEY = "AZURE_COG_SEARCH_AUTH_KEY"
AZURE_SEARCH_USE_SEMANTIC_SEARCH = "false"
AZURE_SEARCH_TOP_K = "5"
AZURE_SEARCH_ENABLE_IN_DOMAIN = "true"
AZURE_SEARCH_CONTENT_COLUMNS = "content"
AZURE_SEARCH_FILENAME_COLUMN = "filepath"
AZURE_SEARCH_TITLE_COLUMN = "title"
AZURE_SEARCH_URL_COLUMN = "url"
AZURE_SEARCH_QUERY_TYPE = "vector"

# AOAI Integration Settings
AZURE_OPENAI_RESOURCE = "AZURE_OPENAI_SHORT_NAME"
AZURE_OPENAI_MODEL = "gpt-4"
AZURE_OPENAI_KEY = "AZURE_OPENAI_AUTH_KEY"
AZURE_OPENAI_TEMPERATURE = 0
AZURE_OPENAI_TOP_P = 1.0
AZURE_OPENAI_MAX_TOKENS = 1000
AZURE_OPENAI_STOP_SEQUENCE = ""
AZURE_OPENAI_SYSTEM_MESSAGE = "You are an AI assistant that helps people find information."
AZURE_OPENAI_PREVIEW_API_VERSION = "2023-06-01-preview"
AZURE_OPENAI_STREAM = "false"
AZURE_OPENAI_MODEL_NAME = "gpt-4"
AZURE_OPENAI_EMBEDDING_ENDPOINT = "https://AZURE_OPENAI_SHORT_NAME.openai.azure.com/openai/deployments/embedding/EMBEDDING_MODEL_NAME?api-version=2023-03-15-preview"
AZURE_OPENAI_EMBEDDING_KEY = "AZURE_OPENAI_AUTH_KEY"

Now we can create a config.py that reads these settings.

from dotenv import load_dotenv
import os
load_dotenv()

# ACS Integration Settings
AZURE_SEARCH_SERVICE = os.environ.get("AZURE_SEARCH_SERVICE")
AZURE_SEARCH_INDEX = os.environ.get("AZURE_SEARCH_INDEX")
AZURE_SEARCH_KEY = os.environ.get("AZURE_SEARCH_KEY")
AZURE_SEARCH_USE_SEMANTIC_SEARCH = os.environ.get("AZURE_SEARCH_USE_SEMANTIC_SEARCH", "false")
AZURE_SEARCH_TOP_K = os.environ.get("AZURE_SEARCH_TOP_K", 5)
AZURE_SEARCH_ENABLE_IN_DOMAIN = os.environ.get("AZURE_SEARCH_ENABLE_IN_DOMAIN", "true")
AZURE_SEARCH_CONTENT_COLUMNS = os.environ.get("AZURE_SEARCH_CONTENT_COLUMNS")
AZURE_SEARCH_FILENAME_COLUMN = os.environ.get("AZURE_SEARCH_FILENAME_COLUMN")
AZURE_SEARCH_TITLE_COLUMN = os.environ.get("AZURE_SEARCH_TITLE_COLUMN")
AZURE_SEARCH_URL_COLUMN = os.environ.get("AZURE_SEARCH_URL_COLUMN")
AZURE_SEARCH_VECTOR_COLUMNS = os.environ.get("AZURE_SEARCH_VECTOR_COLUMNS")
AZURE_SEARCH_QUERY_TYPE = os.environ.get("AZURE_SEARCH_QUERY_TYPE")

# AOAI Integration Settings
AZURE_OPENAI_RESOURCE = os.environ.get("AZURE_OPENAI_RESOURCE")
AZURE_OPENAI_MODEL = os.environ.get("AZURE_OPENAI_MODEL")
AZURE_OPENAI_KEY = os.environ.get("AZURE_OPENAI_KEY")
AZURE_OPENAI_TEMPERATURE = os.environ.get("AZURE_OPENAI_TEMPERATURE", 0)
AZURE_OPENAI_TOP_P = os.environ.get("AZURE_OPENAI_TOP_P", 1.0)
AZURE_OPENAI_MAX_TOKENS = os.environ.get("AZURE_OPENAI_MAX_TOKENS", 1000)
AZURE_OPENAI_STOP_SEQUENCE = os.environ.get("AZURE_OPENAI_STOP_SEQUENCE")
AZURE_OPENAI_SYSTEM_MESSAGE = os.environ.get("AZURE_OPENAI_SYSTEM_MESSAGE", "You are an AI assistant that helps people find information about jobs.")
AZURE_OPENAI_PREVIEW_API_VERSION = os.environ.get("AZURE_OPENAI_PREVIEW_API_VERSION", "2023-06-01-preview")
AZURE_OPENAI_STREAM = os.environ.get("AZURE_OPENAI_STREAM", "true")
AZURE_OPENAI_MODEL_NAME = os.environ.get("AZURE_OPENAI_MODEL_NAME", "gpt-35-turbo")
AZURE_OPENAI_EMBEDDING_ENDPOINT = os.environ.get("AZURE_OPENAI_EMBEDDING_ENDPOINT")
AZURE_OPENAI_EMBEDDING_KEY = os.environ.get("AZURE_OPENAI_EMBEDDING_KEY")

Writing the chat app

Now we will create chat.py. The diagram below summarizes the architecture:

Chat app architecture (high level)

Here is the first section of the code with explanations:

import requests
import streamlit as st
from config import *
import json

# Azure OpenAI REST endpoint
endpoint = f"https://{AZURE_OPENAI_RESOURCE}.openai.azure.com/openai/deployments/{AZURE_OPENAI_MODEL}/extensions/chat/completions?api-version={AZURE_OPENAI_PREVIEW_API_VERSION}"
    
# endpoint headers with Azure OpenAI key
headers = {
    'Content-Type': 'application/json',
    'api-key': AZURE_OPENAI_KEY
}

# Streamlit app title
st.title("🤖 Azure Add Your Data Bot")

# Keep messages array in session state
if "messages" not in st.session_state:
    st.session_state.messages = []

# Display previous chat messages from history on app rerun
# Add your data messages include tool responses and assistant responses
# Exclude the tool responses from the chat display
for message in st.session_state.messages:
    if message["role"] != "tool":
        with st.chat_message(message["role"]):
            st.markdown(message["content"])

A couple of things happen here:

  • We import all the variables from config.py
  • We construct the Azure OpenAI REST endpoint and store it in endpoint; we use the extensions/chat endpoint here which supports the Add your data feature in API version 2023-06-01-preview and higher
  • We configure the HTTP headers to send to the endpoint; the headers include the Azure OpenAI authentication key
  • We print a title with Streamlit (st.title) and define a messages array that we store in Streamlit’s session state
  • Because of the way Streamlit works, we have to print the previous messages of the chat each time the page reloads. We do that in the last part but we exclude the tool role. The extensions/chat endpoint returns a tool response that contains the data returned by Azure Cognitive Search. We do not want to print the tool response. Together with the tool response, the endpoint returns an assistant response which is the response from the gpt model. We do want to print that response.

Now we can look at the code that gets executed each time the user asks a question. In the UI, the question box is at the bottom:

Streamlit chat UI

Whenever you type a question, the following code gets executed:

# if user provides chat input, get and display response
# add user question and response to previous chat messages
if user_prompt := st.chat_input():
    st.chat_message("user").write(user_prompt)
    with st.chat_message("assistant"):
        with st.spinner("🧠 thinking..."):
            # add the user query to the messages array
            st.session_state.messages.append({"role": "user", "content": user_prompt})
            body = {
                "messages": st.session_state.messages,
                "temperature": float(AZURE_OPENAI_TEMPERATURE),
                "max_tokens": int(AZURE_OPENAI_MAX_TOKENS),
                "top_p": float(AZURE_OPENAI_TOP_P),
                "stop": AZURE_OPENAI_STOP_SEQUENCE.split("|") if AZURE_OPENAI_STOP_SEQUENCE else None,
                "stream": False,
                "dataSources": [
                    {
                        "type": "AzureCognitiveSearch",
                        "parameters": {
                            "endpoint": f"https://{AZURE_SEARCH_SERVICE}.search.windows.net",
                            "key": AZURE_SEARCH_KEY,
                            "indexName": AZURE_SEARCH_INDEX,
                            "fieldsMapping": {
                                "contentField": AZURE_SEARCH_CONTENT_COLUMNS.split("|") if AZURE_SEARCH_CONTENT_COLUMNS else [],
                                "titleField": AZURE_SEARCH_TITLE_COLUMN if AZURE_SEARCH_TITLE_COLUMN else None,
                                "urlField": AZURE_SEARCH_URL_COLUMN if AZURE_SEARCH_URL_COLUMN else None,
                                "filepathField": AZURE_SEARCH_FILENAME_COLUMN if AZURE_SEARCH_FILENAME_COLUMN else None,
                                "vectorFields": AZURE_SEARCH_VECTOR_COLUMNS.split("|") if AZURE_SEARCH_VECTOR_COLUMNS else []
                            },
                            "inScope": True if AZURE_SEARCH_ENABLE_IN_DOMAIN.lower() == "true" else False,
                            "topNDocuments": AZURE_SEARCH_TOP_K,
                            "queryType":  AZURE_SEARCH_QUERY_TYPE,
                            "roleInformation": AZURE_OPENAI_SYSTEM_MESSAGE,
                            "embeddingEndpoint": AZURE_OPENAI_EMBEDDING_ENDPOINT,
                            "embeddingKey": AZURE_OPENAI_EMBEDDING_KEY
                        }
                    }   
                ]
            }  

            # send request to chat completion endpoint
            try:
                response = requests.post(endpoint, headers=headers, json=body)

                # there will be a tool response and assistant response
                tool_response = response.json()["choices"][0]["messages"][0]["content"]
                tool_response_json = json.loads(tool_response)
                assistant_response = response.json()["choices"][0]["messages"][1]["content"]

                # get urls for the JSON tool response
                urls = [citation["url"] for citation in tool_response_json["citations"]]


            except Exception as e:
                st.error(e)
                st.stop()
            
           
            # replace [docN] with urls and use 0-based indexing
            for i, url in enumerate(urls):
                assistant_response = assistant_response.replace(f"[doc{i+1}]", f"[[{i}]({url})]")
            

            # write the response to the chat
            st.write(assistant_response)

            # write the urls to the chat; gpt response might not refer to all
            st.write(urls)

            # add both responses to the messages array
            st.session_state.messages.append({"role": "tool", "content": tool_response})
            st.session_state.messages.append({"role": "assistant", "content": assistant_response})
            

When there is input, we write the input to the chat history on the screen and add it to the messages array. The OpenAI APIs expect a messages array that includes user and assistant roles. In other words, user questions and assistant (here gpt-4) responses.

With a valid messages array, we can send our payload to the Azure OpenAI extensions/chat endpoint. If you have ever worked with the OpenAI or Azure OpenAI APIs, many of the settings in the JSON body will be familiar. For example: temperature, max_tokens, and of course the messages themselves.

What’s new here is the dataSources field. It contains all the information required to perform a vector search in Azure Cognitive Services. The search finds content relevant to the user’s question (that was added last to the messages array). Because queryType is set to vector, we also need to provide the embedding endpoint and key. It’s required because the user question has to be vectorized in order to compare it with the stored vectors.

It’s important to note that the extensions/chat endpoint, together with the dataSources configuration takes care of a lot of the details:

  • Perform a k-nearest neighbor search (k=5 here) to find 5 documents closely related to the user’s question
  • It uses vector search for this query (could be combined with keyword and semantic search to perform a hybrid search but that is not used here)
  • It stuffs the prompt to the GPT model with the relevant content
  • It returns the GPT model response (assistant response) together with a tool response. The tool response contains citations that include URLs to the original content and the content itself.

In the UI, we print the URLs from these citations after modifying the assistant response to just return hyperlinked numbers like [0] and [1] for the citations instead of unlinked [doc1], [doc2], etc… In the UI, that looks like:

Printing the URLs from the citations

Note that this chat app is a prototype and does not include management of the messages array. Long interactions will reach the model’s token limit!

You can find this code on GitHub here: https://github.com/gbaeke/azure-cog-search.

Conclusion

Although still in preview, you now have an Azure-native solution that enables the RAG pattern with vector search. RAG stands for Retrieval Augmented Generation. Azure Cognitive Search is a fully managed service that stores the vectors and performs similarity searches. There is no need to deploy a 3rd party vector database.

There is no need for specific libraries to implement this feature because it is all part of the Azure OpenAI API. Microsoft simply extended that API to add data sources and takes care of all the behind-the-scenes work that finds relevant content and adds it to your prompt.

If, for some reason, you do not want to use the Azure OpenAI API directly and use something like LangChain or Semantic Kernel, you can of course still do that. Both solutions support Azure Cognitive Search as a vector store.

Storing and querying for embeddings with Redis

In a previous post, we wrote about using vectorized search and cosine similarity to quickly query a database of blog posts and retrieve the most relevant content to a natural language query. This is achieved using OpenAI’s embeddings API, Pinecone (a vector database), and OpenAI ChatCompletions. For reference, here’s the rough architecture:

Vectorized search with Pinecone

The steps above do the following:

  1. A console app retrieves blog post URLs from an RSS feed and reads all the posts one by one
  2. For each post, create an embedding with OpenAI which results in a vector of 1536 dimensions to store in Pinecone
  3. After the embedding is created, store the embedding in a Pinecone index; we created the index from the Pinecone portal
  4. A web app asks the user for a query (e.g., “How do I create a chat bot?”) and creates an embedding for the query
  5. Perform a vectorized search, finding the closest post vectors to the query vector using cosine similarity and keep the one with the highest score
  6. Use the ChatCompletion API and submit the same query but add the highest scoring post as context to the user question. The post text is injected into the prompt

â„šī¸ See Pinecone and OpenAI magic: A guide to finding your long lost blog posts with vectorized search and ChatGPT – baeke.info for more information.

We can replace Pinecone with Redis, a popular open-source, in-memory data store that can be used as a database, cache, and message broker. Redis is well-suited for this task as it can also store vector representations of our blog posts and has the capability to perform vector queries efficiently.

You can easily run Redis with Docker for local development. In addition, Redis is available in Azure, although you will need the Enterprise version. Only Azure Cache for Redis Enterprise supports the RediSearch functionality and that’s what we need here! Note that the Enterprise version is quite costly.

By leveraging Redis for vector storage and querying, we can harness its high performance, flexibility, and reliability in our solution while maintaining the core functionality of quickly querying and retrieving the most relevant blog post content using vectorized search and similarity queries.

â„šī¸ The code below shows snippets. Full samples (yes, samples 😀) are on GitHub: check upload_vectors_redis.py to upload posts to a local Redis instance and search_vectors_redis.py to test the query functionality.

Run Redis with Docker

If you have Docker on your machine, use the following command:

docker run --name redis-stack-server -p 6380:6379 redis/redis-stack-server:latest

â„šī¸ I already had another instance of Redis running on port 6379 so I mapped port 6380 on localhost to port 6379 of the redis-stack-server container.

If you want a GUI to explore your Redis instance, install RedisInsight. The screenshot below shows the blog posts after uploading them as Redis hashes.

RedisInsight in action

Let’s look at creating the hashes next!

Storing post data in Redis hashes

We will create several Redis hashes, one for each post. Hashes are records structured as collections of field-value pairs. Each hash we store, has the following fields:

  • url: url to the blog post
  • embedding: embedding of the blog post (a vector), created with the OpenAI embeddings API and the text-embedding-ada-002 model

We need the URL to retrieve the entire post after a closest match has been found. In Pinecone, the URL would be metadata to the vector. In Redis, it’s just a field in a hash, just like the vector itself.

In RedisInsight, a hash is shown as below:

Redis hash for post 0 with url and embedding fields

The embedding field in the hash has no special properties. The vector is simply stored as a series of bytes. To store the urls and embeddings of posts, we can use the following code:

import redis
import openai
import os
import requests
from bs4 import BeautifulSoup
import feedparser


# OpenAI API key
openai.api_key = os.getenv('OPENAI_API_KEY')

# Redis connection details
redis_host = os.getenv('REDIS_HOST')
redis_port = os.getenv('REDIS_PORT')
redis_password = os.getenv('REDIS_PASSWORD')

# Connect to the Redis server
conn = redis.Redis(host=redis_host, port=redis_port, password=redis_password, encoding='utf-8', decode_responses=True)

# URL of the RSS feed to parse
url = 'https://atomic-temporary-16150886.wpcomstaging.com/feed/'

# Parse the RSS feed with feedparser
feed = feedparser.parse(url)

p = conn.pipeline(transaction=False)
for i, entry in enumerate(feed.entries[:50]):
    # report progress
    print("Create embedding and save for entry ", i, " of ", entries)

    r = requests.get(entry.link)
    soup = BeautifulSoup(r.text, 'html.parser')
    article = soup.find('div', {'class': 'entry-content'}).text

    # vectorize with OpenAI text-emebdding-ada-002
    embedding = openai.Embedding.create(
        input=article,
        model="text-embedding-ada-002"
    )

    # print the embedding (length = 1536)
    vector = embedding["data"][0]["embedding"]

    # convert to numpy array and bytes
    vector = np.array(vector).astype(np.float32).tobytes()

    # Create a new hash with url and embedding
    post_hash = {
        "url": entry.link,
        "embedding": vector
    }

    # create hash
    conn.hset(name=f"post:{i}", mapping=post_hash)

p.execute()

In the above code, note the following:

  • The OpenAI embeddings API returns a JSON document that contains the embedding for each post; the embedding is retrieved with vector = embedding["data"][0]["embedding"]
  • The resulting vector is converted to bytes with vector = np.array(vector).astype(np.float32).tobytes(); serializing the vector this way is required to store the vector in the Redis hash
  • the Redis hset command is used to store the field-value pairs (these pairs are in a Python dictionary called post_hash) with a key that is prefixed with post: followed by the document number. The prefix will be used later by the search index we will create

Now we have our post information in Redis hashes, we want to use RediSearch functionality to match an input query with one or more of our posts. RediSearch supports vector similarity semantic search. For such a search to work, we will need to create an index that knows there is a vector field. On such indexes, we can perform vector similarity searches.

Creating an index

To create an index with Python code, check the code below:

import redis
from redis.commands.search.field import VectorField, TextField
from redis.commands.search.query import Query
from redis.commands.search.indexDefinition import IndexDefinition, IndexType

# Redis connection details
redis_host = os.getenv('REDIS_HOST')
redis_port = os.getenv('REDIS_PORT')
redis_password = os.getenv('REDIS_PASSWORD')

# Connect to the Redis server
conn = redis.Redis(host=redis_host, port=redis_port, password=redis_password, encoding='utf-8', decode_responses=True)


SCHEMA = [
    TextField("url"),
    VectorField("embedding", "HNSW", {"TYPE": "FLOAT32", "DIM": 1536, "DISTANCE_METRIC": "COSINE"}),
]

# Create the index
try:
    conn.ft("posts").create_index(fields=SCHEMA, definition=IndexDefinition(prefix=["post:"], index_type=IndexType.HASH))
except Exception as e:
    print("Index already exists")


When creating an index, you define the fields to index based on a schema. Above, we include both the text field (url) and the vector field (embedding). The VectorField class is used to construct the vector field and takes several parameters:

  • Name: the name of the field (“embedding” here but could be anything)
  • Algorithm: “FLAT” or “HNSW”; use “FLAT” when search quality is of high priority and search speed is less important; “HNSW” gives you faster querying; for more information see this article
  • Attributes: a Python dictionary that specifies the data type, the number of dimensions of the vector (1536 for text-embedding-ada-002) and the distance metric; here we use COSINE for cosine similarity, which is recommended by OpenAI with their embedding model

â„šī¸ It’s important to get the dimensions right or your index will fail to build properly. It will not be immediately clear that it failed, unless you run FT.INFO <indexname> with redis-cli.

With the schema out of the way, we can now create the index with:

conn.ft("posts").create_index(fields=SCHEMA, definition=IndexDefinition(prefix=["post:"], index_type=IndexType.HASH))

The index we create is called posts. We index the fields defined in SCHEMA and only index hashes with a key prefix of post:. The hashes we created earlier, all have this prefix. With the index created and our existing hashes, the index should be populated with them. Ensure you can see that in RedisInsight:

posts index populated with hashes that were added earlier

Redis vector queries

With the hashes and the index created, we can now perform a similarity search. We will ask the user for a query string (use natural language) and then check the posts that are similar to the query string. The query string will need to be vectorized as well. We will return several post and rank them.

import numpy as np
from redis.commands.search.query import Query
import redis
import openai
import os

openai.api_key = os.getenv('OPENAI_API_KEY')

def search_vectors(query_vector, client, top_k=5):
    base_query = "*=>[KNN 5 @embedding $vector AS vector_score]"
    query = Query(base_query).return_fields("url", "vector_score").sort_by("vector_score").dialect(2)    

    try:
        results = client.ft("posts").search(query, query_params={"vector": query_vector})
    except Exception as e:
        print("Error calling Redis search: ", e)
        return None

    return results

# Redis connection details
redis_host = os.getenv('REDIS_HOST')
redis_port = os.getenv('REDIS_PORT')
redis_password = os.getenv('REDIS_PASSWORD')

# Connect to the Redis server
conn = redis.Redis(host=redis_host, port=redis_port, password=redis_password, encoding='utf-8', decode_responses=True)

if conn.ping():
    print("Connected to Redis")

# Enter a query
query = input("Enter your query: ")

# Vectorize the query using OpenAI's text-embedding-ada-002 model
print("Vectorizing query...")
embedding = openai.Embedding.create(input=query, model="text-embedding-ada-002")
query_vector = embedding["data"][0]["embedding"]

# Convert the vector to a numpy array
query_vector = np.array(query_vector).astype(np.float32).tobytes()

# Perform the similarity search
print("Searching for similar posts...")
results = search_vectors(query_vector, conn)

if results:
    print(f"Found {results.total} results:")
    for i, post in enumerate(results.docs):
        score = 1 - float(post.vector_score)
        print(f"\t{i}. {post.url} (Score: {round(score ,3) })")
else:
    print("No results found")

In the above code, the following happens:

  • Set OpenAI API key: needed to create the embedding for the query typed by the user
  • Connect to Redis based on the environment variables and check the connection with ping().
  • Ask the user for a query
  • Create the embedding from the query string and convert the array to bytes
  • Call the search_vectors function with the vectorized query string and Redis connection as parameters

The search_vectors function uses RediSearch capabilities to query over our hashes and calculate the 5 nearest neighbors to our query vector. Querying is explained in detail in the Redis documentation but it can be a bit dense. You start with the base query:

 base_query = "*=>[KNN 5 @embedding $vector AS vector_score]"

This is just a string with the query format that Redis expects to pass to the Query class in the next step. We are looking for the 5 nearest neighbors of $vector in the embedding fields of the hashes. You use @ to denote the embedding field and $ to denote the vector we will pass in later. That vector is our vectorized query string. With AS vector_score, we add the score to later rank the results from high to low.

The actual query is built with the Query class (one line):

query = Query(base_query).return_fields("url", "vector_score").sort_by("vector_score").dialect(2)    

We return the url and the vector_score and sort on this score. Dialect is just the version of the query language. Here we use dialect 2 as that matches the query syntax. Using an earlier dialect would not work here.

Of course, this still does not pass the query vector to the query. That only happens when we run the query in Redis with:

results = client.ft("posts").search(query, query_params={"vector": query_vector})

The above code performs a search query on the posts index. In the call to the search method, we pass the query we built earlier and a list of query parameters. We only have one parameter, the vector parameter ($vector in base_query) and the value for this parameter is the embedding created from the user query string.

When I query for bot, I get the following results:

Our 5 query results

The results are ranked with the closest match first. We could use that match to grab the post from the URL and send the query to OpenAI ChatCompletion API to answer the question more precisely. For better results, use a better query like “How do I build a chat bot in Python with OpenAI?”. To get an idea of how to do that, check my previous post.

Conclusion

In this post we discussed storing embeddings in Redis and querying embeddings with a similarity search. If you combine this with my previous post, you can use Redis instead of Pinecone as the vector database and query engine. This can be useful for Azure customers because Azure has Azure Cache for Redis Enterprise, a fully managed service that supports the functionality discussed in this post. In addition, it is useful for local development purposes because you can easily run Redis with Docker.