With the gpt-4-vision-preview model available at OpenAI, it was time to build something with it. I decided to use it as part of a quick solution that can search for images with text, or by providing a similar image.
We will do the following:
- Describe a collection of images. To generate the description, GPT-4 Vision is used
- Create a text embedding of the description with the
text-embedding-ada-002model - Create an image embedding using the
vectorizeImageAPI, part of Azure AI Computer Vision - Save the description and both embeddings to an Azure AI Search index
- Search for images with either text or a similar image
The end result should be that when I search for desert plant, I get an image of a cactus or similar plant. When I provide a picture of an apple, I should get an apple or other fruit as a result. It’s basically Google image and reverse image search.
Let’s see how it works and if it is easy to do. The code is here: https://github.com/gbaeke/vision. The main code is in a Jupyter notebook in the image_index folder.
A word on vectors and vectorization
When we want to search for images using text or find similar images, we use a technique that involves turning both text and images into a form that a computer can understand easily. This is done by creating vectors. Think of vectors as a list of numbers that describe the important parts of a text or an image.
For text, we use a tool called ‘text-embedding-ada-002’ which changes the words and sentences into a vector. This vector is like a unique fingerprint of the text. For images, we use something like Azure’s multi-modal embedding API, which does the same thing but for pictures. It turns the image into a vector that represents what’s in the picture.
After we have these vectors, we store them in a place where they can be searched. We will use Azure AI Search. When you search, the system looks for the closest matching vectors – it’s like finding the most similar fingerprint, whether it’s from text or an image. This helps the computer to give you the right image when you search with words or find images that are similar to the one you have.
Getting a description from an image
Although Azure has Computer Vision APIs to describe images, GPT-4 with vision can do the same thing. It is more flexible and easier to use because you have the ability to ask for what you want with a prompt.
To provide an image to the model, you can provide a URL or the base64 encoding of an image file. The code below uses the latter approach:
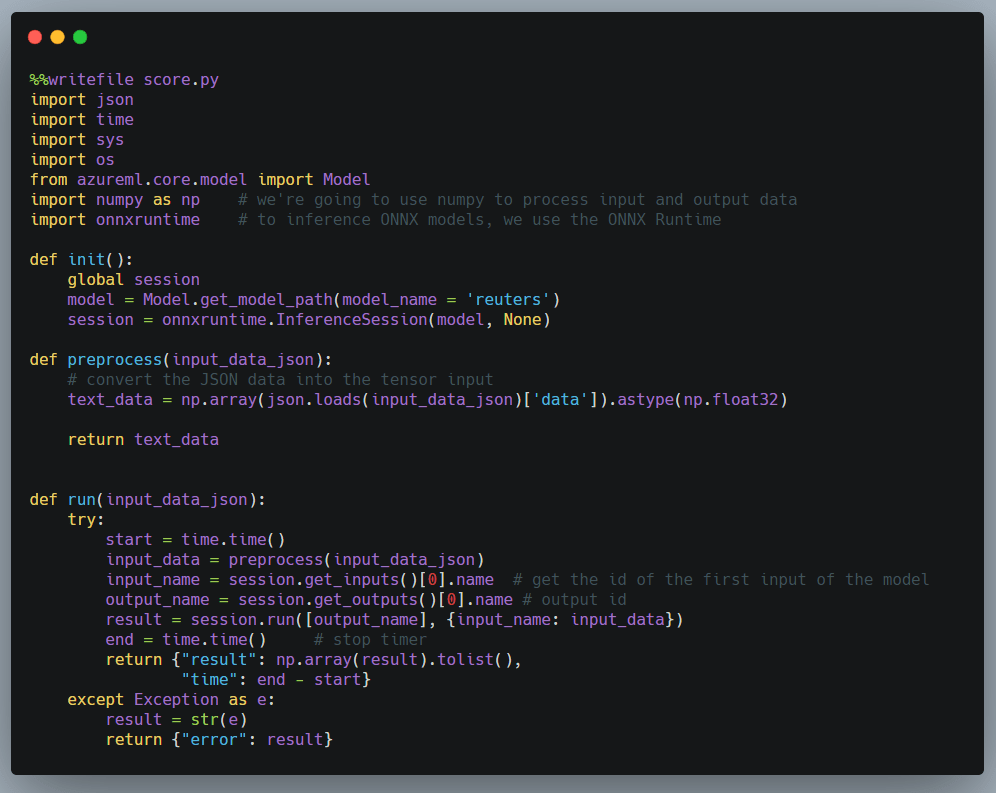
def describe_image(image_file: str) -> str:
    with open(f'{image_file}', 'rb') as f:
        image_base64 = base64.b64encode(f.read()).decode('utf-8')
        print(image_base64[:100] + '...')

    print(f"Describing {image_file}...")

    response = client.chat.completions.create(
        model="gpt-4-vision-preview",
        messages=[
            {
            "role": "user",
            "content": [
                {"type": "text", "text": "Describe the image in detail"},
                {
                "type": "image_url",
                "image_url": {
                    "url": f"data:image/jpeg;base64,{image_base64}",
                },
                },
            ],
            }
        ],
        max_tokens=500,  # default max tokens is low so set higher
    )

    return response.choices[0].message.content
As usual, the OpenAI API is very easy to use. Above, we open and read the image and base64-encode it. The base64 encoded file is provided in the url field. A simple prompt is all you need to get the description. Let’s look at the result for the picture below:

The generated description is below:
The image displays a single, healthy-looking cactus planted in a terracotta-colored pot against a pale pink background. The cactus is elongated, predominantly green with some modest blue hues, and has evenly spaced spines covering its surface. The spines are white or light yellow, quite long, and arranged in rows along the cactus’s ridges. The pot has a classic, cylindrical shape with a slight lip at the top and appears to be a typical pot for houseplants. The overall scene is minimalistic, with a focus on the cactus and the pot due to the plain background, which provides a soft contrast to the vibrant colors of the plant and its container.
Description generated by GPT-4 Vision
Embedding of the image
To create an embedding for the image, I decided to use Azure’s multi-modal embedding API. Take a look at the code below:
def get_image_vector(image_path: str) -> list:
    # Define the URL, headers, and data
    url = "https://AI_ACCOUNT.cognitiveservices.azure.com//computervision/retrieval:vectorizeImage?api-version=2023-02-01-preview&modelVersion=latest"
    headers = {
        "Content-Type": "application/octet-stream",
        "Ocp-Apim-Subscription-Key": os.getenv("AZURE_AI_KEY")
    }

    with open(image_path, 'rb') as image_file:
        # Read the contents of the image file
        image_data = image_file.read()

    print(f"Getting vector for {image_path}...")

    # Send a POST request
    response = requests.post(url, headers=headers, data=image_data)

    # return the vector
    return response.json().get('vector')
The code uses an environment variable to get the key to an Azure AI Services multi-service endpoint. Check the README.md in the repository for a sample .env file.
The API generates a vector with 1024 dimensions. We will need that number when we create the Azure AI Search index.
Note that this API can accept a url or the raw image data (not base64-encoded). Above, we provide the raw image data and set the Content-Type properly.
Generating the data to index
In the next step, we will get all .jpg files from a folder and do the following:
- create the description
- create the image vector
- create the text vector of the description
Check the code below for the details:
# get all *.jpg files in the images folder
image_files = [file for file in os.listdir('./images') if file.endswith('.jpg')]

# describe each image and store filename and description in a list of dicts
descriptions = []
for image_file in image_files:
    try:
        description = describe_image(f"./images/{image_file}")
        image_vector = get_image_vector(f"./images/{image_file}")
        text_vector = get_text_vector(description)

        descriptions.append({
            'id': image_file.split('.')[0], # remove file extension
            'fileName': image_file,
            'imageDescription': description,
            'imageVector': image_vector,
            'textVector': text_vector
        })
    except Exception as e:
        print(f"Error describing {image_file}: {e}")

# print the descriptions but only show first 5 numbers in vector
for description in descriptions:
    print(f"{description['fileName']}: {description['imageDescription'][:50]}... {description['imageVector'][:5]}... {description['textVector'][:5]}...")
The important part is the descriptions list, which is a list of JSON objects with fields that match the fields in the Azure AI Search index we will build in the next step.
The text vector is calculated with the get_text_vector function. It uses OpenAI’s text-embedding-ada-002 model.
Building the index
The code below uses the Azure AI Search Python SDK to build and populate the index in code. You.will need an AZURE_AI_SEARCH_KEY environment variable to authenticate to your Azure AI Search instance.
def blog_index(name: str):
    from azure.search.documents.indexes.models import (
        SearchIndex,
        SearchField,
        SearchFieldDataType,
        SimpleField,
        SearchableField,
        VectorSearch,
        VectorSearchProfile,
        HnswAlgorithmConfiguration,
    )

    fields = [
        SimpleField(name="Id", type=SearchFieldDataType.String, key=True), # key
        SearchableField(name="fileName", type=SearchFieldDataType.String),
        SearchableField(name="imageDescription", type=SearchFieldDataType.String),
        SearchField(
            name="imageVector",
            type=SearchFieldDataType.Collection(SearchFieldDataType.Single),
            searchable=True,
            vector_search_dimensions=1024,
            vector_search_profile_name="vector_config"
        ),
        SearchField(
            name="textVector",
            type=SearchFieldDataType.Collection(SearchFieldDataType.Single),
            searchable=True,
            vector_search_dimensions=1536,
            vector_search_profile_name="vector_config"
        ),

    ]

    vector_search = VectorSearch(
        profiles=[VectorSearchProfile(name="vector_config", algorithm_configuration_name="algo_config")],
        algorithms=[HnswAlgorithmConfiguration(name="algo_config")],
    )
    return SearchIndex(name=name, fields=fields, vector_search=vector_search)

#  create the index
from azure.core.credentials import AzureKeyCredential
from azure.search.documents import SearchClient
from azure.search.documents.indexes import SearchIndexClient
from azure.search.documents.models import VectorizedQuery

service_endpoint = "https://YOUR_SEARCH_INSTANCE.search.windows.net"
index_name = "image-index"
key = os.getenv("AZURE_AI_SEARCH_KEY")

index_client = SearchIndexClient(service_endpoint, AzureKeyCredential(key))
index = blog_index(index_name)

# create the index
try:
    index_client.create_index(index)
    print("Index created")
except Exception as e:
    print("Index probably already exists", e)
The code above creates an index with some string fields and two vector fields:
- imageVector: 1024 dimensions (as defined by the Azure AI Computer Vision image embedder)
- textVector: 1536 dimensions (as defined by the OpenAI embedding model)
Although not specified in the code, the index will use cosine similarity to perform similarity searches. It’s the default. It will return approximate nearest neighbour (ANN) results unless you create a search client that uses exhaustive search. An exhaustive search searches the entire vector space. The queries near the end of this post use the exhaustive setting.
When the index is created, we can upload documents:
# now upload the documents
try:
    search_client = SearchClient(service_endpoint, index_name, AzureKeyCredential(key))
    search_client.upload_documents(descriptions)
    print("Documents uploaded successfully")
except Exception as e:
    print("Error uploading documents", e)
The upload_documents method uploads the documents in the descriptions Python list to the search index. The upload is actually an upsert. You can run this code multiple times without creating duplicate documents in the index.
Search images with text
To search an image with a text description, a vector query on the textVector is used. The function below takes a text query string as input, vectorizes the query, and performs a similarity search returning the first nearest neighbour. The function displays the description and the image in the notebook:
# now search based on text
def single_vector_search(query: str):
    vector_query = VectorizedQuery(vector=get_text_vector(query), k_nearest_neighbors=1, fields="textVector", exhaustive=True)

    results = search_client.search(
        vector_queries=[vector_query],
        select=["fileName", "imageDescription"],

    )

    for result in results:
        print(result['fileName'], result["imageDescription"], sep=": ")

        # show the image
        from IPython.display import Image
        display(Image(f"./images/{result['fileName']}"))

single_vector_search("desert plant")
The code searches for an image based on the query desert plant. It returns the picture of the cactus shown earlier. Note that if you search for something there is no image for, like blue car, you will still get a result because we always return a nearest neighbor. Even if your nearest neighbor lives 100km away, it’s still your nearest neighbor. 😀
Return similar images
Since our index contains an image vector, we can search for images similar to a vector of a reference image. The function below takes an image file path as input, calculates the vector for that image, and performs a nearest neighbor search. The function displays the description and image of each document returned. In this case, the code returns two similar documents:
def image_search(image_file: str):

    vector_query = VectorizedQuery(vector=get_image_vector(image_file), k_nearest_neighbors=2, fields="imageVector", exhaustive=True)

    results = search_client.search(
        vector_queries=[vector_query],
        select=["fileName", "imageDescription"],
    )

    for result in results:
        print(result['fileName'], result["imageDescription"], sep=": ")

        # show the image
        from IPython.display import Image
        display(Image(f"./images/{result['fileName']}"))

# get vector of another image and find closest match
image_search('rotten-apple.jpg')
image_search('flower.jpeg')
At the bottom, the function is called with filenames of pictures that contain a rotten apple and a flower. The result of the first query is a picture of the apple and banana. The result of the second query is the cactus and the rose. You can debate whether the cactus should be in the results. Some cacti have flowers but some don’t. 😀
Conclusion
The GPT-4 Vision API, like most OpenAI APIs, is very easy to use. In this post, we used it to generate image descriptions to build a simple query engine that can search for images via text or a reference image. Together with their text embedding API and Microsoft’s multi-modal embedding API to create an image embedding, it is relatively straightforward to build these type of systems.
As usual, this is a tutorial with quick sample code to illustrate the basic principle. If you need help building these systems in production, simply reach out. Help is around the corner! 😉