In October 2024, OpenAI introduced the Realtime API. It enables developers to integrate low-latency, multimodal conversational experiences into their applications. It supports both text and audio inputs and outputs, facilitating natural speech-to-speech interactions without the need for multiple models.
It addresses the following problems:
- Simplified Integration: Combines speech recognition, language processing, and speech synthesis into a single API call, eliminating the need for multiple models.
- Reduced Latency: Streams audio inputs and outputs directly, enabling more natural and responsive conversational experiences.
- Enhanced Nuance: Preserves emotional tone, emphasis, and accents in speech interactions.
If you have used Advanced Voice Mode in ChatGPT, the Realtime API offers a similar experience for developers to integrate into their applications.
The initial release of the API required WebSockets to support the continuous exchange of messages, including audio. Although that worked, using a protocol like WebRTC is much more interesting:
- Low latency: WebRTC is optimized for realtime media like audio and video with features such as congestion control and bandwidth optimization built in
- Proven in the real world: many applications use WebRTC, including Microsoft Teams, Google Meet and many more
- Native support for audio streaming: compared to WebSockets, as a developer, you don’t have to handle the audio streaming part. WebRTC takes care of that for you.
- Data channels: suitable for low-latency data exchange between peers; these channels are used to send and receive messages between yourself and the Realtime API.
In December 2024, OpenAI announced support for WebRTC in their Realtime API. It makes using the API much simpler and more robust.
Instead of talking about it, let’s look at an example.
Note: full source code is in https://github.com/gbaeke/realtime-webrtc. It is example code without features like user authentication, robust error handling, etc… It’s meant to get you started.
Helper API
To use the Realtime API from the browser, you need to connect to OpenAI with a token. You do not want to use your OpenAI token in the browser as that is not secure. Instead, you should have an API endpoint in a helper API that gets an ephemeral token. In app.py, the helper API, the endpoint looks as follows:
@app.get("/session")
async def get_session():
    async with httpx.AsyncClient() as client:
        response = await client.post(
            'https://api.openai.com/v1/realtime/sessions',
            headers={
                'Authorization': f'Bearer {OPENAI_API_KEY}',
                'Content-Type': 'application/json'
            },
            json={
                "model": "gpt-4o-realtime-preview-2024-12-17",
                "voice": "echo"
            }
        )
        return response.json()
Above, we ask the realtime’s API sessions endpoint for a session. The session includes the ephemeral token. You need an OpenAI key to ask for that session which is known to the helper API via an environment variable. Note the realtime model and voice are set as options. Other options, such as tools, temperature and others can be set here. In this example we will set some of these settings from the browser client by updating the session.
In index.html, the following JavaScript code is used to obtain the session. The ephemeral key or token is in client_secret.value:
const tokenResponse = await fetch("http://localhost:8888/session");
const data = await tokenResponse.json();
const EPHEMERAL_KEY = data.client_secret.value;
In addition to fetching a token via a session, the helper API has another endpoint called weather. The weather endpoint is called with a location parameter to get the current temperature at that location. This endpoint is called when the model detects a function call is needed. For example, when the user says “What is the weather in Amsterdam?”, code in the client will call the weather endpoint with Amsterdam as a parameter and provide the model with the results.
@app.get("/weather/{location}")
async def get_weather(location: str):
# First get coordinates for the location
try:
async with httpx.AsyncClient() as client:
# Get coordinates for location
geocoding_response = await client.get(
f"https://geocoding-api.open-meteo.com/v1/search?name={location}&count=1"
)
geocoding_data = geocoding_response.json()
if not geocoding_data.get("results"):
return {"error": f"Could not find coordinates for {location}"}
lat = geocoding_data["results"][0]["latitude"]
lon = geocoding_data["results"][0]["longitude"]
# Get weather data
weather_response = await client.get(
f"https://api.open-meteo.com/v1/forecast?latitude={lat}&longitude={lon}¤t=temperature_2m"
)
weather_data = weather_response.json()
temperature = weather_data["current"]["temperature_2m"]
return WeatherResponse(temperature=temperature, unit="celsius")
except Exception as e:
return {"error": f"Could not get weather data: {str(e)}"}The weather API does not require authentication so we could have called it from the web client as well. I do not consider that a best practice so it is better to call an API separate from the client code.
The client
The client is an HTML web page with plain JavaScript code. The code to interact with the realtime API is all part of the client. Our helper API simply provides the ephemeral secret.
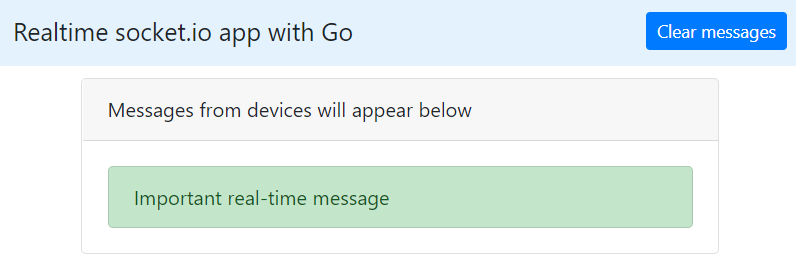
Let’s look at the code step-by-step. Full code is on GitHub. But first, here is the user interface:

Whenever you ask a question, the transcript of the audio response is updated in the text box. Only the responses are added, not the user questions. I will leave that as an exercise for you! 😉
When you click the Start button, the init function gets called:
async function init() {
    startButton.disabled = true;

    try {
        updateStatus('Initializing...');

        const tokenResponse = await fetch("http://localhost:8888/session");
        const data = await tokenResponse.json();
        const EPHEMERAL_KEY = data.client_secret.value;

        peerConnection = new RTCPeerConnection();
        await setupAudio();
        setupDataChannel();

        const offer = await peerConnection.createOffer();
        await peerConnection.setLocalDescription(offer);

        const baseUrl = "https://api.openai.com/v1/realtime";
        const model = "gpt-4o-realtime-preview-2024-12-17";
        const sdpResponse = await fetch(`${baseUrl}?model=${model}`, {
            method: "POST",
            body: offer.sdp,
            headers: {
                Authorization: `Bearer ${EPHEMERAL_KEY}`,
                "Content-Type": "application/sdp"
            },
        });

        const answer = {
            type: "answer",
            sdp: await sdpResponse.text(),
        };
        await peerConnection.setRemoteDescription(answer);

        updateStatus('Connected');
        stopButton.disabled = false;
        hideError();

    } catch (error) {
        startButton.disabled = false;
        stopButton.disabled = true;
        showError('Error: ' + error.message);
        console.error('Initialization error:', error);
        updateStatus('Failed to connect');
    }
}
In the init function, we get the ephemeral key as explained before and then setup the WebRTC peer-to-peer connection. The setupAudio function creates an autoplay audio element and connects the audio stream to the peer-to-peer connection.
The setupDataChannel function sets up a data channel for the peer-to-peer connection and gives it a name. The name is oai-events. Once we have a data channel, we can use it to connect an onopen handler and add an event listener to handle messages sent by the remote peer.
Below are the setupAudio and setupDataChannel functions:
async function setupAudio() {
    const audioEl = document.createElement("audio");
    audioEl.autoplay = true;
    peerConnection.ontrack = e => audioEl.srcObject = e.streams[0];

    audioStream = await navigator.mediaDevices.getUserMedia({ audio: true });
    peerConnection.addTrack(audioStream.getTracks()[0]);
}

function setupDataChannel() {
    dataChannel = peerConnection.createDataChannel("oai-events");
    dataChannel.onopen = onDataChannelOpen;
    dataChannel.addEventListener("message", handleMessage);
}
When the audio and data channel is setup, we can now proceed to negotiate communication parameters between the two peers: your client and OpenAI. WebRTC uses the session description protocol (SDP) to do so. First, an offer is created describing the local peer capabilities like audio codecs etc… The offer is then sent to the server over at OpenAI. Authentication is with the ephemeral key. The response is a description of the remote peer’s capabilities, which is needed to complete the handshake process. With the handshake complete, the peers can now exchange audio and messages. The code below does the handshake:
const offer = await peerConnection.createOffer();
await peerConnection.setLocalDescription(offer);

const baseUrl = "https://api.openai.com/v1/realtime";
const model = "gpt-4o-realtime-preview-2024-12-17";
const sdpResponse = await fetch(`${baseUrl}?model=${model}`, {
    method: "POST",
    body: offer.sdp,
    headers: {
        Authorization: `Bearer ${EPHEMERAL_KEY}`,
        "Content-Type": "application/sdp"
    },
});

const answer = {
    type: "answer",
    sdp: await sdpResponse.text(),
};
await peerConnection.setRemoteDescription(answer);
The diagram below summarizes the steps:

What happens when the channel opens?
After the creation of the data channel, we set up an onopen handler. In this case, the handler does two things:
- Update the session
- Send an initial message
The session is updated with a description of available functions. This is very similar to function calling in the chat completion API. To update the session, you need to send a message of type session.update. The sendMessage helper functions sends messages to the remote peer:
function sendSessionUpdate() {
    const sessionUpdateEvent = {
        "event_id": "event_" + Date.now(),
        "type": "session.update",
        "session": {
            "tools": [{
                "type": "function",
                "name": "get_weather",
                "description": "Get the current weather. Works only for Earth",
                "parameters": {
                    "type": "object",
                    "properties": {
                        "location": { "type": "string" }
                    },
                    "required": ["location"]
                }
            }],
            "tool_choice": "auto"
        }
    };
    sendMessage(sessionUpdateEvent);
}
Although I added an event_id above, that is optional. In the session property we can update the list of tools and set the tool_choice to auto. In this case, that means that the model will select a function if it thinks it is needed. If you ask something like “What is the weather?”, it will first ask for a location and then indicate that the function get_weather needs to be called.
We also send an initial message when the channel opens. The message is of type conversation.item.create and says “MY NAME IS GEERT”.
Check the session update and conversation item code below:
function sendSessionUpdate() {
    const sessionUpdateEvent = {
        "event_id": "event_" + Date.now(),
        "type": "session.update",
        "session": {
            "tools": [{
                "type": "function",
                "name": "get_weather",
                "description": "Get the current weather. Works only for Earth",
                "parameters": {
                    "type": "object",
                    "properties": {
                        "location": { "type": "string" }
                    },
                    "required": ["location"]
                }
            }],
            "tool_choice": "auto"
        }
    };
    sendMessage(sessionUpdateEvent);
}

function sendInitialMessage() {
    const conversationMessage = {
        "event_id": "event_" + Date.now(),
        "type": "conversation.item.create",
        "previous_item_id": null,
        "item": {
            "id": "msg_" + Date.now(),
            "type": "message",
            "role": "user",
            "content": [{
                "type": "input_text",
                "text": "MY NAME IS GEERT"
            }]
        }
    };
    sendMessage(conversationMessage);
}
Note that the above is optional. Without that code, we could start talking with the model. However, it’s a bit more interesting to add function calling to the mix. That does mean we have to check incoming messages from the data channel to find out if we need to call a function.
Handling messages
The function handleMessage is called whenever a new message is sent on the data channel. In that function, we log all messages and check for a specific type of message: response.done.
We do two different things:
- if there is a transcript of the audio: display it
- if the response is a function call, handle the function call
To handle the function call, we check the payload of the response for an output of type function_call and also check the function name and call_id of the message that identified the function call in the first place.
If the function with name get_weather is identified, the weather endpoint of the API is called and the response is sent to the model.
The message handler is shown below:
function handleMessage(event) {
    try {
        const message = JSON.parse(event.data);
        console.log('Received message:', message);

        switch (message.type) {
            case "response.done":
                handleTranscript(message);
                const output = message.response?.output?.[0];
                if (output) handleFunctionCall(output);
                break;
            default:
                console.log('Unhandled message type:', message.type);
        }
    } catch (error) {
        showError('Error processing message: ' + error.message);
    }
}
The function call check is in handleFunctionCall:
function handleFunctionCall(output) {
    if (output?.type === "function_call" &&
        output?.name === "get_weather" &&
        output?.call_id) {
        console.log('Function call found:', output);
        handleWeatherFunction(output);
    }
}
You can check the full source code for the code of handleWeatherFunction and its helpers sendFunctionOutput and sendResponseCreate. They are responsible for:
- parsing the arguments from the function call output and calling the API
- sending the output of the function back to the model and linking it to the message that identified the function call in the first place
- getting a response from the model to tell us about the result of the function call
Conclusion
With WebRTC support, a W3C standard, it has become significantly easier to utilize the OpenAI Realtime API from a browser that natively supports it. All widely recognized desktop and mobile browsers, including Chrome, Safari, Firefox, and Edge, provide WebRTC capabilities.
WebRTC has become the preferred method for browser-based realtime API usage. WebSockets are exclusively recommended for server-to-server applications.
The advent of WebRTC has the potential to catalyze the development of numerous applications that leverage this API. What interesting applications do you intend to build?