Google’s A2A: taking a closer look

In the previous post, I talked about options to build multi-agent solutions. The last option used Google’s A2A. A2A provides a wrapper around your agent, basically a JSON-RPC API, that standardizes how you talk to your agent. In this post we take a closer look at the basics of A2A with simple synchronous message exchange.

⚠️ A2A is still in development. We do not use it in production yet!

The idea is to build solutions that look like this (just one of the many possibilities):

The conversation agent is an agent that uses tools to get the job done. It wouldn’t be much of an agent without tools right? The tools are custom tools created by the developer that call other agents to do work. The other agents can be written in any framework and use any development language. How the agent works internally is irrelevant. When the conversation agent detects (via standard function calling) that the RAG tool needs to be executed, that tool will call the RAG agent over A2A and return the results.

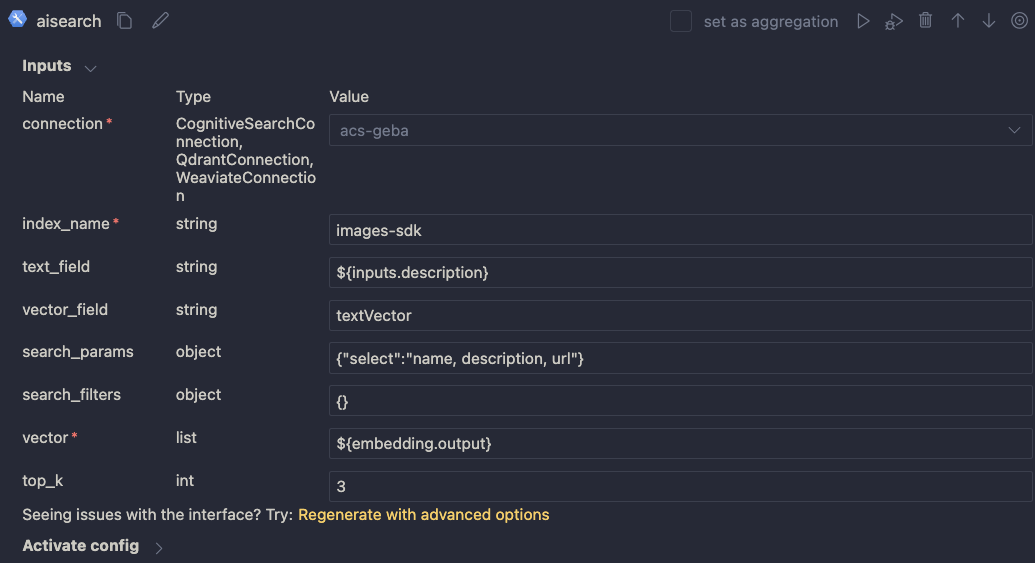
A2A does not dictate how you build your agent. In the example below, an Azure AI Foundry Agent sits at the core. That agent can use any of its hosted tools or custom tools to get the job done. Because this is a RAG Agent, it might use the built-in Azure AI Search or SharePoint knowledge source. As a developer, you use the Azure AI Foundry SDK or Semantic Kernel to interact with your agent as you see fit. Although you do not have to, it is common to wrap your agent in a class and provide one or more methods to interact with it. For example, an invoke() method and an invoke_streaming() method.

Here is a minimal example for the AI Foundry Agent (the yellow box):

class RAGAgent:
    def __init__(self):
        # INITIALIZATION CODE NOT SHOWN
        self.project = AIProjectClient(
            credential=DefaultAzureCredential(),
            endpoint=endpoint)
        self.agent = self.project.agents.get_agent(agent_id)

    async def invoke(self, question: str) -> str:
        thread = self.project.agents.threads.create()

        message = self.project.agents.messages.create(
            thread_id=thread.id,
            role="user",
            content=question
        )
        run = self.project.agents.runs.create_and_process(
            thread_id=thread.id,
            agent_id=self.agent.id)
        messages = list(self.project.agents.messages.list(thread_id=thread.id, order=ListSortOrder.ASCENDING))

        # ...

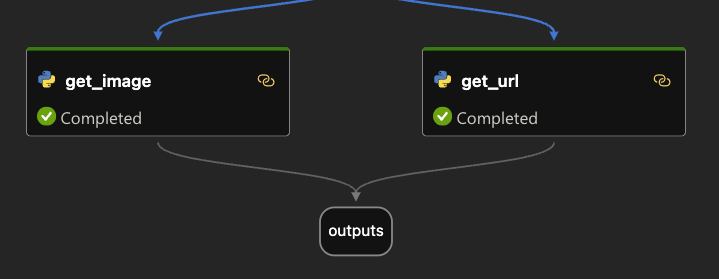
This code has nothing to do with Google A2A and could be implemented in many other ways. This is about to change because we will now call the above agent from A2A’s AgentExecutor. The AgentExecutor is a key server‑side interface: when a client sends a message, the A2A server calls execute() on your AgentExecutor instance, and your implementation handles the logic and sends updates via an event queue. Here’s how your agent is used by A2A. When a client sends a message it works its way down to your agent via several A2A components:

It’s important to understand the different types of message exchange in A2A. This post will not look at all of them. You can find more information in the A2A documentation. This post uses synchronous messaging via message/send where the response is a simple message and not a, potentially longer running, task.

Let’s dive into the AgentExecutor (it processes the message we send) and work our way up to the A2A client.

AgentExecutor

Let’s take a look at a bare bones implementation of AgentExecutor that works with plain/text input and output messages and without streaming:

Client --message--> A2A Server --> Agent Executor --> Agent

and

Agent --> Agent Executor --> A2A Server --message--> Client
class RAGAgentExecutor(AgentExecutor):

    def __init__(self):
        self.agent = RAGAgent()

    async def execute(self, context: RequestContext, event_queue: EventQueue):
        message_text = context.get_user_input()
        
        result = await self.agent.invoke(message_text)

        await event_queue.enqueue_event(new_agent_text_message(result))
        
    async def cancel(self, context: RequestContext, event_queue: EventQueue):
        raise Exception("Cancel not supported")

When a message is sent to the A2A server via JSON-RPC, the execute() method of the RAGAgentExecutor is called. At server startup, __init__ creates our AI Foundry RAGAgent which does the actual work.

Inside the execute() method, we assume the context contains a message. We use the get_user_input() helper to extract the message text (user query). We then simply call our agent’s invoke() method with that query and return the result via the event_queue. The A2A server uses an event_queue to provide responses back to the caller. In this case, the response will be a simple plain/text message.

This is probably as simple as it gets and is useful to understand A2A’s basic operation. In many cases though, you might want to return a longer running task instead of a message and provide updates to the client via streaming. That would require creating the task and streaming the task updates to the client. The client would need to be modified to handle this.

But wait, we still need to create the server that uses this AgentExecutor. Let’s take a look!

A2A Server

The A2A Python SDK uses starlette and uvicorn to create the JSON-RPC server. You don’t really need to know anything about this because A2A does this under the covers for you. The server needs to do a couple of things:

  • Create one or more skills: skills represent a specific capability or function your agent offers—for instance, “currency conversion,” “document summary” or “meeting scheduling”.
  • Create an agent card: an agent card is like a business card for your agent; it tells others what the agent can do; the above skills are part of the agent card; the agent card is published at /.well-known/agent.json on the agents domain (e.g., localhost:9999 on your local machine)
  • Create a request handler: the request handler ties the server to the AgentExecutor you created earlier
  • Create the A2AStarletteApplication: it ties the agent card and the request handler together
  • Serve the A2AStarletteApplication with uvicorn on an address and port of your choosing

This is what it looks like in code:

import logging
import uvicorn
from a2a.server.apps import A2AStarletteApplication
from a2a.server.request_handlers import DefaultRequestHandler
from a2a.server.tasks import InMemoryTaskStore
from a2a.types import AgentCapabilities, AgentCard, AgentSkill
from agent_executor import RagAgentExecutor

def main():
    skill = AgentSkill(
        id="rag_skill",
        name="RAG Skill",
        description="Search knowledge base for project information",
        tags=["rag", "agent", "information"],
        examples=["What is project Astro and what tech is used in it?"],
    )
    agent_card = AgentCard(
        name="RAG Agent",
        description="A simple agent that searches the knowledge base for information",
        url="http://localhost:9998/",
        defaultInputModes=["text"],
        defaultOutputModes=["text"],
        skills=[skill],
        version="1.0.0",
        capabilities=AgentCapabilities(),
    )
    request_handler = DefaultRequestHandler(
        agent_executor=RagAgentExecutor(),
        task_store=InMemoryTaskStore(),
    )
    server = A2AStarletteApplication(
        http_handler=request_handler,
        agent_card=agent_card,
    )
    uvicorn.run(server.build(), host="0.0.0.0", port=9998)
if __name__ == "__main__":
    main()

Validating the agent card

When you run the A2A server on your local machine and expose it to the public with ngrok or other tools, you can use https://a2aprotocol.ai/a2a-protocol-validator to validate it. When I do this for the RAG Agent, I get the following:

In JSON, the agent card is as follows:

{
  "capabilities": {},
  "defaultInputModes": [
    "text"
  ],
  "defaultOutputModes": [
    "text"
  ],
  "description": "A simple agent that searches the knowledge base for information",
  "name": "RAG Agent",
  "protocolVersion": "0.2.5",
  "skills": [
    {
      "description": "Search knowledge base for project information",
      "examples": [
        "What is project Astro and what tech is used in it?"
      ],
      "id": "rag_agent",
      "name": "RAG Agent",
      "tags": [
        "rag",
        "agent",
        "information"
      ]
    }
  ],
  "url": "http://Geerts-MacBook-Air-2.local:9998/",
  "version": "1.0.0"
}

Now it is time to actually start talking to the agent.

Using the A2A client to talk to the agent

With the server up and running and the Agent Card verified, how do we exchange messages with the server?

In our case, where the server supports only text and there is no streaming, the client can be quite simple:

  • Create an httpx client and set timeout higher depending on how long it takes to get a response; this client is used by the A2ACardResolver and A2AClient
  • Retrieve the agent card with the A2ACardResolver
  • Create a client with A2AClient. It needs the agent card as input and will use the url in the agent card to connect to the A2A server
  • Create a Message, include it in a MessageRequest and send the MessageRequest with the client. We use the non-streaming message_send() method.
  • Handle the response from the client

The code below shows what this might look like:

import uuid

import httpx
from a2a.client import A2ACardResolver, A2AClient
from a2a.types import (
    AgentCard,
    Message,
    MessageSendParams,
    Part,
    Role,
    SendMessageRequest,
    TextPart,
)

PUBLIC_AGENT_CARD_PATH = "/.well-known/agent.json"
BASE_URL = "http://localhost:9998"


async def main() -> None:
    timeout = httpx.Timeout(200.0, read=200.0, write=30.0, connect=10.0)
    async with httpx.AsyncClient(timeout=timeout) as httpx_client:
        # Initialize A2ACardResolver
        resolver = A2ACardResolver(
            httpx_client=httpx_client,
            base_url=BASE_URL,
        )

        final_agent_card_to_use: AgentCard | None = None

        try:
            print(
                f"Fetching public agent card from: {BASE_URL}{PUBLIC_AGENT_CARD_PATH}"
            )
            _public_card = await resolver.get_agent_card()
            print("Fetched public agent card")
            print(_public_card.model_dump_json(indent=2))

            final_agent_card_to_use = _public_card

        except Exception as e:
            print(f"Error fetching public agent card: {e}")
            raise RuntimeError("Failed to fetch public agent card")

        client = A2AClient(
            httpx_client=httpx_client, agent_card=final_agent_card_to_use
        )
        print("A2AClient initialized")

        message_payload = Message(
            role=Role.user,
            messageId=str(uuid.uuid4()),
            parts=[Part(root=TextPart(text="Is there a project with the word Astro? If so, describe it."))],
        )
        request = SendMessageRequest(
            id=str(uuid.uuid4()),
            params=MessageSendParams(
                message=message_payload,
            ),
        )
        print("Sending message")

        response = await client.send_message(request)
        print("Response:")
        print(response.model_dump_json(indent=2))


if __name__ == "__main__":
    import asyncio

    asyncio.run(main())

Above, the entire response is printed as JSON. That is useful to learn what the responses look like. This is part of the response:

{
  "id": "6cc795d8-fa84-4734-8b5a-dccd3a22142d",
  "jsonrpc": "2.0",
  "result": {
    "contextId": null,
    "extensions": null,
    "kind": "message",
    "messageId": "fead200d-0ea4-4ccb-bf1c-ed507b38d79d",
    "metadata": null,
    "parts": [
      {
        "kind": "text",
        "metadata": null,
        "text": "RESPONSE FROM RAG AGENT"
      }
    ],
    "referenceTaskIds": null,
    "role": "agent",
    "taskId": null
  }
}

Simply sending the response as a string on the event queue results in a message with one text part. The result from the RAG agent is in the text property. For a longer running task with streaming updates, the response would be quite different.

You can now easily interact with your agent using this client. For example:

  • use the client in any application (need not be an agent)
  • use the client in a workflow engine like LangGraph
  • use the client in an agent tool; the agent can be written in any framework; when the agent identifies a tool call is needed, the tool is run which contains A2AClient code to interact with the A2A Agent

The entire flow

The diagram below shows the end-to-end flow:

Try it yourself

On GitHub, check https://github.com/gbaeke/multi_agent_aca/tree/main/a2a_simple for a skeleton implementation of a calculator agent. The CalculatorAgent class’s invoke() method always returns “I did not do anything!” It’s up to you to change that!

You can run this A2A server as-is and connect to it with test_client.py. To use an actual agent, update the CalculatorAgent class’s invoke() method with a real agent written in your preferred framework.

Check the README.md for more instructions.

That’s it for this post! In a next one, we will look at a more complex example that streams messages to the client. Stay tuned!

Token consumption in Microsoft’s Graph RAG

In the previous post, we discussed Microsoft’s Graph RAG implementation. In this post, we will take a look at token consumption to query the knowledge graph, both for local and global queries.

Note: this test was performed with gpt-4o. A few days after this blog post, OpenAI released gpt-4o-mini. Initital tests with gpt-4o-mini show that index creation and querying work well with a significantly lower cost. You can replace gpt-4o with gpt-4o-mini in the setup below.

Setting up Langfuse logging

To make it easy to see the calls to the LLM, I used the following components:

  • LiteLLM: configured as a proxy; we configure Graph RAG to use this proxy instead of talking to OpenAI or Azure OpenAI directly; see https://www.litellm.ai/
  • Langfuse: an LLM engineering platform that can be used to trace LLM calls; see https://langfuse.com/

To setup LiteLLM, follow the instructions here: https://docs.litellm.ai/docs/proxy/quick_start. I created the following config.yaml for use with LiteLLM:

model_list:
 - model_name: gpt-4o
   litellm_params:
     model: gpt-4o
 - model_name: text-embedding-3-small
   litellm_params:
     model: text-embedding-3-small
litellm_settings:
  success_callback: ["langfuse"]

Before starting the proxy, set the following environment variables:

export OPENAI_API_KEY=my-api-key
export LANGFUSE_PUBLIC_KEY="pk_kk"
export LANGFUSE_SECRET_KEY="sk_ss"

You can obtain the values from both the OpenAI and Langfuse portals. Ensure you also install Langfuse with pip install langfuse.

Next, we can start the proxy with litellm --config config.yaml --debug.

To make Graph RAG work with the proxy, open Graph RAG’s settings.yaml and set the following value under the llm settings:

api_base: http://localhost:4000

LiteLLM is listening for incoming OpenAI requests on that port.

Running a local query

A local query creates an embedding of your question and finds related entities in the knowledge graph by doing a similarity search first. The embeddings are stored in LanceDB during indexing. Basically, the results of the similarity search are used as entrypoints into the graph.

That is the reason that you need to add the embedding model to LiteLLM’s config.yaml. Global queries do not require this setting.

After the similar entities have been found in LanceDB, they are put in a prompt to answer your original question together with related entities.

A local query can be handled with a single LLM call. Let’s look at the trace:

Trace from local query

The query took about 10 seconds and 11500 tokens. The system prompt starts as follows:

First part of local query system prompt

The actual data it works with (called data tables) are listed further in the prompt. You can find a few data points below:

Entity about Winston Smith, a character in the book 1984 (just a part of the text)
Entity for O’Brien, a character he interacts with

The prompt also contains sources from the book where the entities are mentioned. For example:

Relevant sources

The response to this prompt is something like the response below:

LLM response to local query

The response contains references to both the entities and sources with their ids.

Note that you can influence the number of entities retrieved and the number of consumed tokens. In Graph RAG’s settings.yaml, I modified the local search settings as follows:

local_search:
  # text_unit_prop: 0.5
  # community_prop: 0.1
  # conversation_history_max_turns: 5
  top_k_mapped_entities: 5
  top_k_relationships: 5
  max_tokens: 6000

The trace results are clear: token consumption is lower and the latency is lower as well.

Lower token cost

Of course, there will be a bit less detail in the answer. You will have to experiment with these values to see what works best in your scenario.

Global Queries

Global queries are great for broad questions about your dataset. For example: “What are the top themes in 1984?”. A global query is not a single LLM call and is more expensive than a local query.

Let’s take a look at the traces for a global query. Every trace is an LLM call to answer the global query:

Traces for a global query

The last one in the list is where it starts:

First call of many to answer a global query

As you can probably tell, the call above is not returned directly to the user. The system prompt does not contain entities from the graph but community reports. Community reports are created during indexing. First, communities are detected using the Leiden algorithm and then summarized. You can have many communities and summaries in the dataset.

This first trace asks the LLM to answer the question: “What are the top themes in 1984?” to a first set of community reports and generates intermediate answers. These intermediate answers are saved until a last call used to answer the question based on all the intermediate answers. It is entirely possible that community reports are used that are not relevant to the query.

Here is that last call:

Answer the question based on the intermediate answers

I am not showing the whole prompt here. Above, you see the data that is fed to the final prompt: the intermediate answers from the community reports. This then results in the final answer:

Final answer to the global query

Below is the list with all calls again:

All calls to answer a global query

In total, and based on default settings, 12 LLM calls were made consuming around 150K tokens. The total latency cannot be calculated from this list because the calls are made in parallel. That total cost is around 80 cents.

The number of calls and token cost can be reduced by tweaking the default parameters in settings.yaml. For example, I made the following changes:

global_search:
  max_tokens: 6000 # was 12000
  data_max_tokens: 500 # was 1000
  map_max_tokens: 500 # was 1000
  # reduce_max_tokens: 2000
  # concurrency: 32

However, this resulted in more calls with around 140K tokens. Not a big reduction. I tried setting lower values but then I got Python errors and many more LLM calls due to retries. I would need to dig into that further to explain why this happens.

Conclusion

From the above, it is clear that local queries are less intensive and costly than global queries. By tweaking the local query settings, you can get pretty close to the baseline RAG cost where you return 3-5 chunks of text of about 500 tokens each. Latency is pretty good as well. Of course, depending on your data, it’s not guaranteed that the responses of local search will be better that baseline RAG.

Global queries are more costly but do allow you to ask broad questions about your dataset. I would not use these global queries in a chat assistant scenario consistently. However, you could start with a global query and then process follow-up questions with a local query or baseline RAG.

Embedding flows created with Microsoft Prompt Flow in your own applications

A while ago, I wrote about creating your first Prompt Flow in Visual Studio Code. In this post, we will embed such a flow in a Python application built with Streamlit. The application allows you to search for images based on a description. Check the screenshot below:

Streamlit app to search for images based on a description

There are a few things we need to make this work:

  • An index in Azure AI Search that contains descriptions of images, a vector of these descriptions and a link to the image
  • A flow in Prompt Flow that takes a description as input and returns the image link or the entire image as output
  • A Python application (the Streamlit app above) that uses the flow to return an image based on the description

Let’s look at each component in turn.

Azure AI Search Index

Azure AI Search is a search index that supports keyword search, vector search and semantic reranking. You can combine keyword and vector search in what is called a hybrid search. The hybrid search results can optionally be reranked further using a state-of-the-art semantic reranker.

The index we use is represented below:

Index in Azure AI Search
  • Description: contains the description of the image; the image description was generated with the gpt-4-vision model and is larger than just a few words
  • URL: the link to the actual image; the image is not stored in the index, it’s just shown for reference
  • Vector: vector generated by the Azure OpenAI embedding model; it generates 1536 floating point numbers that represent the meaning of the description

Using vectors and vector search allows us to search not just for cat but also for words like kat (in Dutch) or even feline creature.

The flow we will create in Prompt Flow uses the Azure AI Search index to find the URL based on the description. However, because Azure AI Search might return images that are not relevant, we also use a GPT model to make the final call about what image to return.

Flow

In Prompt Flow in Visual Studio Code, we will create the flow below:

Flow we will embed in the Streamlit app

It all starts from the input node:

Input node

The flow takes one input: description. In order to search for this description, we need to convert it to a vector. Note that we could skip this and just do a text search. However, that will not get us the best results.

To embed the input, we use the embedding node:

Embedding node

The embedding node uses a connection called open_ai_connection. This connection contains connection information to an Azure OpenAI resource that hosts the embedding model. The model deployment’s name is embedding. The input to the embedding node is the description from the input. The output is a vector:

Output of embedding node

Now that we have the embedding, we can use a Vector DB Lookup node to perform a vector search in Azure AI Search:

Azure AI Search

Above, we use another connection (acs-geba) that holds the credentials to connect to the Azure AI Search resource. We specify the following to perform the search:

  • index name to search: images-sdk here
  • what text to put in the text_field: the description from the input; this search will be a hybrid search; we search with both text and a vector
  • vector field: the name of the field that holds the vector (textVector field in the images-sdk index)
  • search_params: here we specify the fields we want to return in the search results; name, description and url
  • vector to find similar vectors for: the output from the embedding node
  • the number of similar items to return: top_k is 3

The result of the search node is shown below:

Search results

The result contains three entries from the search index. The first result is the closest to the description from our input node. In this case, we could just take the first result and be done with it. But what if we get results that do not match the description?

To make the final judgement about what picture to return, let’s add an LLM node:

LLM Node

The LLM node uses the same OpenAI connection and is configured to use the chat completions API with the gpt-4 model. We want this node to return proper JSON by setting the response_format to json_object. We also need a prompt, which is a ninja2 template best_image.jinja2:

system:
You return the url to an image that best matches the user's question. Use the provided context to select the image. Return the URL in JSON like so:
{ "url": "the_url_from_search" }

Only return an image when the user question matches the context. If not found, return JSON with the url empty like { "url": "" }

user question:
{{description}}

context : {{search_results}}

The template above sets the system prompt and specifically asks to return JSON. With the response format set to JSON, the word JSON (in uppercase) needs to be in the prompt or you will get an error.

The prompt defines two parameters:

  • description: we connect the description from the input to this parameter
  • search_results: we connect the results from the aisearch node to this parameter

In the screenshot above, you can see this mapping being made. It’s all done in the UI, no code required.

When this node returns an output, it will be in the JSON format we specified. However, that does still not mean that the URL will be correct. The model might still return an incorrect url, although we try to mitigate that in the prompt.

Below is an example of the LLM output when the description is cat:

Model picked the cat picture

Now that we have the URL, I want the flow to output two values:

  • the URL: the URL as a string, not wrapped in JSON
  • the base-64 representation of the image that can we used directly in an HTML IMG tag

We use two Python tools for this and bring the results to the output node. Python tools use custom Python code:

Setting the output

The code in get_image is below:

from promptflow import tool
import json, base64, requests

def url_to_base64(image_url):
    response = requests.get(image_url)
    return 'data:image/jpg;base64,' + base64.b64encode(response.content).decode('utf-8')

@tool
def my_python_tool(image_json: str) -> str:
    url = json.loads(image_json)["url"]

    if url:
        base64_string = url_to_base64(url)
    else:
        base64_string = url_to_base64("https://placehold.co/400/jpg?text=No+image")

    return base64_string

The node executes the function that is marked with the @tool decorator and sends it the output from the LLM node. The code grabs the url and downloads and transforms the image to its base64 representation. You can see how the output from the LLM node is mapped to the image_json parameter below:

linking the function parameter to the LLM output

The code in get_url is similar. It just extracts the url as a string from the input JSON coming from the url.

The output node is the following:

Output node

The output has two properties: data (the base64-encoded image) and the url to the image. Later, in the Python code that uses this flow, the output will be a Python dict with a data and url entry.

Using the flow in your application

Although you can host this flow as an API using either an Azure Machine Learning endpoint or a Docker container, we will simply embed the flow in our Python application and call it like a regular Python function.

Here is the code, which uses Streamlit for the UI:

from promptflow import load_flow
import streamlit as st

# load Prompt Flow from parent folder
flow_path = "../."
f = load_flow(flow_path)

# Streamlit UI
st.title('Search for an image')

# User input
user_query = st.text_input('Enter your query and press enter:')

if user_query:
    # extract url from dict and wrap in img tag
    flow_result = f(description=user_query)
    image = flow_result["data"]
    url = flow_result["url"]

    img_tag = f'<a href="{url}"><img src="{image}" alt="image" width="300"></a>'
     
    # just use markdown to display the image
    st.markdown(f"🌆 Image URL: {url}")
    st.markdown(img_tag, unsafe_allow_html=True)

To load the flow in your Python app as a function:

  • import load_flow from the promptflow module
  • set a path to your flow (relative or absolute): here we load the flow that is in the parent directory that contains flow.dag.yaml.
  • use load_flow to create the function: above the function is called f

When the user enters the query, you can simply use f(description="user's query...") to obtain the output. The output is a Python dict with a data and url entry.

In Streamlit, we can use markdown to display HTML directly using unsafe_allow_html=True. The HTML is simply an <img> tag with the src attribute set to the base64 representation of the image.

Connections

Note that the flow on my system uses two connections: one to connect to OpenAI and one to connect to Azure AI Search. By default, Prompt Flow stores these connections in a SQLite database in the .promptflow folder of your home folder. This means that the Streamlit app work on my machine but will not work anywhere else.

To solve this, you can override the connections in your app. See https://github.com/microsoft/promptflow/blob/main/examples/tutorials/get-started/flow-as-function.ipynb for more information about these overrides.

Conclusion

Embedding a flow as a function in a Python app is one of the easiest ways to use a flow in your applications. Although we used a straightforward Streamlit app here, you could build a FastAPI server that provides endpoints to multiple flows from one API. Such an API can easily be hosted as a container on Container Apps or Kubernetes as part of a larger application.

Give it a try and let me know what you think! 😉

Fast chat bot creation with the OpenAI Assistants API and the Microsoft Bot Framework SDK

This post is part of a series of blog posts about the Azure OpenAI Assistants API. Here are the previous posts:

In all of those posts, we demonstrated the abilities of the Azure OpenAI Assistants API in a Python notebook. In this post, we will build an actual chat application with some help of the Bot Framework SDK.

The Bot Framework SDK is a collection of libraries and tools that let you build, test and deploy bot applications. The target audience is developers. They can write the bot in C#, TypeScript or Python. If you are more of a Power Platform user/developer, you can also use Copilot Studio. I will look at the Assistants API and Copilot Studio in a later post.

The end result after reading this post is a bot you can test with the Bot Framework Emulator. You can download the emulator for your platform here.

When you run the sample code from GitHub and connect the emulator to the bot running on you local machine, you get something like below:

Bot with answers provided by Assistants API

Writing a basic bot

You can follow the Create a basic bot quickstart on Microsoft Learn to get started. It’s a good quickstart and it is easy to follow.

On that page, switch to Python and simply follow the instructions. The end-to-end sample I provide is in Python so using that language will make things easier. At the end of the quickstart, you will have a bot you can start with python app.py. The post also tells you how to connect the Bot Framework Emulator to your bot that runs locally on your machine. The quickstart bot is an echo bot that simply echoes the text you type:

Echo bot in action… oooh exciting 😀

A quick look at the bot code

If you check the bot code in bot.py, you will see two functions:

  • on_members_added_activity: do something when a new chat starts; we can use this to start a new assistant thread
  • on_message_activity: react to a user sending a message; here, we can add the message to a thread, run it, and send the response back to the user

👉 This code uses a tiny fraction of features of the Bot Framework SDK. There’s a huge list of capabilities. Check the How-To for developers, which starts with the basics of sending and receiving messages.

Below is a diagram of the chat and assistant flow:

Assistant Flow

In the diagram, the initial connection triggers on_members_added_activity. Let’s take a look at it:

async def on_members_added_activity(
        self,
        members_added: ChannelAccount,
        turn_context: TurnContext
    ):
        for member_added in members_added:
            if member_added.id != turn_context.activity.recipient.id:
                # Create a new thread
                self.thread_id = assistant.create_thread()
                await turn_context.send_activity("Hello. Thread id is: " + self.thread_id)

The function was modified to create a thread and store the thread.id as a property thread_id of the MyBot class. The function create_thread() comes from a module called assistant.py, which I added to the folder that contains bot.py:

def create_thread():
    thread = client.beta.threads.create()
    return thread.id

Easy enough, right?

The second function, on_message_activity, is used to respond to new chat messages. That’s number 2 in the diagram above.

async def on_message_activity(self, turn_context: TurnContext):
        # add message to thread
        run = assistant.send_message(self.thread_id, turn_context.activity.text)
        if run is None:
            print("Result of send_message is None")
        tool_check = assistant.check_for_tools(run, self.thread_id)
        if tool_check:
            print("Tools ran...")
        else:
            print("No tools ran...")
        message = assistant.return_message(self.thread_id)
        await turn_context.send_activity(message)

Here, we use a few helper methods. It could actually be one function but I decided to break them up somewhat:

  • send_message: add a message to the thread created earlier; we grab the text the user entered in the chat via turn_context.activity.text
  • check_for_tools: check if we need to run a tool (function) like hr_search or request_raise and add tool results to the messages
  • return_message: return the last message from the messages array and send it back to the chat via turn_context.send_activity; that’s number 5 in the diagram

💡 The stateful nature of the Azure OpenAI Assistants API is of great help here. Without it, we would need to use the Chat Completions API and find a way to manage the chat history ourselves. There are various ways to do that but not having to do that is easier!

A look at assistant.py

Check assistant.py on GitHub for the details. It contains the helper functions called from on_message_activity.

In assistant.py, the following happens:

If you have read the previous blog post on retrieval, you should already be familiar with all of the above.

What’s new are the assistant helper functions that get called from the bot.

  • create_thread: creates a thread and returns the thread id
  • wait_for_run: waits for a thread run to complete and returns the run; used internally; never gets called from the bot code
  • check_for_tools: checks a run for required_action, performs the actions by running the functions and returning the results to the assistant API; we have two functions: hr_query and request_raise.
  • send_message: sends a message to the assistant picked up from the bot
  • return_message: picks the latest message from the messages in a thread and returns it to the bot

To get started, this is relatively easy. However, building a chat bot that does exactly what you want and refuses to do what you don’t want is not particularly easy.

Should you do this?

Combining the Bot Framework SDK with OpenAI is a well-established practice. You get the advantages of building enterprise-ready bots with the excellent conversational capabilities of LLMs. At the moment, production bots use the OpenAI chat completions API. Due to the stateless nature of that API you need to maintain the chat history and send it to the API to make it aware of the conversation so far.

As already discussed, the Assistants API is stateful. That makes it very easy to send a message and get the response. The API takes care of chat history management.

As long as the Assistants API does not offer ways to control the chat history by limiting the amount of interactions or summarising the conversation, I would not use this API in production. It’s not recommended to do that anyway because it is in preview (February 2024).

However, as soon as the API is generally available and offers chat history control, using it with the Bot Framework SDK, in my opinion, is the way to go.

For now, as a workaround, you could limit the number of interactions and present a button to start a new thread if the user wants to continue. Chat history is lost at that moment but at least the user will be aware of it.

Conclusion

The OpenAI Assistants API and the Bot Framework SDK are a great match to create chat bots that feel much more natural than with the Bot Framework SDK on its own. The statefulness of the assistants API makes it easier than the chat completions API.

This post did not discuss the ability to connect Bot Framework bots with an Azure Bot Service. Doing so makes it easy to add your bot to multiple channels such as Teams, SMS, a web chat control and much more. We’ll keep that for another post. Maybe! 😀

Retrieval with the Azure OpenAI Assistants API

In two previous blog posts, I wrote an introduction to the Azure OpenAI Assistants API and how to work with custom functions. In this post, we will take a look at an assistant that can answer questions about documents. We will create an HR Assistant that has access to an HR policy document. In addition, we will provide a custom function that employees can use to request a raise.

Retrieval

The OpenAI Assistants API (not the one in Azure) supports a retrieval tool. You can simply upload one or more documents, turn on retrieval and you are good to go. The screenshot below shows the experience on https://platform.openai.com:

Creating an HR Assistant at OpenAI

The important parts above are:

  • the Retrieval tool was enabled
  • Innovatek.pdf was uploaded, making it available to the Retrieval tool

To test the Assistant, we can ask questions in the Playground:

Asking HR-related questions

When asked about company cars, the assistant responds with content from the uploaded pdf file. After upload, OpenAI converted the document to text, chunked it and stored it in vector storage. I believe they even use Azure AI Search to do so. At query time, the vector store returns one or more pieces of text related to the question to the assistant. The assistant uses those pieces of text to answer the user’s question. It’s a typical RAG scenario. RAG stands for Retrieval Augmented Generation.

At the time of writing (February, 2024), the Azure OpenAI Assistants API did not support the retrieval tool. You can upload files but those files can only be used by the code_interpreter tool. That tool can also look in the uploaded files to answer the query but that is very unreliable and slow so it’s not recommended to use it for retrieval tasks.

Can we work around this limitation?

The Azure OpenAI Assistants API was in preview when this post was written. While in preview, limitations are expected. More tools like Web Search and Retrieval will be added as the API goes to general availability.

To work around the limitation, we can do the following ourselves:

  • load and chunk our PDF
  • store the chunks, metadata and embeddings in an in-memory vector store like Chroma
  • create a function that takes in a query and return chunks and metadata as a JSON string
  • use the Assistant API function calling feature to answer HR-related questions using that function

Let’s see how that works. The full code is here: https://github.com/gbaeke/azure-assistants-api/blob/main/files.ipynb

Getting ready

I will not repeat all code here and refer to the notebook. The first code block initialises the AzureOpenAI client with our Azure OpenAI key, endpoint and API version loaded from a .env file.

Next, we setup the Chroma vector store and load our document. The document is Innovatek.pdf in the same folder as the notebook.

from langchain_community.document_loaders import PyPDFLoader
from langchain_openai import AzureOpenAIEmbeddings
from langchain.text_splitter import RecursiveCharacterTextSplitter
from langchain_community.vectorstores import Chroma

pdf = PyPDFLoader("./Innovatek.pdf").load()
text_splitter = RecursiveCharacterTextSplitter(
    chunk_size=1000,
    chunk_overlap=200
)
documents = text_splitter.split_documents(pdf)
print(documents)
print(len(documents))
db = Chroma.from_documents(documents, AzureOpenAIEmbeddings(client=client, model="embedding", api_version="2023-05-15"))

# query the vector store
query = "Can I wear short pants?"
docs = db.similarity_search(query, k=3)
print(docs)
print(len(docs))

If you have ever used LangChain before, this code will be familiar:

  • load the PDF with PyPDFLoader
  • create a recursive character text splitter that splits text based on paragraphs and words as much as possible; check out this notebook for more information about splitting
  • split the PDF in chunks
  • create a Chroma database from the chunks and also pass in the embedding model to use; we use the OpenAI embedding model with a deployment name of embedding; you need to ensure an embedding model with that name is deployed in your region
  • with the db created, we can use the similarity_search method to retrieve 3 chunks similar to the query Can I wear short pants? This returns an array of objects of type Document with properties like page_content and metadata.

Note that you will always get a response from this similarity search, no matter the query. Later, the assistant will decide if the response is relevant.

We can now setup a helper function to query the document(s):

import json

# function to retrieve HR questions
def hr_query(query):
    docs = db.similarity_search(query, k=3)
    docs_dict = [doc.__dict__ for doc in docs]
    return json.dumps(docs_dict)

# try the function; docs array as JSON
print(hr_query("Can I wear short pants?"))

We will later pass the results of this function to the assistant. The function needs to return a string, in this case a JSON dump of the documents array.

Now that we have this setup, we can create the assistant.

Creating the assistant

In the notebook, you will see some sample code that uploads a document for use with an assistant. We will not use that file but it is what you would do to make the file available to the retrieval tool.

In the client.beta.assistants.create method, we provide instructions to tell the assistant what to do. For example, to use the hr_query function to answer HR related questions.

The tools parameter shows how you can provide functions and tools in code rather than in the portal. In our case, we define the following:

  • the request_raise function: allows the user to request a raise, the assistant should ask the user’s name if it does not know; in the real world, you would use a form of authentication in your app to identify the user
  • the hr_query function: performs a similarity search with Chroma as discussed above; it calls our helper function hr_query
  • the code_interpreter tool: needed to avoid errors because I uploaded a file and supply the file ids via the file_ids parameter.

If you check the notebook, you should indeed see a file_ids parameter. When the retrieval tool becomes available, this is how you provide access to the uploaded files. Simply uploading a file is not enough, you need to reference it. Instead of providing the file ids in the assistant, you can also provide them during a thread run.

⚠️ Note that we don’t need the file upload, code_interpreter and file_ids. They are provided as an example of what you would do when the retrieval tool is available.

Creating a thread and adding a message

If you have read the other posts, this will be very familiar. Check the notebook for more information. You can ask any question you want by simply changing the content parameter in the client.beta.threads.messages.create method.

When you run the cell that adds the message, check the run’s model dump. It should indicate that hr_query needs to be called with the question as a parameter. Note that the model can slightly change the parameter from the original question.

⚠️ Depending on the question, the assistant might not call the function. Try a question that is unrelated to HR and see what happens. Even some HR-related questions might be missed. To avoid that, the user can be precise and state the question is HR related.

Call function(s) when necessary

The code block below calls the hr_query or request_raise function when indicated by the assistant’s underlying model. For request_raise we simply return a string result. No real function gets called.

if run.required_action:
    # get tool calls and print them
    # check the output to see what tools_calls contains
    tool_calls = run.required_action.submit_tool_outputs.tool_calls
    print("Tool calls:", tool_calls)

    # we might need to call multiple tools
    # the assistant API supports parallel tool calls
    # we account for this here although we only have one tool call
    tool_outputs = []
    for tool_call in tool_calls:
        func_name = tool_call.function.name
        arguments = json.loads(tool_call.function.arguments)

        # call the function with the arguments provided by the assistant
        if func_name == "hr_query":
            result = hr_query(**arguments)
        elif func_name == "request_raise":
            result = "Request sumbitted. It will take two weeks to review."

        # append the results to the tool_outputs list
        # you need to specify the tool_call_id so the assistant knows which tool call the output belongs to
        tool_outputs.append({
            "tool_call_id": tool_call.id,
            "output": json.dumps(result)
        })

    # now that we have the tool call outputs, pass them to the assistant
    run = client.beta.threads.runs.submit_tool_outputs(
        thread_id=thread.id,
        run_id=run.id,
        tool_outputs=tool_outputs
    )

    print("Tool outputs submitted")

    # now we wait for the run again
    run = wait_for_run(run, thread.id)
else:
    print("No tool calls identified\n")

After running this code in response to the user question about company cars, let’s see what the result is:

Assistant response

The assistant comes up with this response after retrieving several pieces of text from the Chroma query. With the retrieval tool, the response would be similar with one big advantage. The retrieval tool would include sources in its response for you to display however you want. Above, I have simply asked the model to include the sources. The model will behave slightly differently each time unless you give clear instructions about the response format.

Retrieval and large amounts of documents

The retrieval tool of the Assistants API is not built to deal with massive amounts of data. The number of documents and sizes of those documents are limited.

In enterprise scenarios with large knowledge bases, you would use your own search indexes and a data processing pipeline to store your content in these indexes. For Azure customers, the indexes will probably be stored in Azure AI Search, which supports hybrid (text & vector) search plus semantic reranking to come up with the most relevant results.

Conclusion

The Azure OpenAI Assistants API will make it very easy to retrieve content from a limited amount of uploaded documents once the retrieval tool is added to the API.

To work around the missing retrieval tool today, you can use a simple vector storage solution and a custom function to achieve similar results.

A look at the Azure OpenAI Assistants API

Introduction

A while ago, I looked at the OpenAI Assistants API. In February of 2024, Microsoft have released their Assistants API in public preview. It works in the same way as the OpenAI Assistants API while being able to use it with Azure OpenAI models, deployed to a region of your choice.

The goal of the Assistants API is to make it easier for developers to create applications with copilot-like experiences. It should be easier to provide the assistant with extra knowledge or allow the assistant to interact with the world by calling external APIs.

If you have ever created a chat-based copilot with the standard Azure OpenAI chat completions API, you know that it is stateless. It does not know about the conversation history. As a developer, you have to maintain and manage conversation history and pass it to the completions API. With the Assistants API, that is not necessary. The API is stateful. Conversation history is automatically managed via threads. There is no need to manage conversation state to ensure you do not break the model’s context window limits.

In addition to threads, the Assistants API also supports tools. One of these tools is Code Interpreter, a sandboxed Python environment that can help solving complex questions. If you are a ChatGPT Plus subscriber, you should know that tool already. Code Interpreter is often used to solve math questions, something that LLMs are not terribly good at. However, it is not limited to math. Next to Code Interpreter, you can define your own functions. A function could call an API that queries a database that returns the results to the assistant.

Before diving into a code example you should understand the following components:

  • Assistant: custom AI with Azure OpenAI models that have access to files and tools
  • Thread: conversation between the assistant and the user
  • Message: message created by the assistant or a user; a message does not have to be text; it could be an image or a file; messages are stored on a thread
  • Run: you run a thread to illicit a response from the model; for instance if you just placed a user question on the thread and you run the thread, the model can respond with text or perform a tool call
  • Run Step: detailed list of steps the assistant took as part of a run; this could include a tools call

Enough talk, let’s look at some code. The code can be found on GitHub in a Python notebook: https://github.com/gbaeke/azure-assistants-api/blob/main/getting-started.ipynb

Initialising the OpenAI client and creating the assistant

We will use a .env file to load the Azure OpenAI API key, the endpoint and the API version. You will need an Azure OpenAI resource in a supported region such as Sweden Central. The API version should be 2024-02-15-preview.

import os
from dotenv import load_dotenv
from openai import AzureOpenAI

load_dotenv()

# Create Azure OpenAI client
client = AzureOpenAI(
    api_key=os.getenv('AZURE_OPENAI_API_KEY'),
    azure_endpoint=os.getenv('AZURE_OPENAI_ENDPOINT'),
    api_version=os.getenv('AZURE_OPENAI_API_VERSION')
)

assistant = client.beta.assistants.create(
    name="Math Tutor",
    instructions="""You are a math tutor that helps users solve math problems. 
    You have access to a sandboxed environment for writing and testing code. 
    Explain to the user why you used the code and how it works
    """,
    tools=[{"type": "code_interpreter"}],
    model="gpt-4-preview" # ensure you have a deployment in the region you are using
)

Above, we create an assistant with the client.beta.assistant.create method. Indeed, OpenAI Assistants as developed by OpenAI are still in beta so the OpenAI library reflects that.

Note that an assistant is given specific instructions and, in this case, a tool. We will use the built-in Code Interpreter tool. It can help us solving math questions, including the generation of plots.

Ensure that the model refers to a deployed model in your region. I use the gpt-4-turbo preview here.

Note that the assistants you create are shown in the Azure OpenAI Assistant Playground. For example, I created the Math Assistant a few times by running the same code:

Assistants in Azure Open AI Studio

When you click on one of the assistants, it opens in the Assistant Playground. In that playground, you can start chatting right away. For example:

Chatting with the Assistant

In the screenshot above, I have asked the assistant to plot a sinus wave. It explains how it did that because that is what the Instructions tell the assistant to do. At the end, Code Interpreter creates the plot and generates an image file. That image file is picked up in the playground and displayed.

Also note the panel on the right with API instructions. You can click on those instructions to execute them and see the JSON response.

Note that you can reuse an assistant by simply using its id. You can also create the assistant directly in the portal. You do not have to create it in code, like we are doing.

Let’s now create a thread in code and ask some math questions.

Creating a thread and adding a message

Below, a thread is created which results in a thread id. Subsequently, a message is added to the thread with role set to user. This is the first user question in the thread.

# Create a thread
thread = client.beta.threads.create()

# print the thread id
print("Thread id: ", thread.id)

message = client.beta.threads.messages.create(
    thread_id=thread.id,
    role="user",
    content="Solve the equation y = x^2 + 3 for x = 3 and plot the function graph."
)

# Show the messages
thread_messages = client.beta.threads.messages.list(thread.id)
print(thread_messages.model_dump_json(indent=2))

The JSON dump of the messages contains a data array. In our case the single item in the data array contains a content array next to other information such as role, the thread id, the creation timestamp and more. The content array can contain multiple pieces of content of different types. In this case, we simply have the user question which is of type text.

"content": [
        {
          "text": {
            "annotations": [],
            "value": "Solve the equation y = x^2 + 3 for x = 3 and plot the function graph."
          },
          "type": "text"
        }
      ]

Running the thread

A message on a thread is great but does not do all that much. We want a response from the assistant. In order to get a response, we need to run the thread:

run = client.beta.threads.runs.create(
  thread_id=thread.id,
  assistant_id=assistant.id
)

status = run.status

while status not in ["completed", "cancelled", "expired", "failed"]:
    time.sleep(2)
    run = client.beta.threads.runs.retrieve(thread_id=thread.id,run_id=run.id)
    status = run.status
    print(f'Status: {status}')
    clear_output(wait=True)

print(f'Status: {status}')

The run is where the assistant and the thread come together via their ids. As you can probably tell, the run does not directly return the result. You need to check the run status yourself and act accordingly.

When the status is completed, the run was successful. That means that there should be some response from the assistant.

Interpreting the messages after the run

After a completed run in response to a message with role = user, there should be a response from the model. There are all sorts of responses, including responses that indicate you should run a function. Our assistant does not have custom functions defined so the response can be one of the following:

  • a response from the model without using Code Interpreter
  • a response from the model, interpreting the response from Code Interpreter and possibly including images and text

Note that you do not have to call Code Interpreter specifically. The assistant will decide to use Code Interpreter (you can also be explicit) and use the Code Interpreter response in its final answer.

The code below shows one way of dealing with the assistant response:

messages = client.beta.threads.messages.list(
    thread_id=thread.id
)

messages_json = json.loads(messages.model_dump_json())

for item in reversed(messages_json['data']):
    # Check the content array
    for content in reversed(item['content']):
        # If there is text in the content array, print it as Markdown
        if 'text' in content:
            display(Markdown(content['text']['value']))
        # If there is an image_file in the content, print the file_id
        if 'image_file' in content:
            file_id = content['image_file']['file_id']
            file_content = client.files.content(file_id)
            # use PIL with the file_content
            img = Image.open(file_content)
            img = img.resize((400, 400))
            display(img)

Above, the following happens:

  • all messages from the thread are retrieved: this includes the original user question in addition to the assistant response; the later responses are first in the array
  • we loop through the reversed array and check for a content field: if there is a content field (an array) we loop over that and check for a text or image_file field
  • if we find content of type text, we display it with markdown (we are using a Notebook here)
  • if we find content of type image_file, we retrieve the image from Azure OpenAI using its files API and display it in the notebook with some help of PIL.

Here is the response I got in my notebook. Note that there are only two messages. The assistant response contains two pieces of content.

All messages in the thread visualised from 1st to last

Follow-up questions

One of the advantages of the Assistants API is that we do not have to maintain chat history. We only have to add follow-up questions to the thread and run it again. Below is the model response after adding this question: “Is this a concave function?”:

Response to a follow-up question

Above, I print the entire thread in reverse order again. The answer of the assistant is that this is clearly not a concave function but a convex one.

You should know that at present (February 2024), the Assistants API simply tries to fit the messages in the model’s context window. If the context window is large, long conversations might cost you a lot in tokens. At present, there is no way that I know of to change this mechanism. OpenAI, and Microsoft, are planning to add some extra capabilities. For example:

  • control token count regardless of the chosen model (e.g. set token count to 2000 even if the model allows for 8000)
  • generate summaries of previous messages and pass the summaries as context during a thread run

In most production applications that are used at scale, you really need to control token usage by managing chat history meticulously. Today, that is only possible with the chat completions API and/or abstractions on top of it like LangChain.

Conclusion

With the arrival of the Assistants API in Azure OpenAI, it is easier to write assistants that work with tools like Code Interpreter or custom functions. This post has focused on the basics of using the API with only the Code Interpreter tool.

In follow-up posts, we will look at custom functions and how to work with uploaded files.

Keep in mind that this is all in public preview and should not be used in production.

Use Azure OpenAI Add your data vector search from code

In the previous post, we looked at using Azure OpenAI Add your data from the Azure OpenAI Chat Playground. It is an easy-to-follow wizard to add documents to a storage account and start asking questions about them. From the playground, you can deploy a chat app to an Azure web app and you are good to go. The vector search is performed by an Azure Cognitive Search resource via an index that includes a vector next to other fields such as the actual content, the original URL, etc…

In this post, we will look at using this index from code and build a chat app using the Python Streamlit library.

All code can be found here: https://github.com/gbaeke/azure-cog-search

Requirements

You need an Azure Cognitive Search resource with an index that supports vector search. Use this post to create one. Besides Azure Cognitive Search, you will need Azure OpenAI deployed with both gpt-4 (or 3.5) and the text-embedding-ada-002 embedding model. The embedding model is required to support vector search. In Europe, use France Central as the region.

Next, you need Python installed. I use Python 3.11.4 64-bit on an M1 Mac. You will need to install the following libraries with pip:

  • streamlit
  • requests

You do not need the OpenAI library because we will use the Azure OpenAI REST APIs to be able to use the extension that enables the Add your data feature.

Configuration

We need several configuration settings. The can be divided into two big blocks:

  • Azure Cognitive Search settings: name of the resource, access key, index name, columns, type of search (vector), and more…
  • Azure OpenAI settings: name of the model (e.g., gpt-4), OpenAI access key, embedding model, and more…

You should create a .env file with the following content:

AZURE_SEARCH_SERVICE = "AZURE_COG_SEARCH_SHORT_NAME"
AZURE_SEARCH_INDEX = "INDEX_NAME"
AZURE_SEARCH_KEY = "AZURE_COG_SEARCH_AUTH_KEY"
AZURE_SEARCH_USE_SEMANTIC_SEARCH = "false"
AZURE_SEARCH_TOP_K = "5"
AZURE_SEARCH_ENABLE_IN_DOMAIN = "true"
AZURE_SEARCH_CONTENT_COLUMNS = "content"
AZURE_SEARCH_FILENAME_COLUMN = "filepath"
AZURE_SEARCH_TITLE_COLUMN = "title"
AZURE_SEARCH_URL_COLUMN = "url"
AZURE_SEARCH_QUERY_TYPE = "vector"

# AOAI Integration Settings
AZURE_OPENAI_RESOURCE = "AZURE_OPENAI_SHORT_NAME"
AZURE_OPENAI_MODEL = "gpt-4"
AZURE_OPENAI_KEY = "AZURE_OPENAI_AUTH_KEY"
AZURE_OPENAI_TEMPERATURE = 0
AZURE_OPENAI_TOP_P = 1.0
AZURE_OPENAI_MAX_TOKENS = 1000
AZURE_OPENAI_STOP_SEQUENCE = ""
AZURE_OPENAI_SYSTEM_MESSAGE = "You are an AI assistant that helps people find information."
AZURE_OPENAI_PREVIEW_API_VERSION = "2023-06-01-preview"
AZURE_OPENAI_STREAM = "false"
AZURE_OPENAI_MODEL_NAME = "gpt-4"
AZURE_OPENAI_EMBEDDING_ENDPOINT = "https://AZURE_OPENAI_SHORT_NAME.openai.azure.com/openai/deployments/embedding/EMBEDDING_MODEL_NAME?api-version=2023-03-15-preview"
AZURE_OPENAI_EMBEDDING_KEY = "AZURE_OPENAI_AUTH_KEY"

Now we can create a config.py that reads these settings.

from dotenv import load_dotenv
import os
load_dotenv()

# ACS Integration Settings
AZURE_SEARCH_SERVICE = os.environ.get("AZURE_SEARCH_SERVICE")
AZURE_SEARCH_INDEX = os.environ.get("AZURE_SEARCH_INDEX")
AZURE_SEARCH_KEY = os.environ.get("AZURE_SEARCH_KEY")
AZURE_SEARCH_USE_SEMANTIC_SEARCH = os.environ.get("AZURE_SEARCH_USE_SEMANTIC_SEARCH", "false")
AZURE_SEARCH_TOP_K = os.environ.get("AZURE_SEARCH_TOP_K", 5)
AZURE_SEARCH_ENABLE_IN_DOMAIN = os.environ.get("AZURE_SEARCH_ENABLE_IN_DOMAIN", "true")
AZURE_SEARCH_CONTENT_COLUMNS = os.environ.get("AZURE_SEARCH_CONTENT_COLUMNS")
AZURE_SEARCH_FILENAME_COLUMN = os.environ.get("AZURE_SEARCH_FILENAME_COLUMN")
AZURE_SEARCH_TITLE_COLUMN = os.environ.get("AZURE_SEARCH_TITLE_COLUMN")
AZURE_SEARCH_URL_COLUMN = os.environ.get("AZURE_SEARCH_URL_COLUMN")
AZURE_SEARCH_VECTOR_COLUMNS = os.environ.get("AZURE_SEARCH_VECTOR_COLUMNS")
AZURE_SEARCH_QUERY_TYPE = os.environ.get("AZURE_SEARCH_QUERY_TYPE")

# AOAI Integration Settings
AZURE_OPENAI_RESOURCE = os.environ.get("AZURE_OPENAI_RESOURCE")
AZURE_OPENAI_MODEL = os.environ.get("AZURE_OPENAI_MODEL")
AZURE_OPENAI_KEY = os.environ.get("AZURE_OPENAI_KEY")
AZURE_OPENAI_TEMPERATURE = os.environ.get("AZURE_OPENAI_TEMPERATURE", 0)
AZURE_OPENAI_TOP_P = os.environ.get("AZURE_OPENAI_TOP_P", 1.0)
AZURE_OPENAI_MAX_TOKENS = os.environ.get("AZURE_OPENAI_MAX_TOKENS", 1000)
AZURE_OPENAI_STOP_SEQUENCE = os.environ.get("AZURE_OPENAI_STOP_SEQUENCE")
AZURE_OPENAI_SYSTEM_MESSAGE = os.environ.get("AZURE_OPENAI_SYSTEM_MESSAGE", "You are an AI assistant that helps people find information about jobs.")
AZURE_OPENAI_PREVIEW_API_VERSION = os.environ.get("AZURE_OPENAI_PREVIEW_API_VERSION", "2023-06-01-preview")
AZURE_OPENAI_STREAM = os.environ.get("AZURE_OPENAI_STREAM", "true")
AZURE_OPENAI_MODEL_NAME = os.environ.get("AZURE_OPENAI_MODEL_NAME", "gpt-35-turbo")
AZURE_OPENAI_EMBEDDING_ENDPOINT = os.environ.get("AZURE_OPENAI_EMBEDDING_ENDPOINT")
AZURE_OPENAI_EMBEDDING_KEY = os.environ.get("AZURE_OPENAI_EMBEDDING_KEY")

Writing the chat app

Now we will create chat.py. The diagram below summarizes the architecture:

Chat app architecture (high level)

Here is the first section of the code with explanations:

import requests
import streamlit as st
from config import *
import json

# Azure OpenAI REST endpoint
endpoint = f"https://{AZURE_OPENAI_RESOURCE}.openai.azure.com/openai/deployments/{AZURE_OPENAI_MODEL}/extensions/chat/completions?api-version={AZURE_OPENAI_PREVIEW_API_VERSION}"
    
# endpoint headers with Azure OpenAI key
headers = {
    'Content-Type': 'application/json',
    'api-key': AZURE_OPENAI_KEY
}

# Streamlit app title
st.title("🤖 Azure Add Your Data Bot")

# Keep messages array in session state
if "messages" not in st.session_state:
    st.session_state.messages = []

# Display previous chat messages from history on app rerun
# Add your data messages include tool responses and assistant responses
# Exclude the tool responses from the chat display
for message in st.session_state.messages:
    if message["role"] != "tool":
        with st.chat_message(message["role"]):
            st.markdown(message["content"])

A couple of things happen here:

  • We import all the variables from config.py
  • We construct the Azure OpenAI REST endpoint and store it in endpoint; we use the extensions/chat endpoint here which supports the Add your data feature in API version 2023-06-01-preview and higher
  • We configure the HTTP headers to send to the endpoint; the headers include the Azure OpenAI authentication key
  • We print a title with Streamlit (st.title) and define a messages array that we store in Streamlit’s session state
  • Because of the way Streamlit works, we have to print the previous messages of the chat each time the page reloads. We do that in the last part but we exclude the tool role. The extensions/chat endpoint returns a tool response that contains the data returned by Azure Cognitive Search. We do not want to print the tool response. Together with the tool response, the endpoint returns an assistant response which is the response from the gpt model. We do want to print that response.

Now we can look at the code that gets executed each time the user asks a question. In the UI, the question box is at the bottom:

Streamlit chat UI

Whenever you type a question, the following code gets executed:

# if user provides chat input, get and display response
# add user question and response to previous chat messages
if user_prompt := st.chat_input():
    st.chat_message("user").write(user_prompt)
    with st.chat_message("assistant"):
        with st.spinner("🧠 thinking..."):
            # add the user query to the messages array
            st.session_state.messages.append({"role": "user", "content": user_prompt})
            body = {
                "messages": st.session_state.messages,
                "temperature": float(AZURE_OPENAI_TEMPERATURE),
                "max_tokens": int(AZURE_OPENAI_MAX_TOKENS),
                "top_p": float(AZURE_OPENAI_TOP_P),
                "stop": AZURE_OPENAI_STOP_SEQUENCE.split("|") if AZURE_OPENAI_STOP_SEQUENCE else None,
                "stream": False,
                "dataSources": [
                    {
                        "type": "AzureCognitiveSearch",
                        "parameters": {
                            "endpoint": f"https://{AZURE_SEARCH_SERVICE}.search.windows.net",
                            "key": AZURE_SEARCH_KEY,
                            "indexName": AZURE_SEARCH_INDEX,
                            "fieldsMapping": {
                                "contentField": AZURE_SEARCH_CONTENT_COLUMNS.split("|") if AZURE_SEARCH_CONTENT_COLUMNS else [],
                                "titleField": AZURE_SEARCH_TITLE_COLUMN if AZURE_SEARCH_TITLE_COLUMN else None,
                                "urlField": AZURE_SEARCH_URL_COLUMN if AZURE_SEARCH_URL_COLUMN else None,
                                "filepathField": AZURE_SEARCH_FILENAME_COLUMN if AZURE_SEARCH_FILENAME_COLUMN else None,
                                "vectorFields": AZURE_SEARCH_VECTOR_COLUMNS.split("|") if AZURE_SEARCH_VECTOR_COLUMNS else []
                            },
                            "inScope": True if AZURE_SEARCH_ENABLE_IN_DOMAIN.lower() == "true" else False,
                            "topNDocuments": AZURE_SEARCH_TOP_K,
                            "queryType":  AZURE_SEARCH_QUERY_TYPE,
                            "roleInformation": AZURE_OPENAI_SYSTEM_MESSAGE,
                            "embeddingEndpoint": AZURE_OPENAI_EMBEDDING_ENDPOINT,
                            "embeddingKey": AZURE_OPENAI_EMBEDDING_KEY
                        }
                    }   
                ]
            }  

            # send request to chat completion endpoint
            try:
                response = requests.post(endpoint, headers=headers, json=body)

                # there will be a tool response and assistant response
                tool_response = response.json()["choices"][0]["messages"][0]["content"]
                tool_response_json = json.loads(tool_response)
                assistant_response = response.json()["choices"][0]["messages"][1]["content"]

                # get urls for the JSON tool response
                urls = [citation["url"] for citation in tool_response_json["citations"]]


            except Exception as e:
                st.error(e)
                st.stop()
            
           
            # replace [docN] with urls and use 0-based indexing
            for i, url in enumerate(urls):
                assistant_response = assistant_response.replace(f"[doc{i+1}]", f"[[{i}]({url})]")
            

            # write the response to the chat
            st.write(assistant_response)

            # write the urls to the chat; gpt response might not refer to all
            st.write(urls)

            # add both responses to the messages array
            st.session_state.messages.append({"role": "tool", "content": tool_response})
            st.session_state.messages.append({"role": "assistant", "content": assistant_response})
            

When there is input, we write the input to the chat history on the screen and add it to the messages array. The OpenAI APIs expect a messages array that includes user and assistant roles. In other words, user questions and assistant (here gpt-4) responses.

With a valid messages array, we can send our payload to the Azure OpenAI extensions/chat endpoint. If you have ever worked with the OpenAI or Azure OpenAI APIs, many of the settings in the JSON body will be familiar. For example: temperature, max_tokens, and of course the messages themselves.

What’s new here is the dataSources field. It contains all the information required to perform a vector search in Azure Cognitive Services. The search finds content relevant to the user’s question (that was added last to the messages array). Because queryType is set to vector, we also need to provide the embedding endpoint and key. It’s required because the user question has to be vectorized in order to compare it with the stored vectors.

It’s important to note that the extensions/chat endpoint, together with the dataSources configuration takes care of a lot of the details:

  • Perform a k-nearest neighbor search (k=5 here) to find 5 documents closely related to the user’s question
  • It uses vector search for this query (could be combined with keyword and semantic search to perform a hybrid search but that is not used here)
  • It stuffs the prompt to the GPT model with the relevant content
  • It returns the GPT model response (assistant response) together with a tool response. The tool response contains citations that include URLs to the original content and the content itself.

In the UI, we print the URLs from these citations after modifying the assistant response to just return hyperlinked numbers like [0] and [1] for the citations instead of unlinked [doc1], [doc2], etc… In the UI, that looks like:

Printing the URLs from the citations

Note that this chat app is a prototype and does not include management of the messages array. Long interactions will reach the model’s token limit!

You can find this code on GitHub here: https://github.com/gbaeke/azure-cog-search.

Conclusion

Although still in preview, you now have an Azure-native solution that enables the RAG pattern with vector search. RAG stands for Retrieval Augmented Generation. Azure Cognitive Search is a fully managed service that stores the vectors and performs similarity searches. There is no need to deploy a 3rd party vector database.

There is no need for specific libraries to implement this feature because it is all part of the Azure OpenAI API. Microsoft simply extended that API to add data sources and takes care of all the behind-the-scenes work that finds relevant content and adds it to your prompt.

If, for some reason, you do not want to use the Azure OpenAI API directly and use something like LangChain or Semantic Kernel, you can of course still do that. Both solutions support Azure Cognitive Search as a vector store.

Step-by-Step Guide: How to Build Your Own Chatbot with the ChatGPT API

In this blog post, we will be discussing how to build your own chat bot using the ChatGPT API. It’s worth mentioning that we will be using the OpenAI APIs directly and not the Azure OpenAI APIs, and the code will be written in Python. A crucial aspect of creating a chat bot is maintaining context in the conversation, which we will achieve by storing and sending previous messages to the API at each request. If you are just starting with AI and chat bots, this post will guide you through the step-by-step process of building your own simple chat bot using the ChatGPT API.

Python setup

Ensure Python is installed. I am using version 3.10.8. For editing code, I am using Visual Studio code as the editor. For the text-based chat bot, you will need the following Python packages:

  • openai: make sure the version is 0.27.0 or higher; earlier versions do not support the ChatCompletion APIs
  • tiktoken: a library to count the number of tokens of your chat bot messages

Install the above packages with your package manager. For example: pip install openai.

All code can be found on GitHub.

Getting an account at OpenAI

We will write a text-based chat bot that asks for user input indefinitely. The first thing you need to do is sign up for API access at https://platform.openai.com/signup. Access is not free but for personal use, while writing and testing the chat bot, the price will be very low. Here is a screenshot from my account:

Oh no, $0.13 dollars

When you have your account, generate an API key from https://platform.openai.com/account/api-keys. Click the Create new secret key button and store the key somewhere.

Writing the bot

Now create a new Python file called app.py and add the following lines:

import os
import openai
import tiktoken

openai.api_key = os.getenv("OPENAI_KEY")

We already discussed the openai and tiktoken libraries. We will also use the builtin os library to read environment variables.

In the last line, we read the environment variable OPENAI_KEY. If you use Linux, in your shell, use the following command to store the OpenAI key in an environment variable: export OPENAI_KEY=your-OpenAI-key. We use this approach to avoid storing the API key in your code and accidentally uploading it to GitHub.

To implement the core chat functionality, we will use a Python class. I was following a Udemy course about ChatGPT and it used a similar approach, which I liked. By the way, I can highly recommend that course. Check it out here.

Let’s start with the class constructor:

class ChatBot:

    def __init__(self, message):
        self.messages = [
            { "role": "system", "content": message }
        ]

In the constructor, we define a messages list and set the first item in that list to a configurable dictionary: { "role": "system", "content": message }. In the ChatGPT API calls, the messages list provides context to the API because it contains all the previous messages. With this initial system message, we can instruct the API to behave in a certain way. For example, later in the code, you will find this code to create an instance of the ChatBot class:

bot = ChatBot("You are an assistant that always answers correctly. If not sure, say 'I don't know'.")

But you could also do:

bot = ChatBot("You are an assistant that always answers wrongly.Always contradict the user")

In practice, ChatGPT does not follow the system instruction to strongly. User messages are more important. So it could be that, after some back and forth, the answers will not follow the system instruction anymore.

Let’s continue with another method in the class, the chat method:

def chat(self):
        prompt = input("You: ")
        
        self.messages.append(
            { "role": "user", "content": prompt}
        )
        
        response = openai.ChatCompletion.create(
            model="gpt-3.5-turbo",
            messages = self.messages,
            temperature = 0.8
        )
        
        answer = response.choices[0]['message']['content']
        
        print(answer)
        
        self.messages.append(
           { "role": "assistant", "content": answer} 
        )

        tokens = self.num_tokens_from_messages(self.messages)
        print(f"Total tokens: {tokens}")

        if tokens > 4000:
            print("WARNING: Number of tokens exceeds 4000. Truncating messages.")
            self.messages = self.messages[2:]

The chat method is where the action happens. It does the following:

  • It prompts the user to enter some input.
  • The user’s input is stored in a dictionary as a message with a “user” role and appended to a list of messages called self.messages. If this is the first input, we now have two messages in the list, a system message and a user message.
  • It then creates a response using OpenAI’s gpt-3.5-turbo model, passing in the self.messages list and a temperature of 0.8 as parameters. We use the ChatCompletion API versus the Completion API that you use with other models such as text-davinci-003.
  • The generated response is stored in a variable named answer. The full response contains a lot of information. We are only interested in the first response (there is only one) and grab the content.
  • The answer is printed to the console.
  • The answer is also added to the self.messages list as a message with an “assistant” role. If this is the first input, we now have three messages in the list: a system message, the first user message (the input) and the assistant’s response.
  • The total number of tokens in the self.messages list is computed using a separate function called num_tokens_from_messages() and printed to the console.
  • If the number of tokens exceeds 4000, a warning message is printed and the self.messages list is truncated to remove the first two messages. We will talk about these tokens later.

It’s important to realize we are using the Chat completions here. You can find more information about Chat completions here.

If you did not quite get how the text response gets extracted, here is an example of a full response from the Chat completion API:

{
 'id': 'chatcmpl-6p9XYPYSTTRi0xEviKjjilqrWU2Ve',
 'object': 'chat.completion',
 'created': 1677649420,
 'model': 'gpt-3.5-turbo',
 'usage': {'prompt_tokens': 56, 'completion_tokens': 31, 'total_tokens': 87},
 'choices': [
   {
    'message': {
      'role': 'assistant',
      'content': 'The 2020 World Series was played in Arlington, Texas at the Globe Life Field, which was the new home stadium for the Texas Rangers.'},
    'finish_reason': 'stop',
    'index': 0
   }
  ]
}

The response is indeed in choices[0][‘message’][‘content’].

To make this rudimentary chat bot work, we will repeatedly call the chat method like so:

bot = ChatBot("You are an assistant that always answers correctly. If not sure, say 'I don't know'.")
    while True:
        bot.chat()

Every time you input a question, the API answers and both the question and answer is added to the messages list. Of course, that makes the messages list grow larger and larger, up to a point where it gets to large. The question is: “What is too large?”. Let’s answer that in the next section.

Counting tokens

A language model does not work with text as humans do. Instead, they use tokens. It’s not important how this exactly works but it is important to know that you get billed based on these tokens. You pay per token.

In addition, the model we use here (gpt-3.5-turbo) has a maximum limit of 4096 tokens. This might change in the future. With our code, we cannot keep adding messages to the messages list because, eventually, we will pass the limit and the API call will fail.

To have an idea about the tokens in our messages list, we have this function:

def num_tokens_from_messages(self, messages, model="gpt-3.5-turbo"):
        try:
            encoding = tiktoken.encoding_for_model(model)
        except KeyError:
            encoding = tiktoken.get_encoding("cl100k_base")
        if model == "gpt-3.5-turbo":  # note: future models may deviate from this
            num_tokens = 0
            for message in messages:
                num_tokens += 4  # every message follows <im_start>{role/name}\n{content}<im_end>\n
                for key, value in message.items():
                    num_tokens += len(encoding.encode(value))
                    if key == "name":  # if there's a name, the role is omitted
                        num_tokens += -1  # role is always required and always 1 token
            num_tokens += 2  # every reply is primed with <im_start>assistant
            return num_tokens
        else:
            raise NotImplementedError(f"""num_tokens_from_messages() is not presently implemented for model {model}.""")

The above function comes from the OpenAI cookbook on GitHub. In my code, the function is used to count tokens in the messages list and, if the number of tokens is above a certain limit, we remove the first two messages from the list. The code also prints the tokens so you now how many you will be sending to the API.

The function contains references to <im_start> and <im_end>. This is ChatML and is discussed here. Because you use the ChatCompletion API, you do not have to worry about this. You just use the messages list and the API will transform it all to ChatML. But when you count tokens, ChatML needs to be taken into account for the total token count.

Note that Microsoft examples for Azure OpenAI, do use ChatML in the prompt, in combination with the default Completion APIs. See Microsoft Learn for more information. You will quickly see that using the ChatCompletion API with the messages list is much simpler.

To see, and download, the full code, see GitHub.

Running the code

To run the code, just run app.py. On my system, I need to use python3 app.py. I set the system message to You are an assistant that always answers wrongly. Contradict the user. 😀

Here’s an example conversation:

Although, at the start, the responses follow the system message, the assistant starts to correct itself and answers correctly. As stated, user messages eventually carry more weight.

Summary

In this post, we discussed how to build a chat bot using the ChatGPT API and Python. We went through the setup process, created an OpenAI account, and wrote the chat bot code using the OpenAI API. The bot used the ChatCompletion API and maintained context in the conversation by storing and sending previous messages to the API at each request. We also discussed counting tokens and truncating the message list to avoid exceeding the maximum token limit for the model. The full code is available on GitHub, and we provided an example conversation between the bot and the user. The post aimed to guide both beginning developers and beginners in AI and chat bot development through the step-by-step process of building their chat bot using the ChatGPT API and keep it as simple as possible.

Hope you liked it!

A quick look at Azure App Configuration and the Python Provider

When developing an application, it is highly likely that it needs to be configured with all sorts of settings. A simple list of key/value pairs is usually all you need. Some of the values can be read by anyone (e.g., a public URL) while some values should be treated as secrets (e.g., a connection string).

Azure App Configuration is a service to centrally manage these settings in addition to feature flags. In this post, we will look at storing and retrieving application settings and keeping feature flags for another time. I will also say App Config instead of App Configuration to save some keystrokes. 😉

We will do the following:

  • Retrieve key-value pairs for multiple applications and environments from one App Config instance
  • Use Key Vault references in App Config and retrieve these from Key Vault directly
  • Use the Python provider client to retrieve key-value pairs and store them in a Python dictionary

Why use App Configuration at all?

App Configuration helps by providing a fully managed service to store configuration settings for your applications separately from your code. Storing configuration separate from code is a best practice that most developers should follow.

Although you could store configuration values in files, using a service like App Config provides some standardization within or across developer teams.

Some developers store both configuration values and secrets in Key Vault. Although that works, App Config is way more flexible in organizing the settings and retrieving lists of settings with key and label filters. If you need to work with more than a few settings, I would recommend using a combination of App Config and Key Vault.

In what follows, I will show how we store settings for multiple applications and environments in the same App Config instance. Some of these settings will be Key Vault references.

Read https://learn.microsoft.com/en-us/azure/azure-app-configuration/overview before continuing to know more about App Config.

Provisioning App Config

Provisioning App Configuration is very easy from the portal or the Azure CLI. With the Azure CLI, use the following commands to create a resource group and an App Configuration instance in that group:

az group create -n RESOURCEGROUP -l LOCATION
az appconfig create -g RESOURCEGROUP  -n APPCONFIGNAME -l LOCATION

After deployment, we can check the portal and navigate to Configuration Explorer.

App Configuration in the Azure Portal

In Configuration Explorer, you can add the configuration values for your apps. They are just key/value pairs but they can be further enriched with labels, content types, and tags.

Note that there is a Free and a Standard tier of App Config. See https://azure.microsoft.com/en-us/pricing/details/app-configuration/ for more information. In production, you should use the Standard tier.

Storing configuration and secrets for multiple apps and environments

To store configuration values for multiple applications, you will have to identify the application in the key. App Configuration, oddly, has no knowledge of applications. For example, a key could be app1:setting1. You decide on the separator between the app name (app1 here) and its setting (setting1). In your code, you can easily query all settings for your app with a key filter (e.g. “app1:”. I will show an example of using a key filter later with the Python provider.

If you want to have different values for a key per environment (like dev, prd, etc…), you can add a label for each environment. To retrieve all settings for an environment, you can use a label filter. I will show an example of using a label filter later.

Suppose you want to use app1:setting1 in two environments: dev and prd. How do you create the key-value pairs? One way is to use the Azure CLI. You can also create them with the portal or from Python, C#, etc… With the CLI:

az appconfig kv set --name APPCONFIGNAME  --key app1:setting1 --value "value1" --label dev

APPCONFIG name is the name of your App Config instance. Just the name, not the full URL. For the prd environment:

az appconfig kv set --name APPCONFIGNAME  --key app1:setting1 --value "value2" --label prd

In Configuration Explorer, you will now see:

app1:setting1 for two environments (via labels)

For more examples of using the Azure CLI, see https://learn.microsoft.com/en-us/azure/azure-app-configuration/scripts/cli-work-with-keys.

In addition to these plain key-value pairs, you can also create Key Vault references. Let’s create one from the portal. In Configuration Explorer, click + Create and select Key Vault reference. You will get the following UI that allows you to create the reference. Make sure you have a Key Vault with a secret called dev-mysecret if you want to follow along. Below, set the label to dev. I forgot that in the screenshot below:

Creating a Key Vault Reference

Above, I am using the same naming convention for the key in App Config: app1:mysecret. Notice though that the secret I am referencing in Key Vault contains the environment and a dash (-) before the actual secret name. If you use one Key Vault per app instead of a Key Vault per app and environment, you will have to identify the environment in the secret name in some way.

After creating the reference, you will see the following in Configuration explorer:

Configuration explorer with one Key Vault reference

Note that the Key Vault reference has a content type. The content type is application/vnd.microsoft.appconfig.keyvaultref+json;charset=utf-8. You can use the content type in your code to know if the key contains a reference to a Key Vault secret. That reference will be something like https://kv-app1-geba.vault.azure.net/secrets/dev-mysecret. You can then use the Python SDK for Azure Key Vault to retrieve the secret from your code. Azure App Config will not do that for you.

You can use content types in other ways as well. For example, you could store a link to a storage account blob and use a content type that informs your code it needs to retrieve the blob from the account. Of course, you will need to write code to retrieve the blob. App Config only contains the reference.

Reading settings

There are many ways to read settings from App Config. If you need them in an Azure Pipeline, for instance, you can use the Azure App Configuration task to pull keys and values from App Config and set them as Azure pipeline variables.

If you deploy your app to Kubernetes and you do not want to read the settings from your code, you can integrate App Configuration with Helm. See https://learn.microsoft.com/en-us/azure/azure-app-configuration/integrate-kubernetes-deployment-helm for more information.

In most cases though, you will want to read the settings directly from your code. There is an SDK for several languages, including Python. The SDK has all the functionality you need to read and write settings.

Next to the Python SDK, there is also a Python provider which is optimized to read settings from App Config and store them in a Python dictionary. The provider has several options to automatically trim app names from keys and to automatically retrieve a secret from Key Vault if the setting in App Config is a Key Vault reference.

To authenticate to App Config, the default is access keys with a connection string. You can find the connection string in the Portal:

App Config Connection string for read/write or just read

You can also use Azure AD (it’s always enabled) and disable access keys. In this example, I will use a connection string to start with:

Before we connect and retrieve the values, ensure you install the provider first:

pip install azure-appconfiguration-provider

Above, use pip or pip3 depending on your installation of Python.

In your code, ensure the proper imports:

from azure.appconfiguration.provider import (
    AzureAppConfigurationProvider,
    SettingSelector,
    AzureAppConfigurationKeyVaultOptions
)
from azure.keyvault.secrets import SecretClient
from azure.identity import DefaultAzureCredential

To authenticate to Azure Key Vault with Azure AD, we can use DefaultAzureCredential():

try:
    CREDENTIAL = DefaultAzureCredential(exclude_visual_studio_code_credential=True)
except Exception as ex:
    print(f"error setting credentials: {ex}")

Note: on my machine, I had an issue with the VS Code credential feature so I turned that off.

Next, use a SettingSelector from the provider to provide a key filter and label filter. I want to retrieve key-value pairs for an app called app1 and an environment called dev:

app = 'app1'
env = 'dev'
selects = {SettingSelector(key_filter=f"{app}:*", label_filter=env)}

Next, when I retrieve the key-value pairs, I want to strip app1: from the keys:

trimmed_key_prefixes = {f"{app}:"}

In addition, I want the provider to automatically go to Key Vault and retrieve the secret:

key_vault_options = AzureAppConfigurationKeyVaultOptions(secret_resolver=retrieve_secret)

retrieve_secret refers to a function you need to write to retrieve the secret and add custom logic. There are other options as well.

def retrieve_secret(uri):
    try:
        # uri is in format: https://<keyvaultname>.vault.azure.net/secrets/<secretname>
        # retrieve key vault uri and secret name from uri
        vault_uri = "https://" + uri.split('/')[2]
        secret_name = uri.split('/')[-1]
        print(f"Retrieving secret {secret_name} from {vault_uri}...")
 
        # retrieve the secret from Key Vault; CREDENTIAL was set globally
        secret_client = SecretClient(vault_url=vault_uri, credential=CREDENTIAL)
 
        # get secret value from Key Vault
        secret_value = secret_client.get_secret(secret_name).value
 
    except Exception as ex:
        print(f"retrieving secret: {ex}", 1)

    return secret_value

Now that we have all the options, we can retrieve the key-value pairs.

connection_string = 'YOURCONNSTR'
app_config = AzureAppConfigurationProvider.load(
    connection_string=connection_string, selects=selects, key_vault_options=key_vault_options, 
    trimmed_key_prefixes=trimmed_key_prefixes)

print(app_config)

Now we have a Python dictionary app_config with all key-value pairs for app1 and environment dev. The key-value pairs are a mix of plain values from App Config and Key Vault.

You can now use this dictionary in your app in whatever way you like.

If you would like to use the same CREDENTIAL to connect to App Config, you can also use:

endpoint = 'APPCONFIGNAME.azconfig.io' # no https://
app_config = AzureAppConfigurationProvider.load(
    endpoint=endpoint, credential=CREDENTIAL, selects=selects, key_vault_options=key_vault_options, 
    trimmed_key_prefixes=trimmed_key_prefixes)

Ensure the credential you use has the App Configuration Data Reader role to read the key-value pairs.

Here’s all the code in a gist: https://gist.github.com/gbaeke/9b075a87a1198cdcbcc2b2028492085b. Ensure you have the key-value pairs as above and provide the connection string to the connection_string variable.

Conclusion

In this post, we showed how to retrieve key-value pairs with the Python provider from one App Config instance for multiple applications and environments.

The application is stored as a prefix in the key (app1:). The environment is a label (e.g., dev), allowing us to have the same setting with different values per environment.

Some keys can contain a reference to Key Vault to allow your application to retrieve secrets from Key Vault as well. I like this approach to have a list of all settings for an app and environment, where the value of the key can be an actual value or a reference to some other entity like a secret, a blob, or anything else.

Writing a Kubernetes operator with Kopf

In today’s post, we will write a simple operator with Kopf, which is a Python framework created by Zalando. A Kubernetes operator is a piece of software, running in Kubernetes, that does something application specific. To see some examples of what operators are used for, check out operatorhub.io.

Our operator will do something simple in order to easily grasp how it works:

  • the operator will create a deployment that runs nginx
  • nginx will serve a static website based on a git repository that you specify; we will use an init container to grab the website from git and store it in a volume
  • you can control the number of instances via a replicas parameter

That’s great but how will the operator know when it has to do something, like creating or updating resources? We will use custom resources for that. Read on to learn more…

Note: source files are on GitHub

Custom Resource Definition (CRD)

Kubernetes allows you to define your own resources. We will create a resource of type (kind) DemoWeb. The CRD is created with the YAML below:

# A simple CRD to deploy a demo website from a git repo
apiVersion: apiextensions.k8s.io/v1beta1
kind: CustomResourceDefinition
metadata:
  name: demowebs.baeke.info
spec:
  scope: Namespaced
  group: baeke.info
  versions:
    - name: v1
      served: true
      storage: true
  names:
    kind: DemoWeb
    plural: demowebs
    singular: demoweb
    shortNames:
      - dweb
  additionalPrinterColumns:
    - name: Replicas
      type: string
      priority: 0
      JSONPath: .spec.replicas
      description: Amount of replicas
    - name: GitRepo
      type: string
      priority: 0
      JSONPath: .spec.gitrepo
      description: Git repository with web content

For more information (and there is a lot) about CRDs, see the documentation.

Once you create the above resource with kubectl apply (or create), you can create a custom resource based on the definition:

apiVersion: baeke.info/v1
kind: DemoWeb
metadata:
  name: demoweb1
spec:
  replicas: 2
  gitrepo: "https://github.com/gbaeke/static-web.git"

Note that we specified our own API and version in the CRD (baeke.info/v1) and that we set the kind to DemoWeb. In the additionalPrinterColumns, we defined some properties that can be set in the spec that will also be printed on screen. When you list resources of kind DemoWeb, you will the see replicas and gitrepo columns:

Custom resources based on the DemoWeb CRD

Of course, creating the CRD and the custom resources is not enough. To actually create the nginx deployment when the custom resource is created, we need to write and run the operator.

Writing the operator

I wrote the operator on a Mac with Python 3.7.6 (64-bit). On Windows, for best results, make sure you use Miniconda instead of Python from the Windows Store. First install Kopf and the Kubernetes package:

pip3 install kopf kubernetes

Verify you can run kopf:

Running kopf

Let’s write the operator. You can find it in full here. Here’s the first part:

Naturally, we import kopf and other necessary packages. As noted before, kopf and kubernetes will have to be installed with pip. Next, we define a handler that runs whenever a resource of our custom type is spotted by the operator (with the @kopf.on.create decorator). The handler has two parameters:

  • spec object: allows us to retrieve our custom properties with spec.get (e.g. spec.get(‘replicas’, 1) – the second parameter is the default value)
  • **kwargs: a dictionary with lots of extra values we can use; we use it to retrieve the name of our custom resource (e.g. demoweb1); we can use that name to derive the name of our deployment and to set labels for our pods

Note: instead of using **kwargs to retrieve the name, you can also define an extra name parameter in the handler like so: def create_fn(spec, name, **kwargs); see the docs for more information

Our deployment is just yaml stored in the doc variable with some help from the Python yaml package. We use spec.get and the name variable to customise it.

After the doc variable, the following code completes the event handler:

The rest of the operator

With kopf.adopt, we make sure the deployment we create is a child of our custom resource. When we delete the custom resource, its children are also deleted.

Next, we simply use the kubernetes client to create a deployment via the apps/v1 api. The method create_namespaced_deployment takes two required parameters: the namespace and the deployment specification. Note there is only minimal error checking here. There is much more you can do with regards to error checking, retries, etc…

Now we can run the operator with:

kopf run operator-filename.py

You can perfectly run this on your local workstation if you have a working kube config pointing at a running cluster with the CRD installed. Kopf will automatically use that for authentication:

Running the operator on your workstation

Running the operator in your cluster

To run the operator in your cluster, create a Dockerfile that produces an image with Python, kopf, kubernetes and your operator in Python. In my case:

FROM python:3.7
RUN mkdir /src
ADD with_create.py /src
RUN pip install kopf
RUN pip install kubernetes
CMD kopf run /src/with_create.py --verbose

We added the verbose parameter for extra logging. Next, run the following commands to build and push the image (example with my image name):

docker build -t gbaeke/kopf-demoweb .
docker push gbaeke/kopf-demoweb

Now you can deploy the operator to the cluster:

apiVersion: apps/v1
kind: Deployment
metadata:
  name: demowebs-operator
spec:
  replicas: 1
  strategy:
    type: Recreate
  selector:
    matchLabels:
      application: demowebs-operator
  template:
    metadata:
      labels:
        application: demowebs-operator
    spec:
      serviceAccountName: demowebs-account
      containers:
      - name: demowebs
        image: gbaeke/kopf-demoweb

The above is just a regular deployment but the serviceAccountName is extremely important. It gives kopf and your operator the required access rights to create the deployment is the target namespace. Check out the documentation to find out more about the creation of the service account and the required roles. Note that you should only run one instance of the operator!

Once the operator is deployed, you will see it running as a normal pod:

The operator is running

To see what is going on, check the logs. Let’s show them with octant:

Your operator logs

At the bottom, you see what happens when a creation event is detected for a resource of type DemoWeb. The spec is shown with the git repository and the number on replicas.

Now you can create resources of kind DemoWeb and see what happens. If you have your own git repository with some HTML in it, try to use that. Otherwise, just use mine at https://github.com/gbaeke/static-web.

Conclusion

Writing an operator is easy to do with the Kopf framework. Do note that we only touched on the basics to get started. We only have an on.create handler, and no on.update handler. So if you want to increase the number of replicas, you will have to delete the custom resource and create a new one. Based on the example though, it should be pretty easy to fix that. The git repo contains an example of an operator that also implements the on.update handler (with_update.py).