Creating a custom GPT to query any knowledge base with actions

A while ago, OpenAI introduced GPTs. A GPT is a custom version of ChatGPT that combine instructions, extra knowledge, and any combination of skills.

In this tutorial, we are going to create a custom GPT that can answer questions about articles on this blog. In order to achieve that, we will do the following:

  • create an Azure AI Search index
  • populate the index with content of the last 50 blog posts (via its RSS feed)
  • create a custom API with FastAPI (Python) that uses the Azure OpenAI “add your data” APIs to provide relevant content to the user’s query
  • add the custom API as an action to the custom GPT

The image below shows the properties of the GPT. You need to be a ChatGPT Plus subscriber to create a GPT.

Part of the custom GPT definition

To implement a custom action for the GPT, you need an API with an OpenAPI spec. When you use FastAPI, an OpenAPI JSON document can easily be downloaded and provided to the GPT. You will need to modify the JSON document with a servers section to specify the URL the GPT has to use.

In what follows, we will look at all of the different pieces that make this work. Beware: long post! 😀

Azure AI Search Index

Azure AI Search is a search service you create in Azure. Although there is a free tier, I used the basic tier. The basic tiers allows you to use its semantic reranker to optimise search results.

To create the index and populate it with content, I used the following notebook: https://github.com/gbaeke/custom-gpt/blob/main/blog-index/website-index.ipynb.

The result is an index like below:

Index in Azure AI Search

The index contains 292 documents although I only retrieve the last 50 blog posts. This is the result of chunking each post into smaller pieces of about 500 tokens with 100 tokens of overlap for each chunk. We use smaller chunks because we do not want to send entire blog posts as content to the large language model (LLM).

Note that the index supports similarity searches using vectors. The contentVector field contains the OpenAI embedding of the text in the content field.

Although vectors are available, we do not have to use vector search. Azure AI search supports simple keyword search as well. Together with the semantic ranker, it can provide more relevant results than keyword search on its own.

Note: in general, vector search will provide better results, especially when combined with keyword search and the semantic ranker

Use the index with Azure OpenAI “add your data”

I have written about the Azure OpenAI “add your data” features before. It provides a wizard experience to add an Azure AI Search index to the Azure OpenAI playground and directly test your index with the model of your choice.

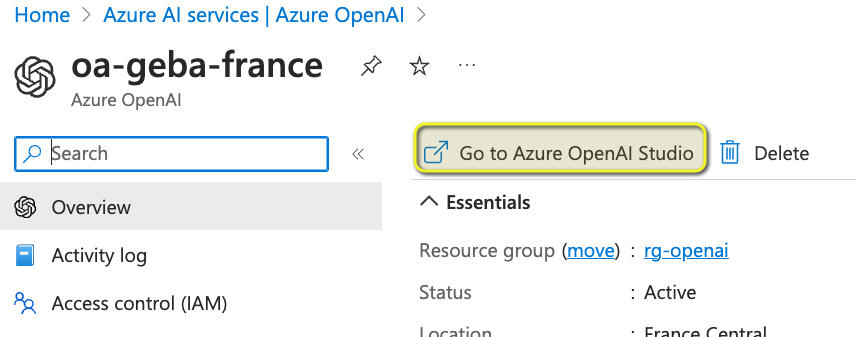
From you Azure OpenAI instance, first open Azure OpenAI Studio:

Go to OpenAI Studio from the Overview page of your Azure OpenAI instance

Note: you still need to complete a form to get access to Azure OpenAI. Currently, it can take around a day before you are allowed to create Azure OpenAI instances in your subscription.

In Azure OpenAI Studio, click Bring your own data from the Home screen:

Bring your own data

Select the Azure AI Search index and click Next.

Azure AI Search index selection

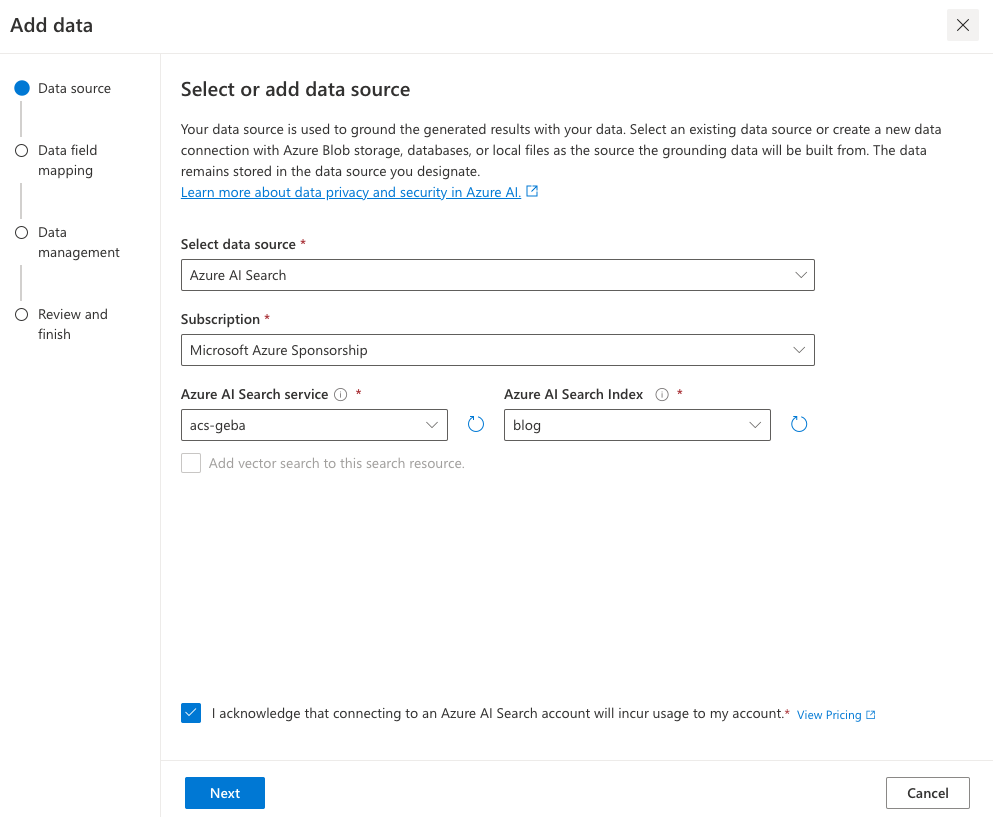
Note: I created the index using the generally available API that supports vector search. The Add your data wizard, at the time of writing, was not updated yet to support these new indexes. That is the reason why vector search cannot be enabled. We will use keyword + semantic search instead. I expect this functionality to be available soon (November/December 2023).

Next, provide field mappings:

Field Mappings

These mappings are required because the Add your data feature excepts these standard fields. You should have at least a content field to search. Above, I do not have a file name field because I have indexed blog posts. It’s ok to leave that field blank.

After clicking Next, we get to data management:

Data Management

Here, we specify the type of search. Semantic means keyword + semantic. In the dropdown list, you can also select keyword search on its own. However, that might give you less relevant results.

Note: for Semantic to work, you need to turn on the Semantic ranker on the Azure AI Search resource. Additionally, you need to create a semantic profile on the index.

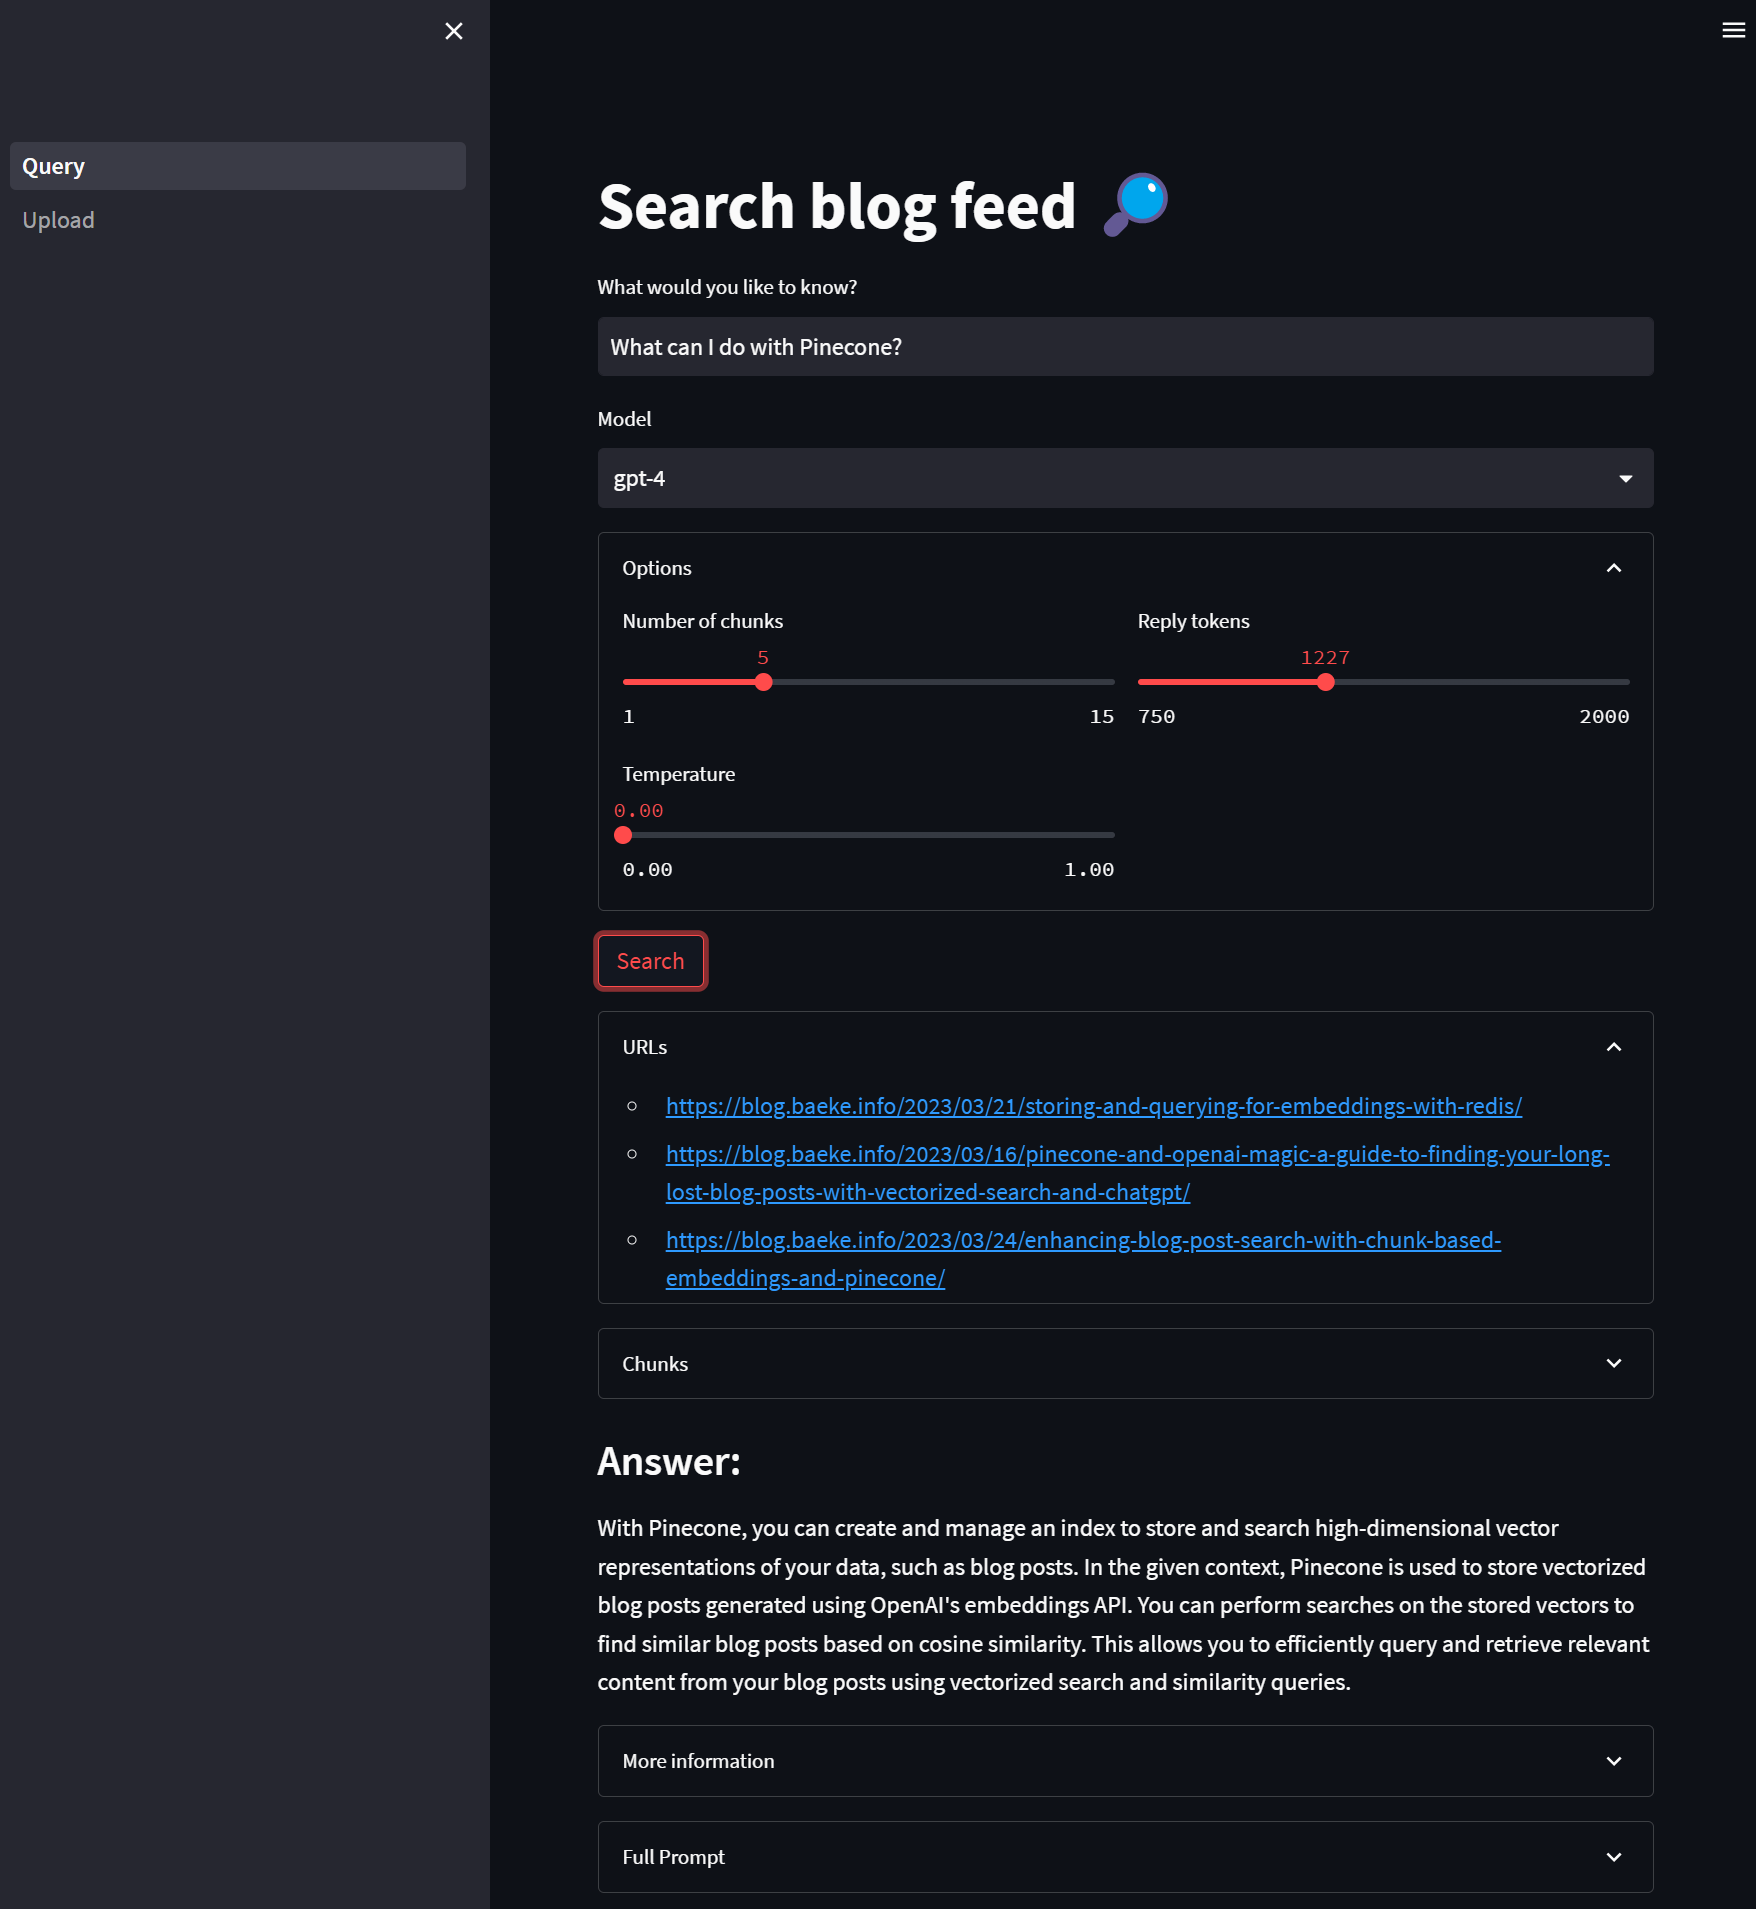
Now you can click Next, followed by Save and close. The Azure OpenAI Chat Playground appears with the index added:

Index added as a data source

You can now start chatting with your data. Select a chat model like gpt-4 or gpt-35-turbo. In Azure OpenAI, you have to deploy these models first and give the deployment a name.

Chat session with your data

Above, I asked about the OpenAI Assistants API, which is one of the posts on my blog. In the background, the playground performs a search on the Azure AI Search index and provides the results as context to the model. The gpt-35-turbo model answers the user’s question, based on the context coming from the index.

When you are happy with the result, you can export this experience to an Azure Web App of CoPilot Studio (Power Virtual Agents):

Export the “chat with data” experience

In our case, we want to use this configuration from code and provide an API we can add to the custom GPT.

⚠️ It’s import to realise that, with this approach, we will send the final answer, generated by an Azure OpenAI model, to the custom GPT. An alternate approach would be to hand the results of the Azure AI Search query to the custom GPT and let it formulate the answer on its own. That would be faster and less costly. If you also provide the blog post’s URL, ChatGPT can refer to it. However, the focus here is on using any API with a custom GPT so let’s continue with the API that uses the “add your data” APIs.

If you want to hand over Azure AI search results directly to ChatGPT, check out the code in the azure-ai-search folder in the Github repo.

Creating the API

To create an API that uses the index with the model, as configured in the playground, we can use some code. In fact, the playground provides sample code to work with:

Sample code from the playground

‼️ Sadly, this code will not work due to changes to the openai Python package. However, the principle is still the same:

  • call the chat completion extension API which is specific to Azure; in the code you will see this is as a Python f-string: f"{openai.api_base}/openai/deployments/{deployment_id}/extensions/chat/completions?api-version={openai.api_version}"
  • the JSON payload for this API needs to include the Azure AI Search configuration in a dataSources array.

The extension API will query Azure AI Search for you and create the prompt for the chat completion with context from the search result.

To create a FastAPI API that does this for the custom GPT, I decided to not use the openai package and simply use the REST API. Here is the code:

from fastapi import FastAPI, HTTPException, Depends, Header
from pydantic import BaseModel
import httpx, os
import dotenv
import re

# Load environment variables
dotenv.load_dotenv()

# Initialize FastAPI app
app = FastAPI()

# Constants (replace with your actual values)
api_base = "https://oa-geba-france.openai.azure.com/"
api_key = os.getenv("OPENAI_API_KEY")
deployment_id = "gpt-35-turbo"
search_endpoint = "https://acs-geba.search.windows.net"
search_key = os.getenv("SEARCH_KEY")
search_index = "blog"
api_version = "2023-08-01-preview"

# Pydantic model for request body
class RequestBody(BaseModel):
    query: str

# Define the API key dependency
def get_api_key(api_key: str = Header(None)):
    if api_key is None or api_key != os.getenv("API_KEY"):
        raise HTTPException(status_code=401, detail="Invalid API Key")
    return api_key

# Endpoint to generate response
@app.post("/generate_response", dependencies=[Depends(get_api_key)])
async def generate_response(request_body: RequestBody):
    url = f"{api_base}openai/deployments/{deployment_id}/extensions/chat/completions?api-version={api_version}"
    headers = {
        "Content-Type": "application/json",
        "api-key": api_key
    }
    data = {
        "dataSources": [
            {
                "type": "AzureCognitiveSearch",
                "parameters": {
                    "endpoint": search_endpoint,
                    "key": search_key,
                    "indexName": search_index
                }
            }
        ],
        "messages": [
            {
                "role": "system",
                "content": "You are a helpful assistant"
            },
            {
                "role": "user",
                "content": request_body.query
            }
        ]
    }

    async with httpx.AsyncClient() as client:
        response = await client.post(url, json=data, headers=headers, timeout=60)

    if response.status_code != 200:
        raise HTTPException(status_code=response.status_code, detail=response.text)

    response_json = response.json()

    # get the assistant response
    assistant_content = response_json['choices'][0]['message']['content']
    assistant_content = re.sub(r'\[doc.\]', '', assistant_content)
    
    # return assistant_content as json
    return {
        "response": assistant_content
    }

# Run the server
if __name__ == "__main__":
    import uvicorn
    uvicorn.run(app, host="0.0.0.0", port=8000, timeout_keep_alive=60)

This API has one endpoint: /generate_response that takes { "query": "your query" }as input and returns { "response": assistant_content }as output. Note that the original response from the model contains references like [doc1], [doc2], etc… The regex in the code removes those references. I don not particularly like how the references are handled by the API so I decided to not include them and simplify the response.

The endpoint expects an api-key header. It it is not present, it returns an error.

The endpoint does a call to the Azure OpenAI chat completion extension API which looks very similar to a regular OpenAI chat completion. The request does however, contain a dataSources field with the Azure AI Search information.

The environment variables like the OPENAI_API_KEY and the SEARCH_KEY are retrieved from a .env file.

Note: to stress this again, this API returns the answer to the query as generated by the chosen Azure OpenAI model. This allows it to be used in any application, not just a custom GPT. For a custom GPT in ChatGPT, an alternate approach would be to hand over the search results from Azure AI search directly, allowing the model in the custom GPT to generate the response. It would be faster and avoid Azure OpenAI costs. We are effectively using the custom GPT as a UI and as a way to maintain history between action calls. 😀

If you want to see the code in GitHub, check this URL: https://github.com/gbaeke/custom-gpt.

Running the API in Azure Container Apps

To run the API in the cloud, I decided to use Azure Container Apps. That means we need a Dockerfile to build the container image locally or in the cloud:

# Use an official Python runtime as a parent image
FROM python:3.9-slim-buster

# Set the working directory in the container to /app
WORKDIR /app

# Add the current directory contents into the container at /app
ADD . /app

# Install any needed packages specified in requirements.txt
RUN pip install --no-cache-dir -r requirements.txt

# Run app.py when the container launches
CMD ["python3", "app.py"]

We also need a requirements.txt file:

fastapi==0.104.1
pydantic==2.5.2
pydantic_core==2.14.5
httpx==0.25.2
python-dotenv==1.0.0
uvicorn==0.24.0.post1

I use the following shell script to build and run the container locally. The script can also push the container to Azure Container Apps.

#!/bin/bash

# Load environment variables from .env file
export $(grep -v '^#' .env | xargs)

# Check the command line argument
if [ "$1" == "build" ]; then
    # Build the Docker image
    docker build -t myblog .
elif [ "$1" == "run" ]; then
    # Run the Docker container, mapping port 8000 to 8000 and setting environment variables
    docker run -p 8000:8000 -e OPENAI_API_KEY=$OPENAI_API_KEY -e SEARCH_KEY=$SEARCH_KEY -e API_KEY=$API_KEY myblog
elif [ "$1" == "up" ]; then
    az containerapp up -n myblog --ingress external --target-port 8000 \
        --env-vars OPENAI_API_KEY=$OPENAI_API_KEY SEARCH_KEY=$SEARCH_KEY API_KEY=$API_KEY \
        --source .
else
    echo "Usage: $0 {build|run|up}"
fi

The shell script extracts the environment variables defined in .env and sets them in the session. Next, we check the first parameter given to the script (Docker is required on your machine for build and run):

  • build: build the Docker image
  • run: run the Docker image locally on port 8000 and specify the environment variables to authenticate to Azure OpenAI and Azure AI Search
  • up: build the Docker image in the cloud and run it in Container Apps; if you do not have a Container Apps Environment or Azure Container Registry, they will be created for you. In the end, you will get an https endpoint to your API in the cloud.

Note: you should not put secrets in environment variables in Azure Container Apps directly; use Container Apps secrets or Key Vault instead; the above is just quick and easy to simplify the deployment

To test the API locally, use the REST Client extension in VS Code with an .http file:

POST http://localhost:8000/generate_response HTTP/1.1
Host: localhost:8000
Content-Type: application/json
api-key: API_KEY_FROM_DOTENV

{
  "query": "what is the openai assistants api?"
}

###

POST https://AZURE_CONTAINER_APPS_ENDPOINT/generate_response HTTP/1.1
Host: AZURE_CONTAINER_APPS_ENDPOINT
Content-Type: application/json
api-key: API_KEY_FROM_DOTENV

{
  "query": "Can I use Redis as a vector db?"
}

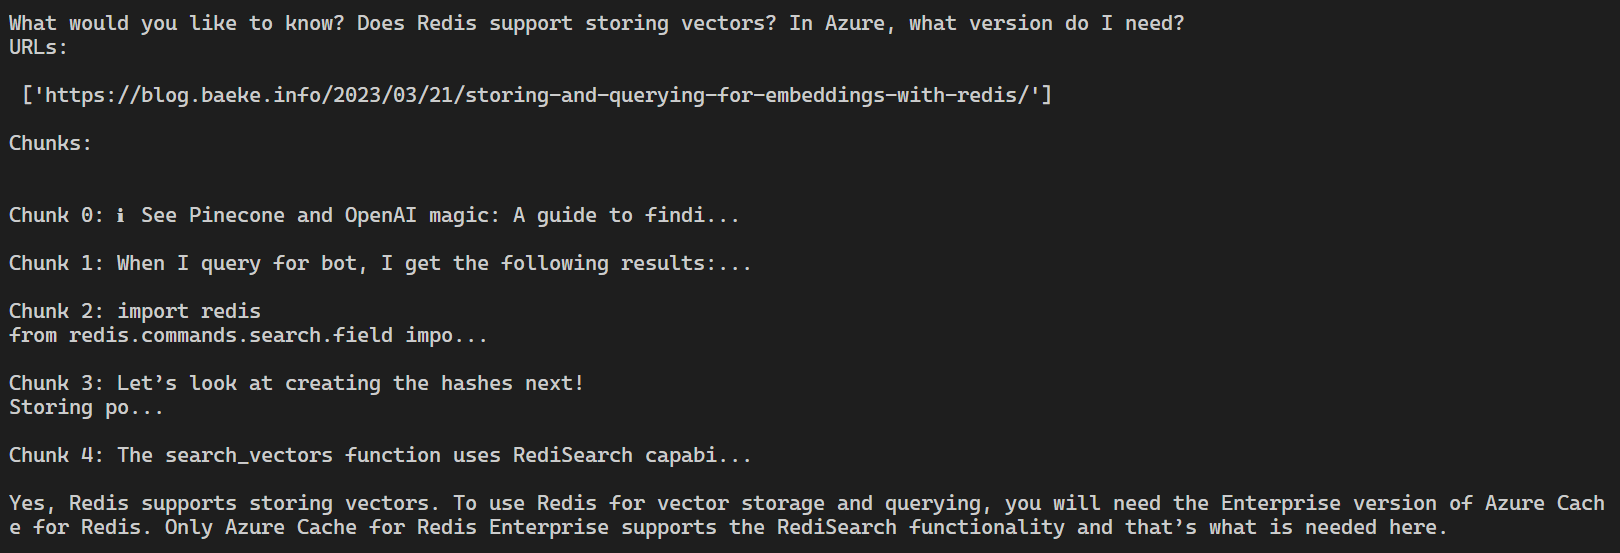
When you get something like below, you are good to go. Note again that we return a final answer and not the relevant chunks from Azure AI search.

Successful response from .http file

Getting the OpenAPI spec and adding it to the GPT

With your API running, you can go to its URL, like this one if the API runs locally: http://localhost:8000/openapi.json. The result is a JSON document you can copy to your GPT. I recommend to copy the JSON to VS Code and format it before you paste it in the GPT.

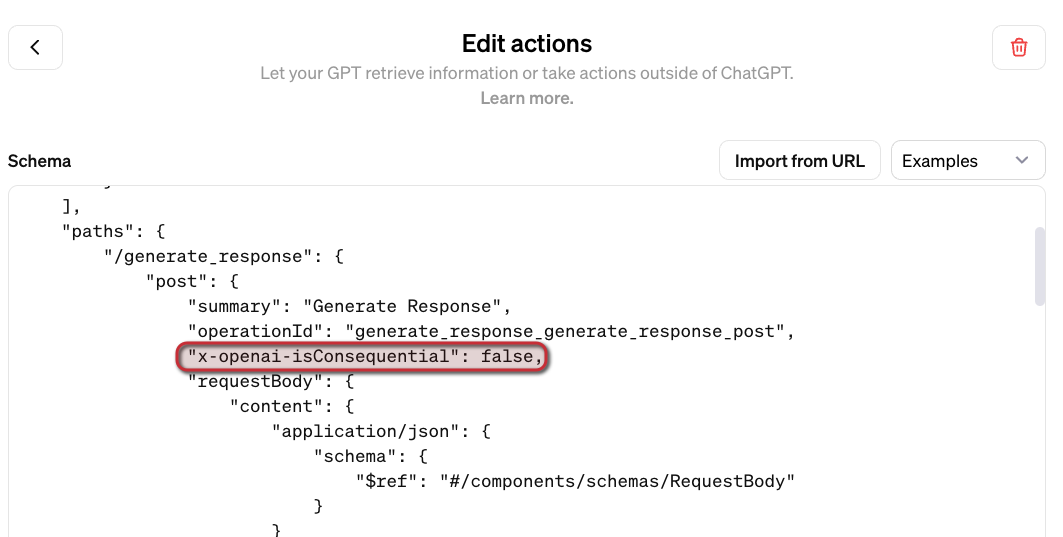
In the GPT, modify the OpenAPI spec with a servers section that includes your Azure Container Apps ingress URL:

Adding the URL to the GPT Action definition

If you want to give the ability to the user to trust the action to be called without approval (after a first call), also add the following:

Allowing the user to say Always Allow when action is used the first time

Take a look at the video below that shows how to create the GPT, including the configuration of the action and testing it.

Conclusion

Custom GPTs in ChatGPT open up a world of possibilities to offer personalised ChatGPT experiences. With custom actions, you can let the GPT do anything you want. In this tutorial, the custom action is an API call that answers the user’s question using Azure OpenAI with Azure AI Search as the provider of relevant context.

As long as you build and host an API and have an OpenAPI spec for your API, the possibilities are virtually limitless.

Note that custom GPTs with actions are not available in the ChatGPT app on mobile yet (end November, 2023). When that happens, it will open up all these capabilities on the go, including enabling voice chat. Fun stuff! 😀

Trying the OpenAI Assistants API

If you have ever tried to build an AI assistant, you know that is not a simple task. In almost all cases, your assistant needs access to external knowledge such as documents or APIs. You might even want to provide your assistant a code sandbox to solve user queries with code. When your assistant is accessed via a chat application, you also have to implement chat history.

Although there are several frameworks like LangChain and Semantic Kernel that can help, OpenAI recently released the Assistants API. It is their own API, tied to their models. The primitives of an assistant are Assistants, Threads and Runs. Let’s start by creating an assistant.

Note: this post contains code snippets in Python. You can find the full example in this gist: https://gist.github.com/gbaeke/e6e88c0dc68af3aa4a89b1228012ae53

Note: although I except this API to become available in Azure OpenAI, I am not quite sure it will happen fast, if at all. So for now, try it out at OpenAI directly. It is still in beta!

Creating an assistant

You can create an assistant using the portal or from code. An assistant has several parameters:

  • Instructions: how should the assistant behave or respond; think of it as the system message
  • Model: use any supported model, including fine-tuned models; to support retrieval from documents, you need the 1106 version of gpt-3.5-turbo/gpt-4
  • Tools: currently, the API supports Code Interpreter and Retrieval; these are fully hosted by OpenAI
  • Functions: define custom functions to call to integrate with external APIs for instance

Note that the retrieval tool supports uploaded files. There is no need for your own search solution (e.g., vector database with support for vector search, hybrid search, etc…). This is great in simpler scenarios where a full-fledged search system is not required. More control over retrieval will come later.

In this post, we will focus on an assistant that uses Code Interpreter. You can simply create the assistant in the portal. You can see the instructions, model, tools and files:

Assistant with only the Code interpreter tool using the latest gpt-4 model

To create this assistant, make sure you have an account at https://platform.openai.com. Create the assistant from the Assistants section:

Creating an assistant

Assistants have an id. For example, my assistant has this id: asst_VljToh6vQ1Mbu6Ct5L6qgpfy. I can use this id in my code to start creating threads.

Before talking about threads, let’s look at creating the assistant with code:

assistant = client.beta.assistants.create(
                name="Math Tutor",
                instructions="You are a personal math tutor. Write and run code to answer math questions.",
                tools=[{"type": "code_interpreter"}],
                model="gpt-4-1106-preview"
  )

To run this code, make sure you use the most recent version of the openai package (>=1.2). Note that if you run this code multiple times, you will create an assistant at each run. You should save the assistant id after creation and implement some logic to only run the above code when you do not have an id.

Above, we create an assistant with one tool: code interpreter.

Threads

After creating an assistant, you can create threads. Although somewhat unintuitive, a thread is not associated with an assistant. They exist on their own. After a thread is created, you can add messages to a thread, for instance a user message:

# we use streamlit so we save the thread in session state
if 'thread' not in st.session_state:
        st.session_state.thread = client.beta.threads.create()

# user_input contains a quesion like 'solve x^2 + 100 =200'
# here we add a message to the thread, using the thread id
client.beta.threads.messages.create(
            thread_id=st.session_state.thread.id,
            role="user",
            content=user_input
 )

To get a completion from the assistant for our thread, we need to create a run. The run tells the assistant to look at the messages in the thread and provide a response.

Runs

Below, we create the run:

run = client.beta.threads.runs.create(
            thread_id=st.session_state.thread.id,
            assistant_id=st.session_state.assistant_id, # refer to assistant in session state
            instructions="Please address the user as Geert. Only answer math questions."
  )

Above, both the thread_id and assistant_id are passed to the run, tying both together. If you did not create the assistant in your code, ensure you pass the id of a valid assistant created in your OpenAI account. Note that the run can be passed extra instructions. You can also override the model and tools that the assistant uses.

Creating a run is an asynchronous operation. It returns the metadata of the run immediately. The metadata includes fields like the run’s id, the created_at date and more.

You will need to manually check the run’s status in your code. For example:

# display a streamlit spinner while we check the run
with st.spinner('Waiting for completion...'):
    run_status = 'pending'
    while run_status != 'completed':
        run = client.beta.threads.runs.retrieve(
            thread_id=st.session_state.thread.id,
            run_id=run.id
        )
        run_status = run.status
        
        if run_status == 'failed' or run_status == "cancelled":
            st.error("Run failed or cancelled")
            st.stop()

        time.sleep(0.5)

When the run is finished, we can retrieve messages:

messages = client.beta.threads.messages.list(
    thread_id=st.session_state.thread.id
)

The messages data field contains all messages. Each message has a role like user or assistant. Assistant messages can have different content, like text or image_file.

For example, if I ask Plot y=x^3 + 2x, there will be both text and image_file responses. It’s up to the developer to properly display them in the app. Below is a naive approach, which only works with text and image responses, not downloads (Code Interpreter can give download links):

try:
    # no support for file download yet, just text and image_file
    for message in messages.data:
        if message.role == 'user':
            st.markdown(f"**User:** {message.content[0].text.value}")
        if message.role == 'assistant':
            for content in message.content:
                if hasattr(content, 'text'):
                    st.markdown(f"**Assistant:** {content.text.value}")
                elif hasattr(content, 'image_file'):
                    # image Id = content.image_file.file_id
                    content = get_content(content.image_file.file_id)
                    image = Image.open(BytesIO(content))
                    st.image(image, caption="Downloaded Image", use_column_width=True)                    
except Exception as e:
    st.error(e)

The above should be pretty clear:

  • if the assistant responds with text, display the text
  • if the assistant responds with an image, there is an image Id; I use a get_content function to download the image from OpenIA; get_content also implements some straightforward caching logic to avoid having to download images over and over again in the same thread

The get_content function uses client.files.content(file_id).response.content to retrieve the file (client is OpenAI client). The returned result can be used by PIL to open the image and subsequently display it with Streamlit’s st.image:

Assistant in a Streamlit app

Note that I can keep asking questions, which adds messages to the same thread, based on the thread’s Id in Streamlit’s session state. When the user refreshes the browser, session state is cleared so a new thread is started. For example, when I ask change 2x in 3x:

Asking to change the function

In the code, I do not have to worry about chat history at all. I just add messages to the thread, which is managed by OpenAI. At the next run, all those messages are sent to the assistant’s model, which responds appropriately. Note that you do pay for the tokens that all those messages consume.

Conclusion

Compared to the synchronous and stateless ChatCompletion API, the Assistants API is asynchronous and stateful. As a developer, you create an assistant with tools, functions and content for retrieval purposes. Interacting with the assistant is easy: simply add messages to a thread and create a run.

Obviously, it is early days for this API as it is still in beta. Personally, I think it’s a great step forward, making it easier to create quite sophisticated assistants. Most orchestration frameworks and AI tools like LangChain, Semantic Kernel, Flowise, etc… already have support or will support assistants and will add extra capabilities or ease of use on top of the base functionality.

Using Azure Database for PostgreSQL as a vector store

When we build LLM applications, there is always a recurring question: “What vector store will we use?”. In Azure, there are several native solutions. Some of them were discussed in previous posts.

  • Azure Cognitive Search: supports vector search but also hybrid search with semantic reranking as discussed here
  • Azure Redis Cache Enterprise: check my blog post
  • Azure Cosmos DB for MongoDB Core: see Microsoft Learn

In addition to the above, you can of course host your own vector database in a container such as Qdrant or others. You can install these on any service that supports containers such as App Service, Container Instances, Container Apps, or Kubernetes.

Using PostgreSQL

If you are familiar with Azure Database for PostgreSQL flexible servers, you can use it as a vector store, as long as you install the vector extension. This extension can be enabled in all compute tiers. I installed PostgreSQL and set the compute tier to Burstable with size Standard_B1ms (1 vCore, 2GB). This is great for testing and will cost around 20 euros per month with 32GB of storage. For production use, the monthly cost will start from about 150 euros at the lowest General Purpose tier.

PostrgreSQL flexible server with lowest compute tier

After deployment, you need to enable the vector extension. In Server Parameters, search for azure.extensions and select VECTOR from the list. Then click Save.

VECTOR extension added

When done, grab the connection details from the Connect pane:

Connection details

In pgAdmin, register the server with the above details. Connect to the server and create a database. Ensure you configure the firewall settings in Azure to allow your IP address to connect to the server.

Database creation in pgAdmin

Inside the database, go to Extensions and add the vector extension:

vector extension added to the database

Note: in the code below, we will use LangChain. LangChain will try to enable the vector extension if it is not enabled

Note: if you do not want to install pgAdmin, you can create the database from the Azure Portal or use the Azure CLI.

Working with the vector store

Although you can create and query tables that contain vectors with plain SQL, we will use LangChain as a higher-level library that takes care of many of the details for us.

Take a look at the following Python code that creates a few embeddings (vectors) and then uses RAG (retrieval augmented generation) to answer a question with OpenAI’s text-davinci-003 model.

Note: the code is on Github as well

import os
import getpass

# read from .env file
from dotenv import load_dotenv
load_dotenv()

from langchain.embeddings.openai import OpenAIEmbeddings
from langchain.text_splitter import CharacterTextSplitter
from langchain.vectorstores import PGVector
from langchain.document_loaders import TextLoader
from langchain.chains import RetrievalQA
from langchain.llms import OpenAI


loader = TextLoader("./state_of_the_union.txt")
documents = loader.load()
text_splitter = CharacterTextSplitter(chunk_size=1000, chunk_overlap=0)
docs = text_splitter.split_documents(documents)

embeddings = OpenAIEmbeddings()


pgpassword = os.getenv("PGPASSWORD", "")
if not pgpassword:
    pgpassword = getpass.getpass("Enter pgpassword: ")

CONNECTION_STRING = f"postgresql+psycopg2://pgadmin:{pgpassword}@pg-vec-geba.postgres.database.azure.com:5432/pgvector"

COLLECTION_NAME = "state_of_the_union_test"

# if you run this code more than once, you will duplicated vectors
# no upserts
db = PGVector.from_documents(
    embedding=embeddings,
    documents=docs,
    collection_name=COLLECTION_NAME,
    connection_string=CONNECTION_STRING
)

retriever = db.as_retriever()

query = "What did the president say about Ketanji Brown Jackson"

# LLM will default to text-davinci-003 because we are using a completion endpoint
# versus a chat endpoint
qa = RetrievalQA.from_chain_type(llm=OpenAI(), chain_type="stuff", retriever=retriever)

answer = qa.run(query)

print(answer)

The code above requires a .env file with the following content:

OPENAI_API_KEY=OPENAI_API_KEY
PGPASSWORD=PASSWORD_TO_POSTGRES

You will also need the State of the Union text file from here.

Before running the code, install the following packages:

pip install pgvector
pip install openai
pip install psycopg2-binary
pip install tiktoken

The code does the following:

  • Import required libraries: important here is the PGVector import
  • Loads the text file and splits it into chunks: chunking strategy is not too important here; just use chunks of 1000 characters
  • Create an instance of type OpenAIEmbeddings, later used to create a vector per chunk for storage in PostgreSQL; it will also be used when doing queries with a retrieval QA chain (see below); uses text-embedding-ada-002 embedding model
  • Construct the connection string for later use and set a collection name: collections are a way to store vectors together; the collections you create are kept in a table and each vector references the collection
  • Create an instance of PGVector with PGVector.from_documents: this will create/use tables to hold the collection(s) and vectors for you; all chunks will be vectorized and stored in a table; we will take a look at those tables in a moment; in a real application, you would reference existing tables and another process would create/update the vectors
  • Create a retriever (qa) from the PGVector instance for use in a retrieval QA chain
  • Run a query and print the answer: the qa.run (query) line does the n-nearest neighbor vector search in PostgreSQL (via the retriever), creates a meta-prompt with the relevant context, and returns the OpenAI model response in one step

In the PostgreSQL database, the above code creates two tables:

Tables created by LangChain to store the vectors

The collection table contains the collections you create from code. Each collection has a unique ID. The embedding table contains the vectors. Each vector has a unique ID and belongs to a collection. The fields of the embedding table are:

  • uuid: unique ID of the vector
  • collection_id: collection ID referencing the collection table
  • embedding: a field of type vector that stores the embedding (1536 dimensions)
  • document: the chunk of text that was vectorized
  • cmetadata: a JSON field with a link to the source file
  • custom_id: an id that is unique for each run

Note that when you run the sample Python code multiple times, you will have duplicated content. In a real application, you should avoid that. The process that creates and stores the vectors will typically be separate from the process that queries them.

⚠️ Important: Today, LangChain cannot search over all vectors in all collections. You always need to specify the collection to search. If you do need to search over all vectors, you can use SQL statements instead.

The search has the following properties:

  • Distance strategy: cosine similarity; the pgvector extension also supports L2 distance and inner product; the code above uses the text-embedding-ada-002 embeddings model by default; with that model, you should use cosine similarity; LangChain uses cosine similarity as the default for PGVector so that’s a match! 👏
  • Exact nearest neighbor search: although this provides perfect recall, it can get slow when there are many vectors because the entire table is scanned; the extension supports the creation of indexes to perform an approximate nearest neighbor search using IVFFLat or HNSW; see pgvector on GitHub for more details and also this article from Crunchy Data.

Note: most other vector databases use HNSW as the index type (e.g., Azure Cognitive Search, Qdrant, …); unlike IVFFLat you can create this index without having any vectors in your database table; at the time of writing (end of September 2023), the version of the vector extension on Azure was 0.4.1 and did not support HNSW; HNSW requires version 0.5.0 or higher

Conclusion

Azure Database for PostgreSQL with the vector extension is an interesting alternative to other vector database solutions in Azure. This is especially the case when PostgreSQL is your database of choice! In this post, we have shown how LangChain supports it with a simple example. If you do not use LangChain or other libraries, you can simply use SQL statements to create and search indexes as documented here.

The drawback of using PostgreSQL is that you need to know a bit more about exact and approximate nearest neighbor searches and the different index mechanisms. That’s actually a good thing if you want to create production applications with good performance. For a simple POC with not a lot of data, you can skip all of this and perform exact searches.

Besides the free tier of Azure Cognitive Search, the configuration above is the service with the lowest cost for POCs that need vector search. On top of that, the cheapest PostgreSQL option has more storage than Cognitive Search’s free tier (32GB vs. 50MB). Adding more storage is easy and relatively cheap as well. Give it a go and tell me what you think!

Use Azure OpenAI Add your data vector search from code

In the previous post, we looked at using Azure OpenAI Add your data from the Azure OpenAI Chat Playground. It is an easy-to-follow wizard to add documents to a storage account and start asking questions about them. From the playground, you can deploy a chat app to an Azure web app and you are good to go. The vector search is performed by an Azure Cognitive Search resource via an index that includes a vector next to other fields such as the actual content, the original URL, etc…

In this post, we will look at using this index from code and build a chat app using the Python Streamlit library.

All code can be found here: https://github.com/gbaeke/azure-cog-search

Requirements

You need an Azure Cognitive Search resource with an index that supports vector search. Use this post to create one. Besides Azure Cognitive Search, you will need Azure OpenAI deployed with both gpt-4 (or 3.5) and the text-embedding-ada-002 embedding model. The embedding model is required to support vector search. In Europe, use France Central as the region.

Next, you need Python installed. I use Python 3.11.4 64-bit on an M1 Mac. You will need to install the following libraries with pip:

  • streamlit
  • requests

You do not need the OpenAI library because we will use the Azure OpenAI REST APIs to be able to use the extension that enables the Add your data feature.

Configuration

We need several configuration settings. The can be divided into two big blocks:

  • Azure Cognitive Search settings: name of the resource, access key, index name, columns, type of search (vector), and more…
  • Azure OpenAI settings: name of the model (e.g., gpt-4), OpenAI access key, embedding model, and more…

You should create a .env file with the following content:

AZURE_SEARCH_SERVICE = "AZURE_COG_SEARCH_SHORT_NAME"
AZURE_SEARCH_INDEX = "INDEX_NAME"
AZURE_SEARCH_KEY = "AZURE_COG_SEARCH_AUTH_KEY"
AZURE_SEARCH_USE_SEMANTIC_SEARCH = "false"
AZURE_SEARCH_TOP_K = "5"
AZURE_SEARCH_ENABLE_IN_DOMAIN = "true"
AZURE_SEARCH_CONTENT_COLUMNS = "content"
AZURE_SEARCH_FILENAME_COLUMN = "filepath"
AZURE_SEARCH_TITLE_COLUMN = "title"
AZURE_SEARCH_URL_COLUMN = "url"
AZURE_SEARCH_QUERY_TYPE = "vector"

# AOAI Integration Settings
AZURE_OPENAI_RESOURCE = "AZURE_OPENAI_SHORT_NAME"
AZURE_OPENAI_MODEL = "gpt-4"
AZURE_OPENAI_KEY = "AZURE_OPENAI_AUTH_KEY"
AZURE_OPENAI_TEMPERATURE = 0
AZURE_OPENAI_TOP_P = 1.0
AZURE_OPENAI_MAX_TOKENS = 1000
AZURE_OPENAI_STOP_SEQUENCE = ""
AZURE_OPENAI_SYSTEM_MESSAGE = "You are an AI assistant that helps people find information."
AZURE_OPENAI_PREVIEW_API_VERSION = "2023-06-01-preview"
AZURE_OPENAI_STREAM = "false"
AZURE_OPENAI_MODEL_NAME = "gpt-4"
AZURE_OPENAI_EMBEDDING_ENDPOINT = "https://AZURE_OPENAI_SHORT_NAME.openai.azure.com/openai/deployments/embedding/EMBEDDING_MODEL_NAME?api-version=2023-03-15-preview"
AZURE_OPENAI_EMBEDDING_KEY = "AZURE_OPENAI_AUTH_KEY"

Now we can create a config.py that reads these settings.

from dotenv import load_dotenv
import os
load_dotenv()

# ACS Integration Settings
AZURE_SEARCH_SERVICE = os.environ.get("AZURE_SEARCH_SERVICE")
AZURE_SEARCH_INDEX = os.environ.get("AZURE_SEARCH_INDEX")
AZURE_SEARCH_KEY = os.environ.get("AZURE_SEARCH_KEY")
AZURE_SEARCH_USE_SEMANTIC_SEARCH = os.environ.get("AZURE_SEARCH_USE_SEMANTIC_SEARCH", "false")
AZURE_SEARCH_TOP_K = os.environ.get("AZURE_SEARCH_TOP_K", 5)
AZURE_SEARCH_ENABLE_IN_DOMAIN = os.environ.get("AZURE_SEARCH_ENABLE_IN_DOMAIN", "true")
AZURE_SEARCH_CONTENT_COLUMNS = os.environ.get("AZURE_SEARCH_CONTENT_COLUMNS")
AZURE_SEARCH_FILENAME_COLUMN = os.environ.get("AZURE_SEARCH_FILENAME_COLUMN")
AZURE_SEARCH_TITLE_COLUMN = os.environ.get("AZURE_SEARCH_TITLE_COLUMN")
AZURE_SEARCH_URL_COLUMN = os.environ.get("AZURE_SEARCH_URL_COLUMN")
AZURE_SEARCH_VECTOR_COLUMNS = os.environ.get("AZURE_SEARCH_VECTOR_COLUMNS")
AZURE_SEARCH_QUERY_TYPE = os.environ.get("AZURE_SEARCH_QUERY_TYPE")

# AOAI Integration Settings
AZURE_OPENAI_RESOURCE = os.environ.get("AZURE_OPENAI_RESOURCE")
AZURE_OPENAI_MODEL = os.environ.get("AZURE_OPENAI_MODEL")
AZURE_OPENAI_KEY = os.environ.get("AZURE_OPENAI_KEY")
AZURE_OPENAI_TEMPERATURE = os.environ.get("AZURE_OPENAI_TEMPERATURE", 0)
AZURE_OPENAI_TOP_P = os.environ.get("AZURE_OPENAI_TOP_P", 1.0)
AZURE_OPENAI_MAX_TOKENS = os.environ.get("AZURE_OPENAI_MAX_TOKENS", 1000)
AZURE_OPENAI_STOP_SEQUENCE = os.environ.get("AZURE_OPENAI_STOP_SEQUENCE")
AZURE_OPENAI_SYSTEM_MESSAGE = os.environ.get("AZURE_OPENAI_SYSTEM_MESSAGE", "You are an AI assistant that helps people find information about jobs.")
AZURE_OPENAI_PREVIEW_API_VERSION = os.environ.get("AZURE_OPENAI_PREVIEW_API_VERSION", "2023-06-01-preview")
AZURE_OPENAI_STREAM = os.environ.get("AZURE_OPENAI_STREAM", "true")
AZURE_OPENAI_MODEL_NAME = os.environ.get("AZURE_OPENAI_MODEL_NAME", "gpt-35-turbo")
AZURE_OPENAI_EMBEDDING_ENDPOINT = os.environ.get("AZURE_OPENAI_EMBEDDING_ENDPOINT")
AZURE_OPENAI_EMBEDDING_KEY = os.environ.get("AZURE_OPENAI_EMBEDDING_KEY")

Writing the chat app

Now we will create chat.py. The diagram below summarizes the architecture:

Chat app architecture (high level)

Here is the first section of the code with explanations:

import requests
import streamlit as st
from config import *
import json

# Azure OpenAI REST endpoint
endpoint = f"https://{AZURE_OPENAI_RESOURCE}.openai.azure.com/openai/deployments/{AZURE_OPENAI_MODEL}/extensions/chat/completions?api-version={AZURE_OPENAI_PREVIEW_API_VERSION}"
    
# endpoint headers with Azure OpenAI key
headers = {
    'Content-Type': 'application/json',
    'api-key': AZURE_OPENAI_KEY
}

# Streamlit app title
st.title("🤖 Azure Add Your Data Bot")

# Keep messages array in session state
if "messages" not in st.session_state:
    st.session_state.messages = []

# Display previous chat messages from history on app rerun
# Add your data messages include tool responses and assistant responses
# Exclude the tool responses from the chat display
for message in st.session_state.messages:
    if message["role"] != "tool":
        with st.chat_message(message["role"]):
            st.markdown(message["content"])

A couple of things happen here:

  • We import all the variables from config.py
  • We construct the Azure OpenAI REST endpoint and store it in endpoint; we use the extensions/chat endpoint here which supports the Add your data feature in API version 2023-06-01-preview and higher
  • We configure the HTTP headers to send to the endpoint; the headers include the Azure OpenAI authentication key
  • We print a title with Streamlit (st.title) and define a messages array that we store in Streamlit’s session state
  • Because of the way Streamlit works, we have to print the previous messages of the chat each time the page reloads. We do that in the last part but we exclude the tool role. The extensions/chat endpoint returns a tool response that contains the data returned by Azure Cognitive Search. We do not want to print the tool response. Together with the tool response, the endpoint returns an assistant response which is the response from the gpt model. We do want to print that response.

Now we can look at the code that gets executed each time the user asks a question. In the UI, the question box is at the bottom:

Streamlit chat UI

Whenever you type a question, the following code gets executed:

# if user provides chat input, get and display response
# add user question and response to previous chat messages
if user_prompt := st.chat_input():
    st.chat_message("user").write(user_prompt)
    with st.chat_message("assistant"):
        with st.spinner("🧠 thinking..."):
            # add the user query to the messages array
            st.session_state.messages.append({"role": "user", "content": user_prompt})
            body = {
                "messages": st.session_state.messages,
                "temperature": float(AZURE_OPENAI_TEMPERATURE),
                "max_tokens": int(AZURE_OPENAI_MAX_TOKENS),
                "top_p": float(AZURE_OPENAI_TOP_P),
                "stop": AZURE_OPENAI_STOP_SEQUENCE.split("|") if AZURE_OPENAI_STOP_SEQUENCE else None,
                "stream": False,
                "dataSources": [
                    {
                        "type": "AzureCognitiveSearch",
                        "parameters": {
                            "endpoint": f"https://{AZURE_SEARCH_SERVICE}.search.windows.net",
                            "key": AZURE_SEARCH_KEY,
                            "indexName": AZURE_SEARCH_INDEX,
                            "fieldsMapping": {
                                "contentField": AZURE_SEARCH_CONTENT_COLUMNS.split("|") if AZURE_SEARCH_CONTENT_COLUMNS else [],
                                "titleField": AZURE_SEARCH_TITLE_COLUMN if AZURE_SEARCH_TITLE_COLUMN else None,
                                "urlField": AZURE_SEARCH_URL_COLUMN if AZURE_SEARCH_URL_COLUMN else None,
                                "filepathField": AZURE_SEARCH_FILENAME_COLUMN if AZURE_SEARCH_FILENAME_COLUMN else None,
                                "vectorFields": AZURE_SEARCH_VECTOR_COLUMNS.split("|") if AZURE_SEARCH_VECTOR_COLUMNS else []
                            },
                            "inScope": True if AZURE_SEARCH_ENABLE_IN_DOMAIN.lower() == "true" else False,
                            "topNDocuments": AZURE_SEARCH_TOP_K,
                            "queryType":  AZURE_SEARCH_QUERY_TYPE,
                            "roleInformation": AZURE_OPENAI_SYSTEM_MESSAGE,
                            "embeddingEndpoint": AZURE_OPENAI_EMBEDDING_ENDPOINT,
                            "embeddingKey": AZURE_OPENAI_EMBEDDING_KEY
                        }
                    }   
                ]
            }  

            # send request to chat completion endpoint
            try:
                response = requests.post(endpoint, headers=headers, json=body)

                # there will be a tool response and assistant response
                tool_response = response.json()["choices"][0]["messages"][0]["content"]
                tool_response_json = json.loads(tool_response)
                assistant_response = response.json()["choices"][0]["messages"][1]["content"]

                # get urls for the JSON tool response
                urls = [citation["url"] for citation in tool_response_json["citations"]]


            except Exception as e:
                st.error(e)
                st.stop()
            
           
            # replace [docN] with urls and use 0-based indexing
            for i, url in enumerate(urls):
                assistant_response = assistant_response.replace(f"[doc{i+1}]", f"[[{i}]({url})]")
            

            # write the response to the chat
            st.write(assistant_response)

            # write the urls to the chat; gpt response might not refer to all
            st.write(urls)

            # add both responses to the messages array
            st.session_state.messages.append({"role": "tool", "content": tool_response})
            st.session_state.messages.append({"role": "assistant", "content": assistant_response})
            

When there is input, we write the input to the chat history on the screen and add it to the messages array. The OpenAI APIs expect a messages array that includes user and assistant roles. In other words, user questions and assistant (here gpt-4) responses.

With a valid messages array, we can send our payload to the Azure OpenAI extensions/chat endpoint. If you have ever worked with the OpenAI or Azure OpenAI APIs, many of the settings in the JSON body will be familiar. For example: temperature, max_tokens, and of course the messages themselves.

What’s new here is the dataSources field. It contains all the information required to perform a vector search in Azure Cognitive Services. The search finds content relevant to the user’s question (that was added last to the messages array). Because queryType is set to vector, we also need to provide the embedding endpoint and key. It’s required because the user question has to be vectorized in order to compare it with the stored vectors.

It’s important to note that the extensions/chat endpoint, together with the dataSources configuration takes care of a lot of the details:

  • Perform a k-nearest neighbor search (k=5 here) to find 5 documents closely related to the user’s question
  • It uses vector search for this query (could be combined with keyword and semantic search to perform a hybrid search but that is not used here)
  • It stuffs the prompt to the GPT model with the relevant content
  • It returns the GPT model response (assistant response) together with a tool response. The tool response contains citations that include URLs to the original content and the content itself.

In the UI, we print the URLs from these citations after modifying the assistant response to just return hyperlinked numbers like [0] and [1] for the citations instead of unlinked [doc1], [doc2], etc… In the UI, that looks like:

Printing the URLs from the citations

Note that this chat app is a prototype and does not include management of the messages array. Long interactions will reach the model’s token limit!

You can find this code on GitHub here: https://github.com/gbaeke/azure-cog-search.

Conclusion

Although still in preview, you now have an Azure-native solution that enables the RAG pattern with vector search. RAG stands for Retrieval Augmented Generation. Azure Cognitive Search is a fully managed service that stores the vectors and performs similarity searches. There is no need to deploy a 3rd party vector database.

There is no need for specific libraries to implement this feature because it is all part of the Azure OpenAI API. Microsoft simply extended that API to add data sources and takes care of all the behind-the-scenes work that finds relevant content and adds it to your prompt.

If, for some reason, you do not want to use the Azure OpenAI API directly and use something like LangChain or Semantic Kernel, you can of course still do that. Both solutions support Azure Cognitive Search as a vector store.

Improvements in Azure OpenAI Add your data

In a previous post, I talked about the Add your data feature in the Azure OpenAI Chat playground. Recently, there have been some updates to this feature, including vector search. Let’s take a look at the updated experience and focus on vector search.

Starting point

I have some PDF documents in a storage account container. They are PDFs containing job descriptions for a select group of companies. You can use .txt, .md, .html, Microsoft Word files, Microsoft PowerPoint files, or PDFs.

PDFs in a storage account

At the storage account level, CORS settings should be GET from all origins (*). This can also be set from the Add your data wizard in the OpenAI Playground.

CORS settings

In addition to the storage account, you need an OpenAI resource deployed to a region of choice. I have chosen France Central which provides access to gpt-4 and the text-embedding-ada-002 embedding model (a text embedding model is required for vector search). Ensure those models are deployed. For example:

Deployed models in France Central

Running the wizard

In OpenAI Chat Playground, you will find the Add your data (preview) tab. Use the + Add a data source button to start.

There are several sources to start from. Because I already have my files in a storage account, I will select Azure Blob Storage as the source and select the name of the storage account and the container with my files. You can also upload files or use an existing index in Cognitive Search. Whatever the option you choose, you will always end up with a Cognitive Search index that serves relevant content to the chat.

Data source options

As you can see from the above screenshot, in addition to the storage account, you have to select an Azure Cognitive Search instance. It will not be created for you. If you do not have such an instance, either click the link under the Select Azure Cognitive Search resource dropdown or create one yourself and use the refresh icon. I already have such a resource called acs-geba. Use the Basic pricing tier as a minimum. This gives you a vector quota of 1GB.

After selecting the Azure Cognitive Search resource, enter an index name. The documents in the storage account will be added to this index so we can search via this index later. The index will be created for you. I will use oai as the index name and also set a schedule to Hourly to update the index automatically. The schedule can be adjusted afterward in Azure Cognitive Search.

We now have the following in the wizard:

Add your data, data source config

You can now add vector search. This is in addition to keyword and semantic search. To use vector search, you need to specify an embedding model. If you do not have text-embedding-ada-002 deployed in your region, you will not be able to turn on vector search. This feature requires at least the Basic or higher SKU.

Turning on vector search (still in the first page of the wizard)

Above, I called my deployment of the text-embedding-ada-002 model embedding but you can use any name you like. It’s just a deployment name.

Now we can press Next, to be presented with the Data management page:

Data management page

You can find more information about those options here. In most cases, using Vector search alone is sufficient but it depends a bit on your dataset and use-case. I will just use Vector search. When we use Redis, Qdrant, Pinecone, or other vector stores, we also use vectorized search exclusively, which works very well.

After clicking Next, review what will happen and click Save and Close. The data will be added to the index:

Data is being added

Asking questions about the data

When the data has been added to Azure Cognitive Search, you can start asking questions. If you want to limit the chat to only your data, ensure that Limit Responses to your data content is checked.

Ready to go

In the Chat Platground, I selected gpt-4 and asked the following question: “Who are MBarQ and do they need AI translators?”. The answer is as follows:

Asking a question

This answer comes from one of the PDFs containing the job description.

Behind the scenes

For the above interaction to work, the question “Who are MBarQ and do they need AI translators?” is vectorized using the selected embedding model. Let’s call this the query vector. The selected embedding model creates a vector with 1536 dimensions that represent the text within a vector space. The nice thing here is that the embedding of the query is created automatically as part of the extended Azure OpenAI API.

The vectors for your documents are stored in an index that ends with the word chunks. Here’s my index and its defined fields. This is all the result of the wizard. No changes have been made to Azure Cognitive Search manually.

Index used for vector search and its fields

As you can see, there is a field for the contentVector which also notes the number of dimensions. The embedding model we used just happens to output 1536 numbers. Other embedding models use a different number of dimensions. Next to the contentVector, the content field contains the actual text that the vector was created from. That text will later be injected, behind the scenes, in the gpt-4 prompt. But we first have to find these pieces of text!

With the query vector in hand, Add your data searches for pieces of text with vectors that are close to the query vector. Cognitive Search uses cosine similarity to do that but there is no real need to know that. Note that we only use vector search in this scenario. When you do hybrid and/or semantic searches, the query process is different. Also, note that the index with vectors works on chunks of text coming from your documents. This chunking happens transparently in the background when the indexer runs.

Once the top N (usually n=5 but can be adjusted in code) vectors that are closest to the query vector are found, we also have the pieces of text closest to the query (from the content field). The original pieces of text that the vectors were calculated from get added to the query and sent to gpt-4. The prompt sent to gpt-4 could be something like the one below (just an example):

Who are MBarQ and do they need AI translators?

Only answer based on the context below after ---

---

First piece of text (no vectors here, just plain text!!!)

Second piece of text

...

Based on this prompt and hopefully relevant context below the — mark, the model can answer the original question.

Note that the Add your data experience also returns references. In the UI, you can click these to see the source text:

References

Deployment

From the Playground, you can deploy the chat experience to a web app or a Power Virtual Agent bot:

Deployment

At this moment (September 2023) the Power Virtual Agent deployment does not work if your default environment is not in the United States. When you click A new Power Virtual Agent bot…, you should quickly copy the URL and replace the environment ID with another one that is in the United States. Navigate to the modified URL to create the bot.

Deploying to a web app is a bit more straightforward because that is just a web app in Azure. No Power Platform madness here… 😀

Note that if you enable chat history, CosmosDB is used. Here’s the app with chat history visible at the right, similar to chat history in ChatGPT or Bing Chat. This app uses Azure Active Directory (Microsoft Entra ID) for authentication.

Chat in web app

Conclusion

The main addition to Add your data surely is vector search. That capability was already a part of Cognitive Search but the Add your data feature did not use it. When you do use it, a lot of stuff happens in the background automatically:

  • An index that supports vectors is created; if selected the index is automatically updated based on the contents in the storage account container
  • Documents are chunked and vectors are created for each of these chunks based on the selected embeddings model
  • There is no need to vectorize the user’s query yourself, performing a nearest neighbor search and stuffing the gpt prompt with content; everything is handled by the underlying API

It will be interesting to see how it evolves further.

Use the Azure Add your data feature from code

In a previous post, we looked at Azure Add your data (preview) that can be configured from the Azure OpenAI Chat playground. In a couple of steps, you can point to or upload files of a supported file type (PDF, Word, …) and create an Azure Cognitive Search index. That index can subsequently be queried to find relevant content to inject in the prompt of an Azure OpenAI model such as gtp-35-turbo or gpt-4. The injection is done for you by the Add your data feature!

Although this feature is fantastic and easy to configure in the portal, you probably want to use it in a custom application. So in this post, we will take a look at how to use this feature in code.

You can find a notebook with some sample code here: https://github.com/gbaeke/azure-cog-search. The code is a subset of the code used by Microsoft to create a web application from the Azure OpenAI playground. That code can be found here. Although the code is written in Python, it does not use specific OpenAI or Azure OpenAI libraries. The code uses the Azure OpenAI REST APIs only, which means you can easily replicate this in any other language or framework.

Before you run the code, make sure you clone the repo and add a .env file as described in README.md. The code itself is in a Python notebook so make sure you can run these notebooks. I use Visual Studio Code to do that:

Running the notebook in VS Code

To configure Visual Studio Code, check https://code.visualstudio.com/docs/datascience/jupyter-notebooks.

The code itself does the following:

  • create Python variables from environment variables to configure both Azure Cognitive Search and Azure OpenAI. Make sure you have read the previous blog post and/or looked at the video to have both of these resources. You will need to add the short names of these services and the authentication keys to these services. The video at the end of this post discusses the options in some more detail.
  • Prepare a messages array with a user question: I am an Azure architect. Is there a job for me? In the previous post, I added documents with job descriptions. You can add any documents you want and modify the user question accordingly.
  • Prepare the JSON body for an HTTP POST. The JSON body will be sent to the Azure OpenAI chat completion (extensions) API and will include information about the Azure Cognitive Search data source.
  • Create the endpoint URL and HTTP headers to send to the chat completion API. The headers contain the Azure OpenAI API key.
  • Send the JSON body to the chat completion endpoint with the Python requests module and extract the full response (that includes citations) and the response by the OpenAI model. In this code, gpt-4 is used.

To see the response from the code, check https://github.com/gbaeke/azure-cog-search/blob/main/cog-search-openai.ipynb. If you have worked with the OpenAI APIs before, you will notice that the response in the choices field contains two messages:

  • a message with the role of tool that includes content from Azure Cognitive Services including metadata like URL and file path
  • a message with the role of assistant that contains the actual answer from the OpenAI model (here gpt-4)

It’s important to note that you need to use the chat completions extensions API with the correct API version of 2023-06-01-preview. This is reflected in the constructed endpoint. Also, note it’s extensions/chat/completions in the URL!

endpoint = f"https://{AZURE_OPENAI_RESOURCE}.openai.azure.com/openai/deployments/{AZURE_OPENAI_MODEL}/extensions/chat/completions?api-version={AZURE_OPENAI_PREVIEW_API_VERSION}"

If you are used to LangChain or other libraries that are supposed to make it easy to work with large language models, prompts, vector databases, etc… you know that the document queries are separated from the actual call to the LLM and that the retrieved documents are injected into the prompt. Of course, LangChain and other tools have higher-level APIs that make it easy to do in just a few lines of code.

Microsoft has gone for direct integration of Azure Cognitive Search in the Azure OpenAI APIs version 2023-06-01-preview and above. You can find the OpenAPI specification (swagger) here. One API call is all that is needed!

Note that in this code, we are not using semantic search. In the sample .env file, AZURE_SEARCH_USE_SEMANTIC_SEARCH is set to false. You cannot simply turn on that setting because it also requires turning on the feature in Azure Cognitive Search. The feature is also in preview:

Semantic search in Azure Cognitive Search (preview)

To understand the differences between lexical search and semantic search, see this article. In general, semantic search should return better results when using natural language queries. By turning on the feature in Cognitive Search (Free tier) and setting AZURE_SEARCH_USE_SEMANTIC_SEARCH to true, you should be good to go.

⚠️ Note that semantic search is not the same as vector search in the context of Azure Cognitive Search. With vector search, you have to generate vectors (embeddings) using an embedding model and store these vectors in your index together with your content. Although Azure Cognitive Search supports vector search, it is not used here. It’s kind of confusing because vector search enables semantic search in a general context.

Here’s a video with more information about this blog post:

Building a chatbot in Azure that works with your data

When I talk to customers about Azure OpenAI, I am often asked how to build a chatbot that uses your own data in the simplest way possible while still allowing for some customization. In Azure, there are a few solutions. We will look at one of the solutions in this post.

Note: don’t feel like reading? Check the video at the bottom of this post to see all this in action.

The easiest solution is “Bring your own data”, also called “Azure OpenAI on your data”. See Microsoft Learn for more information. Right from Azure AI Studio, you can add data from a blob storage container or directly upload your data. In the end, the data ends up in Azure Cognitive Search, which is then linked to the Chat playground as shown in the image below:

Bring your own data in Chat Playground (part of Azure AI Studio)

The following file types are supported: txt, md, html, Word, PowerPoint, PDF. Above, I added a few PDF files with job descriptions. The standard upload procedure works well for small documents. For larger documents, you should use the data preparation script. It will chunk documents into smaller pieces. The chunk size and overlap can be set in a config.json file. This is similar to what you can do with LangChain’s loaders and text splitters. In fact, you can use LangChain’s abstractions instead of the data preparation script but I have not tried this myself yet. See https://python.langchain.com/docs/integrations/vectorstores/azuresearch for more information. If I find the time, I will report on my findings in another blog post.

Right from the playground, you can click a button to deploy the bot to a new web app (Azure App Services):

The same bot in an Azure Web App

Although it is very easy to create the bot, there are a couple of things to note here:

  • The solution requires Azure Cognitive Search which is an extra cost. The minimum cost is around 70 euros per month. There are open-source solutions you can use for free or SaaS solutions that provide a free option (e.g., Pinecone). Azure OpenAI on your data only supports Azure Cognitive Search for now although technically, Microsoft could open this up to other stores.
  • Azure Cognitive Search is somewhat more complex than (some) vector databases such as Pinecone or Chroma. If you want to use other search engines/vector databases, I recommend using LangChain in combination with something like Chainlit to create your prototype. Of course, that means you will have to write more code. No more wizards for you! 😃
  • The source code for the web app is at https://github.com/microsoft/sample-app-aoai-chatGPT. Although the code is not super complex, Python tools such as Streamlit and Chainlit make it much easier to create a prototype from scratch. Note that the web app is protected with Azure Active Directory by default and that it authenticates to Cognitive Search and Azure OpenAI using API keys set as environment variables. This is all automatically configured for you!
  • Azure Cognitive Search integration is part of the Azure OpenAI API version 2023-06-01 and depends on a dataSources field in the JSON body sent to the Azure OpenAI API. Check the source code here. I would have preferred the API to stay aligned with the OpenAI APIs and retrieve extra content as a separate step.

With all this being said, if all you need for your demo is the web app generated by the Chat playground’s Deploy button, this is one of the quickest ways to get there!

To see the entire experience in action, check out the video below or click this link: https://www.youtube.com/watch?v=gySeOggsz-w.

Semantic Kernel Planner 101

Introduction

If you are a developer who wants to build AI-first apps with natural language processing and large language models, you might be interested in Semantic Kernel (SK), a lightweight and open-source SDK that aims to simplify the integration of AI with conventional programming languages.

SK is part of the CoPilot Stack and Microsoft is using it in its own CoPilots.

SK allows you to create and orchestrate semantic functions, native functions, memories, and connectors using C# or Python. Much like LangChain, it supports prompt templating, chaining, and memory with vectors (embeddings).

You can also use SK’s planner to automatically generate and execute complex tasks based on a user’s goals. This is similar to LangChain’s Agents & Tools capabilities. In this blog post, we will introduce some of the features and benefits of SK’s Planner, and show you how to use it in your own applications. I am still learning so I am going to stick to the basics! 😃

Source: Unlock the Potential of AI in Your Apps with Semantic Kernel: A Lightweight SDK for Large Language Models Integration (microsoft.com)

SK’s Planner allows you to create and execute plans based on semantic queries. You start by providing it a goal (an ask). The goal could be: “Create a photo of a meal with these ingredients: {list of ingredients}”. To achieve the goal, the planner can use plugins to generate and execute the plan. For the goal above, suppose we have two plugins:

  • Recipe plugin: creates a recipe based on starter ingredients
  • Image description plugin: creates an image description based on any input

The recipe plugin takes a list of ingredients as input while the image description plugin can take the recipe as input and generate an image description of it. That image description could be used by DALL-E to generate an actual image.

Note: at the time of writing, Microsoft was on the verge of using the word plugin instead of skill. In the code, you will see references to skills but that will go away. This post already the word plugins instead of skills.

Creating plugins

Plugins make expertise available to SK and consist of one or more functions. A function can be either:

  • an LLM prompt: a semantic function
  • native computer code: a native function

A plugin is a container where functions live. Think of it as a folder with each subfolder containing a function. For example:

Badly named 😃 MySkills plugin with two semantic functions

A semantic function is a prompt with placeholders for one or more input variables. The prompt is in skprompt.txt. The Recipe function uses the following prompt:

Write a recipe with the starter ingredients below and be specific about the steps to take and the amount of ingredients to use: 

{{$input}}

The file config.json contains metadata about the function and LLM completion settings such as max_tokens and temperature. For example:

{
    "schema": 1,
    "type": "completion",
    "description": "Creates a recipe from starting ingredients",
    "completion": {
        "max_tokens": 256,
        "temperature": 0,
        "top_p": 0,
        "presence_penalty": 0,
        "frequency_penalty": 0
    },
    "input": {
        "parameters": [
            {
                "name": "input",
                "description": "Input for this semantic function.",
                "defaultValue": ""
            }
        ]
    },
    "default_backends": []
}

From your code, you can simply run this function to create a recipe. The plugin above is similar to a PromptTemplate in LangChain that you can combine with an LLM into a chain. You would then simply run the chain to get the output (a recipe). SK supports creating functions inline in your code as well, similar to how LangChain works.

Using the Planner

As stated above, the Planner can use plugins to reach the goal provided by a user’s ask. It actually works its way backward from the goal to create the plan:

Source: https://learn.microsoft.com/en-us/semantic-kernel/create-chains/planner

There are different types of planners like a sequential planner, an action planner, a custom planner, and more. In our example, we will use a sequential planner and keep things as simple as possible. We will only use semantic functions, no native code functions.

Time for some code. We will build a small .NET Console App based on the example above: create a recipe and generate a photo description for this recipe. Here is the code:


using Microsoft.Extensions.Logging;
using Microsoft.SemanticKernel;
using Microsoft.SemanticKernel.AI.ImageGeneration;
using System.Diagnostics;
using Microsoft.SemanticKernel.Planning;
using System.Text.Json;

var kernelSettings = KernelSettings.LoadSettings();

var kernelConfig = new KernelConfig();
kernelConfig.AddCompletionBackend(kernelSettings);

using ILoggerFactory loggerFactory = LoggerFactory.Create(builder =>
{
    builder
        .SetMinimumLevel(kernelSettings.LogLevel ?? LogLevel.Warning)
        .AddConsole()
        .AddDebug();
});

IKernel kernel = new KernelBuilder()
    .WithLogger(loggerFactory.CreateLogger<IKernel>())
    .WithConfiguration(kernelConfig)
    .Configure(c =>
    {
        c.AddOpenAIImageGenerationService(kernelSettings.ApiKey);

    })
    .Build();

// used later to generate image with dallE
var dallE = kernel.GetService<IImageGeneration>();

// use SKs planner
var planner = new SequentialPlanner(kernel);

// depends on MySkills skill which has two semantic fucntions
// skills will be renamed to plugins in the future
var skillsDirectory = Path.Combine(System.IO.Directory.GetCurrentDirectory(), "skills");
var skill = kernel.ImportSemanticSkillFromDirectory(skillsDirectory, "MySkills");

// ask for starter ingredients
Console.Write("Enter ingredients: ");
string? input = Console.ReadLine();


if (!string.IsNullOrEmpty(input))
{

    // define the ASK for the planner; the two semantic functions should be used by the plan
    // note that these functions are too simple to be useful in a real application
    // a single prompt to the model would be enough
    var ask = "Create a photo of a meal with these ingredients:" + input;

    // create the plan and print it to see if the functions are used correctly
    var newPlan = await planner.CreatePlanAsync(ask);

    Console.WriteLine("Updated plan:\n");
    Console.WriteLine(JsonSerializer.Serialize(newPlan, new JsonSerializerOptions { WriteIndented = true }));

    // run the plan; result should be an image description
    var newPlanResult = await newPlan.InvokeAsync();


    // generate the url to the images created by dalle
    Console.WriteLine("Plan result: " + newPlanResult.ToString());
    var imageURL = await dallE.GenerateImageAsync(newPlanResult.ToString(), 512, 512);

    // display image in browser (MacOS!!!)
    Process.Start("open", imageURL);

The code uses config/appsettings.json which contains settings like serviceType, serviceId, and the API key to use with either OpenAI or Azure OpenAI. In my case, serviceType is OpenAI and the serviceId is gpt-4. Ensure you have gpt-4 access in OpenAI’s API. I actually wanted to use Azure OpenAI but I do not have access to DALL-E and I do not think SK would support it anyway.

After loading the settings, a KernelConfig is created, and a completion backend gets added (using gpt-4 here). After setting up logging, a new kernel is created with a new KernelBuilder() with the following settings;

  • a logger
  • the configuration with the completion backend
  • an image generation service (DALL-E2 here) which needs the OpenAI API key (retrieved from kernelSettings)

We can now create the planner with var planner = new SequentialPlanner(kernel); and add skills (plugins) to the kernel. We add plugins from the skills/MySkills folder in our project.

Now it’s just a matter of asking the user for some ingredients (stored in input) and creating the plan based on the ask. The ask is “Create a photo of a meal with these ingredients: …”

var ask = "Create a photo of a meal with these ingredients:" + input;

var newPlan = await planner.CreatePlanAsync(ask);

Note that CreatePlanAsync does not execute the plan, it just creates it. We can look at the plan with the following code:

Console.WriteLine("Updated plan:\n");
    Console.WriteLine(JsonSerializer.Serialize(newPlan, new JsonSerializerOptions { WriteIndented = true }));

The output is something like this (note that there are typos in the ingredients but that’s ok, the model should understand):

{
  "state": [
    {
      "Key": "INPUT",
      "Value": ""
    }
  ],
  "steps": [
    {
      "state": [
        {
          "Key": "INPUT",
          "Value": ""
        }
      ],
      "steps": [],
      "parameters": [
        {
          "Key": "INPUT",
          "Value": "courgette, collieflower, steak, tomato"
        }
      ],
      "outputs": [
        "RECIPE_RESULT"
      ],
      "next_step_index": 0,
      "name": "Recipe",
      "skill_name": "MySkills",
      "description": "Creates a recipe from starting ingredients"
    },
    {
      "state": [
        {
          "Key": "INPUT",
          "Value": ""
        }
      ],
      "steps": [],
      "parameters": [
        {
          "Key": "INPUT",
          "Value": "$RECIPE_RESULT"
        }
      ],
      "outputs": [
        "RESULT__IMAGE_DESCRIPTION"
      ],
      "next_step_index": 0,
      "name": "ImageDesc",
      "skill_name": "MySkills",
      "description": "Generate image description for a photo of a recipe or meal"
    }
  ],
  "parameters": [
    {
      "Key": "INPUT",
      "Value": ""
    }
  ],
  "outputs": [
    "RESULT__IMAGE_DESCRIPTION"
  ],
  "next_step_index": 0,
  "name": "",
  "skill_name": "Microsoft.SemanticKernel.Planning.Plan",
  "description": "Create a photo of a meal with these ingredients:courgette, collieflower, steak, tomato"
}

The output shows that the two skills will be used in this case. The input to the ImageDesc plugin is the output from the Recipe plugin.

Note that if your ask has nothing to do with generating dishes and photos of a dish, the skills will still be used resulting in unexpected results.

If you do not provide any skills, the planner will just use itself as a skill and the result will be the original ask. That would still work in this case because the ask can be passed to Dall-E on its own!

With the plan created, we can now execute it and show the result:

var newPlanResult = await newPlan.InvokeAsync();
Console.WriteLine("Plan result: " + newPlanResult.ToString());

This should print the description of the photo. We can pass that result to DALL-E with:

var imageURL = await dallE.GenerateImageAsync(newPlanResult.ToString(), 512, 512);
Process.Start("open", imageURL);   // works on MacOS

If I provide carrots and meat, then I get the following description and photo.

Description: A steaming pot of hearty carrot and meat stew is pictured. The pot is filled with chunks of lean ground beef, diced carrots, diced onion, minced garlic, and a rich tomato paste. Aromatic herbs of oregano and thyme are sprinkled on top, and the stew is finished with a drizzle of olive oil. The stew is ready to be served and is sure to be a delicious and comforting meal.

The photo:

Testing skills and plans

The Semantic Kernel extension for VS Code will find your plugins (skills) and allow you to execute them:

Recipe skill in VS Code

When you click the play icon next to the skill, you will be asked for input. The prompt will then be run by your selected model, with output to the screen:

You can also create plans and execute them in VS Code:

Plan in VS Code

Above, a plan was created based on a goal. The plan included the two plugins and shows the inputs and outputs. By clicking on Execute Plan you can run it without having to write any code. The UI above allows you to inspect the generated plan and change it if it’s not performing as intended.

Conclusion

This concludes my quick look at the Planner functionality in Semantic Kernel with a simple plan and a couple of semantic skills. If you want to learn more, be sure to check these resources:

Enhancing Semantic Search with a Streamlit UI

In a previous blog post, we discussed two Python programs, upload_vectors.py and search_vectors.py. These programs were used to create and search vectors, respectively. The upload_vectors.py script created vectors from chunks of a larger text and stored them in Pinecone, while the search_vectors.py script enabled semantic search on the text. In this blog post, we will discuss how to create a user interface (UI) for these two programs using Streamlit.

🚀 I kickstarted the Streamlit app by handing over the text-based version to ChatGPT and asking it to work its magic ✨💻. Yes, it was that easy! Afterwards, I made several manual changes to make it look the way I wanted.

Pinecone, Vectors, Embeddings, and Semantic Search: What’s all that about?

Pinecone is a vector database service that allows for easy storage and retrieval of high-dimensional vectors. It is optimized for similarity search, which makes it a perfect fit for tasks like semantic search. Our script stores vectors in Pinecone by parsing an RSS feed, chunking the blog posts, and creating the vectors with OpenAI’s embedding APIs.

Vectors are mathematical representations of data in the form of an array of numbers. In our case, we use vectors to represent chunks of text retrieved from blog posts. These vectors are generated using a process called embedding, which is a way of representing complex data, like text, in a lower-dimensional space while preserving the essential information.

Semantic search is a type of search that goes beyond keyword matching to understand the meaning and context of the query. By using vector embeddings, we can compare the similarity between queries and stored texts to find the most relevant results. Pinecone does that search for us and simply returns a number of matching chunks (pieces of text).

What is Streamlit?

Streamlit is a Python library that makes it easy to create custom web apps for machine learning and data science projects. You can build interactive UIs with minimal code, allowing you to focus on the core logic of your application.

Here’s an example of creating an extremely simple Streamlit app:

import streamlit as st

st.title('Hello, Streamlit!')
st.write('This is a simple Streamlit app.')

This code would generate a web app with a title and a text output. You can also create more complex UIs with user input, like sliders, text inputs, and buttons.

Creating a Streamlit UI for Semantic Search

Now let’s examine the provided code for creating a Streamlit UI for the search_vectors.py program. The code can be broken down into the following sections:

  1. Import necessary libraries and check environment variables.
  2. Set up the tokenizer and define the tiktoken_len function.
  3. Create the UI elements, including the title, text input, dropdown, sliders, and buttons.
  4. Define the main search functionality that is triggered when the user clicks the “Search” button.

Here is the full code:

import os
import pinecone
import openai
import tiktoken
import streamlit as st

# check environment variables
if os.getenv('PINECONE_API_KEY') is None:
    st.error("PINECONE_API_KEY not set. Please set this environment variable and restart the app.")
if os.getenv('PINECONE_ENVIRONMENT') is None:
    st.error("PINECONE_ENVIRONMENT not set. Please set this environment variable and restart the app.")
if os.getenv('OPENAI_API_KEY') is None:
    st.error("OPENAI_API_KEY not set. Please set this environment variable and restart the app.")

# use cl100k_base tokenizer for gpt-3.5-turbo and gpt-4
tokenizer = tiktoken.get_encoding('cl100k_base')


def tiktoken_len(text):
    tokens = tokenizer.encode(
        text,
        disallowed_special=()
    )
    return len(tokens)

# create a title for the app
st.title("Search blog feed 🔎")

# create a text input for the user query
your_query = st.text_input("What would you like to know?")
model = st.selectbox("Model", ["gpt-3.5-turbo", "gpt-4"])

with st.expander("Options"):

    max_chunks = 5
    if model == "gpt-4":
        max_chunks = 15

    max_reply_tokens = 1250
    if model == "gpt-4":
        max_reply_tokens = 2000

    col1, col2 = st.columns(2)

    # model dropdown
    with col1:
        chunks = st.slider("Number of chunks", 1, max_chunks, 5)
        temperature = st.slider("Temperature", 0.0, 1.0, 0.0)

    with col2:
        reply_tokens = st.slider("Reply tokens", 750, max_reply_tokens, 750)
    

# create a submit button
if st.button("Search"):
    # get the Pinecone API key and environment
    pinecone_api = os.getenv('PINECONE_API_KEY')
    pinecone_env = os.getenv('PINECONE_ENVIRONMENT')

    pinecone.init(api_key=pinecone_api, environment=pinecone_env)

    # set index
    index = pinecone.Index('blog-index')


    # vectorize your query with openai
    try:
        query_vector = openai.Embedding.create(
            input=your_query,
            model="text-embedding-ada-002"
        )["data"][0]["embedding"]
    except Exception as e:
        st.error(f"Error calling OpenAI Embedding API: {e}")
        st.stop()

    # search for the most similar vector in Pinecone
    search_response = index.query(
        top_k=chunks,
        vector=query_vector,
        include_metadata=True)

    # create a list of urls from search_response['matches']['metadata']['url']
    urls = [item["metadata"]['url'] for item in search_response['matches']]

    # make urls unique
    urls = list(set(urls))

    # create a list of texts from search_response['matches']['metadata']['text']
    chunk_texts = [item["metadata"]['text'] for item in search_response['matches']]

    # combine texts into one string to insert in prompt
    all_chunks = "\n".join(chunk_texts)

    # show urls of the chunks
    with st.expander("URLs", expanded=True):
        for url in urls:
            st.markdown(f"* {url}")
    

    with st.expander("Chunks"):
        for i, t in enumerate(chunk_texts):
            # remove newlines from chunk
            tokens = tiktoken_len(t)
            t = t.replace("\n", " ")
            st.write("Chunk ", i, "(Tokens: ", tokens, ") - ", t[:50] + "...")
    with st.spinner("Summarizing..."):
        try:
            prompt = f"""Answer the following query based on the context below ---: {your_query}
                                                        Do not answer beyond this context!
                                                        ---
                                                        {all_chunks}"""


            # openai chatgpt with article as context
            # chat api is cheaper than gpt: 0.002 / 1000 tokens
            response = openai.ChatCompletion.create(
                model=model,
                messages=[
                    { "role": "system", "content":  "You are a truthful assistant!" },
                    { "role": "user", "content": prompt }
                ],
                temperature=temperature,
                max_tokens=max_reply_tokens
            )

            st.markdown("### Answer:")
            st.write(response.choices[0]['message']['content'])

            with st.expander("More information"):
                st.write("Query: ", your_query)
                st.write("Full Response: ", response)

            with st.expander("Full Prompt"):
                st.write(prompt)

            st.balloons()
        except Exception as e:
            st.error(f"Error with OpenAI Completion: {e}")

A closer look

The code first imports the necessary libraries and checks if the required environment variables are set, displaying an error message if they are not. The libraries you need are in requirements.txt on GitHub. You can install them with:

pip3 install -r requirements.txt

ℹ️ I recommend using a Python virtual environment when you install these dependencies; see poetry (just one example)

The tiktoken_len function calculates the token length of a given text using the tokenizer. This is used to display the tokens of each chunk of text we set to the ChatCompletion API. Depending on the model, 4096 or 8192 tokens are supported.

The UI is built using Streamlit functions, such as st.title, st.text_input, st.selectbox, and st.columns. These functions create various UI elements that the user can interact with to input their query and set search parameters. If you look at the code, you will see how easy it is to add those elements.

With the UI elements, you can set:

  • the number of text chunks to return from Pinecone and to forward to the ChatCompletion API (using st.slider)
  • the number of tokens to reply with (using st.slider)
  • the model: gpt-3.5-turbo or gpt-4 (ensure you have access to the gpt-4 API)
  • the temperature (using st-slider)

The options are shown in two columns with st.columns.

The main search functionality is triggered when the user clicks the “Search” button. The code then vectorizes the query, searches for the most similar vectors in Pinecone, and displays the URLs and chunks found. Finally, the selected model is used to generate an answer based on the chunks found and the user’s query. Often, gpt-4 will provide the best answer. It seems to be able to better understand all the chunks of text thrown at it.

Running the code

To run the code you need the following:

  • A Pinecode API key and environment
  • An OpenAI API key

It is easiest to run the code with Docker. If you have it installed, run the following command:

docker run -p 8501:8501 -e OPENAI_API_KEY="YOURKEY" \
    -e PINECONE_API_KEY="YOURKEY" \
    -e PINECONE_ENVIRONMENT="YOURENV" gbaeke/blogsearch

The gbaeke/blogsearch image is available on Docker Hub. You can also build your own with the Dockerfile provided on GitHub.

After running the image, go to http://localhost:8501 and first use the Upload page to create your Pinecode index and store vectors in it. You can use my blog’s feed or any other feed. You can experiment with the chunk size and chunk overlap.

Upload to Pinecone

You can add multiple RSS feeds one-by-one as long as you turn off Recreate index before each new upload. After you have populated the index, use the Search page to start searching:

Searching

Above, we ask what we can do with Pinecone and let gpt-4 do the answering. The similarity search will search for 5 similar items and return them. We show the original URLs these results come from. In the Chunks section, you can see the original chunks because they are also in Pinecone as metadata. After the answer, you can find the full JSON returned by the ChatCompletion API and the full prompt we sent to that API.

Conclusion

In this blog post, we showed you how to create a Streamlit UI for the search_vectors.py script we talked about in a previous post. Streamlit allows you to easily build interactive web applications for your machine learning and data science projects. We also created a UI to upload posts to Pinecone. The full program allows you to add as much data as you want and query that data with semantic search, summarized and synthesized by the GPT model of choice. Give it a try and let me know what you think.

Enhancing Blog Post Search with Chunk-based Embeddings and Pinecone

In this blog post, we’ll show you a different approach to searching through a large database of blog posts. The previous approach involved creating a single embedding for the entire article and storing it in a vector database. The new approach is much more effective, and in this post, we’ll explain why and how to implement it.

The new approach involves the following steps:

  1. Chunk the article into pieces of about 400 tokens using LangChain
  2. Create an embedding for each chunk
  3. Store each embedding, along with its metadata such as the URL and the original text, in Pinecone
  4. Store the original text in Pinecone, but not indexed
  5. To search the blog posts, find the 5 best matching chunks and add them to the ChatCompletion prompt

We’ll explain each step in more detail below, but first, let’s start with a brief overview of the previous approach.

The previous approach used OpenAI’s embeddings API to vectorize the blog post articles and Pinecone, a vector database, to store and query the vectors. The article was vectorized as a whole, and the resulting vector was stored in Pinecone. To search the blog posts, cosine similarity was used to find the closest matching article, and the contents of the article were retrieved using the Python requests library and the BeautifulSoup library. Finally, a prompt was created for the ChatCompletion API, including the retrieved article.

The problem with this approach was that the entire article was vectorized as one piece. This meant that if the article was long, the vector might not represent the article accurately, as it would be too general. Moreover, if the article was too long, the ChatCompletion API call might fail because too many tokens were used.

The new approach solves these problems by chunking the article into smaller pieces, creating an embedding for each chunk, and storing each embedding in Pinecone. This way, we have a much more accurate representation of the article, as each chunk represents a smaller, more specific part of the article. And because each chunk is smaller, there is less risk of using too many tokens in the ChatCompletion API call.

To implement the new approach, we’ll use LangChain to chunk the article into pieces of about 400 tokens. LangChain is a library aimed at assisting in the development of applications that use LLMs, or large language models.

Next, we’ll create an embedding for each chunk using OpenAI’s embeddings API. As before, we will use the text-embedding-ada-002 model. And once we have the embeddings, we’ll store each one, along with its metadata, in Pinecone. The key for each embedding will be a hash of the URL, combined with the chunk number.

The original text will also be stored in Pinecone, but not indexed, so that it can be retrieved later. With this approach, we do not need to retrieve a blog article from the web. Instead, we just get the text from Pinecone directly.

To search the blog posts, we’ll use cosine similarity to find the 5 best-matching chunks. The 5 best matching chunks will be added to the ChatCompletion prompt, allowing us to ask questions based on the article’s contents.

Uploading the embeddings

The code to upload the embeddings is shown below. You will need to set the following environment variables:

export OPENAI_API_KEY=your_openai_api_key
export PINECONE_API_KEY=your_pinecone_api_key
export PINECONE_ENVIRONMENT=your_pinecone_environment
import feedparser
import os
import pinecone
import openai
import requests
from bs4 import BeautifulSoup
from retrying import retry
from langchain.text_splitter import RecursiveCharacterTextSplitter
import tiktoken
import hashlib

# use cl100k_base tokenizer for gpt-3.5-turbo and gpt-4
tokenizer = tiktoken.get_encoding('cl100k_base')

# create the length function used by the RecursiveCharacterTextSplitter
def tiktoken_len(text):
    tokens = tokenizer.encode(
        text,
        disallowed_special=()
    )
    return len(tokens)

@retry(wait_exponential_multiplier=1000, wait_exponential_max=10000)
def create_embedding(article):
    # vectorize with OpenAI text-emebdding-ada-002
    embedding = openai.Embedding.create(
        input=article,
        model="text-embedding-ada-002"
    )

    return embedding["data"][0]["embedding"]

# OpenAI API key
openai.api_key = os.getenv('OPENAI_API_KEY')

# get the Pinecone API key and environment
pinecone_api = os.getenv('PINECONE_API_KEY')
pinecone_env = os.getenv('PINECONE_ENVIRONMENT')

pinecone.init(api_key=pinecone_api, environment=pinecone_env)

if "blog-index" not in pinecone.list_indexes():
    print("Index does not exist. Creating...")
    pinecone.create_index("blog-index", 1536, metadata_config= {"indexed": ["url", "chunk-id"]})
else:
    print("Index already exists. Deleting...")
    pinecone.delete_index("blog-index")
    print("Creating new index...")
    pinecone.create_index("blog-index", 1536, metadata_config= {"indexed": ["url", "chunk-id"]})

# set index; must exist
index = pinecone.Index('blog-index')

# URL of the RSS feed to parse
url = 'https://atomic-temporary-16150886.wpcomstaging.com/feed/'

# Parse the RSS feed with feedparser
print("Parsing RSS feed: ", url)
feed = feedparser.parse(url)

# get number of entries in feed
entries = len(feed.entries)
print("Number of entries: ", entries)

# create recursive text splitter
text_splitter = RecursiveCharacterTextSplitter(
    chunk_size=400,
    chunk_overlap=20,  # number of tokens overlap between chunks
    length_function=tiktoken_len,
    separators=['\n\n', '\n', ' ', '']
)

pinecone_vectors = []
for i, entry in enumerate(feed.entries[:50]):
    # report progress
    print("Create embeddings for entry ", i, " of ", entries, " (", entry.link, ")")

    r = requests.get(entry.link)
    soup = BeautifulSoup(r.text, 'html.parser')
    article = soup.find('div', {'class': 'entry-content'}).text

    # create chunks
    chunks = text_splitter.split_text(article)

    # create md5 hash of entry.link
    url = entry.link
    url_hash = hashlib.md5(url.encode("utf-8"))
    url_hash = url_hash.hexdigest()
        
    # create embeddings for each chunk
    for j, chunk in enumerate(chunks):
        print("\tCreating embedding for chunk ", j, " of ", len(chunks))
        vector = create_embedding(chunk)

        # concatenate hash and j
        hash_j = url_hash + str(j)

        # add vector to pinecone_vectors list
        print("\tAdding vector to pinecone_vectors list for chunk ", j, " of ", len(chunks))
        pinecone_vectors.append((hash_j, vector, {"url": entry.link, "chunk-id": j, "text": chunk}))

        # upsert every 100 vectors
        if len(pinecone_vectors) % 100 == 0:
            print("Upserting batch of 100 vectors...")
            upsert_response = index.upsert(vectors=pinecone_vectors)
            pinecone_vectors = []

# if there are any vectors left, upsert them
if len(pinecone_vectors) > 0:
    print("Upserting remaining vectors...")
    upsert_response = index.upsert(vectors=pinecone_vectors)
    pinecone_vectors = []

print("Vector upload complete.")

Searching for blog posts

The code below is used to search blog posts:

import os
import pinecone
import openai
import tiktoken

# use cl100k_base tokenizer for gpt-3.5-turbo and gpt-4
tokenizer = tiktoken.get_encoding('cl100k_base')


def tiktoken_len(text):
    tokens = tokenizer.encode(
        text,
        disallowed_special=()
    )
    return len(tokens)

# get the Pinecone API key and environment
pinecone_api = os.getenv('PINECONE_API_KEY')
pinecone_env = os.getenv('PINECONE_ENVIRONMENT')

pinecone.init(api_key=pinecone_api, environment=pinecone_env)

# set index
index = pinecone.Index('blog-index')

while True:
    # set query
    your_query = input("\nWhat would you like to know? ")
    
    # vectorize your query with openai
    try:
        query_vector = openai.Embedding.create(
            input=your_query,
            model="text-embedding-ada-002"
        )["data"][0]["embedding"]
    except Exception as e:
        print("Error calling OpenAI Embedding API: ", e)
        continue

    # search for the most similar vector in Pinecone
    search_response = index.query(
        top_k=5,
        vector=query_vector,
        include_metadata=True)

    # create a list of urls from search_response['matches']['metadata']['url']
    urls = [item["metadata"]['url'] for item in search_response['matches']]

    # make urls unique
    urls = list(set(urls))

    # create a list of texts from search_response['matches']['metadata']['text']
    chunks = [item["metadata"]['text'] for item in search_response['matches']]

    # combine texts into one string to insert in prompt
    all_chunks = "\n".join(chunks)

    # print urls of the chunks
    print("URLs:\n\n", urls)

    # print the text number and first 50 characters of each text
    print("\nChunks:\n")
    for i, t in enumerate(chunks):
        print(f"\nChunk {i}: {t[:50]}...")

    try:
        # openai chatgpt with article as context
        # chat api is cheaper than gpt: 0.002 / 1000 tokens
        response = openai.ChatCompletion.create(
            model="gpt-3.5-turbo",
            messages=[
                { "role": "system", "content":  "You are a thruthful assistant!" },
                { "role": "user", "content": f"""Answer the following query based on the context below ---: {your_query}
                                                    Do not answer beyond this context!
                                                    ---
                                                    {all_chunks}""" }
            ],
            temperature=0,
            max_tokens=750
        )

        print(f"\n{response.choices[0]['message']['content']}")
    except Exception as e:
        print(f"Error with OpenAI Completion: {e}")

In Action

Below, we ask if Redis supports storing vectors and what version of Redis we need in Azure. The Pinecone vector search found 5 chunks, all from the same blog post (there is only one URL). The five chunks are combined and sent to ChatGPT, together with the original question. The response from the ChatCompletion API is clear!

Example question and response

Conclusion

In conclusion, the “chunked” approach to searching through a database of blog posts is much more effective and solves many of the problems associated with the previous approach. We hope you found this post helpful, and we encourage you to try out the new approach in your own projects!