Writing an multi-service document extractor with the help of Diagrid’s Catalyst

Many enterprises have systems in place that take documents, possibly handwritten, that contain data that needs to be extracted. In this post, we will create an application that can extract data from documents that you upload. We will make use of an LLM, in this case gpt-4o. We will use model version 2024-08-06 and its new structured output capabilities. Other LLMs can be used as well.

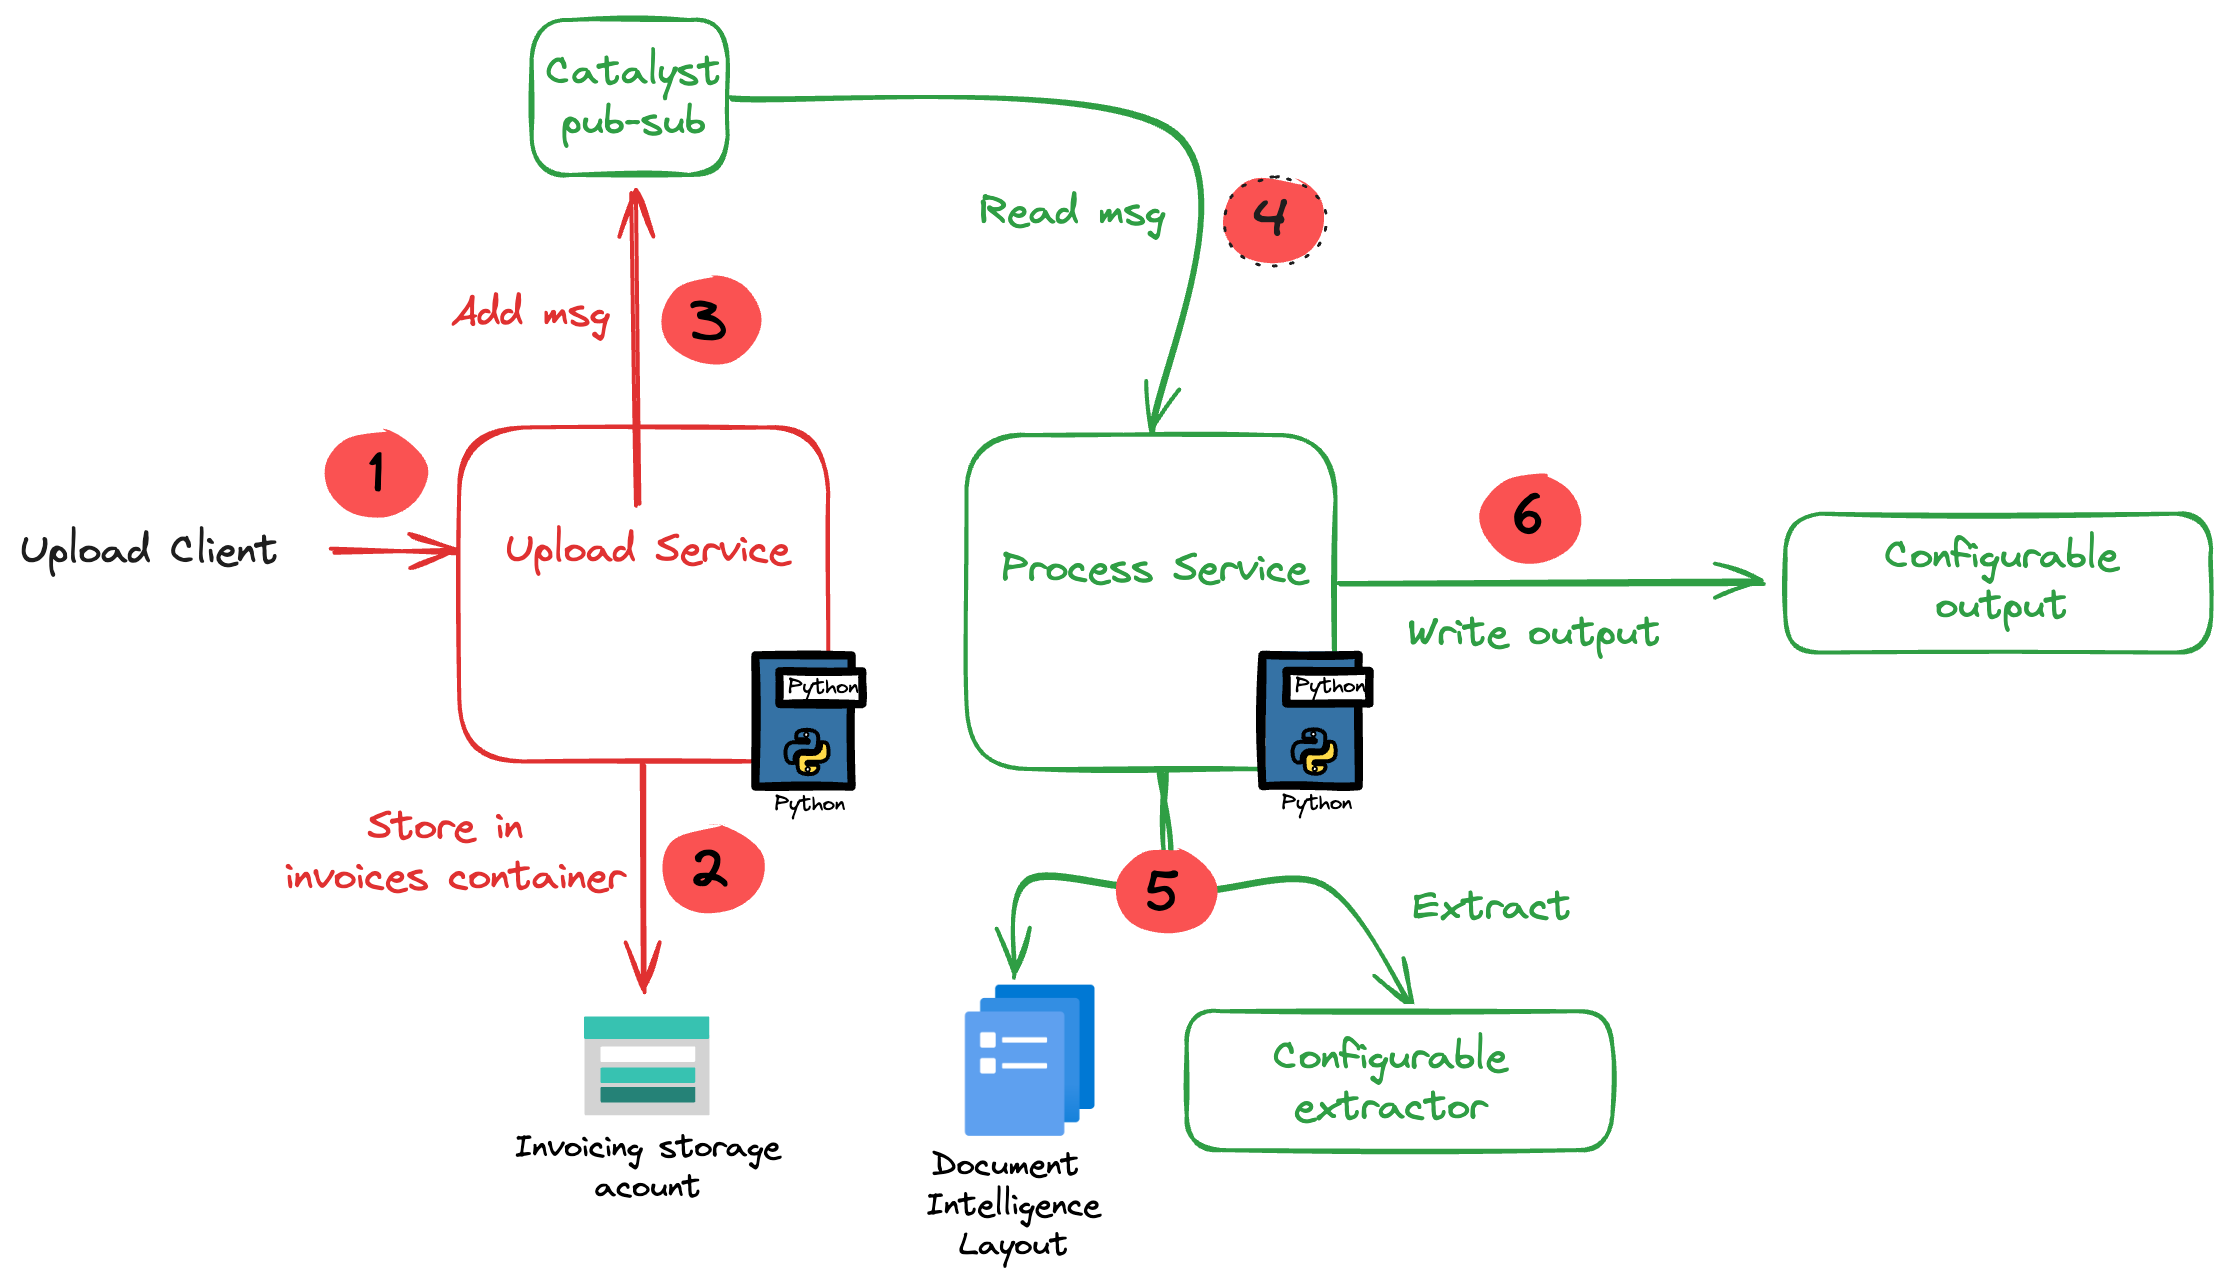
The core of the application is illustrated in the diagram below. The application uses more services than in the diagram. We will get to them later in this post.

Application Diagram

Note: the LLM-based extraction logic in this project is pretty basic. In production, you need to do quite a bit more to get the extraction just right.

The flow of the application is as follows:

  • A user or process submits a document to the upload service. This can be a pdf but other formats are supported as well.
  • In addition to the document, a template is specified by name. A template contains the fields to extract, together with their type (str, bool, float). For example: customer_name (str), invoice_total (float).
  • The upload service uploads the document to an Azure Storage account using a unique filename and preserves the extension.
  • The upload service publishes a message to a topic on a pub/sub message broker. The message contains data such as the document url and the name of the template.
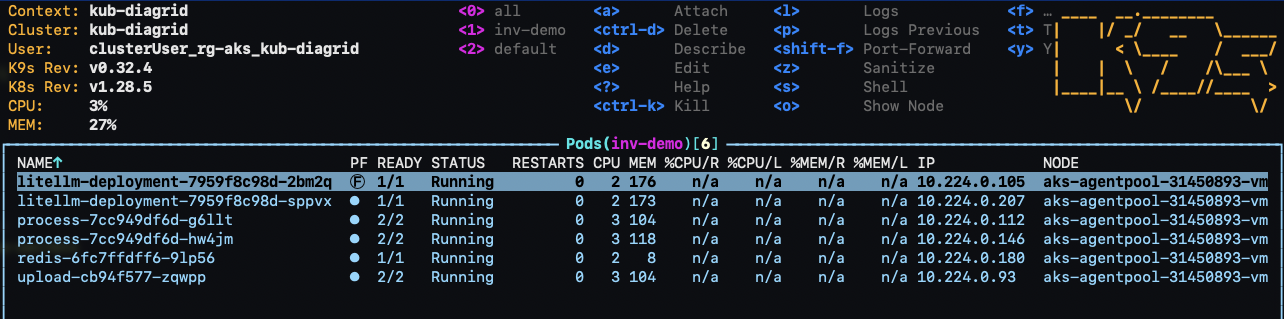
  • The process service subscribes to the topic on the message broker and retrieves the message.
  • It downloads the file from the storage account and sends it to Azure Document Intelligence to convert it to plain text.
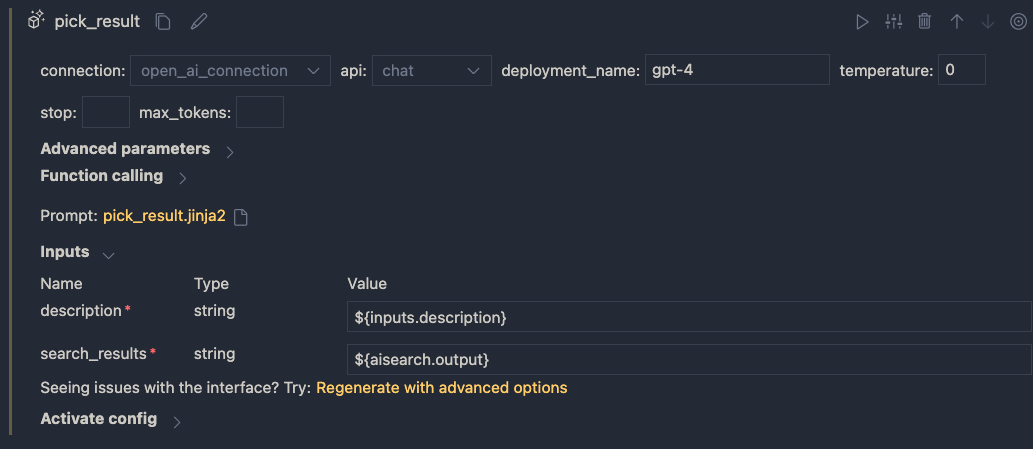
  • Using a configurable extractor, an LLM is used to extract the fields in the template from the document text. The sample code contains an OpenAI and a Groq extractor.
  • The extracted fields are written to a configurable output handler. The sample code contains a CSV and JSONL handler.

In addition to a pub-sub broker, templates are stored in a state store. The upload service is the only service that interfaces with the state store. It provides an HTTP method that the process service can use to retrieve a template from the state store.

To implement pub-sub, the state store and method invocations, we will use Diagrid’s Catalyst instead of doing this all by ourselves.

What is Catalyst?

If you are familiar with Dapr, the distributed application runtime, Catalyst will be easy to understand. Catalyst provides you with a set of APIs, hosted in the cloud and compatible with Dapr to support you in building cloud-native, distributed applications. It provides several building blocks. The ones we use are below:

  • request/reply: to support synchronous communication between services in a secure fashion
  • publish/subscribe: to support asynchronous communication between services using either a broker provided by Catalyst or other supported brokers like Azure Service Bus
  • key/value: allows services to save state in a key/value store. You can use the state store provided by Catalyst or other supported state stores like Azure Cosmos DB or an Azure Storage Account

The key to these building blocks is that your code stays the same if you swap the underlying message broker or key/value store. For example, you can start with Catalyst’s key/value store and later switch to Cosmos DB very easily. There is no need to add Cosmos DB libraries to your code. Catalyst will handle the Cosmos DB connectivity for you.

Important: I am referring mainly to Azure services here but Catalyst (and Dapr) support many services in other clouds as well!

Note that you do not need to install Dapr on your local machine or on platforms like Kubernetes when you use Catalyst. You only use the Dapr SDKs in your code and, when configured to do so, the SDK will connect to the proper APIs hosted in the cloud by Catalyst. In fact, you do not even need an SDK because the APIs can be used with plain HTTP or GRPC. Of course, using an SDK makes things a lot easier.

If you want to learn more about Catalyst, take a look at the following playlist: https://www.youtube.com/watch?v=7D7rMwJEMsk&list=PLdl4NkEiMsJscq00RLRrN4ip_VpzvuwUC. Lots of good stuff in there!

By doing all of the above in Catalyst we have a standardised approach that remains the same no matter the service behind it. We also get implementation best practices, for example for pub/sub. In addition, we are also provided with golden metrics and a UI to see how the application performs. All API calls are logged to aid in troubleshooting.

Let’s now take a look at the inner loop development process!

Scaffolding a new project

You need to sign up for Catalyst first. At the time of writing, Catalyst was in preview and not supported for production workloads. When you have an account, you should install the Diagrid CLI. The CLI is not just for Catalyst. It’s also used with Diagrid’s other products, such as Conductor.

With the CLI, you can create a new project, create services and application identities. For this post, we will use the UI instead.

In the Catalyst dashboard, I created a project called idpdemo:

List of projects; use Create Project to create a new one

Next, for each of my services (upload and process), we create an App ID. Each App ID has its own token. Services use the token to authenticate to the Catalyst APIs and use the services they are allowed to use.

The process App ID has the following configuration (partial view):

process App ID API configuration

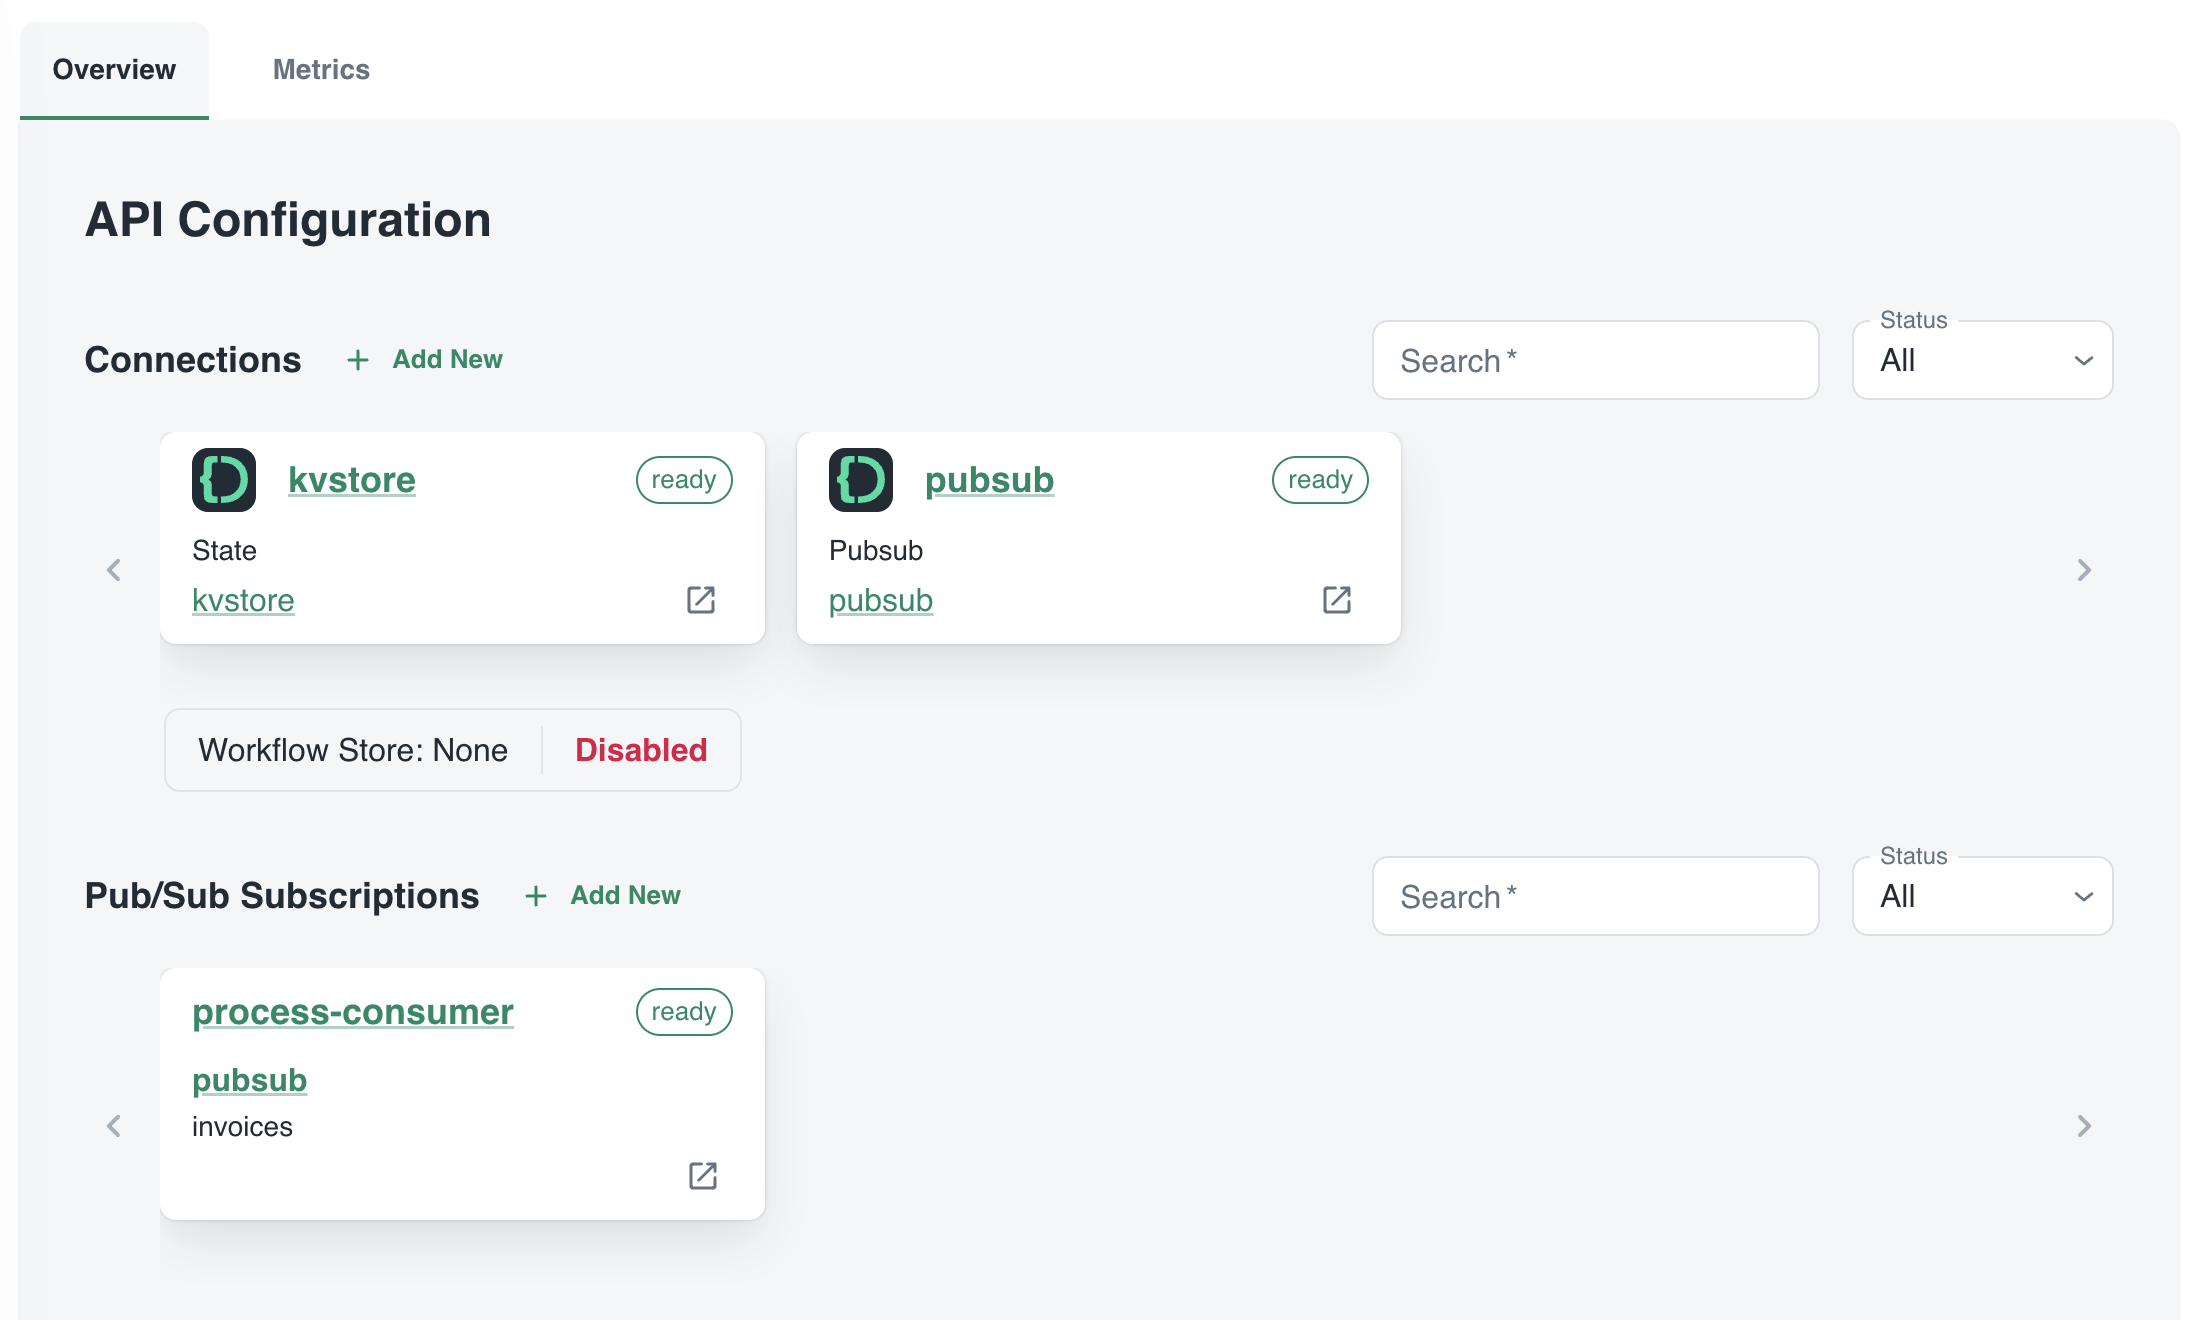
The process service interacts with both the Catalyst key/value store (kvstore) and the pub/sub broker (pubsub). These services need to be enabled as well. We will show that later. We can also see that the process service has a pub/sub subscription called process-consumer. Via that subscription, we have pub/sub messages delivered to the process service whenever the upload service sends a message to the pub/sub topic.

In Diagrid Services, you can click on the pub/sub and key/value store to see what is going on. For example, in the pub/sub service you can see the topics, the subscribers to these topics and the message count.

pub/sub topics

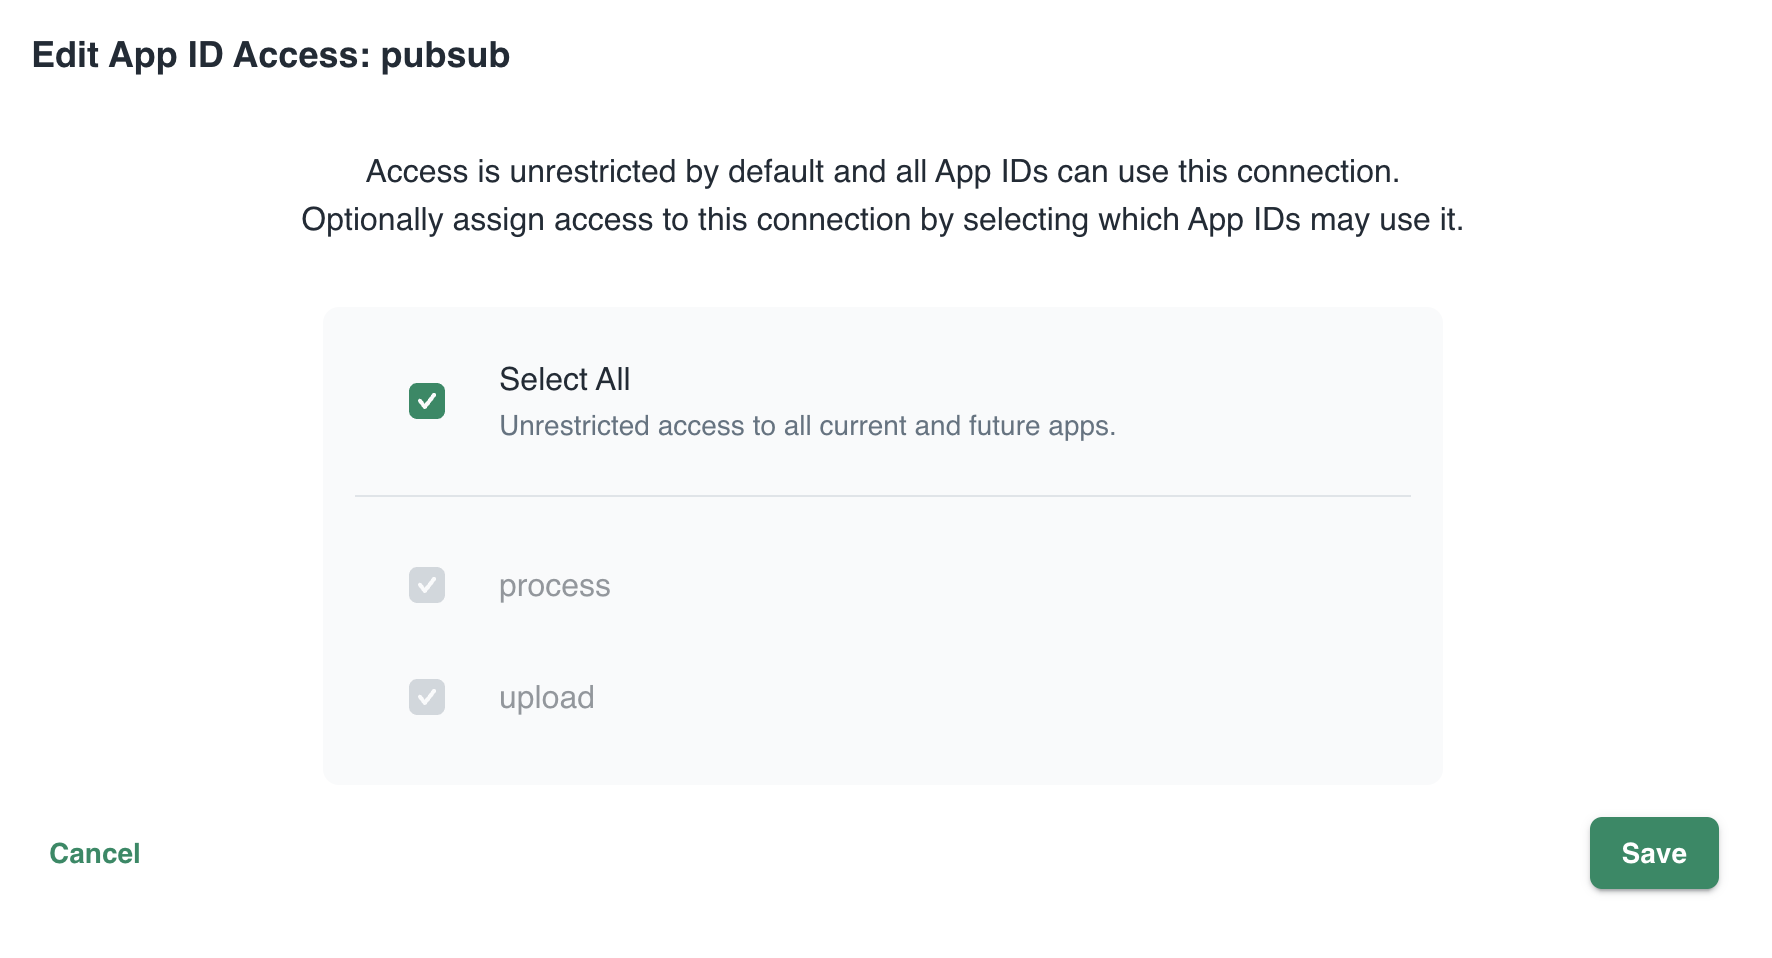
In Connections, you can see your services (represented by App ID upload and process) and their scope. In this case, all App IDs have access to all services. That can easily be changed:

changing the scope: access by App IDs to the pubsub service; default All

Now that we have some understanding of App IDs, Diagrid services and connections, we can take a look at how to connect to Catalyst from code.

Important: in this post we only look at using request/reply, Diagrid pub/sub and key/value. Catalyst also supports workflow and bindings but they are not used in this post.

Connecting your code

All code is available on GitHub: https://github.com/gbaeke/catalyst

The upload service needs to connect to both the pub/sub broker and key/value store:

  • Whenever a document is uploaded, it is uploaded to Azure Storage. When that succeeds, a message is put on the broker with the path of the file and a template name.
  • Templates are created and validated by the upload service so that you can only upload files with a template that exists. Templates are written and read in the key/value store.

Before we write code, we need to provide the Dapr SDK for Python (we’ll only use the Python SDK here) the necessary connection information. It needs to know it should not connect to a Dapr sidecar but to Catalyst. You set these via environment variables:

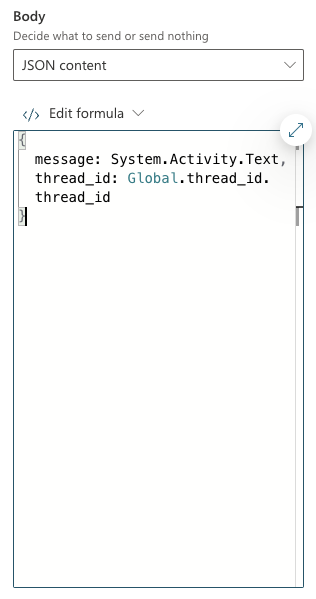
These environment variables are automatically picked up and used by SDK to interact with the Catalyst APIs. The following code can be used to put a message on the pub/sub broker:

with DaprClient() as d:
    try:
        result = d.publish_event(
            pubsub_name=pubsub_name,
            topic_name=topic_name,
            data=invoice.model_dump_json(),
            data_content_type='application/json',
        )
        logging.info('Publish Successful. Invoice published: %s' %
                        invoice.path)
        return True
    except grpc.RpcError as err:
        logging.error(f"Failed to publish invoice: {err}")
        return False

This is the same code that you would use with Dapr on your local machine or in Kubernetes or Azure Container Apps. Like with Dapr, you need to specify the pubsub name and topic. Here that is pubsub and invoices as previously shown in the Catalyst UI. The data in the message is an instance of a Pydantic class that holds the path and template but converted to JSON.

The code below shows how to write to the state store (key/value store):

with DaprClient() as d:
    try:
        d.save_state(store_name=kvstore_name,
                        key=template_name, value=str(invoice_data))
    except grpc.RpcError as err:
        logging.error(f"Dapr state store error: {err.details()}")
        raise HTTPException(status_code=500, detail="Failed to save template")

This is of course very similar. We use the save_state method here and provide the store name (kvstore), key (template name) and value.

Let’s now turn to the process service. It needs to:

  • be notified when there is a new message on the invoices topic
    • check and retrieve the template by calling a method on the upload service

We only use two building blocks here: pub/sub and request/reply. The process service does not interact directly with the state store.

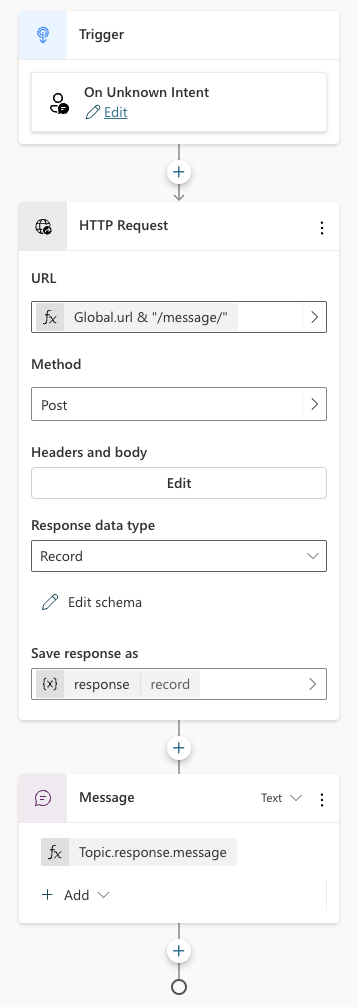
To receive a message, Catalyst needs a handler to call. In the pub/sub subscription, the handler (default route to be correct) is configured to be /process:

Configuration of default route on subscription

Our code that implements the handler is as follows (FastAPI):

@app.post('/process')  # called by pub/sub when a new invoice is uploaded
async def consume_orders(event: CloudEvent):
    # your code here

As you can see, when Catalyst calls the handler, it passes in a CloudEvent. The event has a data field that holds the path to our document and the template name. The CloudEvent type is defined as follows:

# pub/sub uses CloudEvent; Invoice above is the data
class CloudEvent(BaseModel):
    datacontenttype: str
    source: str
    topic: str
    pubsubname: str
    data: dict
    id: str
    specversion: str
    tracestate: str
    type: str
    traceid: str

In the handler, you simply extract the expected data and use it to process the event. In our case:

  • extract path and template from the data field
  • download the file from blob storage
  • send the file to Azure Document Intelligence to convert to text
  • extract the details from the document based on the template; if the template contains fields like customer_name and invoice_total, the LLM will try to extract that and return that content in JSON.
  • write the extracted values to JSON or CSV or any other output handler

Of course, we do need to extract the full template because we only have the template name. Let’s use the request/reply APIs to do that and call the template GET endpoint of the upload service via Catalyst:

def retrieve_template_from_kvstore(template_name: str):

    headers = {'dapr-app-id': invoke_target_appid, 'dapr-api-token': dapr_api_token,
               'content-type': 'application/json'}  
    try:
        result = requests.get(
            url='%s/template/%s' % (base_url, template_name),
            headers=headers
        )

        if result.ok:
            logging.info('Invocation successful with status code: %s' %
                         result.status_code)
            logging.info(f"Template retrieved: {result.json()}")
            return result.json()

    except Exception as e:
        logging.error(f"An error occurred while retrieving template from Dapr KV store: {str(e)}")
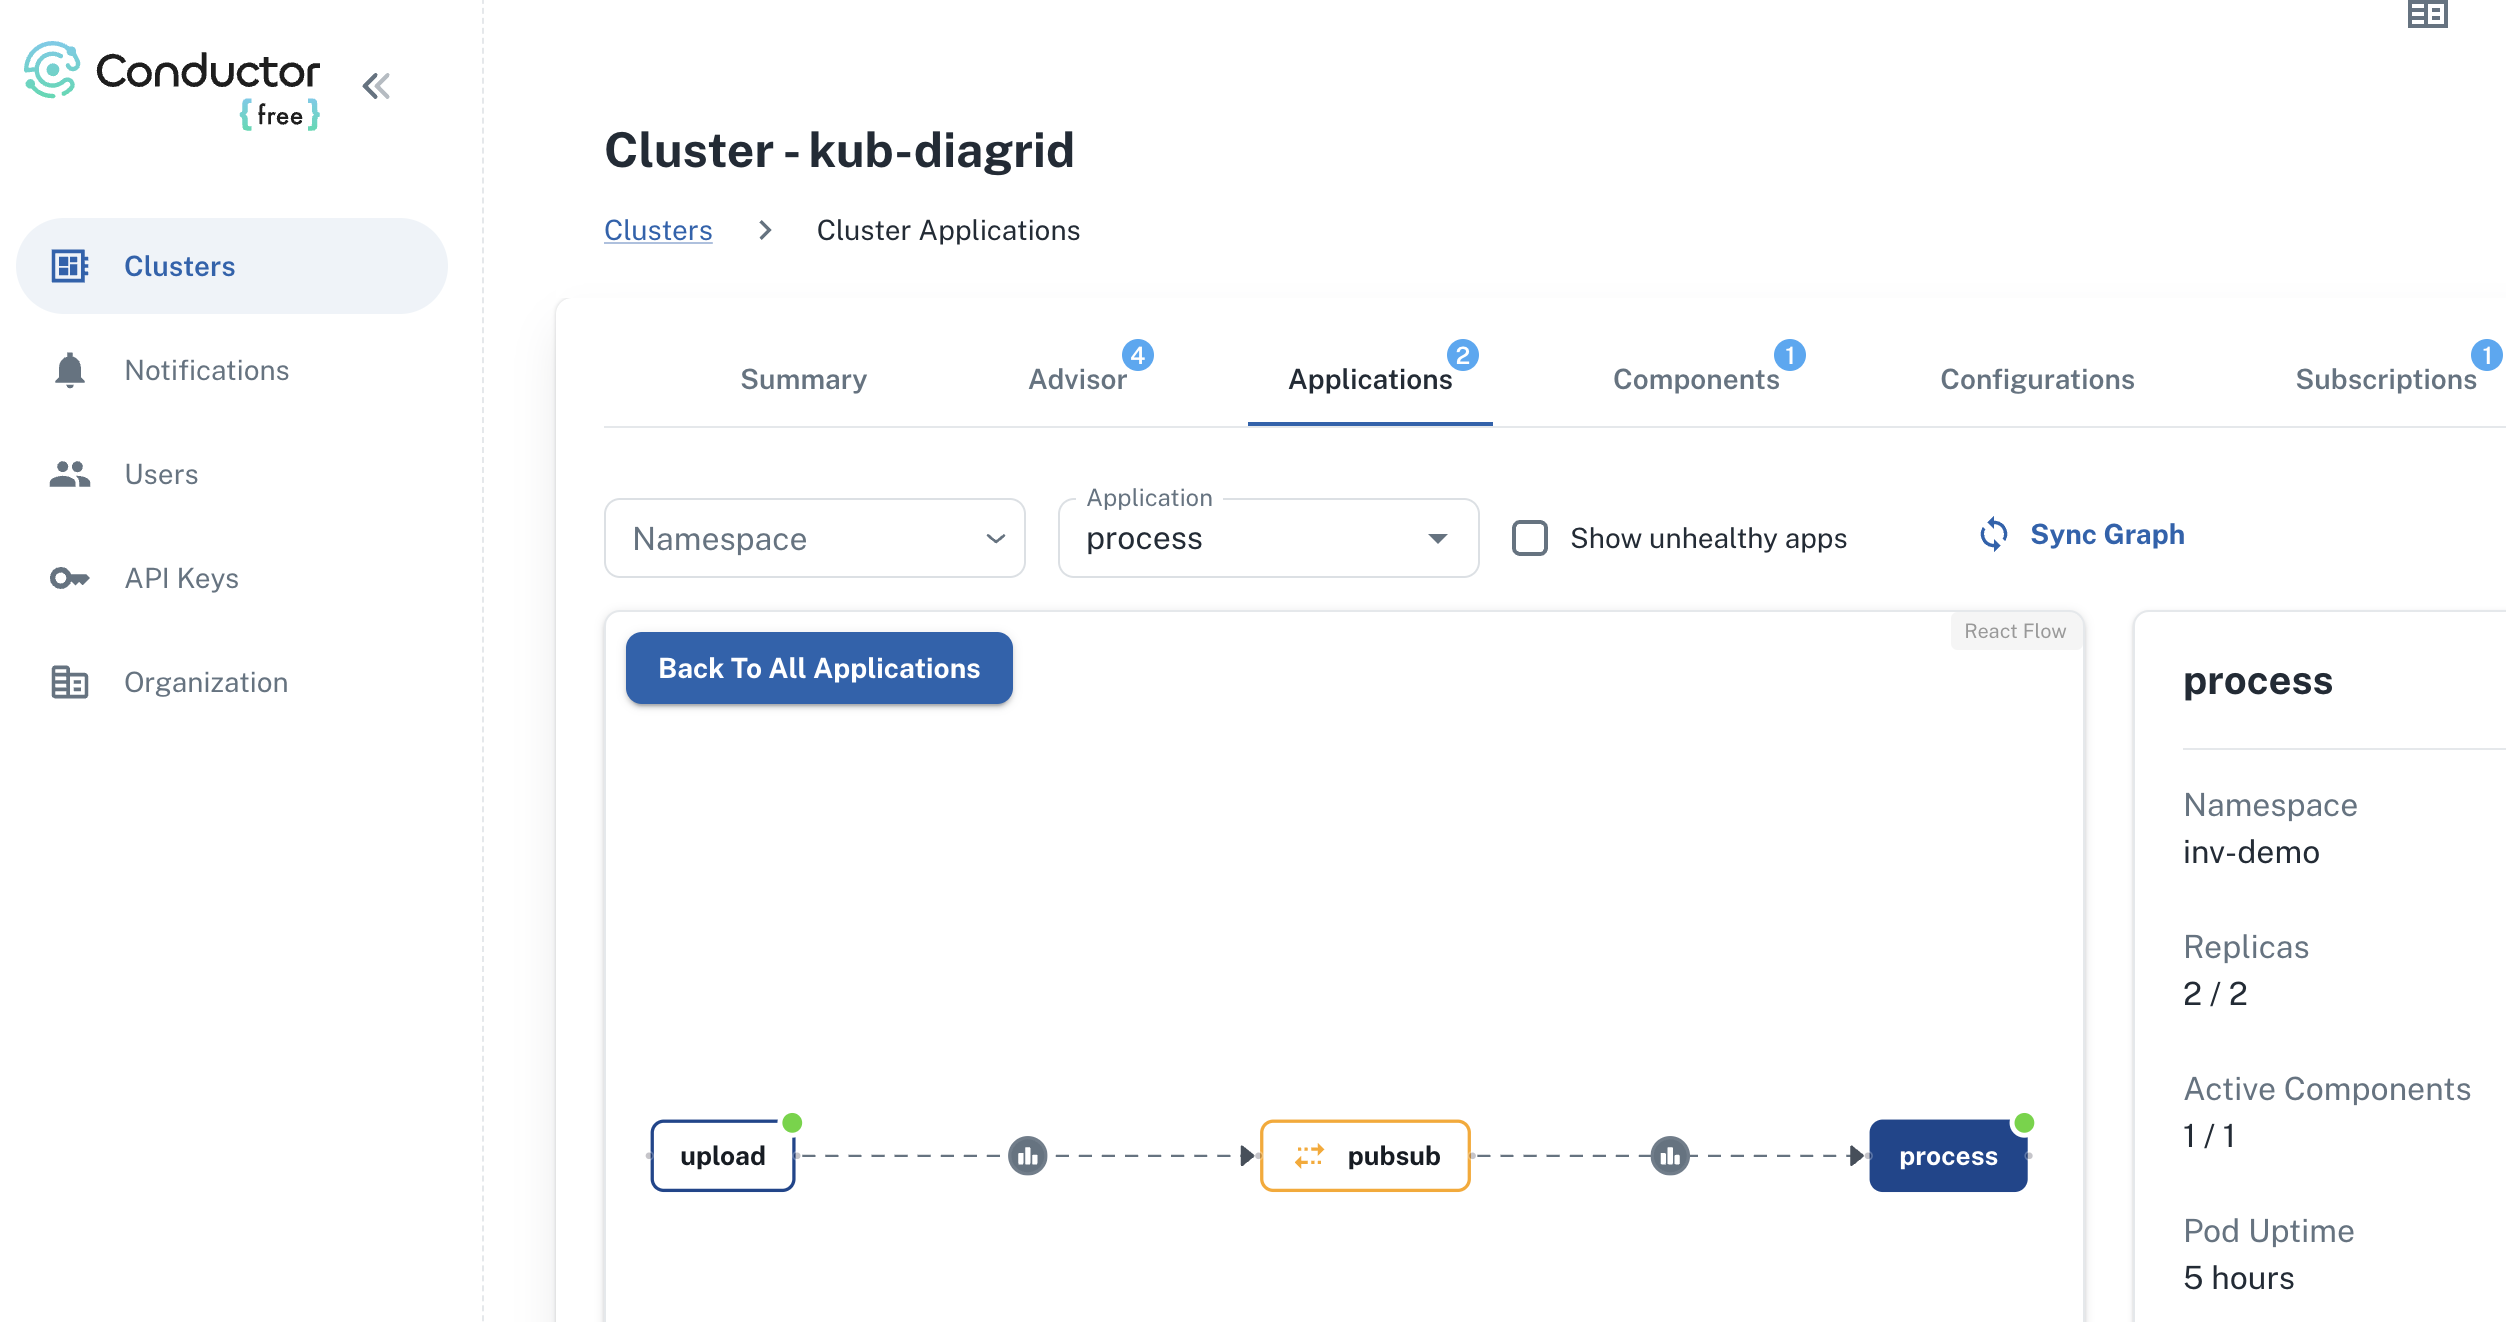
        return None

As an example, we use the HTTP API here instead of the Dapr invoke API. It might not be immediately clear but Catalyst is involved in this process and will have information and metrics about these calls:

Call Graph

The full line represents request/reply (invoke) from process to upload as just explained. The dotted line represents pub/sub traffic where upload creates messages to be consumed by process.

Running the app

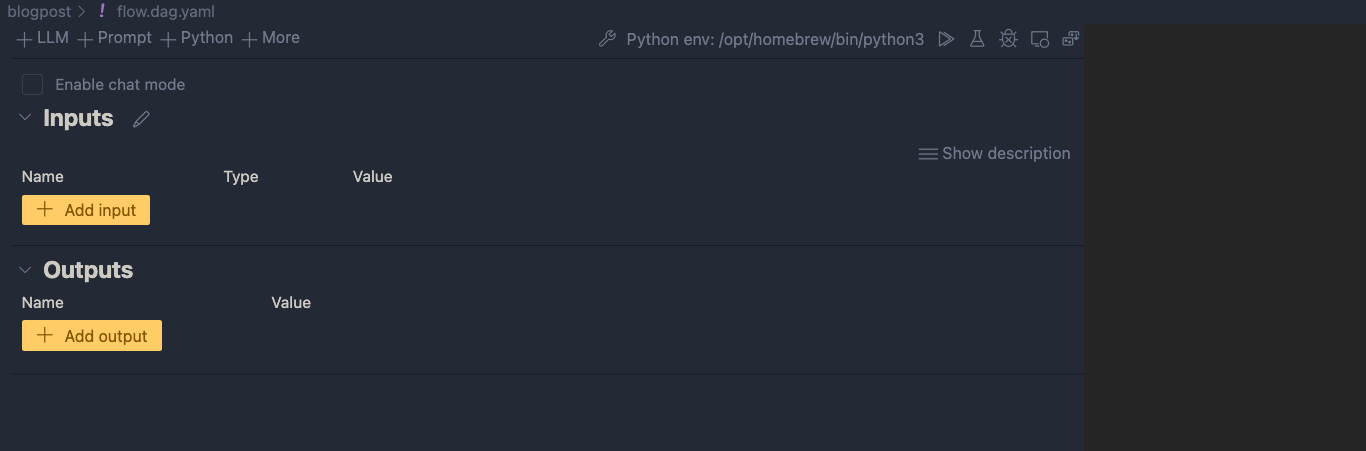
You can easily run your application locally using the Diagrid Dev CLI. Ensure you are logged in by running diagrid login. In the preview, with only one project, the default project should already be that one. Then simply run diagrid dev scaffold to generate a yaml file.

In my case, after some modification, my dev-{project-name}.yaml file looked like below:

project: idpdemo
apps:
- appId: process
  disabled: true
  appPort: 8001
  env:
    DAPR_API_TOKEN: ...
    DAPR_APP_ID: process
    DAPR_CLIENT_TIMEOUT_SECONDS: 10
    DAPR_GRPC_ENDPOINT: https://XYZ.api.cloud.diagrid.io:443
    DAPR_HTTP_ENDPOINT: https://XYZ.api.cloud.diagrid.io
    OTHER ENV VARS HERE

  workDir: process
  command: ["python", "app.py"]
- appId: upload
  appPort: 8000
  env:
    ... similar
  workDir: upload
  command: ["python", "app.py"]
appLogDestination: ""

Of course, the file was modified with environment variables required by the code. For example the storage account key, Azure Document Intelligence key, etc…

All you need to do now is to run diagrid dev start to start the apps. The result should be like below:

Local project startup

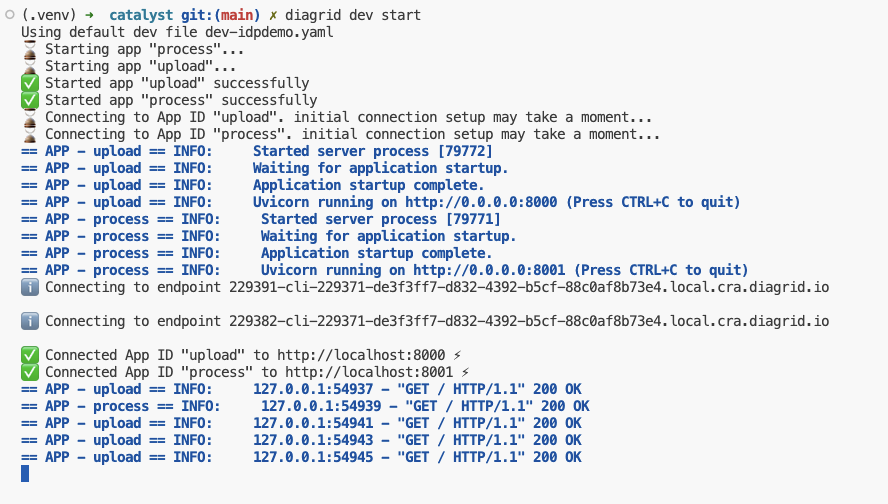
By default, your service logs are written to the console with a prefix for each service.

If you use the code in GitHub, check the README.md to configure the project and run the code properly. If you would rather run the code with Dapr on your local machine (e.g., if you do not have access to Catalyst) you can do that as well.

Conclusion

In this post, we have taken a look at Catalyst, a set of cloud APIs that help you to write distributed applications in a standard and secure fashion. These APIs are compatible with Dapr, a toolkit that has already gained quite some traction in the community. With Catalyst, we quickly built an application that can be used as a starter to implement an asynchronous LLM-based document extraction pipeline. I did not have to worry too much about pub/sub and key/value services because that’s all part of Catalyst.

What will you build with Catalyst?

Load balancing OpenAI API calls with LiteLLM

If you have ever created an application that makes calls to Azure OpenAI models, you know there are limits to the amount of calls you can make per minute. Take a look at the settings of a GPT model below:

GPT deployment settings

Above, the tokens per minute (TPM) rate limit is set to 60 000 tokens. This translates to about 360 requests per minute. When you exceed these limits, you get 429 Too Many Requests errors.

There are many ways to deal with these limits. A few of the main ones are listed below:

  • You can ask for a PAYGO quota increase: remember that high quotas do not necessarily lead to consistent lower-latency responses
  • You can use PTUs (provisioned throughput units): highly recommended if you want consistently quick responses with the lowest latency. Don’t we all? 😉
  • Your application can use retries with backoffs. Note that OpenAI libraries use automatic retries by default. For Python, it is set to two but that is configurable.
  • You can use multiple Azure OpenAI instances and load balance between them

In this post, we will take a look at implementing load balancing between OpenAI resources with an open source solution called LiteLLM. Note that, in Azure, you can also use Azure API Management. One example is discussed here. Use it if you must but know it is not simple to configure.

A look at LiteLLM

LiteLLM has many features. In this post, I will be implementing it as a standalone proxy, running as a container in Azure Kubernetes Service (AKS). The proxy is part of a larger application illustrated in the diagram below:

LLM-based document processor

The application above has an upload service that allows users to upload a PDF or other supported document. After storing the document in an Azure Storage Account container, the upload service sends a message to an Azure Service Bus topic. The process service uses those messages to process each file. One part of the process is the use of Azure OpenAI to extract fields from the document. For example, a supplier, document number or anything else.

To support the processing of many documents, multiple Azure OpenAI resources are used: one in France and one in Sweden. Both regions have the gpt-4-turbo model that we require.

The process service uses the Python OpenAI library in combination with the instructor library. Instructor is great for getting structured output from documents based on Pydantic classes. Below is a snippet of code:

from openai import OpenAI
import instructor

client = instructor.from_openai(OpenAI(
        base_url=azure_openai_endpoint,
        api_key=azure_openai_key
))

The only thing we need to do is to set the base_url to the LiteLLM proxy. The api_key is configurable. By default it is empty but you can configure a master key or even virtual keys for different teams and report on the use of these keys. More about that later.

The key point here is that LiteLLM is a transparent proxy that fully supports the OpenAI API. Your code does not have to change. The actual LLM does not have to be an OpenAI LLM. It can be Gemini, Claude and many others.

Let’s take a look at deploying the proxy in AKS.

Deploying LiteLLM on Kubernetes

Before deploying LiteLLM, we need to configure it via a config file. In true Kubernetes style, let’s do that with a ConfigMap:

apiVersion: v1
kind: ConfigMap
metadata:
  name: litellm-config-file
data:
  config.yaml: |
      model_list: 
        - model_name: gpt-4-preview
          litellm_params:
            model: azure/gpt-4-preview
            api_base: os.environ/SWE_AZURE_OPENAI_ENDPOINT
            api_key: os.environ/SWE_AZURE_OPENAI_KEY
          rpm: 300
        - model_name: gpt-4-preview
          litellm_params:
            model: azure/gpt-4-preview
            api_base: os.environ/FRA_AZURE_OPENAI_ENDPOINT
            api_key: os.environ/FRA_AZURE_OPENAI_KEY
          rpm: 360
      router_settings:
        routing_strategy: least-busy
        num_retries: 2
        timeout: 60                                  
        redis_host: redis
        redis_password: os.environ/REDIS_PASSWORD
        redis_port: 6379
      general_settings:
        master_key: os.environ/MASTER_KEY

The configuration contains a list of models. Above, there are two models with the same name: gpt-4-preview. Each model points to a deployed model in Azure with the same name (can be different) and its own API base and key. For example, the first model uses an API base and API key for my instance in Sweden. However, by using os.environ/ and appending an environment variable, we can tell LiteLLM to use an environment variable. Of course, that means we have to set these environment variables in the LiteLLM container. We will do that later.

When the code in the process service uses the gpt-4-preview model via the proxy, the proxy will perform load balancing based on the router settings.

To spin up more than one instance of LiteLLM, a Redis instance is required. Redis is used to share information between the instances to make routing decisions. The routing strategy is set to least-busy.

Note that retries is set to 2. You can turn off retries in your code and let the proxy handle this for you.

To support mounting the secrets as environment variables, I use a .env file in combination with a secretGenerator in Kustomize:

STORAGE_CONNECTION_STRING=<placeholder for storage connection string>
CONTAINER=<placeholder for container name>
AZURE_AI_ENDPOINT=<placeholder for Azure AI endpoint>
AZURE_AI_KEY=<placeholder for Azure AI key>
AZURE_OPENAI_ENDPOINT=<placeholder for Azure OpenAI endpoint>
AZURE_OPENAI_KEY=<placeholder for Azure OpenAI key>

LLM_LITE_SWE_AZURE_OPENAI_ENDPOINT=<placeholder for LLM Lite SWE Azure OpenAI endpoint>
LLM_LITE_SWE_AZURE_OPENAI_KEY=<placeholder for LLM Lite SWE Azure OpenAI key>

LLM_LITE_FRA_AZURE_OPENAI_ENDPOINT=<placeholder for LLM Lite FRA Azure OpenAI endpoint>
LLM_LITE_FRA_AZURE_OPENAI_KEY=<placeholder for LLM Lite FRA Azure OpenAI key>

TOPIC_KEY=<placeholder for topic key>
TOPIC_ENDPOINT=<placeholder for topic endpoint>
PUBSUB_NAME=<placeholder for pubsub name>
TOPIC_NAME=<placeholder for topic name>
SB_CONNECTION_STRING=<placeholder for Service Bus connection string>

REDIS_PASSWORD=<placeholder for Redis password>
MASTER_KEY=<placeholder for Cosmos DB master key>

POSTGRES_DB_URL=postgresql://USER:PASSWORD@SERVERNAME-pg.postgres.database.azure.com:5432/postgres

There are many secrets here. Some are for LiteLLM, although weirdly prefixed with LLM_LITE instead. I do that sometimes! The others are to support the upload and process services.

To get these values into secrets, I use the following kustomization.yaml:

apiVersion: kustomize.config.k8s.io/v1beta1
kind: Kustomization
namespace: inv-demo


resources:
- namespace.yaml
- pubsub.yaml
- upload.yaml
- process.yaml
- llmproxy.yaml
- redis.yaml

secretGenerator:
- name: invoices-secrets
  envs:
  - .env
  
generatorOptions:
  disableNameSuffixHash: true

The secretGenerator will create a secret called invoices-secrets in the inv-demo namespace. We can reference the secrets in the LiteLLM Kubernetes deployment:

apiVersion: apps/v1
kind: Deployment
metadata:
  name: litellm-deployment
  labels:
    app: litellm
spec:
  replicas: 2
  selector:
    matchLabels:
      app: litellm
  template:
    metadata:
      labels:
        app: litellm
    spec:
      containers:
      - name: litellm
        image: ghcr.io/berriai/litellm:main-latest
        args:
        - "--config"
        - "/app/proxy_server_config.yaml"
        ports:
        - containerPort: 4000
        volumeMounts:
        - name: config-volume
          mountPath: /app/proxy_server_config.yaml
          subPath: config.yaml
        env:
        - name: SWE_AZURE_OPENAI_ENDPOINT
          valueFrom:
            secretKeyRef:
              name: invoices-secrets
              key: LLM_LITE_SWE_AZURE_OPENAI_ENDPOINT
        - name: SWE_AZURE_OPENAI_KEY
          valueFrom:
            secretKeyRef:
              name: invoices-secrets
              key: LLM_LITE_SWE_AZURE_OPENAI_KEY
        - name: FRA_AZURE_OPENAI_ENDPOINT
          valueFrom:
            secretKeyRef:
              name: invoices-secrets
              key: LLM_LITE_FRA_AZURE_OPENAI_ENDPOINT
        - name: FRA_AZURE_OPENAI_KEY
          valueFrom:
            secretKeyRef:
              name: invoices-secrets
              key: LLM_LITE_FRA_AZURE_OPENAI_KEY
        - name: MASTER_KEY
          valueFrom:
            secretKeyRef:
              name: invoices-secrets
              key: MASTER_KEY
        - name: DATABASE_URL
          valueFrom:
            secretKeyRef:
              name: invoices-secrets
              key: POSTGRES_DB_URL
      volumes:
        - name: config-volume
          configMap:
            name: litellm-config-file

The ConfigMap content is mounted as /app/proxy_server_config.yaml. You need to specify the config file via the --config parameter, supplied in args.

Next, we simply mount all the environment variables that we need. The LiteLLM ConfigMap uses several of those via the os.environ references. There is also a DATABASE_URL that is not mentioned in the ConfigMap. The URL points to a PostgreSQL instance in Azure where information is kept to support the LiteLLM dashboard and other settings. If you do not want the dashboard feature, you can omit the database URL.

There’s one last thing: the process service needs to connect to LiteLLM via Kubernetes internal networking. Of course, that means we need a service:

apiVersion: v1
kind: Service
metadata:
  name: litellm-service
spec:
  selector:
    app: litellm
  ports:
  - protocol: TCP
    port: 80
    targetPort: 4000
  type: ClusterIP

With this service definition, the process service can set the OpenAI base URL as http://litellm-service to route all requests to the proxy via its internal IP address.

As you can probably tell from the kustomization.yaml file, the ConfigMap, Deployment and Service are in llmproxy.yaml. The other YAML files do the following:

  • namespace.yaml: creates the inv-demo namespace
  • upload.yaml: deploys the upload service (written in Python and uses FastAPI, 1 replica))
  • process.yaml: deploys the process service (written in Python as a Dapr grpc service, 2 replicas)
  • pubsub.yaml: creates a Dapr pubsub component that uses Azure Service Bus
  • redis.yaml: creates a standalone Redis instance to support multiple replicas of the LiteLLM proxy

To deploy all of the above, you just need to run the command below:

kubectl apply -k .

⚠️ Although this can be used in production, several shortcuts are taken. One thing that would be different is secrets management. Secrets would be in a Key Vault and made available to applications via the Secret Store CSI driver or other solutions.

With everything deployed, I see the following in k9s:

The view from k9s

As a side note, I also use Diagrid to provide insights about the use of Dapr on the cluster:

upload and process are communicating via pubsub (Service Bus)

Dapr is only used between process and upload. The other services do not use Dapr and, as a result, are not visible here. The above is from Diagrid Conductor Free. As I said…. total side note! 🤷‍♂️

Back to the main topic…

The proxy in action

Let’s see if the proxy uses both Azure OpenAI instances. The dashboard below presents a view of the metrics after processing several documents:

OpenAI usage in France and Sweden

It’s clear that the proxy uses both resources. Remember that this is the least-busy routing option. It picks the deployment with the least number of ongoing calls. Both these instances are only used by the process service so the expectation is a more or less even distribution.

LiteLLM Dashboard

If you configured authentication in combination with providing a URL to a PostGreSQL database, you can access the dashboard. To see the dashboard in action without deploying it, see https://litellm.vercel.app/docs/proxy/demo.

One of the things you can do is creating teams. Below, you see a team called dev which has access to only the gpt-4-preview model with unlimited TPM and RPM:

dev team in LiteLLM

In addition to the team, a virtual key is created and assigned to the team. This virtual key starts with sk- and is used as the OpenAI API key in the process service:

LiteLLM virtual key for the dev team

We can now report on the use of OpenAI by the dev team:

Usage for the dev team

Above, there’s a small section that’s unassigned because I used LiteLLM without a key and a master key before switching to a team-based key.

The idea here is that you can deploy the LiteLLM proxy centrally and hand out virtual keys to teams so they can all access their models via the proxy. We have not tested this in a production setting yet but it is certainly something worth exploring.

Conclusion

I have only scratched the surface of LiteLLM here but my experience with it so far is pretty good. If you want to deploy it as a central proxy server that developers can use to access models, deployment to Kubernetes and other environments with the container image is straightforward.

In this post I used Kubernetes but that is not required. It runs in Container Apps and other container runtimes as well. In fact, you do not need to run it in a container at all. It also works as a standalone application or can be used directly in your Python apps.

There is much more to explore but for now, if you need a transparent OpenAI-based proxy that works with many different models, take a look at LiteLLM.

Use Azure OpenAI on your data with Semantic Kernel

I have written before about Azure OpenAI on your data. For a refresher, see Microsoft Learn. In short, Azure OpenAI on your data tries to make it easy to create an Azure AI Search index that supports advanced search mechanisms like vector search, potentially enhanced with semantic reranking.

On of the things you can do is simply upload your documents and start asking questions about these documents, right from within the Azure OpenAI Chat playground. The screenshot below shows the starting screen of a step-by-step wizard to get your documents into an index:

Upload your documents to Azure OpenAI on your data

Note that whatever option you choose in the wizard, you will always end up with an index in Azure AI Search. When the index is created, you can start asking questions about your data:

Your questions are answered with links to source documents (citations)

Instead of uploading your documents, you can use any Azure AI Search index. You will have the ability to map the fields from your index to the fields Azure OpenAI expects. You will see an example in the Semantic Kernel code later and in the next section.

Extensions to the OpenAI APIs

To make this feature work, Microsoft extended the OpenAI APIs. By providing extra information to the API about Azure AI Search, mapped fields, type of search, etc… the APIs retrieve relevant content, add that to the prompt and let the model answer. It is retrieval augmented generation (RAG) but completely API driven.

The question I asked in the last screenshot was: “Does Redis on Azure support vector queries?”. The API creates an embedding for that question to find similar vectors. The vectors are stored together with their source text (from your documents). That text is added as context to the prompt, allowing the chosen model to answer as shown above.

Under the hood, the UI makes a call to the URL below:

{openai.api_base}/openai/deployments/{deployment_id}/extensions/chat/completions?api-version={openai.api_version}

This looks similar to a regular chat completions call except for the extensions part. When you use this extension API, you can supply extra information. Using the Python OpenAI packages, the extra information looks like below:

dataSources=[
  {
    "type": "AzureCognitiveSearch",
    "parameters": {
      "endpoint": "'$search_endpoint'",
      "indexName": "'$search_index'",
      "semanticConfiguration": "default",
      "queryType": "vectorSimpleHybrid",
      "fieldsMapping": {
        "contentFieldsSeparator": "\n",
        "contentFields": [
          "Content"
        ],
        "filepathField": null,
        "titleField": "Title",
        "urlField": "Url",
        "vectorFields": [
          "contentVector"
        ]
   ... many more settings (shortened here)

The dataSources section is used by the extension API to learn about the Azure AI Search resource, the API key to use (not shown above), the type of search to perform (hybrid) and how to map the fields in your index to the fields this API expects. For example, we can tell the API about one or more contentFields. Above, there is only one such field named Content. That’s the name of a field in your chosen index.

You can easily get a Python code example to use this API from the Chat Completions playground:

Get sample code by clicking View code in the playground

How to do this in Semantic Kernel?

In what follows, I will show snippets of a full sample you can find on GitHub. The sample uses Streamlit to provide the following UI:

Sample Streamlit app

Above, (1) is the original user questions. Using Azure OpenAI on your data, we use Semantic Kernel to provide a response with citations (2). As an extra, all URLs returned by the vector search are shown in (3). They are not reflected in the response because not all retrieved results are relevant.

Let’s look at the code now…

st.session_state.kernel = sk.Kernel()

# Azure AI Search integration
azure_ai_search_settings = sk.azure_aisearch_settings_from_dot_env_as_dict()
azure_ai_search_settings["fieldsMapping"] = {
    "titleField": "Title",
    "urlField": "Url",
    "contentFields": ["Content"],
    "vectorFields": ["contentVector"], 
}
azure_ai_search_settings["embeddingDependency"] = {
    "type": "DeploymentName",
    "deploymentName": "embedding"  # you need an embedding model with this deployment name is same region as AOAI
}
az_source = AzureAISearchDataSources(**azure_ai_search_settings, queryType="vectorSimpleHybrid", system_message=system_message) # set to simple for text only and vector for vector
az_data = AzureDataSources(type="AzureCognitiveSearch", parameters=az_source)
extra = ExtraBody(dataSources=[az_data]) if search_data else None

Above we create a (semantic) kernel. Don’t bother with the session state stuff, that’s specific to Streamlit. After that, the code effectively puts together the Azure AI Search information to be added to the extension API:

  • get Azure AI Search settings from a .env file: contains the Azure AI Search endpoint, API key and index name
  • add fieldsMapping to the Azure AI Search settings: contentFields and vectorFields are arrays; we need to map the fields in our index to the fields that the API expects
  • add embedding information: the deploymentName is set to embedding; you need an embedding model with that name in the same region as the OpenAI model you will use
  • create an instance of class AzureAISearchDataSources: creates the Azure AI Search settings and add additional settings such as queryType (hybrid search here)
  • create an instance of class AzureDataSources: this will tell the extension API that the data source is AzureCognitiveSearch with the settings provided via the AzureAISearchDataSources class; other datasources are supported
  • the call to the extension API needs the dataSources field as discussed earlier: the ExtraBody class allows us to define what needs to be added to the POST body of a chat completions call; multiple dataSources can be provided but here, we have only one datasource (of type AzureCognitiveSearch); we will need this extra variable later in our request settings

Note: I have a parameter in my code, search_data. Only if search_data is True, Azure OpenAI on your data should be enabled. If it is false, the variable extra should be None. You will see this variable pop up in other places as well

In Semantic Kernel, you can add one or more services to the kernel. In this case, we only add a chat completions service that points to a gpt-4-preview deployment. A .env file is used to get the Azure OpenAI endpoint, key and deployment.

service_id = "gpt"
deployment, api_key, endpoint = azure_openai_settings_from_dot_env(include_api_version=False)
chat_service = sk_oai.AzureChatCompletion(
    service_id=service_id,
    deployment_name=deployment,
    api_key=api_key,
    endpoint=endpoint,
    api_version="2023-12-01-preview" if search_data else "2024-02-01",  # azure openai on your data in SK only supports 2023-12-01-preview
    use_extensions=True if search_data else False # extensions are required for data search
)
st.session_state.kernel.add_service(chat_service)

Above, there are two important settings to make Azure OpenAI on your data work:

  • api_version: needs to be set to 2023-12-01-preview; Semantic Kernel does not support the newer versions at the time of this writing (end of March, 2024). However, this will be resolved soon.
  • use_extensions: required to use the extension API; without it the call to the chat completions API will not have the extension part.

We are not finished yet. We also need to supply the ExtraBody data (extra variable) to the call. That is done via the AzureChatPromptExecutionSettings:

req_settings = AzureChatPromptExecutionSettings(
    service_id=service_id,
    extra_body=extra,
    tool_choice="none" if search_data else "auto", # no tool calling for data search
    temperature=0,
    max_tokens=1000
)

In Semantic Kernel, we can create a function from a prompt with chat history and use that prompt to effectively create the chat experience:

prompt_template_config = PromptTemplateConfig(
    template="{{$chat_history}}{{$user_input}}",
    name="chat",
    template_format="semantic-kernel",
    input_variables=[
        InputVariable(name="chat_history", description="The history of the conversation", is_required=True),
        InputVariable(name="user_input", description="The user input", is_required=True),
    ],
)

# create the chat function
if "chat_function" not in st.session_state:
    st.session_state.chat_function = st.session_state.kernel.create_function_from_prompt(
        plugin_name="chat",
        function_name="chat",
        prompt_template_config=prompt_template_config,
    )

Later, we can call our chat function and provide KernelArguments that contain the request settings we defined earlier, plus the user input and the chat history:

arguments = KernelArguments(settings=req_settings)

arguments["chat_history"] = history
arguments["user_input"] = prompt
response = await st.session_state.kernel.invoke(st.session_state.chat_function, arguments=arguments)

The important part here is that we invoke our chat function. With the kernel’s chat completion service configured to use extensions, and the extra request body field added to the request settings, you effectively use the Azure OpenAI on your data APIs as mentioned earlier.

Conclusion

Semantic Kernel supports Azure OpenAI on your data. To use the feature effectively, you need to:

  • Prepare the extra configuration (ExtraBody) to send to the extension API
  • Enable the extension API in your Azure chat completion service and ensure you use the supported API version
  • Add the ExtraBody data to your AzureChatPromptExecutionSettings together with settings like temperature etc…

Although it should be possible to use Azure OpenAI on your data together with function calling, I could not get that to work. Function calling requires a higher API version, which is not supported by Semantic Kernel in combination with Azure OpenAI on your data yet!

The code on GitHub can be toggled to function mode by setting MODE in .env to anything but search. In that case though, add your data is not used. Be sure to restart the Streamlit app after you change that setting in the .env file. In function mode you can ask about the current time and date. If you provide a Bing api key, you can also ask questions that require a web search.

Super fast bot creation with Copilot Studio and the Azure OpenAI Assistants API

In a previous post, I discussed the Microsoft Bot Framework SDK that provides a fast track to deploying intelligent bots with the help of the Assistants API. Yet, the journey doesn’t stop there. Copilot Studio, a low-code tool, introduces an even more efficient approach, eliminating the need for intricate bot coding. It empowers developers to quickly design and deploy bots, focusing on functionality over coding complexities.

In this post, we will combine Copilot Studio with the Assistants API. But first, let’s take a quick look at the basics of Copilot Studio.

Copilot Studio

Copilot Studio, known before as Power Virtual Agents, is part of Microsoft’s Power Platform. It allows anyone to create a bot fast with it’s intent-based authoring experience. To try it out, just click the Try Free button on the Copilot Studio web page.

Note: I will not go into licensing here. I do not have a Phd in Power Platform Licensing yet! 😉

When you create a new bot, you will get the screen below:

New bot creation screen

You simply give your bot a name and a language. Right from the start, you can add Generative AI capabilities by providing a website URL. If that website is searchable by Bing, users can ask questions about content on that website.

However, this does not mean Copilot Studio can carry a conversation like ChatGPT. It simply means that, when Copilot Studio cannot identify an intent, it will search the website for answers and provide the answer to you. You can ask follow-up questions but it’s not a full ChatGPT experience. For example, you cannot say “Answer the following questions in bullet style” and expect the bot to remember that. It will simply throw an error and try to escalate you to a live agent after three tries.

Note: this error & escalate mechanism is a default; you can change that if you wish

So what is an intent? If you look at the screenshot below, you will see some out of the box topics available to your bot.

Topics and Plugins screen

Above, you see a list of topics and plugins. I have not created any plugins so there are only topics: regular topics and system topics. Whenever you send a message, the system tries to find out what your intent is by checking matching phrases defined in a trigger.

If you click on the Greeting topic, you will see the following:

Greeting topic (click to enlarge)

This topic is triggered by a number of phrases. When the user sends a message like Hi!, that message will match the trigger phrases (intent is known). A response message will be sent back: “Hello, how can I help you today?”.

It’s important to realise that no LLM (large language model) is involved here. Other machine learning stuff is at play here.

The behaviour is different when I send a message that is not matched to any of the topics. Because I setup the bot with my website (https://atomic-temporary-16150886.wpcomstaging.com), the following happens when I ask: “What is the OpenAI Assistants API?”

Generative Answers from https://atomic-temporary-16150886.wpcomstaging.com

Check the topic above. We are in the Conversational Boosting topic now. It was automatically created when I added my website in the Generative Answers section during creation:

Boosting topic triggered when intent in not knowsn

If you look closely, you will notice that the trigger is set to On Unknown Intent. This means that this topic is used whenever you type something that cannot be matched to other topics. Behind the scenes, the system searches the website and returns a summary of the search to you, totally driven by Azure OpenAI. You do not need an Azure OpenAI resource to enable this.

This mixing and matching of intents is interesting in several ways:

  • you can catch specific intents and answer accordingly without using an OpenAI model: for example, when a user wants to book a business trip, you can present a form which will trigger an API that talks to an internal booking system
  • to answer from larger knowledge bases, you can add either use a catch-all such as the Conversational Boosting topic or even use custom intents that use the Create Generative Answers node to go to any supported data source

Besides web sites, other data sources are supported such as SharePoint, custom documents or even Azure OpenAI Add your data.

What we want to do is different. We want to use Copilot Studio to provide a full ChatGPT experience. We will not need Generative Answers to do so. Instead, we will use the OpenAI Assistants API behind the scenes.

Copilot Studio and Azure OpenAI Assistants

We want to achieve the following:

  • When a new conversation is started: create a new tread
  • When the user sends a message: add the message to the thread, run the thread and send the response back to Copilot Studio.
  • When the user asks to start over, start a new conversation which starts a new thread

One way of doing this, is to write a small API that can create a thread and add messages to it. Here’s the API I wrote using Python FastAPI:

from fastapi import FastAPI, Depends, HTTPException, status
from fastapi.security.api_key import APIKeyHeader, APIKey
from pydantic import BaseModel
import logging
import uvicorn
from openai import AzureOpenAI
from dotenv import load_dotenv
import os
import time
import json

load_dotenv("../.env")

# Configure logging
logging.basicConfig(level=logging.INFO)
logger = logging.getLogger(__name__)

# Define API key header; set it in ../.env
API_KEY = os.getenv("API_KEY")

# Check for API key
if API_KEY is None:
    raise ValueError("API_KEY environment variable not set")

API_KEY_NAME = "access_token"
api_key_header = APIKeyHeader(name=API_KEY_NAME, auto_error=True)

async def get_api_key(api_key_header: str = Depends(api_key_header)):
    if api_key_header == API_KEY:
        return api_key_header
    else:
        raise HTTPException(
            status_code=status.HTTP_403_FORBIDDEN, detail="Could not validate credentials"
        )

app = FastAPI()

# Pydantic models
class MessageRequest(BaseModel):
    message: str
    thread_id: str

class MessageResponse(BaseModel):
    message: str

class ThreadResponse(BaseModel):
    thread_id: str

# set the env vars below in ../.env
client = AzureOpenAI(
    api_key=os.getenv('AZURE_OPENAI_API_KEY'),
    azure_endpoint=os.getenv('AZURE_OPENAI_ENDPOINT'),
    api_version=os.getenv('AZURE_OPENAI_API_VERSION')
)

# this refers to an assistant without functions
assistant_id = "asst_fRWdahKY1vWamWODyKnwtXxj"

def wait_for_run(run, thread_id):
    while run.status == 'queued' or run.status == 'in_progress':
        run = client.beta.threads.runs.retrieve(
                thread_id=thread_id,
                run_id=run.id
        )
        time.sleep(0.5)

    return run

# Example endpoint using different models for request and response
@app.post("/message/", response_model=MessageResponse)
async def message(item: MessageRequest, api_key: APIKey = Depends(get_api_key)):
    logger.info(f"Message received: {item.message}")

    # Send message to assistant
    message = client.beta.threads.messages.create(
        thread_id=item.thread_id,
        role="user",
        content=item.message
    )

    run = client.beta.threads.runs.create(
        thread_id=item.thread_id,
        assistant_id=assistant_id # use the assistant id defined aboe
    )

    run = wait_for_run(run, item.thread_id)

    if run.status == 'completed':
        messages = client.beta.threads.messages.list(limit=1, thread_id=item.thread_id)
        messages_json = json.loads(messages.model_dump_json())
        message_content = messages_json['data'][0]['content']
        text = message_content[0].get('text', {}).get('value')
        return MessageResponse(message=text)
    else:
        return MessageResponse(message="Assistant reported an error.")


@app.post("/thread/", response_model=ThreadResponse)
async def thread(api_key: APIKey = Depends(get_api_key)):
    thread = client.beta.threads.create()
    logger.info(f"Thread created with ID: {thread.id}")
    return ThreadResponse(thread_id=thread.id)

# Uvicorn startup
if __name__ == "__main__":
    uvicorn.run(app, host="127.0.0.1", port=8324)

Note: you can find this code on GitHub as well: https://github.com/gbaeke/azure-assistants-api/tree/main/api

Some things to note here:

  • I am using an assistant I created in the Azure OpenAI Assistant Playground and reference it by its ID; this assistant does not use any tools or files
  • I require an API key via a custom HTTP header access_token; later Copilot Studio will need this key to authenticate to the API
  • I define two methods: /thread and /message

If you have followed the other posts about the Assistants API, the code should be somewhat self-explanatory. The code focuses on the basics so not a lot of error checking for robustness.

If you run the above code, you can use a .http file in Visual Studio Code to test it. This requires the REST Client extension. Here’s the file:

POST http://127.0.0.1:8324/message
Content-Type: application/json
access_token: 12345678

{
    "message": "How does Copilot Studio work?",
    "thread_id": "thread_S2mwvse5Zycp6BOXNyrUdlaK"
}

###

POST http://127.0.0.1:8324/thread
Content-Type: application/json
access_token: 12345678

In VS Code, with the extension loaded, you will see Send Request links above the POST commands. Click them to execute the requests. Click the thread request first and use the thread ID from the response in the body of the message request.

After you verified that it works, we can expose the API to the outside world with ngrok.

Using ngrok

If you have never used ngrok, download it for your platform. You should also get an authtoken by signing up and providing it to ngrok.

When the API is running, in a terminal window, type ngrok http 8324. You should see something like:

ngrok running

Check the forwarding URL. This is a public URL you can use. We will use this URL from Copilot Studio.

Note: in reality, we would publish this API to container apps or another hosting platform

Using the API from Copilot Studio

In Copilot Studio, I created a new bot without generative answers. The first thing we need to do is to create a thread when a new conversation starts:

In the UI, it looks like below:

Welcoming the user and starting a new thread

You can use the Conversation Start system topic to create the thread. The first section of the topic looks like below:

Starting a new conversation

Above there are three nodes:

  • Trigger node: On Conversation Start
  • Message: welcoming the user
  • Set variable: a global variable is set that’s available to all topics; the variable holds the URL of the API to call; that is the ngrok public url in this case

Below the set variable node, there are two other nodes:

Two last nodes of the Conversation Start topic

The HTTP Request node, unsurprisingly, can do HTTP requests. This is a built-in node in Copilot Studio. We call the /thread endpoint via the URL, which is the global url + “/thread” appended. The method is POST. In Headers and Body, you need to set the access_token header to the API key that matches the one from the code. There is no body to send here. When the request is successful, we save the thread ID to another global variable, global.thread_id. We need that variable is the /message calls later. The variable is of type record and holds the full JSON response from the /thread endpoint.

To finish the topic, we tell the user a new thread has started.

Now that we have a thread, how do we add a message to the thread? In the System Topics, I renamed the Fallback topic to Main intent. It is triggered when the intent is unknown, similar to how generative answers are used by default:

Fallback topic renamed to Main Intent

The topic is similar to the previous one:

Main intent topic

Above, HTTP Request is used again, this time to call the /message endpoint. This time Headers and Body needs some more information. In addition to the access_token header, the request requires a JSON body:

/message request body

The API expects JSON with two fields:

  • message: we capture what the user typed via System.Activity.Text
  • thread_id: stored in Global.thread_id.thread_id. The Global.thread_id variable is of type record (result from the /thread call) and contains a thread_id value. Great naming by yours truly here!

The last node in the topic simply takes the response record from the HTTP Request and sends the message field from that record back to the chat user.

You can now verify if the chat bot works from the Chat pane:

Testing the bot

You can carry on a conversation with the assistant virtually indefinitely. As mentioned in previous posts, the assistants API tries to use up the model’s context window and only starts to trim messages from the thread when the context limit is reached.

If your assistant has tools and function calling, it’s possible it sends back images. The API does not account for that. Only text responses are retrieved.

Note: the API and bot configuration is just the bare minimum to get this to work; there is more work to do to make this fully functional, like showing image responses etc…

Adding a Teams channel

Copilot Studio bots can easily by tied to a channel. One of those channels is Teams. You can also do that with the Bot Framework SDK if you combine it with an Azure Bot resource. But it is easier with Copilot Studio.

Before you enable a channel, ensure your bot is published. Go to Publish (left pane) and click the Publish button.

Note: whenever you start a new ngrok session and update the URL in the bot, publish the bot again

Next, go to Settings and then Channels. I enabled the Teams channel:

Teams channel enabled

In the right pane, there’s a link to open the bot directly in Teams. It could be that does not work in your organisation but it does in mine:

Our Copilot Studio assistant in Teams

Note that it might be needed to restart the conversation if there is something wrong. By default, the chat bot has a Start Over topic. I modified that topic to redirect to Conversation Start. That results in the creation of a new thread:

Redirect to Conversation Start when user types start over or similar phrases

The user can simple type something like Start Over. The bot would respond as follows:

Starting over

Conclusion

If you want to use a low-code solution to build the front-end of an Azure OpenAI Assistant, using Copilot Studio in conjunction with the Assistants API is one way of achieving that.

Today, it does require some “pro-code” as the glue between both systems. I can foresee a future with tighter integration where this is just some UI configuration. I don’t know if the teams are working on this, but I surely would like to see it.

Fast chat bot creation with the OpenAI Assistants API and the Microsoft Bot Framework SDK

This post is part of a series of blog posts about the Azure OpenAI Assistants API. Here are the previous posts:

In all of those posts, we demonstrated the abilities of the Azure OpenAI Assistants API in a Python notebook. In this post, we will build an actual chat application with some help of the Bot Framework SDK.

The Bot Framework SDK is a collection of libraries and tools that let you build, test and deploy bot applications. The target audience is developers. They can write the bot in C#, TypeScript or Python. If you are more of a Power Platform user/developer, you can also use Copilot Studio. I will look at the Assistants API and Copilot Studio in a later post.

The end result after reading this post is a bot you can test with the Bot Framework Emulator. You can download the emulator for your platform here.

When you run the sample code from GitHub and connect the emulator to the bot running on you local machine, you get something like below:

Bot with answers provided by Assistants API

Writing a basic bot

You can follow the Create a basic bot quickstart on Microsoft Learn to get started. It’s a good quickstart and it is easy to follow.

On that page, switch to Python and simply follow the instructions. The end-to-end sample I provide is in Python so using that language will make things easier. At the end of the quickstart, you will have a bot you can start with python app.py. The post also tells you how to connect the Bot Framework Emulator to your bot that runs locally on your machine. The quickstart bot is an echo bot that simply echoes the text you type:

Echo bot in action… oooh exciting 😀

A quick look at the bot code

If you check the bot code in bot.py, you will see two functions:

  • on_members_added_activity: do something when a new chat starts; we can use this to start a new assistant thread
  • on_message_activity: react to a user sending a message; here, we can add the message to a thread, run it, and send the response back to the user

👉 This code uses a tiny fraction of features of the Bot Framework SDK. There’s a huge list of capabilities. Check the How-To for developers, which starts with the basics of sending and receiving messages.

Below is a diagram of the chat and assistant flow:

Assistant Flow

In the diagram, the initial connection triggers on_members_added_activity. Let’s take a look at it:

async def on_members_added_activity(
        self,
        members_added: ChannelAccount,
        turn_context: TurnContext
    ):
        for member_added in members_added:
            if member_added.id != turn_context.activity.recipient.id:
                # Create a new thread
                self.thread_id = assistant.create_thread()
                await turn_context.send_activity("Hello. Thread id is: " + self.thread_id)

The function was modified to create a thread and store the thread.id as a property thread_id of the MyBot class. The function create_thread() comes from a module called assistant.py, which I added to the folder that contains bot.py:

def create_thread():
    thread = client.beta.threads.create()
    return thread.id

Easy enough, right?

The second function, on_message_activity, is used to respond to new chat messages. That’s number 2 in the diagram above.

async def on_message_activity(self, turn_context: TurnContext):
        # add message to thread
        run = assistant.send_message(self.thread_id, turn_context.activity.text)
        if run is None:
            print("Result of send_message is None")
        tool_check = assistant.check_for_tools(run, self.thread_id)
        if tool_check:
            print("Tools ran...")
        else:
            print("No tools ran...")
        message = assistant.return_message(self.thread_id)
        await turn_context.send_activity(message)

Here, we use a few helper methods. It could actually be one function but I decided to break them up somewhat:

  • send_message: add a message to the thread created earlier; we grab the text the user entered in the chat via turn_context.activity.text
  • check_for_tools: check if we need to run a tool (function) like hr_search or request_raise and add tool results to the messages
  • return_message: return the last message from the messages array and send it back to the chat via turn_context.send_activity; that’s number 5 in the diagram

💡 The stateful nature of the Azure OpenAI Assistants API is of great help here. Without it, we would need to use the Chat Completions API and find a way to manage the chat history ourselves. There are various ways to do that but not having to do that is easier!

A look at assistant.py

Check assistant.py on GitHub for the details. It contains the helper functions called from on_message_activity.

In assistant.py, the following happens:

If you have read the previous blog post on retrieval, you should already be familiar with all of the above.

What’s new are the assistant helper functions that get called from the bot.

  • create_thread: creates a thread and returns the thread id
  • wait_for_run: waits for a thread run to complete and returns the run; used internally; never gets called from the bot code
  • check_for_tools: checks a run for required_action, performs the actions by running the functions and returning the results to the assistant API; we have two functions: hr_query and request_raise.
  • send_message: sends a message to the assistant picked up from the bot
  • return_message: picks the latest message from the messages in a thread and returns it to the bot

To get started, this is relatively easy. However, building a chat bot that does exactly what you want and refuses to do what you don’t want is not particularly easy.

Should you do this?

Combining the Bot Framework SDK with OpenAI is a well-established practice. You get the advantages of building enterprise-ready bots with the excellent conversational capabilities of LLMs. At the moment, production bots use the OpenAI chat completions API. Due to the stateless nature of that API you need to maintain the chat history and send it to the API to make it aware of the conversation so far.

As already discussed, the Assistants API is stateful. That makes it very easy to send a message and get the response. The API takes care of chat history management.

As long as the Assistants API does not offer ways to control the chat history by limiting the amount of interactions or summarising the conversation, I would not use this API in production. It’s not recommended to do that anyway because it is in preview (February 2024).

However, as soon as the API is generally available and offers chat history control, using it with the Bot Framework SDK, in my opinion, is the way to go.

For now, as a workaround, you could limit the number of interactions and present a button to start a new thread if the user wants to continue. Chat history is lost at that moment but at least the user will be aware of it.

Conclusion

The OpenAI Assistants API and the Bot Framework SDK are a great match to create chat bots that feel much more natural than with the Bot Framework SDK on its own. The statefulness of the assistants API makes it easier than the chat completions API.

This post did not discuss the ability to connect Bot Framework bots with an Azure Bot Service. Doing so makes it easy to add your bot to multiple channels such as Teams, SMS, a web chat control and much more. We’ll keep that for another post. Maybe! 😀

Retrieval with the Azure OpenAI Assistants API

In two previous blog posts, I wrote an introduction to the Azure OpenAI Assistants API and how to work with custom functions. In this post, we will take a look at an assistant that can answer questions about documents. We will create an HR Assistant that has access to an HR policy document. In addition, we will provide a custom function that employees can use to request a raise.

Retrieval

The OpenAI Assistants API (not the one in Azure) supports a retrieval tool. You can simply upload one or more documents, turn on retrieval and you are good to go. The screenshot below shows the experience on https://platform.openai.com:

Creating an HR Assistant at OpenAI

The important parts above are:

  • the Retrieval tool was enabled
  • Innovatek.pdf was uploaded, making it available to the Retrieval tool

To test the Assistant, we can ask questions in the Playground:

Asking HR-related questions

When asked about company cars, the assistant responds with content from the uploaded pdf file. After upload, OpenAI converted the document to text, chunked it and stored it in vector storage. I believe they even use Azure AI Search to do so. At query time, the vector store returns one or more pieces of text related to the question to the assistant. The assistant uses those pieces of text to answer the user’s question. It’s a typical RAG scenario. RAG stands for Retrieval Augmented Generation.

At the time of writing (February, 2024), the Azure OpenAI Assistants API did not support the retrieval tool. You can upload files but those files can only be used by the code_interpreter tool. That tool can also look in the uploaded files to answer the query but that is very unreliable and slow so it’s not recommended to use it for retrieval tasks.

Can we work around this limitation?

The Azure OpenAI Assistants API was in preview when this post was written. While in preview, limitations are expected. More tools like Web Search and Retrieval will be added as the API goes to general availability.

To work around the limitation, we can do the following ourselves:

  • load and chunk our PDF
  • store the chunks, metadata and embeddings in an in-memory vector store like Chroma
  • create a function that takes in a query and return chunks and metadata as a JSON string
  • use the Assistant API function calling feature to answer HR-related questions using that function

Let’s see how that works. The full code is here: https://github.com/gbaeke/azure-assistants-api/blob/main/files.ipynb

Getting ready

I will not repeat all code here and refer to the notebook. The first code block initialises the AzureOpenAI client with our Azure OpenAI key, endpoint and API version loaded from a .env file.

Next, we setup the Chroma vector store and load our document. The document is Innovatek.pdf in the same folder as the notebook.

from langchain_community.document_loaders import PyPDFLoader
from langchain_openai import AzureOpenAIEmbeddings
from langchain.text_splitter import RecursiveCharacterTextSplitter
from langchain_community.vectorstores import Chroma

pdf = PyPDFLoader("./Innovatek.pdf").load()
text_splitter = RecursiveCharacterTextSplitter(
    chunk_size=1000,
    chunk_overlap=200
)
documents = text_splitter.split_documents(pdf)
print(documents)
print(len(documents))
db = Chroma.from_documents(documents, AzureOpenAIEmbeddings(client=client, model="embedding", api_version="2023-05-15"))

# query the vector store
query = "Can I wear short pants?"
docs = db.similarity_search(query, k=3)
print(docs)
print(len(docs))

If you have ever used LangChain before, this code will be familiar:

  • load the PDF with PyPDFLoader
  • create a recursive character text splitter that splits text based on paragraphs and words as much as possible; check out this notebook for more information about splitting
  • split the PDF in chunks
  • create a Chroma database from the chunks and also pass in the embedding model to use; we use the OpenAI embedding model with a deployment name of embedding; you need to ensure an embedding model with that name is deployed in your region
  • with the db created, we can use the similarity_search method to retrieve 3 chunks similar to the query Can I wear short pants? This returns an array of objects of type Document with properties like page_content and metadata.

Note that you will always get a response from this similarity search, no matter the query. Later, the assistant will decide if the response is relevant.

We can now setup a helper function to query the document(s):

import json

# function to retrieve HR questions
def hr_query(query):
    docs = db.similarity_search(query, k=3)
    docs_dict = [doc.__dict__ for doc in docs]
    return json.dumps(docs_dict)

# try the function; docs array as JSON
print(hr_query("Can I wear short pants?"))

We will later pass the results of this function to the assistant. The function needs to return a string, in this case a JSON dump of the documents array.

Now that we have this setup, we can create the assistant.

Creating the assistant

In the notebook, you will see some sample code that uploads a document for use with an assistant. We will not use that file but it is what you would do to make the file available to the retrieval tool.

In the client.beta.assistants.create method, we provide instructions to tell the assistant what to do. For example, to use the hr_query function to answer HR related questions.

The tools parameter shows how you can provide functions and tools in code rather than in the portal. In our case, we define the following:

  • the request_raise function: allows the user to request a raise, the assistant should ask the user’s name if it does not know; in the real world, you would use a form of authentication in your app to identify the user
  • the hr_query function: performs a similarity search with Chroma as discussed above; it calls our helper function hr_query
  • the code_interpreter tool: needed to avoid errors because I uploaded a file and supply the file ids via the file_ids parameter.

If you check the notebook, you should indeed see a file_ids parameter. When the retrieval tool becomes available, this is how you provide access to the uploaded files. Simply uploading a file is not enough, you need to reference it. Instead of providing the file ids in the assistant, you can also provide them during a thread run.

⚠️ Note that we don’t need the file upload, code_interpreter and file_ids. They are provided as an example of what you would do when the retrieval tool is available.

Creating a thread and adding a message

If you have read the other posts, this will be very familiar. Check the notebook for more information. You can ask any question you want by simply changing the content parameter in the client.beta.threads.messages.create method.

When you run the cell that adds the message, check the run’s model dump. It should indicate that hr_query needs to be called with the question as a parameter. Note that the model can slightly change the parameter from the original question.

⚠️ Depending on the question, the assistant might not call the function. Try a question that is unrelated to HR and see what happens. Even some HR-related questions might be missed. To avoid that, the user can be precise and state the question is HR related.

Call function(s) when necessary

The code block below calls the hr_query or request_raise function when indicated by the assistant’s underlying model. For request_raise we simply return a string result. No real function gets called.

if run.required_action:
    # get tool calls and print them
    # check the output to see what tools_calls contains
    tool_calls = run.required_action.submit_tool_outputs.tool_calls
    print("Tool calls:", tool_calls)

    # we might need to call multiple tools
    # the assistant API supports parallel tool calls
    # we account for this here although we only have one tool call
    tool_outputs = []
    for tool_call in tool_calls:
        func_name = tool_call.function.name
        arguments = json.loads(tool_call.function.arguments)

        # call the function with the arguments provided by the assistant
        if func_name == "hr_query":
            result = hr_query(**arguments)
        elif func_name == "request_raise":
            result = "Request sumbitted. It will take two weeks to review."

        # append the results to the tool_outputs list
        # you need to specify the tool_call_id so the assistant knows which tool call the output belongs to
        tool_outputs.append({
            "tool_call_id": tool_call.id,
            "output": json.dumps(result)
        })

    # now that we have the tool call outputs, pass them to the assistant
    run = client.beta.threads.runs.submit_tool_outputs(
        thread_id=thread.id,
        run_id=run.id,
        tool_outputs=tool_outputs
    )

    print("Tool outputs submitted")

    # now we wait for the run again
    run = wait_for_run(run, thread.id)
else:
    print("No tool calls identified\n")

After running this code in response to the user question about company cars, let’s see what the result is:

Assistant response

The assistant comes up with this response after retrieving several pieces of text from the Chroma query. With the retrieval tool, the response would be similar with one big advantage. The retrieval tool would include sources in its response for you to display however you want. Above, I have simply asked the model to include the sources. The model will behave slightly differently each time unless you give clear instructions about the response format.

Retrieval and large amounts of documents

The retrieval tool of the Assistants API is not built to deal with massive amounts of data. The number of documents and sizes of those documents are limited.

In enterprise scenarios with large knowledge bases, you would use your own search indexes and a data processing pipeline to store your content in these indexes. For Azure customers, the indexes will probably be stored in Azure AI Search, which supports hybrid (text & vector) search plus semantic reranking to come up with the most relevant results.

Conclusion

The Azure OpenAI Assistants API will make it very easy to retrieve content from a limited amount of uploaded documents once the retrieval tool is added to the API.

To work around the missing retrieval tool today, you can use a simple vector storage solution and a custom function to achieve similar results.

Using tools with the Azure OpenAI Assistants API

Introduction

In a previous blog post, I wrote an introduction about the Azure OpenAI Assistants API. As an example, I created an assistant that had access to the Code Interpreter tool. You can find the code here.

In this post, we will provide the assistant with custom tools. These custom tools use the function calling features of more recent GPT models. As a result, these custom tools are called functions in the Assistants API. What’s in a name right?

There are a couple of steps you need to take for this to work:

  • Create an assistant and give it a name and instructions.
  • Define one or more functions in the assistant. Functions are defined in JSON. You need to provide good descriptions for the function and all of its parameters.
  • In your code, detect when the model chooses one or more functions that should be executed.
  • Execute the functions and pass the results to the model to get a final response that uses the function results.

From the above, it should be clear that the model, gpt-3.5-turbo or gpt-4, does not call your code. It merely proposes functions and their parameters in response to a user question.

For instance, if the user asks “Turn on the light in the living room”, the model will check if there is a function that can do that. If there is, it might propose to call function set-lamp with parameters such as the lamp name and maybe a state like true or false. This is illustrated in the diagram below when the call to the function succeeds.

Assistant Function Calling Flow

Creating the assistant in Azure OpenAI Playground

Unlike the previous post, the assistant will be created in Azure OpenAI Playground. Our code will then use the assistant using its unique identifier. In the Azure OpenAI Playground, the Assistant looks like below:

Home Assistant in the portal

Let’s discuss the numbers in the diagram:

  1. Once you save the assistant, you get its ID. The ID will be used in our code later
  2. Assistant name
  3. Assistant instructions: description of what the assistant can do, that it has functions, and how it should behave; you will probably need to experiment with this to let the assistant do exactly what you want
  4. Two function definitions: set_lamp and set_lamp_brightness
  5. You can test the functions in the chat panel. When the assistant detects that a function needs to be called, it will propose the function and its parameters and ask you to provide a result. The result you type is then used to formulate a response like The living room lamp has been turned on.

Let’s take a look at the function definition for set_lamp:

{
  "name": "set_lamp",
  "description": "Turn lamp on or off",
  "parameters": {
    "type": "object",
    "properties": {
      "lamp": {
        "type": "string",
        "description": "Name of the lamp"
      },
      "state": {
        "type": "boolean"
      }
    },
    "required": [
      "lamp",
      "state"
    ]
  }
}

The other function is similar but the second parameter is an integer between 0 and 100. When you notice your function does not get called, or the parameters are wrong, you should try to improve the description of both the function and each of the parameters. The underlying GPT model uses these descriptions to try and match a user question to one or more functions.

Let’s look at some code. See https://github.com/gbaeke/azure-assistants-api/blob/main/func.ipynb for the example notebook.

Using the assistant from your code

We start with an Azure OpenAI client, as discussed in the previous post.

import os
from dotenv import load_dotenv
from openai import AzureOpenAI
load_dotenv()

# Create Azure OpenAI client
client = AzureOpenAI(
    api_key=os.getenv('AZURE_OPENAI_API_KEY'),
    azure_endpoint=os.getenv('AZURE_OPENAI_ENDPOINT'),
    api_version=os.getenv('AZURE_OPENAI_API_VERSION')
)

# assistant ID as created in the portal
assistant_id = "YOUR ASSISTANT ID"

Creating a thread and adding a message

We will add the following message to a new thread: “Turn living room lamp and kitchen lamp on. Set both lamps to half brightness.“.

The model should propose multiple functions to be called in a certain order. The expected order is:

  • turn on living room lamp
  • turn on kitchen lamp
  • set living room brightness to 50
  • set kitchen brightness to 50
# Create a thread
thread = client.beta.threads.create()

import time
from IPython.display import clear_output

# function returns the run when status is no longer queued or in_progress
def wait_for_run(run, thread_id):
    while run.status == 'queued' or run.status == 'in_progress':
        run = client.beta.threads.runs.retrieve(
                thread_id=thread_id,
                run_id=run.id
        )
        time.sleep(0.5)

    return run


# create a message
message = client.beta.threads.messages.create(
    thread_id=thread.id,
    role="user",
    content="Turn living room lamp and kitchen lamp on. Set both lamps to half brightness."
)

# create a run 
run = client.beta.threads.runs.create(
    thread_id=thread.id,
    assistant_id=assistant_id # use the assistant id defined in the first cell
)

# wait for the run to complete
run = wait_for_run(run, thread.id)

# show information about the run
# should indicate that run status is requires_action
# should contain information about the tools to call
print(run.model_dump_json(indent=2))

After creating the thread and adding a message, we use a slightly different approach to check the status of the run. The wait_for_run function keeps running as long as the status is either queued or in_progress. When it is not, the run is returned. When we are done waiting, we dump the run as JSON.

Here is where it gets interesting. A run has many properties like created_at, model and more. I our case, we expect a response that indicates we need to take action by running one or more functions. This is indicated by the presence of the required_action property. It actually will ask for tool outputs and will present a list of tool calls to perform (tool, function, whatever… 😀). Here’s a JSON snippet as part of the run JSON dump:

"required_action": {
    "submit_tool_outputs": {
      "tool_calls": [
        {
          "id": "call_2MhF7oRsIIh3CpLjM7RAuIBA",
          "function": {
            "arguments": "{\"lamp\": \"living room\", \"state\": true}",
            "name": "set_lamp"
          },
          "type": "function"
        },
        {
          "id": "call_SWvFSPllcmVv1ozwRz7mDAD6",
          "function": {
            "arguments": "{\"lamp\": \"kitchen\", \"state\": true}",
            "name": "set_lamp"
          },
          "type": "function"
        }, ... more function calls follow...

Above it’s clear that the assistant wants you to submit a tool output for multiple functions. Only the first two are shown:

  • Function set_lamp with arguments for lamp and state as “living room” and ‘true”
  • Function set_lamp with arguments for lamp and state as “kitchen” and ‘true”
  • The other two functions propose set_lamp_brightness for both lamps with brightness set to 50

Defining the functions

Our code will need some real functions to call that actually do something. In this example, we use these two dummy functions. In reality, you could integrate this with Hue or other smart lighting. In fact, I have something like that: https://github.com/gbaeke/openai_assistant.

Here are the dummy functions:

make_error = False

def set_lamp(lamp="", state=True):
    if make_error:
        return "An error occurred"
    return f"The {lamp} is {'on' if state else 'off'}"

def set_lamp_brightness(lamp="", brightness=100):
    if make_error:
        return "An error occurred"
    return f"The brightness of the {lamp} is set to {brightness}"

The functions should return a string that the model can interpret. Be as concise as possible to save tokens…💰

Doing the tool/function calls

In the next code block, we check if the run requires action, get the tool calls we need to do and then iterate through the tool_calls array. At each iteration we check the function name, call the function and add the result to a results array. The results array is then passed to the model. Check out the code below and its comments:

import json

# we only check for required_action here
# required action means we need to call a tool
if run.required_action:
    # get tool calls and print them
    # check the output to see what tools_calls contains
    tool_calls = run.required_action.submit_tool_outputs.tool_calls
    print("Tool calls:", tool_calls)

    # we might need to call multiple tools
    # the assistant API supports parallel tool calls
    # we account for this here although we only have one tool call
    tool_outputs = []
    for tool_call in tool_calls:
        func_name = tool_call.function.name
        arguments = json.loads(tool_call.function.arguments)

        # call the function with the arguments provided by the assistant
        if func_name == "set_lamp":
            result = set_lamp(**arguments)
        elif func_name == "set_lamp_brightness":
            result = set_lamp_brightness(**arguments)

        # append the results to the tool_outputs list
        # you need to specify the tool_call_id so the assistant knows which tool call the output belongs to
        tool_outputs.append({
            "tool_call_id": tool_call.id,
            "output": json.dumps(result)
        })

    # now that we have the tool call outputs, pass them to the assistant
    run = client.beta.threads.runs.submit_tool_outputs(
        thread_id=thread.id,
        run_id=run.id,
        tool_outputs=tool_outputs
    )

    print("Tool outputs submitted")

    # now we wait for the run again
    run = wait_for_run(run, thread.id)
else:
    print("No tool calls identified\n")

# show information about the run
print("Run information:")
print("----------------")
print(run.model_dump_json(indent=2), "\n")

# now print all messages in the thread
print("Messages in the thread:")
print("-----------------------")
messages = client.beta.threads.messages.list(thread_id=thread.id)
print(messages.model_dump_json(indent=2))

At the end, we dump both the run and the messages JSON. The messages should indicate some final response from the model. To print the messages in a nicer way, you can use the following code:

import json

messages_json = json.loads(messages.model_dump_json())

def role_icon(role):
    if role == "user":
        return "👤"
    elif role == "assistant":
        return "🤖"

for item in reversed(messages_json['data']):
    # Check the content array
    for content in reversed(item['content']):
        # If there is text in the content array, print it
        if 'text' in content:
            print(role_icon(item["role"]),content['text']['value'], "\n")
        # If there is an image_file in the content, print the file_id
        if 'image_file' in content:
            print("Image ID:" , content['image_file']['file_id'], "\n")

In my case, the output was as follows:

Question and final model response (after getting tool call results)

I set make_error to True. In that case, the tool responses indicate an error at every call. The model reports that back to the user.

What makes this unique?

Function calling is not unique to the Assistants API. Function calling is a feature of more recent GPT models, to allow those models to propose one or more function to call from your code. You can simply use the Chat Completion API to pass in your function descriptions in JSON.

If you use frameworks like Semantic Kernel or LangChain, you can use function calling with the abstractions that they provide. In most cases that means you do not have to create the function JSON description. Instead, you just write your functions in native code and annotate them as a tool or make them part of a plugin. You can then pass a list of tools to an agent or plugins to a kernel and you’re done! In fact, LangChain (and soon Semantic Kernel) already supports the Assistant API.

One of the advantages that the Assistants API has, is the ability to define all your functions within the assistant. You can do that with code but also via the portal. The Assistants API also makes it a bit simpler to process the tool responses although the difference is not massive.

Being able to test your functions in the Assistant Playground is a big benefit as well.

Conclusion

Function calling in the Assistants API is not very different from function calling in the Chat Completion API. It’s nice you can create and update your function definitions in the portal and directly try them in the chat panel. Working with the tool calls and tool responses is also a bit easier.

A look at the Azure OpenAI Assistants API

Introduction

A while ago, I looked at the OpenAI Assistants API. In February of 2024, Microsoft have released their Assistants API in public preview. It works in the same way as the OpenAI Assistants API while being able to use it with Azure OpenAI models, deployed to a region of your choice.

The goal of the Assistants API is to make it easier for developers to create applications with copilot-like experiences. It should be easier to provide the assistant with extra knowledge or allow the assistant to interact with the world by calling external APIs.

If you have ever created a chat-based copilot with the standard Azure OpenAI chat completions API, you know that it is stateless. It does not know about the conversation history. As a developer, you have to maintain and manage conversation history and pass it to the completions API. With the Assistants API, that is not necessary. The API is stateful. Conversation history is automatically managed via threads. There is no need to manage conversation state to ensure you do not break the model’s context window limits.

In addition to threads, the Assistants API also supports tools. One of these tools is Code Interpreter, a sandboxed Python environment that can help solving complex questions. If you are a ChatGPT Plus subscriber, you should know that tool already. Code Interpreter is often used to solve math questions, something that LLMs are not terribly good at. However, it is not limited to math. Next to Code Interpreter, you can define your own functions. A function could call an API that queries a database that returns the results to the assistant.

Before diving into a code example you should understand the following components:

  • Assistant: custom AI with Azure OpenAI models that have access to files and tools
  • Thread: conversation between the assistant and the user
  • Message: message created by the assistant or a user; a message does not have to be text; it could be an image or a file; messages are stored on a thread
  • Run: you run a thread to illicit a response from the model; for instance if you just placed a user question on the thread and you run the thread, the model can respond with text or perform a tool call
  • Run Step: detailed list of steps the assistant took as part of a run; this could include a tools call

Enough talk, let’s look at some code. The code can be found on GitHub in a Python notebook: https://github.com/gbaeke/azure-assistants-api/blob/main/getting-started.ipynb

Initialising the OpenAI client and creating the assistant

We will use a .env file to load the Azure OpenAI API key, the endpoint and the API version. You will need an Azure OpenAI resource in a supported region such as Sweden Central. The API version should be 2024-02-15-preview.

import os
from dotenv import load_dotenv
from openai import AzureOpenAI

load_dotenv()

# Create Azure OpenAI client
client = AzureOpenAI(
    api_key=os.getenv('AZURE_OPENAI_API_KEY'),
    azure_endpoint=os.getenv('AZURE_OPENAI_ENDPOINT'),
    api_version=os.getenv('AZURE_OPENAI_API_VERSION')
)

assistant = client.beta.assistants.create(
    name="Math Tutor",
    instructions="""You are a math tutor that helps users solve math problems. 
    You have access to a sandboxed environment for writing and testing code. 
    Explain to the user why you used the code and how it works
    """,
    tools=[{"type": "code_interpreter"}],
    model="gpt-4-preview" # ensure you have a deployment in the region you are using
)

Above, we create an assistant with the client.beta.assistant.create method. Indeed, OpenAI Assistants as developed by OpenAI are still in beta so the OpenAI library reflects that.

Note that an assistant is given specific instructions and, in this case, a tool. We will use the built-in Code Interpreter tool. It can help us solving math questions, including the generation of plots.

Ensure that the model refers to a deployed model in your region. I use the gpt-4-turbo preview here.

Note that the assistants you create are shown in the Azure OpenAI Assistant Playground. For example, I created the Math Assistant a few times by running the same code:

Assistants in Azure Open AI Studio

When you click on one of the assistants, it opens in the Assistant Playground. In that playground, you can start chatting right away. For example:

Chatting with the Assistant

In the screenshot above, I have asked the assistant to plot a sinus wave. It explains how it did that because that is what the Instructions tell the assistant to do. At the end, Code Interpreter creates the plot and generates an image file. That image file is picked up in the playground and displayed.

Also note the panel on the right with API instructions. You can click on those instructions to execute them and see the JSON response.

Note that you can reuse an assistant by simply using its id. You can also create the assistant directly in the portal. You do not have to create it in code, like we are doing.

Let’s now create a thread in code and ask some math questions.

Creating a thread and adding a message

Below, a thread is created which results in a thread id. Subsequently, a message is added to the thread with role set to user. This is the first user question in the thread.

# Create a thread
thread = client.beta.threads.create()

# print the thread id
print("Thread id: ", thread.id)

message = client.beta.threads.messages.create(
    thread_id=thread.id,
    role="user",
    content="Solve the equation y = x^2 + 3 for x = 3 and plot the function graph."
)

# Show the messages
thread_messages = client.beta.threads.messages.list(thread.id)
print(thread_messages.model_dump_json(indent=2))

The JSON dump of the messages contains a data array. In our case the single item in the data array contains a content array next to other information such as role, the thread id, the creation timestamp and more. The content array can contain multiple pieces of content of different types. In this case, we simply have the user question which is of type text.

"content": [
        {
          "text": {
            "annotations": [],
            "value": "Solve the equation y = x^2 + 3 for x = 3 and plot the function graph."
          },
          "type": "text"
        }
      ]

Running the thread

A message on a thread is great but does not do all that much. We want a response from the assistant. In order to get a response, we need to run the thread:

run = client.beta.threads.runs.create(
  thread_id=thread.id,
  assistant_id=assistant.id
)

status = run.status

while status not in ["completed", "cancelled", "expired", "failed"]:
    time.sleep(2)
    run = client.beta.threads.runs.retrieve(thread_id=thread.id,run_id=run.id)
    status = run.status
    print(f'Status: {status}')
    clear_output(wait=True)

print(f'Status: {status}')

The run is where the assistant and the thread come together via their ids. As you can probably tell, the run does not directly return the result. You need to check the run status yourself and act accordingly.

When the status is completed, the run was successful. That means that there should be some response from the assistant.

Interpreting the messages after the run

After a completed run in response to a message with role = user, there should be a response from the model. There are all sorts of responses, including responses that indicate you should run a function. Our assistant does not have custom functions defined so the response can be one of the following:

  • a response from the model without using Code Interpreter
  • a response from the model, interpreting the response from Code Interpreter and possibly including images and text

Note that you do not have to call Code Interpreter specifically. The assistant will decide to use Code Interpreter (you can also be explicit) and use the Code Interpreter response in its final answer.

The code below shows one way of dealing with the assistant response:

messages = client.beta.threads.messages.list(
    thread_id=thread.id
)

messages_json = json.loads(messages.model_dump_json())

for item in reversed(messages_json['data']):
    # Check the content array
    for content in reversed(item['content']):
        # If there is text in the content array, print it as Markdown
        if 'text' in content:
            display(Markdown(content['text']['value']))
        # If there is an image_file in the content, print the file_id
        if 'image_file' in content:
            file_id = content['image_file']['file_id']
            file_content = client.files.content(file_id)
            # use PIL with the file_content
            img = Image.open(file_content)
            img = img.resize((400, 400))
            display(img)

Above, the following happens:

  • all messages from the thread are retrieved: this includes the original user question in addition to the assistant response; the later responses are first in the array
  • we loop through the reversed array and check for a content field: if there is a content field (an array) we loop over that and check for a text or image_file field
  • if we find content of type text, we display it with markdown (we are using a Notebook here)
  • if we find content of type image_file, we retrieve the image from Azure OpenAI using its files API and display it in the notebook with some help of PIL.

Here is the response I got in my notebook. Note that there are only two messages. The assistant response contains two pieces of content.

All messages in the thread visualised from 1st to last

Follow-up questions

One of the advantages of the Assistants API is that we do not have to maintain chat history. We only have to add follow-up questions to the thread and run it again. Below is the model response after adding this question: “Is this a concave function?”:

Response to a follow-up question

Above, I print the entire thread in reverse order again. The answer of the assistant is that this is clearly not a concave function but a convex one.

You should know that at present (February 2024), the Assistants API simply tries to fit the messages in the model’s context window. If the context window is large, long conversations might cost you a lot in tokens. At present, there is no way that I know of to change this mechanism. OpenAI, and Microsoft, are planning to add some extra capabilities. For example:

  • control token count regardless of the chosen model (e.g. set token count to 2000 even if the model allows for 8000)
  • generate summaries of previous messages and pass the summaries as context during a thread run

In most production applications that are used at scale, you really need to control token usage by managing chat history meticulously. Today, that is only possible with the chat completions API and/or abstractions on top of it like LangChain.

Conclusion

With the arrival of the Assistants API in Azure OpenAI, it is easier to write assistants that work with tools like Code Interpreter or custom functions. This post has focused on the basics of using the API with only the Code Interpreter tool.

In follow-up posts, we will look at custom functions and how to work with uploaded files.

Keep in mind that this is all in public preview and should not be used in production.

Writing your first flow with Prompt Flow in Visual Studio Code

In this blog post, we will create a flow with Prompt Flow in Visual Studio Code. Prompt Flow is a suite of development tools to build LLM-based AI applications. It tries to cover the end-to-end development cycle, including prototyping, testing and deployment to production.

In Prompt Flow, you create flows. Flows link LLMs (large language models), prompts and tools together in an executable workflow. An example of such a flow is show below:

Sample flow

The flow above (basically a distributed acyclical graph – DAG – of functions) sends its input, a description to search for an image, to a tool that embeds the description with an Azure OpenAI embedding model. The embedding is used as input to a Python tool that does a similarity search in Azure AI Search. The search returns three results. The original input, together with the query results, are subsequently handed to an LLM (above, the final_result node) that hopefully picks the correct image url.

Although you could write your own API that does all of the above, Prompt Flow allows you to visually build, run and debug a flow that has input and output. When you are happy with the flow, you can convert it to an API. One of the ways to host the API is via a container.

We will build this flow on our local machine and host it as a container. Note that Prompt Flow can also be used from the portal using Azure Machine Learning or Azure AI Studio.

👉 Another blog post will describe how to build and run the container

Installing Prompt Flow on your machine

To install Prompt Flow you will need Python on your machine. Use Python 3.9 or higher. I use Python 3.11 on an Apple M2. Check the full installation instructions here. Without using a Python virtual environment, you can just run the following command to install Prompt Flow:

pip install promptflow promptflow-tools

Next, run pf -v to check the installation.

⚠️ Do not forget to install promptflow-tools because it enables the embedding tool, llm tool and other tools to be used as nodes in the flow; also ensure this package is installed in the container image that will be created for this flow

In Visual Studio Code, install the Prompt flow for VS Code extension. It has the VS Code Python Extension as a prerequisite. Be sure to check the Prompt Flow Quick Start for full instructions.

We will mainly use the Visual Code extension. Note that the pf command can be used to perform many of the tasks we will discuss below (e.g, creating connections, running a flow, etc…).

Creating an empty flow

In VS Code, ensure you opened an empty folder or create a new folder. Right click and select New flow in this directory. You will get the following question:

Flow selection

Select Empty Flow. This creates a file called flow.dag.yaml with the following content:

Empty flow.dag.yaml

If you look closely, you will see a link to open a Visual editor. Click that link:

Visual editor with empty input and output and blank canvas

We can now add input(s) and output(s) and add the nodes in between.

Inputs and outputs

Inputs have a type and a value. Add a string input called description:

One string input: a description (of an image, like creature or fruit)

When you later run the flow, you can type the description in the Value textbox. When the flow is converted to an API, the API will except a description in the POST body.

Next, add an output called url. In the end, the flow returns a url to an image that matches the description:

One output: the url to a matching image

The value of the output will be the coming from another node. We still have to add those. If you click the Value dropdown list, you will only be able to select the input value for now. You can do that and click the run icon. Save your flow before running it.

Running the flow with output set to the input

When you click the run button, a command will be run in the terminal that runs the flow:

python3 -m promptflow._cli._pf.entry flow test --flow /Users/geertbaeke/projects/promptflow/images/blogpost --user-agent "prompt-flow-extension/1.6.0 (darwin; arm64) VSCode/1.85.0"

The output of this command is:

Output of the flow is JSON, here with just the url

Although this is not very useful, the flow runs and produces a result. The output is our input. We can now add nodes to do something useful.

Creating an embedding from the description

We need to embed the description to search for similar descriptions in an Azure AI Search index. If you are not sure what embeddings are, check Microsoft Learn for a quick intro. It short, it’s a bunch of numbers that represents the meaning of a piece of text. We can use the numbers of the description to compare it to the sets of numbers of image descriptions to see how close they are.

To create an embedding, we need access to an Azure OpenAI embedding model. Such a model takes text as input and returns the bunch of numbers we talked about. This model returns 1536 numbers, aka dimensions.

To use the model, we will need an Azure OpenAI resource’s endpoint and key. If you do not have an Azure OpenAI resource in Azure, create one and deploy the text-embedding-ada-002 model. In my example, the deployment is called embedding:

Embedding model in Azure OpenAI

With the Azure resources created, we can add a connection in Prompt Flow that holds the OpenAI endpoint and key:

Click the Prompt Flow extension icon and click + next to Azure OpenAI in the Connections section:

Azure OpenAI connection

A document will open that looks like the one below:

Connection information

Fill in the name and api_base only. The api_base is the https url to your Azure OpenAI instance. It’s something like https://OPENAIRESOURCENAME.openai.azure.com/. Do not provide the api_key. When you click Create connection (the smallish link at the bottom), you will be asked for the key.

After providing the key, the connection should appear under the Azure OpenAI section. You will need this connection in the embedding tool to point to the embedding model to use.

In the Prompt Flow extension pane, now click + next to Embedding in the TOOLS section:

Embedding tool

You will be asked for the tool’s name (top of VS Code window). Provide a name (e.g, embedding) and press enter. Select the connection you just created, the deployment name of your embedding model and the input. The input is the description we configured in the flow’s input node. We want to embed that description. The output of this tool will be a list of floating point numbers, a vector, of 1536 dimensions.

Embedding tool

The moment you set the input of the embedding, the input node will be connected to the embedding node on the canvas. To check if embedding works, you can connect the output of the embedding node to the url output and run the flow. You should then see the vector as output. The canvas looks like:

Show the embedding as output

Of course, we will need to supply the embedding to a vector search engine, not to the output. In our case, that is Azure AI Search. Let’s try that…

⚠️ Instead of connecting the embedding to the output, you can simply debug the embedding by clicking the debug icon in the embedding tool. The tool will be executed with the value of the input. The result should be a bunch of numbers in your terminal:

Debug output of the embedding tool

Searching for similar images

This section is a bit more tricky because you need an Azure AI Search index that allows you to search for images using a description of an image. To create such an index, see https://atomic-temporary-16150886.wpcomstaging.com/2023/12/09/building-an-azure-ai-search-index-with-a-custom-skill/.

Although you can use a Vector DB Lookup tool that supports Azure AI Search, we will create a custom Python tool that does the same thing. The Python tool uses the azure-search-documents Python library to perform the search. Learning how to use Python tools is important to implement logic there is no specific tool for.

First, we will create a custom connection that holds the name of our Azure AI Search instance and a key to authenticate.

Similar to the Azure OpenAI connection, create a custom connection:

Custom connection

After clicking +, a document opens. Modify it as follows:

Custom connection content

Like before, set a name. In a custom connection, you can have configs and secrets. In configs add the Azure AI Search endpoint and index name. In the secrets set key to <user-input>. When you click Create connection, you will be asked to supply the key.

⚠️ Connection information is saved to a local SQLLite database in the .promtflow folder in your home folder

We can now add a Python tool. In TOOLS, next to Python click +. Give the tool a name and select new file. You should get a new Python file in your code with the filename set to <YOURTOOLNAME>.py. The code without comments is below:

from promptflow import tool

@tool
def my_python_tool(input1: str) -> str:
    return 'hello ' + input1

This tool takes a string input and returns a string. The @tool decorator is required.

We need to change this code to get the custom connection information, query Azure AI Search and return search results as a list. The code is below:

from promptflow import tool
from promptflow.connections import CustomConnection
from azure.core.credentials import AzureKeyCredential
from azure.search.documents import SearchClient
from azure.search.documents.models import VectorizedQuery

@tool
def my_python_tool(vector: list, ai_conn: CustomConnection) -> list:
    ai_conn_dict = dict(ai_conn)
    endpoint = ai_conn_dict['endpoint']
    key = ai_conn_dict['key']
    index = ai_conn_dict['index']

    # query azure ai search
    credential = AzureKeyCredential(key)
    client = SearchClient(endpoint=endpoint,
                          index_name=index,
                          credential=credential)
    vector_query = VectorizedQuery(vector=vector, k_nearest_neighbors=3, fields="textVector", exhaustive=True)
    results = client.search(
        search_text=None,
        vector_queries=[vector_query],
        select=["name", "description", "url"]
    )

    # convert results to json list
    results = [dict(result) for result in results]

    return results

The function has two parameters: a vector of type list to match the output of the embedding tool, and a variable of type CustomConnection. The custom connection can be converted to a dict to retrieve both the configs and the secret.

Next, we use the configs and secret to perform the query with a SearchClient. The query only returns three fields from our index: name, description and url. The result returned from Azure AI Search is converted to a list and returned.

When you save the Python file and go back to your flow, you should see the Python tool (aisearch) with the vector and ai_conn field. If not, click the regenerate link. Set it as below:

Python tool

The input to the Python tool is the output from the embedding tool. We also pass in the custom connection to provide the configs and key to the tool.

You can set the output of the entire flow (url) to the output of the Python tool to check the results of the search when you run the flow:

Running the flow with Python tool’s output as output

I ran the flow with a description equal to cat. A list of three JSON objects is returned.The first search result is the url to cat.jpg but there are other results as well (not shown above).

Adding an LLM tool

Although we could just pick the first result from the search, that would not work very well. Azure AI Search will always return a result, even if it does not make much sense. In a search for nearest neighbors, your nearest neighbor could be very far away! 😀

For example, if I search for person with a hat, I will get a result even though I do not have such a picture in my index. It simply finds vectors that are “closest” but semantically “far” away from my description. That is bound to happen with just a few images in the index.

An LLM can look at the original description and see if it matches one of the search results. It might pick the 3rd result if it fits better. It might also decide to return nothing if there is no match. In order to do so, we will need a good prompt.

Click + LLM at the top left of the flow to add an LLM tool:

Adding an LLM

Give the LLM tool a name and select new file. In the flow editor, set the LLM model information:

LLM settings

You can reuse the connection that was used for the embedding. Ensure you have deployed a chat model in your Azure OpenAI resource. I deployed gpt-4 and called the deployment gpt-4 as well. I also set temperature to 0.

The inputs of the node do not make much sense. We do not need chat history for instance. The inputs come from a .jinja2 file that was created for you. The file has the name of the LLM tool. Following the example above, the name is pick_result.jinja2. Open that file and replace it with the following contents and save it:

system:
You return the url to an image that best matches the user's question. Use the provided context to select the image. Only return the url. When no
matching url is found, simply return NO_IMAGE

user:
{{description}}

context : {{search_results}}

The file defines a system message to tell the LLM what to do. The input from the user is the description from the input node. We provide extra context to the LLM as well (the output from search). The {{…}} serve as placeholders to inject data into the prompt.

When you save the file and go back to the flow designer, you should see description and search_results as parameters. Set them as follows:

Inputs to the LLM node

In addition, set the output of the flow output node to the output of the LLM node:

Setting the output

Save your flow and run it. In my case, with a description of cat I get the following output:

Output is just a URL from the LLM node

It I use man with a hat as input, I get:

LLM did not find a URL to match the description

Using a prompt variant

Suppose we want to try a different prompt that returns JSON instead of text. To try that, we can create a prompt variant.

In the LLM node, click the variants icon:

Variants

You will see a + icon to create a new variant. Click it.

New variant

The variant appears under the original variant and is linked to a new file: pick_result_variant_1.jinja2. I have also set the variant as default. Let’s click the new file to open it. Add the following prompt:

system:
You return the url to an image that best matches the user's question. Use the provided context to select the image. 
Return the url and name of the file as JSON. Here is an example of a response. Do not use markdown in the response. Use pure JSON.
{
  "url": "http://www.example.com/images/1.jpg",
  "name": "1.jpg"
}

If there is not matching image, return an empty string in the JSON:
{
  "url": ""
}

user:
{{description}}

context : {{search_results}}

This prompt should return JSON instead of just the url or NO_IMAGE. To test this, run the flow and select Use default variant for all nodes. When I run the flow with description cat, I get the following output:

JSON output

Because the flow’s output is already JSON, the string representation of the JSON result is used. Adding an extra Python tool that parses the JSON and outputs both the URL and file name might be a good idea here.

You can modify and switch between the prompts and see which one works best. This is especially handy when you are prototyping your flow.

Conclusion

On your local machine, Prompt Flow is easy to install and get started with. In this post we built a relatively simple flow that did not require a lot of custom code. We also touched on using variants, to test different prompts and their outcome.

In a follow-up post, we will take a look at turning this flow into a container. Stay tuned! 📺

Finding images with text and image queries with the help of GPT-4 Vision

With the gpt-4-vision-preview model available at OpenAI, it was time to build something with it. I decided to use it as part of a quick solution that can search for images with text, or by providing a similar image.

We will do the following:

  • Describe a collection of images. To generate the description, GPT-4 Vision is used
  • Create a text embedding of the description with the text-embedding-ada-002 model
  • Create an image embedding using the vectorizeImage API, part of Azure AI Computer Vision
  • Save the description and both embeddings to an Azure AI Search index
  • Search for images with either text or a similar image

The end result should be that when I search for desert plant, I get an image of a cactus or similar plant. When I provide a picture of an apple, I should get an apple or other fruit as a result. It’s basically Google image and reverse image search.

Let’s see how it works and if it is easy to do. The code is here: https://github.com/gbaeke/vision. The main code is in a Jupyter notebook in the image_index folder.

A word on vectors and vectorization

When we want to search for images using text or find similar images, we use a technique that involves turning both text and images into a form that a computer can understand easily. This is done by creating vectors. Think of vectors as a list of numbers that describe the important parts of a text or an image.

For text, we use a tool called ‘text-embedding-ada-002’ which changes the words and sentences into a vector. This vector is like a unique fingerprint of the text. For images, we use something like Azure’s multi-modal embedding API, which does the same thing but for pictures. It turns the image into a vector that represents what’s in the picture.

After we have these vectors, we store them in a place where they can be searched. We will use Azure AI Search. When you search, the system looks for the closest matching vectors – it’s like finding the most similar fingerprint, whether it’s from text or an image. This helps the computer to give you the right image when you search with words or find images that are similar to the one you have.

Getting a description from an image

Although Azure has Computer Vision APIs to describe images, GPT-4 with vision can do the same thing. It is more flexible and easier to use because you have the ability to ask for what you want with a prompt.

To provide an image to the model, you can provide a URL or the base64 encoding of an image file. The code below uses the latter approach:

def describe_image(image_file: str) -> str:
    with open(f'{image_file}', 'rb') as f:
        image_base64 = base64.b64encode(f.read()).decode('utf-8')
        print(image_base64[:100] + '...')

    print(f"Describing {image_file}...")

    response = client.chat.completions.create(
        model="gpt-4-vision-preview",
        messages=[
            {
            "role": "user",
            "content": [
                {"type": "text", "text": "Describe the image in detail"},
                {
                "type": "image_url",
                "image_url": {
                    "url": f"data:image/jpeg;base64,{image_base64}",
                },
                },
            ],
            }
        ],
        max_tokens=500,  # default max tokens is low so set higher
    )

    return response.choices[0].message.content

As usual, the OpenAI API is very easy to use. Above, we open and read the image and base64-encode it. The base64 encoded file is provided in the url field. A simple prompt is all you need to get the description. Let’s look at the result for the picture below:

The generated description is below:

The image displays a single, healthy-looking cactus planted in a terracotta-colored pot against a pale pink background. The cactus is elongated, predominantly green with some modest blue hues, and has evenly spaced spines covering its surface. The spines are white or light yellow, quite long, and arranged in rows along the cactus’s ridges. The pot has a classic, cylindrical shape with a slight lip at the top and appears to be a typical pot for houseplants. The overall scene is minimalistic, with a focus on the cactus and the pot due to the plain background, which provides a soft contrast to the vibrant colors of the plant and its container.

Description generated by GPT-4 Vision

Embedding of the image

To create an embedding for the image, I decided to use Azure’s multi-modal embedding API. Take a look at the code below:

def get_image_vector(image_path: str) -> list:
    # Define the URL, headers, and data
    url = "https://AI_ACCOUNT.cognitiveservices.azure.com//computervision/retrieval:vectorizeImage?api-version=2023-02-01-preview&modelVersion=latest"
    headers = {
        "Content-Type": "application/octet-stream",
        "Ocp-Apim-Subscription-Key": os.getenv("AZURE_AI_KEY")
    }

    with open(image_path, 'rb') as image_file:
        # Read the contents of the image file
        image_data = image_file.read()

    print(f"Getting vector for {image_path}...")

    # Send a POST request
    response = requests.post(url, headers=headers, data=image_data)

    # return the vector
    return response.json().get('vector')

The code uses an environment variable to get the key to an Azure AI Services multi-service endpoint. Check the README.md in the repository for a sample .env file.

The API generates a vector with 1024 dimensions. We will need that number when we create the Azure AI Search index.

Note that this API can accept a url or the raw image data (not base64-encoded). Above, we provide the raw image data and set the Content-Type properly.

Generating the data to index

In the next step, we will get all .jpg files from a folder and do the following:

  • create the description
  • create the image vector
  • create the text vector of the description

Check the code below for the details:

# get all *.jpg files in the images folder
image_files = [file for file in os.listdir('./images') if file.endswith('.jpg')]

# describe each image and store filename and description in a list of dicts
descriptions = []
for image_file in image_files:
    try:
        description = describe_image(f"./images/{image_file}")
        image_vector = get_image_vector(f"./images/{image_file}")
        text_vector = get_text_vector(description)
        
        descriptions.append({
            'id': image_file.split('.')[0], # remove file extension
            'fileName': image_file,
            'imageDescription': description,
            'imageVector': image_vector,
            'textVector': text_vector
        })
    except Exception as e:
        print(f"Error describing {image_file}: {e}")

# print the descriptions but only show first 5 numbers in vector
for description in descriptions:
    print(f"{description['fileName']}: {description['imageDescription'][:50]}... {description['imageVector'][:5]}... {description['textVector'][:5]}...")

The important part is the descriptions list, which is a list of JSON objects with fields that match the fields in the Azure AI Search index we will build in the next step.

The text vector is calculated with the get_text_vector function. It uses OpenAI’s text-embedding-ada-002 model.

Building the index

The code below uses the Azure AI Search Python SDK to build and populate the index in code. You.will need an AZURE_AI_SEARCH_KEY environment variable to authenticate to your Azure AI Search instance.

def blog_index(name: str):
    from azure.search.documents.indexes.models import (
        SearchIndex,
        SearchField,
        SearchFieldDataType,
        SimpleField,
        SearchableField,
        VectorSearch,
        VectorSearchProfile,
        HnswAlgorithmConfiguration,
    )

    fields = [
        SimpleField(name="Id", type=SearchFieldDataType.String, key=True), # key
        SearchableField(name="fileName", type=SearchFieldDataType.String),
        SearchableField(name="imageDescription", type=SearchFieldDataType.String),
        SearchField(
            name="imageVector",
            type=SearchFieldDataType.Collection(SearchFieldDataType.Single),
            searchable=True,
            vector_search_dimensions=1024,
            vector_search_profile_name="vector_config"
        ),
        SearchField(
            name="textVector",
            type=SearchFieldDataType.Collection(SearchFieldDataType.Single),
            searchable=True,
            vector_search_dimensions=1536,
            vector_search_profile_name="vector_config"
        ),

    ]

    vector_search = VectorSearch(
        profiles=[VectorSearchProfile(name="vector_config", algorithm_configuration_name="algo_config")],
        algorithms=[HnswAlgorithmConfiguration(name="algo_config")],
    )
    return SearchIndex(name=name, fields=fields, vector_search=vector_search)

#  create the index
from azure.core.credentials import AzureKeyCredential
from azure.search.documents import SearchClient
from azure.search.documents.indexes import SearchIndexClient
from azure.search.documents.models import VectorizedQuery

service_endpoint = "https://YOUR_SEARCH_INSTANCE.search.windows.net"
index_name = "image-index"
key = os.getenv("AZURE_AI_SEARCH_KEY")

index_client = SearchIndexClient(service_endpoint, AzureKeyCredential(key))
index = blog_index(index_name)

# create the index
try:
    index_client.create_index(index)
    print("Index created")
except Exception as e:
    print("Index probably already exists", e)

The code above creates an index with some string fields and two vector fields:

  • imageVector: 1024 dimensions (as defined by the Azure AI Computer Vision image embedder)
  • textVector: 1536 dimensions (as defined by the OpenAI embedding model)

Although not specified in the code, the index will use cosine similarity to perform similarity searches. It’s the default. It will return approximate nearest neighbour (ANN) results unless you create a search client that uses exhaustive search. An exhaustive search searches the entire vector space. The queries near the end of this post use the exhaustive setting.

When the index is created, we can upload documents:

# now upload the documents
try:
    search_client = SearchClient(service_endpoint, index_name, AzureKeyCredential(key))
    search_client.upload_documents(descriptions)
    print("Documents uploaded successfully")
except Exception as e:
    print("Error uploading documents", e)

The upload_documents method uploads the documents in the descriptions Python list to the search index. The upload is actually an upsert. You can run this code multiple times without creating duplicate documents in the index.

Search images with text

To search an image with a text description, a vector query on the textVector is used. The function below takes a text query string as input, vectorizes the query, and performs a similarity search returning the first nearest neighbour. The function displays the description and the image in the notebook:

# now search based on text
def single_vector_search(query: str):
    vector_query = VectorizedQuery(vector=get_text_vector(query), k_nearest_neighbors=1, fields="textVector", exhaustive=True)

    results = search_client.search(
        vector_queries=[vector_query],
        select=["fileName", "imageDescription"],
        
    )

    for result in results:
        print(result['fileName'], result["imageDescription"], sep=": ")

        # show the image
        from IPython.display import Image
        display(Image(f"./images/{result['fileName']}"))
    
single_vector_search("desert plant")

The code searches for an image based on the query desert plant. It returns the picture of the cactus shown earlier. Note that if you search for something there is no image for, like blue car, you will still get a result because we always return a nearest neighbor. Even if your nearest neighbor lives 100km away, it’s still your nearest neighbor. 😀

Return similar images

Since our index contains an image vector, we can search for images similar to a vector of a reference image. The function below takes an image file path as input, calculates the vector for that image, and performs a nearest neighbor search. The function displays the description and image of each document returned. In this case, the code returns two similar documents:

def image_search(image_file: str):

    vector_query = VectorizedQuery(vector=get_image_vector(image_file), k_nearest_neighbors=2, fields="imageVector", exhaustive=True)

    results = search_client.search(
        vector_queries=[vector_query],
        select=["fileName", "imageDescription"],
    )

    for result in results:
        print(result['fileName'], result["imageDescription"], sep=": ")

        # show the image
        from IPython.display import Image
        display(Image(f"./images/{result['fileName']}"))
 
# get vector of another image and find closest match
image_search('rotten-apple.jpg')
image_search('flower.jpeg')

At the bottom, the function is called with filenames of pictures that contain a rotten apple and a flower. The result of the first query is a picture of the apple and banana. The result of the second query is the cactus and the rose. You can debate whether the cactus should be in the results. Some cacti have flowers but some don’t. 😀

Conclusion

The GPT-4 Vision API, like most OpenAI APIs, is very easy to use. In this post, we used it to generate image descriptions to build a simple query engine that can search for images via text or a reference image. Together with their text embedding API and Microsoft’s multi-modal embedding API to create an image embedding, it is relatively straightforward to build these type of systems.

As usual, this is a tutorial with quick sample code to illustrate the basic principle. If you need help building these systems in production, simply reach out. Help is around the corner! 😉