Super fast bot creation with Copilot Studio and the Azure OpenAI Assistants API

In a previous post, I discussed the Microsoft Bot Framework SDK that provides a fast track to deploying intelligent bots with the help of the Assistants API. Yet, the journey doesn’t stop there. Copilot Studio, a low-code tool, introduces an even more efficient approach, eliminating the need for intricate bot coding. It empowers developers to quickly design and deploy bots, focusing on functionality over coding complexities.

In this post, we will combine Copilot Studio with the Assistants API. But first, let’s take a quick look at the basics of Copilot Studio.

Copilot Studio

Copilot Studio, known before as Power Virtual Agents, is part of Microsoft’s Power Platform. It allows anyone to create a bot fast with it’s intent-based authoring experience. To try it out, just click the Try Free button on the Copilot Studio web page.

Note: I will not go into licensing here. I do not have a Phd in Power Platform Licensing yet! 😉

When you create a new bot, you will get the screen below:

New bot creation screen

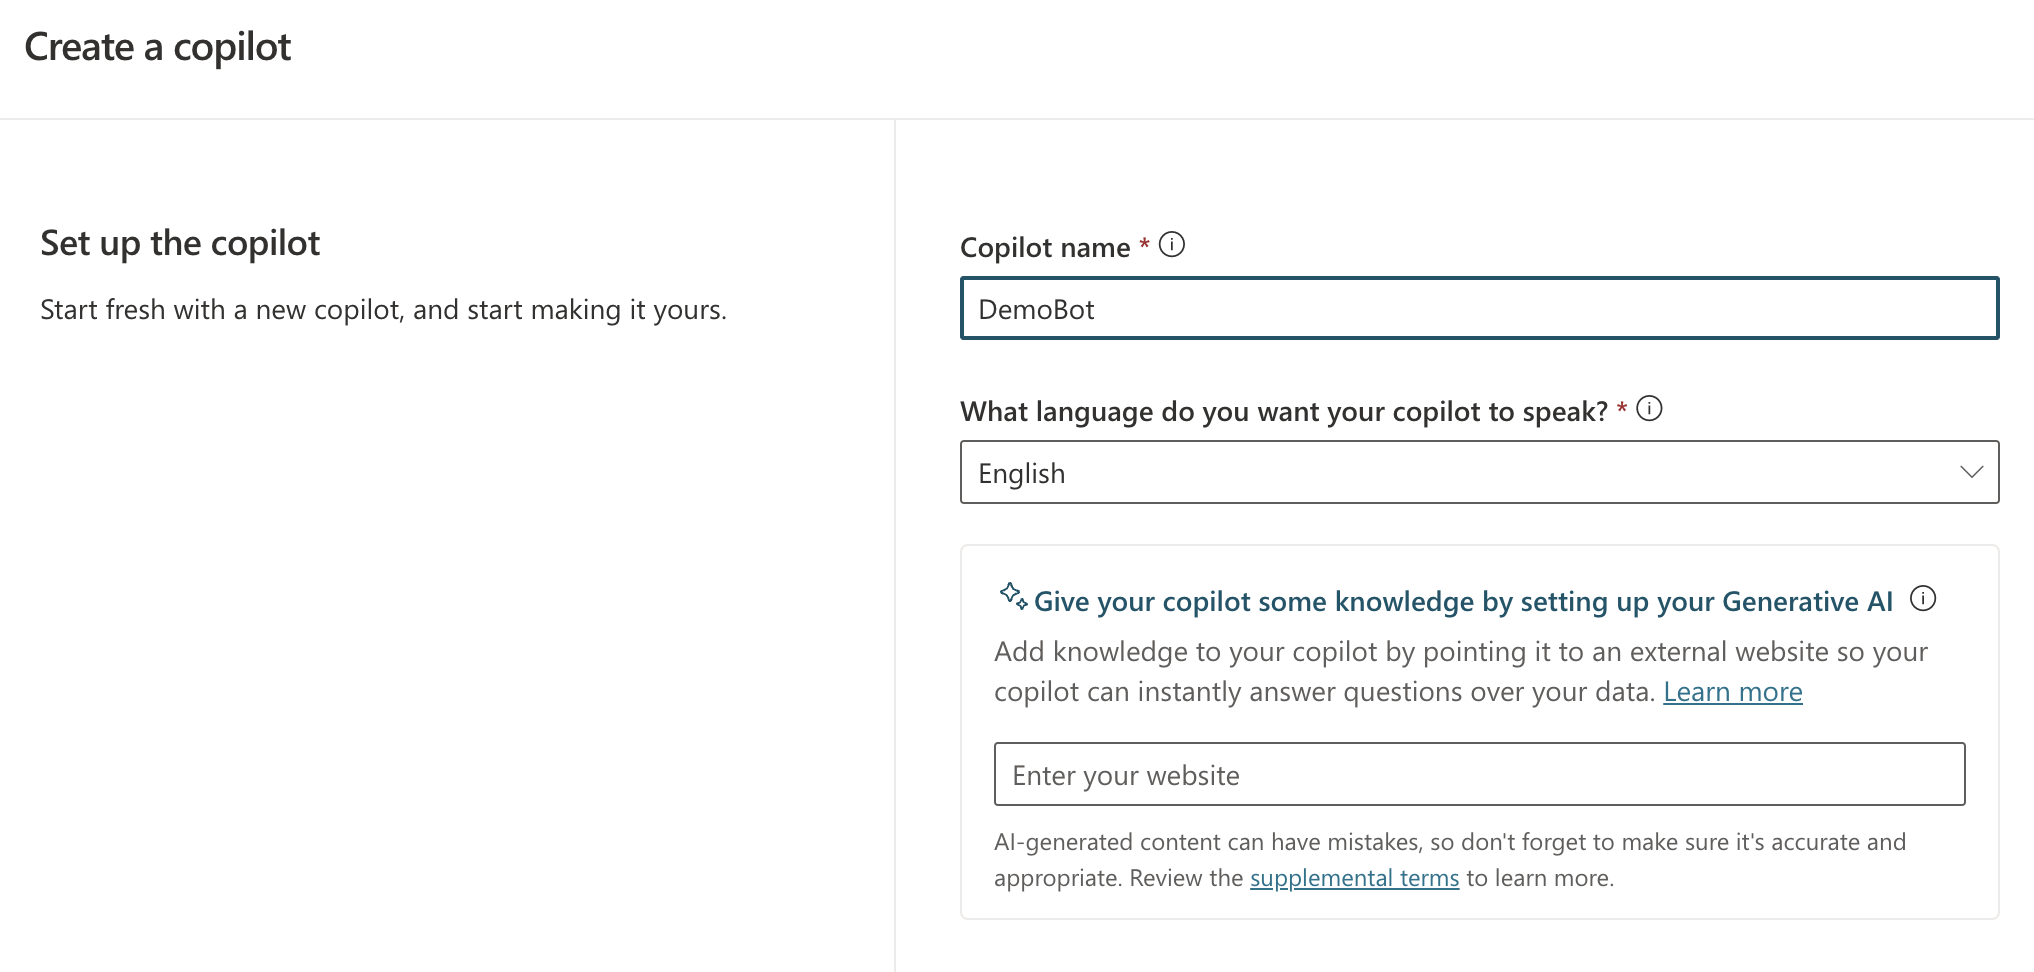
You simply give your bot a name and a language. Right from the start, you can add Generative AI capabilities by providing a website URL. If that website is searchable by Bing, users can ask questions about content on that website.

However, this does not mean Copilot Studio can carry a conversation like ChatGPT. It simply means that, when Copilot Studio cannot identify an intent, it will search the website for answers and provide the answer to you. You can ask follow-up questions but it’s not a full ChatGPT experience. For example, you cannot say “Answer the following questions in bullet style” and expect the bot to remember that. It will simply throw an error and try to escalate you to a live agent after three tries.

Note: this error & escalate mechanism is a default; you can change that if you wish

So what is an intent? If you look at the screenshot below, you will see some out of the box topics available to your bot.

Topics and Plugins screen

Above, you see a list of topics and plugins. I have not created any plugins so there are only topics: regular topics and system topics. Whenever you send a message, the system tries to find out what your intent is by checking matching phrases defined in a trigger.

If you click on the Greeting topic, you will see the following:

Greeting topic (click to enlarge)

This topic is triggered by a number of phrases. When the user sends a message like Hi!, that message will match the trigger phrases (intent is known). A response message will be sent back: “Hello, how can I help you today?”.

It’s important to realise that no LLM (large language model) is involved here. Other machine learning stuff is at play here.

The behaviour is different when I send a message that is not matched to any of the topics. Because I setup the bot with my website (https://atomic-temporary-16150886.wpcomstaging.com), the following happens when I ask: “What is the OpenAI Assistants API?”

Generative Answers from https://atomic-temporary-16150886.wpcomstaging.com

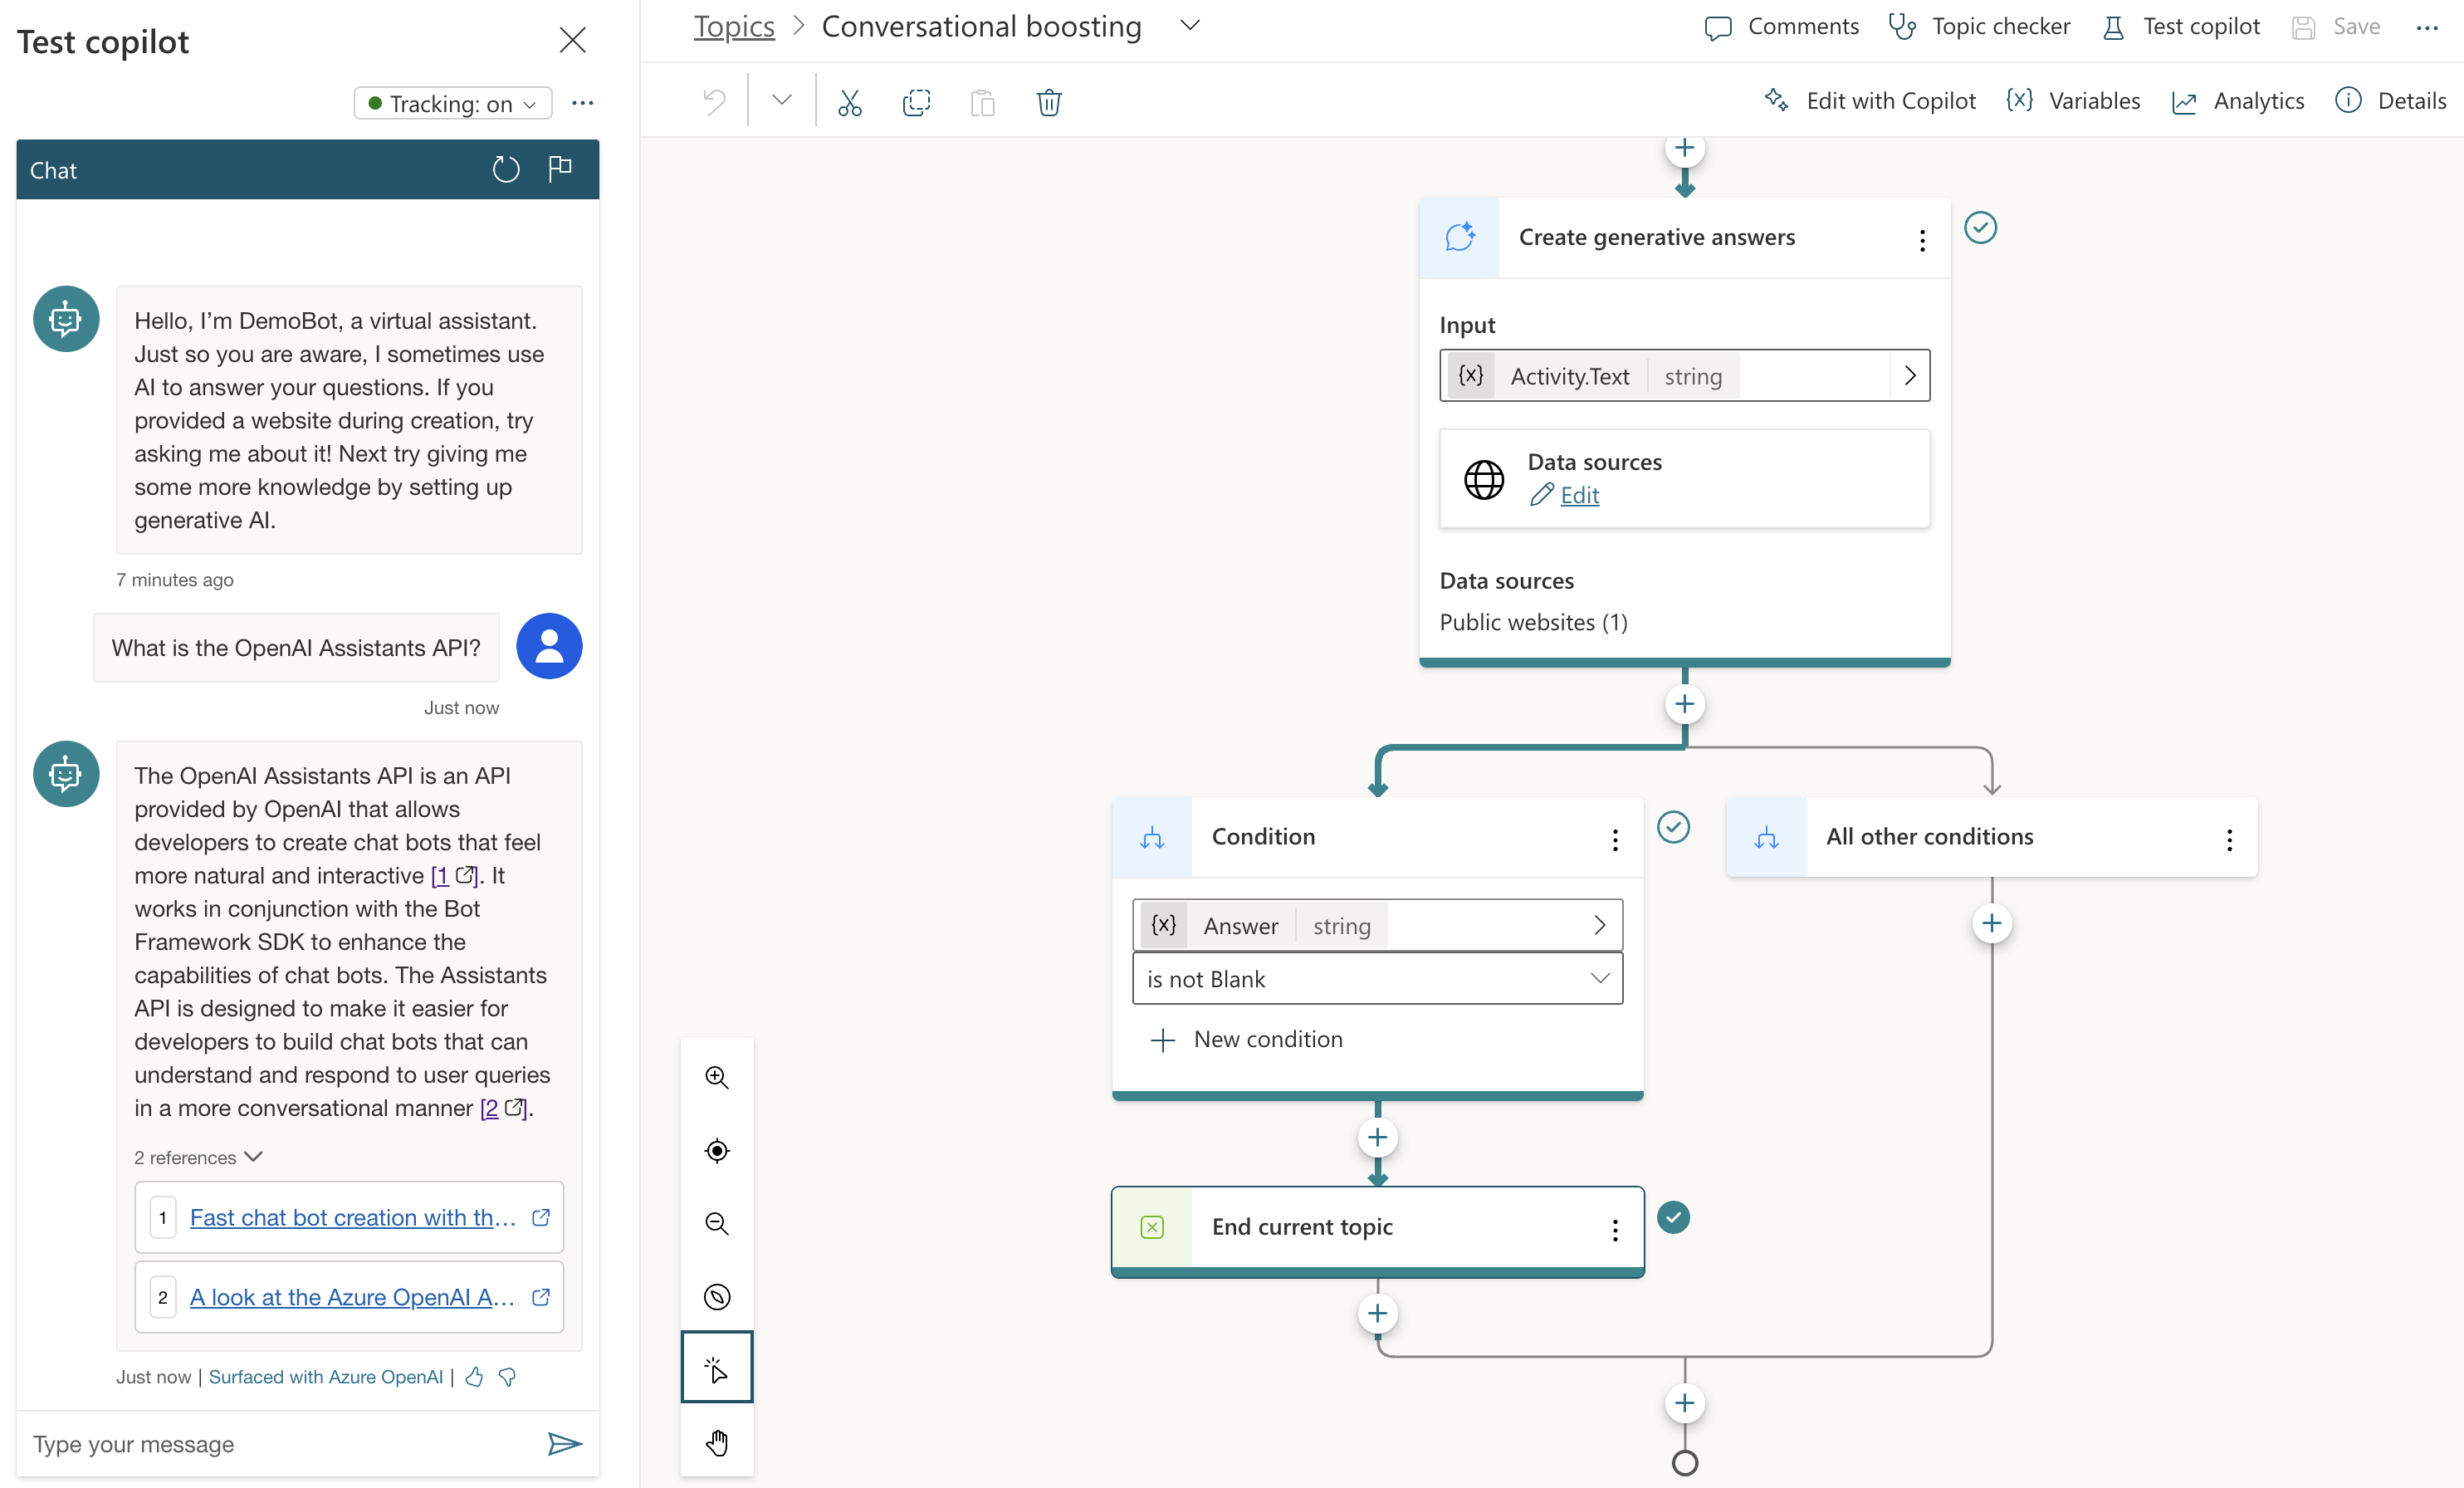
Check the topic above. We are in the Conversational Boosting topic now. It was automatically created when I added my website in the Generative Answers section during creation:

Boosting topic triggered when intent in not knowsn

If you look closely, you will notice that the trigger is set to On Unknown Intent. This means that this topic is used whenever you type something that cannot be matched to other topics. Behind the scenes, the system searches the website and returns a summary of the search to you, totally driven by Azure OpenAI. You do not need an Azure OpenAI resource to enable this.

This mixing and matching of intents is interesting in several ways:

  • you can catch specific intents and answer accordingly without using an OpenAI model: for example, when a user wants to book a business trip, you can present a form which will trigger an API that talks to an internal booking system
  • to answer from larger knowledge bases, you can add either use a catch-all such as the Conversational Boosting topic or even use custom intents that use the Create Generative Answers node to go to any supported data source

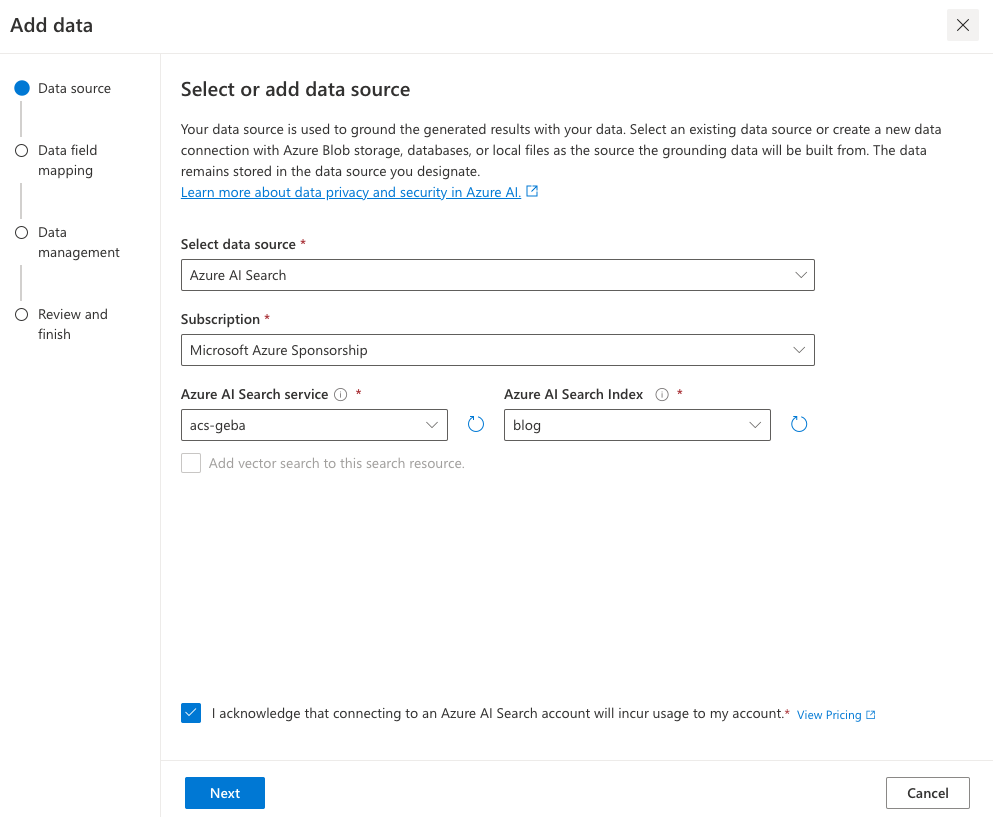
Besides web sites, other data sources are supported such as SharePoint, custom documents or even Azure OpenAI Add your data.

What we want to do is different. We want to use Copilot Studio to provide a full ChatGPT experience. We will not need Generative Answers to do so. Instead, we will use the OpenAI Assistants API behind the scenes.

Copilot Studio and Azure OpenAI Assistants

We want to achieve the following:

  • When a new conversation is started: create a new tread
  • When the user sends a message: add the message to the thread, run the thread and send the response back to Copilot Studio.
  • When the user asks to start over, start a new conversation which starts a new thread

One way of doing this, is to write a small API that can create a thread and add messages to it. Here’s the API I wrote using Python FastAPI:

from fastapi import FastAPI, Depends, HTTPException, status
from fastapi.security.api_key import APIKeyHeader, APIKey
from pydantic import BaseModel
import logging
import uvicorn
from openai import AzureOpenAI
from dotenv import load_dotenv
import os
import time
import json

load_dotenv("../.env")

# Configure logging
logging.basicConfig(level=logging.INFO)
logger = logging.getLogger(__name__)

# Define API key header; set it in ../.env
API_KEY = os.getenv("API_KEY")

# Check for API key
if API_KEY is None:
    raise ValueError("API_KEY environment variable not set")

API_KEY_NAME = "access_token"
api_key_header = APIKeyHeader(name=API_KEY_NAME, auto_error=True)

async def get_api_key(api_key_header: str = Depends(api_key_header)):
    if api_key_header == API_KEY:
        return api_key_header
    else:
        raise HTTPException(
            status_code=status.HTTP_403_FORBIDDEN, detail="Could not validate credentials"
        )

app = FastAPI()

# Pydantic models
class MessageRequest(BaseModel):
    message: str
    thread_id: str

class MessageResponse(BaseModel):
    message: str

class ThreadResponse(BaseModel):
    thread_id: str

# set the env vars below in ../.env
client = AzureOpenAI(
    api_key=os.getenv('AZURE_OPENAI_API_KEY'),
    azure_endpoint=os.getenv('AZURE_OPENAI_ENDPOINT'),
    api_version=os.getenv('AZURE_OPENAI_API_VERSION')
)

# this refers to an assistant without functions
assistant_id = "asst_fRWdahKY1vWamWODyKnwtXxj"

def wait_for_run(run, thread_id):
    while run.status == 'queued' or run.status == 'in_progress':
        run = client.beta.threads.runs.retrieve(
                thread_id=thread_id,
                run_id=run.id
        )
        time.sleep(0.5)

    return run

# Example endpoint using different models for request and response
@app.post("/message/", response_model=MessageResponse)
async def message(item: MessageRequest, api_key: APIKey = Depends(get_api_key)):
    logger.info(f"Message received: {item.message}")

    # Send message to assistant
    message = client.beta.threads.messages.create(
        thread_id=item.thread_id,
        role="user",
        content=item.message
    )

    run = client.beta.threads.runs.create(
        thread_id=item.thread_id,
        assistant_id=assistant_id # use the assistant id defined aboe
    )

    run = wait_for_run(run, item.thread_id)

    if run.status == 'completed':
        messages = client.beta.threads.messages.list(limit=1, thread_id=item.thread_id)
        messages_json = json.loads(messages.model_dump_json())
        message_content = messages_json['data'][0]['content']
        text = message_content[0].get('text', {}).get('value')
        return MessageResponse(message=text)
    else:
        return MessageResponse(message="Assistant reported an error.")


@app.post("/thread/", response_model=ThreadResponse)
async def thread(api_key: APIKey = Depends(get_api_key)):
    thread = client.beta.threads.create()
    logger.info(f"Thread created with ID: {thread.id}")
    return ThreadResponse(thread_id=thread.id)

# Uvicorn startup
if __name__ == "__main__":
    uvicorn.run(app, host="127.0.0.1", port=8324)

Note: you can find this code on GitHub as well: https://github.com/gbaeke/azure-assistants-api/tree/main/api

Some things to note here:

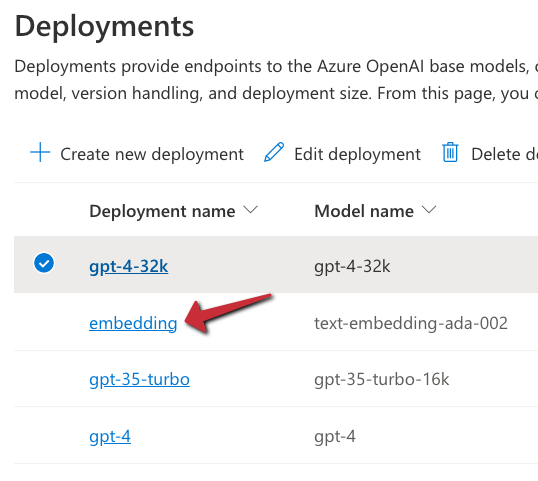
  • I am using an assistant I created in the Azure OpenAI Assistant Playground and reference it by its ID; this assistant does not use any tools or files
  • I require an API key via a custom HTTP header access_token; later Copilot Studio will need this key to authenticate to the API
  • I define two methods: /thread and /message

If you have followed the other posts about the Assistants API, the code should be somewhat self-explanatory. The code focuses on the basics so not a lot of error checking for robustness.

If you run the above code, you can use a .http file in Visual Studio Code to test it. This requires the REST Client extension. Here’s the file:

POST http://127.0.0.1:8324/message
Content-Type: application/json
access_token: 12345678

{
    "message": "How does Copilot Studio work?",
    "thread_id": "thread_S2mwvse5Zycp6BOXNyrUdlaK"
}

###

POST http://127.0.0.1:8324/thread
Content-Type: application/json
access_token: 12345678

In VS Code, with the extension loaded, you will see Send Request links above the POST commands. Click them to execute the requests. Click the thread request first and use the thread ID from the response in the body of the message request.

After you verified that it works, we can expose the API to the outside world with ngrok.

Using ngrok

If you have never used ngrok, download it for your platform. You should also get an authtoken by signing up and providing it to ngrok.

When the API is running, in a terminal window, type ngrok http 8324. You should see something like:

ngrok running

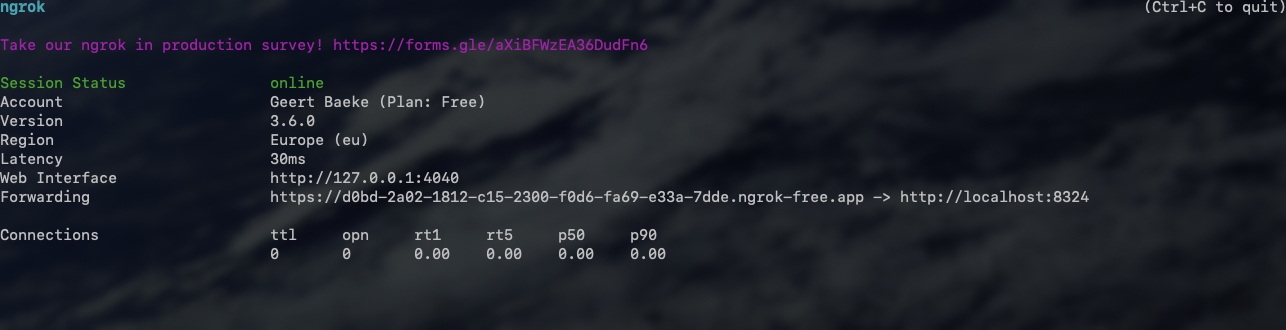
Check the forwarding URL. This is a public URL you can use. We will use this URL from Copilot Studio.

Note: in reality, we would publish this API to container apps or another hosting platform

Using the API from Copilot Studio

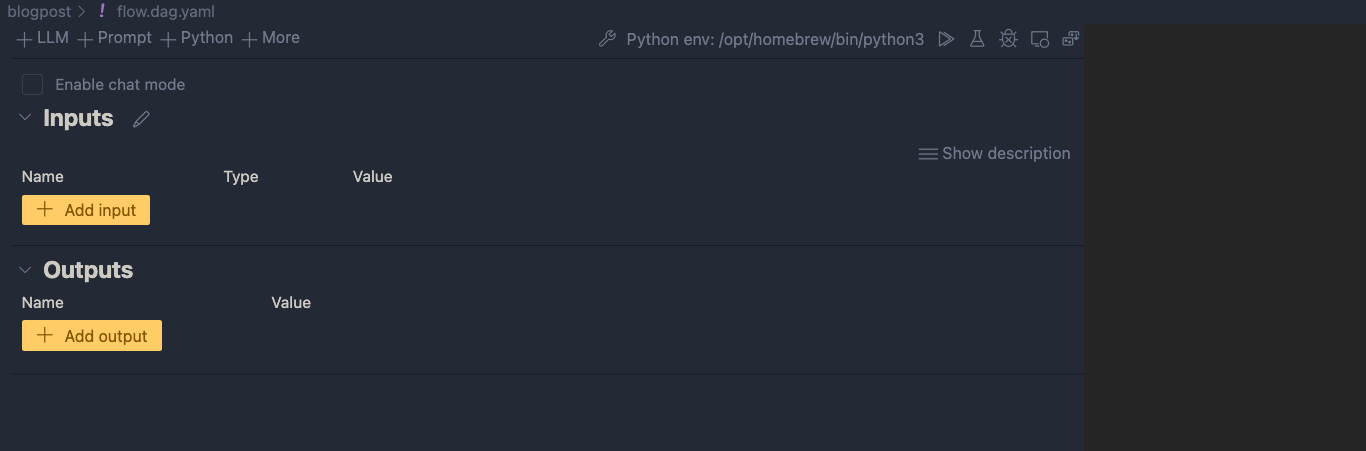
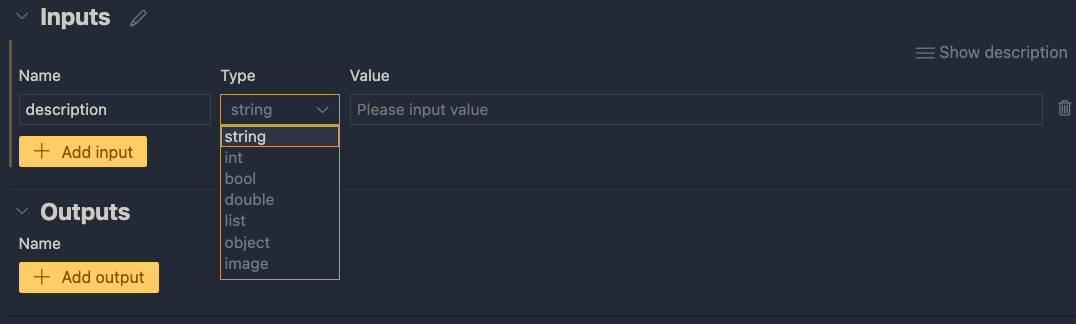
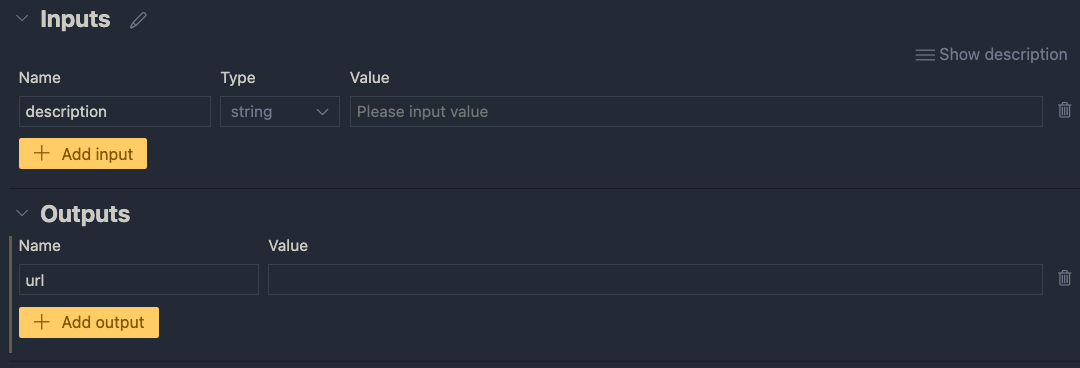
In Copilot Studio, I created a new bot without generative answers. The first thing we need to do is to create a thread when a new conversation starts:

In the UI, it looks like below:

Welcoming the user and starting a new thread

You can use the Conversation Start system topic to create the thread. The first section of the topic looks like below:

Starting a new conversation

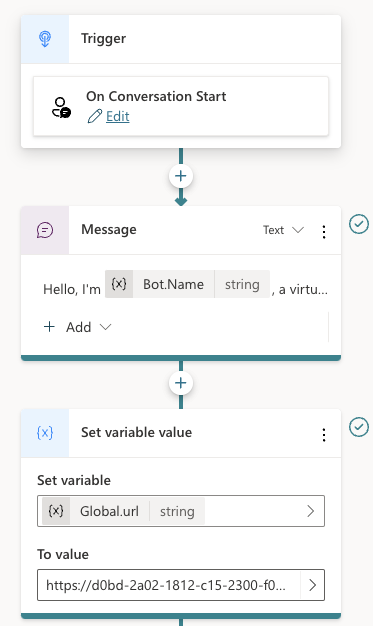
Above there are three nodes:

  • Trigger node: On Conversation Start
  • Message: welcoming the user
  • Set variable: a global variable is set that’s available to all topics; the variable holds the URL of the API to call; that is the ngrok public url in this case

Below the set variable node, there are two other nodes:

Two last nodes of the Conversation Start topic

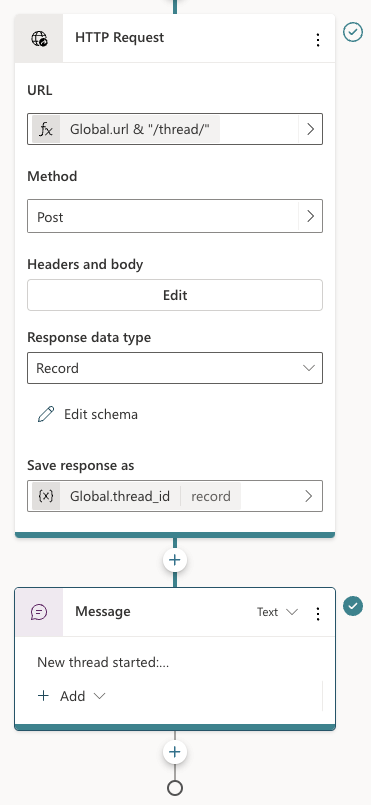
The HTTP Request node, unsurprisingly, can do HTTP requests. This is a built-in node in Copilot Studio. We call the /thread endpoint via the URL, which is the global url + “/thread” appended. The method is POST. In Headers and Body, you need to set the access_token header to the API key that matches the one from the code. There is no body to send here. When the request is successful, we save the thread ID to another global variable, global.thread_id. We need that variable is the /message calls later. The variable is of type record and holds the full JSON response from the /thread endpoint.

To finish the topic, we tell the user a new thread has started.

Now that we have a thread, how do we add a message to the thread? In the System Topics, I renamed the Fallback topic to Main intent. It is triggered when the intent is unknown, similar to how generative answers are used by default:

Fallback topic renamed to Main Intent

The topic is similar to the previous one:

Main intent topic

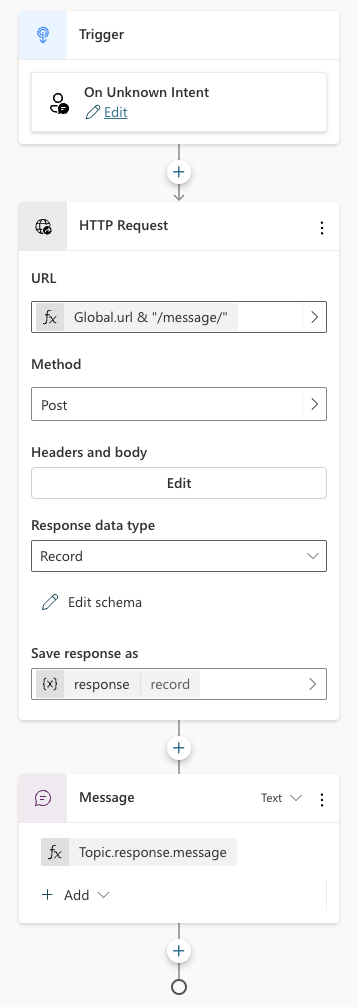
Above, HTTP Request is used again, this time to call the /message endpoint. This time Headers and Body needs some more information. In addition to the access_token header, the request requires a JSON body:

/message request body

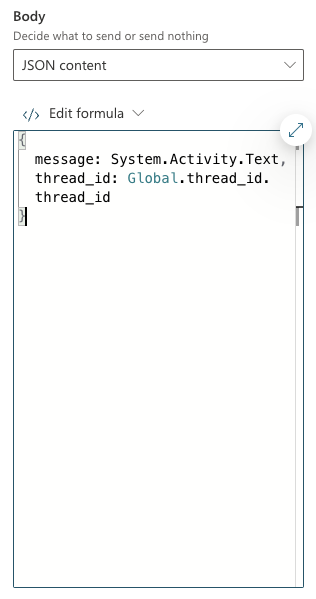
The API expects JSON with two fields:

  • message: we capture what the user typed via System.Activity.Text
  • thread_id: stored in Global.thread_id.thread_id. The Global.thread_id variable is of type record (result from the /thread call) and contains a thread_id value. Great naming by yours truly here!

The last node in the topic simply takes the response record from the HTTP Request and sends the message field from that record back to the chat user.

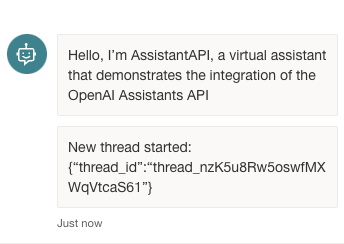
You can now verify if the chat bot works from the Chat pane:

Testing the bot

You can carry on a conversation with the assistant virtually indefinitely. As mentioned in previous posts, the assistants API tries to use up the model’s context window and only starts to trim messages from the thread when the context limit is reached.

If your assistant has tools and function calling, it’s possible it sends back images. The API does not account for that. Only text responses are retrieved.

Note: the API and bot configuration is just the bare minimum to get this to work; there is more work to do to make this fully functional, like showing image responses etc…

Adding a Teams channel

Copilot Studio bots can easily by tied to a channel. One of those channels is Teams. You can also do that with the Bot Framework SDK if you combine it with an Azure Bot resource. But it is easier with Copilot Studio.

Before you enable a channel, ensure your bot is published. Go to Publish (left pane) and click the Publish button.

Note: whenever you start a new ngrok session and update the URL in the bot, publish the bot again

Next, go to Settings and then Channels. I enabled the Teams channel:

Teams channel enabled

In the right pane, there’s a link to open the bot directly in Teams. It could be that does not work in your organisation but it does in mine:

Our Copilot Studio assistant in Teams

Note that it might be needed to restart the conversation if there is something wrong. By default, the chat bot has a Start Over topic. I modified that topic to redirect to Conversation Start. That results in the creation of a new thread:

Redirect to Conversation Start when user types start over or similar phrases

The user can simple type something like Start Over. The bot would respond as follows:

Starting over

Conclusion

If you want to use a low-code solution to build the front-end of an Azure OpenAI Assistant, using Copilot Studio in conjunction with the Assistants API is one way of achieving that.

Today, it does require some “pro-code” as the glue between both systems. I can foresee a future with tighter integration where this is just some UI configuration. I don’t know if the teams are working on this, but I surely would like to see it.

Retrieval with the Azure OpenAI Assistants API

In two previous blog posts, I wrote an introduction to the Azure OpenAI Assistants API and how to work with custom functions. In this post, we will take a look at an assistant that can answer questions about documents. We will create an HR Assistant that has access to an HR policy document. In addition, we will provide a custom function that employees can use to request a raise.

Retrieval

The OpenAI Assistants API (not the one in Azure) supports a retrieval tool. You can simply upload one or more documents, turn on retrieval and you are good to go. The screenshot below shows the experience on https://platform.openai.com:

Creating an HR Assistant at OpenAI

The important parts above are:

  • the Retrieval tool was enabled
  • Innovatek.pdf was uploaded, making it available to the Retrieval tool

To test the Assistant, we can ask questions in the Playground:

Asking HR-related questions

When asked about company cars, the assistant responds with content from the uploaded pdf file. After upload, OpenAI converted the document to text, chunked it and stored it in vector storage. I believe they even use Azure AI Search to do so. At query time, the vector store returns one or more pieces of text related to the question to the assistant. The assistant uses those pieces of text to answer the user’s question. It’s a typical RAG scenario. RAG stands for Retrieval Augmented Generation.

At the time of writing (February, 2024), the Azure OpenAI Assistants API did not support the retrieval tool. You can upload files but those files can only be used by the code_interpreter tool. That tool can also look in the uploaded files to answer the query but that is very unreliable and slow so it’s not recommended to use it for retrieval tasks.

Can we work around this limitation?

The Azure OpenAI Assistants API was in preview when this post was written. While in preview, limitations are expected. More tools like Web Search and Retrieval will be added as the API goes to general availability.

To work around the limitation, we can do the following ourselves:

  • load and chunk our PDF
  • store the chunks, metadata and embeddings in an in-memory vector store like Chroma
  • create a function that takes in a query and return chunks and metadata as a JSON string
  • use the Assistant API function calling feature to answer HR-related questions using that function

Let’s see how that works. The full code is here: https://github.com/gbaeke/azure-assistants-api/blob/main/files.ipynb

Getting ready

I will not repeat all code here and refer to the notebook. The first code block initialises the AzureOpenAI client with our Azure OpenAI key, endpoint and API version loaded from a .env file.

Next, we setup the Chroma vector store and load our document. The document is Innovatek.pdf in the same folder as the notebook.

from langchain_community.document_loaders import PyPDFLoader
from langchain_openai import AzureOpenAIEmbeddings
from langchain.text_splitter import RecursiveCharacterTextSplitter
from langchain_community.vectorstores import Chroma

pdf = PyPDFLoader("./Innovatek.pdf").load()
text_splitter = RecursiveCharacterTextSplitter(
    chunk_size=1000,
    chunk_overlap=200
)
documents = text_splitter.split_documents(pdf)
print(documents)
print(len(documents))
db = Chroma.from_documents(documents, AzureOpenAIEmbeddings(client=client, model="embedding", api_version="2023-05-15"))

# query the vector store
query = "Can I wear short pants?"
docs = db.similarity_search(query, k=3)
print(docs)
print(len(docs))

If you have ever used LangChain before, this code will be familiar:

  • load the PDF with PyPDFLoader
  • create a recursive character text splitter that splits text based on paragraphs and words as much as possible; check out this notebook for more information about splitting
  • split the PDF in chunks
  • create a Chroma database from the chunks and also pass in the embedding model to use; we use the OpenAI embedding model with a deployment name of embedding; you need to ensure an embedding model with that name is deployed in your region
  • with the db created, we can use the similarity_search method to retrieve 3 chunks similar to the query Can I wear short pants? This returns an array of objects of type Document with properties like page_content and metadata.

Note that you will always get a response from this similarity search, no matter the query. Later, the assistant will decide if the response is relevant.

We can now setup a helper function to query the document(s):

import json

# function to retrieve HR questions
def hr_query(query):
    docs = db.similarity_search(query, k=3)
    docs_dict = [doc.__dict__ for doc in docs]
    return json.dumps(docs_dict)

# try the function; docs array as JSON
print(hr_query("Can I wear short pants?"))

We will later pass the results of this function to the assistant. The function needs to return a string, in this case a JSON dump of the documents array.

Now that we have this setup, we can create the assistant.

Creating the assistant

In the notebook, you will see some sample code that uploads a document for use with an assistant. We will not use that file but it is what you would do to make the file available to the retrieval tool.

In the client.beta.assistants.create method, we provide instructions to tell the assistant what to do. For example, to use the hr_query function to answer HR related questions.

The tools parameter shows how you can provide functions and tools in code rather than in the portal. In our case, we define the following:

  • the request_raise function: allows the user to request a raise, the assistant should ask the user’s name if it does not know; in the real world, you would use a form of authentication in your app to identify the user
  • the hr_query function: performs a similarity search with Chroma as discussed above; it calls our helper function hr_query
  • the code_interpreter tool: needed to avoid errors because I uploaded a file and supply the file ids via the file_ids parameter.

If you check the notebook, you should indeed see a file_ids parameter. When the retrieval tool becomes available, this is how you provide access to the uploaded files. Simply uploading a file is not enough, you need to reference it. Instead of providing the file ids in the assistant, you can also provide them during a thread run.

⚠️ Note that we don’t need the file upload, code_interpreter and file_ids. They are provided as an example of what you would do when the retrieval tool is available.

Creating a thread and adding a message

If you have read the other posts, this will be very familiar. Check the notebook for more information. You can ask any question you want by simply changing the content parameter in the client.beta.threads.messages.create method.

When you run the cell that adds the message, check the run’s model dump. It should indicate that hr_query needs to be called with the question as a parameter. Note that the model can slightly change the parameter from the original question.

⚠️ Depending on the question, the assistant might not call the function. Try a question that is unrelated to HR and see what happens. Even some HR-related questions might be missed. To avoid that, the user can be precise and state the question is HR related.

Call function(s) when necessary

The code block below calls the hr_query or request_raise function when indicated by the assistant’s underlying model. For request_raise we simply return a string result. No real function gets called.

if run.required_action:
    # get tool calls and print them
    # check the output to see what tools_calls contains
    tool_calls = run.required_action.submit_tool_outputs.tool_calls
    print("Tool calls:", tool_calls)

    # we might need to call multiple tools
    # the assistant API supports parallel tool calls
    # we account for this here although we only have one tool call
    tool_outputs = []
    for tool_call in tool_calls:
        func_name = tool_call.function.name
        arguments = json.loads(tool_call.function.arguments)

        # call the function with the arguments provided by the assistant
        if func_name == "hr_query":
            result = hr_query(**arguments)
        elif func_name == "request_raise":
            result = "Request sumbitted. It will take two weeks to review."

        # append the results to the tool_outputs list
        # you need to specify the tool_call_id so the assistant knows which tool call the output belongs to
        tool_outputs.append({
            "tool_call_id": tool_call.id,
            "output": json.dumps(result)
        })

    # now that we have the tool call outputs, pass them to the assistant
    run = client.beta.threads.runs.submit_tool_outputs(
        thread_id=thread.id,
        run_id=run.id,
        tool_outputs=tool_outputs
    )

    print("Tool outputs submitted")

    # now we wait for the run again
    run = wait_for_run(run, thread.id)
else:
    print("No tool calls identified\n")

After running this code in response to the user question about company cars, let’s see what the result is:

Assistant response

The assistant comes up with this response after retrieving several pieces of text from the Chroma query. With the retrieval tool, the response would be similar with one big advantage. The retrieval tool would include sources in its response for you to display however you want. Above, I have simply asked the model to include the sources. The model will behave slightly differently each time unless you give clear instructions about the response format.

Retrieval and large amounts of documents

The retrieval tool of the Assistants API is not built to deal with massive amounts of data. The number of documents and sizes of those documents are limited.

In enterprise scenarios with large knowledge bases, you would use your own search indexes and a data processing pipeline to store your content in these indexes. For Azure customers, the indexes will probably be stored in Azure AI Search, which supports hybrid (text & vector) search plus semantic reranking to come up with the most relevant results.

Conclusion

The Azure OpenAI Assistants API will make it very easy to retrieve content from a limited amount of uploaded documents once the retrieval tool is added to the API.

To work around the missing retrieval tool today, you can use a simple vector storage solution and a custom function to achieve similar results.

Using tools with the Azure OpenAI Assistants API

Introduction

In a previous blog post, I wrote an introduction about the Azure OpenAI Assistants API. As an example, I created an assistant that had access to the Code Interpreter tool. You can find the code here.

In this post, we will provide the assistant with custom tools. These custom tools use the function calling features of more recent GPT models. As a result, these custom tools are called functions in the Assistants API. What’s in a name right?

There are a couple of steps you need to take for this to work:

  • Create an assistant and give it a name and instructions.
  • Define one or more functions in the assistant. Functions are defined in JSON. You need to provide good descriptions for the function and all of its parameters.
  • In your code, detect when the model chooses one or more functions that should be executed.
  • Execute the functions and pass the results to the model to get a final response that uses the function results.

From the above, it should be clear that the model, gpt-3.5-turbo or gpt-4, does not call your code. It merely proposes functions and their parameters in response to a user question.

For instance, if the user asks “Turn on the light in the living room”, the model will check if there is a function that can do that. If there is, it might propose to call function set-lamp with parameters such as the lamp name and maybe a state like true or false. This is illustrated in the diagram below when the call to the function succeeds.

Assistant Function Calling Flow

Creating the assistant in Azure OpenAI Playground

Unlike the previous post, the assistant will be created in Azure OpenAI Playground. Our code will then use the assistant using its unique identifier. In the Azure OpenAI Playground, the Assistant looks like below:

Home Assistant in the portal

Let’s discuss the numbers in the diagram:

  1. Once you save the assistant, you get its ID. The ID will be used in our code later
  2. Assistant name
  3. Assistant instructions: description of what the assistant can do, that it has functions, and how it should behave; you will probably need to experiment with this to let the assistant do exactly what you want
  4. Two function definitions: set_lamp and set_lamp_brightness
  5. You can test the functions in the chat panel. When the assistant detects that a function needs to be called, it will propose the function and its parameters and ask you to provide a result. The result you type is then used to formulate a response like The living room lamp has been turned on.

Let’s take a look at the function definition for set_lamp:

{
  "name": "set_lamp",
  "description": "Turn lamp on or off",
  "parameters": {
    "type": "object",
    "properties": {
      "lamp": {
        "type": "string",
        "description": "Name of the lamp"
      },
      "state": {
        "type": "boolean"
      }
    },
    "required": [
      "lamp",
      "state"
    ]
  }
}

The other function is similar but the second parameter is an integer between 0 and 100. When you notice your function does not get called, or the parameters are wrong, you should try to improve the description of both the function and each of the parameters. The underlying GPT model uses these descriptions to try and match a user question to one or more functions.

Let’s look at some code. See https://github.com/gbaeke/azure-assistants-api/blob/main/func.ipynb for the example notebook.

Using the assistant from your code

We start with an Azure OpenAI client, as discussed in the previous post.

import os
from dotenv import load_dotenv
from openai import AzureOpenAI
load_dotenv()

# Create Azure OpenAI client
client = AzureOpenAI(
    api_key=os.getenv('AZURE_OPENAI_API_KEY'),
    azure_endpoint=os.getenv('AZURE_OPENAI_ENDPOINT'),
    api_version=os.getenv('AZURE_OPENAI_API_VERSION')
)

# assistant ID as created in the portal
assistant_id = "YOUR ASSISTANT ID"

Creating a thread and adding a message

We will add the following message to a new thread: “Turn living room lamp and kitchen lamp on. Set both lamps to half brightness.“.

The model should propose multiple functions to be called in a certain order. The expected order is:

  • turn on living room lamp
  • turn on kitchen lamp
  • set living room brightness to 50
  • set kitchen brightness to 50
# Create a thread
thread = client.beta.threads.create()

import time
from IPython.display import clear_output

# function returns the run when status is no longer queued or in_progress
def wait_for_run(run, thread_id):
    while run.status == 'queued' or run.status == 'in_progress':
        run = client.beta.threads.runs.retrieve(
                thread_id=thread_id,
                run_id=run.id
        )
        time.sleep(0.5)

    return run


# create a message
message = client.beta.threads.messages.create(
    thread_id=thread.id,
    role="user",
    content="Turn living room lamp and kitchen lamp on. Set both lamps to half brightness."
)

# create a run 
run = client.beta.threads.runs.create(
    thread_id=thread.id,
    assistant_id=assistant_id # use the assistant id defined in the first cell
)

# wait for the run to complete
run = wait_for_run(run, thread.id)

# show information about the run
# should indicate that run status is requires_action
# should contain information about the tools to call
print(run.model_dump_json(indent=2))

After creating the thread and adding a message, we use a slightly different approach to check the status of the run. The wait_for_run function keeps running as long as the status is either queued or in_progress. When it is not, the run is returned. When we are done waiting, we dump the run as JSON.

Here is where it gets interesting. A run has many properties like created_at, model and more. I our case, we expect a response that indicates we need to take action by running one or more functions. This is indicated by the presence of the required_action property. It actually will ask for tool outputs and will present a list of tool calls to perform (tool, function, whatever… 😀). Here’s a JSON snippet as part of the run JSON dump:

"required_action": {
    "submit_tool_outputs": {
      "tool_calls": [
        {
          "id": "call_2MhF7oRsIIh3CpLjM7RAuIBA",
          "function": {
            "arguments": "{\"lamp\": \"living room\", \"state\": true}",
            "name": "set_lamp"
          },
          "type": "function"
        },
        {
          "id": "call_SWvFSPllcmVv1ozwRz7mDAD6",
          "function": {
            "arguments": "{\"lamp\": \"kitchen\", \"state\": true}",
            "name": "set_lamp"
          },
          "type": "function"
        }, ... more function calls follow...

Above it’s clear that the assistant wants you to submit a tool output for multiple functions. Only the first two are shown:

  • Function set_lamp with arguments for lamp and state as “living room” and ‘true”
  • Function set_lamp with arguments for lamp and state as “kitchen” and ‘true”
  • The other two functions propose set_lamp_brightness for both lamps with brightness set to 50

Defining the functions

Our code will need some real functions to call that actually do something. In this example, we use these two dummy functions. In reality, you could integrate this with Hue or other smart lighting. In fact, I have something like that: https://github.com/gbaeke/openai_assistant.

Here are the dummy functions:

make_error = False

def set_lamp(lamp="", state=True):
    if make_error:
        return "An error occurred"
    return f"The {lamp} is {'on' if state else 'off'}"

def set_lamp_brightness(lamp="", brightness=100):
    if make_error:
        return "An error occurred"
    return f"The brightness of the {lamp} is set to {brightness}"

The functions should return a string that the model can interpret. Be as concise as possible to save tokens…💰

Doing the tool/function calls

In the next code block, we check if the run requires action, get the tool calls we need to do and then iterate through the tool_calls array. At each iteration we check the function name, call the function and add the result to a results array. The results array is then passed to the model. Check out the code below and its comments:

import json

# we only check for required_action here
# required action means we need to call a tool
if run.required_action:
    # get tool calls and print them
    # check the output to see what tools_calls contains
    tool_calls = run.required_action.submit_tool_outputs.tool_calls
    print("Tool calls:", tool_calls)

    # we might need to call multiple tools
    # the assistant API supports parallel tool calls
    # we account for this here although we only have one tool call
    tool_outputs = []
    for tool_call in tool_calls:
        func_name = tool_call.function.name
        arguments = json.loads(tool_call.function.arguments)

        # call the function with the arguments provided by the assistant
        if func_name == "set_lamp":
            result = set_lamp(**arguments)
        elif func_name == "set_lamp_brightness":
            result = set_lamp_brightness(**arguments)

        # append the results to the tool_outputs list
        # you need to specify the tool_call_id so the assistant knows which tool call the output belongs to
        tool_outputs.append({
            "tool_call_id": tool_call.id,
            "output": json.dumps(result)
        })

    # now that we have the tool call outputs, pass them to the assistant
    run = client.beta.threads.runs.submit_tool_outputs(
        thread_id=thread.id,
        run_id=run.id,
        tool_outputs=tool_outputs
    )

    print("Tool outputs submitted")

    # now we wait for the run again
    run = wait_for_run(run, thread.id)
else:
    print("No tool calls identified\n")

# show information about the run
print("Run information:")
print("----------------")
print(run.model_dump_json(indent=2), "\n")

# now print all messages in the thread
print("Messages in the thread:")
print("-----------------------")
messages = client.beta.threads.messages.list(thread_id=thread.id)
print(messages.model_dump_json(indent=2))

At the end, we dump both the run and the messages JSON. The messages should indicate some final response from the model. To print the messages in a nicer way, you can use the following code:

import json

messages_json = json.loads(messages.model_dump_json())

def role_icon(role):
    if role == "user":
        return "👤"
    elif role == "assistant":
        return "🤖"

for item in reversed(messages_json['data']):
    # Check the content array
    for content in reversed(item['content']):
        # If there is text in the content array, print it
        if 'text' in content:
            print(role_icon(item["role"]),content['text']['value'], "\n")
        # If there is an image_file in the content, print the file_id
        if 'image_file' in content:
            print("Image ID:" , content['image_file']['file_id'], "\n")

In my case, the output was as follows:

Question and final model response (after getting tool call results)

I set make_error to True. In that case, the tool responses indicate an error at every call. The model reports that back to the user.

What makes this unique?

Function calling is not unique to the Assistants API. Function calling is a feature of more recent GPT models, to allow those models to propose one or more function to call from your code. You can simply use the Chat Completion API to pass in your function descriptions in JSON.

If you use frameworks like Semantic Kernel or LangChain, you can use function calling with the abstractions that they provide. In most cases that means you do not have to create the function JSON description. Instead, you just write your functions in native code and annotate them as a tool or make them part of a plugin. You can then pass a list of tools to an agent or plugins to a kernel and you’re done! In fact, LangChain (and soon Semantic Kernel) already supports the Assistant API.

One of the advantages that the Assistants API has, is the ability to define all your functions within the assistant. You can do that with code but also via the portal. The Assistants API also makes it a bit simpler to process the tool responses although the difference is not massive.

Being able to test your functions in the Assistant Playground is a big benefit as well.

Conclusion

Function calling in the Assistants API is not very different from function calling in the Chat Completion API. It’s nice you can create and update your function definitions in the portal and directly try them in the chat panel. Working with the tool calls and tool responses is also a bit easier.

Writing your first flow with Prompt Flow in Visual Studio Code

In this blog post, we will create a flow with Prompt Flow in Visual Studio Code. Prompt Flow is a suite of development tools to build LLM-based AI applications. It tries to cover the end-to-end development cycle, including prototyping, testing and deployment to production.

In Prompt Flow, you create flows. Flows link LLMs (large language models), prompts and tools together in an executable workflow. An example of such a flow is show below:

Sample flow

The flow above (basically a distributed acyclical graph – DAG – of functions) sends its input, a description to search for an image, to a tool that embeds the description with an Azure OpenAI embedding model. The embedding is used as input to a Python tool that does a similarity search in Azure AI Search. The search returns three results. The original input, together with the query results, are subsequently handed to an LLM (above, the final_result node) that hopefully picks the correct image url.

Although you could write your own API that does all of the above, Prompt Flow allows you to visually build, run and debug a flow that has input and output. When you are happy with the flow, you can convert it to an API. One of the ways to host the API is via a container.

We will build this flow on our local machine and host it as a container. Note that Prompt Flow can also be used from the portal using Azure Machine Learning or Azure AI Studio.

👉 Another blog post will describe how to build and run the container

Installing Prompt Flow on your machine

To install Prompt Flow you will need Python on your machine. Use Python 3.9 or higher. I use Python 3.11 on an Apple M2. Check the full installation instructions here. Without using a Python virtual environment, you can just run the following command to install Prompt Flow:

pip install promptflow promptflow-tools

Next, run pf -v to check the installation.

⚠️ Do not forget to install promptflow-tools because it enables the embedding tool, llm tool and other tools to be used as nodes in the flow; also ensure this package is installed in the container image that will be created for this flow

In Visual Studio Code, install the Prompt flow for VS Code extension. It has the VS Code Python Extension as a prerequisite. Be sure to check the Prompt Flow Quick Start for full instructions.

We will mainly use the Visual Code extension. Note that the pf command can be used to perform many of the tasks we will discuss below (e.g, creating connections, running a flow, etc…).

Creating an empty flow

In VS Code, ensure you opened an empty folder or create a new folder. Right click and select New flow in this directory. You will get the following question:

Flow selection

Select Empty Flow. This creates a file called flow.dag.yaml with the following content:

Empty flow.dag.yaml

If you look closely, you will see a link to open a Visual editor. Click that link:

Visual editor with empty input and output and blank canvas

We can now add input(s) and output(s) and add the nodes in between.

Inputs and outputs

Inputs have a type and a value. Add a string input called description:

One string input: a description (of an image, like creature or fruit)

When you later run the flow, you can type the description in the Value textbox. When the flow is converted to an API, the API will except a description in the POST body.

Next, add an output called url. In the end, the flow returns a url to an image that matches the description:

One output: the url to a matching image

The value of the output will be the coming from another node. We still have to add those. If you click the Value dropdown list, you will only be able to select the input value for now. You can do that and click the run icon. Save your flow before running it.

Running the flow with output set to the input

When you click the run button, a command will be run in the terminal that runs the flow:

python3 -m promptflow._cli._pf.entry flow test --flow /Users/geertbaeke/projects/promptflow/images/blogpost --user-agent "prompt-flow-extension/1.6.0 (darwin; arm64) VSCode/1.85.0"

The output of this command is:

Output of the flow is JSON, here with just the url

Although this is not very useful, the flow runs and produces a result. The output is our input. We can now add nodes to do something useful.

Creating an embedding from the description

We need to embed the description to search for similar descriptions in an Azure AI Search index. If you are not sure what embeddings are, check Microsoft Learn for a quick intro. It short, it’s a bunch of numbers that represents the meaning of a piece of text. We can use the numbers of the description to compare it to the sets of numbers of image descriptions to see how close they are.

To create an embedding, we need access to an Azure OpenAI embedding model. Such a model takes text as input and returns the bunch of numbers we talked about. This model returns 1536 numbers, aka dimensions.

To use the model, we will need an Azure OpenAI resource’s endpoint and key. If you do not have an Azure OpenAI resource in Azure, create one and deploy the text-embedding-ada-002 model. In my example, the deployment is called embedding:

Embedding model in Azure OpenAI

With the Azure resources created, we can add a connection in Prompt Flow that holds the OpenAI endpoint and key:

Click the Prompt Flow extension icon and click + next to Azure OpenAI in the Connections section:

Azure OpenAI connection

A document will open that looks like the one below:

Connection information

Fill in the name and api_base only. The api_base is the https url to your Azure OpenAI instance. It’s something like https://OPENAIRESOURCENAME.openai.azure.com/. Do not provide the api_key. When you click Create connection (the smallish link at the bottom), you will be asked for the key.

After providing the key, the connection should appear under the Azure OpenAI section. You will need this connection in the embedding tool to point to the embedding model to use.

In the Prompt Flow extension pane, now click + next to Embedding in the TOOLS section:

Embedding tool

You will be asked for the tool’s name (top of VS Code window). Provide a name (e.g, embedding) and press enter. Select the connection you just created, the deployment name of your embedding model and the input. The input is the description we configured in the flow’s input node. We want to embed that description. The output of this tool will be a list of floating point numbers, a vector, of 1536 dimensions.

Embedding tool

The moment you set the input of the embedding, the input node will be connected to the embedding node on the canvas. To check if embedding works, you can connect the output of the embedding node to the url output and run the flow. You should then see the vector as output. The canvas looks like:

Show the embedding as output

Of course, we will need to supply the embedding to a vector search engine, not to the output. In our case, that is Azure AI Search. Let’s try that…

⚠️ Instead of connecting the embedding to the output, you can simply debug the embedding by clicking the debug icon in the embedding tool. The tool will be executed with the value of the input. The result should be a bunch of numbers in your terminal:

Debug output of the embedding tool

Searching for similar images

This section is a bit more tricky because you need an Azure AI Search index that allows you to search for images using a description of an image. To create such an index, see https://atomic-temporary-16150886.wpcomstaging.com/2023/12/09/building-an-azure-ai-search-index-with-a-custom-skill/.

Although you can use a Vector DB Lookup tool that supports Azure AI Search, we will create a custom Python tool that does the same thing. The Python tool uses the azure-search-documents Python library to perform the search. Learning how to use Python tools is important to implement logic there is no specific tool for.

First, we will create a custom connection that holds the name of our Azure AI Search instance and a key to authenticate.

Similar to the Azure OpenAI connection, create a custom connection:

Custom connection

After clicking +, a document opens. Modify it as follows:

Custom connection content

Like before, set a name. In a custom connection, you can have configs and secrets. In configs add the Azure AI Search endpoint and index name. In the secrets set key to <user-input>. When you click Create connection, you will be asked to supply the key.

⚠️ Connection information is saved to a local SQLLite database in the .promtflow folder in your home folder

We can now add a Python tool. In TOOLS, next to Python click +. Give the tool a name and select new file. You should get a new Python file in your code with the filename set to <YOURTOOLNAME>.py. The code without comments is below:

from promptflow import tool

@tool
def my_python_tool(input1: str) -> str:
    return 'hello ' + input1

This tool takes a string input and returns a string. The @tool decorator is required.

We need to change this code to get the custom connection information, query Azure AI Search and return search results as a list. The code is below:

from promptflow import tool
from promptflow.connections import CustomConnection
from azure.core.credentials import AzureKeyCredential
from azure.search.documents import SearchClient
from azure.search.documents.models import VectorizedQuery

@tool
def my_python_tool(vector: list, ai_conn: CustomConnection) -> list:
    ai_conn_dict = dict(ai_conn)
    endpoint = ai_conn_dict['endpoint']
    key = ai_conn_dict['key']
    index = ai_conn_dict['index']

    # query azure ai search
    credential = AzureKeyCredential(key)
    client = SearchClient(endpoint=endpoint,
                          index_name=index,
                          credential=credential)
    vector_query = VectorizedQuery(vector=vector, k_nearest_neighbors=3, fields="textVector", exhaustive=True)
    results = client.search(
        search_text=None,
        vector_queries=[vector_query],
        select=["name", "description", "url"]
    )

    # convert results to json list
    results = [dict(result) for result in results]

    return results

The function has two parameters: a vector of type list to match the output of the embedding tool, and a variable of type CustomConnection. The custom connection can be converted to a dict to retrieve both the configs and the secret.

Next, we use the configs and secret to perform the query with a SearchClient. The query only returns three fields from our index: name, description and url. The result returned from Azure AI Search is converted to a list and returned.

When you save the Python file and go back to your flow, you should see the Python tool (aisearch) with the vector and ai_conn field. If not, click the regenerate link. Set it as below:

Python tool

The input to the Python tool is the output from the embedding tool. We also pass in the custom connection to provide the configs and key to the tool.

You can set the output of the entire flow (url) to the output of the Python tool to check the results of the search when you run the flow:

Running the flow with Python tool’s output as output

I ran the flow with a description equal to cat. A list of three JSON objects is returned.The first search result is the url to cat.jpg but there are other results as well (not shown above).

Adding an LLM tool

Although we could just pick the first result from the search, that would not work very well. Azure AI Search will always return a result, even if it does not make much sense. In a search for nearest neighbors, your nearest neighbor could be very far away! 😀

For example, if I search for person with a hat, I will get a result even though I do not have such a picture in my index. It simply finds vectors that are “closest” but semantically “far” away from my description. That is bound to happen with just a few images in the index.

An LLM can look at the original description and see if it matches one of the search results. It might pick the 3rd result if it fits better. It might also decide to return nothing if there is no match. In order to do so, we will need a good prompt.

Click + LLM at the top left of the flow to add an LLM tool:

Adding an LLM

Give the LLM tool a name and select new file. In the flow editor, set the LLM model information:

LLM settings

You can reuse the connection that was used for the embedding. Ensure you have deployed a chat model in your Azure OpenAI resource. I deployed gpt-4 and called the deployment gpt-4 as well. I also set temperature to 0.

The inputs of the node do not make much sense. We do not need chat history for instance. The inputs come from a .jinja2 file that was created for you. The file has the name of the LLM tool. Following the example above, the name is pick_result.jinja2. Open that file and replace it with the following contents and save it:

system:
You return the url to an image that best matches the user's question. Use the provided context to select the image. Only return the url. When no
matching url is found, simply return NO_IMAGE

user:
{{description}}

context : {{search_results}}

The file defines a system message to tell the LLM what to do. The input from the user is the description from the input node. We provide extra context to the LLM as well (the output from search). The {{…}} serve as placeholders to inject data into the prompt.

When you save the file and go back to the flow designer, you should see description and search_results as parameters. Set them as follows:

Inputs to the LLM node

In addition, set the output of the flow output node to the output of the LLM node:

Setting the output

Save your flow and run it. In my case, with a description of cat I get the following output:

Output is just a URL from the LLM node

It I use man with a hat as input, I get:

LLM did not find a URL to match the description

Using a prompt variant

Suppose we want to try a different prompt that returns JSON instead of text. To try that, we can create a prompt variant.

In the LLM node, click the variants icon:

Variants

You will see a + icon to create a new variant. Click it.

New variant

The variant appears under the original variant and is linked to a new file: pick_result_variant_1.jinja2. I have also set the variant as default. Let’s click the new file to open it. Add the following prompt:

system:
You return the url to an image that best matches the user's question. Use the provided context to select the image. 
Return the url and name of the file as JSON. Here is an example of a response. Do not use markdown in the response. Use pure JSON.
{
  "url": "http://www.example.com/images/1.jpg",
  "name": "1.jpg"
}

If there is not matching image, return an empty string in the JSON:
{
  "url": ""
}

user:
{{description}}

context : {{search_results}}

This prompt should return JSON instead of just the url or NO_IMAGE. To test this, run the flow and select Use default variant for all nodes. When I run the flow with description cat, I get the following output:

JSON output

Because the flow’s output is already JSON, the string representation of the JSON result is used. Adding an extra Python tool that parses the JSON and outputs both the URL and file name might be a good idea here.

You can modify and switch between the prompts and see which one works best. This is especially handy when you are prototyping your flow.

Conclusion

On your local machine, Prompt Flow is easy to install and get started with. In this post we built a relatively simple flow that did not require a lot of custom code. We also touched on using variants, to test different prompts and their outcome.

In a follow-up post, we will take a look at turning this flow into a container. Stay tuned! 📺

Finding images with text and image queries with the help of GPT-4 Vision

With the gpt-4-vision-preview model available at OpenAI, it was time to build something with it. I decided to use it as part of a quick solution that can search for images with text, or by providing a similar image.

We will do the following:

  • Describe a collection of images. To generate the description, GPT-4 Vision is used
  • Create a text embedding of the description with the text-embedding-ada-002 model
  • Create an image embedding using the vectorizeImage API, part of Azure AI Computer Vision
  • Save the description and both embeddings to an Azure AI Search index
  • Search for images with either text or a similar image

The end result should be that when I search for desert plant, I get an image of a cactus or similar plant. When I provide a picture of an apple, I should get an apple or other fruit as a result. It’s basically Google image and reverse image search.

Let’s see how it works and if it is easy to do. The code is here: https://github.com/gbaeke/vision. The main code is in a Jupyter notebook in the image_index folder.

A word on vectors and vectorization

When we want to search for images using text or find similar images, we use a technique that involves turning both text and images into a form that a computer can understand easily. This is done by creating vectors. Think of vectors as a list of numbers that describe the important parts of a text or an image.

For text, we use a tool called ‘text-embedding-ada-002’ which changes the words and sentences into a vector. This vector is like a unique fingerprint of the text. For images, we use something like Azure’s multi-modal embedding API, which does the same thing but for pictures. It turns the image into a vector that represents what’s in the picture.

After we have these vectors, we store them in a place where they can be searched. We will use Azure AI Search. When you search, the system looks for the closest matching vectors – it’s like finding the most similar fingerprint, whether it’s from text or an image. This helps the computer to give you the right image when you search with words or find images that are similar to the one you have.

Getting a description from an image

Although Azure has Computer Vision APIs to describe images, GPT-4 with vision can do the same thing. It is more flexible and easier to use because you have the ability to ask for what you want with a prompt.

To provide an image to the model, you can provide a URL or the base64 encoding of an image file. The code below uses the latter approach:

def describe_image(image_file: str) -> str:
    with open(f'{image_file}', 'rb') as f:
        image_base64 = base64.b64encode(f.read()).decode('utf-8')
        print(image_base64[:100] + '...')

    print(f"Describing {image_file}...")

    response = client.chat.completions.create(
        model="gpt-4-vision-preview",
        messages=[
            {
            "role": "user",
            "content": [
                {"type": "text", "text": "Describe the image in detail"},
                {
                "type": "image_url",
                "image_url": {
                    "url": f"data:image/jpeg;base64,{image_base64}",
                },
                },
            ],
            }
        ],
        max_tokens=500,  # default max tokens is low so set higher
    )

    return response.choices[0].message.content

As usual, the OpenAI API is very easy to use. Above, we open and read the image and base64-encode it. The base64 encoded file is provided in the url field. A simple prompt is all you need to get the description. Let’s look at the result for the picture below:

The generated description is below:

The image displays a single, healthy-looking cactus planted in a terracotta-colored pot against a pale pink background. The cactus is elongated, predominantly green with some modest blue hues, and has evenly spaced spines covering its surface. The spines are white or light yellow, quite long, and arranged in rows along the cactus’s ridges. The pot has a classic, cylindrical shape with a slight lip at the top and appears to be a typical pot for houseplants. The overall scene is minimalistic, with a focus on the cactus and the pot due to the plain background, which provides a soft contrast to the vibrant colors of the plant and its container.

Description generated by GPT-4 Vision

Embedding of the image

To create an embedding for the image, I decided to use Azure’s multi-modal embedding API. Take a look at the code below:

def get_image_vector(image_path: str) -> list:
    # Define the URL, headers, and data
    url = "https://AI_ACCOUNT.cognitiveservices.azure.com//computervision/retrieval:vectorizeImage?api-version=2023-02-01-preview&modelVersion=latest"
    headers = {
        "Content-Type": "application/octet-stream",
        "Ocp-Apim-Subscription-Key": os.getenv("AZURE_AI_KEY")
    }

    with open(image_path, 'rb') as image_file:
        # Read the contents of the image file
        image_data = image_file.read()

    print(f"Getting vector for {image_path}...")

    # Send a POST request
    response = requests.post(url, headers=headers, data=image_data)

    # return the vector
    return response.json().get('vector')

The code uses an environment variable to get the key to an Azure AI Services multi-service endpoint. Check the README.md in the repository for a sample .env file.

The API generates a vector with 1024 dimensions. We will need that number when we create the Azure AI Search index.

Note that this API can accept a url or the raw image data (not base64-encoded). Above, we provide the raw image data and set the Content-Type properly.

Generating the data to index

In the next step, we will get all .jpg files from a folder and do the following:

  • create the description
  • create the image vector
  • create the text vector of the description

Check the code below for the details:

# get all *.jpg files in the images folder
image_files = [file for file in os.listdir('./images') if file.endswith('.jpg')]

# describe each image and store filename and description in a list of dicts
descriptions = []
for image_file in image_files:
    try:
        description = describe_image(f"./images/{image_file}")
        image_vector = get_image_vector(f"./images/{image_file}")
        text_vector = get_text_vector(description)
        
        descriptions.append({
            'id': image_file.split('.')[0], # remove file extension
            'fileName': image_file,
            'imageDescription': description,
            'imageVector': image_vector,
            'textVector': text_vector
        })
    except Exception as e:
        print(f"Error describing {image_file}: {e}")

# print the descriptions but only show first 5 numbers in vector
for description in descriptions:
    print(f"{description['fileName']}: {description['imageDescription'][:50]}... {description['imageVector'][:5]}... {description['textVector'][:5]}...")

The important part is the descriptions list, which is a list of JSON objects with fields that match the fields in the Azure AI Search index we will build in the next step.

The text vector is calculated with the get_text_vector function. It uses OpenAI’s text-embedding-ada-002 model.

Building the index

The code below uses the Azure AI Search Python SDK to build and populate the index in code. You.will need an AZURE_AI_SEARCH_KEY environment variable to authenticate to your Azure AI Search instance.

def blog_index(name: str):
    from azure.search.documents.indexes.models import (
        SearchIndex,
        SearchField,
        SearchFieldDataType,
        SimpleField,
        SearchableField,
        VectorSearch,
        VectorSearchProfile,
        HnswAlgorithmConfiguration,
    )

    fields = [
        SimpleField(name="Id", type=SearchFieldDataType.String, key=True), # key
        SearchableField(name="fileName", type=SearchFieldDataType.String),
        SearchableField(name="imageDescription", type=SearchFieldDataType.String),
        SearchField(
            name="imageVector",
            type=SearchFieldDataType.Collection(SearchFieldDataType.Single),
            searchable=True,
            vector_search_dimensions=1024,
            vector_search_profile_name="vector_config"
        ),
        SearchField(
            name="textVector",
            type=SearchFieldDataType.Collection(SearchFieldDataType.Single),
            searchable=True,
            vector_search_dimensions=1536,
            vector_search_profile_name="vector_config"
        ),

    ]

    vector_search = VectorSearch(
        profiles=[VectorSearchProfile(name="vector_config", algorithm_configuration_name="algo_config")],
        algorithms=[HnswAlgorithmConfiguration(name="algo_config")],
    )
    return SearchIndex(name=name, fields=fields, vector_search=vector_search)

#  create the index
from azure.core.credentials import AzureKeyCredential
from azure.search.documents import SearchClient
from azure.search.documents.indexes import SearchIndexClient
from azure.search.documents.models import VectorizedQuery

service_endpoint = "https://YOUR_SEARCH_INSTANCE.search.windows.net"
index_name = "image-index"
key = os.getenv("AZURE_AI_SEARCH_KEY")

index_client = SearchIndexClient(service_endpoint, AzureKeyCredential(key))
index = blog_index(index_name)

# create the index
try:
    index_client.create_index(index)
    print("Index created")
except Exception as e:
    print("Index probably already exists", e)

The code above creates an index with some string fields and two vector fields:

  • imageVector: 1024 dimensions (as defined by the Azure AI Computer Vision image embedder)
  • textVector: 1536 dimensions (as defined by the OpenAI embedding model)

Although not specified in the code, the index will use cosine similarity to perform similarity searches. It’s the default. It will return approximate nearest neighbour (ANN) results unless you create a search client that uses exhaustive search. An exhaustive search searches the entire vector space. The queries near the end of this post use the exhaustive setting.

When the index is created, we can upload documents:

# now upload the documents
try:
    search_client = SearchClient(service_endpoint, index_name, AzureKeyCredential(key))
    search_client.upload_documents(descriptions)
    print("Documents uploaded successfully")
except Exception as e:
    print("Error uploading documents", e)

The upload_documents method uploads the documents in the descriptions Python list to the search index. The upload is actually an upsert. You can run this code multiple times without creating duplicate documents in the index.

Search images with text

To search an image with a text description, a vector query on the textVector is used. The function below takes a text query string as input, vectorizes the query, and performs a similarity search returning the first nearest neighbour. The function displays the description and the image in the notebook:

# now search based on text
def single_vector_search(query: str):
    vector_query = VectorizedQuery(vector=get_text_vector(query), k_nearest_neighbors=1, fields="textVector", exhaustive=True)

    results = search_client.search(
        vector_queries=[vector_query],
        select=["fileName", "imageDescription"],
        
    )

    for result in results:
        print(result['fileName'], result["imageDescription"], sep=": ")

        # show the image
        from IPython.display import Image
        display(Image(f"./images/{result['fileName']}"))
    
single_vector_search("desert plant")

The code searches for an image based on the query desert plant. It returns the picture of the cactus shown earlier. Note that if you search for something there is no image for, like blue car, you will still get a result because we always return a nearest neighbor. Even if your nearest neighbor lives 100km away, it’s still your nearest neighbor. 😀

Return similar images

Since our index contains an image vector, we can search for images similar to a vector of a reference image. The function below takes an image file path as input, calculates the vector for that image, and performs a nearest neighbor search. The function displays the description and image of each document returned. In this case, the code returns two similar documents:

def image_search(image_file: str):

    vector_query = VectorizedQuery(vector=get_image_vector(image_file), k_nearest_neighbors=2, fields="imageVector", exhaustive=True)

    results = search_client.search(
        vector_queries=[vector_query],
        select=["fileName", "imageDescription"],
    )

    for result in results:
        print(result['fileName'], result["imageDescription"], sep=": ")

        # show the image
        from IPython.display import Image
        display(Image(f"./images/{result['fileName']}"))
 
# get vector of another image and find closest match
image_search('rotten-apple.jpg')
image_search('flower.jpeg')

At the bottom, the function is called with filenames of pictures that contain a rotten apple and a flower. The result of the first query is a picture of the apple and banana. The result of the second query is the cactus and the rose. You can debate whether the cactus should be in the results. Some cacti have flowers but some don’t. 😀

Conclusion

The GPT-4 Vision API, like most OpenAI APIs, is very easy to use. In this post, we used it to generate image descriptions to build a simple query engine that can search for images via text or a reference image. Together with their text embedding API and Microsoft’s multi-modal embedding API to create an image embedding, it is relatively straightforward to build these type of systems.

As usual, this is a tutorial with quick sample code to illustrate the basic principle. If you need help building these systems in production, simply reach out. Help is around the corner! 😉

Creating a custom GPT to query any knowledge base with actions

A while ago, OpenAI introduced GPTs. A GPT is a custom version of ChatGPT that combine instructions, extra knowledge, and any combination of skills.

In this tutorial, we are going to create a custom GPT that can answer questions about articles on this blog. In order to achieve that, we will do the following:

  • create an Azure AI Search index
  • populate the index with content of the last 50 blog posts (via its RSS feed)
  • create a custom API with FastAPI (Python) that uses the Azure OpenAI “add your data” APIs to provide relevant content to the user’s query
  • add the custom API as an action to the custom GPT

The image below shows the properties of the GPT. You need to be a ChatGPT Plus subscriber to create a GPT.

Part of the custom GPT definition

To implement a custom action for the GPT, you need an API with an OpenAPI spec. When you use FastAPI, an OpenAPI JSON document can easily be downloaded and provided to the GPT. You will need to modify the JSON document with a servers section to specify the URL the GPT has to use.

In what follows, we will look at all of the different pieces that make this work. Beware: long post! 😀

Azure AI Search Index

Azure AI Search is a search service you create in Azure. Although there is a free tier, I used the basic tier. The basic tiers allows you to use its semantic reranker to optimise search results.

To create the index and populate it with content, I used the following notebook: https://github.com/gbaeke/custom-gpt/blob/main/blog-index/website-index.ipynb.

The result is an index like below:

Index in Azure AI Search

The index contains 292 documents although I only retrieve the last 50 blog posts. This is the result of chunking each post into smaller pieces of about 500 tokens with 100 tokens of overlap for each chunk. We use smaller chunks because we do not want to send entire blog posts as content to the large language model (LLM).

Note that the index supports similarity searches using vectors. The contentVector field contains the OpenAI embedding of the text in the content field.

Although vectors are available, we do not have to use vector search. Azure AI search supports simple keyword search as well. Together with the semantic ranker, it can provide more relevant results than keyword search on its own.

Note: in general, vector search will provide better results, especially when combined with keyword search and the semantic ranker

Use the index with Azure OpenAI “add your data”

I have written about the Azure OpenAI “add your data” features before. It provides a wizard experience to add an Azure AI Search index to the Azure OpenAI playground and directly test your index with the model of your choice.

From you Azure OpenAI instance, first open Azure OpenAI Studio:

Go to OpenAI Studio from the Overview page of your Azure OpenAI instance

Note: you still need to complete a form to get access to Azure OpenAI. Currently, it can take around a day before you are allowed to create Azure OpenAI instances in your subscription.

In Azure OpenAI Studio, click Bring your own data from the Home screen:

Bring your own data

Select the Azure AI Search index and click Next.

Azure AI Search index selection

Note: I created the index using the generally available API that supports vector search. The Add your data wizard, at the time of writing, was not updated yet to support these new indexes. That is the reason why vector search cannot be enabled. We will use keyword + semantic search instead. I expect this functionality to be available soon (November/December 2023).

Next, provide field mappings:

Field Mappings

These mappings are required because the Add your data feature excepts these standard fields. You should have at least a content field to search. Above, I do not have a file name field because I have indexed blog posts. It’s ok to leave that field blank.

After clicking Next, we get to data management:

Data Management

Here, we specify the type of search. Semantic means keyword + semantic. In the dropdown list, you can also select keyword search on its own. However, that might give you less relevant results.

Note: for Semantic to work, you need to turn on the Semantic ranker on the Azure AI Search resource. Additionally, you need to create a semantic profile on the index.

Now you can click Next, followed by Save and close. The Azure OpenAI Chat Playground appears with the index added:

Index added as a data source

You can now start chatting with your data. Select a chat model like gpt-4 or gpt-35-turbo. In Azure OpenAI, you have to deploy these models first and give the deployment a name.

Chat session with your data

Above, I asked about the OpenAI Assistants API, which is one of the posts on my blog. In the background, the playground performs a search on the Azure AI Search index and provides the results as context to the model. The gpt-35-turbo model answers the user’s question, based on the context coming from the index.

When you are happy with the result, you can export this experience to an Azure Web App of CoPilot Studio (Power Virtual Agents):

Export the “chat with data” experience

In our case, we want to use this configuration from code and provide an API we can add to the custom GPT.

⚠️ It’s import to realise that, with this approach, we will send the final answer, generated by an Azure OpenAI model, to the custom GPT. An alternate approach would be to hand the results of the Azure AI Search query to the custom GPT and let it formulate the answer on its own. That would be faster and less costly. If you also provide the blog post’s URL, ChatGPT can refer to it. However, the focus here is on using any API with a custom GPT so let’s continue with the API that uses the “add your data” APIs.

If you want to hand over Azure AI search results directly to ChatGPT, check out the code in the azure-ai-search folder in the Github repo.

Creating the API

To create an API that uses the index with the model, as configured in the playground, we can use some code. In fact, the playground provides sample code to work with:

Sample code from the playground

‼️ Sadly, this code will not work due to changes to the openai Python package. However, the principle is still the same:

  • call the chat completion extension API which is specific to Azure; in the code you will see this is as a Python f-string: f"{openai.api_base}/openai/deployments/{deployment_id}/extensions/chat/completions?api-version={openai.api_version}"
  • the JSON payload for this API needs to include the Azure AI Search configuration in a dataSources array.

The extension API will query Azure AI Search for you and create the prompt for the chat completion with context from the search result.

To create a FastAPI API that does this for the custom GPT, I decided to not use the openai package and simply use the REST API. Here is the code:

from fastapi import FastAPI, HTTPException, Depends, Header
from pydantic import BaseModel
import httpx, os
import dotenv
import re

# Load environment variables
dotenv.load_dotenv()

# Initialize FastAPI app
app = FastAPI()

# Constants (replace with your actual values)
api_base = "https://oa-geba-france.openai.azure.com/"
api_key = os.getenv("OPENAI_API_KEY")
deployment_id = "gpt-35-turbo"
search_endpoint = "https://acs-geba.search.windows.net"
search_key = os.getenv("SEARCH_KEY")
search_index = "blog"
api_version = "2023-08-01-preview"

# Pydantic model for request body
class RequestBody(BaseModel):
    query: str

# Define the API key dependency
def get_api_key(api_key: str = Header(None)):
    if api_key is None or api_key != os.getenv("API_KEY"):
        raise HTTPException(status_code=401, detail="Invalid API Key")
    return api_key

# Endpoint to generate response
@app.post("/generate_response", dependencies=[Depends(get_api_key)])
async def generate_response(request_body: RequestBody):
    url = f"{api_base}openai/deployments/{deployment_id}/extensions/chat/completions?api-version={api_version}"
    headers = {
        "Content-Type": "application/json",
        "api-key": api_key
    }
    data = {
        "dataSources": [
            {
                "type": "AzureCognitiveSearch",
                "parameters": {
                    "endpoint": search_endpoint,
                    "key": search_key,
                    "indexName": search_index
                }
            }
        ],
        "messages": [
            {
                "role": "system",
                "content": "You are a helpful assistant"
            },
            {
                "role": "user",
                "content": request_body.query
            }
        ]
    }

    async with httpx.AsyncClient() as client:
        response = await client.post(url, json=data, headers=headers, timeout=60)

    if response.status_code != 200:
        raise HTTPException(status_code=response.status_code, detail=response.text)

    response_json = response.json()

    # get the assistant response
    assistant_content = response_json['choices'][0]['message']['content']
    assistant_content = re.sub(r'\[doc.\]', '', assistant_content)
    
    # return assistant_content as json
    return {
        "response": assistant_content
    }

# Run the server
if __name__ == "__main__":
    import uvicorn
    uvicorn.run(app, host="0.0.0.0", port=8000, timeout_keep_alive=60)

This API has one endpoint: /generate_response that takes { "query": "your query" }as input and returns { "response": assistant_content }as output. Note that the original response from the model contains references like [doc1], [doc2], etc… The regex in the code removes those references. I don not particularly like how the references are handled by the API so I decided to not include them and simplify the response.

The endpoint expects an api-key header. It it is not present, it returns an error.

The endpoint does a call to the Azure OpenAI chat completion extension API which looks very similar to a regular OpenAI chat completion. The request does however, contain a dataSources field with the Azure AI Search information.

The environment variables like the OPENAI_API_KEY and the SEARCH_KEY are retrieved from a .env file.

Note: to stress this again, this API returns the answer to the query as generated by the chosen Azure OpenAI model. This allows it to be used in any application, not just a custom GPT. For a custom GPT in ChatGPT, an alternate approach would be to hand over the search results from Azure AI search directly, allowing the model in the custom GPT to generate the response. It would be faster and avoid Azure OpenAI costs. We are effectively using the custom GPT as a UI and as a way to maintain history between action calls. 😀

If you want to see the code in GitHub, check this URL: https://github.com/gbaeke/custom-gpt.

Running the API in Azure Container Apps

To run the API in the cloud, I decided to use Azure Container Apps. That means we need a Dockerfile to build the container image locally or in the cloud:

# Use an official Python runtime as a parent image
FROM python:3.9-slim-buster

# Set the working directory in the container to /app
WORKDIR /app

# Add the current directory contents into the container at /app
ADD . /app

# Install any needed packages specified in requirements.txt
RUN pip install --no-cache-dir -r requirements.txt

# Run app.py when the container launches
CMD ["python3", "app.py"]

We also need a requirements.txt file:

fastapi==0.104.1
pydantic==2.5.2
pydantic_core==2.14.5
httpx==0.25.2
python-dotenv==1.0.0
uvicorn==0.24.0.post1

I use the following shell script to build and run the container locally. The script can also push the container to Azure Container Apps.

#!/bin/bash

# Load environment variables from .env file
export $(grep -v '^#' .env | xargs)

# Check the command line argument
if [ "$1" == "build" ]; then
    # Build the Docker image
    docker build -t myblog .
elif [ "$1" == "run" ]; then
    # Run the Docker container, mapping port 8000 to 8000 and setting environment variables
    docker run -p 8000:8000 -e OPENAI_API_KEY=$OPENAI_API_KEY -e SEARCH_KEY=$SEARCH_KEY -e API_KEY=$API_KEY myblog
elif [ "$1" == "up" ]; then
    az containerapp up -n myblog --ingress external --target-port 8000 \
        --env-vars OPENAI_API_KEY=$OPENAI_API_KEY SEARCH_KEY=$SEARCH_KEY API_KEY=$API_KEY \
        --source .
else
    echo "Usage: $0 {build|run|up}"
fi

The shell script extracts the environment variables defined in .env and sets them in the session. Next, we check the first parameter given to the script (Docker is required on your machine for build and run):

  • build: build the Docker image
  • run: run the Docker image locally on port 8000 and specify the environment variables to authenticate to Azure OpenAI and Azure AI Search
  • up: build the Docker image in the cloud and run it in Container Apps; if you do not have a Container Apps Environment or Azure Container Registry, they will be created for you. In the end, you will get an https endpoint to your API in the cloud.

Note: you should not put secrets in environment variables in Azure Container Apps directly; use Container Apps secrets or Key Vault instead; the above is just quick and easy to simplify the deployment

To test the API locally, use the REST Client extension in VS Code with an .http file:

POST http://localhost:8000/generate_response HTTP/1.1
Host: localhost:8000
Content-Type: application/json
api-key: API_KEY_FROM_DOTENV

{
  "query": "what is the openai assistants api?"
}

###

POST https://AZURE_CONTAINER_APPS_ENDPOINT/generate_response HTTP/1.1
Host: AZURE_CONTAINER_APPS_ENDPOINT
Content-Type: application/json
api-key: API_KEY_FROM_DOTENV

{
  "query": "Can I use Redis as a vector db?"
}

When you get something like below, you are good to go. Note again that we return a final answer and not the relevant chunks from Azure AI search.

Successful response from .http file

Getting the OpenAPI spec and adding it to the GPT

With your API running, you can go to its URL, like this one if the API runs locally: http://localhost:8000/openapi.json. The result is a JSON document you can copy to your GPT. I recommend to copy the JSON to VS Code and format it before you paste it in the GPT.

In the GPT, modify the OpenAPI spec with a servers section that includes your Azure Container Apps ingress URL:

Adding the URL to the GPT Action definition

If you want to give the ability to the user to trust the action to be called without approval (after a first call), also add the following:

Allowing the user to say Always Allow when action is used the first time

Take a look at the video below that shows how to create the GPT, including the configuration of the action and testing it.

Conclusion

Custom GPTs in ChatGPT open up a world of possibilities to offer personalised ChatGPT experiences. With custom actions, you can let the GPT do anything you want. In this tutorial, the custom action is an API call that answers the user’s question using Azure OpenAI with Azure AI Search as the provider of relevant context.

As long as you build and host an API and have an OpenAPI spec for your API, the possibilities are virtually limitless.

Note that custom GPTs with actions are not available in the ChatGPT app on mobile yet (end November, 2023). When that happens, it will open up all these capabilities on the go, including enabling voice chat. Fun stuff! 😀

Enhancing Semantic Search with a Streamlit UI

In a previous blog post, we discussed two Python programs, upload_vectors.py and search_vectors.py. These programs were used to create and search vectors, respectively. The upload_vectors.py script created vectors from chunks of a larger text and stored them in Pinecone, while the search_vectors.py script enabled semantic search on the text. In this blog post, we will discuss how to create a user interface (UI) for these two programs using Streamlit.

🚀 I kickstarted the Streamlit app by handing over the text-based version to ChatGPT and asking it to work its magic ✨💻. Yes, it was that easy! Afterwards, I made several manual changes to make it look the way I wanted.

Pinecone, Vectors, Embeddings, and Semantic Search: What’s all that about?

Pinecone is a vector database service that allows for easy storage and retrieval of high-dimensional vectors. It is optimized for similarity search, which makes it a perfect fit for tasks like semantic search. Our script stores vectors in Pinecone by parsing an RSS feed, chunking the blog posts, and creating the vectors with OpenAI’s embedding APIs.

Vectors are mathematical representations of data in the form of an array of numbers. In our case, we use vectors to represent chunks of text retrieved from blog posts. These vectors are generated using a process called embedding, which is a way of representing complex data, like text, in a lower-dimensional space while preserving the essential information.

Semantic search is a type of search that goes beyond keyword matching to understand the meaning and context of the query. By using vector embeddings, we can compare the similarity between queries and stored texts to find the most relevant results. Pinecone does that search for us and simply returns a number of matching chunks (pieces of text).

What is Streamlit?

Streamlit is a Python library that makes it easy to create custom web apps for machine learning and data science projects. You can build interactive UIs with minimal code, allowing you to focus on the core logic of your application.

Here’s an example of creating an extremely simple Streamlit app:

import streamlit as st

st.title('Hello, Streamlit!')
st.write('This is a simple Streamlit app.')

This code would generate a web app with a title and a text output. You can also create more complex UIs with user input, like sliders, text inputs, and buttons.

Creating a Streamlit UI for Semantic Search

Now let’s examine the provided code for creating a Streamlit UI for the search_vectors.py program. The code can be broken down into the following sections:

  1. Import necessary libraries and check environment variables.
  2. Set up the tokenizer and define the tiktoken_len function.
  3. Create the UI elements, including the title, text input, dropdown, sliders, and buttons.
  4. Define the main search functionality that is triggered when the user clicks the “Search” button.

Here is the full code:

import os
import pinecone
import openai
import tiktoken
import streamlit as st

# check environment variables
if os.getenv('PINECONE_API_KEY') is None:
    st.error("PINECONE_API_KEY not set. Please set this environment variable and restart the app.")
if os.getenv('PINECONE_ENVIRONMENT') is None:
    st.error("PINECONE_ENVIRONMENT not set. Please set this environment variable and restart the app.")
if os.getenv('OPENAI_API_KEY') is None:
    st.error("OPENAI_API_KEY not set. Please set this environment variable and restart the app.")

# use cl100k_base tokenizer for gpt-3.5-turbo and gpt-4
tokenizer = tiktoken.get_encoding('cl100k_base')


def tiktoken_len(text):
    tokens = tokenizer.encode(
        text,
        disallowed_special=()
    )
    return len(tokens)

# create a title for the app
st.title("Search blog feed 🔎")

# create a text input for the user query
your_query = st.text_input("What would you like to know?")
model = st.selectbox("Model", ["gpt-3.5-turbo", "gpt-4"])

with st.expander("Options"):

    max_chunks = 5
    if model == "gpt-4":
        max_chunks = 15

    max_reply_tokens = 1250
    if model == "gpt-4":
        max_reply_tokens = 2000

    col1, col2 = st.columns(2)

    # model dropdown
    with col1:
        chunks = st.slider("Number of chunks", 1, max_chunks, 5)
        temperature = st.slider("Temperature", 0.0, 1.0, 0.0)

    with col2:
        reply_tokens = st.slider("Reply tokens", 750, max_reply_tokens, 750)
    

# create a submit button
if st.button("Search"):
    # get the Pinecone API key and environment
    pinecone_api = os.getenv('PINECONE_API_KEY')
    pinecone_env = os.getenv('PINECONE_ENVIRONMENT')

    pinecone.init(api_key=pinecone_api, environment=pinecone_env)

    # set index
    index = pinecone.Index('blog-index')


    # vectorize your query with openai
    try:
        query_vector = openai.Embedding.create(
            input=your_query,
            model="text-embedding-ada-002"
        )["data"][0]["embedding"]
    except Exception as e:
        st.error(f"Error calling OpenAI Embedding API: {e}")
        st.stop()

    # search for the most similar vector in Pinecone
    search_response = index.query(
        top_k=chunks,
        vector=query_vector,
        include_metadata=True)

    # create a list of urls from search_response['matches']['metadata']['url']
    urls = [item["metadata"]['url'] for item in search_response['matches']]

    # make urls unique
    urls = list(set(urls))

    # create a list of texts from search_response['matches']['metadata']['text']
    chunk_texts = [item["metadata"]['text'] for item in search_response['matches']]

    # combine texts into one string to insert in prompt
    all_chunks = "\n".join(chunk_texts)

    # show urls of the chunks
    with st.expander("URLs", expanded=True):
        for url in urls:
            st.markdown(f"* {url}")
    

    with st.expander("Chunks"):
        for i, t in enumerate(chunk_texts):
            # remove newlines from chunk
            tokens = tiktoken_len(t)
            t = t.replace("\n", " ")
            st.write("Chunk ", i, "(Tokens: ", tokens, ") - ", t[:50] + "...")
    with st.spinner("Summarizing..."):
        try:
            prompt = f"""Answer the following query based on the context below ---: {your_query}
                                                        Do not answer beyond this context!
                                                        ---
                                                        {all_chunks}"""


            # openai chatgpt with article as context
            # chat api is cheaper than gpt: 0.002 / 1000 tokens
            response = openai.ChatCompletion.create(
                model=model,
                messages=[
                    { "role": "system", "content":  "You are a truthful assistant!" },
                    { "role": "user", "content": prompt }
                ],
                temperature=temperature,
                max_tokens=max_reply_tokens
            )

            st.markdown("### Answer:")
            st.write(response.choices[0]['message']['content'])

            with st.expander("More information"):
                st.write("Query: ", your_query)
                st.write("Full Response: ", response)

            with st.expander("Full Prompt"):
                st.write(prompt)

            st.balloons()
        except Exception as e:
            st.error(f"Error with OpenAI Completion: {e}")

A closer look

The code first imports the necessary libraries and checks if the required environment variables are set, displaying an error message if they are not. The libraries you need are in requirements.txt on GitHub. You can install them with:

pip3 install -r requirements.txt

ℹ️ I recommend using a Python virtual environment when you install these dependencies; see poetry (just one example)

The tiktoken_len function calculates the token length of a given text using the tokenizer. This is used to display the tokens of each chunk of text we set to the ChatCompletion API. Depending on the model, 4096 or 8192 tokens are supported.

The UI is built using Streamlit functions, such as st.title, st.text_input, st.selectbox, and st.columns. These functions create various UI elements that the user can interact with to input their query and set search parameters. If you look at the code, you will see how easy it is to add those elements.

With the UI elements, you can set:

  • the number of text chunks to return from Pinecone and to forward to the ChatCompletion API (using st.slider)
  • the number of tokens to reply with (using st.slider)
  • the model: gpt-3.5-turbo or gpt-4 (ensure you have access to the gpt-4 API)
  • the temperature (using st-slider)

The options are shown in two columns with st.columns.

The main search functionality is triggered when the user clicks the “Search” button. The code then vectorizes the query, searches for the most similar vectors in Pinecone, and displays the URLs and chunks found. Finally, the selected model is used to generate an answer based on the chunks found and the user’s query. Often, gpt-4 will provide the best answer. It seems to be able to better understand all the chunks of text thrown at it.

Running the code

To run the code you need the following:

  • A Pinecode API key and environment
  • An OpenAI API key

It is easiest to run the code with Docker. If you have it installed, run the following command:

docker run -p 8501:8501 -e OPENAI_API_KEY="YOURKEY" \
    -e PINECONE_API_KEY="YOURKEY" \
    -e PINECONE_ENVIRONMENT="YOURENV" gbaeke/blogsearch

The gbaeke/blogsearch image is available on Docker Hub. You can also build your own with the Dockerfile provided on GitHub.

After running the image, go to http://localhost:8501 and first use the Upload page to create your Pinecode index and store vectors in it. You can use my blog’s feed or any other feed. You can experiment with the chunk size and chunk overlap.

Upload to Pinecone

You can add multiple RSS feeds one-by-one as long as you turn off Recreate index before each new upload. After you have populated the index, use the Search page to start searching:

Searching

Above, we ask what we can do with Pinecone and let gpt-4 do the answering. The similarity search will search for 5 similar items and return them. We show the original URLs these results come from. In the Chunks section, you can see the original chunks because they are also in Pinecone as metadata. After the answer, you can find the full JSON returned by the ChatCompletion API and the full prompt we sent to that API.

Conclusion

In this blog post, we showed you how to create a Streamlit UI for the search_vectors.py script we talked about in a previous post. Streamlit allows you to easily build interactive web applications for your machine learning and data science projects. We also created a UI to upload posts to Pinecone. The full program allows you to add as much data as you want and query that data with semantic search, summarized and synthesized by the GPT model of choice. Give it a try and let me know what you think.

Pinecone and OpenAI magic: A guide to finding your long lost blog posts with vectorized search and ChatGPT

Searching through a large database of blog posts can be a daunting task, especially if there are thousands of articles. However, using vectorized search and cosine similarity, you can quickly query your blog posts and retrieve the most relevant content.

In this blog post, we’ll show you how to query a list of blog posts (from this blog) using a combination of vectorized search with cosine similarity and OpenAI ChatCompletions. We’ll be using OpenAI’s embeddings API to vectorize the blog post articles and Pinecone, a vector database, to store and query the vectors. We’ll also show you how to retrieve the contents of the article, create a prompt using the ChatCompletion API, and return the result to a web page.

ℹ️ Sample code is on GitHub: https://github.com/gbaeke/gpt-vectors

ℹ️ If you want an introduction to embeddings and cosine similarity, watch the video on YouTube by Part Time Larry.

Setting Up Pinecone

Before we can start querying our blog posts, we need to set up Pinecone. Pinecone is a vector database that makes it easy to store and query high-dimensional data. It’s perfect for our use case since we’ll be working with high-dimensional vectors.

ℹ️ Using a vector database is not strictly required. The GitHub repo contains app.py, which uses scikit-learn to create the vectors and perform a cosine similarity search. Many other approaches are possible. Pinecone just makes storing and querying the vectors super easy.

ℹ️ If you want more information about Pinecone and the concept of a vector database, watch this introduction video.

First, we’ll need to create an account with Pinecone and get the API key and environment name. In the Pinecone UI, you will find these as shown below. There will be a Show Key and Copy Key button in the Actions section next to the key.

Key and environment for Pinecone

Once we have an API key and the environment, we can use the Pinecone Python library to create and use indexes. Install the Pinecone library with pip install pinecone-client.

Although you can create a Pinecone index from code, we will create the index in the Pinecone portal. Go to Indexes and select Create Index. Create the index using cosine as metric and 1536 dimensions:

blog-index in Pinecone

The embedding model we will use to create the vectors, text-embedding-ada-002, outputs vectors with 1536 dimensions. For more info see OpenAI’s blog post of December 15, 2022.

To use the Pinecode index from code, look at the snippet below:

import pinecone

pinecone_api = "<your_api_key>"
pinecone_env = "<your_environment>"

pinecone.init(api_key=pinecone_api, environment=pinecone_env)

index = pinecone.Index('blog-index')

We create an instance of the Index class with the name “blog-index” and store this in index. This index will be used to store our blog post vectors or to perform searches on.

Vectorizing Blog Posts with OpenAI’s Embeddings API

Next, we’ll need to vectorize our blog post articles. We’ll be using OpenAI’s embeddings API to do this. The embeddings API takes a piece of text and returns a high-dimensional vector representation of that text. Here’s an example of how to do that for one article or string:

import openai

openai.api_key = "<your_api_key>"

article = "Some text from a blog post"

vector = openai.Embedding.create(
    input=article,
    model="text-embedding-ada-002"
)["data"][0]["embedding"]

We create a vector representation of our blog post article by calling the Embedding class’s create method. We pass in the article text as input and the text-embedding-ada-002 model, which is a pre-trained language model that can generate high-quality embeddings.

Storing Vectors in Pinecone

Once we have the vector representations of our blog post articles, we can store them in Pinecone. Instead of storing vector per vector, we can use upsert to store a list of vectors. The code below uses the feed of this blog to grab the URLs for 50 posts, every post is vectorized and the vector is added to a Python list of tuples, as expected by the upsert method. The list is then added to Pinecone at once. The tuple that Pinecone expects is:

(id, vector, metadata dictionary)

e.g. (0, vector for post 1, {"url": url to post 1}

Here is the code that uploads the first 50 posts of baeke.info to Pinecone. You need to set the Pinecone key and environment and the OpenAI key as environment variables. The code uses feedparser to grab the blog feed, and BeatifulSoup to parse the retrieved HTML. The code serves as an example only. It is not very robust when it comes to error checking etc…

import feedparser
import os
import pinecone
import numpy as np
import openai
import requests
from bs4 import BeautifulSoup

# OpenAI API key
openai.api_key = os.getenv('OPENAI_API_KEY')

# get the Pinecone API key and environment
pinecone_api = os.getenv('PINECONE_API_KEY')
pinecone_env = os.getenv('PINECONE_ENVIRONMENT')

pinecone.init(api_key=pinecone_api, environment=pinecone_env)

# set index; must exist
index = pinecone.Index('blog-index')

# URL of the RSS feed to parse
url = 'https://atomic-temporary-16150886.wpcomstaging.com/feed/'

# Parse the RSS feed with feedparser
feed = feedparser.parse(url)

# get number of entries in feed
entries = len(feed.entries)
print("Number of entries: ", entries)

post_texts = []
pinecone_vectors = []
for i, entry in enumerate(feed.entries[:50]):
    # report progress
    print("Processing entry ", i, " of ", entries)

    r = requests.get(entry.link)
    soup = BeautifulSoup(r.text, 'html.parser')
    article = soup.find('div', {'class': 'entry-content'}).text

    # vectorize with OpenAI text-emebdding-ada-002
    embedding = openai.Embedding.create(
        input=article,
        model="text-embedding-ada-002"
    )

    # print the embedding (length = 1536)
    vector = embedding["data"][0]["embedding"]

    # append tuple to pinecone_vectors list
    pinecone_vectors.append((str(i), vector, {"url": entry.link}))

# all vectors can be upserted to pinecode in one go
upsert_response = index.upsert(vectors=pinecone_vectors)

print("Vector upload complete.")

Querying Vectors with Pinecone

Now that we have stored our blog post vectors in Pinecone, we can start querying them. We’ll use cosine similarity to find the closest matching blog post. Here is some code that does just that:

query_vector = <vector representation of query>  # vector created with OpenAI as well

search_response = index.query(
    top_k=5,
    vector=query_vector,
    include_metadata=True
)

url = get_highest_score_url(search_response['matches'])

def get_highest_score_url(items):
    highest_score_item = max(items, key=lambda item: item["score"])

    if highest_score_item["score"] > 0.8:
        return highest_score_item["metadata"]['url']
    else:
        return ""

We create a vector representation of our query (you don’t see that here but it’s the same code used to vectorize the blog posts) and pass it to the query method of the Pinecone Index class. We set top_k=5 to retrieve the top 5 matching blog posts. We also set include_metadata=True to include the metadata associated with each vector in our response. That way, we also have the URL of the top 5 matching posts.

The query method returns a dictionary that contains a matches key. The matches value is a list of dictionaries, with each dictionary representing a matching blog post. The score key in each dictionary represents the cosine similarity score between the query vector and the blog post vector. We use the get_highest_score_url function to find the blog post with the highest cosine similarity score.

The function contains some code to only return the highest scoring URL if the score is > 0.8. It’s of course up to you to accept lower matching results. There is a potential for the vector query to deliver an article that’s not highly relevant which results in an irrelevant context for the OpenAI ChatCompletion API call we will do later.

Retrieving the Contents of the Blog Post

Once we have the URL of the closest matching blog post, we can retrieve the contents of the article using the Python requests library and the BeautifulSoup library.

import requests
from bs4 import BeautifulSoup

r = requests.get(url)
soup = BeautifulSoup(r.text, 'html.parser')

article = soup.find('div', {'class': 'entry-content'}).text

We send a GET request to the URL of the closest matching blog post and retrieve the HTML content. We use the BeautifulSoup library to parse the HTML and extract the contents of the <div> element with the class “entry-content”.

Creating a Prompt for the ChatCompletion API

Now that we have the contents of the blog post, we can create a prompt for the ChatCompletion API. The crucial part here is that our OpenAI query should include the blog post we just retrieved!

response = openai.ChatCompletion.create(
    model="gpt-3.5-turbo",
    messages=[
        { "role": "system", "content": "You are a polite assistant" },
        { "role": "user", "content": "Based on the article below, answer the following question: " + your_query +
            "\nAnswer as follows:" +
            "\nHere is the answer directly from the article:" +
            "\nHere is the answer from other sources:" +
             "\n---\n" + article }
           
    ],
    temperature=0,
    max_tokens=200
)

response_text=f"\n{response.choices[0]['message']['content']}"

We use the ChatCompletion API with the gpt-3.5-turbo model to ask our question. This is the same as using ChatGPT on the web with that model. At this point in time, the GPT-4 model was not available yet.

Instead of one prompt, we send a number of dictionaries in a messages list. The first item in the list sets the system message. The second item is the actual user question. We ask to answer the question based on the blog post we stored in the article variable and we provide some instructions on how to answer. We add the contents of the article to our query.

If the article is long, you run the risk of using too many tokens. If that happens, the ChatCompletion call will fail. You can use the tiktoken library to count the tokens and prevent the call to happen in the first place. Or you can catch the exception and tell the user. In the above code, there is no error handling. We only include the core code that’s required.

Returning the Result to a Web Page

If you are running the search code in an HTTP handler as the result of the user typing a query in a web page, you can return the result to the caller:

return jsonify({
    'url': url,
    'response': response_text
})

The full example, including an HTML page and Flask code can be found on GitHub.

The result could look like this:

Query results in the closest URL using vectorized search and ChatGPT answering the question based on the contents the URL points at

Conclusion

Using vectorized search and cosine similarity, we can quickly query a database of blog posts and retrieve the most relevant post. By combining OpenAI’s embeddings API, Pinecone, and the ChatCompletion API, we can create a powerful tool for searching and retrieving blog post content using natural language.

Note that there are some potential issues as well. The code we show is merely a starting point:

  • Limitations of cosine similarity: it does not take into account all properties of the vectors, which can lead to misleading results
  • Prompt engineering: the prompt we use works but there might be prompts that just work better. Experimentation with different prompts is crucial!
  • Embeddings: OpenAI embeddings are trained on a large corpus of text, which may not be representative of the domain-specific language in the posts
  • Performance might not be sufficient if the size of the database grows large. For my blog, that’s not really an issue. 😀

Step-by-Step Guide: How to Build Your Own Chatbot with the ChatGPT API

In this blog post, we will be discussing how to build your own chat bot using the ChatGPT API. It’s worth mentioning that we will be using the OpenAI APIs directly and not the Azure OpenAI APIs, and the code will be written in Python. A crucial aspect of creating a chat bot is maintaining context in the conversation, which we will achieve by storing and sending previous messages to the API at each request. If you are just starting with AI and chat bots, this post will guide you through the step-by-step process of building your own simple chat bot using the ChatGPT API.

Python setup

Ensure Python is installed. I am using version 3.10.8. For editing code, I am using Visual Studio code as the editor. For the text-based chat bot, you will need the following Python packages:

  • openai: make sure the version is 0.27.0 or higher; earlier versions do not support the ChatCompletion APIs
  • tiktoken: a library to count the number of tokens of your chat bot messages

Install the above packages with your package manager. For example: pip install openai.

All code can be found on GitHub.

Getting an account at OpenAI

We will write a text-based chat bot that asks for user input indefinitely. The first thing you need to do is sign up for API access at https://platform.openai.com/signup. Access is not free but for personal use, while writing and testing the chat bot, the price will be very low. Here is a screenshot from my account:

Oh no, $0.13 dollars

When you have your account, generate an API key from https://platform.openai.com/account/api-keys. Click the Create new secret key button and store the key somewhere.

Writing the bot

Now create a new Python file called app.py and add the following lines:

import os
import openai
import tiktoken

openai.api_key = os.getenv("OPENAI_KEY")

We already discussed the openai and tiktoken libraries. We will also use the builtin os library to read environment variables.

In the last line, we read the environment variable OPENAI_KEY. If you use Linux, in your shell, use the following command to store the OpenAI key in an environment variable: export OPENAI_KEY=your-OpenAI-key. We use this approach to avoid storing the API key in your code and accidentally uploading it to GitHub.

To implement the core chat functionality, we will use a Python class. I was following a Udemy course about ChatGPT and it used a similar approach, which I liked. By the way, I can highly recommend that course. Check it out here.

Let’s start with the class constructor:

class ChatBot:

    def __init__(self, message):
        self.messages = [
            { "role": "system", "content": message }
        ]

In the constructor, we define a messages list and set the first item in that list to a configurable dictionary: { "role": "system", "content": message }. In the ChatGPT API calls, the messages list provides context to the API because it contains all the previous messages. With this initial system message, we can instruct the API to behave in a certain way. For example, later in the code, you will find this code to create an instance of the ChatBot class:

bot = ChatBot("You are an assistant that always answers correctly. If not sure, say 'I don't know'.")

But you could also do:

bot = ChatBot("You are an assistant that always answers wrongly.Always contradict the user")

In practice, ChatGPT does not follow the system instruction to strongly. User messages are more important. So it could be that, after some back and forth, the answers will not follow the system instruction anymore.

Let’s continue with another method in the class, the chat method:

def chat(self):
        prompt = input("You: ")
        
        self.messages.append(
            { "role": "user", "content": prompt}
        )
        
        response = openai.ChatCompletion.create(
            model="gpt-3.5-turbo",
            messages = self.messages,
            temperature = 0.8
        )
        
        answer = response.choices[0]['message']['content']
        
        print(answer)
        
        self.messages.append(
           { "role": "assistant", "content": answer} 
        )

        tokens = self.num_tokens_from_messages(self.messages)
        print(f"Total tokens: {tokens}")

        if tokens > 4000:
            print("WARNING: Number of tokens exceeds 4000. Truncating messages.")
            self.messages = self.messages[2:]

The chat method is where the action happens. It does the following:

  • It prompts the user to enter some input.
  • The user’s input is stored in a dictionary as a message with a “user” role and appended to a list of messages called self.messages. If this is the first input, we now have two messages in the list, a system message and a user message.
  • It then creates a response using OpenAI’s gpt-3.5-turbo model, passing in the self.messages list and a temperature of 0.8 as parameters. We use the ChatCompletion API versus the Completion API that you use with other models such as text-davinci-003.
  • The generated response is stored in a variable named answer. The full response contains a lot of information. We are only interested in the first response (there is only one) and grab the content.
  • The answer is printed to the console.
  • The answer is also added to the self.messages list as a message with an “assistant” role. If this is the first input, we now have three messages in the list: a system message, the first user message (the input) and the assistant’s response.
  • The total number of tokens in the self.messages list is computed using a separate function called num_tokens_from_messages() and printed to the console.
  • If the number of tokens exceeds 4000, a warning message is printed and the self.messages list is truncated to remove the first two messages. We will talk about these tokens later.

It’s important to realize we are using the Chat completions here. You can find more information about Chat completions here.

If you did not quite get how the text response gets extracted, here is an example of a full response from the Chat completion API:

{
 'id': 'chatcmpl-6p9XYPYSTTRi0xEviKjjilqrWU2Ve',
 'object': 'chat.completion',
 'created': 1677649420,
 'model': 'gpt-3.5-turbo',
 'usage': {'prompt_tokens': 56, 'completion_tokens': 31, 'total_tokens': 87},
 'choices': [
   {
    'message': {
      'role': 'assistant',
      'content': 'The 2020 World Series was played in Arlington, Texas at the Globe Life Field, which was the new home stadium for the Texas Rangers.'},
    'finish_reason': 'stop',
    'index': 0
   }
  ]
}

The response is indeed in choices[0][‘message’][‘content’].

To make this rudimentary chat bot work, we will repeatedly call the chat method like so:

bot = ChatBot("You are an assistant that always answers correctly. If not sure, say 'I don't know'.")
    while True:
        bot.chat()

Every time you input a question, the API answers and both the question and answer is added to the messages list. Of course, that makes the messages list grow larger and larger, up to a point where it gets to large. The question is: “What is too large?”. Let’s answer that in the next section.

Counting tokens

A language model does not work with text as humans do. Instead, they use tokens. It’s not important how this exactly works but it is important to know that you get billed based on these tokens. You pay per token.

In addition, the model we use here (gpt-3.5-turbo) has a maximum limit of 4096 tokens. This might change in the future. With our code, we cannot keep adding messages to the messages list because, eventually, we will pass the limit and the API call will fail.

To have an idea about the tokens in our messages list, we have this function:

def num_tokens_from_messages(self, messages, model="gpt-3.5-turbo"):
        try:
            encoding = tiktoken.encoding_for_model(model)
        except KeyError:
            encoding = tiktoken.get_encoding("cl100k_base")
        if model == "gpt-3.5-turbo":  # note: future models may deviate from this
            num_tokens = 0
            for message in messages:
                num_tokens += 4  # every message follows <im_start>{role/name}\n{content}<im_end>\n
                for key, value in message.items():
                    num_tokens += len(encoding.encode(value))
                    if key == "name":  # if there's a name, the role is omitted
                        num_tokens += -1  # role is always required and always 1 token
            num_tokens += 2  # every reply is primed with <im_start>assistant
            return num_tokens
        else:
            raise NotImplementedError(f"""num_tokens_from_messages() is not presently implemented for model {model}.""")

The above function comes from the OpenAI cookbook on GitHub. In my code, the function is used to count tokens in the messages list and, if the number of tokens is above a certain limit, we remove the first two messages from the list. The code also prints the tokens so you now how many you will be sending to the API.

The function contains references to <im_start> and <im_end>. This is ChatML and is discussed here. Because you use the ChatCompletion API, you do not have to worry about this. You just use the messages list and the API will transform it all to ChatML. But when you count tokens, ChatML needs to be taken into account for the total token count.

Note that Microsoft examples for Azure OpenAI, do use ChatML in the prompt, in combination with the default Completion APIs. See Microsoft Learn for more information. You will quickly see that using the ChatCompletion API with the messages list is much simpler.

To see, and download, the full code, see GitHub.

Running the code

To run the code, just run app.py. On my system, I need to use python3 app.py. I set the system message to You are an assistant that always answers wrongly. Contradict the user. 😀

Here’s an example conversation:

Although, at the start, the responses follow the system message, the assistant starts to correct itself and answers correctly. As stated, user messages eventually carry more weight.

Summary

In this post, we discussed how to build a chat bot using the ChatGPT API and Python. We went through the setup process, created an OpenAI account, and wrote the chat bot code using the OpenAI API. The bot used the ChatCompletion API and maintained context in the conversation by storing and sending previous messages to the API at each request. We also discussed counting tokens and truncating the message list to avoid exceeding the maximum token limit for the model. The full code is available on GitHub, and we provided an example conversation between the bot and the user. The post aimed to guide both beginning developers and beginners in AI and chat bot development through the step-by-step process of building their chat bot using the ChatGPT API and keep it as simple as possible.

Hope you liked it!