Introduction
Imagine automating the creation of professional presentations through a coordinated series of intelligent agents. In this blog post, we’ll explore how to build a workflow that combines research, outline generation, content creation, and design, all orchestrated through the Microsoft Agent Framework.
We’ll build a practical example that generates presentations using:
- Azure OpenAI Responses API for agent creation
- Microsoft Agent Framework Workflows for orchestration
- Tavily Search API for concurrent web research
- GAMMA API for stunning presentation generation (In October 2025, this API was in beta)
By the end, you’ll understand how to leverage these tools to create end-to-end workflows that tackle complex, multi-step tasks.
What is Microsoft Agent Framework?
The Microsoft Agent Framework is a new, modern framework for building intelligent automation systems powered by AI agents. It enables you to create agents and workflows that blend AI reasoning with structured business processes.
Agents vs. Workflows: Understanding the Difference
Before diving into workflows, it’s important to understand how agents and workflows complement each other:
- AI Agents are LLM-powered systems that make dynamic decisions based on context. They have access to tools and can reason through problems, but the steps they take are determined by the model at runtime.

- Workflows, on the other hand, are predefined sequences of operations with explicit control flow. They define exactly how data flows from one step to the next. Workflows can contain agents as components, orchestrating them alongside other executors and services.

Think of it this way:
- An agent is like an expert consultant who decides how to solve a problem
- A workflow is like a project manager who coordinates multiple specialists in a structured process
The framework provides the tools to do both and to combine them in interesting ways.
Creating an Agent with Azure OpenAI Responses API
Let’s start by understanding how to create individual agents before we orchestrate them into workflows.
The Azure OpenAI Responses API is Azure’s version of the OpenAI Responses API . It’s the successor to the chat completion APIs and supports structured outputs, tool calling, stateful interactions and hosted tools.
Note: Azure OpenAI Responses API does not support the native web search tool. We will use Tavily to support web searches.
Here’s how to create a simple agent in Agent Framework, based on the Responses API:
import asyncio
import os
from dotenv import load_dotenv
from agent_framework.azure import AzureOpenAIResponsesClient
from azure.identity import AzureCliCredential

# Load environment variables from .env
load_dotenv()

async def main():
    # Create a client
    client = AzureOpenAIResponsesClient(
        endpoint=os.getenv("AZURE_OPENAI_ENDPOINT"),
        api_key=os.getenv("AZURE_OPENAI_API_KEY"),
        deployment_name=os.getenv("AZURE_OPENAI_DEPLOYMENT", "gpt-4o")
    )

    # Create an agent
    agent = client.create_agent(
        name="OutlineAgent",
        instructions="Based on the user's request, you create an outline for a presentation.",
    )

    # Run the agent
    result = await agent.run("Create an outline for a presentation about Python")
    print(result.text)

if __name__ == "__main__":
    asyncio.run(main())
Note: this is just one type of agent you can create with Agent Framework. Some of the other supported types are chat completion agents and Azure AI Foundry Agents. See Microsoft Learn for more information. We could have used these agents as well.
Agents with Function Tools
Agents become truly useful when equipped with function tools—custom Python functions that agents can call to accomplish tasks. In Agent Framework, you can use the optional @ai_function decorator to provide a meaningful description to the LLM using the function. An alternative is to use a docstring. The framework will automatically convert the Python functions to tools the LLM understands.
from agent_framework import ai_function
from typing import Annotated
from pydantic import Field

@ai_function(
    name="search_web",
    description="Search the web for information"
)
async def search_web(
    queries: Annotated[list[str], Field(description="List of search queries")]
) -> str:
    # Implementation here
    pass
Once defined, you pass these tools to your agent:
agent = client.create_agent(
    name="ResearchAgent",
    instructions="You research and create content for slides.",
    tools=[search_web]  # Register the tool
)
Now the agent can autonomously decide to call search_web when it needs information! In the agent instructions, you can tell the agent how and when to use the tool if needed.
In the example discussed further in this post, both the outline agent and research agent use the search function to build the slide content.
Structured Output with Pydantic
For predictable, structured responses, the framework supports structured output with Pydantic models:
from pydantic import BaseModel, Field
from typing import List, Annotated

class OutlineResponse(BaseModel):
    title: str
    number_of_slides: Annotated[int, Field(default=5)]
    slide_titles: List[str]
    audience: Annotated[str, Field(default="general")]

agent = client.create_agent(
    name="OutlineAgent",
    instructions="Create a presentation outline.",
    response_format=OutlineResponse  # Enforce this structure
)
The agent’s response will automatically be validated and parsed as an OutlineResponse object: type-safe and predictable. This feature is supported by the underlying Responses API with its support for structured outputs.
We use structured outputs extensively in the example code discussed below.
Understanding Workflows: Orchestrating Agents at Scale
Now that we understand agents, let’s see how to compose them into workflows.
A workflow is built from four key components:
- Executors – The individual processing nodes (agents, custom logic, integrations)
- Edges – Connections defining data flow between executors
- Workflows – The orchestrator that manages execution and routing
- Events – Real-time observability into execution
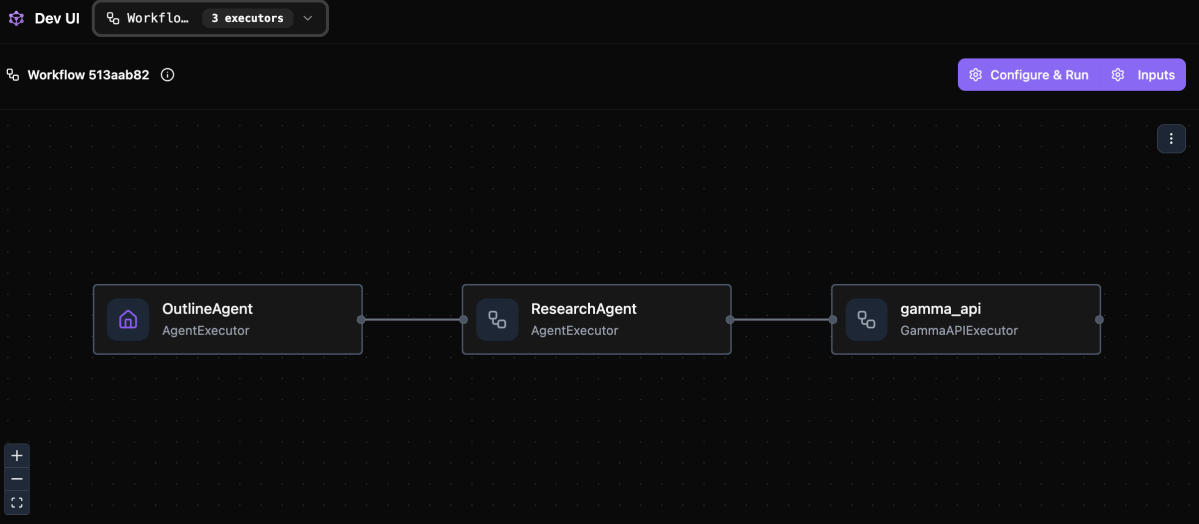
Agent Framework can visualize workflows in different ways. One option is to use the DevUI:

To run the workflow, simply click Configure & Run and provide your input. The steps in the workflow will light up when they are doing work.
For more information about Dev UI see the Agent Framework repository on GitHub.
Building a Workflow with WorkflowBuilder
After defining the executors, you use WorkflowBuilder to build a workflow:
from agent_framework import WorkflowBuilder

workflow = (
    WorkflowBuilder()
    .set_start_executor(outline_agent)          # First step
    .add_edge(outline_agent, research_agent)    # Data flows here
    .add_edge(research_agent, gamma_executor)   # Final step
    .build()
)

# serve workflow with Dev UI
serve(entities=[workflow], port=8093, auto_open=True)
This creates a linear, sequential flow where:
- Input → outline_agent produces an outline
- Outline → research_agent researches and creates slide content
- Slide content → gamma_executor generates the presentation
Note that the first two steps are simply Azure Responses API agents (AgentExecutors). The third step is a custom executor inheriting from the Executor class.
The workflow is served with Dev UI, which results in a browser opening the Dev UI interface as shown in the screenshot above.
Input and Output Between Nodes
Understanding data flow in the workflow is crucial. Each executor (agents or custom) receives input and must send output to the next executor. Below is a custom executor created from a Python function. You can also create executors from a Python class:
@executor(id="some executor id")
async def handle_input(self, message: str, ctx: WorkflowContext) -> None:
    # Process the input
    result = do_some_work(message)

    # Send output to next executor(s)
    ctx.send_message(result)
For agents specifically, they receive messages and produce AgentExecutorResponse objects automatically. You do not have to write code that sends the output of an agent to the next node.
Custom Executors for Complex Logic
Sometimes you need logic beyond agent reasoning. Custom executors handle this. Below is a class-based executor versus a fuction-based executor above:
from agent_framework import Executor, handler, WorkflowContext

class GammaAPIExecutor(Executor):
    def __init__(self, id: str = "gamma_api"):
        super().__init__(id=id)

    @handler
    async def call_gamma_api(
        self, response: AgentExecutorResponse, ctx: WorkflowContext
    ) -> None:
        # Extract data from agent response
        slide_content = response.agent_run_response.text

        # Call external API
        api_response = requests.post(
            "https://api.gamma.app/generations",
            json=payload
        )

        # Yield final output
        await ctx.yield_output({"status": "success", "pdf_url": pdf_url})
Custom executors are perfect for:
- Calling external APIs
- Data transformation and validation
- Conditional routing logic
- Long-running operations like polling
We will use a custom executor to call the GAMMA API to create a presentation based on the output of the previous agent nodes.
Using Sequential Orchestration
The simplest types of workflow process tasks one after another, each building on the previous result. This is ideal for pipelines where each step depends on prior outputs.
Input → Agent A → Agent B → Agent C → Output
Use sequential when:
- Steps have dependencies
- Later steps need data from earlier ones
- You want controlled, predictable execution flow
Other types of workflow orchestration are discussed on Microsoft Learn. We will use a sequential workflow in the example below.
The Presentation Workflow in Action
Now let’s see how all these concepts come together in our actual implementation.
Architecture Overview
Our workflow follows this flow:

Step 1: Outline Agent
This is an agent with a web search tool. The agent generates a search query relevant to the user input and decides on a presentation title and a list of slide titles:
outline_agent = AzureOpenAIResponsesClient(
    endpoint=endpoint,
    api_key=api_key,
    deployment_name=deployment_name
).create_agent(
    name="OutlineAgent",
    instructions="""
        Based on the user's request, you create an outline for a presentation.
        Before you generate the outline, use the 'search_web' tool to research
        the topic thoroughly with ONE query.
        Base the outline on the research findings.
    """,
    tools=[search_web],
    response_format=OutlineResponse,
    middleware=[logging_function_middleware]
)
- Input: User’s presentation request sent to the agent as a user message
Processing:
- Calls
search_webto research the topic - Generates a structured outline with title and slide titles
Output: OutlineResponse object with title, number_of_slides, slide_titles, and audience
If the user specifies the number of slides and audience, this will be reflected in the reponses.
Note: this agent uses middleware to log the use of the search_web tool.
Step 2: Research Agent
The research agent takes the presentation title and slides from the previous step and does research on the web for each slide:
research_agent = AzureOpenAIResponsesClient(
    endpoint=endpoint,
    api_key=api_key,
    deployment_name=deployment_name
).create_agent(
    name="ResearchAgent",
    instructions="""
        You research and create content for slides.
        Generate one web search query for each slide title.
        Keep in mind the target audience when generating queries.
        Next, use the 'search_web' tool ONCE passing in the queries all at once.

        Use the result from the queries to generate content for each slide.
        Content for slides should be limited to 100 words max with three main bullet points.
    """,
    tools=[search_web],
    response_format=ResearchResponse,
    middleware=[logging_function_middleware]
)
Input: The OutlineResponse from the outline agent is automatically sent as a user message. This message will contain the JSON output from the previous step.
Processing:
- Generates one search queries per slide
- Calls
search_webwith all queries concurrently (crucial for performance!) - Creates 100-word slide content with bullet points. It’s best to keep slide content concise for best results.
Output: ResearchResponse object with slide content for each slide
Why Concurrency Matters: The Search Tool
To speed up research, the search_web function uses AsyncTavilyClient for concurrent searching:
from tavily import AsyncTavilyClient

tavily_client = AsyncTavilyClient(TAVILY_API_KEY)

@ai_function(
    name="search_web",
    description="Search the web for multiple topics using Tavily"
)
async def search_web(
    queries: Annotated[list[str], Field(description="List of search queries")]
) -> str:
    logger.info(f"SEARCH - Performing web searches for {len(queries)} queries")

    async def _search_single_query(query: str) -> dict:
        try:
            logger.info(f'SEARCH - "{query}" - Searching')
            # AsyncTavilyClient.search() is awaitable
            response = await tavily_client.search(
                query=query,
                search_depth="advanced",
                max_results=5,
            )
            return {"query": query, "results": response.get("results", [])}
        except Exception as e:
            logger.error(f'SEARCH - "{query}" - {str(e)}')
            return {"query": query, "results": [], "error": str(e)}

    # Run all searches concurrently!
    tasks = [_search_single_query(query) for query in queries]
    search_results = await asyncio.gather(*tasks)

    # Aggregate and return
    aggregated = {r["query"]: r["results"] for r in search_results}
    return json.dumps({"results": aggregated})
Key insight: By using AsyncTavilyClient instead of the synchronous TavilyClient, we enable concurrent execution. All queries run in parallel, dramatically reducing total execution time.
To learn more about Tavily, check their website. They have a generous free tier which I almost exhausted creating this example! 😊
Step 3: Custom Gamma Executor
Step three does not need an agent. It uses the output of the agents to call the GAMMA API:
class GammaAPIExecutor(Executor):
    @handler
    async def call_gamma_api(
        self, response: AgentExecutorResponse, ctx: WorkflowContext
    ) -> None:
        # Extract slide content
        slide_content = response.agent_run_response.text
        response_json = json.loads(slide_content)

        logger.info(f'GAMMA - "{title}" - Slides: {number_of_slides}')

        # Call Gamma API
        api_response = requests.post(
            f"{GAMMA_API_BASE_URL}/generations",
            headers=headers,
            json=payload,
            timeout=30,
        )

        generation_id = data.get("id") or data.get("generationId")
        logger.info(f'GAMMA - POST /generations {api_response.status_code}')

        # Poll for completion
        completed_data = await self._poll_for_completion(generation_id)

        # Download PDF
        pdf_path = self._download_pdf(completed_data.get("exportUrl"))

        logger.info(f'GAMMA - Presentation completed')
        await ctx.yield_output(f"PDF saved to: {pdf_path}")
Input: The ResearchResponse from the research agent (slide content)
Processing:
- Calls GAMMA API to generate presentation
- Polls for completion (generation is asynchronous)
- Downloads resulting PDF
- The presentation is also available in Gamma for easy editing:

Output: Success message with PDF path and presentation in Gamma.
Running the example
The workflow code is on GitHub in the gamma folder: https://github.com/gbaeke/maf/tree/main/gamma
In that folder, check https://github.com/gbaeke/maf/blob/main/gamma/SETUP_GUIDE.md for setup instructions.
