In a previous post, I wrote about Diagrid Catalyst. Catalyst provides services like pub/sub and state stores to support the developer in writing distributed applications. In the post, we discussed a sample application that processes documents and extracts fields with an LLM (gpt-4o structured extraction). Two services, upload and process, communicate via the pub/sub pattern.
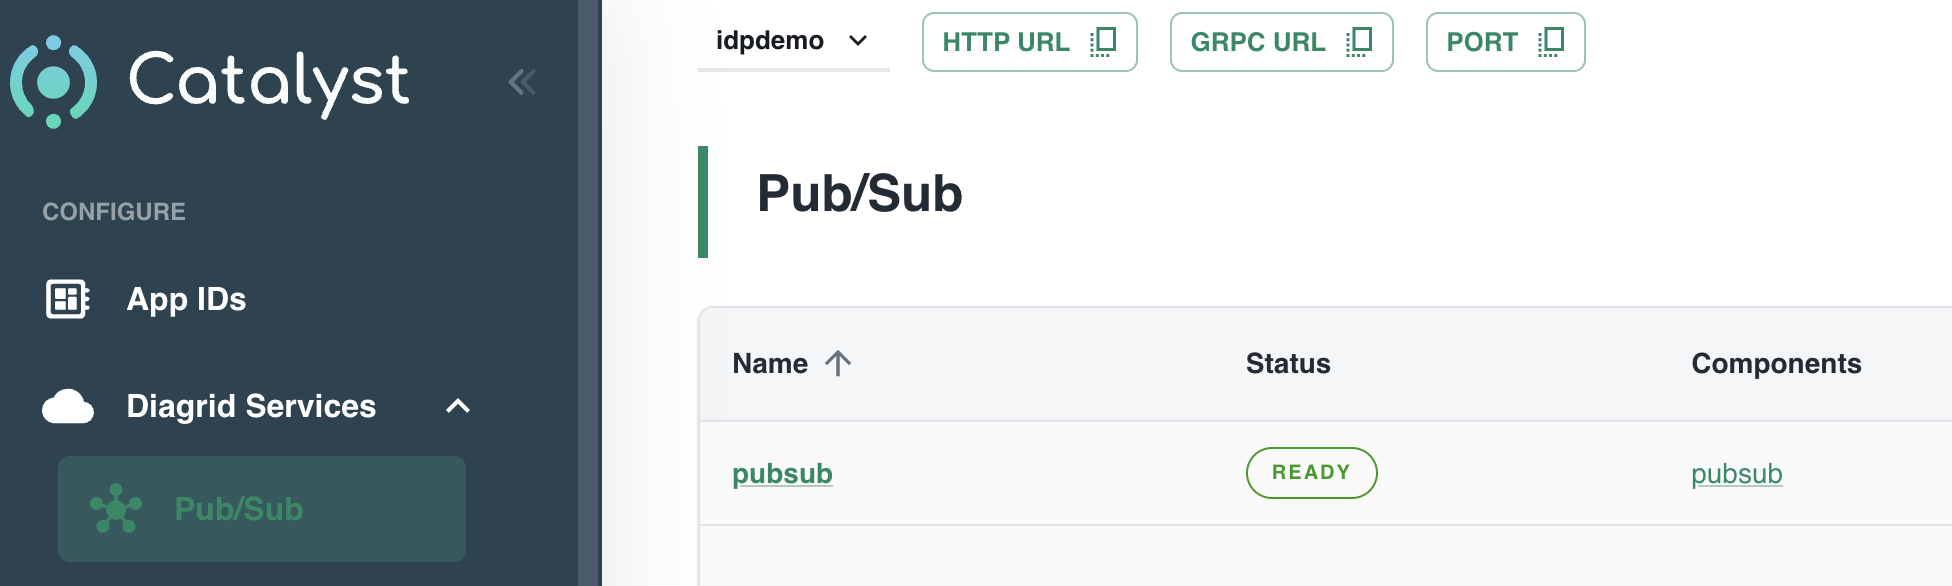
In that post, we used a pub/sub broker built-in to Catalyst. Using the built-in broker makes it extremely easy to get started. You simply create the service and topic subscription and write code to wire it all up using the Dapr APIs.
Catalyst built-in pub/sub service
But what if you want to use your own broker? Read on to learn how that works.
Using Azure Service Bus as the broker
To use Azure Service Bus, simply deploy an instance in a region of your choice. Ensure you use the standard tier because you need topics, not queues:
Azure Service Bus Standard Tier deployed in Sweden; public endpoint
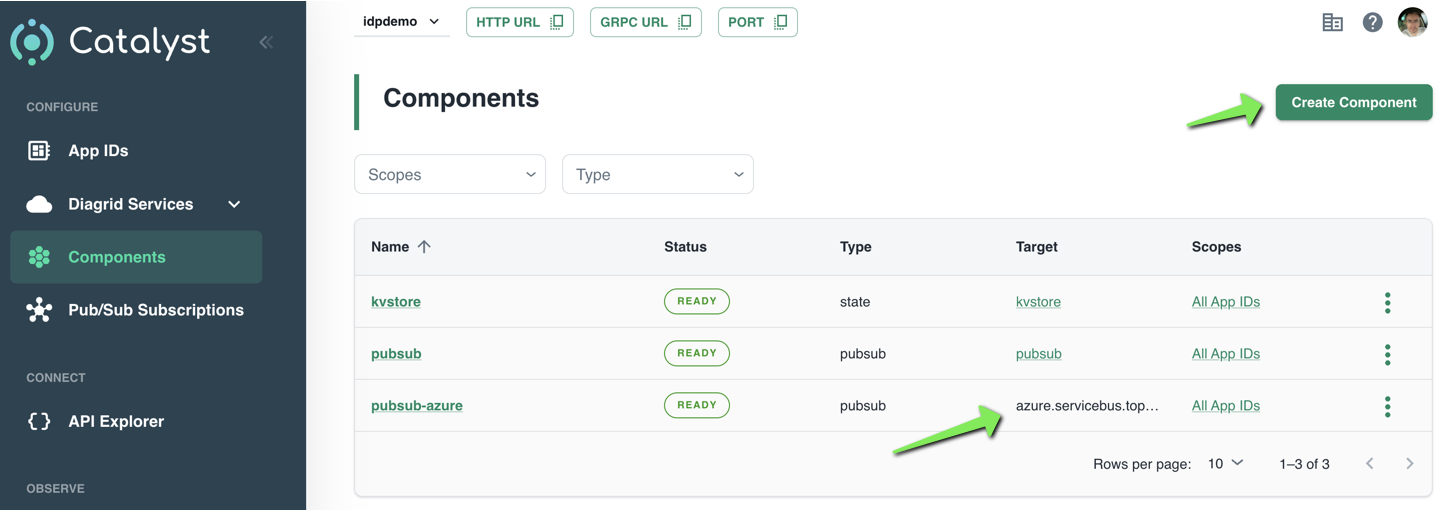
With Service Bus deployed, we can now tell Catalyst about it. You do so in Components in the Catalyst portal:
Creating an Azure Service Bus component
Simply click Create Component to start a wizard. After completion of the wizard, your component will appear in the list. Above, at the bottom, a component with Azure Service Bus as the target is in the list.
The wizard itself is fairly straightforward. The first screen is shown below:
Component wizard
Above, in the first step, I clicked Pub/Sub and selected Azure Service Bus Topics. As you can see, several other pub/sub brokers are supported. The above list is not complete.
In the next steps, the following is set:
Assign access: configure the services that can access this component; in my case, that is the upload and process service
Authentication profile: decide how to authenticate to Azure Service Bus; I used a connection string
Configure component: set the component name and properties such as timeouts. These properties are specific to Service Bus. I only set the name and left the properties at their default.
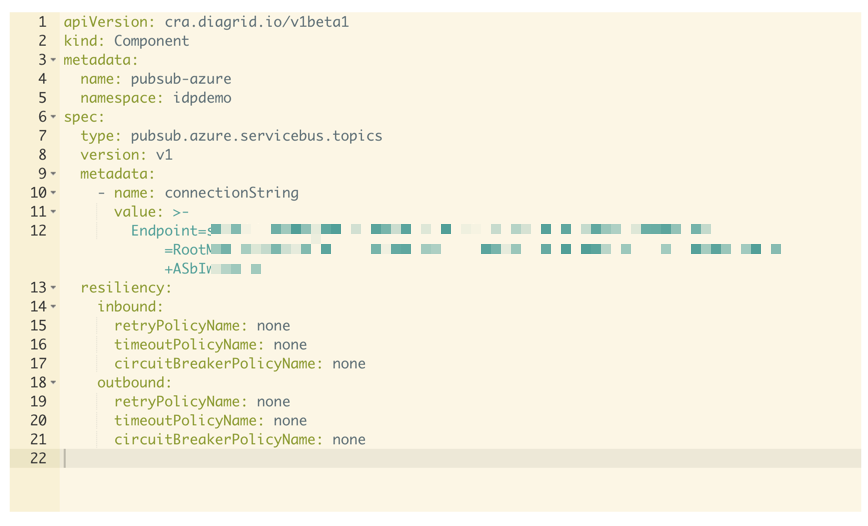
That’s it. You now have defined a component that can be used by your applications. When you click the component, you can also inspect its YAML definition:
YAML representation of the component
You can use these YAML files from the diagrid CLI to create components. In the CLI they are called connections but it’s essentially the same from what I can tell at this point:
Listing connections
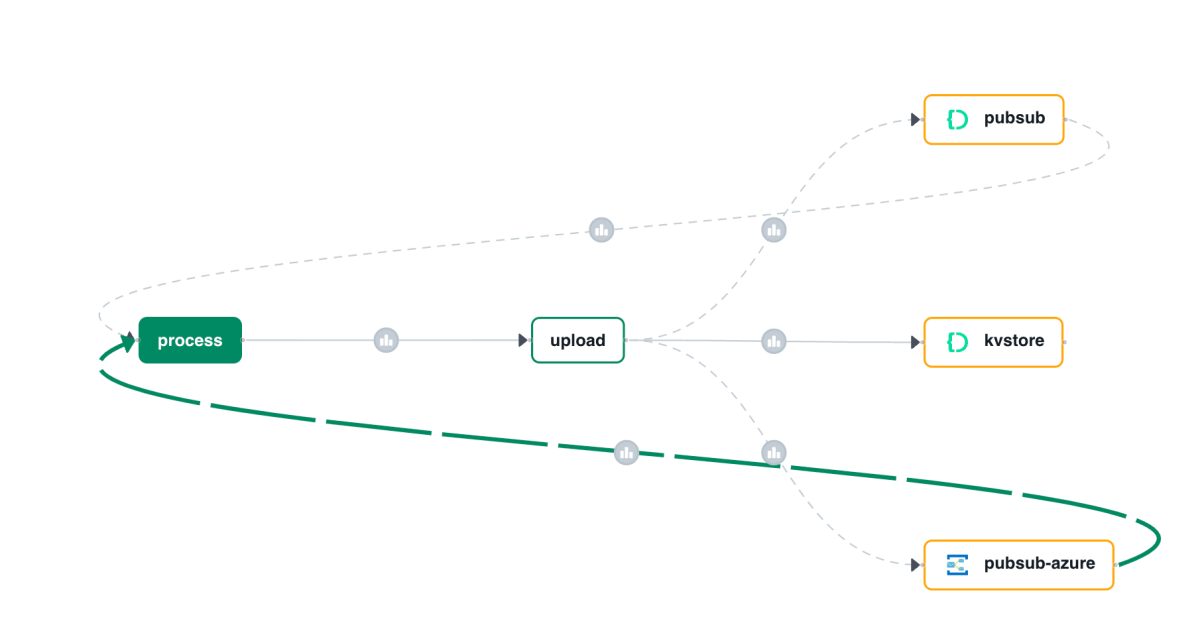
Showing the call graph
With Catalyst, all activity is logged and can be used to visualize a call graph like the one below:
Call Graph
Above, I clicked on the subscription that delivers messages to the process service. The messages come from our Azure pub/sub broker.
Note: you can also see the older pub/sub Catalyst broker in the call graph. It will be removed from the call graph some time after it is not used anymore.
Creating a subscription
A subscription to an Azure Service Bus topic looks the same as a subscription to the built-in Pub/Sub broker:
Subscription to topic invoices
The only difference with the previous blog post is the component. It’s the one we just created. The /process handler in your code will stay the same.
Code changes
The code from the previous post does not have to change a lot. That code uses an environment variable, PUBSUB_NAME, that needs to be set to pubsub-azure now. That’s it. The Dapr SDK code is unchanged:
with DaprClient() as d:
    try:
        result = d.publish_event(
            pubsub_name=pubsub_name,
            topic_name=topic_name,
            data=invoice.model_dump_json(),
            data_content_type='application/json',
        )
        logging.info('Publish Successful. Invoice published: %s' %
                        invoice.path)
        logging.info(f"Invoice model: {invoice.model_dump()}")
        return True
    except grpc.RpcError as err:
        logging.error(f"Failed to publish invoice: {err}")
        return False
Conclusion
Instead of using the default Catalyst pub/sub broker, we switched the underlying broker to a broker of our choice. This is just configuration. You code, besides maybe an environment variable, does not need to change.
In this post, we only changed the pub/sub broker. You can also easily change the underlying state store to Azure Blob Storage or Azure Cosmos DB.
Many enterprises have systems in place that take documents, possibly handwritten, that contain data that needs to be extracted. In this post, we will create an application that can extract data from documents that you upload. We will make use of an LLM, in this case gpt-4o. We will use model version 2024-08-06 and its new structured output capabilities. Other LLMs can be used as well.
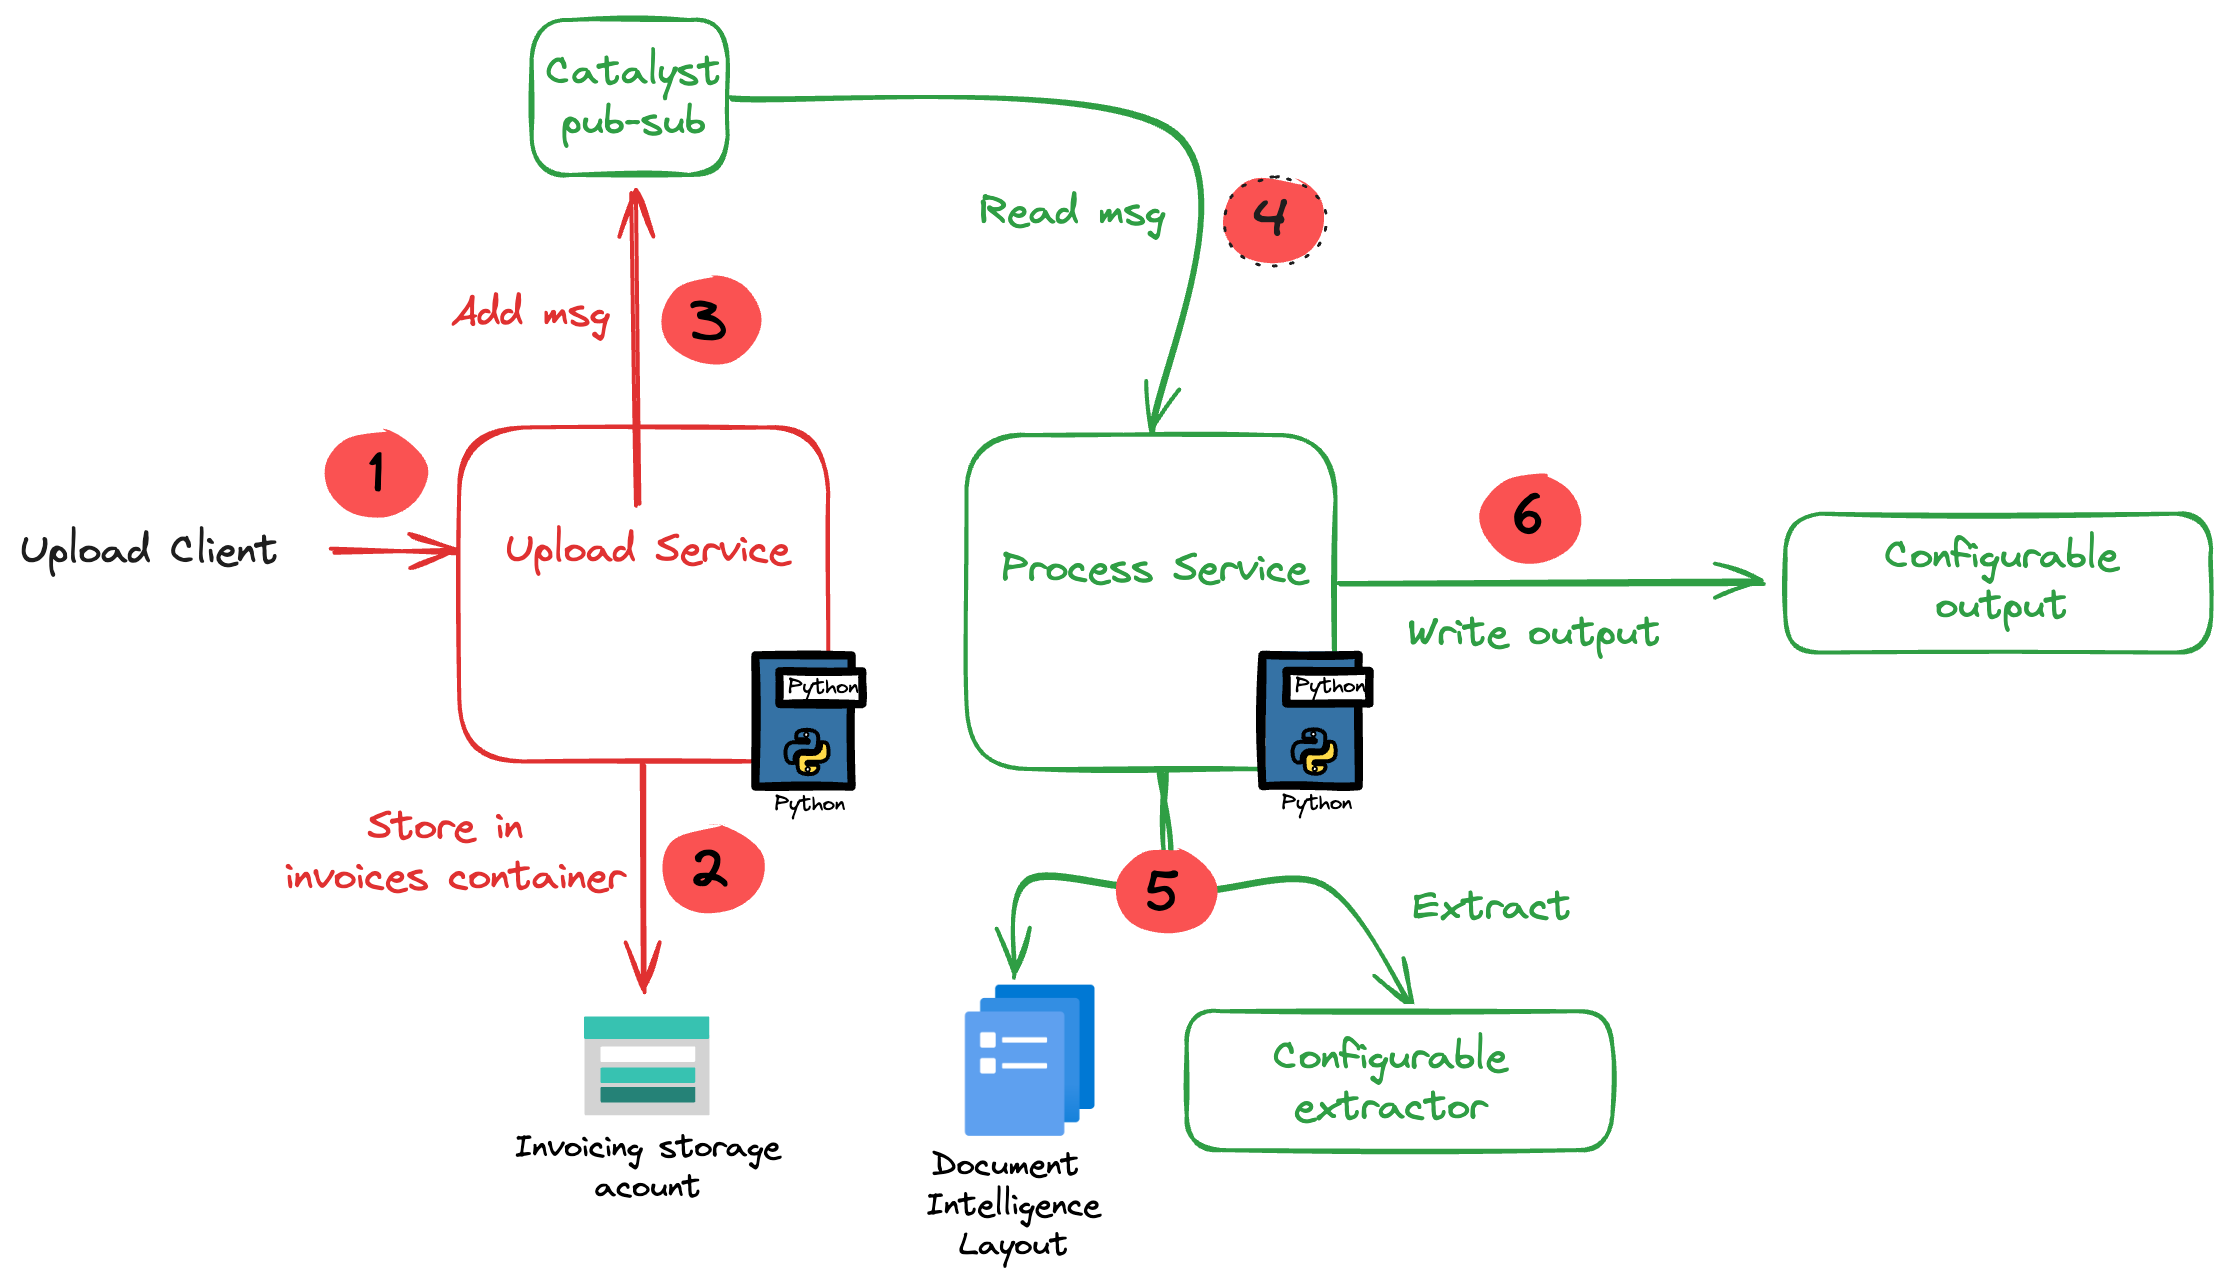
The core of the application is illustrated in the diagram below. The application uses more services than in the diagram. We will get to them later in this post.
Application Diagram
Note: the LLM-based extraction logic in this project is pretty basic. In production, you need to do quite a bit more to get the extraction just right.
The flow of the application is as follows:
A user or process submits a document to the upload service. This can be a pdf but other formats are supported as well.
In addition to the document, a template is specified by name. A template contains the fields to extract, together with their type (str, bool, float). For example: customer_name (str), invoice_total (float).
The upload service uploads the document to an Azure Storage account using a unique filename and preserves the extension.
The upload service publishes a message to a topic on a pub/sub message broker. The message contains data such as the document url and the name of the template.
The process service subscribes to the topic on the message broker and retrieves the message.
It downloads the file from the storage account and sends it to Azure Document Intelligence to convert it to plain text.
Using a configurable extractor, an LLM is used to extract the fields in the template from the document text. The sample code contains an OpenAI and a Groq extractor.
The extracted fields are written to a configurable output handler. The sample code contains a CSV and JSONL handler.
In addition to a pub-sub broker, templates are stored in a state store. The upload service is the only service that interfaces with the state store. It provides an HTTP method that the process service can use to retrieve a template from the state store.
To implement pub-sub, the state store and method invocations, we will use Diagrid’s Catalyst instead of doing this all by ourselves.
What is Catalyst?
If you are familiar with Dapr, the distributed application runtime, Catalyst will be easy to understand. Catalyst provides you with a set of APIs, hosted in the cloud and compatible with Dapr to support you in building cloud-native, distributed applications. It provides several building blocks. The ones we use are below:
request/reply: to support synchronous communication between services in a secure fashion
publish/subscribe: to support asynchronous communication between services using either a broker provided by Catalyst or other supported brokers like Azure Service Bus
key/value: allows services to save state in a key/value store. You can use the state store provided by Catalyst or other supported state stores like Azure Cosmos DB or an Azure Storage Account
The key to these building blocks is that your code stays the same if you swap the underlying message broker or key/value store. For example, you can start with Catalyst’s key/value store and later switch to Cosmos DB very easily. There is no need to add Cosmos DB libraries to your code. Catalyst will handle the Cosmos DB connectivity for you.
Important: I am referring mainly to Azure services here but Catalyst (and Dapr) support many services in other clouds as well!
Note that you do not need to install Dapr on your local machine or on platforms like Kubernetes when you use Catalyst. You only use the Dapr SDKs in your code and, when configured to do so, the SDK will connect to the proper APIs hosted in the cloud by Catalyst. In fact, you do not even need an SDK because the APIs can be used with plain HTTP or GRPC. Of course, using an SDK makes things a lot easier.
By doing all of the above in Catalyst we have a standardised approach that remains the same no matter the service behind it. We also get implementation best practices, for example for pub/sub. In addition, we are also provided with golden metrics and a UI to see how the application performs. All API calls are logged to aid in troubleshooting.
Let’s now take a look at the inner loop development process!
Scaffolding a new project
You need to sign up for Catalyst first. At the time of writing, Catalyst was in preview and not supported for production workloads. When you have an account, you should install the Diagrid CLI. The CLI is not just for Catalyst. It’s also used with Diagrid’s other products, such as Conductor.
With the CLI, you can create a new project, create services and application identities. For this post, we will use the UI instead.
In the Catalyst dashboard, I created a project called idpdemo:
List of projects; use Create Project to create a new one
Next, for each of my services (upload and process), we create an App ID. Each App ID has its own token. Services use the token to authenticate to the Catalyst APIs and use the services they are allowed to use.
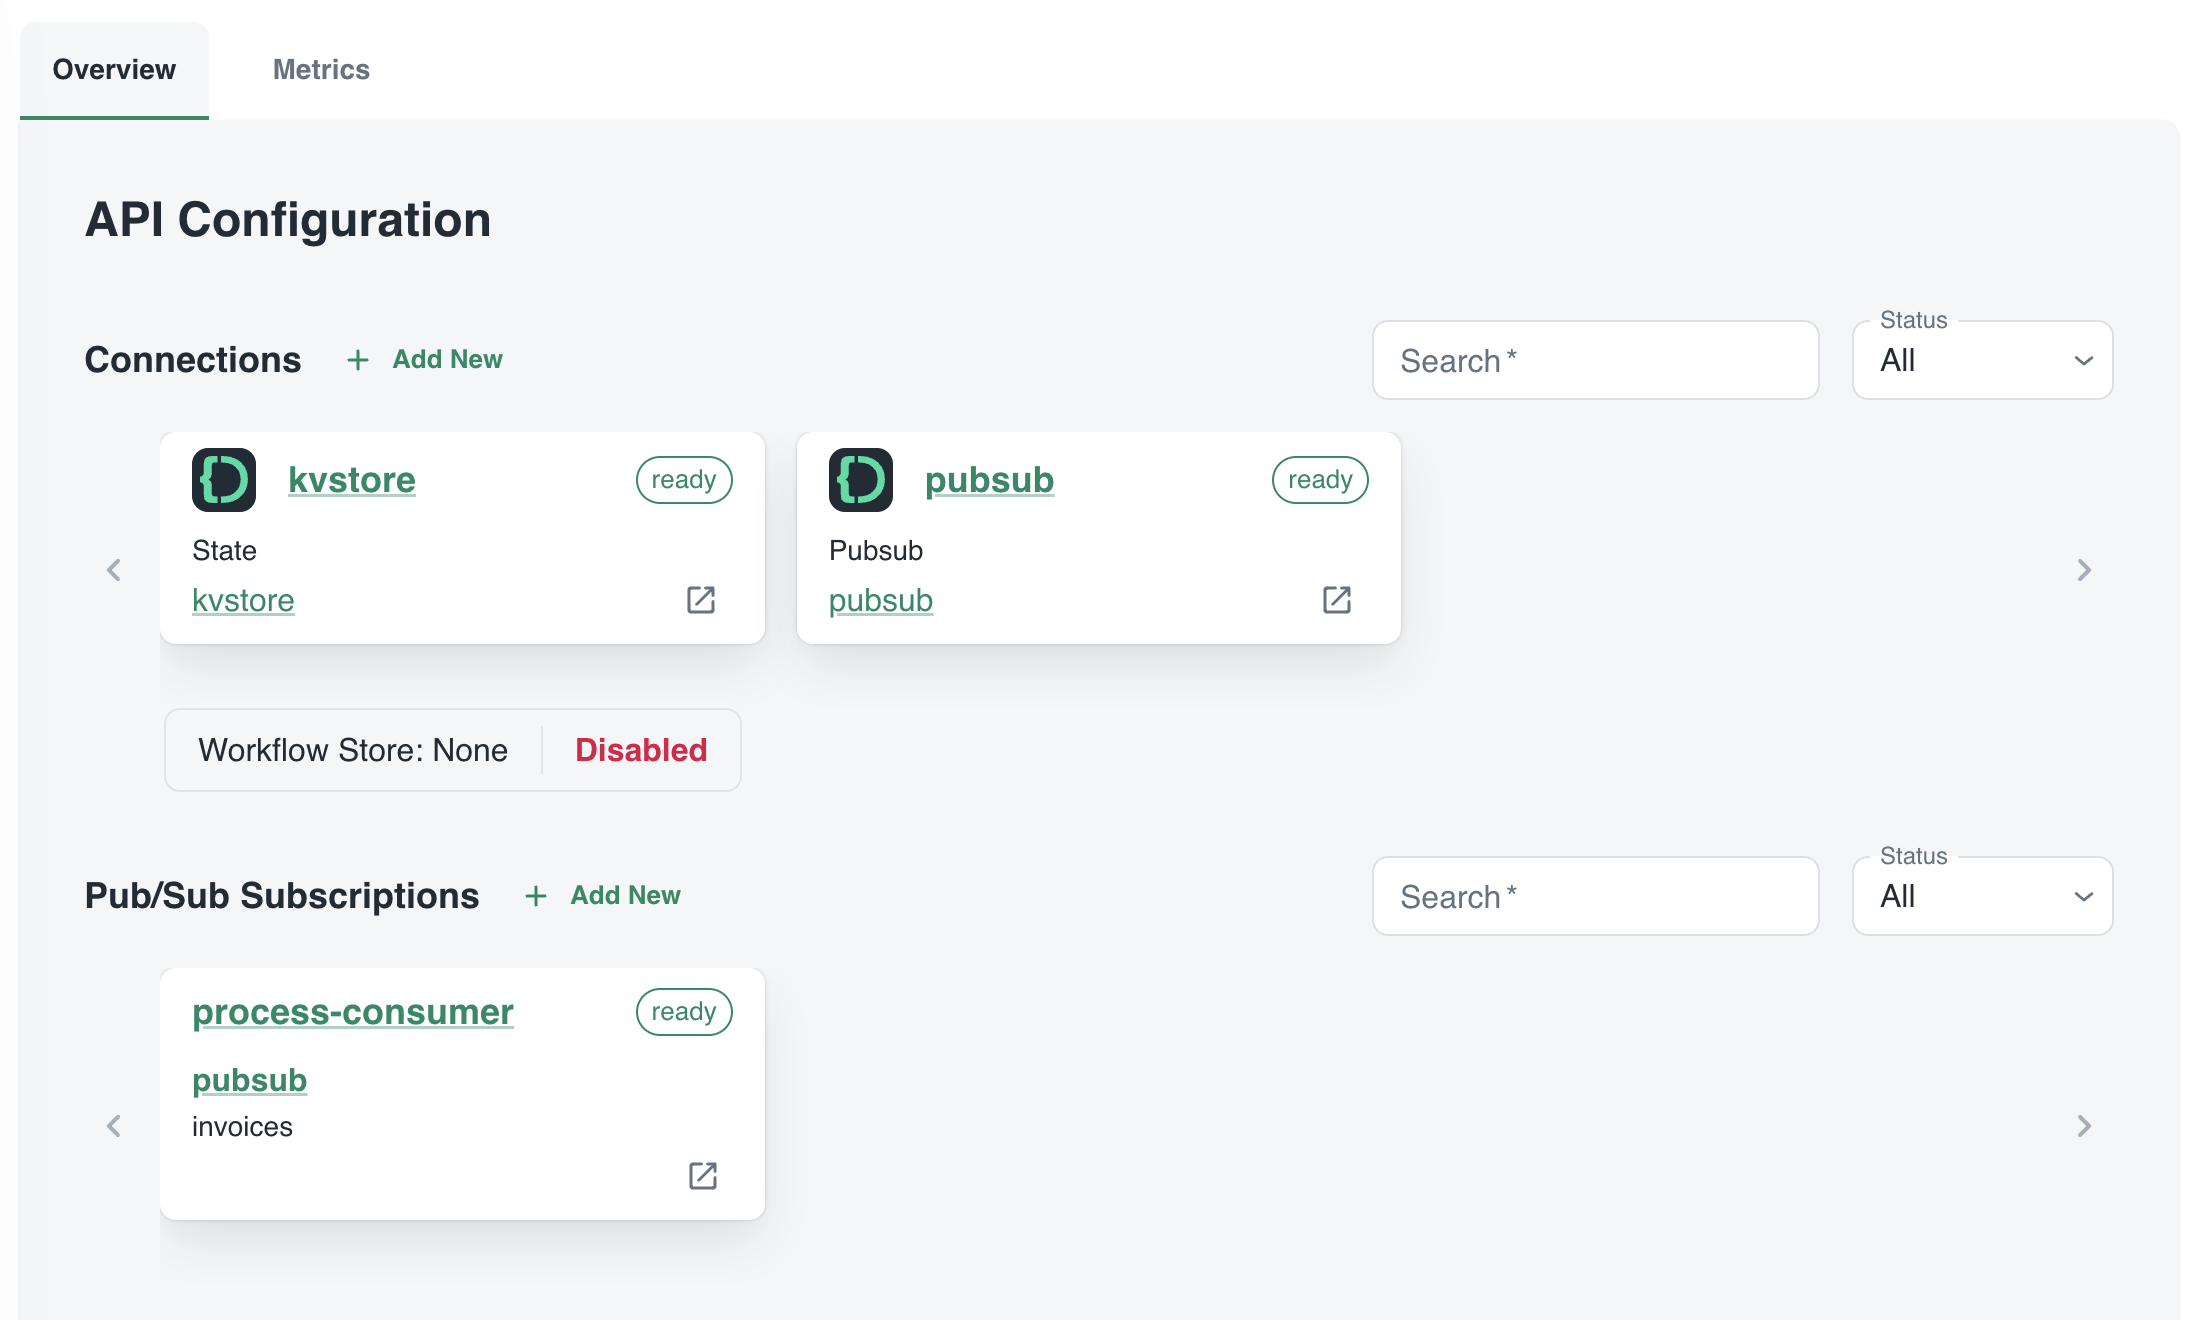
The process App ID has the following configuration (partial view):
process App ID API configuration
The process service interacts with both the Catalyst key/value store (kvstore) and the pub/sub broker (pubsub). These services need to be enabled as well. We will show that later. We can also see that the process service has a pub/sub subscription called process-consumer. Via that subscription, we have pub/sub messages delivered to the process service whenever the upload service sends a message to the pub/sub topic.
In Diagrid Services, you can click on the pub/sub and key/value store to see what is going on. For example, in the pub/sub service you can see the topics, the subscribers to these topics and the message count.
pub/sub topics
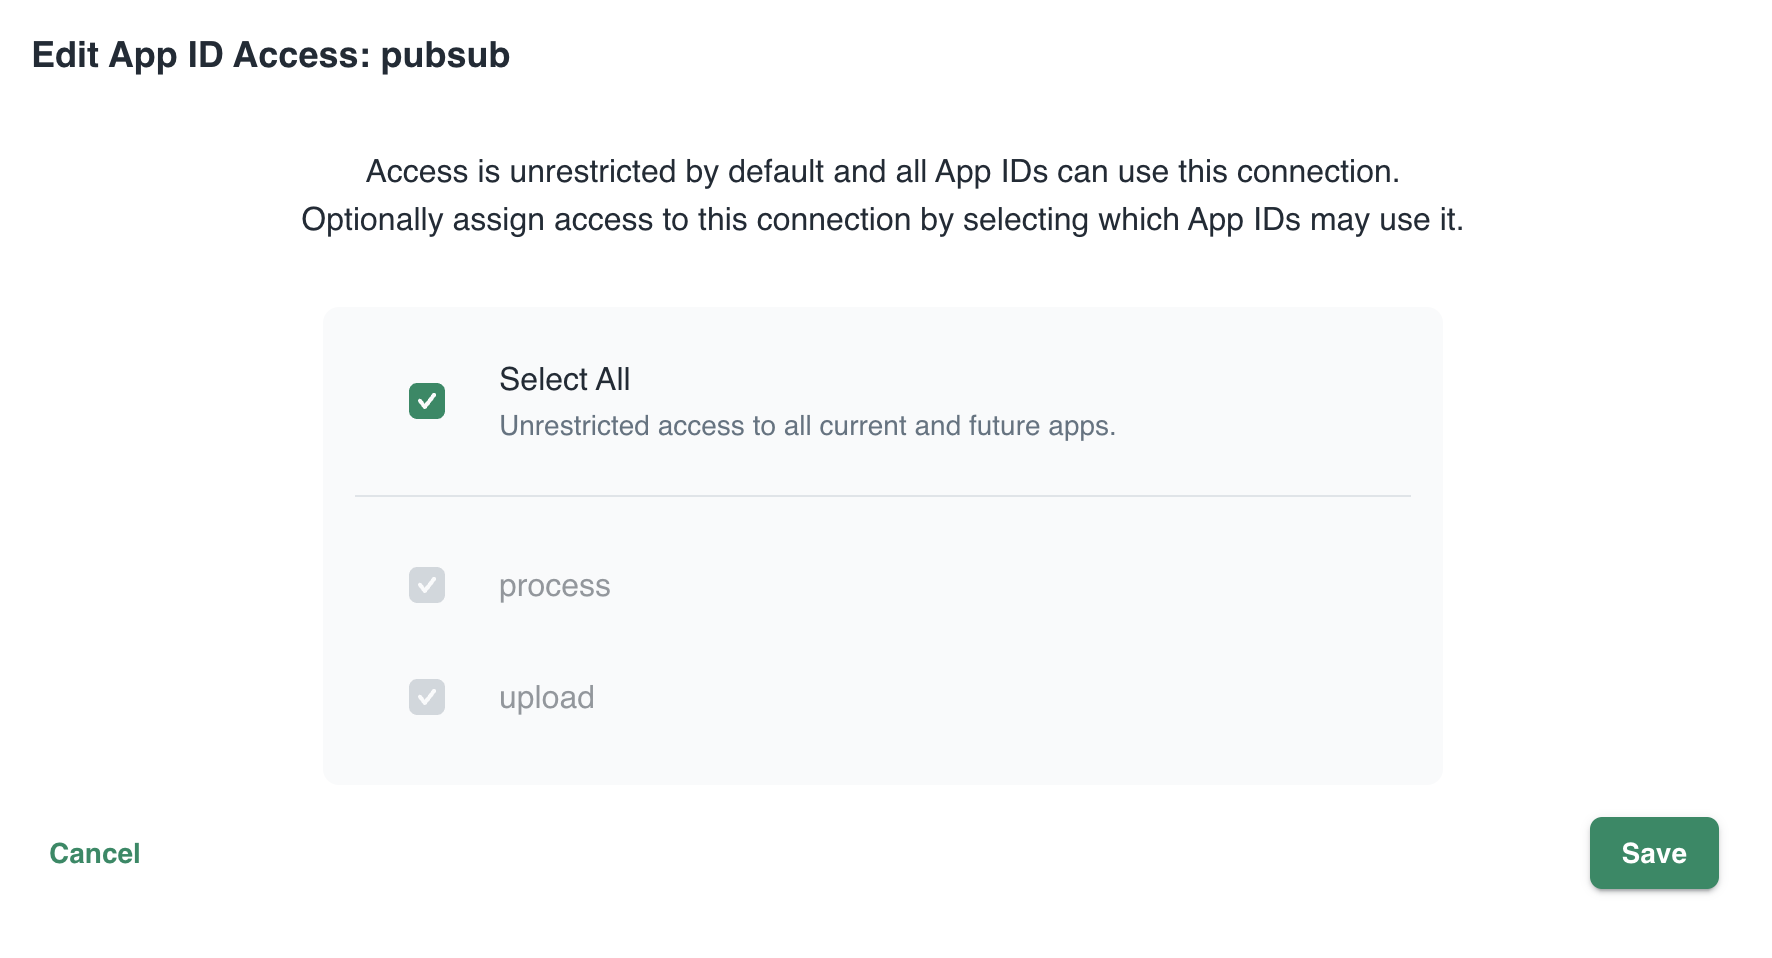
In Connections, you can see your services (represented by App ID upload and process) and their scope. In this case, all App IDs have access to all services. That can easily be changed:
changing the scope: access by App IDs to the pubsub service; default All
Now that we have some understanding of App IDs, Diagrid services and connections, we can take a look at how to connect to Catalyst from code.
Important: in this post we only look at using request/reply, Diagrid pub/sub and key/value. Catalyst also supports workflow and bindings but they are not used in this post.
The upload service needs to connect to both the pub/sub broker and key/value store:
Whenever a document is uploaded, it is uploaded to Azure Storage. When that succeeds, a message is put on the broker with the path of the file and a template name.
Templates are created and validated by the upload service so that you can only upload files with a template that exists. Templates are written and read in the key/value store.
Before we write code, we need to provide the Dapr SDK for Python (we’ll only use the Python SDK here) the necessary connection information. It needs to know it should not connect to a Dapr sidecar but to Catalyst. You set these via environment variables:
These environment variables are automatically picked up and used by SDK to interact with the Catalyst APIs. The following code can be used to put a message on the pub/sub broker:
with DaprClient() as d:
    try:
        result = d.publish_event(
            pubsub_name=pubsub_name,
            topic_name=topic_name,
            data=invoice.model_dump_json(),
            data_content_type='application/json',
        )
        logging.info('Publish Successful. Invoice published: %s' %
                        invoice.path)
        return True
    except grpc.RpcError as err:
        logging.error(f"Failed to publish invoice: {err}")
        return False
This is the same code that you would use with Dapr on your local machine or in Kubernetes or Azure Container Apps. Like with Dapr, you need to specify the pubsub name and topic. Here that is pubsub and invoices as previously shown in the Catalyst UI. The data in the message is an instance of a Pydantic class that holds the path and template but converted to JSON.
The code below shows how to write to the state store (key/value store):
with DaprClient() as d:
    try:
        d.save_state(store_name=kvstore_name,
                        key=template_name, value=str(invoice_data))
    except grpc.RpcError as err:
        logging.error(f"Dapr state store error: {err.details()}")
        raise HTTPException(status_code=500, detail="Failed to save template")
This is of course very similar. We use the save_state method here and provide the store name (kvstore), key (template name) and value.
Let’s now turn to the process service. It needs to:
be notified when there is a new message on the invoices topic
check and retrieve the template by calling a method on the upload service
We only use two building blocks here: pub/sub and request/reply. The process service does not interact directly with the state store.
To receive a message, Catalyst needs a handler to call. In the pub/sub subscription, the handler (default route to be correct) is configured to be /process:
Configuration of default route on subscription
Our code that implements the handler is as follows (FastAPI):
@app.post('/process')  # called by pub/sub when a new invoice is uploaded
async def consume_orders(event: CloudEvent):
    # your code here
As you can see, when Catalyst calls the handler, it passes in a CloudEvent. The event has a data field that holds the path to our document and the template name. The CloudEvent type is defined as follows:
# pub/sub uses CloudEvent; Invoice above is the data
class CloudEvent(BaseModel):
    datacontenttype: str
    source: str
    topic: str
    pubsubname: str
    data: dict
    id: str
    specversion: str
    tracestate: str
    type: str
    traceid: str
In the handler, you simply extract the expected data and use it to process the event. In our case:
extract path and template from the data field
download the file from blob storage
send the file to Azure Document Intelligence to convert to text
extract the details from the document based on the template; if the template contains fields like customer_name and invoice_total, the LLM will try to extract that and return that content in JSON.
write the extracted values to JSON or CSV or any other output handler
Of course, we do need to extract the full template because we only have the template name. Let’s use the request/reply APIs to do that and call the template GET endpoint of the upload service via Catalyst:
def retrieve_template_from_kvstore(template_name: str):

    headers = {'dapr-app-id': invoke_target_appid, 'dapr-api-token': dapr_api_token,
               'content-type': 'application/json'}
    try:
        result = requests.get(
            url='%s/template/%s' % (base_url, template_name),
            headers=headers
        )

        if result.ok:
            logging.info('Invocation successful with status code: %s' %
                         result.status_code)
            logging.info(f"Template retrieved: {result.json()}")
            return result.json()

    except Exception as e:
        logging.error(f"An error occurred while retrieving template from Dapr KV store: {str(e)}")
        return None
As an example, we use the HTTP API here instead of the Dapr invoke API. It might not be immediately clear but Catalyst is involved in this process and will have information and metrics about these calls:
Call Graph
The full line represents request/reply (invoke) from process to upload as just explained. The dotted line represents pub/sub traffic where upload creates messages to be consumed by process.
Running the app
You can easily run your application locally using the Diagrid Dev CLI. Ensure you are logged in by running diagrid login. In the preview, with only one project, the default project should already be that one. Then simply run diagrid dev scaffold to generate a yaml file.
In my case, after some modification, my dev-{project-name}.yaml file looked like below:
project: idpdemo
apps:
- appId: process
  disabled: true
  appPort: 8001
  env:
    DAPR_API_TOKEN: ...
    DAPR_APP_ID: process
    DAPR_CLIENT_TIMEOUT_SECONDS: 10
    DAPR_GRPC_ENDPOINT: https://XYZ.api.cloud.diagrid.io:443
    DAPR_HTTP_ENDPOINT: https://XYZ.api.cloud.diagrid.io
    OTHER ENV VARS HERE

  workDir: process
  command: ["python", "app.py"]
- appId: upload
  appPort: 8000
  env:
    ... similar
  workDir: upload
  command: ["python", "app.py"]
appLogDestination: ""
Of course, the file was modified with environment variables required by the code. For example the storage account key, Azure Document Intelligence key, etc…
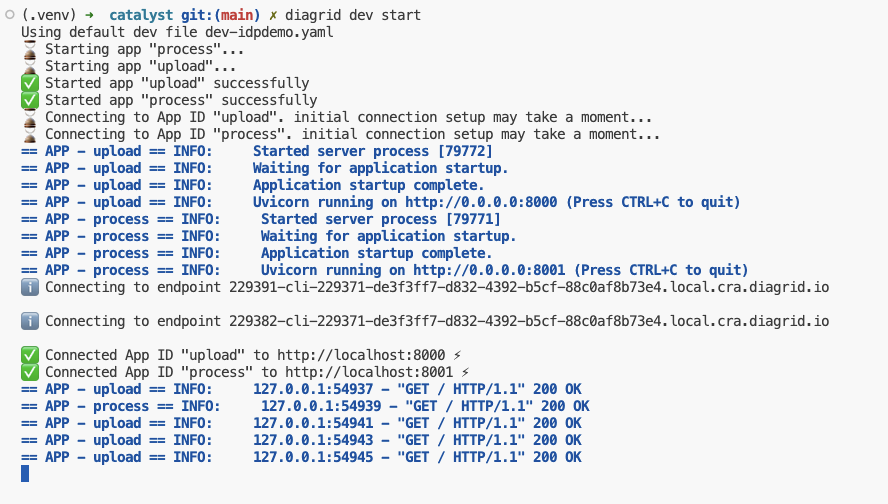
All you need to do now is to run diagrid dev start to start the apps. The result should be like below:
Local project startup
By default, your service logs are written to the console with a prefix for each service.
If you use the code in GitHub, check the README.md to configure the project and run the code properly. If you would rather run the code with Dapr on your local machine (e.g., if you do not have access to Catalyst) you can do that as well.
Conclusion
In this post, we have taken a look at Catalyst, a set of cloud APIs that help you to write distributed applications in a standard and secure fashion. These APIs are compatible with Dapr, a toolkit that has already gained quite some traction in the community. With Catalyst, we quickly built an application that can be used as a starter to implement an asynchronous LLM-based document extraction pipeline. I did not have to worry too much about pub/sub and key/value services because that’s all part of Catalyst.
In the Authorization Code flow, an authorization code is a temporary code that a client obtains after being redirected to an authorization URL (https://login.microsoftonline.com/{tenant}/oauth2/authorize) where you provide your credentials interactively (not useful for service-service non-interactive scenarios). That code is then handed to your app which exchanges it for an access token. With the access token, the authenticated user can access your app.
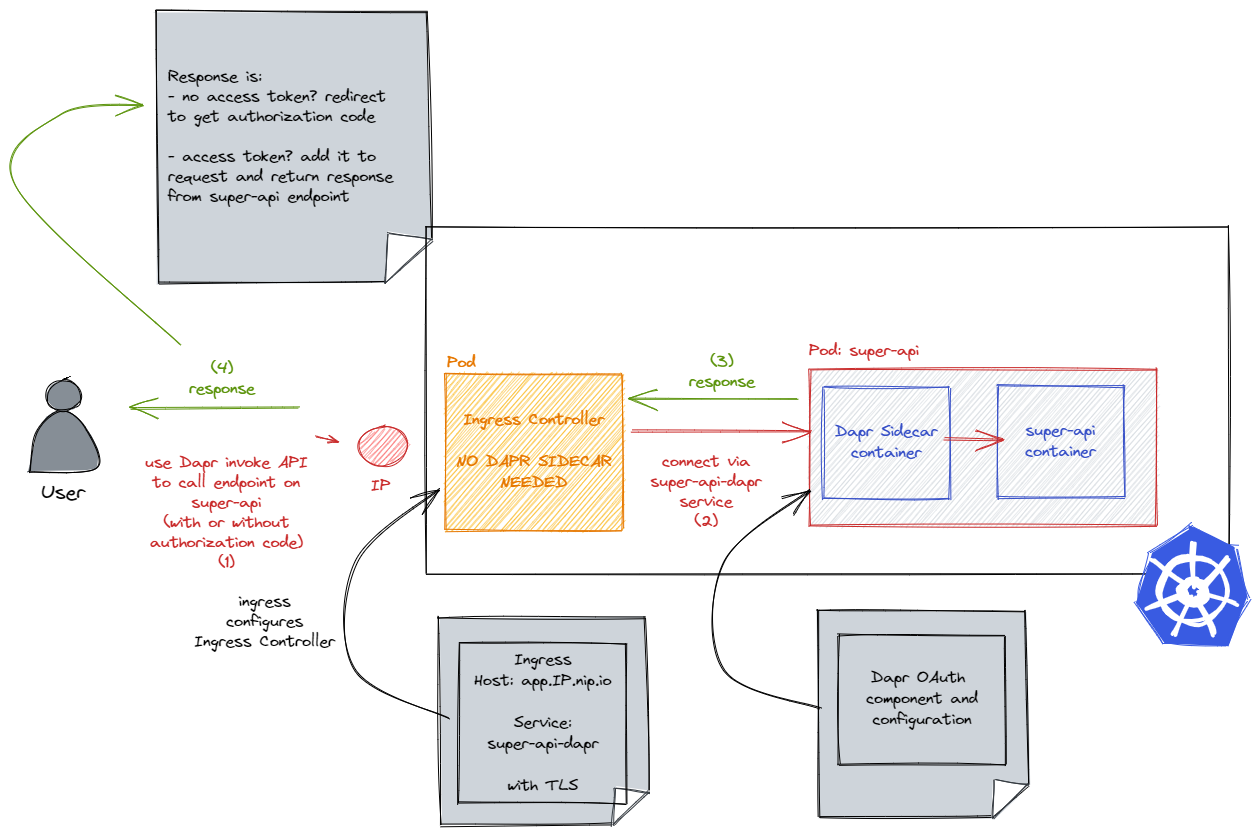
Instead of coding this OAuth flow in your app, we will let the Dapr middleware handle all of that work. Our app can then pickup the token from an HTTP header. When there is a token, access to the app is granted. Otherwise, Dapr (well, the Dapr sidecar next to your app) redirects your client to the authorization server to get a code.
Let’s take a look how this all works with Azure Active Directory. Other authorization servers are supported as well: Facebook, GitHub, Google, and more.
What we will build
Some experience with Kubernetes, deployments, ingresses, Ingress Controllers and Dapr is required.
If you think the explanation below can be improved, or I have made errors, do let me know. Let’s go…
Create an app registration
Using Azure AD means we need an app registration! Other platforms have similar requirements.
First, create an app registration following this quick start. In the first step, give the app a name and, for this demo, just select Accounts in this organizational directory only. The redirect URI will be configured later so just click Register.
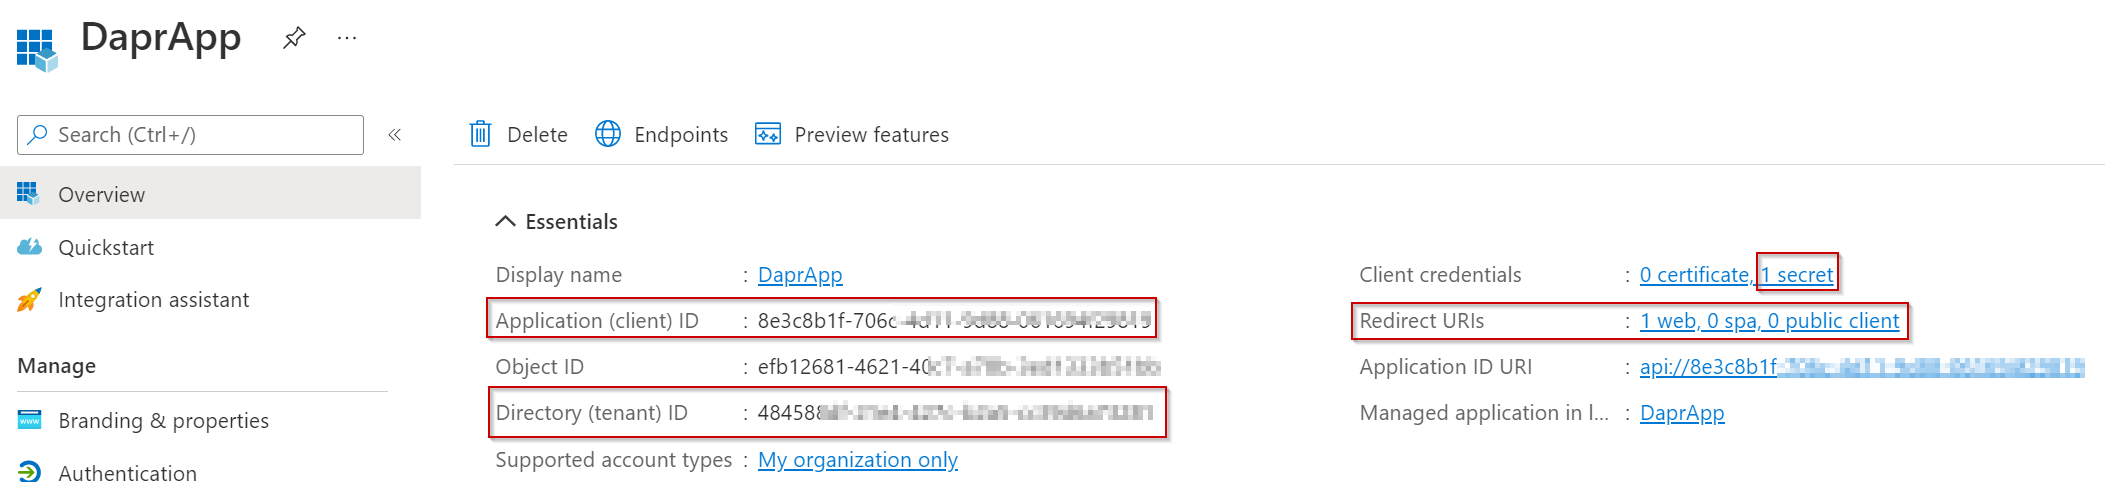
After following the quick start, you should have:
the client ID and client secret: will be used in the Dapr component
the Azure AD tenant ID: used in the auth and token URLs in the Dapr component; Dapr needs to know where to redirect to and where to exchange the authorization code for an access token
App registration in my Azure AD Tenant
There is no need for your app to know about these values. All work is done by Dapr and Dapr only!
We will come back to the app registration later to create a redirect URI.
Install an Ingress Controller
We will use an Ingress Controller to provide access to our app’s Dapr sidecar from the Internet, using HTTP.
In this example, we will install ingress-nginx. Use the following commands (requires Helm):
Although you will find articles about daprizing your Ingress Controller, we will not do that here. We will use the Ingress Controller simply as a way to provide HTTP access to the Dapr sidecar of our app. We do not want Dapr-to-Dapr gRPC traffic between the Ingress Controller and our app.
When ingress-nginx is installed, grab the public IP address of the service that it uses. Use kubectl get svc -n ingress-nginx. I will use the IP address with nip.io to construct a host name like app.11.12.13.14.nip.io. The nip.io service resolves such a host name to the IP address in the name automatically.
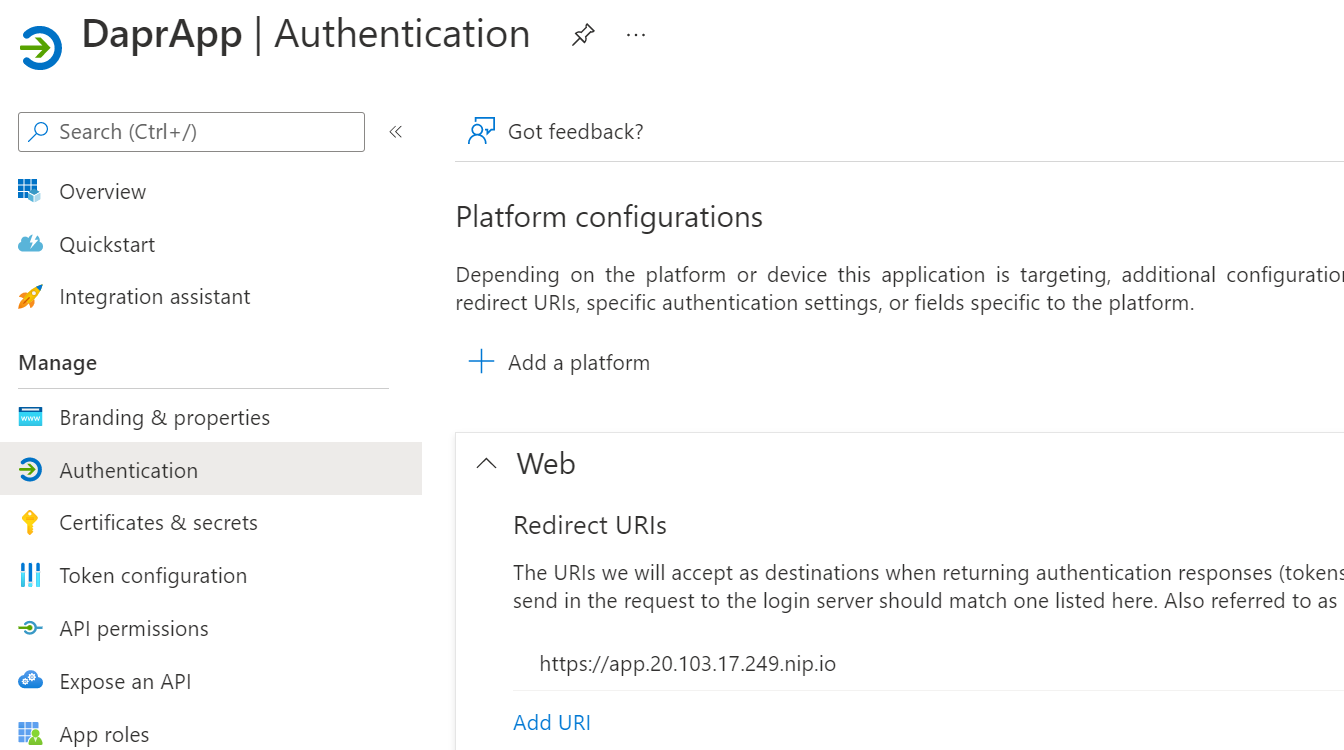
The host name will be used in the ingress and the Dapr component. In addition, use the host name to set the redirect URI of the app registration: https://app.11.12.13.14.nip.io. For example:
Added a platform configuration for a web app and set the redirect URI
Note that we are using https here. We will configure TLS on the ingress later.
Install Dapr
Install the Dapr CLI on your machine and run dapr init -k. This requires a working Kubernetes context to install Dapr to your cluster. I am using a single-node AKS cluster in Azure.
Create the Dapr component and configuration
Below is the Dapr middleware component we need. The component is called myauth. Give it any name you want. The name will later be used in a Dapr configuration that is, in turn, used by the app.
apiVersion: dapr.io/v1alpha1
kind: Component
metadata:
  name: myauth
spec:
  type: middleware.http.oauth2
  version: v1
  metadata:
  - name: clientId
    value: "CLIENTID of your app reg"
  - name: clientSecret
    value: "CLIENTSECRET that you created on the app reg"
  - name: authURL
    value: "https://login.microsoftonline.com/TENANTID/oauth2/authorize"
  - name: tokenURL
    value: "https://login.microsoftonline.com/TENANTID/oauth2/token"
  - name: redirectURL
    value: "https://app.YOUR-IP.nip.io"
  - name: authHeaderName
    value: "authorization"
  - name: forceHTTPS
    value: "true"
scopes:
- super-api
Replace YOUR-IP with the public IP address of the Ingress Controller. Also replace the TENANTID.
With the information above, Dapr can exchange the authorization code for an access token. Note that the client secret is hard coded in the manifest. It is recommended to use a Kubernetes secret instead.
The component on its own is not enough. We need to create a Dapr configuration that references it:
Note that the configuration is called auth. Our app will need to use this configuration later, via an annotation on the Kubernetes pods.
Both manifests can be submitted to the cluster using kubectl apply -f. It is OK to use the default namespace for this demo. Keep the configuration and component in the same namespace as your app.
Deploy the app
The app we will deploy is super-api, which has a /source endpoint to dump all HTTP headers. When authentication is successful, the authorization header will be in the list.
dapr.io/enabled: injects the Dapr sidecar in the pods
dapr.io/app-id: a Dapr app needs an id; a service will automatically be created with that id and -dapr appended; in our case the name will be super-api-dapr; our ingress will forward traffic to this service
dapr.io/app-port: Dapr will need to call endpoints in our app (after authentication in this case) so it needs the port that our app container uses
dapr.io/config: refers to the configuration we created above, which enables the http middleware defined by our OAuth component
dapr.io/sidecar-listen-addresses: ⚠️ needs to be set to “0.0.0.0”; without this setting, we will not be able to send requests to the Dapr sidecar directly from the Ingress Controller
Submit the app manifest with kubectl apply -f.
Check that the pod has two containers: the Dapr sidecar and your app container. Also check that there is a service called super-api-dapr. There is no need to create your own service. Our ingress will forward traffic to this service.
Create an ingress
In the same namespace as the app (default), create an ingress. This requires the ingress-nginx Ingress Controller we installed earlier:
Let’s use the browser to connect to the /source endpoint. You will need to use the Dapr invoke API because the request will be sent to the Dapr sidecar. You need to speak a language that Dapr understands! The sidecar will just call http://localhost:8080/source and send back the response. It will only call the endpoint when authentication has succeeded, otherwise you will be redirected.
Use the following URL in the browser. It’s best to use an incognito session or private window.
Your browser will warn you of security risks because the certificate is not trusted. Proceed anyway! 😉
Note: we could use some URL rewriting on the ingress to avoid having to use /v1.0/invoke etc… You can also use different URL formats. See the docs.
You should get an authentication screen which indicates that the Dapr configuration is doing its thing:
Redirection to the authorize URL
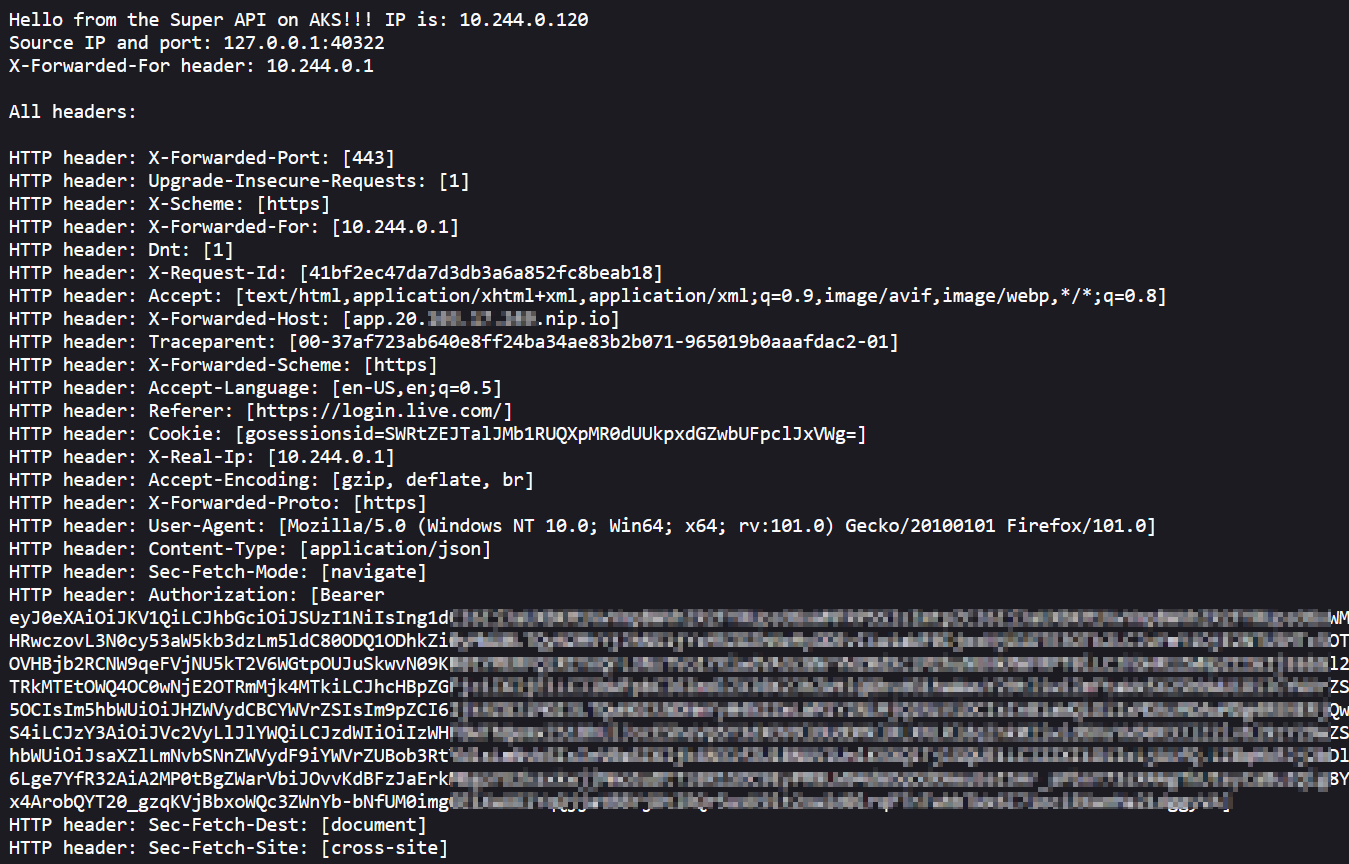
After successful authentication, you should see the response from the /source endpoint of super-api:
Response from /source
The response contains an Authorization header. The header contains a JWT after the word Bearer. You can paste that JWT in https://jwt.io to see its content. We can only access the app with a valid token. That’s all we do in this case, ensuring only authenticated users can access our app.
Conclusion
In this article, we used Dapr to secure access to an app without having to modify the app itself. The source code of super-api was not changed in any way to enable this functionality. Via a component and a configuration, we instructed our app’s Dapr sidecar to do all this work for us. App endpoints such as /source are only called when there is a valid token. When there is such a token, it is saved in a header of your choice.
It is important to note that we have to send HTTP requests to our app’s sidecar for this to work. To enable this, we instructed the sidecar to listen on all IP addresses of the pod, not just 127.0.0.1. That allows us to send HTTP requests to the service that Dapr creates for the app. The ingress forwards requests to the Dapr service directly. That also means that you have to call your endpoint via the Dapr invoke API. I admit that can be confusing in the beginning. 😉
Note that, at the time of this writing (June 2022), the OAuth2 middleware in Dapr is in an alpha state.
At Ignite November 2021, Microsoft released Azure Container Apps as a public preview. It allows you to run containerized applications on a serverless platform, in the sense that you do not have to worry about the underlying infrastructure.
The underlying infrastructure is Kubernetes (AKS) as the control plane with additional software such as:
Dapr: distributed application runtime to easily work with state, pub/sub and other Dapr building blocks
KEDA: Kubernetes event-driven autoscaler so you can use any KEDA supported scaler, in addition to scaling based on HTTP traffic, CPU and memory
Envoy: used to provide ingress functionality and traffic splitting for blue-green deployment, A/B testing, etc…
Your apps actually run on Azure Container Instances (ACI). ACI was always meant to be used as raw compute to build platforms with and this is a great use case.
Note: there is some discussion in the community whether ACI (via AKS virtual nodes) is used or not; I will leave it in for now but in the end, it does not matter too much as the service is meant to hide this complexity anyway
Azure Container Apps does not care about the runtime or programming model you use. Just use whatever feels most comfortable and package it as a container image.
In this post, we will deploy an application that uses Dapr to save state to Cosmos DB. Along the way, we will explain most of the concepts you need to understand to use Azure Container Apps in your own scenarios. The code I am using is on GitHub and written in Go.
Configure the Azure CLI
In this post, we will use the Azure CLI exclusively to perform all the steps. Instead of the Azure CLI, you can also use ARM templates or Bicep. If you want to play with a sample that deploys multiple container apps and uses Bicep, be sure to check out this great Azure sample.
You will need to have the Azure CLI installed and also add the Container Apps extension:
az extension add \
  --source https://workerappscliextension.blob.core.windows.net/azure-cli-extension/containerapp-0.2.0-py2.py3-none-any.whl
The extension allows you to use commands like az containerapp create and az containerapp update.
Create an environment
An environment runs one or more container apps. A container app can run multiple containers and can have revisions. If you know how Kubernetes works, each revision of a container app is actually a scaled collection of Kubernetes pods, using the scalers discussed above. Each revision can be thought of as a separate Kubernetes Deployment/ReplicaSet that runs a specific version of your app. Whenever you modify your app, depending on the type of modification, you get a new revision. You can have multiple active revisions and set traffic weights to distribute traffic as you wish.
Container apps, revisions, pods, and containers
Note that above, although you see multiple containers in a pod in a revision, that is not the most common use case. Most of the time, a pod will have only one application container. That is entirely up to you and the rationale behind using one or more containers is similar to multi-container pods in Kubernetes.
To create an environment, be sure to register or re-register the Microsoft.Web provider. That provider has the kubeEnvironments resource type, which represents a Container App environment.
az provider register --namespace Microsoft.Web
Next, create a resource group:
az group create --name rg-dapr --location northeurope
I have chosen North Europe here, but the location of the resource group does not really matter. What does matter is that you create the environment in either North Europe or Canada Central at this point in time (November 2021).
Every environment needs to be associated with a Log Analytics workspace. You can use that workspace later to view the logs of your container apps. Let’s create such a workspace in the resource group we just created:
Next, we want to retrieve the workspace client id and secret. We will need that when we create the Container Apps environment. Commands below expect the use of bash:
The Container App environment shows up in the portal like so:
Container App Environment in the portal
There is not a lot you can do in the portal, besides listing the apps in the environment. Provisioning an environment is extremely quick, in my case a matter of seconds.
Deploying Cosmos DB
We will deploy a container app that uses Dapr to write key/value pairs to Cosmos DB. Let’s deploy Cosmos DB:
uniqueId=$RANDOM
az cosmosdb create \
  --name dapr-cosmosdb-$uniqueId \
  --resource-group rg-dapr \
  --locations regionName='northeurope'

az cosmosdb sql database create \
    -a dapr-cosmosdb-$uniqueId \
    -g rg-dapr \
    -n dapr-db

az cosmosdb sql container create \
    -a dapr-cosmosdb-$uniqueId \
    -g rg-dapr \
    -d dapr-db \
    -n statestore \
    -p '/partitionKey' \
    --throughput 400
The above commands create the following resources:
A Cosmos DB account in North Europe: note that this uses session-level consistency (remember that for later in this post 😉)
A Cosmos DB database that uses the SQL API
A Cosmos DB container in that database, called statestore (can be anything you want)
In Cosmos DB Data Explorer, you should see:
statestore collection will be used as a State Store in Dapr
Deploying the Container App
We can use the following command to deploy the container app and enable Dapr on it:
Let’s unpack what happens when you run the above command:
A container app daprstate is created in environment dapr-ca
The container app will have an initial revision (revision 1) that runs one container in its pod; the container uses image gbaeke/dapr-state:1.0.0
We turn off scaling by setting min and max replicas to 1
We enable ingress with the type set to external. That configures a public IP address and DNS name to reach our container app on the Internet; Envoy proxy is used under the hood to achieve this; TLS is automatically configured but we do need to tell the proxy the port our app listens on (–target-port 8080)
Dapr is enabled and requires that our app gets a Dapr id (–enable-dapr and –dapr-app-id daprstate)
Because this app uses the Dapr SDK to write key/value pairs to a state store, we need to configure this. That is were the –dapr-components parameter comes in. The component is actually defined in a file components-cosmosdb.yaml:
In the file, the name of our state store is statestore but you can choose any name. The type has to be state.azure.cosmosdb which requires the use of several metadata fields to specify the URL to your Cosmos DB account, the key to authenticate, the database, and collection.
In the Go code, the name of the state store is configurable via environment variables or arguments and, by total coincidence, defaults to statestore 😉.
func main() {
	fmt.Printf("Welcome to super api\n\n")

	// flags
	... code omitted for brevity
	// State store name
	f.String("statestore", "statestore", "State store name")
The flag is used in the code that writes to Cosmos DB with the Dapr SDK (s.config.Statestore in the call to daprClient.SaveState below):
// write data to Dapr statestore
	ctx := r.Context()
	if err := s.daprClient.SaveState(ctx, s.config.Statestore, state.Key, []byte(state.Data)); err != nil {
		w.WriteHeader(http.StatusInternalServerError)
		fmt.Fprintf(w, "Error writing to statestore: %v\n", err)
		return
	} else {
		w.WriteHeader(http.StatusOK)
		fmt.Fprintf(w, "Successfully wrote to statestore\n")
	}
After running the az containerapp create command, you should see the following output (redacted):
The output above gives you a hint on how to define the Container App in an ARM template. Note the template section. It defines the containers that are part of this app. We have only one container with default resource allocations. It is possible to set environment variables for your containers but there are none in this case. We will set one later.
Also note the dapr section. It defines the app’s Dapr id and the components it can use.
Note: it is not a good practice to enter secrets in configuration files as we did above. To fix that:
add a secret to the Container App in the az containerapp create command via the --secrets flag. E.g. --secrets cosmosdb='YOURCOSMOSDBKEY'
in components-cosmosdb.yaml, replace value: YOURMASTERKEY with secretRef: cosmosdb
Trying the curl command will result in an error because Dapr wants to use strong consistency with Cosmos DB and we configured it for session-level consistency. That is not very relevant for now as that is related to Dapr and not Container Apps. Switching the Cosmos DB account to strong consistency will fix the error.
Update the container app
Let’s see what happens when we update the container app. We will add an environment variable WELCOME to change the welcome message that the app displays. Run the following command:
az containerapp update \
  --name daprstate \
  --resource-group rg-dapr \
  --environment-variables WELCOME='Hello from new revision'
It is important to realize that, when the template changes, a new revision will be created. We now have two revisions, reflected in the portal as below:
Container App with two revisions
The new revision is active and receives 100% of the traffic. When we hit the / endpoint, we get Hello from new revision.
The idea here is that you deploy a new revision and test it before you make it active. Another option is to send a small part of the traffic to the new revision and see how that goes. It’s not entirely clear to me how you can automate this, including automated tests, similar to how progressive delivery controllers like Argo Rollouts and Flagger work. Tip to the team to include this! 😉
The az container app create and update commands can take a lot of parameters. Use az container app update –help to check what is supported. You will also see several examples.
Check the logs
Let’s check the container app logs that are sent to the Log Analytics workspace attached to the Container App environment. Make sure you still have the log analytics id in $LOG_ANALYTICS_WORKSPACE_CLIENT_ID:
az monitor log-analytics query --workspace $LOG_ANALYTICS_WORKSPACE_CLIENT_ID --analytics-query "ContainerAppConsoleLogs_CL | where ContainerAppName_s == 'daprstate' | project ContainerAppName_s, Log_s, TimeGenerated | take 50" --out table
This will display both logs from the application container and the Dapr logs. One of the log entries shows that the statestore was successfully initialized:
We have only scratched the surface here but I hope this post gave you some insights into concepts such as environments, container apps, revisions, ingress, the use of Dapr and logging. There is much more to look at such as virtual network integration, setting up scale rules (e.g. KEDA), automated deployments, and much more… Stay tuned!
In a previous post, we looked at using the Dapr InfluxDB component to write data to InfluxDB Cloud. In this post, we will take a look at reading data from an MQTT topic and storing it in InfluxDB. We will use Dapr 0.10, which includes both components.
To get up to speed with Dapr, please read the previous post and make sure you have an InfluxDB instance up and running in the cloud.
If you want to see a video instead:
MQTT to Influx with Dapr
Note that the video sends output to both InfluxDB and Azure SignalR. In addition, the video uses Dapr 0.8 with a custom compiled Dapr because I was still developing and testing the InfluxDB component.
MQTT Server
Although there are cloud-based MQTT servers you can use, let’s mix it up a little and run the MQTT server from Docker. If you have Docker installed, type the following:
docker run -it -p 1883:1883 -p 9001:9001 eclipse-mosquitto
The above command runs Mosquitto and exposes port 1883 on your local machine. You can use a tool such as MQTT Explorer to send data. Install MQTT Explorer on your local machine and run it. Create a connection like in the below screenshot:
MQTT Explorer connection
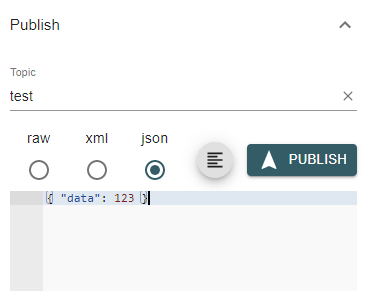
Now, click Connect to connect to Mosquitto. With MQTT, you send data to topics of your choice. Publish a json message to a topic called test as shown below:
Publish json data to the test topic
You can now click the topic in the list of topics and see its most recent value:
Subscribing to the test topic
Using MQTT with Dapr
You are now ready to read data from an MQTT topic with Dapr. If you have Dapr installed, you can run the following code to read from the test topic and store the data in InfluxDB:
const express = require('express');
const bodyParser = require('body-parser');

const app = express();
app.use(bodyParser.json());

const port = 3000;

// mqtt component will post messages from influx topic here
app.post('/mqtt', (req, res) => {
    console.log("MQTT Binding Trigger");
    console.log(req.body)

    // body is expected to contain room and temperature
    room = req.body.room
    temperature = req.body.temperature

    // room should not contain spaces
    room = room.split(" ").join("_")

    // create message for influx component
    message = {
        "measurement": "stat",
        "tags": `room=${room}`,
        "values": `temperature=${temperature}`
    };

    // send the message to influx output binding
    res.send({
        "to": ["influx"],
        "data": message
    });
});

app.listen(port, () => console.log(`Node App listening on port ${port}!`));
In this example, we use Node.js instead of Python to illustrate that Dapr works with any language. You will also need this package.json and run npm install:
In the previous post about InfluxDB, we used an output binding. You use an output binding by posting data to a Dapr HTTP URI.
To use an input binding like MQTT, you will need to create an HTTP server. Above, we create an HTTP server with Express, and listen on port 3000 for incoming requests. Later, we will instruct Dapr to listen for messages on an MQTT topic and, when a message arrives, post it to our server. We can then retrieve the message from the request body.
To tell Dapr what to do, we’ll create a components folder in the same folder that holds the Node.js code. Put a file in that folder with the following contents:
Above, we configure the MQTT component to list to topic test on mqtt://localhost:1883. The name we use (in metadata) is important because that needs to correspond to our HTTP handler (/mqtt).
Like in the previous post, there’s another file that configures the InfluxDB component:
Replace the parameters in the file above with your own.
Saving the MQTT request body to InfluxDB
If you look at the Node.js code, you have probably noticed that we send a response body in the /mqtt handler:
res.send({
        "to": ["influx"],
        "data": message
    });
Dapr is written to accept responses that include a to and a data field in the JSON response. The above response simply tells Dapr to send the message in the data field to the configured influx component.
Does it work?
Let’s run the code with Dapr to see if it works:
dapr run --app-id mqqtinflux --app-port 3000 --components-path=./components node app.js
In dapr run, we also need to specify the port our app uses. Remember that Dapr will post JSON data to our /mqtt handler!
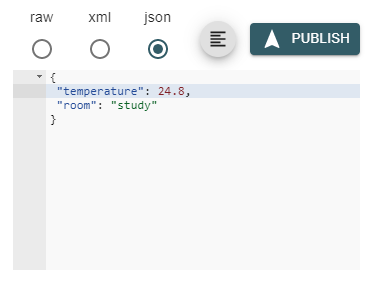
Let’s post some JSON with the expected fields of temperature and room to our MQTT server:
Posting data to the test topic
The Dapr logs show the following:
Logs from the APP (appear alongside the Dapr logs)
In InfluxDB Cloud table view:
Data stored in InfluxDB Cloud (posted some other data points before)
Conclusion
Dapr makes it really easy to retrieve data with input bindings and send that data somewhere else with output bindings. There are many other input and output bindings so make sure you check them out on GitHub!
Recently, I published several videos about Dapr on my Youtube channel. The videos cover the basics of state management, PubSub and service invocation.
The Getting Started with state management and service invocation:
Let’s take a closer look at service invocation with HTTP, Python and Node.
Service Invocation with HTTP
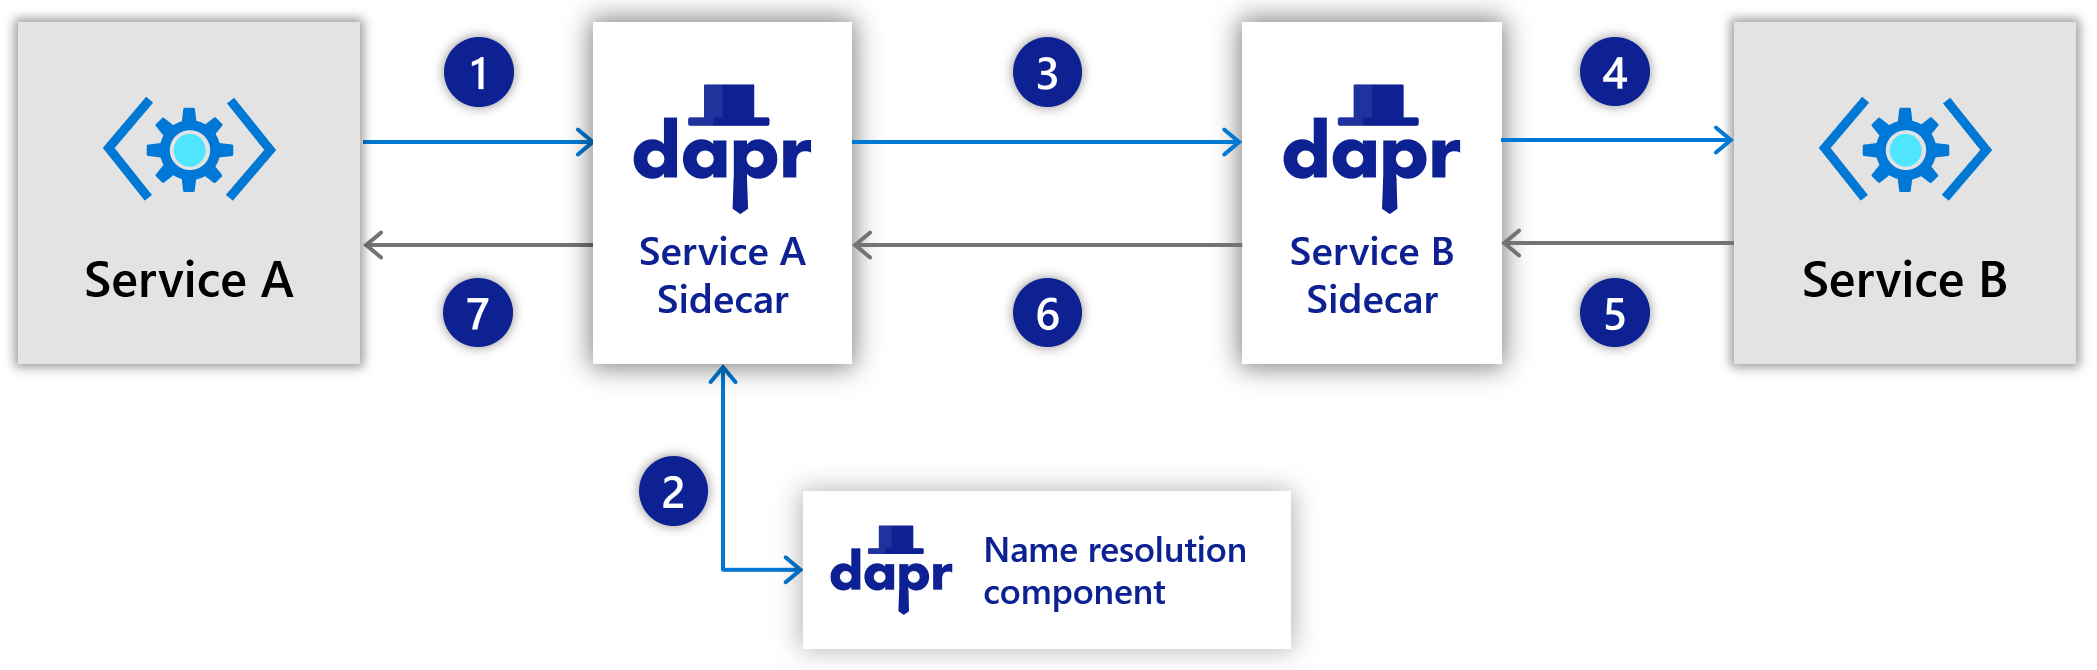
Service invocation (from Dapr docs)
The services you write (here Service A and B) talk to each other using the Dapr runtime. On Kubernetes, you talk to a Dapr sidecar deployed alongside your service container. On your development machine, you run your services via dapr run.
If you want to expose a method on Service B and you use HTTP, you just need to expose an HTTP handler or route. For example, with Express in Node you would use something like:
On your local machine, you would just run the service via dapr run:
dapr run --app-id node --app-port 3000 node app.js
In the last example, the Dapr id is node and we indicate that the service is listening on port 3000. To invoke the method from service A, it can use the following code (Python example shown):
As you can see, service A does not contact service B directly. It just talks to its Dapr sidecar on localhost (or Dapr on your dev machine) and asks it to invoke the neworder method via a service that uses Dapr id node. It is also clear that both service A and B use HTTP only. Because you just use HTTP to expose and invoke methods, you can use any language or framework.
You can find a complete example here with Node and Python.
Service Invocation with HTTP and GRPC
Dapr has SDKs available for C#, Go and other languages. You might prefer those over the generic HTTP approach. In the case of Go, the SDK uses GRPC to interface with the Dapr runtime. With Dapr in between, one service can use HTTP while another uses GRPC.
Let’s take a look at a service that exposes a method (HelloFromGo) from a Go application. The full example is here. Instead of creating an HTTP route with the name of your method, you use an OnInvoke handler that looks like this (only the start is shown, see the full code):
func (s *server) OnInvoke(ctx context.Context, in *commonv1pb.InvokeRequest) (*commonv1pb.InvokeResponse, error) {
	var response string

	switch in.Method {
	case "HelloFromGo":

		response = s.HelloFromGo()
Naturally, you also have to implement an HelloFromGo() method as well:
// HelloFromGo is a simple demo method to invoke
func (s *server) HelloFromGo() string {
	return "Hello"

}
Another service can use any language or framework and invoke the above method with a POST to the following URL if the Dapr id of the Go service is goserver:
A POST to the above URL tells Dapr to execute the OnInvoke method via GRPC which will run the HelloFromGo function. It is perfectly possible to include a payload in your POST and have the OnInvoke handler to process that payload. The full example is here which also includes sending and processing a JSON payload and sending back a text response. You will need to somewhat understand how GRPC works and also understand protocol buffers. A good book on GRPC is the following one: https://learning.oreilly.com/library/view/grpc-up-and/9781492058328/.
Conclusion
Dapr allows you to choose between HTTP and GRPC interfaces to interact with the runtime. You can choose whatever is most comfortable to you. One team can use HTTP with Python, JavaScript etc… while other teams use GRPC with their language of choice. Whatever you choose, the Dapr runtime will make sure service invocation just works allowing you to focus on the code.