Introduction
A while ago, I looked at the OpenAI Assistants API. In February of 2024, Microsoft have released their Assistants API in public preview. It works in the same way as the OpenAI Assistants API while being able to use it with Azure OpenAI models, deployed to a region of your choice.
The goal of the Assistants API is to make it easier for developers to create applications with copilot-like experiences. It should be easier to provide the assistant with extra knowledge or allow the assistant to interact with the world by calling external APIs.
If you have ever created a chat-based copilot with the standard Azure OpenAI chat completions API, you know that it is stateless. It does not know about the conversation history. As a developer, you have to maintain and manage conversation history and pass it to the completions API. With the Assistants API, that is not necessary. The API is stateful. Conversation history is automatically managed via threads. There is no need to manage conversation state to ensure you do not break the model’s context window limits.
In addition to threads, the Assistants API also supports tools. One of these tools is Code Interpreter, a sandboxed Python environment that can help solving complex questions. If you are a ChatGPT Plus subscriber, you should know that tool already. Code Interpreter is often used to solve math questions, something that LLMs are not terribly good at. However, it is not limited to math. Next to Code Interpreter, you can define your own functions. A function could call an API that queries a database that returns the results to the assistant.
Before diving into a code example you should understand the following components:
- Assistant: custom AI with Azure OpenAI models that have access to files and tools
- Thread: conversation between the assistant and the user
- Message: message created by the assistant or a user; a message does not have to be text; it could be an image or a file; messages are stored on a thread
- Run: you run a thread to illicit a response from the model; for instance if you just placed a user question on the thread and you run the thread, the model can respond with text or perform a tool call
- Run Step: detailed list of steps the assistant took as part of a run; this could include a tools call
Enough talk, let’s look at some code. The code can be found on GitHub in a Python notebook: https://github.com/gbaeke/azure-assistants-api/blob/main/getting-started.ipynb
Initialising the OpenAI client and creating the assistant
We will use a .env file to load the Azure OpenAI API key, the endpoint and the API version. You will need an Azure OpenAI resource in a supported region such as Sweden Central. The API version should be 2024-02-15-preview.
import os
from dotenv import load_dotenv
from openai import AzureOpenAI

load_dotenv()

# Create Azure OpenAI client
client = AzureOpenAI(
    api_key=os.getenv('AZURE_OPENAI_API_KEY'),
    azure_endpoint=os.getenv('AZURE_OPENAI_ENDPOINT'),
    api_version=os.getenv('AZURE_OPENAI_API_VERSION')
)

assistant = client.beta.assistants.create(
    name="Math Tutor",
    instructions="""You are a math tutor that helps users solve math problems.
    You have access to a sandboxed environment for writing and testing code.
    Explain to the user why you used the code and how it works
    """,
    tools=[{"type": "code_interpreter"}],
    model="gpt-4-preview" # ensure you have a deployment in the region you are using
)
Above, we create an assistant with the client.beta.assistant.create method. Indeed, OpenAI Assistants as developed by OpenAI are still in beta so the OpenAI library reflects that.
Note that an assistant is given specific instructions and, in this case, a tool. We will use the built-in Code Interpreter tool. It can help us solving math questions, including the generation of plots.
Ensure that the model refers to a deployed model in your region. I use the gpt-4-turbo preview here.
Note that the assistants you create are shown in the Azure OpenAI Assistant Playground. For example, I created the Math Assistant a few times by running the same code:

When you click on one of the assistants, it opens in the Assistant Playground. In that playground, you can start chatting right away. For example:

In the screenshot above, I have asked the assistant to plot a sinus wave. It explains how it did that because that is what the Instructions tell the assistant to do. At the end, Code Interpreter creates the plot and generates an image file. That image file is picked up in the playground and displayed.
Also note the panel on the right with API instructions. You can click on those instructions to execute them and see the JSON response.
Note that you can reuse an assistant by simply using its id. You can also create the assistant directly in the portal. You do not have to create it in code, like we are doing.
Let’s now create a thread in code and ask some math questions.
Creating a thread and adding a message
Below, a thread is created which results in a thread id. Subsequently, a message is added to the thread with role set to user. This is the first user question in the thread.
# Create a thread
thread = client.beta.threads.create()
# print the thread id
print("Thread id: ", thread.id)
message = client.beta.threads.messages.create(
thread_id=thread.id,
role="user",
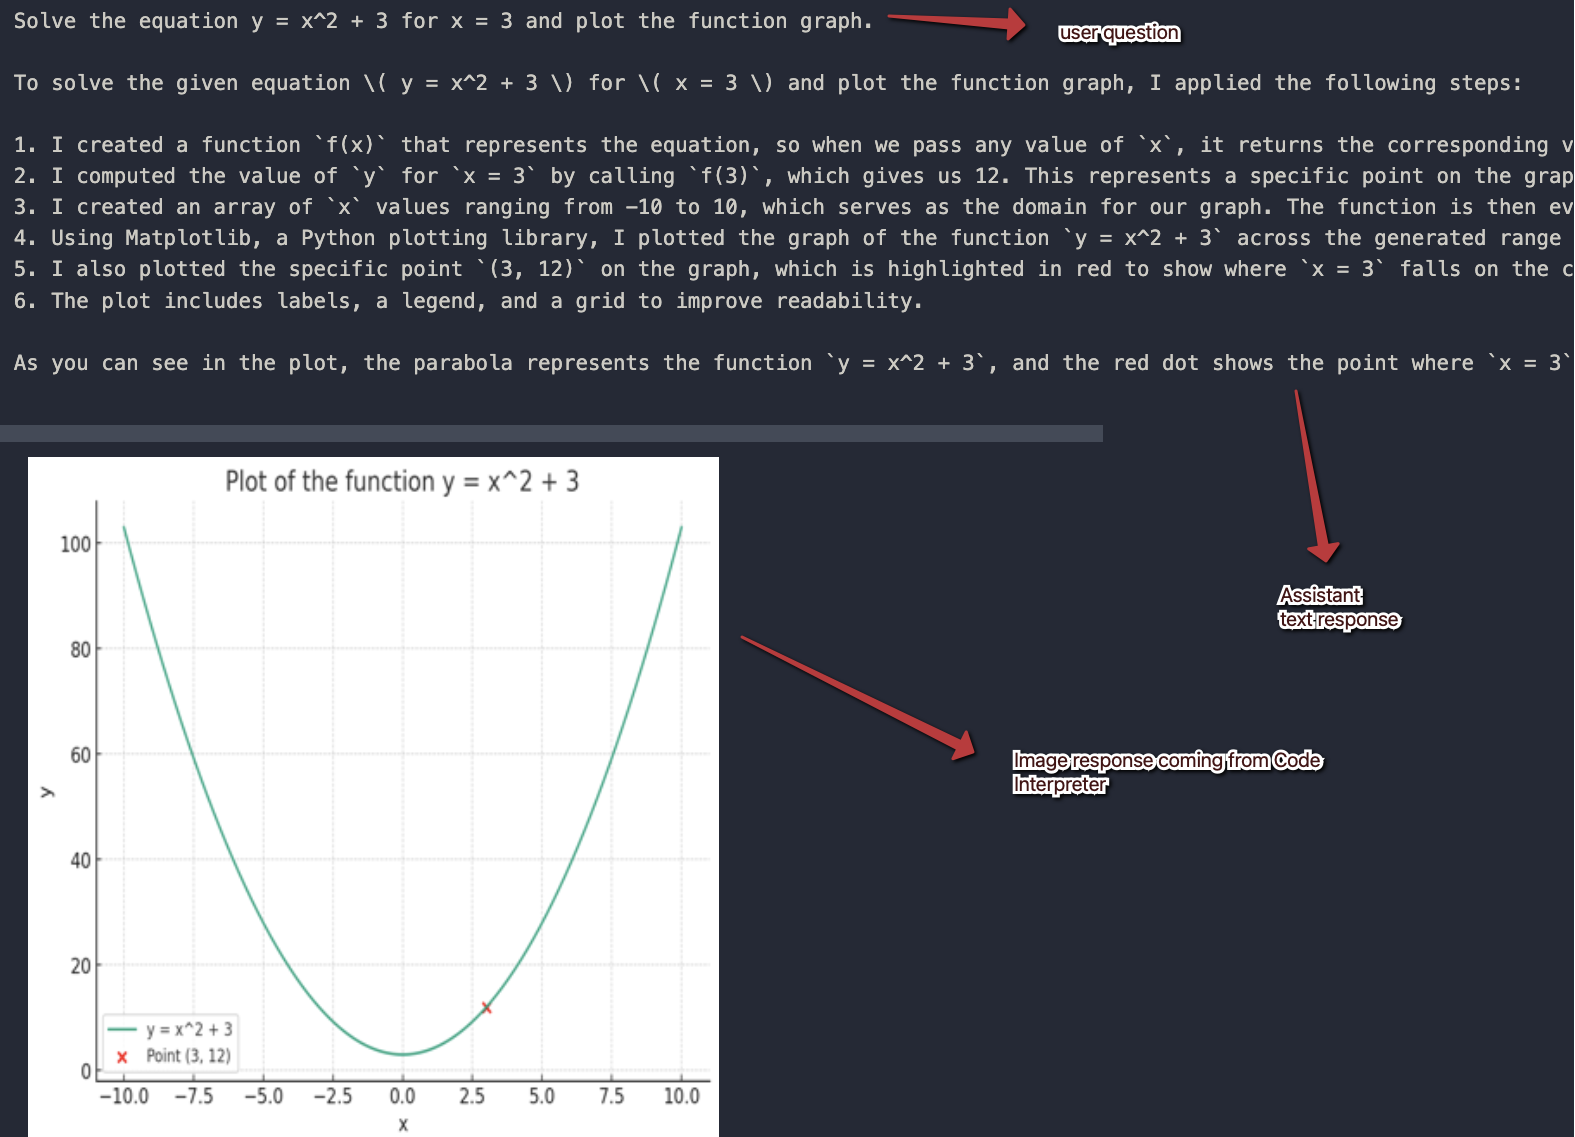
content="Solve the equation y = x^2 + 3 for x = 3 and plot the function graph."
)
# Show the messages
thread_messages = client.beta.threads.messages.list(thread.id)
print(thread_messages.model_dump_json(indent=2))
The JSON dump of the messages contains a data array. In our case the single item in the data array contains a content array next to other information such as role, the thread id, the creation timestamp and more. The content array can contain multiple pieces of content of different types. In this case, we simply have the user question which is of type text.
"content": [
        {
          "text": {
            "annotations": [],
            "value": "Solve the equation y = x^2 + 3 for x = 3 and plot the function graph."
          },
          "type": "text"
        }
      ]
Running the thread
A message on a thread is great but does not do all that much. We want a response from the assistant. In order to get a response, we need to run the thread:
run = client.beta.threads.runs.create(
  thread_id=thread.id,
  assistant_id=assistant.id
)

status = run.status

while status not in ["completed", "cancelled", "expired", "failed"]:
    time.sleep(2)
    run = client.beta.threads.runs.retrieve(thread_id=thread.id,run_id=run.id)
    status = run.status
    print(f'Status: {status}')
    clear_output(wait=True)

print(f'Status: {status}')
The run is where the assistant and the thread come together via their ids. As you can probably tell, the run does not directly return the result. You need to check the run status yourself and act accordingly.
When the status is completed, the run was successful. That means that there should be some response from the assistant.
Interpreting the messages after the run
After a completed run in response to a message with role = user, there should be a response from the model. There are all sorts of responses, including responses that indicate you should run a function. Our assistant does not have custom functions defined so the response can be one of the following:
- a response from the model without using Code Interpreter
- a response from the model, interpreting the response from Code Interpreter and possibly including images and text
Note that you do not have to call Code Interpreter specifically. The assistant will decide to use Code Interpreter (you can also be explicit) and use the Code Interpreter response in its final answer.
The code below shows one way of dealing with the assistant response:
messages = client.beta.threads.messages.list(
    thread_id=thread.id
)

messages_json = json.loads(messages.model_dump_json())

for item in reversed(messages_json['data']):
    # Check the content array
    for content in reversed(item['content']):
        # If there is text in the content array, print it as Markdown
        if 'text' in content:
            display(Markdown(content['text']['value']))
        # If there is an image_file in the content, print the file_id
        if 'image_file' in content:
            file_id = content['image_file']['file_id']
            file_content = client.files.content(file_id)
            # use PIL with the file_content
            img = Image.open(file_content)
            img = img.resize((400, 400))
            display(img)
Above, the following happens:
- all messages from the thread are retrieved: this includes the original user question in addition to the assistant response; the later responses are first in the array
- we loop through the reversed array and check for a
contentfield: if there is acontentfield (an array) we loop over that and check for atextorimage_filefield - if we find content of type
text, we display it with markdown (we are using a Notebook here) - if we find content of type
image_file, we retrieve the image from Azure OpenAI using itsfilesAPI and display it in the notebook with some help of PIL.
Here is the response I got in my notebook. Note that there are only two messages. The assistant response contains two pieces of content.
Follow-up questions
One of the advantages of the Assistants API is that we do not have to maintain chat history. We only have to add follow-up questions to the thread and run it again. Below is the model response after adding this question: “Is this a concave function?”:

Above, I print the entire thread in reverse order again. The answer of the assistant is that this is clearly not a concave function but a convex one.
You should know that at present (February 2024), the Assistants API simply tries to fit the messages in the model’s context window. If the context window is large, long conversations might cost you a lot in tokens. At present, there is no way that I know of to change this mechanism. OpenAI, and Microsoft, are planning to add some extra capabilities. For example:
- control token count regardless of the chosen model (e.g. set token count to 2000 even if the model allows for 8000)
- generate summaries of previous messages and pass the summaries as context during a thread run
In most production applications that are used at scale, you really need to control token usage by managing chat history meticulously. Today, that is only possible with the chat completions API and/or abstractions on top of it like LangChain.
Conclusion
With the arrival of the Assistants API in Azure OpenAI, it is easier to write assistants that work with tools like Code Interpreter or custom functions. This post has focused on the basics of using the API with only the Code Interpreter tool.
In follow-up posts, we will look at custom functions and how to work with uploaded files.
Keep in mind that this is all in public preview and should not be used in production.