Use Azure OpenAI Add your data vector search from code

In the previous post, we looked at using Azure OpenAI Add your data from the Azure OpenAI Chat Playground. It is an easy-to-follow wizard to add documents to a storage account and start asking questions about them. From the playground, you can deploy a chat app to an Azure web app and you are good to go. The vector search is performed by an Azure Cognitive Search resource via an index that includes a vector next to other fields such as the actual content, the original URL, etc…

In this post, we will look at using this index from code and build a chat app using the Python Streamlit library.

All code can be found here: https://github.com/gbaeke/azure-cog-search

Requirements

You need an Azure Cognitive Search resource with an index that supports vector search. Use this post to create one. Besides Azure Cognitive Search, you will need Azure OpenAI deployed with both gpt-4 (or 3.5) and the text-embedding-ada-002 embedding model. The embedding model is required to support vector search. In Europe, use France Central as the region.

Next, you need Python installed. I use Python 3.11.4 64-bit on an M1 Mac. You will need to install the following libraries with pip:

  • streamlit
  • requests

You do not need the OpenAI library because we will use the Azure OpenAI REST APIs to be able to use the extension that enables the Add your data feature.

Configuration

We need several configuration settings. The can be divided into two big blocks:

  • Azure Cognitive Search settings: name of the resource, access key, index name, columns, type of search (vector), and more…
  • Azure OpenAI settings: name of the model (e.g., gpt-4), OpenAI access key, embedding model, and more…

You should create a .env file with the following content:

AZURE_SEARCH_SERVICE = "AZURE_COG_SEARCH_SHORT_NAME"
AZURE_SEARCH_INDEX = "INDEX_NAME"
AZURE_SEARCH_KEY = "AZURE_COG_SEARCH_AUTH_KEY"
AZURE_SEARCH_USE_SEMANTIC_SEARCH = "false"
AZURE_SEARCH_TOP_K = "5"
AZURE_SEARCH_ENABLE_IN_DOMAIN = "true"
AZURE_SEARCH_CONTENT_COLUMNS = "content"
AZURE_SEARCH_FILENAME_COLUMN = "filepath"
AZURE_SEARCH_TITLE_COLUMN = "title"
AZURE_SEARCH_URL_COLUMN = "url"
AZURE_SEARCH_QUERY_TYPE = "vector"

# AOAI Integration Settings
AZURE_OPENAI_RESOURCE = "AZURE_OPENAI_SHORT_NAME"
AZURE_OPENAI_MODEL = "gpt-4"
AZURE_OPENAI_KEY = "AZURE_OPENAI_AUTH_KEY"
AZURE_OPENAI_TEMPERATURE = 0
AZURE_OPENAI_TOP_P = 1.0
AZURE_OPENAI_MAX_TOKENS = 1000
AZURE_OPENAI_STOP_SEQUENCE = ""
AZURE_OPENAI_SYSTEM_MESSAGE = "You are an AI assistant that helps people find information."
AZURE_OPENAI_PREVIEW_API_VERSION = "2023-06-01-preview"
AZURE_OPENAI_STREAM = "false"
AZURE_OPENAI_MODEL_NAME = "gpt-4"
AZURE_OPENAI_EMBEDDING_ENDPOINT = "https://AZURE_OPENAI_SHORT_NAME.openai.azure.com/openai/deployments/embedding/EMBEDDING_MODEL_NAME?api-version=2023-03-15-preview"
AZURE_OPENAI_EMBEDDING_KEY = "AZURE_OPENAI_AUTH_KEY"

Now we can create a config.py that reads these settings.

from dotenv import load_dotenv
import os
load_dotenv()

# ACS Integration Settings
AZURE_SEARCH_SERVICE = os.environ.get("AZURE_SEARCH_SERVICE")
AZURE_SEARCH_INDEX = os.environ.get("AZURE_SEARCH_INDEX")
AZURE_SEARCH_KEY = os.environ.get("AZURE_SEARCH_KEY")
AZURE_SEARCH_USE_SEMANTIC_SEARCH = os.environ.get("AZURE_SEARCH_USE_SEMANTIC_SEARCH", "false")
AZURE_SEARCH_TOP_K = os.environ.get("AZURE_SEARCH_TOP_K", 5)
AZURE_SEARCH_ENABLE_IN_DOMAIN = os.environ.get("AZURE_SEARCH_ENABLE_IN_DOMAIN", "true")
AZURE_SEARCH_CONTENT_COLUMNS = os.environ.get("AZURE_SEARCH_CONTENT_COLUMNS")
AZURE_SEARCH_FILENAME_COLUMN = os.environ.get("AZURE_SEARCH_FILENAME_COLUMN")
AZURE_SEARCH_TITLE_COLUMN = os.environ.get("AZURE_SEARCH_TITLE_COLUMN")
AZURE_SEARCH_URL_COLUMN = os.environ.get("AZURE_SEARCH_URL_COLUMN")
AZURE_SEARCH_VECTOR_COLUMNS = os.environ.get("AZURE_SEARCH_VECTOR_COLUMNS")
AZURE_SEARCH_QUERY_TYPE = os.environ.get("AZURE_SEARCH_QUERY_TYPE")

# AOAI Integration Settings
AZURE_OPENAI_RESOURCE = os.environ.get("AZURE_OPENAI_RESOURCE")
AZURE_OPENAI_MODEL = os.environ.get("AZURE_OPENAI_MODEL")
AZURE_OPENAI_KEY = os.environ.get("AZURE_OPENAI_KEY")
AZURE_OPENAI_TEMPERATURE = os.environ.get("AZURE_OPENAI_TEMPERATURE", 0)
AZURE_OPENAI_TOP_P = os.environ.get("AZURE_OPENAI_TOP_P", 1.0)
AZURE_OPENAI_MAX_TOKENS = os.environ.get("AZURE_OPENAI_MAX_TOKENS", 1000)
AZURE_OPENAI_STOP_SEQUENCE = os.environ.get("AZURE_OPENAI_STOP_SEQUENCE")
AZURE_OPENAI_SYSTEM_MESSAGE = os.environ.get("AZURE_OPENAI_SYSTEM_MESSAGE", "You are an AI assistant that helps people find information about jobs.")
AZURE_OPENAI_PREVIEW_API_VERSION = os.environ.get("AZURE_OPENAI_PREVIEW_API_VERSION", "2023-06-01-preview")
AZURE_OPENAI_STREAM = os.environ.get("AZURE_OPENAI_STREAM", "true")
AZURE_OPENAI_MODEL_NAME = os.environ.get("AZURE_OPENAI_MODEL_NAME", "gpt-35-turbo")
AZURE_OPENAI_EMBEDDING_ENDPOINT = os.environ.get("AZURE_OPENAI_EMBEDDING_ENDPOINT")
AZURE_OPENAI_EMBEDDING_KEY = os.environ.get("AZURE_OPENAI_EMBEDDING_KEY")

Writing the chat app

Now we will create chat.py. The diagram below summarizes the architecture:

Chat app architecture (high level)

Here is the first section of the code with explanations:

import requests
import streamlit as st
from config import *
import json

# Azure OpenAI REST endpoint
endpoint = f"https://{AZURE_OPENAI_RESOURCE}.openai.azure.com/openai/deployments/{AZURE_OPENAI_MODEL}/extensions/chat/completions?api-version={AZURE_OPENAI_PREVIEW_API_VERSION}"
    
# endpoint headers with Azure OpenAI key
headers = {
    'Content-Type': 'application/json',
    'api-key': AZURE_OPENAI_KEY
}

# Streamlit app title
st.title("🤖 Azure Add Your Data Bot")

# Keep messages array in session state
if "messages" not in st.session_state:
    st.session_state.messages = []

# Display previous chat messages from history on app rerun
# Add your data messages include tool responses and assistant responses
# Exclude the tool responses from the chat display
for message in st.session_state.messages:
    if message["role"] != "tool":
        with st.chat_message(message["role"]):
            st.markdown(message["content"])

A couple of things happen here:

  • We import all the variables from config.py
  • We construct the Azure OpenAI REST endpoint and store it in endpoint; we use the extensions/chat endpoint here which supports the Add your data feature in API version 2023-06-01-preview and higher
  • We configure the HTTP headers to send to the endpoint; the headers include the Azure OpenAI authentication key
  • We print a title with Streamlit (st.title) and define a messages array that we store in Streamlit’s session state
  • Because of the way Streamlit works, we have to print the previous messages of the chat each time the page reloads. We do that in the last part but we exclude the tool role. The extensions/chat endpoint returns a tool response that contains the data returned by Azure Cognitive Search. We do not want to print the tool response. Together with the tool response, the endpoint returns an assistant response which is the response from the gpt model. We do want to print that response.

Now we can look at the code that gets executed each time the user asks a question. In the UI, the question box is at the bottom:

Streamlit chat UI

Whenever you type a question, the following code gets executed:

# if user provides chat input, get and display response
# add user question and response to previous chat messages
if user_prompt := st.chat_input():
    st.chat_message("user").write(user_prompt)
    with st.chat_message("assistant"):
        with st.spinner("🧠 thinking..."):
            # add the user query to the messages array
            st.session_state.messages.append({"role": "user", "content": user_prompt})
            body = {
                "messages": st.session_state.messages,
                "temperature": float(AZURE_OPENAI_TEMPERATURE),
                "max_tokens": int(AZURE_OPENAI_MAX_TOKENS),
                "top_p": float(AZURE_OPENAI_TOP_P),
                "stop": AZURE_OPENAI_STOP_SEQUENCE.split("|") if AZURE_OPENAI_STOP_SEQUENCE else None,
                "stream": False,
                "dataSources": [
                    {
                        "type": "AzureCognitiveSearch",
                        "parameters": {
                            "endpoint": f"https://{AZURE_SEARCH_SERVICE}.search.windows.net",
                            "key": AZURE_SEARCH_KEY,
                            "indexName": AZURE_SEARCH_INDEX,
                            "fieldsMapping": {
                                "contentField": AZURE_SEARCH_CONTENT_COLUMNS.split("|") if AZURE_SEARCH_CONTENT_COLUMNS else [],
                                "titleField": AZURE_SEARCH_TITLE_COLUMN if AZURE_SEARCH_TITLE_COLUMN else None,
                                "urlField": AZURE_SEARCH_URL_COLUMN if AZURE_SEARCH_URL_COLUMN else None,
                                "filepathField": AZURE_SEARCH_FILENAME_COLUMN if AZURE_SEARCH_FILENAME_COLUMN else None,
                                "vectorFields": AZURE_SEARCH_VECTOR_COLUMNS.split("|") if AZURE_SEARCH_VECTOR_COLUMNS else []
                            },
                            "inScope": True if AZURE_SEARCH_ENABLE_IN_DOMAIN.lower() == "true" else False,
                            "topNDocuments": AZURE_SEARCH_TOP_K,
                            "queryType":  AZURE_SEARCH_QUERY_TYPE,
                            "roleInformation": AZURE_OPENAI_SYSTEM_MESSAGE,
                            "embeddingEndpoint": AZURE_OPENAI_EMBEDDING_ENDPOINT,
                            "embeddingKey": AZURE_OPENAI_EMBEDDING_KEY
                        }
                    }   
                ]
            }  

            # send request to chat completion endpoint
            try:
                response = requests.post(endpoint, headers=headers, json=body)

                # there will be a tool response and assistant response
                tool_response = response.json()["choices"][0]["messages"][0]["content"]
                tool_response_json = json.loads(tool_response)
                assistant_response = response.json()["choices"][0]["messages"][1]["content"]

                # get urls for the JSON tool response
                urls = [citation["url"] for citation in tool_response_json["citations"]]


            except Exception as e:
                st.error(e)
                st.stop()
            
           
            # replace [docN] with urls and use 0-based indexing
            for i, url in enumerate(urls):
                assistant_response = assistant_response.replace(f"[doc{i+1}]", f"[[{i}]({url})]")
            

            # write the response to the chat
            st.write(assistant_response)

            # write the urls to the chat; gpt response might not refer to all
            st.write(urls)

            # add both responses to the messages array
            st.session_state.messages.append({"role": "tool", "content": tool_response})
            st.session_state.messages.append({"role": "assistant", "content": assistant_response})
            

When there is input, we write the input to the chat history on the screen and add it to the messages array. The OpenAI APIs expect a messages array that includes user and assistant roles. In other words, user questions and assistant (here gpt-4) responses.

With a valid messages array, we can send our payload to the Azure OpenAI extensions/chat endpoint. If you have ever worked with the OpenAI or Azure OpenAI APIs, many of the settings in the JSON body will be familiar. For example: temperature, max_tokens, and of course the messages themselves.

What’s new here is the dataSources field. It contains all the information required to perform a vector search in Azure Cognitive Services. The search finds content relevant to the user’s question (that was added last to the messages array). Because queryType is set to vector, we also need to provide the embedding endpoint and key. It’s required because the user question has to be vectorized in order to compare it with the stored vectors.

It’s important to note that the extensions/chat endpoint, together with the dataSources configuration takes care of a lot of the details:

  • Perform a k-nearest neighbor search (k=5 here) to find 5 documents closely related to the user’s question
  • It uses vector search for this query (could be combined with keyword and semantic search to perform a hybrid search but that is not used here)
  • It stuffs the prompt to the GPT model with the relevant content
  • It returns the GPT model response (assistant response) together with a tool response. The tool response contains citations that include URLs to the original content and the content itself.

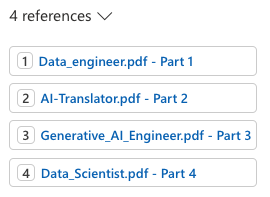
In the UI, we print the URLs from these citations after modifying the assistant response to just return hyperlinked numbers like [0] and [1] for the citations instead of unlinked [doc1], [doc2], etc… In the UI, that looks like:

Printing the URLs from the citations

Note that this chat app is a prototype and does not include management of the messages array. Long interactions will reach the model’s token limit!

You can find this code on GitHub here: https://github.com/gbaeke/azure-cog-search.

Conclusion

Although still in preview, you now have an Azure-native solution that enables the RAG pattern with vector search. RAG stands for Retrieval Augmented Generation. Azure Cognitive Search is a fully managed service that stores the vectors and performs similarity searches. There is no need to deploy a 3rd party vector database.

There is no need for specific libraries to implement this feature because it is all part of the Azure OpenAI API. Microsoft simply extended that API to add data sources and takes care of all the behind-the-scenes work that finds relevant content and adds it to your prompt.

If, for some reason, you do not want to use the Azure OpenAI API directly and use something like LangChain or Semantic Kernel, you can of course still do that. Both solutions support Azure Cognitive Search as a vector store.

Improvements in Azure OpenAI Add your data

In a previous post, I talked about the Add your data feature in the Azure OpenAI Chat playground. Recently, there have been some updates to this feature, including vector search. Let’s take a look at the updated experience and focus on vector search.

Starting point

I have some PDF documents in a storage account container. They are PDFs containing job descriptions for a select group of companies. You can use .txt, .md, .html, Microsoft Word files, Microsoft PowerPoint files, or PDFs.

PDFs in a storage account

At the storage account level, CORS settings should be GET from all origins (*). This can also be set from the Add your data wizard in the OpenAI Playground.

CORS settings

In addition to the storage account, you need an OpenAI resource deployed to a region of choice. I have chosen France Central which provides access to gpt-4 and the text-embedding-ada-002 embedding model (a text embedding model is required for vector search). Ensure those models are deployed. For example:

Deployed models in France Central

Running the wizard

In OpenAI Chat Playground, you will find the Add your data (preview) tab. Use the + Add a data source button to start.

There are several sources to start from. Because I already have my files in a storage account, I will select Azure Blob Storage as the source and select the name of the storage account and the container with my files. You can also upload files or use an existing index in Cognitive Search. Whatever the option you choose, you will always end up with a Cognitive Search index that serves relevant content to the chat.

Data source options

As you can see from the above screenshot, in addition to the storage account, you have to select an Azure Cognitive Search instance. It will not be created for you. If you do not have such an instance, either click the link under the Select Azure Cognitive Search resource dropdown or create one yourself and use the refresh icon. I already have such a resource called acs-geba. Use the Basic pricing tier as a minimum. This gives you a vector quota of 1GB.

After selecting the Azure Cognitive Search resource, enter an index name. The documents in the storage account will be added to this index so we can search via this index later. The index will be created for you. I will use oai as the index name and also set a schedule to Hourly to update the index automatically. The schedule can be adjusted afterward in Azure Cognitive Search.

We now have the following in the wizard:

Add your data, data source config

You can now add vector search. This is in addition to keyword and semantic search. To use vector search, you need to specify an embedding model. If you do not have text-embedding-ada-002 deployed in your region, you will not be able to turn on vector search. This feature requires at least the Basic or higher SKU.

Turning on vector search (still in the first page of the wizard)

Above, I called my deployment of the text-embedding-ada-002 model embedding but you can use any name you like. It’s just a deployment name.

Now we can press Next, to be presented with the Data management page:

Data management page

You can find more information about those options here. In most cases, using Vector search alone is sufficient but it depends a bit on your dataset and use-case. I will just use Vector search. When we use Redis, Qdrant, Pinecone, or other vector stores, we also use vectorized search exclusively, which works very well.

After clicking Next, review what will happen and click Save and Close. The data will be added to the index:

Data is being added

Asking questions about the data

When the data has been added to Azure Cognitive Search, you can start asking questions. If you want to limit the chat to only your data, ensure that Limit Responses to your data content is checked.

Ready to go

In the Chat Platground, I selected gpt-4 and asked the following question: “Who are MBarQ and do they need AI translators?”. The answer is as follows:

Asking a question

This answer comes from one of the PDFs containing the job description.

Behind the scenes

For the above interaction to work, the question “Who are MBarQ and do they need AI translators?” is vectorized using the selected embedding model. Let’s call this the query vector. The selected embedding model creates a vector with 1536 dimensions that represent the text within a vector space. The nice thing here is that the embedding of the query is created automatically as part of the extended Azure OpenAI API.

The vectors for your documents are stored in an index that ends with the word chunks. Here’s my index and its defined fields. This is all the result of the wizard. No changes have been made to Azure Cognitive Search manually.

Index used for vector search and its fields

As you can see, there is a field for the contentVector which also notes the number of dimensions. The embedding model we used just happens to output 1536 numbers. Other embedding models use a different number of dimensions. Next to the contentVector, the content field contains the actual text that the vector was created from. That text will later be injected, behind the scenes, in the gpt-4 prompt. But we first have to find these pieces of text!

With the query vector in hand, Add your data searches for pieces of text with vectors that are close to the query vector. Cognitive Search uses cosine similarity to do that but there is no real need to know that. Note that we only use vector search in this scenario. When you do hybrid and/or semantic searches, the query process is different. Also, note that the index with vectors works on chunks of text coming from your documents. This chunking happens transparently in the background when the indexer runs.

Once the top N (usually n=5 but can be adjusted in code) vectors that are closest to the query vector are found, we also have the pieces of text closest to the query (from the content field). The original pieces of text that the vectors were calculated from get added to the query and sent to gpt-4. The prompt sent to gpt-4 could be something like the one below (just an example):

Who are MBarQ and do they need AI translators?

Only answer based on the context below after ---

---

First piece of text (no vectors here, just plain text!!!)

Second piece of text

...

Based on this prompt and hopefully relevant context below the — mark, the model can answer the original question.

Note that the Add your data experience also returns references. In the UI, you can click these to see the source text:

References

Deployment

From the Playground, you can deploy the chat experience to a web app or a Power Virtual Agent bot:

Deployment

At this moment (September 2023) the Power Virtual Agent deployment does not work if your default environment is not in the United States. When you click A new Power Virtual Agent bot…, you should quickly copy the URL and replace the environment ID with another one that is in the United States. Navigate to the modified URL to create the bot.

Deploying to a web app is a bit more straightforward because that is just a web app in Azure. No Power Platform madness here… 😀

Note that if you enable chat history, CosmosDB is used. Here’s the app with chat history visible at the right, similar to chat history in ChatGPT or Bing Chat. This app uses Azure Active Directory (Microsoft Entra ID) for authentication.

Chat in web app

Conclusion

The main addition to Add your data surely is vector search. That capability was already a part of Cognitive Search but the Add your data feature did not use it. When you do use it, a lot of stuff happens in the background automatically:

  • An index that supports vectors is created; if selected the index is automatically updated based on the contents in the storage account container
  • Documents are chunked and vectors are created for each of these chunks based on the selected embeddings model
  • There is no need to vectorize the user’s query yourself, performing a nearest neighbor search and stuffing the gpt prompt with content; everything is handled by the underlying API

It will be interesting to see how it evolves further.

Use the Azure Add your data feature from code

In a previous post, we looked at Azure Add your data (preview) that can be configured from the Azure OpenAI Chat playground. In a couple of steps, you can point to or upload files of a supported file type (PDF, Word, …) and create an Azure Cognitive Search index. That index can subsequently be queried to find relevant content to inject in the prompt of an Azure OpenAI model such as gtp-35-turbo or gpt-4. The injection is done for you by the Add your data feature!

Although this feature is fantastic and easy to configure in the portal, you probably want to use it in a custom application. So in this post, we will take a look at how to use this feature in code.

You can find a notebook with some sample code here: https://github.com/gbaeke/azure-cog-search. The code is a subset of the code used by Microsoft to create a web application from the Azure OpenAI playground. That code can be found here. Although the code is written in Python, it does not use specific OpenAI or Azure OpenAI libraries. The code uses the Azure OpenAI REST APIs only, which means you can easily replicate this in any other language or framework.

Before you run the code, make sure you clone the repo and add a .env file as described in README.md. The code itself is in a Python notebook so make sure you can run these notebooks. I use Visual Studio Code to do that:

Running the notebook in VS Code

To configure Visual Studio Code, check https://code.visualstudio.com/docs/datascience/jupyter-notebooks.

The code itself does the following:

  • create Python variables from environment variables to configure both Azure Cognitive Search and Azure OpenAI. Make sure you have read the previous blog post and/or looked at the video to have both of these resources. You will need to add the short names of these services and the authentication keys to these services. The video at the end of this post discusses the options in some more detail.
  • Prepare a messages array with a user question: I am an Azure architect. Is there a job for me? In the previous post, I added documents with job descriptions. You can add any documents you want and modify the user question accordingly.
  • Prepare the JSON body for an HTTP POST. The JSON body will be sent to the Azure OpenAI chat completion (extensions) API and will include information about the Azure Cognitive Search data source.
  • Create the endpoint URL and HTTP headers to send to the chat completion API. The headers contain the Azure OpenAI API key.
  • Send the JSON body to the chat completion endpoint with the Python requests module and extract the full response (that includes citations) and the response by the OpenAI model. In this code, gpt-4 is used.

To see the response from the code, check https://github.com/gbaeke/azure-cog-search/blob/main/cog-search-openai.ipynb. If you have worked with the OpenAI APIs before, you will notice that the response in the choices field contains two messages:

  • a message with the role of tool that includes content from Azure Cognitive Services including metadata like URL and file path
  • a message with the role of assistant that contains the actual answer from the OpenAI model (here gpt-4)

It’s important to note that you need to use the chat completions extensions API with the correct API version of 2023-06-01-preview. This is reflected in the constructed endpoint. Also, note it’s extensions/chat/completions in the URL!

endpoint = f"https://{AZURE_OPENAI_RESOURCE}.openai.azure.com/openai/deployments/{AZURE_OPENAI_MODEL}/extensions/chat/completions?api-version={AZURE_OPENAI_PREVIEW_API_VERSION}"

If you are used to LangChain or other libraries that are supposed to make it easy to work with large language models, prompts, vector databases, etc… you know that the document queries are separated from the actual call to the LLM and that the retrieved documents are injected into the prompt. Of course, LangChain and other tools have higher-level APIs that make it easy to do in just a few lines of code.

Microsoft has gone for direct integration of Azure Cognitive Search in the Azure OpenAI APIs version 2023-06-01-preview and above. You can find the OpenAPI specification (swagger) here. One API call is all that is needed!

Note that in this code, we are not using semantic search. In the sample .env file, AZURE_SEARCH_USE_SEMANTIC_SEARCH is set to false. You cannot simply turn on that setting because it also requires turning on the feature in Azure Cognitive Search. The feature is also in preview:

Semantic search in Azure Cognitive Search (preview)

To understand the differences between lexical search and semantic search, see this article. In general, semantic search should return better results when using natural language queries. By turning on the feature in Cognitive Search (Free tier) and setting AZURE_SEARCH_USE_SEMANTIC_SEARCH to true, you should be good to go.

⚠️ Note that semantic search is not the same as vector search in the context of Azure Cognitive Search. With vector search, you have to generate vectors (embeddings) using an embedding model and store these vectors in your index together with your content. Although Azure Cognitive Search supports vector search, it is not used here. It’s kind of confusing because vector search enables semantic search in a general context.

Here’s a video with more information about this blog post:

Building a chatbot in Azure that works with your data

When I talk to customers about Azure OpenAI, I am often asked how to build a chatbot that uses your own data in the simplest way possible while still allowing for some customization. In Azure, there are a few solutions. We will look at one of the solutions in this post.

Note: don’t feel like reading? Check the video at the bottom of this post to see all this in action.

The easiest solution is “Bring your own data”, also called “Azure OpenAI on your data”. See Microsoft Learn for more information. Right from Azure AI Studio, you can add data from a blob storage container or directly upload your data. In the end, the data ends up in Azure Cognitive Search, which is then linked to the Chat playground as shown in the image below:

Bring your own data in Chat Playground (part of Azure AI Studio)

The following file types are supported: txt, md, html, Word, PowerPoint, PDF. Above, I added a few PDF files with job descriptions. The standard upload procedure works well for small documents. For larger documents, you should use the data preparation script. It will chunk documents into smaller pieces. The chunk size and overlap can be set in a config.json file. This is similar to what you can do with LangChain’s loaders and text splitters. In fact, you can use LangChain’s abstractions instead of the data preparation script but I have not tried this myself yet. See https://python.langchain.com/docs/integrations/vectorstores/azuresearch for more information. If I find the time, I will report on my findings in another blog post.

Right from the playground, you can click a button to deploy the bot to a new web app (Azure App Services):

The same bot in an Azure Web App

Although it is very easy to create the bot, there are a couple of things to note here:

  • The solution requires Azure Cognitive Search which is an extra cost. The minimum cost is around 70 euros per month. There are open-source solutions you can use for free or SaaS solutions that provide a free option (e.g., Pinecone). Azure OpenAI on your data only supports Azure Cognitive Search for now although technically, Microsoft could open this up to other stores.
  • Azure Cognitive Search is somewhat more complex than (some) vector databases such as Pinecone or Chroma. If you want to use other search engines/vector databases, I recommend using LangChain in combination with something like Chainlit to create your prototype. Of course, that means you will have to write more code. No more wizards for you! 😃
  • The source code for the web app is at https://github.com/microsoft/sample-app-aoai-chatGPT. Although the code is not super complex, Python tools such as Streamlit and Chainlit make it much easier to create a prototype from scratch. Note that the web app is protected with Azure Active Directory by default and that it authenticates to Cognitive Search and Azure OpenAI using API keys set as environment variables. This is all automatically configured for you!
  • Azure Cognitive Search integration is part of the Azure OpenAI API version 2023-06-01 and depends on a dataSources field in the JSON body sent to the Azure OpenAI API. Check the source code here. I would have preferred the API to stay aligned with the OpenAI APIs and retrieve extra content as a separate step.

With all this being said, if all you need for your demo is the web app generated by the Chat playground’s Deploy button, this is one of the quickest ways to get there!

To see the entire experience in action, check out the video below or click this link: https://www.youtube.com/watch?v=gySeOggsz-w.

First steps with Crossplane

Image Source: crossplane.io

Although Crossplane has been around for a while, I never got around to trying it. Crossplane has many capabilities. However, in this post, I will focus on the following aspects:

  • Installing Crossplane on a Kubernetes cluster (AKS); you can install on a local cluster as well (e.g., k3s, kind, minikube, …) but then you would need Azure Arc for Kubernetes to install the microsoft.flux extension (I will be using GitOps with Flux via that extension)
  • Adding and configuring providers for Azure and Kubernetes: providers allow you to deploy to Azure and Kubernetes (and much more) from Crossplane
  • Deploying Azure infrastructure with Crossplane using a fully declarative GitOps approach

Introduction

Crossplane basically allows you to build a control plane that you or your teams can use to deploy infrastructure and applications. This control plane is built on Kubernetes. In short, suppose I want to deploy an Azure resource group with Crossplane, I would create the below YAML file and apply it with kubectl apply -f filename.yaml.

This is, in essence, a fully declarative approach to deploying Azure infrastructure using Kubernetes. There are other projects, such as the Azure Service Operator v2, that do something similar.

apiVersion: azure.jet.crossplane.io/v1alpha2
kind: ResourceGroup
metadata:
  name: rg-crossplane
spec:
  forProvider:
    location: "westeurope"
    tags:
      provisioner: crossplane
  providerConfigRef:
    name: default

In order to enable this functionality, you need the following:

  • Install Crossplane on your Kubernetes cluster
  • Add a provider that can create Azure resources; above the jet provider for Azure is used; more about providers later
  • Configure the provider with credentials; in this case Azure credentials

In a diagram:

Install Crossplane from git with Flux on AKS; deploy an Azure resource group and another AKS cluster from Crossplane; create a namespace on that new cluster

Combination with GitOps

Although you can install and configure Crossplane manually and just use kubectl to add custom resources, I wanted to add Crossplane and custom resources using GitOps. To that end, I am using Azure Kubernetes Service (AKS) with the microsoft.flux extension. For more information to enable and install the extension, see my Flux v2 quick guide.

⚠️ The git repository I am using with Flux v2 and Crossplane is here: https://github.com/gbaeke/crossplane/tree/blogpost. This refers to the blogpost branch, which should match the content of this post. Tbe main branch might be different.

The repo contains several folders that match Flux kustomizations:

  • infra folder: installs Crossplane and Azure Key Vault to Kubernetes; an infra kustomization will point to this folder
  • secrets folder: creates a secret with Azure Key Vault to Kubernetes from Azure Key Vault; the secrets kustomization will point to this folder
  • crossplane-apps folder: installs Azure resources and Kubernetes resources with the respective Crossplane providers; the apps kustomization will point to this folder

Note: if you do not know what Flux kustomizations are and how Flux works, do check my Flux playlist: https://www.youtube.com/playlist?list=PLG9qZAczREKmCq6on_LG8D0uiHMx1h3yn. The videos look at the open source version of Flux and not the microsoft.flux extension. To learn more about that extension, see https://www.youtube.com/watch?v=w_eoJbgDs3g.

Installing Crossplane

The infra customization installs Crossplane and Azure Key Vault to Kubernetes. The latter is used to sync a secret from Key Vault that contains credentials for the Crossplane Azure provider. More details are in the diagram below:

As noted above, the installation of Crossplane is done with Flux. First, there is the HelmRepository resource that adds the Crossplane Helm repository to Flux.

apiVersion: source.toolkit.fluxcd.io/v1beta2
kind: HelmRepository
metadata:
  namespace: config-infra
  name: crossplane
spec:
  interval: 1m0s
  url: https://charts.crossplane.io/stable

Next, there is the HelmRelease that installs Crossplane. Important: target namespace is crossplane-system (bottom line):

apiVersion: helm.toolkit.fluxcd.io/v2beta1
kind: HelmRelease
metadata:
  name: crossplane
  namespace: config-infra
spec:
  chart:
    spec:
      chart: crossplane
      reconcileStrategy: ChartVersion
      sourceRef:
        kind: HelmRepository
        name: crossplane
        namespace: config-infra
  install:
    createNamespace: true
  interval: 1m0s
  targetNamespace: crossplane-system

For best results, in the YAML above, set the namespace of the resource to the namespace you use with the AKS k8s-configuration. The resources to install Azure Key Vault to Kubernetes are similar.

To install the Crossplane jet provider for Azure:

---
apiVersion: pkg.crossplane.io/v1alpha1
kind: ControllerConfig
metadata:
  name: jet-azure-config
  labels:
    app: crossplane-provider-jet-azure
spec:
  image: crossplane/provider-jet-azure-controller:v0.9.0
  args: ["-d"]
---
apiVersion: pkg.crossplane.io/v1
kind: Provider
metadata:
  name: crossplane-provider-jet-azure
spec:
  package: crossplane/provider-jet-azure:v0.9.0
  controllerConfigRef:
    name: jet-azure-config

Above, debugging is turned on for the provider. This is optional. The provider actually runs in the crossplane-system namespace:

jet provider

The provider is added via the Provider resource (second resource in the YAML manifest).

We can now create the AKS k8s-configuration, which creates a Flux source and a kustomization:

RG=your AKS resource group
CLUSTER=your AKS cluster name (to install Crossplane to)

az k8s-configuration flux create -g $RG -c $CLUSTER \
  -n cluster-config --namespace config-infra -t managedClusters \
  --scope cluster -u https://github.com/gbaeke/crossplane \
  --branch main  \
  --kustomization name=infra path=./infra prune=true

The Flux source will be the repo specified with -u. There is one kustomization: infra. Pruning is turned on. With pruning, removing manifests from the repo results is removing them from Kubernetes.

The k8s-configuration should result in:

Don’t mind the other Kustomizations; will be added later; this is the GitOps view in the properties of the cluster in the Azure Portal

Crossplane is now installed with two providers. We can now configure the Azure provider with credentials.

Configuring Azure Credentials

You need to create a service principal by following the steps in https://crossplane.io/docs/v1.9/cloud-providers/azure/azure-provider.html. I compacted the resulting JSON with:

cat <path-to-JSON> | jq -c

The output of the above command was added to Key Vault:

Azure creds in Key Vault

The Key Vault I am using uses the Azure RBAC permission model. Ensure that the AKS cluster’s kubelet identity has at least the Key Vault Secrets User role. It is a user-assigned managed identity with a name like clustername-agentpool.

To actually create a Kubernetes secret from this Key Vault secret, the secrets folder in the git repo contains the manifest below:

apiVersion: spv.no/v2beta1
kind: AzureKeyVaultSecret
metadata:
  name: azure-creds 
  namespace: crossplane-system
spec:
  vault:
    name: kvgebadefault # name of key vault
    object:
      name: azure-creds # name of the akv object
      type: secret # akv object type
  output: 
    secret: 
      name: azure-creds # kubernetes secret name
      dataKey: creds # key to store object value in kubernetes secret

This creates a Kubernetes secret in the crossplane-system namespace with name azure-creds and a key creds that holds the credentials JSON.

Secret as seen in k9s
the decoded secret as shown in k9s

To add the secret(s) as an extra kustomization, run:

RG=your AKS resource group
CLUSTER=your AKS cluster name

az k8s-configuration flux create -g $RG -c $CLUSTER \
  -n cluster-config --namespace config-infra -t managedClusters \
  --scope cluster -u https://github.com/gbaeke/crossplane \
  --branch main  \
  --kustomization name=infra path=./infra prune=true \
  --kustomization name=secrets path=./secrets prune=true dependsOn=["infra"]

Note that the secrets kustomization is dependent on the infra kustomization. After running this command, ensure the secret is in the crossplane-system namespace. The k8s-configuration uses the same source but now has two kustomizations.

Deploying resources with the Jet provider for Azure

Before explaining how to create Azure resources, a note on providers. As a novice Crossplane user, I started with the following Azure provider: https://github.com/crossplane-contrib/provider-azure. This works well but it is not so simple for contributors to ensure the provider is up-to-date with the latest and greatest Azure features. For example, if you deploy AKS, you cannot use managed identity, the cluster uses availability sets etc…

To improve this, Terrajet was created. It is a code generation framework that can generate Crossplane CRDs (custom resource definitions) and sets up the provider to use Terraform. Building on top of Terraform is an advantage because it is more up-to-date with new cloud features. That is the reason why this post uses the jet provider. When we later create an AKS cluster, it will take advantage of managed identity and other newer features.

Note: there is also a Terraform provider that can take Terraform HCL to do anything you want; we are not using that in this post

Ok, let’s create a resource group and deploy AKS. First, we have to configure the provider with Azure credentials. The crossplane-apps folder contains a file called jet-provider-config.yaml:

apiVersion: azure.jet.crossplane.io/v1alpha1
kind: ProviderConfig
metadata:
  name: default
spec:
  credentials:
    source: Secret
    secretRef:
      namespace: crossplane-system
      name: azure-creds
      key: creds

The above ProviderConfig tells the provider to use the credentials in the Kubernetes secret we created earlier. We know we are configuring the jet provider from the apiVersion: azure.jet.crossplane.io/v1alpha1.

With that out of the way, we can create the resource group and AKS cluster. Earlier in this post, the YAML to create the resource group was already shown. To create a basic AKS cluster called clu-cp in this group, aks.yaml is used:

apiVersion: containerservice.azure.jet.crossplane.io/v1alpha2
kind: KubernetesCluster
metadata:
  name: clu-cp
spec:
  writeConnectionSecretToRef:
    name: example-kubeconfig
    namespace: crossplane-system
  forProvider:
    location: "westeurope"
    resourceGroupNameRef:
      name: rg-crossplane
    dnsPrefix: "clu-cp"
    defaultNodePool:
      - name: default
        nodeCount: 1
        vmSize: "Standard_D2_v2"
    identity:
      - type: "SystemAssigned"
    tags:
      environment: dev
  providerConfigRef:
    name: default

Above, we refer to our resource group by name (resourceGroupNameRef) and we write the credentials to our cluster to a secret (writeConnectionSecretToRef). That secret will contain keys with the certificate and private key, but also a kubeconfig key with a valid kubeconfig file. We can use that later to connect and deploy to the cluster.

To see an example of connecting to the deployed cluster and creating a namespace, see k8s-provider-config.yaml and k8s-namespace.yaml in the repo. The resource k8s-provider-config.yaml will use the example-kubeconfig secret created above to connect to the AKS cluster that we created in the previous steps.

To create a kustomization for the crossplane-apps folder, run the following command:

RG=your AKS resource group
CLUSTER=your AKS cluster name

az k8s-configuration flux create -g $RG -c $CLUSTER \
  -n cluster-config --namespace config-infra -t managedClusters \
  --scope cluster -u https://github.com/gbaeke/crossplane \
  --branch main  \
  --kustomization name=infra path=./infra prune=true \
  --kustomization name=secrets path=./secrets prune=true dependsOn=["infra"] \
  --kustomization name=apps path=./crossplane-apps prune=true dependsOn=["secrets"]

This folder does not contain a kustomization.yaml file. Any manifest you drop in it will be applied to the cluster! The k8s-kustomization now has the same source but three kustomizations:

infra, secrets and apps kustomizations

After a while, an AKS cluster clu-cp should be deployed to resource group rg-crossplane:

AKS deployed by Crossplane running on another AKS cluster

To play around with this, I recommend using Visual Studio Code and the GitOps extension. When you make a change locally and push to main, to speed things up, you can reconcile the git repository and the apps kustomization manually:

Reconcile the GitRepository source and kustomization from the GitOps extension for Visual Studio Code

Conclusion

In this post, we looked at installing and configuring Crossplane on AKS via GitOps and the microsoft.flux extension. In addition, we deployed a few Azure resources with Crossplane and its jet provider for Azure. We only scratched the surface here but I hope this gets you started quickly when evaluating Crossplane for yourself.

Quick Guide to the Secret Store CSI driver for Azure Key Vault on AKS

Yesterday, I posted the Quick Guide to Kubernetes Workload Identity on AKS. This post contains a similar guide to enabling and using the Secret Store CSI driver for Azure Key Vault on AKS.

All commands assume bash. You should have the Azure CLI installed and logged in to the subscription as the owner (because you need to configure RBAC in the scripts below).

Step 1: Enable the driver

The command to enable the driver on an existing cluster is below. Please set the variables to point to your cluster and resource group:

RG=YOUR_RESOURCE_GROUP
CLUSTER=YOUR_CLUSTER_NAME

az aks enable-addons --addons=azure-keyvault-secrets-provider --name=$CLUSTER --resource-group=$RG

If the driver is already enabled, you will simply get a message stating that.

Step 2: Create a Key Vault

In this step, we create a Key Vault and configure RBAC. We will also add a sample secret.

# replace <SOMETHING> with a value like your initials for example
KV=<SOMETHING>$RANDOM

# name of the key vault secret
SECRET=demosecret

# value of the secret
VALUE=demovalue

# create the key vault and turn on Azure RBAC; we will grant a managed identity access to this key vault below
az keyvault create --name $KV --resource-group $RG --location westeurope --enable-rbac-authorization true

# get the subscription id
SUBSCRIPTION_ID=$(az account show --query id -o tsv)

# get your user object id
USER_OBJECT_ID=$(az ad signed-in-user show --query objectId -o tsv)

# grant yourself access to key vault
az role assignment create --assignee-object-id $USER_OBJECT_ID --role "Key Vault Administrator" --scope /subscriptions/$SUBSCRIPTION_ID/resourceGroups/$RG/providers/Microsoft.KeyVault/vaults/$KV

# add a secret to the key vault
az keyvault secret set --vault-name $KV --name $SECRET --value $VALUE

You can use the portal to check the Key Vault and see the secret:

Key Vault created and secret added

If you go to Access Policies, you will notice that the Key Vault uses Azure RBAC:

Key Vault uses RBAC permission model

Step 3: Grant a managed identity access to Key Vault

In the previous step, your account was granted access to Key Vault. In this step, we will grant the same access to the managed identity that the secret store csi provider will use. We will need to configure the managed identity we want to use in later steps.

This guide uses the managed identity created by the secret store provider. It lives in the resource group associated with your cluster. By default, that group starts with MC_. The account is called azurekeyvaultsecretsprovider-<CLUSTER-NAME>.

# grab the managed identity principalId assuming it is in the default
# MC_ group for your cluster and resource group
IDENTITY_ID=$(az identity show -g MC\_$RG\_$CLUSTER\_westeurope --name azurekeyvaultsecretsprovider-$CLUSTER --query principalId -o tsv)

# grant access rights on Key Vault
az role assignment create --assignee-object-id $IDENTITY_ID --role "Key Vault Administrator" --scope /subscriptions/$SUBSCRIPTION_ID/resourceGroups/$RG/providers/Microsoft.KeyVault/vaults/$KV

Above, we grant the Key Vault Administrator role. In production, that should be a role with less privileges.

Step 4: Create a SecretProviderClass

Let’s create and apply the SecretProviderClass in one step.

AZURE_TENANT_ID=$(az account show --query tenantId -o tsv)
CLIENT_ID=$(az aks show -g $RG -n $CLUSTER --query addonProfiles.azureKeyvaultSecretsProvider.identity.clientId -o tsv)

cat <<EOF | kubectl apply -f -
apiVersion: secrets-store.csi.x-k8s.io/v1
kind: SecretProviderClass
metadata:
  name: demo-secret
  namespace: default
spec:
  provider: azure
  secretObjects:
  - secretName: demosecret
    type: Opaque
    data:
    - objectName: "demosecret"
      key: demosecret
  parameters:
    usePodIdentity: "false"
    useVMManagedIdentity: "true"
    userAssignedIdentityID: "$CLIENT_ID"
    keyvaultName: "$KV"
    objects: |
      array:
        - |
          objectName: "demosecret"
          objectType: secret
    tenantId: "$AZURE_TENANT_ID"
EOF

After retrieving the Azure AD tenant Id and managed identity client Id, the SecretProviderClass is created. Pay special attention to the following fields:

  • userAssignedIdentityID: the clientId (⚠️ not the principalId we retrieved earlier) of the managed identity used by the secret store provider; you can use other user-assigned managed identities or even a system-assigned managed identity assigned to the virtual machine scale set that runs your agent pool; I recommend using user-assigned identity
    • above, the clientId is retrieved via the az aks command
  • keyvaultName: the name you assigned your Key Vault
  • tenantId: the Azure AD tenant Id where your identities live
  • usePodIdentity: not recommended because pod identity will be replaced by workload identity
  • useVMManagedIdentity: set to true even if you use user-assigned managed identity

Step 5: Mount the secrets in pods

Create pods that use the secrets.

cat <<EOF | kubectl apply -f -
apiVersion: apps/v1
kind: Deployment
metadata:
  labels:
    app: secretpods
  name: secretpods
spec:
  replicas: 1
  selector:
    matchLabels:
      app: secretpods
  template:
    metadata:
      labels:
        app: secretpods
    spec:
      containers:
      - image: nginx
        name: nginx
        env:
          - name:  demosecret
            valueFrom:
              secretKeyRef:
                name:  demosecret
                key:  demosecret
        volumeMounts:
          - name:  secret-store
            mountPath:  "mnt/secret-store"
            readOnly: true
      volumes:
        - name:  secret-store
          csi:
            driver: secrets-store.csi.k8s.io
            readOnly: true
            volumeAttributes:
              secretProviderClass: "demo-secret"
EOF

The above command creates a deployment that runs nginx. The Key Vault secrets are mounted in a volume that is mounted at mnt/secret-store. The Key Vault secret is also available as an environment variable demosecret.

Step 6: Verify

Issue the commands below to get a shell to the pods of the nginx deployment and check the mount path and environment variable:

export POD_NAME=$(kubectl get pods -l "app=secretpods" -o jsonpath="{.items[0].metadata.name}")

# if this does not work, check the status of the pod
# if still in ContainerCreating there might be an issue
kubectl exec -it $POD_NAME -- sh

cd /mnt/secret-store
ls # the file containing the secret is listed
cat demosecret; echo # demovalue is revealed

# echo the value of the environment variable
echo $demosecret # demovalue is revealed

Important: the secret store CSI provider always mounts secrets in a volume. A Kubernetes secret (here used to populate the environment variable) is not created by default. It is created here because of the secretObjects field in the SecretProviderClass.

Conclusion

The above commands should make it relatively straightforward to try the secret store CSI provider and understand what it does. It works especially well in GitOps scenarios where you cannot store secrets in Git and you do not have pipelines that can retrieve Azure Key Vault secrets at deploy time.

If you spot errors in the above commands, please let me know!

Taking Azure Container Apps for a spin

At Ignite November 2021, Microsoft released Azure Container Apps as a public preview. It allows you to run containerized applications on a serverless platform, in the sense that you do not have to worry about the underlying infrastructure.

The underlying infrastructure is Kubernetes (AKS) as the control plane with additional software such as:

  • Dapr: distributed application runtime to easily work with state, pub/sub and other Dapr building blocks
  • KEDA: Kubernetes event-driven autoscaler so you can use any KEDA supported scaler, in addition to scaling based on HTTP traffic, CPU and memory
  • Envoy: used to provide ingress functionality and traffic splitting for blue-green deployment, A/B testing, etc…

Your apps actually run on Azure Container Instances (ACI). ACI was always meant to be used as raw compute to build platforms with and this is a great use case.

Note: there is some discussion in the community whether ACI (via AKS virtual nodes) is used or not; I will leave it in for now but in the end, it does not matter too much as the service is meant to hide this complexity anyway

Azure Container Apps does not care about the runtime or programming model you use. Just use whatever feels most comfortable and package it as a container image.

In this post, we will deploy an application that uses Dapr to save state to Cosmos DB. Along the way, we will explain most of the concepts you need to understand to use Azure Container Apps in your own scenarios. The code I am using is on GitHub and written in Go.

Configure the Azure CLI

In this post, we will use the Azure CLI exclusively to perform all the steps. Instead of the Azure CLI, you can also use ARM templates or Bicep. If you want to play with a sample that deploys multiple container apps and uses Bicep, be sure to check out this great Azure sample.

You will need to have the Azure CLI installed and also add the Container Apps extension:

az extension add \
  --source https://workerappscliextension.blob.core.windows.net/azure-cli-extension/containerapp-0.2.0-py2.py3-none-any.whl

The extension allows you to use commands like az containerapp create and az containerapp update.

Create an environment

An environment runs one or more container apps. A container app can run multiple containers and can have revisions. If you know how Kubernetes works, each revision of a container app is actually a scaled collection of Kubernetes pods, using the scalers discussed above. Each revision can be thought of as a separate Kubernetes Deployment/ReplicaSet that runs a specific version of your app. Whenever you modify your app, depending on the type of modification, you get a new revision. You can have multiple active revisions and set traffic weights to distribute traffic as you wish.

Container apps, revisions, pods, and containers

Note that above, although you see multiple containers in a pod in a revision, that is not the most common use case. Most of the time, a pod will have only one application container. That is entirely up to you and the rationale behind using one or more containers is similar to multi-container pods in Kubernetes.

To create an environment, be sure to register or re-register the Microsoft.Web provider. That provider has the kubeEnvironments resource type, which represents a Container App environment.

az provider register --namespace Microsoft.Web

Next, create a resource group:

az group create --name rg-dapr --location northeurope

I have chosen North Europe here, but the location of the resource group does not really matter. What does matter is that you create the environment in either North Europe or Canada Central at this point in time (November 2021).

Every environment needs to be associated with a Log Analytics workspace. You can use that workspace later to view the logs of your container apps. Let’s create such a workspace in the resource group we just created:

az monitor log-analytics workspace create \
  --resource-group rg-dapr \
  --workspace-name dapr-logs

Next, we want to retrieve the workspace client id and secret. We will need that when we create the Container Apps environment. Commands below expect the use of bash:

LOG_ANALYTICS_WORKSPACE_CLIENT_ID=`az monitor log-analytics workspace show --query customerId -g rg-dapr -n dapr-logs --out tsv`
LOG_ANALYTICS_WORKSPACE_CLIENT_SECRET=`az monitor log-analytics workspace get-shared-keys --query primarySharedKey -g rg-dapr -n dapr-logs --out tsv`

Now we can create the environment in North Europe:

az containerapp env create \
  --name dapr-ca \
  --resource-group rg-dapr \
  --logs-workspace-id $LOG_ANALYTICS_WORKSPACE_CLIENT_ID \
  --logs-workspace-key $LOG_ANALYTICS_WORKSPACE_CLIENT_SECRET \
  --location northeurope

The Container App environment shows up in the portal like so:

Container App Environment in the portal

There is not a lot you can do in the portal, besides listing the apps in the environment. Provisioning an environment is extremely quick, in my case a matter of seconds.

Deploying Cosmos DB

We will deploy a container app that uses Dapr to write key/value pairs to Cosmos DB. Let’s deploy Cosmos DB:

uniqueId=$RANDOM
az cosmosdb create \
  --name dapr-cosmosdb-$uniqueId \
  --resource-group rg-dapr \
  --locations regionName='northeurope'

az cosmosdb sql database create \
    -a dapr-cosmosdb-$uniqueId \
    -g rg-dapr \
    -n dapr-db

az cosmosdb sql container create \
    -a dapr-cosmosdb-$uniqueId \
    -g rg-dapr \
    -d dapr-db \
    -n statestore \
    -p '/partitionKey' \
    --throughput 400

The above commands create the following resources:

  • A Cosmos DB account in North Europe: note that this uses session-level consistency (remember that for later in this post 😉)
  • A Cosmos DB database that uses the SQL API
  • A Cosmos DB container in that database, called statestore (can be anything you want)

In Cosmos DB Data Explorer, you should see:

statestore collection will be used as a State Store in Dapr

Deploying the Container App

We can use the following command to deploy the container app and enable Dapr on it:

az containerapp create \
  --name daprstate \
  --resource-group rg-dapr \
  --environment dapr-ca \
  --image gbaeke/dapr-state:1.0.0 \
  --min-replicas 1 \
  --max-replicas 1 \
  --enable-dapr \
  --dapr-app-id daprstate \
  --dapr-components ./components-cosmosdb.yaml \
  --target-port 8080 \
  --ingress external

Let’s unpack what happens when you run the above command:

  • A container app daprstate is created in environment dapr-ca
  • The container app will have an initial revision (revision 1) that runs one container in its pod; the container uses image gbaeke/dapr-state:1.0.0
  • We turn off scaling by setting min and max replicas to 1
  • We enable ingress with the type set to external. That configures a public IP address and DNS name to reach our container app on the Internet; Envoy proxy is used under the hood to achieve this; TLS is automatically configured but we do need to tell the proxy the port our app listens on (–target-port 8080)
  • Dapr is enabled and requires that our app gets a Dapr id (–enable-dapr and –dapr-app-id daprstate)

Because this app uses the Dapr SDK to write key/value pairs to a state store, we need to configure this. That is were the –dapr-components parameter comes in. The component is actually defined in a file components-cosmosdb.yaml:

- name: statestore
  type: state.azure.cosmosdb
  version: v1
  metadata:
    - name: url
      value: YOURURL
    - name: masterkey
      value: YOURMASTERKEY
    - name: database
      value: YOURDB
    - name: collection
      value: YOURCOLLECTION

In the file, the name of our state store is statestore but you can choose any name. The type has to be state.azure.cosmosdb which requires the use of several metadata fields to specify the URL to your Cosmos DB account, the key to authenticate, the database, and collection.

In the Go code, the name of the state store is configurable via environment variables or arguments and, by total coincidence, defaults to statestore 😉.

func main() {
	fmt.Printf("Welcome to super api\n\n")

	// flags
	... code omitted for brevity
	// State store name
	f.String("statestore", "statestore", "State store name")

The flag is used in the code that writes to Cosmos DB with the Dapr SDK (s.config.Statestore in the call to daprClient.SaveState below):

// write data to Dapr statestore
	ctx := r.Context()
	if err := s.daprClient.SaveState(ctx, s.config.Statestore, state.Key, []byte(state.Data)); err != nil {
		w.WriteHeader(http.StatusInternalServerError)
		fmt.Fprintf(w, "Error writing to statestore: %v\n", err)
		return
	} else {
		w.WriteHeader(http.StatusOK)
		fmt.Fprintf(w, "Successfully wrote to statestore\n")
	}

After running the az containerapp create command, you should see the following output (redacted):

{
  "configuration": {
    "activeRevisionsMode": "Multiple",
    "ingress": {
      "allowInsecure": false,
      "external": true,
      "fqdn": "daprstate.politegrass-37c1a51f.northeurope.azurecontainerapps.io",
      "targetPort": 8080,
      "traffic": [
        {
          "latestRevision": true,
          "revisionName": null,
          "weight": 100
        }
      ],
      "transport": "Auto"
    },
    "registries": null,
    "secrets": null
  },
  "id": "/subscriptions/SUBID/resourceGroups/rg-dapr/providers/Microsoft.Web/containerApps/daprstate",
  "kind": null,
  "kubeEnvironmentId": "/subscriptions/SUBID/resourceGroups/rg-dapr/providers/Microsoft.Web/kubeEnvironments/dapr-ca",
  "latestRevisionFqdn": "daprstate--6sbsmip.politegrass-37c1a51f.northeurope.azurecontainerapps.io",
  "latestRevisionName": "daprstate--6sbsmip",
  "location": "North Europe",
  "name": "daprstate",
  "provisioningState": "Succeeded",
  "resourceGroup": "rg-dapr",
  "tags": null,
  "template": {
    "containers": [
      {
        "args": null,
        "command": null,
        "env": null,
        "image": "gbaeke/dapr-state:1.0.0",
        "name": "daprstate",
        "resources": {
          "cpu": 0.5,
          "memory": "1Gi"
        }
      }
    ],
    "dapr": {
      "appId": "daprstate",
      "appPort": null,
      "components": [
        {
          "metadata": [
            {
              "name": "url",
              "secretRef": "",
              "value": "https://ACCOUNTNAME.documents.azure.com:443/"
            },
            {
              "name": "masterkey",
              "secretRef": "",
              "value": "MASTERKEY"
            },
            {
              "name": "database",
              "secretRef": "",
              "value": "dapr-db"
            },
            {
              "name": "collection",
              "secretRef": "",
              "value": "statestore"
            }
          ],
          "name": "statestore",
          "type": "state.azure.cosmosdb",
          "version": "v1"
        }
      ],
      "enabled": true
    },
    "revisionSuffix": "",
    "scale": {
      "maxReplicas": 1,
      "minReplicas": 1,
      "rules": null
    }
  },
  "type": "Microsoft.Web/containerApps"
}

The output above gives you a hint on how to define the Container App in an ARM template. Note the template section. It defines the containers that are part of this app. We have only one container with default resource allocations. It is possible to set environment variables for your containers but there are none in this case. We will set one later.

Also note the dapr section. It defines the app’s Dapr id and the components it can use.

Note: it is not a good practice to enter secrets in configuration files as we did above. To fix that:

  • add a secret to the Container App in the az containerapp create command via the --secrets flag. E.g. --secrets cosmosdb='YOURCOSMOSDBKEY'
  • in components-cosmosdb.yaml, replace value: YOURMASTERKEY with secretRef: cosmosdb

The URL for the app is https://daprstate.politegrass-37c1a51f.northeurope.azurecontainerapps.io. When I browse to it, I just get a welcome message: Hello from Super API on Container Apps.

Every revision also gets a URL. The revision URL is https://daprstate–6sbsmip.politegrass-37c1a51f.northeurope.azurecontainerapps.io. Of course, this revision URL gives the same result. Our app has only one revision.

Save state

The application has a /state endpoint you can post a JSON payload to in the form of:

{
  "key": "keyname",
  "data": "datatostoreinkey"
}

We can use curl to try this:

curl -v -H "Content-type: application/json" -d '{ "key": "cool","data": "somedata"}' 'https://daprstate.politegrass-37c1a51f.northeurope.azurecontainerapps.io/state'

Trying the curl command will result in an error because Dapr wants to use strong consistency with Cosmos DB and we configured it for session-level consistency. That is not very relevant for now as that is related to Dapr and not Container Apps. Switching the Cosmos DB account to strong consistency will fix the error.

Update the container app

Let’s see what happens when we update the container app. We will add an environment variable WELCOME to change the welcome message that the app displays. Run the following command:

az containerapp update \
  --name daprstate \
  --resource-group rg-dapr \
  --environment-variables WELCOME='Hello from new revision'

The template section in the JSON output is now:

"template": {
    "containers": [
      {
        "args": null,
        "command": null,
        "env": [
          {
            "name": "WELCOME",
            "secretRef": null,
            "value": "Hello from new revision"
          }
        ],
        "image": "gbaeke/dapr-state:1.0.0",
        "name": "daprstate",
        "resources": {
          "cpu": 0.5,
          "memory": "1Gi"
        }
      }
    ]

It is important to realize that, when the template changes, a new revision will be created. We now have two revisions, reflected in the portal as below:

Container App with two revisions

The new revision is active and receives 100% of the traffic. When we hit the / endpoint, we get Hello from new revision.

The idea here is that you deploy a new revision and test it before you make it active. Another option is to send a small part of the traffic to the new revision and see how that goes. It’s not entirely clear to me how you can automate this, including automated tests, similar to how progressive delivery controllers like Argo Rollouts and Flagger work. Tip to the team to include this! 😉

The az container app create and update commands can take a lot of parameters. Use az container app update –help to check what is supported. You will also see several examples.

Check the logs

Let’s check the container app logs that are sent to the Log Analytics workspace attached to the Container App environment. Make sure you still have the log analytics id in $LOG_ANALYTICS_WORKSPACE_CLIENT_ID:

az monitor log-analytics query   --workspace $LOG_ANALYTICS_WORKSPACE_CLIENT_ID   --analytics-query "ContainerAppConsoleLogs_CL | where ContainerAppName_s == 'daprstate' | project ContainerAppName_s, Log_s, TimeGenerated | take 50"   --out table

This will display both logs from the application container and the Dapr logs. One of the log entries shows that the statestore was successfully initialized:

... msg="component loaded. name: statestore, type: state.azure.cosmosdb/v1"

Conclusion

We have only scratched the surface here but I hope this post gave you some insights into concepts such as environments, container apps, revisions, ingress, the use of Dapr and logging. There is much more to look at such as virtual network integration, setting up scale rules (e.g. KEDA), automated deployments, and much more… Stay tuned!

DNS Options for Private Azure Kubernetes Service

When you deploy Azure Kubernetes Service (AKS), by default the API server is publicly made available. That means it has a public IP address and an Azure-assigned name that’s resolvable by public DNS servers. To secure access, you can use authorized IP ranges.

As an alternative, you can deploy a private AKS cluster. That means the AKS API server gets an IP address in a private Azure virtual network. Most customers I work with use this option to comply with security policies. When you deploy a private AKS cluster, you still need a fully qualified domain name (FQDN) that resolves to the private IP address. There are several options you can use:

  • System (the default option): AKS creates a Private DNS Zone in the Node Resource Group; any virtual network that is linked to that Private DNS Zone can resolve the name; the virtual network used by AKS is automatically linked to the Private DNS Zone
  • None: default to public DNS; AKS creates a name for your cluster in a public DNS zone that resolves to the private IP address
  • Custom Private DNS Zone: AKS uses a Private DNS Zone that you or another team has created beforehand; this is mostly used in enterprise scenarios when the Private DNS Zones are integrated with custom DNS servers (e.g., on AD domain controllers, Infoblox, …)

The first two options, System and None, are discussed in the video below:

Overview of the 3 DNS options with a discussion of the first two: System and None

The third option, custom Private DNS Zone, is discussed in a separate video:

Private AKS with a custom Private DNS Zone

With the custom DNS option, you cannot use any name you like. The Private DNS Zone has to be like: privatelink.<region>.azmk8s.io. For instance, if you deploy your AKS cluster in West Europe, the Private DNS Zone’s name should be privatelink.westeurope.azmk8s.io. There is an option to use a subdomain as well.

When you use the custom DNS option, you also need to use a user-assigned Managed Identity for the AKS control plane. To make the registration of the A record in the Private DNS Zone work, in addition to linking the Private DNS Zone to the virtual network, the managed identity needs the following roles (at least):

  • Private DNS Zone Contributor role on the Private DNS Zone
  • Network Contributor role on the virtual network used by AKS

To deploy a private AKS cluster with a custom Private DNS Zone, you can use the following Azure CLI command which also sets the network plugin to azure (as an example). Private cluster also works with kubenet if you prefer that model. For other examples, see Create a private Azure Kubernetes Service cluster – Azure Kubernetes Service | Microsoft Docs.

az aks create \
    --resource-group RGNAME \
    --name aks-private \
    --network-plugin azure \
    --vnet-subnet-id "resourceId of AKS subnet" \
    --docker-bridge-address 172.17.0.1/16 \
    --dns-service-ip 10.3.0.10 \
    --service-cidr 10.3.0.0/24 \
    --enable-managed-identity \
    --assign-identity "resourceId of user-assigned managed identity" \
    --enable-private-cluster \
    --load-balancer-sku standard \
    --private-dns-zone "resourceId of Private DNS Zone"

The option that is easiest to use is the None option. You do not have to worry about Private DNS Zones and it just works. That option, at the time of this writing (June 2021) is still in preview and needs to be enabled on your subscription. In most cases though, I see enterprises go for the third option where the Private DNS Zones are created beforehand and integrated with custom DNS.

Approving a private endpoint connection with Azure CLI

In my previous post, I wrote about App Services with Private Link and used Azure Front Door to publish the web app. Azure Front Door Premium (in preview), can create a Private Endpoint and link it to your web app via Azure Private Link. When that happens, you need to approve the pending connection in Private Link Center.

The pending connection would be shown here, ready for approval

Although this is easy to do, you might want to automate this approval. Automation is possible via a REST API but it is easier via Azure CLI.

To do so, first list the private endpoint connections of your resource, in my case that is a web app:

az network private-endpoint-connection list --id /subscriptions/SUBID/resourceGroups/RGNAME/providers/Microsoft.Web/sites/APPSERVICENAME

The above command will return all private endpoint connections of the resource. For each connection, you get the following information:

 {
    "id": "PE CONNECTION ID",
    "location": "East US",
    "name": "NAME",
    "properties": {
      "ipAddresses": [],
      "privateEndpoint": {
        "id": "PE ID",
        "resourceGroup": "RESOURCE GROUP NAME OF PE"
      },
      "privateLinkServiceConnectionState": {
        "actionsRequired": "None",
        "description": "Please approve this connection.",
        "status": "Pending"
      },
      "provisioningState": "Pending"
    },
    "resourceGroup": "RESOURCE GROUP NAME OF YOUR RESOURCE",
    "type": "YOUR RESOURCE TYPE"
  }

To approve the above connection, use the following command:

az network private-endpoint-connection approve --id  PE CONNECTION ID --description "Approved"

The –id in the approve command refers to the private endpoint connection ID, which looks like below for a web app:

/subscriptions/YOUR SUB ID/resourceGroups/YOUR RESOURCE GROUP/providers/Microsoft.Web/sites/YOUR APP SERVICE NAME/privateEndpointConnections/YOUR PRIVATE ENDPOINT CONNECTION NAME

After running the above command, the connection should show as approved:

Approved private endpoint connection

When you automate this in a pipeline, you can first list the private endpoint connections of your resource and filter on provisioningState=”Pending” to find the ones you need to approve.

Hope it helps!

Azure Policy for Kubernetes: Contraints and ConstraintTemplates

In one on my videos on my YouTube channel, I talked about Kubernetes authentication and used the image below:

Securing access to the Kubernetes API Server

To secure access to the Kubernetes API server, you need to be authenticated and properly authorized to do what you need to do. The third mechanism to secure access is admission control. Simply put, admission control allows you to inspect requests to the API server and accept or deny the request based on rules you set. You will need an admission controller, which is just code that intercepts the request after authentication and authorization.

There is a list of admission controllers that are compiled-in with two special ones (check the docs):

  • MutatingAdmissionWebhook
  • ValidatingAdmissionWebhook

With the two admission controllers above, you can develop admission plugins as extensions and configure them at runtime. In this post, we will look at a ValidatingAdmissionWebhook that is used together with Azure Policy to inspect requests to the AKS API Server and either deny or audit these requests.

Note that I already have a post about Azure Policy and pod security policies here. There is some overlap between that post and this one. In this post, we will look more closely at what happens on the cluster.

Want a video instead?

Azure Policy

Azure has its own policy engine to control the Azure Resource Manager (ARM) requests you can make. A common rule in many organizations for instance is the prohibition of creation of expensive resources or even creating resources in unapproved regions. For example, a European company might want to only create resources in West Europe or North Europe. Azure Policy is the engine that can enforce such a rule. For more information, see Overview of Azure Policy. In short, you select from an ever growing list of policies or you create your own. Policies can be grouped in policy initiatives. A single policy or an initiative gets assigned to a scope, which can be a management group, a subscription or a resource group. In the portal, you then check for compliance:

Compliancy? What do I care? It’s just my personal subscription 😁

Besides checking for compliance, you can deny the requests in real time. There are also policies that can create resources when they are missing.

Azure Policy for Kubernetes

Although Azure Policy works great with Azure Resource Manager (ARM), which is basically the API that allows you to interact with Azure resources, it does not work with Kubernetes out of the box. We will need an admission controller (see above) that understands how to interpret Kubernetes API requests in addition to another component that can sync policies in Azure Policy to Kubernetes for the admission controller to pick up. There is a built-in list of supported Kubernetes policies.

For the admission controller, Microsoft uses Gatekeeper v3. There is a lot, and I do mean a LOT, to say about Gatekeeper and its history. We will not go down that path here. Check out this post for more information if you are truly curious. For us it’s enough to know that Gatekeeper v3 needs to be installed on AKS. In order to do that, we can use an AKS add-on. In fact, you should use the add-on if you want to work with Azure Policy. Installing Gatekeeper v3 on its own will not work.

Note: there are ways to configure Azure Policy to work with Azure Arc for Kubernetes and AKS Engine. In this post, we only focus on the managed Azure Kubernetes Service (AKS)

So how do we install the add-on? It is very easy to do with the portal or the Azure CLI. For all details, check out the docs. With the Azure CLI, it is as simple as:

az aks enable-addons --addons azure-policy --name CLUSTERNAME --resource-group RESOURCEGROUP

If you want to do it from an ARM template, just add the add-on to the template as shown here.

What happens after installing the add-on?

I installed the add-on without active policies. In kube-system, you will find the two pods below:

azure-policy and azure-policy-webhook

The above pods are part of the add-on. I am not entirely sure what the azure-policy-webhook does, but the azure-policy pod is responsible for checking Azure Policy for new assignments and translating that to resources that Gatekeeper v3 understands (hint: constraints). It also checks policies on the cluster and reports results back to Azure Policy. In the logs, you will see things like:

  • No audit results found
  • Schedule running
  • Creating constraint

The last line creates a constraint but what exactly is that? Constraints tell GateKeeper v3 what to check for when a request comes to the API server. An example of a constraint is that a container should not run privileged. Constraints are backed by constraint templates that contain the schema and logic of the constraint. Good to know, but where are the Gatekeeper v3 pods?

Gatekeeper pods in the gatekeeper-system namespace

Gatekeeper was automatically installed by the Azure Policy add-on and will work with the constraints created by the add-on, synced from Azure Policy. When you remove these pods, the add-on will install them again.

Creating a policy

Although you normally create policy initiatives, we will create a single policy and see what happens on the cluster. In Azure Policy, choose Assign Policy and scope the policy to the resource group of your cluster. In Policy definition, select Kubernetes cluster should not allow privileged containers. As discussed, that is one of the built-in policies:

Creating a policy that does not allow privileged containers

In the next step, set the effect to deny. This will deny requests in real time. Note that the three namespaces in Namespace exclusions are automatically added. You can add extra namespaces there. You can also specifically target a policy to one or more namespaces or even use a label selector.

Policy parameters

You can now select Review and create and then select Create to create the policy assignment. This is the result:

Policy assigned

Now we have to wait a while for the change to be picked up by the add-on on the cluster. This can take several minutes. After a while, you will see the following log entry in the azure-policy pod:

Creating constraint: azurepolicy-container-no-privilege-blablabla

You can see the constraint when you run k get constraints. The constraint is based on a constraint template. You can list the templates with k get constrainttemplates. This is the result:

constraint templates

With k get constrainttemplates k8sazurecontainernoprivilege -o yaml, you will find that the template contains some logic:

the template’s logic

The block of rego contains the logic of this template. Without knowing rego, which is the policy language used by Open Policy Agent (OPA) which is used by Gatekeeper v3 on our cluster, you can actually guess that the privileged field inside securityContext is checked. If that field is true, that’s a violation of policy. Although it is useful to understand more details about OPA and rego, Azure Policy hides the complexity for you.

Does it work?

Let’s try to deploy the following deployment.yaml:

apiVersion: apps/v1
kind: Deployment
metadata:
  name: nginx-deployment
  labels:
    app: nginx
spec:
  replicas: 3
  selector:
    matchLabels:
      app: nginx
  template:
    metadata:
      labels:
        app: nginx
    spec:
      containers:
        - name: nginx
          image: nginx:1.14.2
          ports:
            - containerPort: 80
          securityContext:
            privileged: true

After running kubectl apply -f deployment.yaml, everything seems fine. But when we run kubectl get deploy:

Pods are not coming up

Let’s run kubectl get events:

Oops…

Notice that validation.gatekeeper.sh denied the request because privileged was set to true.

Adding more policies

Azure Security Center comes with a large initiative, Azure Security Benchmark, that also includes many Kubernetes policies. All of these policies are set to audit for compliance. On my system, the initiative is assigned at the subscription level:

Azure Security Benchmark assigned at subscription level with name Security Center

The Azure Policy add-on on our cluster will pick up the Kubernetes policies and create the templates and constraints:

Several new templates created

Now we have two constraints for k8sazurecontainernoprivilege:

Two constraints: one deny and the other audit

The new constraint comes from the larger initiative. In the spec, the enforcementAction is set to dryrun (audit). Although I do not have pods that violate k8sazurecontainernoprivilege, I do have pods that violate another policy that checks for host path mapping. That is reported back by the add-on in the compliance report:

Yes, akv2k8s maps to /etc/kubernetes on the host

Conclusion

In this post, you have seen what happens when you install the AKS policy add-on and enable a Kubernetes policy in Azure Policy. The add-on creates constraints and constraint templates that Gatekeeper v3 understands. The rego in a constraint template contains logic used to define the policy. When the policy is set to deny, Gatekeeper v3, which is an admission controller denies the request in real-time. When the policy is set to audit (or dry run at the constraint level), audit results are reported by the add-on to Azure Policy.