⚠️ This is an AI-generated article based on a video to transcript generator I created to summarise Microsoft Build sessions. This article is used as an example for a LinkedIn post.
This article is based on the Microsoft Build keynote delivered on Tuesday, May 21st, 2024. It was created with gpt-4o. The post is unedited and as such contains errors such as PHY models instead of Phi etc… Most errors come from errors in the transcription phase.
Here’s the generated content ⬇️
As the digital age advances, we’re witnessing an unprecedented transformation powered by artificial intelligence (AI). Three decades ago, the vision was “information at your fingertips.” Today, we stand on the cusp of a new era: “expertise at your fingertips.” This shift from mere access to information to access to actionable expertise is revolutionizing industries across the globe. From farms to classrooms, boardrooms to labs, AI is proving to be a universal tool for everyone, everywhere.
The Evolution of AI: From Information to Expertise
In the early days of computing, the primary challenge was to make computers understand us rather than us having to understand them. We dreamed of a world where vast amounts of data could be harnessed to help us reason, plan, and act more effectively. Fast forward 70 years, and we’re seeing those dreams realized through groundbreaking advancements in AI. This new generation of AI is reshaping every layer of technology, from data center infrastructures to edge devices, enabling distributed, synchronous data parallel workloads.
Scaling Laws: Driving the Intelligence Revolution
Much like Moore’s Law propelled the information revolution, the scaling laws of deep neural networks (DNNs) are now driving the intelligence revolution. These laws, combined with innovative model architectures and data utilization methods, are leading to rapid advancements in AI. The result is a natural, multimodal user interface that supports text, speech, images, and video, along with memory and reasoning capabilities that reduce cognitive load and enhance productivity.
AI in Action: Real-World Impact
The transformative power of AI is not just theoretical. Real-world applications are demonstrating its potential to change lives. Consider the rural Indian farmer who used AI to navigate government farm subsidies, or the developer in Thailand leveraging the latest AI models to optimize workflows. These examples highlight the democratization of AI, where cutting-edge technology developed on one side of the world can directly benefit individuals on the other.
Microsoft Copilot: Your Everyday AI Companion
One of the most exciting developments in this AI revolution is Microsoft Copilot. This platform brings knowledge and expertise directly to users, helping them act on it effectively. Microsoft has introduced several key components to enhance Copilot’s capabilities:
Copilot Plus PCs: The fastest AI-first PCs, equipped with powerful NPUs for lightning-fast local inference, offering unprecedented speed and efficiency.
Windows Copilot Runtime: Making Windows the best platform for building AI applications with local APIs, no-code integrations, and support for over 40 models out of the box.
Azure AI Studio: An end-to-end development environment for building, training, and fine-tuning AI models, now generally available with built-in safety features.
Expanding Horizons: AI Infrastructure and Models
Microsoft is building the most comprehensive AI infrastructure with Azure, scaling AI capacity globally while ensuring sustainability. This includes partnerships with industry leaders like NVIDIA and AMD to provide the best performance and cost-efficiency for AI workloads. Additionally, Microsoft offers a broad selection of foundation models, including GPT-4, trained on Azure, and the new PHY family of small language models designed for efficient on-device inferencing.
Real-Time Intelligence and Fabric Integration
Microsoft Fabric is another game-changer, offering an integrated SaaS platform for data analytics and AI capabilities. With real-time intelligence, Fabric enables instant, actionable insights from streaming data, helping businesses stay proactive and make informed decisions. This platform’s seamless integration with tools like Esri for spatial analytics and Azure AI Search for retrieval-augmented generation (RAG) applications further extends its utility.
Empowering Developers: From Idea to Code
GitHub Copilot, the first major product of the generative AI age, is revolutionizing software development. With over 1.8 million subscribers, Copilot assists developers in their native languages, streamlining the coding process. The new GitHub Copilot extensions allow developers to customize and integrate third-party services, enhancing the overall development experience.
The Future of AI: A Call to Innovate
The advancements in AI are opening up new possibilities for innovation and transformation. As we continue to build and refine these platforms, the real impact will come from the developers and innovators who leverage this technology to create meaningful solutions. This is a call to all developers: embrace this special moment in history, take advantage of the tools at your disposal, and build the future.
Conclusion
The age of AI transformation is here, and it’s redefining how we interact with technology. From personal assistants to team collaborators, from education to healthcare, AI is poised to make a significant impact. Microsoft’s commitment to providing the infrastructure, tools, and platforms necessary for this revolution is clear. Now, it’s up to us to harness this power and drive the next wave of innovation. Welcome to the new era of AI.
I have written before about Azure OpenAI on your data. For a refresher, see Microsoft Learn. In short, Azure OpenAI on your data tries to make it easy to create an Azure AI Search index that supports advanced search mechanisms like vector search, potentially enhanced with semantic reranking.
On of the things you can do is simply upload your documents and start asking questions about these documents, right from within the Azure OpenAI Chat playground. The screenshot below shows the starting screen of a step-by-step wizard to get your documents into an index:
Upload your documents to Azure OpenAI on your data
Note that whatever option you choose in the wizard, you will always end up with an index in Azure AI Search. When the index is created, you can start asking questions about your data:
Your questions are answered with links to source documents (citations)
Instead of uploading your documents, you can use any Azure AI Search index. You will have the ability to map the fields from your index to the fields Azure OpenAI expects. You will see an example in the Semantic Kernel code later and in the next section.
Extensions to the OpenAI APIs
To make this feature work, Microsoft extended the OpenAI APIs. By providing extra information to the API about Azure AI Search, mapped fields, type of search, etc… the APIs retrieve relevant content, add that to the prompt and let the model answer. It is retrieval augmented generation (RAG) but completely API driven.
The question I asked in the last screenshot was: “Does Redis on Azure support vector queries?”. The API creates an embedding for that question to find similar vectors. The vectors are stored together with their source text (from your documents). That text is added as context to the prompt, allowing the chosen model to answer as shown above.
Under the hood, the UI makes a call to the URL below:
This looks similar to a regular chat completions call except for the extensions part. When you use this extension API, you can supply extra information. Using the Python OpenAI packages, the extra information looks like below:
The dataSources section is used by the extension API to learn about the Azure AI Search resource, the API key to use (not shown above), the type of search to perform (hybrid) and how to map the fields in your index to the fields this API expects. For example, we can tell the API about one or more contentFields. Above, there is only one such field named Content. That’s the name of a field in your chosen index.
You can easily get a Python code example to use this API from the Chat Completions playground:
Get sample code by clicking View code in the playground
How to do this in Semantic Kernel?
In what follows, I will show snippets of a full sample you can find on GitHub. The sample uses Streamlit to provide the following UI:
Sample Streamlit app
Above, (1) is the original user questions. Using Azure OpenAI on your data, we use Semantic Kernel to provide a response with citations (2). As an extra, all URLs returned by the vector search are shown in (3). They are not reflected in the response because not all retrieved results are relevant.
Let’s look at the code now…
st.session_state.kernel = sk.Kernel()

# Azure AI Search integration
azure_ai_search_settings = sk.azure_aisearch_settings_from_dot_env_as_dict()
azure_ai_search_settings["fieldsMapping"] = {
    "titleField": "Title",
    "urlField": "Url",
    "contentFields": ["Content"],
    "vectorFields": ["contentVector"],
}
azure_ai_search_settings["embeddingDependency"] = {
    "type": "DeploymentName",
    "deploymentName": "embedding"  # you need an embedding model with this deployment name is same region as AOAI
}
az_source = AzureAISearchDataSources(**azure_ai_search_settings, queryType="vectorSimpleHybrid", system_message=system_message) # set to simple for text only and vector for vector
az_data = AzureDataSources(type="AzureCognitiveSearch", parameters=az_source)
extra = ExtraBody(dataSources=[az_data]) if search_data else None
Above we create a (semantic) kernel. Don’t bother with the session state stuff, that’s specific to Streamlit. After that, the code effectively puts together the Azure AI Search information to be added to the extension API:
get Azure AI Search settings from a .env file: contains the Azure AI Search endpoint, API key and index name
add fieldsMapping to the Azure AI Search settings: contentFields and vectorFields are arrays; we need to map the fields in our index to the fields that the API expects
add embedding information: the deploymentName is set to embedding; you need an embedding model with that name in the same region as the OpenAI model you will use
create an instance of class AzureAISearchDataSources: creates the Azure AI Search settings and add additional settings such as queryType (hybrid search here)
create an instance of class AzureDataSources: this will tell the extension API that the data source is AzureCognitiveSearch with the settings provided via the AzureAISearchDataSources class; other datasources are supported
the call to the extension API needs the dataSources field as discussed earlier: the ExtraBody class allows us to define what needs to be added to the POST body of a chat completions call; multiple dataSources can be provided but here, we have only one datasource (of type AzureCognitiveSearch); we will need this extra variable later in our request settings
Note: I have a parameter in my code, search_data. Only if search_data is True, Azure OpenAI on your data should be enabled. If it is false, the variable extra should be None. You will see this variable pop up in other places as well
In Semantic Kernel, you can add one or more services to the kernel. In this case, we only add a chat completions service that points to a gpt-4-preview deployment. A .env file is used to get the Azure OpenAI endpoint, key and deployment.
service_id = "gpt"
deployment, api_key, endpoint = azure_openai_settings_from_dot_env(include_api_version=False)
chat_service = sk_oai.AzureChatCompletion(
    service_id=service_id,
    deployment_name=deployment,
    api_key=api_key,
    endpoint=endpoint,
    api_version="2023-12-01-preview" if search_data else "2024-02-01",  # azure openai on your data in SK only supports 2023-12-01-preview
    use_extensions=True if search_data else False # extensions are required for data search
)
st.session_state.kernel.add_service(chat_service)
Above, there are two important settings to make Azure OpenAI on your data work:
api_version: needs to be set to 2023-12-01-preview; Semantic Kernel does not support the newer versions at the time of this writing (end of March, 2024). However, this will be resolved soon.
use_extensions: required to use the extension API; without it the call to the chat completions API will not have the extension part.
We are not finished yet. We also need to supply the ExtraBody data (extra variable) to the call. That is done via the AzureChatPromptExecutionSettings:
req_settings = AzureChatPromptExecutionSettings(
    service_id=service_id,
    extra_body=extra,
    tool_choice="none" if search_data else "auto", # no tool calling for data search
    temperature=0,
    max_tokens=1000
)
In Semantic Kernel, we can create a function from a prompt with chat history and use that prompt to effectively create the chat experience:
prompt_template_config = PromptTemplateConfig(
    template="{{$chat_history}}{{$user_input}}",
    name="chat",
    template_format="semantic-kernel",
    input_variables=[
        InputVariable(name="chat_history", description="The history of the conversation", is_required=True),
        InputVariable(name="user_input", description="The user input", is_required=True),
    ],
)

# create the chat function
if "chat_function" not in st.session_state:
    st.session_state.chat_function = st.session_state.kernel.create_function_from_prompt(
        plugin_name="chat",
        function_name="chat",
        prompt_template_config=prompt_template_config,
    )
Later, we can call our chat function and provide KernelArguments that contain the request settings we defined earlier, plus the user input and the chat history:
The important part here is that we invoke our chat function. With the kernel’s chat completion service configured to use extensions, and the extra request body field added to the request settings, you effectively use the Azure OpenAI on your data APIs as mentioned earlier.
Conclusion
Semantic Kernel supports Azure OpenAI on your data. To use the feature effectively, you need to:
Prepare the extra configuration (ExtraBody) to send to the extension API
Enable the extension API in your Azure chat completion service and ensure you use the supported API version
Add the ExtraBody data to your AzureChatPromptExecutionSettings together with settings like temperature etc…
Although it should be possible to use Azure OpenAI on your data together with function calling, I could not get that to work. Function calling requires a higher API version, which is not supported by Semantic Kernel in combination with Azure OpenAI on your data yet!
The code on GitHub can be toggled to function mode by setting MODE in .env to anything but search. In that case though, add your data is not used. Be sure to restart the Streamlit app after you change that setting in the .env file. In function mode you can ask about the current time and date. If you provide a Bing api key, you can also ask questions that require a web search.
In all of those posts, we demonstrated the abilities of the Azure OpenAI Assistants API in a Python notebook. In this post, we will build an actual chat application with some help of the Bot Framework SDK.
The Bot Framework SDK is a collection of libraries and tools that let you build, test and deploy bot applications. The target audience is developers. They can write the bot in C#, TypeScript or Python. If you are more of a Power Platform user/developer, you can also use Copilot Studio. I will look at the Assistants API and Copilot Studio in a later post.
The end result after reading this post is a bot you can test with the Bot Framework Emulator. You can download the emulator for your platform here.
When you run the sample code from GitHub and connect the emulator to the bot running on you local machine, you get something like below:
Bot with answers provided by Assistants API
Writing a basic bot
You can follow the Create a basic botquickstart on Microsoft Learn to get started. It’s a good quickstart and it is easy to follow.
On that page, switch to Python and simply follow the instructions. The end-to-end sample I provide is in Python so using that language will make things easier. At the end of the quickstart, you will have a bot you can start with python app.py. The post also tells you how to connect the Bot Framework Emulator to your bot that runs locally on your machine. The quickstart bot is an echo bot that simply echoes the text you type:
Echo bot in action… oooh exciting 😀
A quick look at the bot code
If you check the bot code in bot.py, you will see two functions:
on_members_added_activity: do something when a new chat starts; we can use this to start a new assistant thread
on_message_activity: react to a user sending a message; here, we can add the message to a thread, run it, and send the response back to the user
👉 This code uses a tiny fraction of features of the Bot Framework SDK. There’s a huge list of capabilities. Check the How-To for developers, which starts with the basics of sending and receiving messages.
Below is a diagram of the chat and assistant flow:
Assistant Flow
In the diagram, the initial connection triggers on_members_added_activity. Let’s take a look at it:
async def on_members_added_activity(
        self,
        members_added: ChannelAccount,
        turn_context: TurnContext
    ):
        for member_added in members_added:
            if member_added.id != turn_context.activity.recipient.id:
                # Create a new thread
                self.thread_id = assistant.create_thread()
                await turn_context.send_activity("Hello. Thread id is: " + self.thread_id)
The function was modified to create a thread and store the thread.id as a property thread_id of the MyBot class. The function create_thread() comes from a module called assistant.py, which I added to the folder that contains bot.py:
The second function, on_message_activity, is used to respond to new chat messages. That’s number 2 in the diagram above.
async def on_message_activity(self, turn_context: TurnContext):
        # add message to thread
        run = assistant.send_message(self.thread_id, turn_context.activity.text)
        if run is None:
            print("Result of send_message is None")
        tool_check = assistant.check_for_tools(run, self.thread_id)
        if tool_check:
            print("Tools ran...")
        else:
            print("No tools ran...")
        message = assistant.return_message(self.thread_id)
        await turn_context.send_activity(message)
Here, we use a few helper methods. It could actually be one function but I decided to break them up somewhat:
send_message: add a message to the thread created earlier; we grab the text the user entered in the chat via turn_context.activity.text
check_for_tools: check if we need to run a tool (function) like hr_search or request_raise and add tool results to the messages
return_message: return the last message from the messages array and send it back to the chat via turn_context.send_activity; that’s number 5 in the diagram
💡 The stateful nature of the Azure OpenAI Assistants API is of great help here. Without it, we would need to use the Chat Completions API and find a way to manage the chat history ourselves. There are various ways to do that but not having to do that is easier!
A look at assistant.py
Check assistant.py on GitHub for the details. It contains the helper functions called from on_message_activity.
Define a helper function to query the Chroma database
If you have read the previous blog post on retrieval, you should already be familiar with all of the above.
What’s new are the assistant helper functions that get called from the bot.
create_thread: creates a thread and returns the thread id
wait_for_run: waits for a thread run to complete and returns the run; used internally; never gets called from the bot code
check_for_tools: checks a run for required_action, performs the actions by running the functions and returning the results to the assistant API; we have two functions: hr_query and request_raise.
send_message: sends a message to the assistant picked up from the bot
return_message: picks the latest message from the messages in a thread and returns it to the bot
To get started, this is relatively easy. However, building a chat bot that does exactly what you want and refuses to do what you don’t want is not particularly easy.
Should you do this?
Combining the Bot Framework SDK with OpenAI is a well-established practice. You get the advantages of building enterprise-ready bots with the excellent conversational capabilities of LLMs. At the moment, production bots use the OpenAI chat completions API. Due to the stateless nature of that API you need to maintain the chat history and send it to the API to make it aware of the conversation so far.
As already discussed, the Assistants API is stateful. That makes it very easy to send a message and get the response. The API takes care of chat history management.
As long as the Assistants API does not offer ways to control the chat history by limiting the amount of interactions or summarising the conversation, I would not use this API in production. It’s not recommended to do that anyway because it is in preview (February 2024).
However, as soon as the API is generally available and offers chat history control, using it with the Bot Framework SDK, in my opinion, is the way to go.
For now, as a workaround, you could limit the number of interactions and present a button to start a new thread if the user wants to continue. Chat history is lost at that moment but at least the user will be aware of it.
Conclusion
The OpenAI Assistants API and the Bot Framework SDK are a great match to create chat bots that feel much more natural than with the Bot Framework SDK on its own. The statefulness of the assistants API makes it easier than the chat completions API.
This post did not discuss the ability to connect Bot Framework bots with an Azure Bot Service. Doing so makes it easy to add your bot to multiple channels such as Teams, SMS, a web chat control and much more. We’ll keep that for another post. Maybe! 😀
In a previous blog post, I wrote an introduction about the Azure OpenAI Assistants API. As an example, I created an assistant that had access to the Code Interpreter tool. You can find the code here.
In this post, we will provide the assistant with custom tools. These custom tools use the function calling features of more recent GPT models. As a result, these custom tools are called functions in the Assistants API. What’s in a name right?
There are a couple of steps you need to take for this to work:
Create an assistant and give it a name and instructions.
Define one or more functions in the assistant. Functions are defined in JSON. You need to provide good descriptions for the function and all of its parameters.
In your code, detect when the model chooses one or more functions that should be executed.
Execute the functions and pass the results to the model to get a final response that uses the function results.
From the above, it should be clear that the model, gpt-3.5-turbo or gpt-4, does not call your code. It merely proposes functions and their parameters in response to a user question.
For instance, if the user asks “Turn on the light in the living room”, the model will check if there is a function that can do that. If there is, it might propose to call function set-lamp with parameters such as the lamp name and maybe a state like true or false. This is illustrated in the diagram below when the call to the function succeeds.
Assistant Function Calling Flow
Creating the assistant in Azure OpenAI Playground
Unlike the previous post, the assistant will be created in Azure OpenAI Playground. Our code will then use the assistant using its unique identifier. In the Azure OpenAI Playground, the Assistant looks like below:
Home Assistant in the portal
Let’s discuss the numbers in the diagram:
Once you save the assistant, you get its ID. The ID will be used in our code later
Assistant name
Assistant instructions: description of what the assistant can do, that it has functions, and how it should behave; you will probably need to experiment with this to let the assistant do exactly what you want
Two function definitions: set_lamp and set_lamp_brightness
You can test the functions in the chat panel. When the assistant detects that a function needs to be called, it will propose the function and its parameters and ask you to provide a result. The result you type is then used to formulate a response like The living room lamp has been turned on.
Let’s take a look at the function definition for set_lamp:
{
  "name": "set_lamp",
  "description": "Turn lamp on or off",
  "parameters": {
    "type": "object",
    "properties": {
      "lamp": {
        "type": "string",
        "description": "Name of the lamp"
      },
      "state": {
        "type": "boolean"
      }
    },
    "required": [
      "lamp",
      "state"
    ]
  }
}
The other function is similar but the second parameter is an integer between 0 and 100. When you notice your function does not get called, or the parameters are wrong, you should try to improve the description of both the function and each of the parameters. The underlying GPT model uses these descriptions to try and match a user question to one or more functions.
We start with an Azure OpenAI client, as discussed in the previous post.
import os
from dotenv import load_dotenv
from openai import AzureOpenAI
load_dotenv()

# Create Azure OpenAI client
client = AzureOpenAI(
    api_key=os.getenv('AZURE_OPENAI_API_KEY'),
    azure_endpoint=os.getenv('AZURE_OPENAI_ENDPOINT'),
    api_version=os.getenv('AZURE_OPENAI_API_VERSION')
)

# assistant ID as created in the portal
assistant_id = "YOUR ASSISTANT ID"
Creating a thread and adding a message
We will add the following message to a new thread: “Turn living room lamp and kitchen lamp on. Set both lamps to half brightness.“.
The model should propose multiple functions to be called in a certain order. The expected order is:
turn on living room lamp
turn on kitchen lamp
set living room brightness to 50
set kitchen brightness to 50
# Create a thread
thread = client.beta.threads.create()

import time
from IPython.display import clear_output

# function returns the run when status is no longer queued or in_progress
def wait_for_run(run, thread_id):
    while run.status == 'queued' or run.status == 'in_progress':
        run = client.beta.threads.runs.retrieve(
                thread_id=thread_id,
                run_id=run.id
        )
        time.sleep(0.5)

    return run


# create a message
message = client.beta.threads.messages.create(
    thread_id=thread.id,
    role="user",
    content="Turn living room lamp and kitchen lamp on. Set both lamps to half brightness."
)

# create a run
run = client.beta.threads.runs.create(
    thread_id=thread.id,
    assistant_id=assistant_id # use the assistant id defined in the first cell
)

# wait for the run to complete
run = wait_for_run(run, thread.id)

# show information about the run
# should indicate that run status is requires_action
# should contain information about the tools to call
print(run.model_dump_json(indent=2))
After creating the thread and adding a message, we use a slightly different approach to check the status of the run. The wait_for_run function keeps running as long as the status is either queued or in_progress. When it is not, the run is returned. When we are done waiting, we dump the run as JSON.
Here is where it gets interesting. A run has many properties like created_at, model and more. I our case, we expect a response that indicates we need to take action by running one or more functions. This is indicated by the presence of the required_action property. It actually will ask for tool outputs and will present a list of tool calls to perform (tool, function, whatever… 😀). Here’s a JSON snippet as part of the run JSON dump:
Above it’s clear that the assistant wants you to submit a tool output for multiple functions. Only the first two are shown:
Function set_lamp with arguments for lamp and state as “living room” and ‘true”
Function set_lamp with arguments for lamp and state as “kitchen” and ‘true”
The other two functions propose set_lamp_brightness for both lamps with brightness set to 50
Defining the functions
Our code will need some real functions to call that actually do something. In this example, we use these two dummy functions. In reality, you could integrate this with Hue or other smart lighting. In fact, I have something like that: https://github.com/gbaeke/openai_assistant.
Here are the dummy functions:
make_error = False

def set_lamp(lamp="", state=True):
    if make_error:
        return "An error occurred"
    return f"The {lamp} is {'on' if state else 'off'}"

def set_lamp_brightness(lamp="", brightness=100):
    if make_error:
        return "An error occurred"
    return f"The brightness of the {lamp} is set to {brightness}"
The functions should return a string that the model can interpret. Be as concise as possible to save tokens…💰
Doing the tool/function calls
In the next code block, we check if the run requires action, get the tool calls we need to do and then iterate through the tool_calls array. At each iteration we check the function name, call the function and add the result to a results array. The results array is then passed to the model. Check out the code below and its comments:
import json

# we only check for required_action here
# required action means we need to call a tool
if run.required_action:
    # get tool calls and print them
    # check the output to see what tools_calls contains
    tool_calls = run.required_action.submit_tool_outputs.tool_calls
    print("Tool calls:", tool_calls)

    # we might need to call multiple tools
    # the assistant API supports parallel tool calls
    # we account for this here although we only have one tool call
    tool_outputs = []
    for tool_call in tool_calls:
        func_name = tool_call.function.name
        arguments = json.loads(tool_call.function.arguments)

        # call the function with the arguments provided by the assistant
        if func_name == "set_lamp":
            result = set_lamp(**arguments)
        elif func_name == "set_lamp_brightness":
            result = set_lamp_brightness(**arguments)

        # append the results to the tool_outputs list
        # you need to specify the tool_call_id so the assistant knows which tool call the output belongs to
        tool_outputs.append({
            "tool_call_id": tool_call.id,
            "output": json.dumps(result)
        })

    # now that we have the tool call outputs, pass them to the assistant
    run = client.beta.threads.runs.submit_tool_outputs(
        thread_id=thread.id,
        run_id=run.id,
        tool_outputs=tool_outputs
    )

    print("Tool outputs submitted")

    # now we wait for the run again
    run = wait_for_run(run, thread.id)
else:
    print("No tool calls identified\n")

# show information about the run
print("Run information:")
print("----------------")
print(run.model_dump_json(indent=2), "\n")

# now print all messages in the thread
print("Messages in the thread:")
print("-----------------------")
messages = client.beta.threads.messages.list(thread_id=thread.id)
print(messages.model_dump_json(indent=2))
At the end, we dump both the run and the messages JSON. The messages should indicate some final response from the model. To print the messages in a nicer way, you can use the following code:
import json

messages_json = json.loads(messages.model_dump_json())

def role_icon(role):
    if role == "user":
        return "👤"
    elif role == "assistant":
        return "🤖"

for item in reversed(messages_json['data']):
    # Check the content array
    for content in reversed(item['content']):
        # If there is text in the content array, print it
        if 'text' in content:
            print(role_icon(item["role"]),content['text']['value'], "\n")
        # If there is an image_file in the content, print the file_id
        if 'image_file' in content:
            print("Image ID:" , content['image_file']['file_id'], "\n")
In my case, the output was as follows:
Question and final model response (after getting tool call results)
I set make_error to True. In that case, the tool responses indicate an error at every call. The model reports that back to the user.
What makes this unique?
Function calling is not unique to the Assistants API. Function calling is a feature of more recent GPT models, to allow those models to propose one or more function to call from your code. You can simply use the Chat Completion API to pass in your function descriptions in JSON.
If you use frameworks like Semantic Kernel or LangChain, you can use function calling with the abstractions that they provide. In most cases that means you do not have to create the function JSON description. Instead, you just write your functions in native code and annotate them as a tool or make them part of a plugin. You can then pass a list of tools to an agent or plugins to a kernel and you’re done! In fact, LangChain (and soon Semantic Kernel) already supports the Assistant API.
One of the advantages that the Assistants API has, is the ability to define all your functions within the assistant. You can do that with code but also via the portal. The Assistants API also makes it a bit simpler to process the tool responses although the difference is not massive.
Being able to test your functions in the Assistant Playground is a big benefit as well.
Conclusion
Function calling in the Assistants API is not very different from function calling in the Chat Completion API. It’s nice you can create and update your function definitions in the portal and directly try them in the chat panel. Working with the tool calls and tool responses is also a bit easier.
A while ago, I looked at the OpenAI Assistants API. In February of 2024, Microsoft have released their Assistants API in public preview. It works in the same way as the OpenAI Assistants API while being able to use it with Azure OpenAI models, deployed to a region of your choice.
The goal of the Assistants API is to make it easier for developers to create applications with copilot-like experiences. It should be easier to provide the assistant with extra knowledge or allow the assistant to interact with the world by calling external APIs.
If you have ever created a chat-based copilot with the standard Azure OpenAI chat completions API, you know that it is stateless. It does not know about the conversation history. As a developer, you have to maintain and manage conversation history and pass it to the completions API. With the Assistants API, that is not necessary. The API is stateful. Conversation history is automatically managed via threads. There is no need to manage conversation state to ensure you do not break the model’s context window limits.
In addition to threads, the Assistants API also supports tools. One of these tools is Code Interpreter, a sandboxed Python environment that can help solving complex questions. If you are a ChatGPT Plus subscriber, you should know that tool already. Code Interpreter is often used to solve math questions, something that LLMs are not terribly good at. However, it is not limited to math. Next to Code Interpreter, you can define your own functions. A function could call an API that queries a database that returns the results to the assistant.
Before diving into a code example you should understand the following components:
Assistant: custom AI with Azure OpenAI models that have access to files and tools
Thread: conversation between the assistant and the user
Message: message created by the assistant or a user; a message does not have to be text; it could be an image or a file; messages are stored on a thread
Run: you run a thread to illicit a response from the model; for instance if you just placed a user question on the thread and you run the thread, the model can respond with text or perform a tool call
Run Step: detailed list of steps the assistant took as part of a run; this could include a tools call
Initialising the OpenAI client and creating the assistant
We will use a .env file to load the Azure OpenAI API key, the endpoint and the API version. You will need an Azure OpenAI resource in a supported region such as Sweden Central. The API version should be 2024-02-15-preview.
import os
from dotenv import load_dotenv
from openai import AzureOpenAI

load_dotenv()

# Create Azure OpenAI client
client = AzureOpenAI(
    api_key=os.getenv('AZURE_OPENAI_API_KEY'),
    azure_endpoint=os.getenv('AZURE_OPENAI_ENDPOINT'),
    api_version=os.getenv('AZURE_OPENAI_API_VERSION')
)

assistant = client.beta.assistants.create(
    name="Math Tutor",
    instructions="""You are a math tutor that helps users solve math problems.
    You have access to a sandboxed environment for writing and testing code.
    Explain to the user why you used the code and how it works
    """,
    tools=[{"type": "code_interpreter"}],
    model="gpt-4-preview" # ensure you have a deployment in the region you are using
)
Above, we create an assistant with the client.beta.assistant.create method. Indeed, OpenAI Assistants as developed by OpenAI are still in beta so the OpenAI library reflects that.
Note that an assistant is given specific instructions and, in this case, a tool. We will use the built-in Code Interpreter tool. It can help us solving math questions, including the generation of plots.
Ensure that the model refers to a deployed model in your region. I use the gpt-4-turbo preview here.
Note that the assistants you create are shown in the Azure OpenAI Assistant Playground. For example, I created the Math Assistant a few times by running the same code:
Assistants in Azure Open AI Studio
When you click on one of the assistants, it opens in the Assistant Playground. In that playground, you can start chatting right away. For example:
Chatting with the Assistant
In the screenshot above, I have asked the assistant to plot a sinus wave. It explains how it did that because that is what the Instructions tell the assistant to do. At the end, Code Interpreter creates the plot and generates an image file. That image file is picked up in the playground and displayed.
Also note the panel on the right with API instructions. You can click on those instructions to execute them and see the JSON response.
Note that you can reuse an assistant by simply using its id. You can also create the assistant directly in the portal. You do not have to create it in code, like we are doing.
Let’s now create a thread in code and ask some math questions.
Creating a thread and adding a message
Below, a thread is created which results in a thread id. Subsequently, a message is added to the thread with role set to user. This is the first user question in the thread.
# Create a thread
thread = client.beta.threads.create()
# print the thread id
print("Thread id: ", thread.id)
message = client.beta.threads.messages.create(
thread_id=thread.id,
role="user",
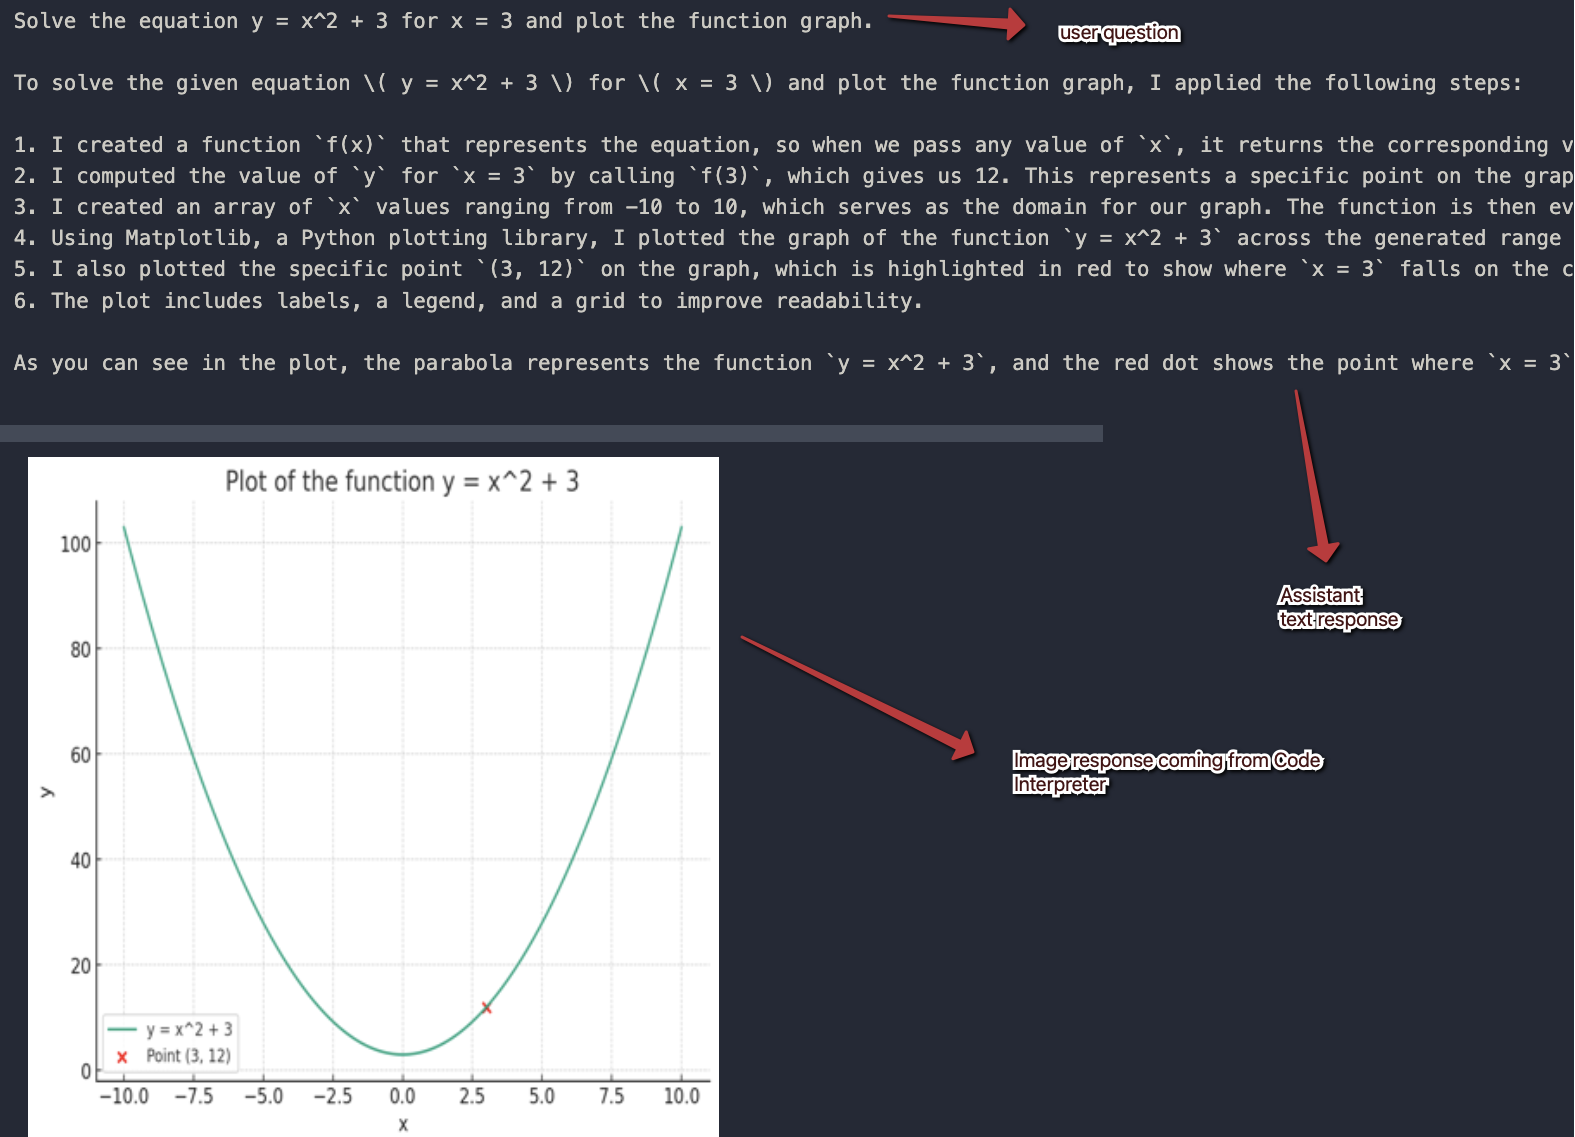
content="Solve the equation y = x^2 + 3 for x = 3 and plot the function graph."
)
# Show the messages
thread_messages = client.beta.threads.messages.list(thread.id)
print(thread_messages.model_dump_json(indent=2))
The JSON dump of the messages contains a data array. In our case the single item in the data array contains a content array next to other information such as role, the thread id, the creation timestamp and more. The content array can contain multiple pieces of content of different types. In this case, we simply have the user question which is of type text.
"content": [
        {
          "text": {
            "annotations": [],
            "value": "Solve the equation y = x^2 + 3 for x = 3 and plot the function graph."
          },
          "type": "text"
        }
      ]
Running the thread
A message on a thread is great but does not do all that much. We want a response from the assistant. In order to get a response, we need to run the thread:
run = client.beta.threads.runs.create(
  thread_id=thread.id,
  assistant_id=assistant.id
)

status = run.status

while status not in ["completed", "cancelled", "expired", "failed"]:
    time.sleep(2)
    run = client.beta.threads.runs.retrieve(thread_id=thread.id,run_id=run.id)
    status = run.status
    print(f'Status: {status}')
    clear_output(wait=True)

print(f'Status: {status}')
The run is where the assistant and the thread come together via their ids. As you can probably tell, the run does not directly return the result. You need to check the run status yourself and act accordingly.
When the status is completed, the run was successful. That means that there should be some response from the assistant.
Interpreting the messages after the run
After a completed run in response to a message with role = user, there should be a response from the model. There are all sorts of responses, including responses that indicate you should run a function. Our assistant does not have custom functions defined so the response can be one of the following:
a response from the model without using Code Interpreter
a response from the model, interpreting the response from Code Interpreter and possibly including images and text
Note that you do not have to call Code Interpreter specifically. The assistant will decide to use Code Interpreter (you can also be explicit) and use the Code Interpreter response in its final answer.
The code below shows one way of dealing with the assistant response:
messages = client.beta.threads.messages.list(
    thread_id=thread.id
)

messages_json = json.loads(messages.model_dump_json())

for item in reversed(messages_json['data']):
    # Check the content array
    for content in reversed(item['content']):
        # If there is text in the content array, print it as Markdown
        if 'text' in content:
            display(Markdown(content['text']['value']))
        # If there is an image_file in the content, print the file_id
        if 'image_file' in content:
            file_id = content['image_file']['file_id']
            file_content = client.files.content(file_id)
            # use PIL with the file_content
            img = Image.open(file_content)
            img = img.resize((400, 400))
            display(img)
Above, the following happens:
all messages from the thread are retrieved: this includes the original user question in addition to the assistant response; the later responses are first in the array
we loop through the reversed array and check for a content field: if there is a content field (an array) we loop over that and check for a text or image_file field
if we find content of type text, we display it with markdown (we are using a Notebook here)
if we find content of type image_file, we retrieve the image from Azure OpenAI using its files API and display it in the notebook with some help of PIL.
Here is the response I got in my notebook. Note that there are only two messages. The assistant response contains two pieces of content.
All messages in the thread visualised from 1st to last
Follow-up questions
One of the advantages of the Assistants API is that we do not have to maintain chat history. We only have to add follow-up questions to the thread and run it again. Below is the model response after adding this question: “Is this a concave function?”:
Response to a follow-up question
Above, I print the entire thread in reverse order again. The answer of the assistant is that this is clearly not a concave function but a convex one.
You should know that at present (February 2024), the Assistants API simply tries to fit the messages in the model’s context window. If the context window is large, long conversations might cost you a lot in tokens. At present, there is no way that I know of to change this mechanism. OpenAI, and Microsoft, are planning to add some extra capabilities. For example:
control token count regardless of the chosen model (e.g. set token count to 2000 even if the model allows for 8000)
generate summaries of previous messages and pass the summaries as context during a thread run
In most production applications that are used at scale, you really need to control token usage by managing chat history meticulously. Today, that is only possible with the chat completions API and/or abstractions on top of it like LangChain.
Conclusion
With the arrival of the Assistants API in Azure OpenAI, it is easier to write assistants that work with tools like Code Interpreter or custom functions. This post has focused on the basics of using the API with only the Code Interpreter tool.
In follow-up posts, we will look at custom functions and how to work with uploaded files.
Keep in mind that this is all in public preview and should not be used in production.
Update: this post used an older version of Prompt Flow at the time. It had some issues with building and running the Docker image without issues. In version 1.5.0, it should work fine because the Dockerfile now also installs gcc.
In the previous post, we created a flow with Prompt Flow in Visual Studio Code. The Prompt Flow extension for VS Code has a visual flow editor to test the flow. You simply provide the input and click the Run button. When the flow is finished, the result can be seen in the Outputs node, including a trace of the flow:
Running a flow in Prompt Flow
Now it’s time to deploy the flow. One of the options is creating a container image with Docker.
Before we start, we will first convert this flow into a chat flow. Chat does not make much sense for this flow. However, the Docker container includes a UI to run your flow via a chat interface. You will also be able to test your flow locally in a web app.
Convert the flow to a chat flow
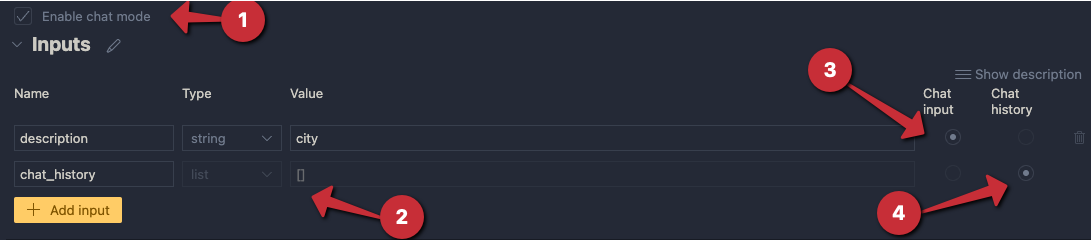
To convert the flow to a chat flow, enable chat mode and add chat_history to the Inputs node:
Enable chat
To include the chat history in your conversations, modify the .jinja2 template in the LLM node:
system:
You return the url to an image that best matches the user's question. Use the provided context to select the image. Only return the url. When no
matching url is found, simply return NO_IMAGE

{% for item in chat_history %}
user:
{{item.inputs.description}}
assistant:
{{item.outputs.url}}
{% endfor %}

user:
{{description}}

context : {{search_results}}
Enabling chat history allows you to loop over its content and reconstruct the user/assistant interactions before adding the most recent description. When you run the flow, you get:
Running a chat flow
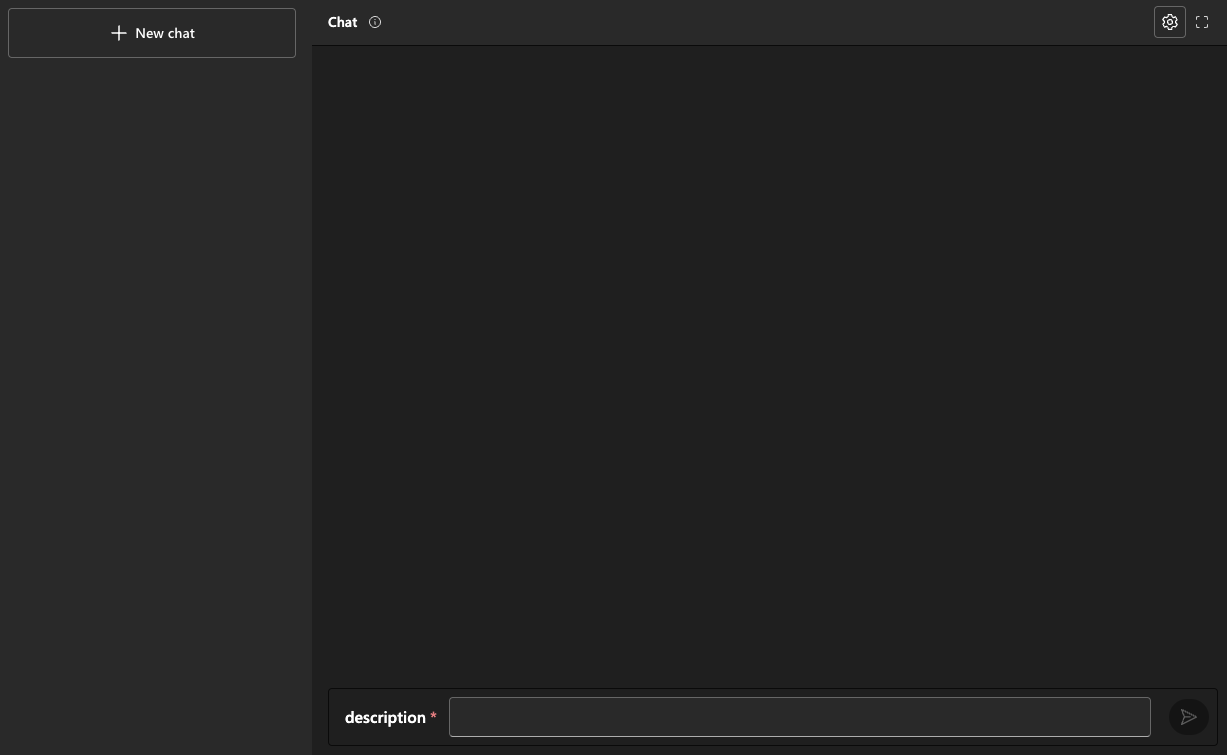
The third option will give you a GUI to test your flow:
Interactive run
As you can probably tell, this requires Streamlit. The first time you run this flow, check the terminal for instructions about the packages to install. When you are finished, press CTRL-C in the terminal.
Now that we know the chat flow works, we can create the Docker image.
⚠️ Important: a chat flow is not required to build the Docker image; we only add it here to illustrate the user interface that the Docker image can present to the user; you can always call your flow using a HTTP endpoint, chat flow or not
Generating the Docker image
Before creating the Docker image, ensure your Python requirements.txt file in your flow’s folder has the following content:
We need promptflow-tools to support tools like the embedding tool in the container. We also need azure-search-documents to use in the custom Python tool.
To build the flow as a Docker image, you should be able to use the build icon and select Build as Docker:
Build icon
However, in my case, that did not result in any output to build a Docker image. This is a temporary issue from the 1.6 version of the extension and will be fixed. For now, I recommend building the image with the command line tool:
Note that this copies your flow’s files to a flow folder under the docker folder. Ensure that requirements.txt in the docker/flow folder matches requirements.txt in your original flow folder (it should).
You can now cd into the Docker folder and run the following command. Don’t forget the . at the end:
docker build -t YOURTAG .
In my case, I used:
docker build -t gbaeke/pfimage .
After running the above command, you might get an error. I got: ERROR: failed to solve... I fixed that by modifying the Docker file. Move the RUN apt-get line above the RUN conda create line and add gcc:
# syntax=docker/dockerfile:1
FROM docker.io/continuumio/miniconda3:latest

WORKDIR /

COPY ./flow /flow

RUN apt-get update && apt-get install -y runit gcc

# create conda environment
RUN conda create -n promptflow-serve python=3.9.16 pip=23.0.1 -q -y && \
    conda run -n promptflow-serve \
.......
After this modification, the docker build command ran successfully.
Running the image
The image contains the connections you created. Remember we created an Azure OpenAI connection and a custom connection. Connections contain both config and secrets. Although the config is available in the image, the secrets are not. You need to provide the secrets as environment variables.
You can find the names of the environment variables in the settings.json file:
Run the container as shown below and replace OPENAIKEY and AISEARCHKEY with the key to your Azure OpenAI resource and Azure AI Search resource. In the container, the code listens on port 8080 so we map that port to port 8080 on the host:
docker run -itp 8080:8080 -e OPEN_AI_CONNECTION_API_KEY=OPENAIKEY \
  AZURE_AI_SEARCH_CONNECTION_KEY=AISEARCHKEY
When you run the above command, you get the following output (some parts removed):
You should now be able to send requests to the score endpoint. The screenshot below shows a .http file with the call config and result:
Calling the flow via the container’s score endpoint
When you browse to http://localhost:8080, you get a chat interface like the one below:
Chat UI served by Docker container
In my case, the chat UI did not work. Although I could enter a description and press ENTER, I did not see the response. In the background, the flow was triggered, just the response was missing. Remember that these features, and Prompt Flow on your local machine are still experimental at the time of writing (December 2023). They will probably change quite a lot in the future or have changed by the time you read this.
Conclusion
Although you can create a flow in the cloud and deploy that flow to an online endpoint, you might want more control over the deployment. Developing the flow locally and building a container image gives you that control. Once the image is built and pushed to a container registry, you can deploy to your environment of choice. That could be Kubernetes, Azure Container Apps or any other environment that supports containers.
In this blog post, we will create a flow with Prompt Flow in Visual Studio Code. Prompt Flow is a suite of development tools to build LLM-based AI applications. It tries to cover the end-to-end development cycle, including prototyping, testing and deployment to production.
In Prompt Flow, you create flows. Flows link LLMs (large language models), prompts and tools together in an executable workflow. An example of such a flow is show below:
Sample flow
The flow above (basically a distributed acyclical graph – DAG – of functions) sends its input, a description to search for an image, to a tool that embeds the description with an Azure OpenAI embedding model. The embedding is used as input to a Python tool that does a similarity search in Azure AI Search. The search returns three results. The original input, together with the query results, are subsequently handed to an LLM (above, the final_result node) that hopefully picks the correct image url.
Although you could write your own API that does all of the above, Prompt Flow allows you to visually build, run and debug a flow that has input and output. When you are happy with the flow, you can convert it to an API. One of the ways to host the API is via a container.
We will build this flow on our local machine and host it as a container. Note that Prompt Flow can also be used from the portal using Azure Machine Learning or Azure AI Studio.
👉 Another blog post will describe how to build and run the container
Installing Prompt Flow on your machine
To install Prompt Flow you will need Python on your machine. Use Python 3.9 or higher. I use Python 3.11 on an Apple M2. Check the full installation instructions here. Without using a Python virtual environment, you can just run the following command to install Prompt Flow:
pip install promptflow promptflow-tools
Next, run pf -v to check the installation.
⚠️ Do not forget to install promptflow-tools because it enables the embedding tool, llm tool and other tools to be used as nodes in the flow; also ensure this package is installed in the container image that will be created for this flow
We will mainly use the Visual Code extension. Note that the pf command can be used to perform many of the tasks we will discuss below (e.g, creating connections, running a flow, etc…).
Creating an empty flow
In VS Code, ensure you opened an empty folder or create a new folder. Right click and select New flow in this directory. You will get the following question:
Flow selection
Select Empty Flow. This creates a file called flow.dag.yaml with the following content:
Empty flow.dag.yaml
If you look closely, you will see a link to open a Visual editor. Click that link:
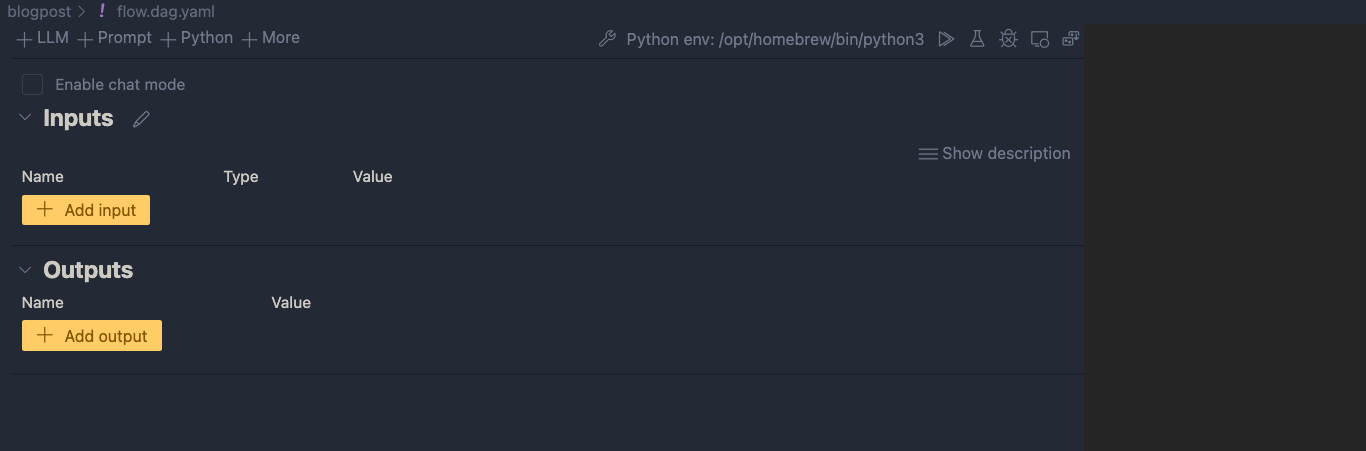
Visual editor with empty input and output and blank canvas
We can now add input(s) and output(s) and add the nodes in between.
Inputs and outputs
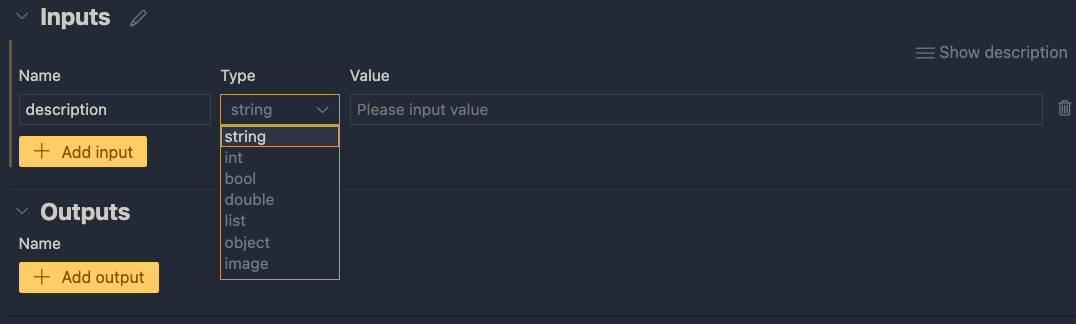
Inputs have a type and a value. Add a string input called description:
One string input: a description (of an image, like creature or fruit)
When you later run the flow, you can type the description in the Value textbox. When the flow is converted to an API, the API will except a description in the POST body.
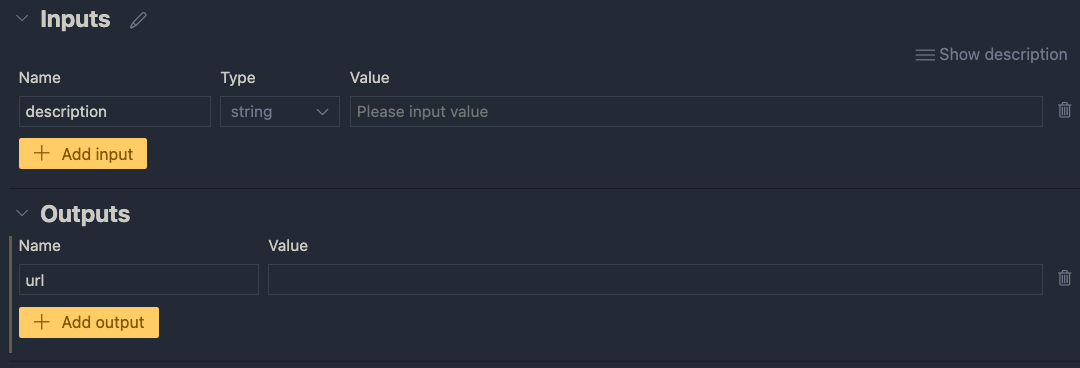
Next, add an output called url. In the end, the flow returns a url to an image that matches the description:
One output: the url to a matching image
The value of the output will be the coming from another node. We still have to add those. If you click the Value dropdown list, you will only be able to select the input value for now. You can do that and click the run icon. Save your flow before running it.
Running the flow with output set to the input
When you click the run button, a command will be run in the terminal that runs the flow:
Output of the flow is JSON, here with just the url
Although this is not very useful, the flow runs and produces a result. The output is our input. We can now add nodes to do something useful.
Creating an embedding from the description
We need to embed the description to search for similar descriptions in an Azure AI Search index. If you are not sure what embeddings are, check Microsoft Learn for a quick intro. It short, it’s a bunch of numbers that represents the meaning of a piece of text. We can use the numbers of the description to compare it to the sets of numbers of image descriptions to see how close they are.
To create an embedding, we need access to an Azure OpenAI embedding model. Such a model takes text as input and returns the bunch of numbers we talked about. This model returns 1536 numbers, aka dimensions.
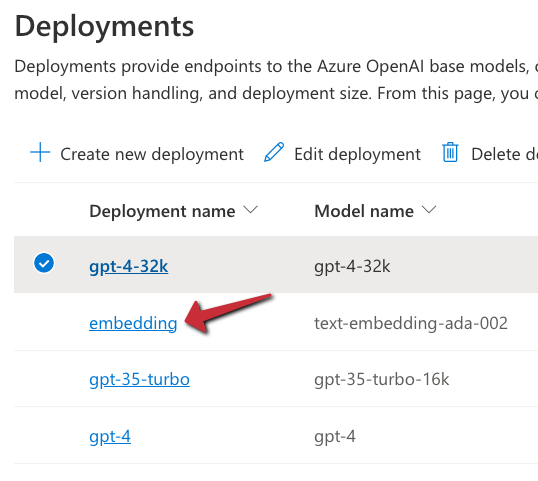
To use the model, we will need an Azure OpenAI resource’s endpoint and key. If you do not have an Azure OpenAI resource in Azure, create one and deploy the text-embedding-ada-002 model. In my example, the deployment is called embedding:
Embedding model in Azure OpenAI
With the Azure resources created, we can add a connection in Prompt Flow that holds the OpenAI endpoint and key:
Click the Prompt Flow extension icon and click + next to Azure OpenAI in the Connections section:
Azure OpenAI connection
A document will open that looks like the one below:
Connection information
Fill in the name and api_base only. The api_base is the https url to your Azure OpenAI instance. It’s something like https://OPENAIRESOURCENAME.openai.azure.com/. Do not provide the api_key. When you click Create connection (the smallish link at the bottom), you will be asked for the key.
After providing the key, the connection should appear under the Azure OpenAI section. You will need this connection in the embedding tool to point to the embedding model to use.
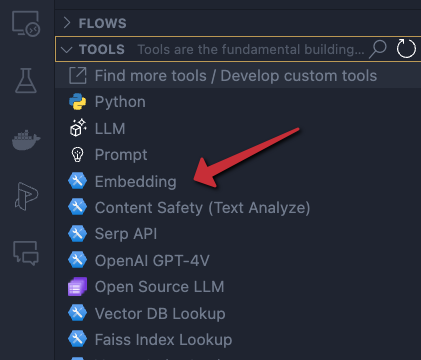
In the Prompt Flow extension pane, now click + next to Embedding in the TOOLS section:
Embedding tool
You will be asked for the tool’s name (top of VS Code window). Provide a name (e.g, embedding) and press enter. Select the connection you just created, the deployment name of your embedding model and the input. The input is the description we configured in the flow’s input node. We want to embed that description. The output of this tool will be a list of floating point numbers, a vector, of 1536 dimensions.
Embedding tool
The moment you set the input of the embedding, the input node will be connected to the embedding node on the canvas. To check if embedding works, you can connect the output of the embedding node to the url output and run the flow. You should then see the vector as output. The canvas looks like:
Show the embedding as output
Of course, we will need to supply the embedding to a vector search engine, not to the output. In our case, that is Azure AI Search. Let’s try that…
⚠️ Instead of connecting the embedding to the output, you can simply debug the embedding by clicking the debug icon in the embedding tool. The tool will be executed with the value of the input. The result should be a bunch of numbers in your terminal:
Although you can use a Vector DB Lookup tool that supports Azure AI Search, we will create a custom Python tool that does the same thing. The Python tool uses the azure-search-documents Python library to perform the search. Learning how to use Python tools is important to implement logic there is no specific tool for.
First, we will create a custom connection that holds the name of our Azure AI Search instance and a key to authenticate.
Similar to the Azure OpenAI connection, create a custom connection:
Custom connection
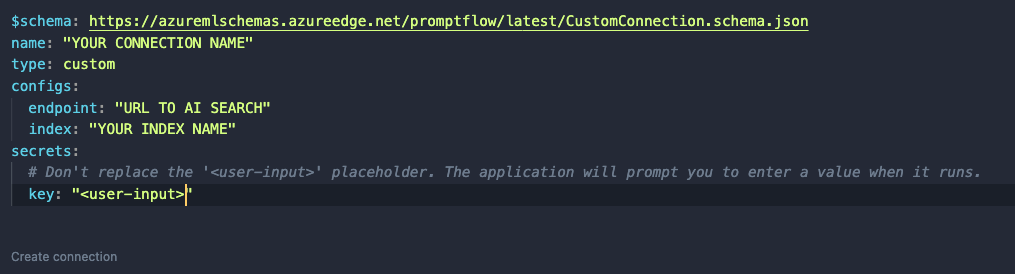
After clicking +, a document opens. Modify it as follows:
Custom connection content
Like before, set a name. In a custom connection, you can have configs and secrets. In configs add the Azure AI Search endpoint and index name. In the secrets set key to <user-input>. When you click Create connection, you will be asked to supply the key.
⚠️ Connection information is saved to a local SQLLite database in the .promtflow folder in your home folder
We can now add a Python tool. In TOOLS, next to Python click +. Give the tool a name and select new file. You should get a new Python file in your code with the filename set to <YOURTOOLNAME>.py. The code without comments is below:
This tool takes a string input and returns a string. The @tool decorator is required.
We need to change this code to get the custom connection information, query Azure AI Search and return search results as a list. The code is below:
from promptflow import tool
from promptflow.connections import CustomConnection
from azure.core.credentials import AzureKeyCredential
from azure.search.documents import SearchClient
from azure.search.documents.models import VectorizedQuery

@tool
def my_python_tool(vector: list, ai_conn: CustomConnection) -> list:
    ai_conn_dict = dict(ai_conn)
    endpoint = ai_conn_dict['endpoint']
    key = ai_conn_dict['key']
    index = ai_conn_dict['index']

    # query azure ai search
    credential = AzureKeyCredential(key)
    client = SearchClient(endpoint=endpoint,
                          index_name=index,
                          credential=credential)
    vector_query = VectorizedQuery(vector=vector, k_nearest_neighbors=3, fields="textVector", exhaustive=True)
    results = client.search(
        search_text=None,
        vector_queries=[vector_query],
        select=["name", "description", "url"]
    )

    # convert results to json list
    results = [dict(result) for result in results]

    return results
The function has two parameters: a vector of type list to match the output of the embedding tool, and a variable of type CustomConnection. The custom connection can be converted to a dict to retrieve both the configs and the secret.
Next, we use the configs and secret to perform the query with a SearchClient. The query only returns three fields from our index: name, description and url. The result returned from Azure AI Search is converted to a list and returned.
When you save the Python file and go back to your flow, you should see the Python tool (aisearch) with the vector and ai_conn field. If not, click the regenerate link. Set it as below:
Python tool
The input to the Python tool is the output from the embedding tool. We also pass in the custom connection to provide the configs and key to the tool.
You can set the output of the entire flow (url) to the output of the Python tool to check the results of the search when you run the flow:
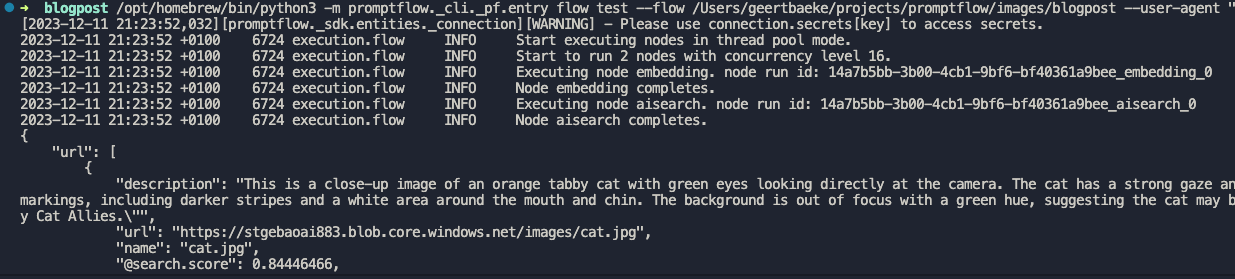
Running the flow with Python tool’s output as output
I ran the flow with a description equal to cat. A list of three JSON objects is returned.The first search result is the url to cat.jpg but there are other results as well (not shown above).
Adding an LLM tool
Although we could just pick the first result from the search, that would not work very well. Azure AI Search will always return a result, even if it does not make much sense. In a search for nearest neighbors, your nearest neighbor could be very far away! 😀
For example, if I search for person with a hat, I will get a result even though I do not have such a picture in my index. It simply finds vectors that are “closest” but semantically “far” away from my description. That is bound to happen with just a few images in the index.
An LLM can look at the original description and see if it matches one of the search results. It might pick the 3rd result if it fits better. It might also decide to return nothing if there is no match. In order to do so, we will need a good prompt.
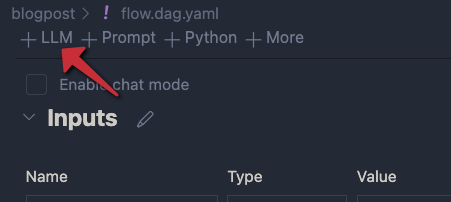
Click + LLM at the top left of the flow to add an LLM tool:
Adding an LLM
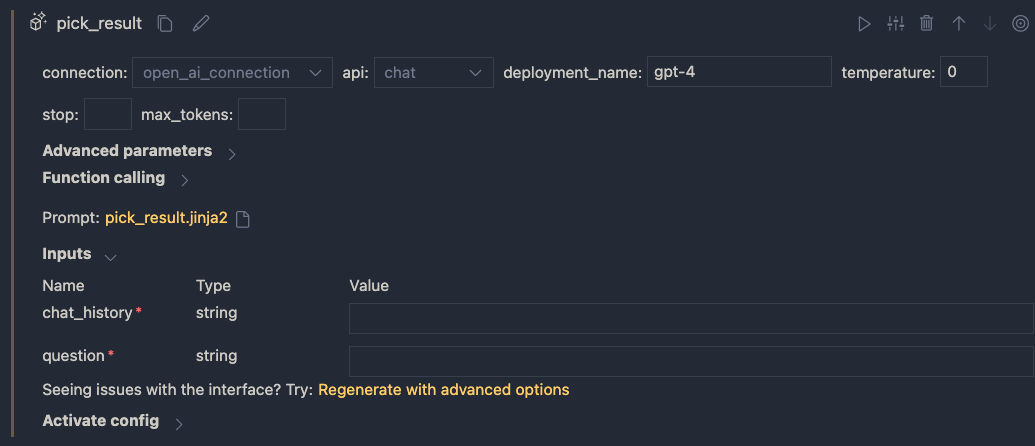
Give the LLM tool a name and select new file. In the flow editor, set the LLM model information:
LLM settings
You can reuse the connection that was used for the embedding. Ensure you have deployed a chat model in your Azure OpenAI resource. I deployed gpt-4 and called the deployment gpt-4 as well. I also set temperature to 0.
The inputs of the node do not make much sense. We do not need chat history for instance. The inputs come from a .jinja2 file that was created for you. The file has the name of the LLM tool. Following the example above, the name is pick_result.jinja2. Open that file and replace it with the following contents and save it:
system:
You return the url to an image that best matches the user's question. Use the provided context to select the image. Only return the url. When no
matching url is found, simply return NO_IMAGE

user:
{{description}}

context : {{search_results}}
The file defines a system message to tell the LLM what to do. The input from the user is the description from the input node. We provide extra context to the LLM as well (the output from search). The {{…}} serve as placeholders to inject data into the prompt.
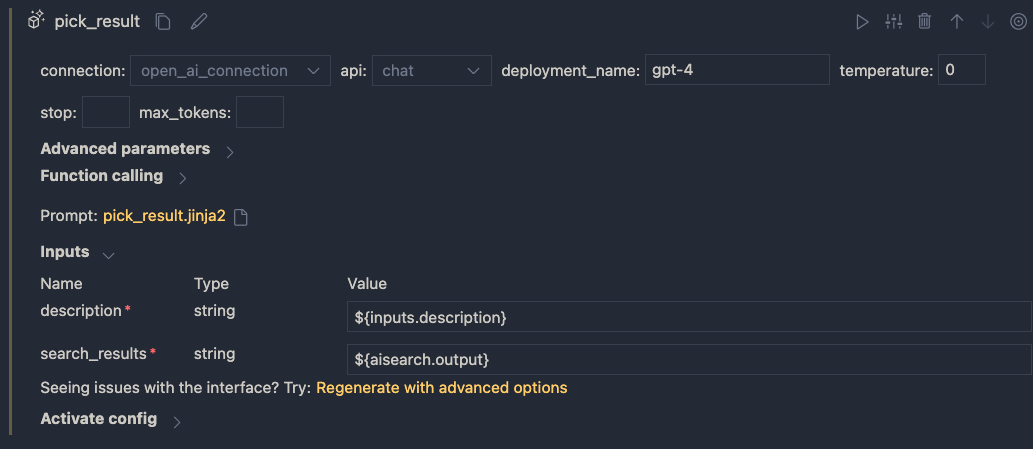
When you save the file and go back to the flow designer, you should see description and search_results as parameters. Set them as follows:
Inputs to the LLM node
In addition, set the output of the flow output node to the output of the LLM node:
Setting the output
Save your flow and run it. In my case, with a description of cat I get the following output:
Output is just a URL from the LLM node
It I use man with a hat as input, I get:
LLM did not find a URL to match the description
Using a prompt variant
Suppose we want to try a different prompt that returns JSON instead of text. To try that, we can create a prompt variant.
In the LLM node, click the variants icon:
Variants
You will see a + icon to create a new variant. Click it.
New variant
The variant appears under the original variant and is linked to a new file: pick_result_variant_1.jinja2. I have also set the variant as default. Let’s click the new file to open it. Add the following prompt:
system:
You return the url to an image that best matches the user's question. Use the provided context to select the image.
Return the url and name of the file as JSON. Here is an example of a response. Do not use markdown in the response. Use pure JSON.
{
  "url": "http://www.example.com/images/1.jpg",
  "name": "1.jpg"
}

If there is not matching image, return an empty string in the JSON:
{
  "url": ""
}

user:
{{description}}

context : {{search_results}}
This prompt should return JSON instead of just the url or NO_IMAGE. To test this, run the flow and select Use default variant for all nodes. When I run the flow with description cat, I get the following output:
JSON output
Because the flow’s output is already JSON, the string representation of the JSON result is used. Adding an extra Python tool that parses the JSON and outputs both the URL and file name might be a good idea here.
You can modify and switch between the prompts and see which one works best. This is especially handy when you are prototyping your flow.
Conclusion
On your local machine, Prompt Flow is easy to install and get started with. In this post we built a relatively simple flow that did not require a lot of custom code. We also touched on using variants, to test different prompts and their outcome.
In a follow-up post, we will take a look at turning this flow into a container. Stay tuned! 📺
In this post, we will take a look at building an Azure AI Search index with a custom skill. We will use the Azure AI Search Python SDK to do the following:
create a search index: a search index contains content to be searched
create a data source: a datasource tells an Azure AI Search indexer where to get input data
create a skillset: a skillset is a collection of skills that process the input data during the indexing process; you can use built-in skills but also build your own skills
create an indexer: the indexer creates a search index from input data in the data source; it can transform the data with skills
If you are more into videos, I already created a video about this topic. In the video, I use the REST API to define the resources above. In this post, I will use the Python SDK.
Azure AI Search with custom GPT-4 vision skill
What do we want to achieve?
We want to build an application that allows a user to search for images with text or a similar image like in the diagram below:
Search application
The application uses an Azure AI Search index to provide search results. An index is basically a collection of JSON documents that can be searched with various techniques.
The input data to create the index is just a bunch of .jpg files in Azure Blob Storage. The index will need fields to support the two different types of searches (text and image search):
a text description of the image: we will need to generate the description from the image; we will use GPT-4 Vision to do so; the description supports keyword-based searches
a text vector of the description: with text vectors, we can search for descriptions similar to the user’s query; it can provide better results than keyword-based searches alone
an image vector of the image: with image vectors, we can supply an image and search for similar images in the index
I described building this application in a previous blog post. In that post, we pushed the index content to the index. In this post, we create an indexer that pulls in the data, potentially on a schedule. Using an indexer is recommended.
Creating the index
If you have an Azure subscription, first create an Azure AI Search resource. The code we write requires at least the basic tier.
The notebook starts with the necessary imports and also loads environment variables via a .env file. See the README of the repo to learn about the required variables.
To create the index, we define a blog_index function that returns an index definition. Here’s the start of the function:
Above, we define an array of fields for the index. We will have 7 fields. The first three fields will be retrieved from blob storage metadata:
path: base64-encoded url of the file; will be used as unique key
name: name of the file
url: full url of the file in Azure blob storage
The link between these fields and the metadata is defined in the indexer we will create later.
Next, we have the description field. We will generate the image description via GPT-4 Vision during indexing. The indexer will use a custom skill to do so.
The enriched field is there for debugging. It will show the enrichments by custom or built-in skills. You can remove that field if you wish.
To finish, we have vector fields. These fields are designed to hold arrays of a specific size:
imageVector: a vector field that can hold 1024 values; the image vector model we use outputs 1024 dimensions
textVector: a vector field that can hold 1536 values; the text vector model we use outputs that number of dimensions
Note that the vector fields references a search profile. We create that in the next block of code in the blog_index function:
Above, vector_config is an instance of the VectorSearch object, which holds algorithms, profiles and vectorizers:
algorithms: Azure AI search supports both HNSW and exhaustive to search for nearest neighbors to an input vector; above, both algorithms are defined; they both use cosine similarity as the distance metric
vectorizers: this defines the integrated vectorizer and points to an Azure OpenAI resource and embedding model. You need to deploy that model in Azure OpenAI and give it a name; at the time of writing (December 2023), this feature was in public preview
profiles: a profile combines an algorithm and a vectorizer; we create two profiles, one for each algorithm; the vector fields use the myHnswProfile profile.
Note: using HNSW on a vector field, designed to perform approximate nearest neighbor searches, still allows you to do an exhaustive search; the notebook contains sample searches at the bottom, which use exhaustive searches to search the entire vector space; note that the reverse is not possible (using HNSW when index on field is set as exhaustive).
Above, we specify a semantic_config. It is used to inform the semantic reranker abiut the fields in our index with valuable data. Here, we use the description field. The config is used to create an instance of type Semantic_Settings. You also have to enable the semantic reranker in Azure AI Search to enable this feature.
The function ends by returning an instance of type SearchIndex, which contains the fields array, the vector configuration and the semantic configuration.
Now we can use the output of this function to create the index:
service_endpoint = "https://acs-geba.search.windows.net"
index_name = "images-sdk"
key = os.getenv("AZURE_AI_SEARCH_KEY")


index_client = SearchIndexClient(service_endpoint, AzureKeyCredential(key))
search_client = SearchClient(service_endpoint, index_name, AzureKeyCredential(key))
index = blog_index(index_name)

# create the index
try:
    index_client.create_or_update_index(index)
    print("Index created or updated successfully")
except Exception as e:
    print("Index creation error", e)
The important part here is the creation of a SearchIndexClient that authenticates to our Azure AI Search resource. We use that client to create_or_update our index. That function requires a SearchIndex parameter, provided by the blog_index function.
When that call succeeds, you should see the index in the portal. Text and vector fields are searchable.
Index in the portal
The vector profiles should be present:
Vector profiles
Click on an algorithm or vectorizer. It should match the definition in our code.
Now we can define the data source, skillset and indexer.
Data source
Our images are stored in Azure Blob Storage. The data source needs to point to that resource and specify a container. We can use the following code:
# Create a data source
ds_client = SearchIndexerClient(service_endpoint, AzureKeyCredential(key))
container = SearchIndexerDataContainer(name="images")
data_source_connection = SearchIndexerDataSourceConnection(
    name=f"{index_name}-blob",
    type="azureblob",
    connection_string=os.getenv("STORAGE_CONNNECTION_STRING"),
    container=container
)
data_source = ds_client.create_or_update_data_source_connection(data_source_connection)

print(f"Data source '{data_source.name}' created or updated")
The code is pretty self-explanatory. The data source is shown in the portal as below:
Azure AI Search data source
Skillset with two skills
Before we create the indexer, we define a skillset with two skills:
AzureOpenAIEmbeddingSkill: a built-in skill that uses an Azure OpenAI embedding model and takes text as input; it returns a vector (embedding) of 1536 dimensions; this skill is not free; you will be billed for the vectors you create via your Azure OpenAI resource
WebApiSkill: a custom skill that points to an endpoint that you need to build and host; you define the inputs and outputs of the custom skill; my custom skill runs in Azure Container Apps but it can run anywhere. Often, skills are implemented as an Azure Function.
Above, we define the skillset and the embedding_skill. The AzureOpenAIEmbeddingSkill points to a deployed text-embedding-ada-002 embedding model. Use the name of your deployment, not the model name.
A skillset operates within a context. The context above is the entire document (/document) but that’s not necessarily the case for other skills. The input to the embedding skill is our description field (/document/description). The output will be a vector. The target_name above is some sort of a temporary name used during the so-called enrichment process of the indexer. We will need to configure the indexer to write this field to the index.
The question is: “Where does the description come from?”. The description comes from the WebApiSkill. Because the embedding skill needs the description field generated by the WebApiSkill, the WebApiSkill will run first. Here is the custom web api skill:
custom_skill = WebApiSkill(
    description="A custom skill that creates an image vector and description",
    uri="YOUR_ENDPOINT",
    http_method="POST",
    timeout="PT60S",
    batch_size=4,
    degree_of_parallelism=4,
    context="/document",
    inputs=[
        InputFieldMappingEntry(name="url", source="/document/url"),
    ],
    outputs=[
        OutputFieldMappingEntry(name="embedding", target_name="imageVector"),
        OutputFieldMappingEntry(name="description", target_name="description"),
    ],
)
The input to the custom skill is the url to our image. That url is posted to the endpoint you define in the uri field. You can control how many inputs are sent in one batch and how many batches are sent concurrently. The inputs have to be sent in a specific format.
This skill also operates at the document level and creates two new fields. The contents of those fields are generated by your custom endpoint and returned as embedding and description. They are mapped to imageVector and description. Again, those fields are temporary and need to be written to the index by the indexer.
To see the code of the custom skill, check https://github.com/gbaeke/vision/tree/main/img_vector_skill. That skill is written for demo purposes and was not thoroughly vetted to be used in production. Use at your own risk. In addition, GPT-4 Vision requires an OpenAI key (not Azure OpenAI) and currently (December 2023) allows 100 calls per day! You currently cannot use this at scale. Azure also provides image captioning models that might fit the purpose.
Now we can create the skillset:
skillset = SearchIndexerSkillset(
    name=skillset_name,
    description="Skillset to generate embeddings",
    skills=[embedding_skill, custom_skill],
)

client = SearchIndexerClient(service_endpoint, AzureKeyCredential(key))
client.create_or_update_skillset(skillset)
print(f"Skillset '{skillset.name}' created or updated")
The above code results in the following:
skllset with two skills
Indexer
The indexer is the final piece of the puzzle and brings the data source, index and skillset together:
indexer_name = f"{index_name}-indexer"

indexer = SearchIndexer(
    name=indexer_name,
    description="Indexer to index documents and generate description and embeddings",
    skillset_name=skillset_name,
    target_index_name=index_name,
    parameters=IndexingParameters(
        max_failed_items=-1
    ),
    data_source_name=data_source.name,
    # Map the metadata_storage_name field to the title field in the index to display the PDF title in the search results
    field_mappings=[
        FieldMapping(source_field_name="metadata_storage_path", target_field_name="path",
            mapping_function=FieldMappingFunction(name="base64Encode")),
        FieldMapping(source_field_name="metadata_storage_name", target_field_name="name"),
        FieldMapping(source_field_name="metadata_storage_path", target_field_name="url"),
    ],
    output_field_mappings=[
        FieldMapping(source_field_name="/document/textVector", target_field_name="textVector"),
        FieldMapping(source_field_name="/document/imageVector", target_field_name="imageVector"),
        FieldMapping(source_field_name="/document/description", target_field_name="description"),
    ],
)

indexer_client = SearchIndexerClient(service_endpoint, AzureKeyCredential(key))
indexer_result = indexer_client.create_or_update_indexer(indexer)
Above, we create an instance of type SearchIndexer and set the indexer’s name, the data source name, the skillset name and the target index.
The most important parts are the field mappings and the output field mappings.
Field mappings take data from the indexer’s data source and map them to a field in the index. In our case, that’s content and metadata from Azure Blob Storage. The metadata fields in the code above are described in the documentation. In a field mapping, you can configure a mapping function. We use the base64Encode mapping function for the path field.
Output field mappings take new fields created during the enrichment process and map them to fields in the index. You can see that the fields created by the skills are mapped to fields in the index. Without these mappings, the skillsets would generate the data internally but the data would never appear in the index.
Once the indexer is defined, it gets created (or updated) using an instance of type SearchIndexerClient.
Note that we set a parameter in the index, max_failed_items, to -1. This means that the indexer process keeps going, no matter how many errors it produces. In the indexer screen below, you can see there was one error:
Indexer with one error
The error happened because the image vectorizer in the custom web skill threw an error on one of the images.
Using an indexer has several advantages:
Indexing is a background process and can run on a schedule; there is no need to schedule your own indexing process
Indexers keep track of what they indexed and can index only new data; with your own code, you have to maintain that state; failed documents like above are not reprocessed
Depending on the source, indexers see deletions and will remove entries from the index
Indexers can be easily reset to trigger a full index
Indexing errors are reported and errors can be sent to a debugger to inspect what went wrong
Testing the index
We can test the index by performing a text-based search that uses the integrated vectorizer:
# Pure Vector Search
query = "city"

search_client = SearchClient(service_endpoint, index_name, credential=AzureKeyCredential(key))
vector_query = VectorizableTextQuery(text=query, k=1, fields="textVector", exhaustive=True)


results = search_client.search(
    search_text=None,
    vector_queries= [vector_query],
    select=["name", "description", "url"],
    top=1
)

# print selected fields from dictionary
for result in results:
    print(result["name"])
    print(result["description"])
    print(result["url"])
    print("")
Above, we search for city (in the query variable). The VectorizableTextQuery class (in preview) takes the plain text in the query variable and vectorizes it for us with the embedding model defined in the integrated vectorizer. In addition, we specify how many results to return (1 nearest neighbors) and that we want to search all vectors (exhaustive).
Note: remember that the vector field was configured for HNSW; we can switch to exhaustive as shown above
Next, search_client.search performs the actual search. It only provides the vector query, which results in a pure similarity search with the query vector. search_text is set to None. Set search string to the query if you want to do a hybrid search. The notebook contains additional examples that also does a keyword and semantic search with highlighting.
The search gives the following result (selected fields: name, description, url):
city.jpg
This is an image of the London skyline, featuring a mix of modern skyscrapers and historical buildings. Prominent among the skyscrapers are the Leadenhall Building, also known as the "Cheesegrater," and the rounded, distinctive shape of 30 St Mary Axe, commonly referred to as "The Gherkin." Further in the background, the towers of Canary Wharf can be seen. The view is clear and taken on a day with excellent visibility.
https://stgebaoai883.blob.core.windows.net/images/city.jpg
The image the URL points to is:
yep, a city (London)
In the repo’s search-client folder, you can find a Streamlit app to search for and display images and dump the entire search result object. Make sure you install all the packages in requirements.txt and the preview Azure AI Search package from the whl folder. Simply type streamlit run app.py to run the app:
Streamlit Query app
Conclusion
In this post, we demonstrated the use of the Azure AI Search Python SDK to create an indexer that takes images as input, create new fields with skills, and write those fields + metadata to an index.
We touched on the advantages of using an indexer versus your own indexing code (pull versus push).
With this code and some sample images, you should be able to build an image search application yourself.
With the gpt-4-vision-preview model available at OpenAI, it was time to build something with it. I decided to use it as part of a quick solution that can search for images with text, or by providing a similar image.
We will do the following:
Describe a collection of images. To generate the description, GPT-4 Vision is used
Create a text embedding of the description with the text-embedding-ada-002 model
Create an image embedding using the vectorizeImage API, part of Azure AI Computer Vision
Save the description and both embeddings to an Azure AI Search index
Search for images with either text or a similar image
The end result should be that when I search for desert plant, I get an image of a cactus or similar plant. When I provide a picture of an apple, I should get an apple or other fruit as a result. It’s basically Google image and reverse image search.
Let’s see how it works and if it is easy to do. The code is here: https://github.com/gbaeke/vision. The main code is in a Jupyter notebook in the image_index folder.
A word on vectors and vectorization
When we want to search for images using text or find similar images, we use a technique that involves turning both text and images into a form that a computer can understand easily. This is done by creating vectors. Think of vectors as a list of numbers that describe the important parts of a text or an image.
For text, we use a tool called ‘text-embedding-ada-002’ which changes the words and sentences into a vector. This vector is like a unique fingerprint of the text. For images, we use something like Azure’s multi-modal embedding API, which does the same thing but for pictures. It turns the image into a vector that represents what’s in the picture.
After we have these vectors, we store them in a place where they can be searched. We will use Azure AI Search. When you search, the system looks for the closest matching vectors – it’s like finding the most similar fingerprint, whether it’s from text or an image. This helps the computer to give you the right image when you search with words or find images that are similar to the one you have.
Getting a description from an image
Although Azure has Computer Vision APIs to describe images, GPT-4 with vision can do the same thing. It is more flexible and easier to use because you have the ability to ask for what you want with a prompt.
To provide an image to the model, you can provide a URL or the base64 encoding of an image file. The code below uses the latter approach:
def describe_image(image_file: str) -> str:
    with open(f'{image_file}', 'rb') as f:
        image_base64 = base64.b64encode(f.read()).decode('utf-8')
        print(image_base64[:100] + '...')

    print(f"Describing {image_file}...")

    response = client.chat.completions.create(
        model="gpt-4-vision-preview",
        messages=[
            {
            "role": "user",
            "content": [
                {"type": "text", "text": "Describe the image in detail"},
                {
                "type": "image_url",
                "image_url": {
                    "url": f"data:image/jpeg;base64,{image_base64}",
                },
                },
            ],
            }
        ],
        max_tokens=500,  # default max tokens is low so set higher
    )

    return response.choices[0].message.content
As usual, the OpenAI API is very easy to use. Above, we open and read the image and base64-encode it. The base64 encoded file is provided in the url field. A simple prompt is all you need to get the description. Let’s look at the result for the picture below:
The generated description is below:
The image displays a single, healthy-looking cactus planted in a terracotta-colored pot against a pale pink background. The cactus is elongated, predominantly green with some modest blue hues, and has evenly spaced spines covering its surface. The spines are white or light yellow, quite long, and arranged in rows along the cactus’s ridges. The pot has a classic, cylindrical shape with a slight lip at the top and appears to be a typical pot for houseplants. The overall scene is minimalistic, with a focus on the cactus and the pot due to the plain background, which provides a soft contrast to the vibrant colors of the plant and its container.
Description generated by GPT-4 Vision
Embedding of the image
To create an embedding for the image, I decided to use Azure’s multi-modal embedding API. Take a look at the code below:
def get_image_vector(image_path: str) -> list:
    # Define the URL, headers, and data
    url = "https://AI_ACCOUNT.cognitiveservices.azure.com//computervision/retrieval:vectorizeImage?api-version=2023-02-01-preview&modelVersion=latest"
    headers = {
        "Content-Type": "application/octet-stream",
        "Ocp-Apim-Subscription-Key": os.getenv("AZURE_AI_KEY")
    }

    with open(image_path, 'rb') as image_file:
        # Read the contents of the image file
        image_data = image_file.read()

    print(f"Getting vector for {image_path}...")

    # Send a POST request
    response = requests.post(url, headers=headers, data=image_data)

    # return the vector
    return response.json().get('vector')
The code uses an environment variable to get the key to an Azure AI Services multi-service endpoint. Check the README.md in the repository for a sample .env file.
The API generates a vector with 1024 dimensions. We will need that number when we create the Azure AI Search index.
Note that this API can accept a url or the raw image data (not base64-encoded). Above, we provide the raw image data and set the Content-Type properly.
Generating the data to index
In the next step, we will get all .jpg files from a folder and do the following:
create the description
create the image vector
create the text vector of the description
Check the code below for the details:
# get all *.jpg files in the images folder
image_files = [file for file in os.listdir('./images') if file.endswith('.jpg')]

# describe each image and store filename and description in a list of dicts
descriptions = []
for image_file in image_files:
    try:
        description = describe_image(f"./images/{image_file}")
        image_vector = get_image_vector(f"./images/{image_file}")
        text_vector = get_text_vector(description)

        descriptions.append({
            'id': image_file.split('.')[0], # remove file extension
            'fileName': image_file,
            'imageDescription': description,
            'imageVector': image_vector,
            'textVector': text_vector
        })
    except Exception as e:
        print(f"Error describing {image_file}: {e}")

# print the descriptions but only show first 5 numbers in vector
for description in descriptions:
    print(f"{description['fileName']}: {description['imageDescription'][:50]}... {description['imageVector'][:5]}... {description['textVector'][:5]}...")
The important part is the descriptions list, which is a list of JSON objects with fields that match the fields in the Azure AI Search index we will build in the next step.
The text vector is calculated with the get_text_vector function. It uses OpenAI’s text-embedding-ada-002 model.
Building the index
The code below uses the Azure AI Search Python SDK to build and populate the index in code. You.will need an AZURE_AI_SEARCH_KEY environment variable to authenticate to your Azure AI Search instance.
def blog_index(name: str):
    from azure.search.documents.indexes.models import (
        SearchIndex,
        SearchField,
        SearchFieldDataType,
        SimpleField,
        SearchableField,
        VectorSearch,
        VectorSearchProfile,
        HnswAlgorithmConfiguration,
    )

    fields = [
        SimpleField(name="Id", type=SearchFieldDataType.String, key=True), # key
        SearchableField(name="fileName", type=SearchFieldDataType.String),
        SearchableField(name="imageDescription", type=SearchFieldDataType.String),
        SearchField(
            name="imageVector",
            type=SearchFieldDataType.Collection(SearchFieldDataType.Single),
            searchable=True,
            vector_search_dimensions=1024,
            vector_search_profile_name="vector_config"
        ),
        SearchField(
            name="textVector",
            type=SearchFieldDataType.Collection(SearchFieldDataType.Single),
            searchable=True,
            vector_search_dimensions=1536,
            vector_search_profile_name="vector_config"
        ),

    ]

    vector_search = VectorSearch(
        profiles=[VectorSearchProfile(name="vector_config", algorithm_configuration_name="algo_config")],
        algorithms=[HnswAlgorithmConfiguration(name="algo_config")],
    )
    return SearchIndex(name=name, fields=fields, vector_search=vector_search)

#  create the index
from azure.core.credentials import AzureKeyCredential
from azure.search.documents import SearchClient
from azure.search.documents.indexes import SearchIndexClient
from azure.search.documents.models import VectorizedQuery

service_endpoint = "https://YOUR_SEARCH_INSTANCE.search.windows.net"
index_name = "image-index"
key = os.getenv("AZURE_AI_SEARCH_KEY")

index_client = SearchIndexClient(service_endpoint, AzureKeyCredential(key))
index = blog_index(index_name)

# create the index
try:
    index_client.create_index(index)
    print("Index created")
except Exception as e:
    print("Index probably already exists", e)
The code above creates an index with some string fields and two vector fields:
imageVector: 1024 dimensions (as defined by the Azure AI Computer Vision image embedder)
textVector: 1536 dimensions (as defined by the OpenAI embedding model)
Although not specified in the code, the index will use cosine similarity to perform similarity searches. It’s the default. It will return approximate nearest neighbour (ANN) results unless you create a search client that uses exhaustive search. An exhaustive search searches the entire vector space. The queries near the end of this post use the exhaustive setting.
When the index is created, we can upload documents:
# now upload the documents
try:
    search_client = SearchClient(service_endpoint, index_name, AzureKeyCredential(key))
    search_client.upload_documents(descriptions)
    print("Documents uploaded successfully")
except Exception as e:
    print("Error uploading documents", e)
The upload_documents method uploads the documents in the descriptions Python list to the search index. The upload is actually an upsert. You can run this code multiple times without creating duplicate documents in the index.
Search images with text
To search an image with a text description, a vector query on the textVector is used. The function below takes a text query string as input, vectorizes the query, and performs a similarity search returning the first nearest neighbour. The function displays the description and the image in the notebook:
# now search based on text
def single_vector_search(query: str):
    vector_query = VectorizedQuery(vector=get_text_vector(query), k_nearest_neighbors=1, fields="textVector", exhaustive=True)

    results = search_client.search(
        vector_queries=[vector_query],
        select=["fileName", "imageDescription"],

    )

    for result in results:
        print(result['fileName'], result["imageDescription"], sep=": ")

        # show the image
        from IPython.display import Image
        display(Image(f"./images/{result['fileName']}"))

single_vector_search("desert plant")
The code searches for an image based on the query desert plant. It returns the picture of the cactus shown earlier. Note that if you search for something there is no image for, like blue car, you will still get a result because we always return a nearest neighbor. Even if your nearest neighbor lives 100km away, it’s still your nearest neighbor. 😀
Return similar images
Since our index contains an image vector, we can search for images similar to a vector of a reference image. The function below takes an image file path as input, calculates the vector for that image, and performs a nearest neighbor search. The function displays the description and image of each document returned. In this case, the code returns two similar documents:
def image_search(image_file: str):

    vector_query = VectorizedQuery(vector=get_image_vector(image_file), k_nearest_neighbors=2, fields="imageVector", exhaustive=True)

    results = search_client.search(
        vector_queries=[vector_query],
        select=["fileName", "imageDescription"],
    )

    for result in results:
        print(result['fileName'], result["imageDescription"], sep=": ")

        # show the image
        from IPython.display import Image
        display(Image(f"./images/{result['fileName']}"))

# get vector of another image and find closest match
image_search('rotten-apple.jpg')
image_search('flower.jpeg')
At the bottom, the function is called with filenames of pictures that contain a rotten apple and a flower. The result of the first query is a picture of the apple and banana. The result of the second query is the cactus and the rose. You can debate whether the cactus should be in the results. Some cacti have flowers but some don’t. 😀
Conclusion
The GPT-4 Vision API, like most OpenAI APIs, is very easy to use. In this post, we used it to generate image descriptions to build a simple query engine that can search for images via text or a reference image. Together with their text embedding API and Microsoft’s multi-modal embedding API to create an image embedding, it is relatively straightforward to build these type of systems.
As usual, this is a tutorial with quick sample code to illustrate the basic principle. If you need help building these systems in production, simply reach out. Help is around the corner! 😉
The vector search capability of Azure AI Search became generally available mid November 2023. With that release, the developer is responsible for creating embeddings and storing them in a vector field in the index.
However, Microsoft also released integrated vectorization in preview. Integrated vectorization is useful in two ways:
You can define a vectorizer in the index schema. It can be used to automatically convert a query to a vector. This is useful in the Search Explorer in the portal but can also be used programmatically.
You can use an embedding skill for your indexer that automatically vectorizes index fields for you.
First, let’s look at defining a vectorizer in the index definition and using it in the portal for search.
Vector search in the portal
Below is a screenshot of an index with a title and a titleVector field. The index stores information about movies:
Index with a vector field
The integrated vectorizer is defined in the Vector profiles section:
Vector profile
When you add the profile, you configure the algorithm and vectorizer. The vectorizer simply points to an embedding model in Azure OpenAI. For example:
Vectorizer
Note: it’s recommended to use managed identity
Now, from JSON View in Search Explorer, you can perform a vector search. If you see a search field at the top, you can remove that. It’s for full-text search.
Vector search in the portal
Above, the query commencement is converted to a vector by the integrated vectorizer. The vector search comes up with Inception as the first match. I am not sure if you would want to search for movies this way but it proves the point. 😛
Using an embedding skill during indexing
Suppose you have several JSON documents about movies. Below is one example:
When you have a bunch of these files in Azure Blob Storage, you can use the Import Data wizard to construct an index from these files.
Import Data Wizard
This wizard, at the time of writing, does not create vectors for you. There is another wizard, Import and vectorize data, but it will treat the JSON as any document and store it in a content field. A vector is created from the content field.
We will stick to the first wizard. It will do several things:
create a data source to access the JSON documents in an Azure Storage Account container
infer the schema from the JSON files
propose an index definition that you can alter
create an indexer that indexes the documents on the schedule that you set
add skills like entity extraction; select a simple skill here like translation so you are sure there will be a skillset that the indexer will use
In the step to customize the index definition, ensure you make fields searchable and retrievable as needed. In addition, define a vector field. In my case, I created a titleVector field:
titleVector
When the wizard is finished, the indexer will run and populate the index. Of course, the titleVector field will be empty because there is no process in place that calculates the vectors during indexing.
Let’s fix that. In Skillsets, go the the skillset created by the wizard and click it.
Skillset created by the wizard
Replace the Skillset JSON definition with the content below and change resourceUri, apiKey and deploymentId as needed. You can also add the embedding skill to the existing array of skills if you want to keep them.
Above, we want to embed the title field in our document and create a vector for it. The context is set to /document which means that this skill is executed for each document once.
Now save the skillset. This skill on its own will create the vectors but will not save them in the index. You need to update the indexer to write the vector to a field.
Let’s navigate to the indexer:
Indexer
Click the indexer and go to the Indexer Definition (JSON) tab. Ensure you have an outputFieldMappings section like below:
Above, we map the titleVector enrichment (think of it as something temporary during indexing) to the real titleVector field in the index.
Reset and run the indexer
Reset the indexer so it will index all documents again:
Resetting the indexer
Next, click the Run button to start the indexing process. When it finishes, do a search with Search Explorer and check that there are vectors in the titleVector field. It’s an array of 1536 floating point numbers.
Conclusion
Integrated vectorization is a welcome extra feature in Azure AI Search. Using it in searches is very easy, especially in the portal.
Using the embedding skill is a bit harder, because you need to work with skillset and indexer definitions in JSON and you have to know exactly what you have to add. But once you get it right, the indexer does all the vectorization work for you.