In a previous post, we looked at Azure Add your data (preview) that can be configured from the Azure OpenAI Chat playground. In a couple of steps, you can point to or upload files of a supported file type (PDF, Word, …) and create an Azure Cognitive Search index. That index can subsequently be queried to find relevant content to inject in the prompt of an Azure OpenAI model such as gtp-35-turbo or gpt-4. The injection is done for you by the Add your data feature!
Although this feature is fantastic and easy to configure in the portal, you probably want to use it in a custom application. So in this post, we will take a look at how to use this feature in code.
You can find a notebook with some sample code here: https://github.com/gbaeke/azure-cog-search. The code is a subset of the code used by Microsoft to create a web application from the Azure OpenAI playground. That code can be found here. Although the code is written in Python, it does not use specific OpenAI or Azure OpenAI libraries. The code uses the Azure OpenAI REST APIs only, which means you can easily replicate this in any other language or framework.
Before you run the code, make sure you clone the repo and add a .env file as described in README.md. The code itself is in a Python notebook so make sure you can run these notebooks. I use Visual Studio Code to do that:
create Python variables from environment variables to configure both Azure Cognitive Search and Azure OpenAI. Make sure you have read the previous blog post and/or looked at the video to have both of these resources. You will need to add the short names of these services and the authentication keys to these services. The video at the end of this post discusses the options in some more detail.
Prepare a messages array with a user question: I am an Azure architect. Is there a job for me? In the previous post, I added documents with job descriptions. You can add any documents you want and modify the user question accordingly.
Prepare the JSON body for an HTTP POST. The JSON body will be sent to the Azure OpenAI chat completion (extensions) API and will include information about the Azure Cognitive Search data source.
Create the endpoint URL and HTTP headers to send to the chat completion API. The headers contain the Azure OpenAI API key.
Send the JSON body to the chat completion endpoint with the Python requests module and extract the full response (that includes citations) and the response by the OpenAI model. In this code, gpt-4 is used.
a message with the role of tool that includes content from Azure Cognitive Services including metadata like URL and file path
a message with the role of assistant that contains the actual answer from the OpenAI model (here gpt-4)
It’s important to note that you need to use the chat completions extensions API with the correct API version of 2023-06-01-preview. This is reflected in the constructed endpoint. Also, note it’s extensions/chat/completions in the URL!
If you are used to LangChain or other libraries that are supposed to make it easy to work with large language models, prompts, vector databases, etc… you know that the document queries are separated from the actual call to the LLM and that the retrieved documents are injected into the prompt. Of course, LangChain and other tools have higher-level APIs that make it easy to do in just a few lines of code.
Microsoft has gone for direct integration of Azure Cognitive Search in the Azure OpenAI APIs version 2023-06-01-preview and above. You can find the OpenAPI specification (swagger) here. One API call is all that is needed!
Note that in this code, we are not using semantic search. In the sample .env file, AZURE_SEARCH_USE_SEMANTIC_SEARCH is set to false. You cannot simply turn on that setting because it also requires turning on the feature in Azure Cognitive Search. The feature is also in preview:
Semantic search in Azure Cognitive Search (preview)
To understand the differences between lexical search and semantic search, see this article. In general, semantic search should return better results when using natural language queries. By turning on the feature in Cognitive Search (Free tier) and setting AZURE_SEARCH_USE_SEMANTIC_SEARCH to true, you should be good to go.
⚠️ Note that semantic search is not the same as vector search in the context of Azure Cognitive Search. With vector search, you have to generate vectors (embeddings) using an embedding model and store these vectors in your index together with your content. Although Azure Cognitive Search supports vector search, it is not used here. It’s kind of confusing because vector search enables semantic search in a general context.
Here’s a video with more information about this blog post:
When I talk to customers about Azure OpenAI, I am often asked how to build a chatbot that uses your own data in the simplest way possible while still allowing for some customization. In Azure, there are a few solutions. We will look at one of the solutions in this post.
Note: don’t feel like reading? Check the video at the bottom of this post to see all this in action.
The easiest solution is “Bring your own data”, also called “Azure OpenAI on your data”. See Microsoft Learn for more information. Right from Azure AI Studio, you can add data from a blob storage container or directly upload your data. In the end, the data ends up in Azure Cognitive Search, which is then linked to the Chat playground as shown in the image below:
Bring your own data in Chat Playground (part of Azure AI Studio)
The following file types are supported: txt, md, html, Word, PowerPoint, PDF. Above, I added a few PDF files with job descriptions. The standard upload procedure works well for small documents. For larger documents, you should use the data preparation script. It will chunk documents into smaller pieces. The chunk size and overlap can be set in a config.json file. This is similar to what you can do with LangChain’s loaders and text splitters. In fact, you can use LangChain’s abstractions instead of the data preparation script but I have not tried this myself yet. See https://python.langchain.com/docs/integrations/vectorstores/azuresearch for more information. If I find the time, I will report on my findings in another blog post.
Right from the playground, you can click a button to deploy the bot to a new web app (Azure App Services):
The same bot in an Azure Web App
Although it is very easy to create the bot, there are a couple of things to note here:
The solution requires Azure Cognitive Search which is an extra cost. The minimum cost is around 70 euros per month. There are open-source solutions you can use for free or SaaS solutions that provide a free option (e.g., Pinecone). Azure OpenAI on your data only supports Azure Cognitive Search for now although technically, Microsoft could open this up to other stores.
Azure Cognitive Search is somewhat more complex than (some) vector databases such as Pinecone or Chroma. If you want to use other search engines/vector databases, I recommend using LangChain in combination with something like Chainlit to create your prototype. Of course, that means you will have to write more code. No more wizards for you! 😃
The source code for the web app is at https://github.com/microsoft/sample-app-aoai-chatGPT. Although the code is not super complex, Python tools such as Streamlit and Chainlit make it much easier to create a prototype from scratch. Note that the web app is protected with Azure Active Directory by default and that it authenticates to Cognitive Search and Azure OpenAI using API keys set as environment variables. This is all automatically configured for you!
Azure Cognitive Search integration is part of the Azure OpenAI API version 2023-06-01 and depends on a dataSources field in the JSON body sent to the Azure OpenAI API. Check the source code here. I would have preferred the API to stay aligned with the OpenAI APIs and retrieve extra content as a separate step.
With all this being said, if all you need for your demo is the web app generated by the Chat playground’s Deploy button, this is one of the quickest ways to get there!
If you are a developer who wants to build AI-first apps with natural language processing and large language models, you might be interested in Semantic Kernel (SK), a lightweight and open-source SDK that aims to simplify the integration of AI with conventional programming languages.
SK is part of the CoPilot Stack and Microsoft is using it in its own CoPilots.
SK allows you to create and orchestrate semantic functions, native functions, memories, and connectors using C# or Python. Much like LangChain, it supports prompt templating, chaining, and memory with vectors (embeddings).
You can also use SK’s planner to automatically generate and execute complex tasks based on a user’s goals. This is similar to LangChain’s Agents & Tools capabilities. In this blog post, we will introduce some of the features and benefits of SK’s Planner, and show you how to use it in your own applications. I am still learning so I am going to stick to the basics! 😃
SK’s Planner allows you to create and execute plans based on semantic queries. You start by providing it a goal (an ask). The goal could be: “Create a photo of a meal with these ingredients: {list of ingredients}”. To achieve the goal, the planner can use plugins to generate and execute the plan. For the goal above, suppose we have two plugins:
Recipe plugin: creates a recipe based on starter ingredients
Image description plugin: creates an image description based on any input
The recipe plugin takes a list of ingredients as input while the image description plugin can take the recipe as input and generate an image description of it. That image description could be used by DALL-E to generate an actual image.
Note: at the time of writing, Microsoft was on the verge of using the word plugin instead of skill. In the code, you will see references to skills but that will go away. This post already the word plugins instead of skills.
Creating plugins
Plugins make expertise available to SK and consist of one or more functions. A function can be either:
an LLM prompt: a semantic function
native computer code: a native function
A plugin is a container where functions live. Think of it as a folder with each subfolder containing a function. For example:
Badly named 😃 MySkills plugin with two semantic functions
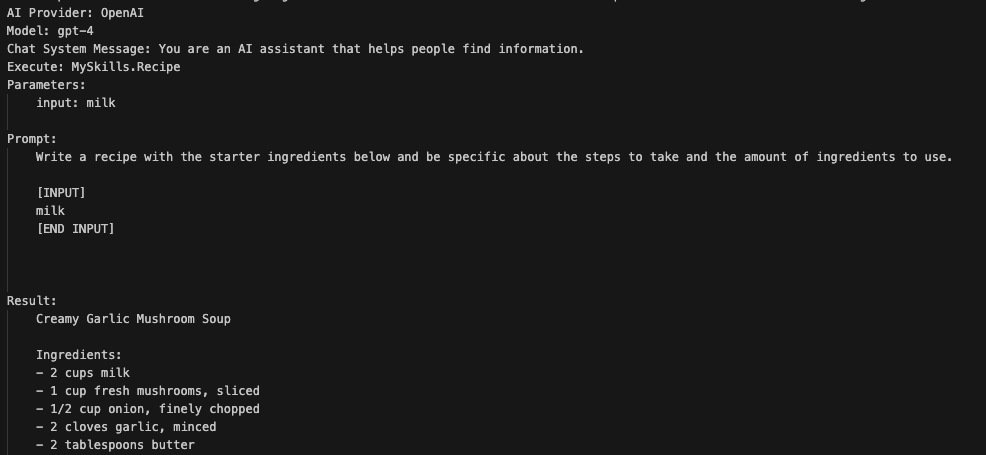
A semantic function is a prompt with placeholders for one or more input variables. The prompt is in skprompt.txt. The Recipe function uses the following prompt:
Write a recipe with the starter ingredients below and be specific about the steps to take and the amount of ingredients to use:

{{$input}}
The file config.json contains metadata about the function and LLM completion settings such as max_tokens and temperature. For example:
From your code, you can simply run this function to create a recipe. The plugin above is similar to a PromptTemplate in LangChain that you can combine with an LLM into a chain. You would then simply run the chain to get the output (a recipe). SK supports creating functions inline in your code as well, similar to how LangChain works.
Using the Planner
As stated above, the Planner can use plugins to reach the goal provided by a user’s ask. It actually works its way backward from the goal to create the plan:
There are different types of planners like a sequential planner, an action planner, a custom planner, and more. In our example, we will use a sequential planner and keep things as simple as possible. We will only use semantic functions, no native code functions.
Time for some code. We will build a small .NET Console App based on the example above: create a recipe and generate a photo description for this recipe. Here is the code:
using Microsoft.Extensions.Logging;
using Microsoft.SemanticKernel;
using Microsoft.SemanticKernel.AI.ImageGeneration;
using System.Diagnostics;
using Microsoft.SemanticKernel.Planning;
using System.Text.Json;

var kernelSettings = KernelSettings.LoadSettings();

var kernelConfig = new KernelConfig();
kernelConfig.AddCompletionBackend(kernelSettings);

using ILoggerFactory loggerFactory = LoggerFactory.Create(builder =>
{
    builder
        .SetMinimumLevel(kernelSettings.LogLevel ?? LogLevel.Warning)
        .AddConsole()
        .AddDebug();
});

IKernel kernel = new KernelBuilder()
    .WithLogger(loggerFactory.CreateLogger<IKernel>())
    .WithConfiguration(kernelConfig)
    .Configure(c =>
    {
        c.AddOpenAIImageGenerationService(kernelSettings.ApiKey);

    })
    .Build();

// used later to generate image with dallE
var dallE = kernel.GetService<IImageGeneration>();

// use SKs planner
var planner = new SequentialPlanner(kernel);

// depends on MySkills skill which has two semantic fucntions
// skills will be renamed to plugins in the future
var skillsDirectory = Path.Combine(System.IO.Directory.GetCurrentDirectory(), "skills");
var skill = kernel.ImportSemanticSkillFromDirectory(skillsDirectory, "MySkills");

// ask for starter ingredients
Console.Write("Enter ingredients: ");
string? input = Console.ReadLine();


if (!string.IsNullOrEmpty(input))
{

    // define the ASK for the planner; the two semantic functions should be used by the plan
    // note that these functions are too simple to be useful in a real application
    // a single prompt to the model would be enough
    var ask = "Create a photo of a meal with these ingredients:" + input;

    // create the plan and print it to see if the functions are used correctly
    var newPlan = await planner.CreatePlanAsync(ask);

    Console.WriteLine("Updated plan:\n");
    Console.WriteLine(JsonSerializer.Serialize(newPlan, new JsonSerializerOptions { WriteIndented = true }));

    // run the plan; result should be an image description
    var newPlanResult = await newPlan.InvokeAsync();


    // generate the url to the images created by dalle
    Console.WriteLine("Plan result: " + newPlanResult.ToString());
    var imageURL = await dallE.GenerateImageAsync(newPlanResult.ToString(), 512, 512);

    // display image in browser (MacOS!!!)
    Process.Start("open", imageURL);
The code uses config/appsettings.json which contains settings like serviceType, serviceId, and the API key to use with either OpenAI or Azure OpenAI. In my case, serviceType is OpenAI and the serviceId is gpt-4. Ensure you have gpt-4 access in OpenAI’s API. I actually wanted to use Azure OpenAI but I do not have access to DALL-E and I do not think SK would support it anyway.
After loading the settings, a KernelConfig is created, and a completion backend gets added (using gpt-4 here). After setting up logging, a new kernel is created with a new KernelBuilder() with the following settings;
a logger
the configuration with the completion backend
an image generation service (DALL-E2 here) which needs the OpenAI API key (retrieved from kernelSettings)
We can now create the planner with var planner = new SequentialPlanner(kernel); and add skills (plugins) to the kernel. We add plugins from the skills/MySkills folder in our project.
Now it’s just a matter of asking the user for some ingredients (stored in input) and creating the plan based on the ask. The ask is “Create a photo of a meal with these ingredients: …”
var ask = "Create a photo of a meal with these ingredients:" + input;

var newPlan = await planner.CreatePlanAsync(ask);
Note that CreatePlanAsync does not execute the plan, it just creates it. We can look at the plan with the following code:
Console.WriteLine("Updated plan:\n");
    Console.WriteLine(JsonSerializer.Serialize(newPlan, new JsonSerializerOptions { WriteIndented = true }));
The output is something like this (note that there are typos in the ingredients but that’s ok, the model should understand):
The output shows that the two skills will be used in this case. The input to the ImageDesc plugin is the output from the Recipe plugin.
Note that if your ask has nothing to do with generating dishes and photos of a dish, the skills will still be used resulting in unexpected results.
If you do not provide any skills, the planner will just use itself as a skill and the result will be the original ask. That would still work in this case because the ask can be passed to Dall-E on its own!
With the plan created, we can now execute it and show the result:
var newPlanResult = await newPlan.InvokeAsync();
Console.WriteLine("Plan result: " + newPlanResult.ToString());
This should print the description of the photo. We can pass that result to DALL-E with:
var imageURL = await dallE.GenerateImageAsync(newPlanResult.ToString(), 512, 512);
Process.Start("open", imageURL);   // works on MacOS
If I provide carrots and meat, then I get the following description and photo.
Description: A steaming pot of hearty carrot and meat stew is pictured. The pot is filled with chunks of lean ground beef, diced carrots, diced onion, minced garlic, and a rich tomato paste. Aromatic herbs of oregano and thyme are sprinkled on top, and the stew is finished with a drizzle of olive oil. The stew is ready to be served and is sure to be a delicious and comforting meal.
The photo:
Testing skills and plans
The Semantic Kernel extension for VS Code will find your plugins (skills) and allow you to execute them:
Recipe skill in VS Code
When you click the play icon next to the skill, you will be asked for input. The prompt will then be run by your selected model, with output to the screen:
You can also create plans and execute them in VS Code:
Plan in VS Code
Above, a plan was created based on a goal. The plan included the two plugins and shows the inputs and outputs. By clicking on Execute Plan you can run it without having to write any code. The UI above allows you to inspect the generated plan and change it if it’s not performing as intended.
Conclusion
This concludes my quick look at the Planner functionality in Semantic Kernel with a simple plan and a couple of semantic skills. If you want to learn more, be sure to check these resources:
In this post, we will take a look at creating a simple machine learning model for text classification and deploying it as a container with Azure Machine Learning service. This post is not intended to discuss the finer details of creating a text classification model. In fact, we will use the Keras library and its Reuters newswire dataset to create a simple dense neural network. You can find many online examples based on this dataset. For further information, be sure to check out and buy 👍 Deep Learning with Python by François Chollet, the creator of Keras and now at Google. It contains a section that explains using this dataset in much more detail!
Together with the workspace, you also get a storage account, a key vault, application insights and a container registry. In later steps, we will create a container and store it in this registry. That all happens behind the scenes though. You will just write a few simple lines of code to make that happen!
Note the Authoring (Preview) section! These were added just before Build 2019 started. For now, we will not use them.
Azure Notebooks
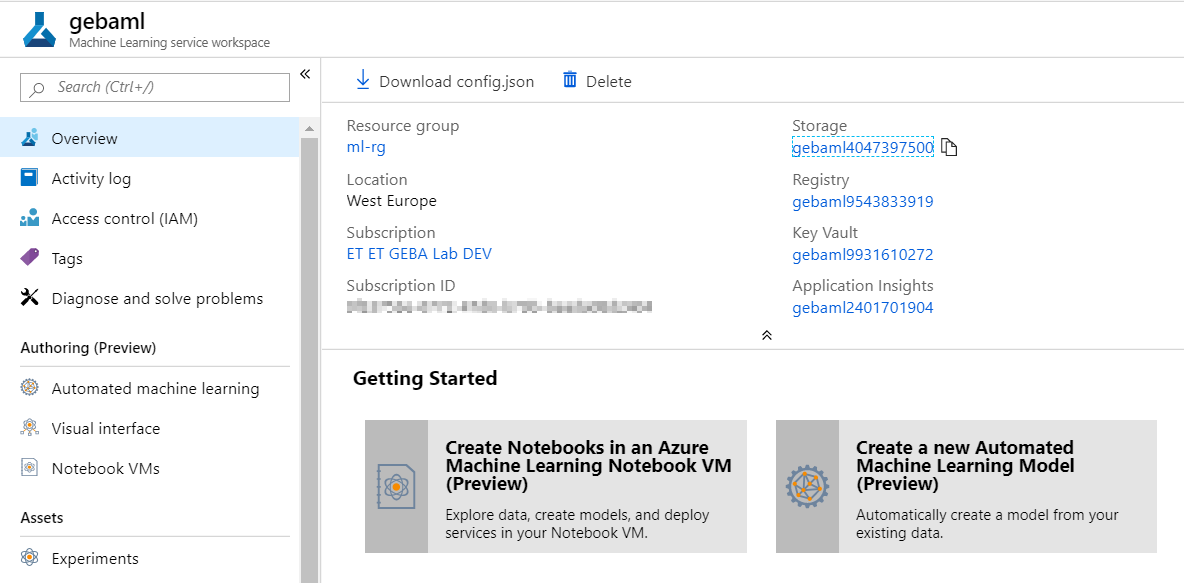
To create the model and interact with the workspace, we will use a free Jupyter notebook in Azure Notebooks. At this point in time (8 May 2019), Azure Notebooks is still in preview. To get started, find the link below in the Overview section of the Machine Learning service workspace:
When you open the notebook, you will see the following first four cells:
Getting the dataset
It’s always simple if a prepared dataset is handed to you like in the above example. Above, you simply use the reuters class of keras.datasets and use the load_data method to get the data and directly assign it to variables to hold the train and test data plus labels.
In this case, the data consists of newswires with a corresponding label that indicates the category of the newswire (e.g. an earnings call newswire). There are 46 categories in this dataset. In the real world, you would have the newswire in text format. In this case, the newswire has already been converted (preprocessed) for you in an array of integers, with each integer corresponding to a word in a dictionary.
A bit further in the notebook, you will find a Vectorization section:
Vectorization
In this section, the train and test data is vectorized using a one-hot encoding method. Because we specified, in the very first cell of the notebook, to only use the 10000 most important words each article can be converted to a vector with 10000 values. Each value is either 1 or 0, indicating the word is in the text or not.
This bag-of-words approach is one of the ways to represent text in a data structure that can be used in a machine learning model. Besides vectorizing the training and test samples, the categories are also one-hot encoded.
Now the dense neural network model can be created:
Dense neural net with Keras
The above code defines a very simple dense neural network. A dense neural network is not necessarily the best type but that’s ok for this post. The specifics are not that important. Just note that the nn variable is our model. We will use this variable later when we convert the model to the ONNX format.
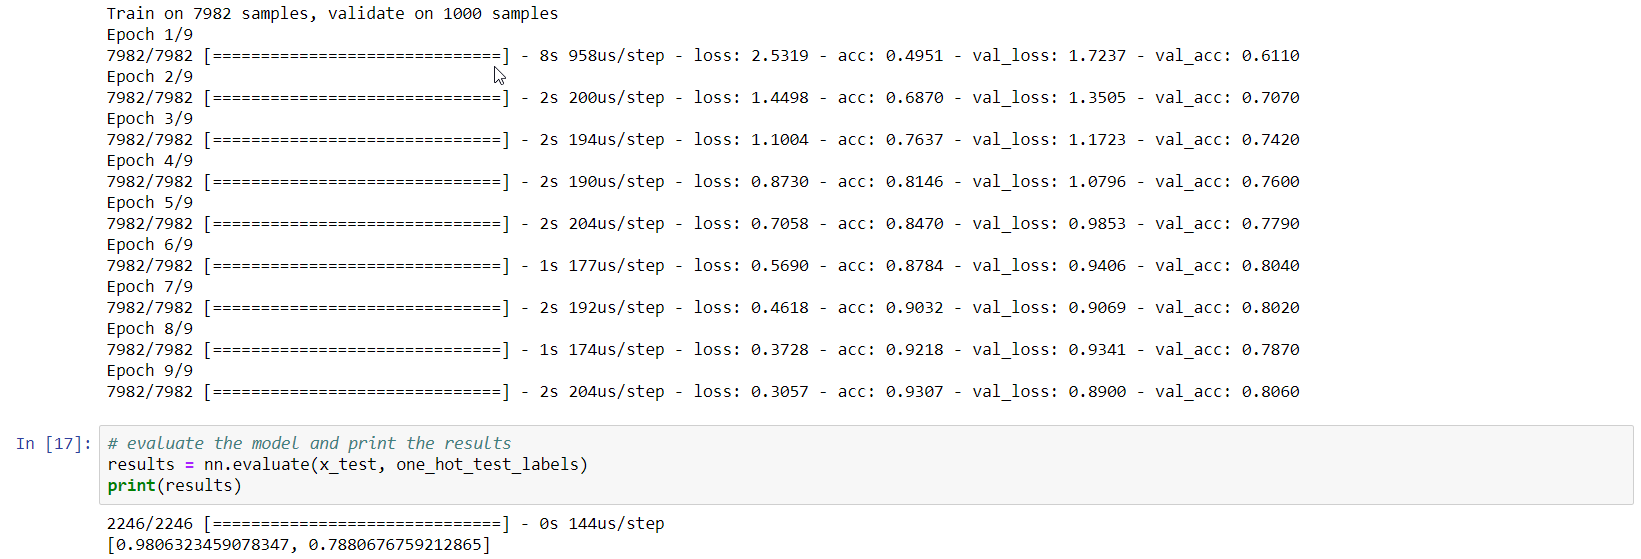
The last cell (16 above) does the actual training in 9 epochs. Training will be fast because the dataset is relatively small and the neural network is simple. Using the Azure Notebooks compute is sufficient. After 9 epochs, this is the result:
Training result
Not exactly earth-shattering: 78% accuracy on the test set!
Saving the model in ONNX format
ONNX is an open format to store deep learning models. When your model is in that format, you can use the ONNX runtime for inference.
Converting the Keras model to ONNX is easy with the onnxmltools:
Converting the Keras model to ONNX
The result of the above code is a file called reuters.onnx in your notebook project.
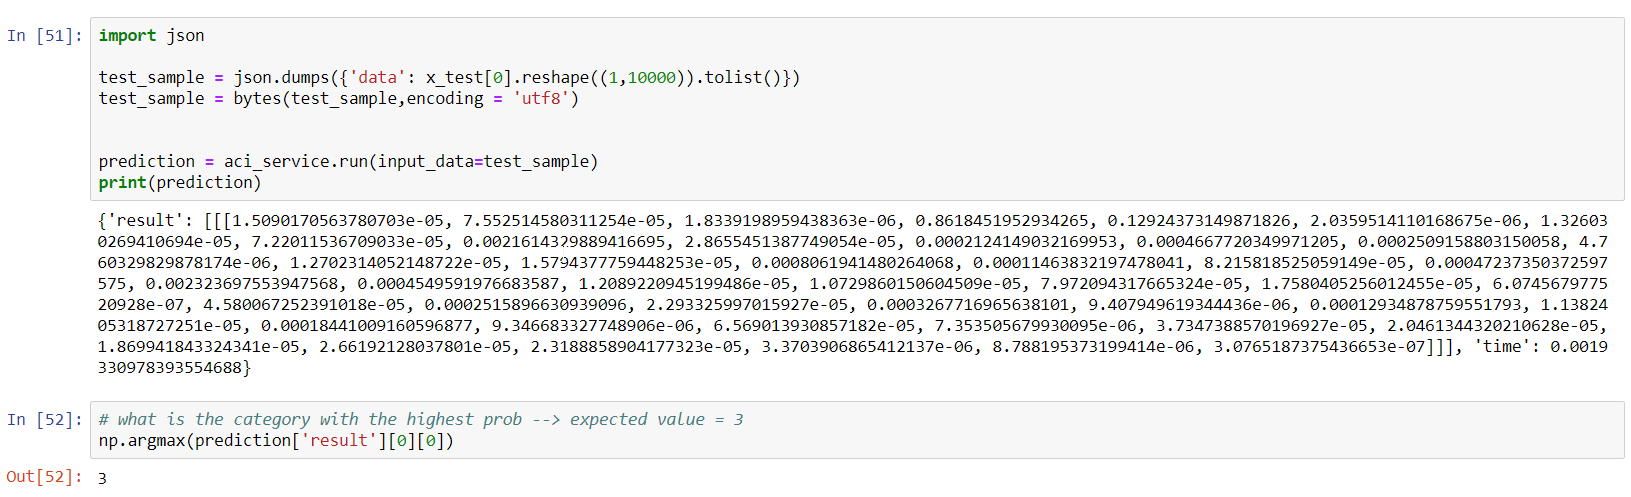
Predict with the ONNX model
Let’s try to predict the category of the first newswire in the test set. Its real label is 3, which means it’s a newswire about an earnings call (earn class):
Inferencing with the ONNX model
We will use similar code later in score.py, a file that will be used in a container we will create to expose the model as an API. The code is pretty simple: start an inference session based on the reuters.onnx file, grab the input and output and use run to predict. The resulting array is the output of the softmax layer and we use argmax to extract the category with the highest probability.
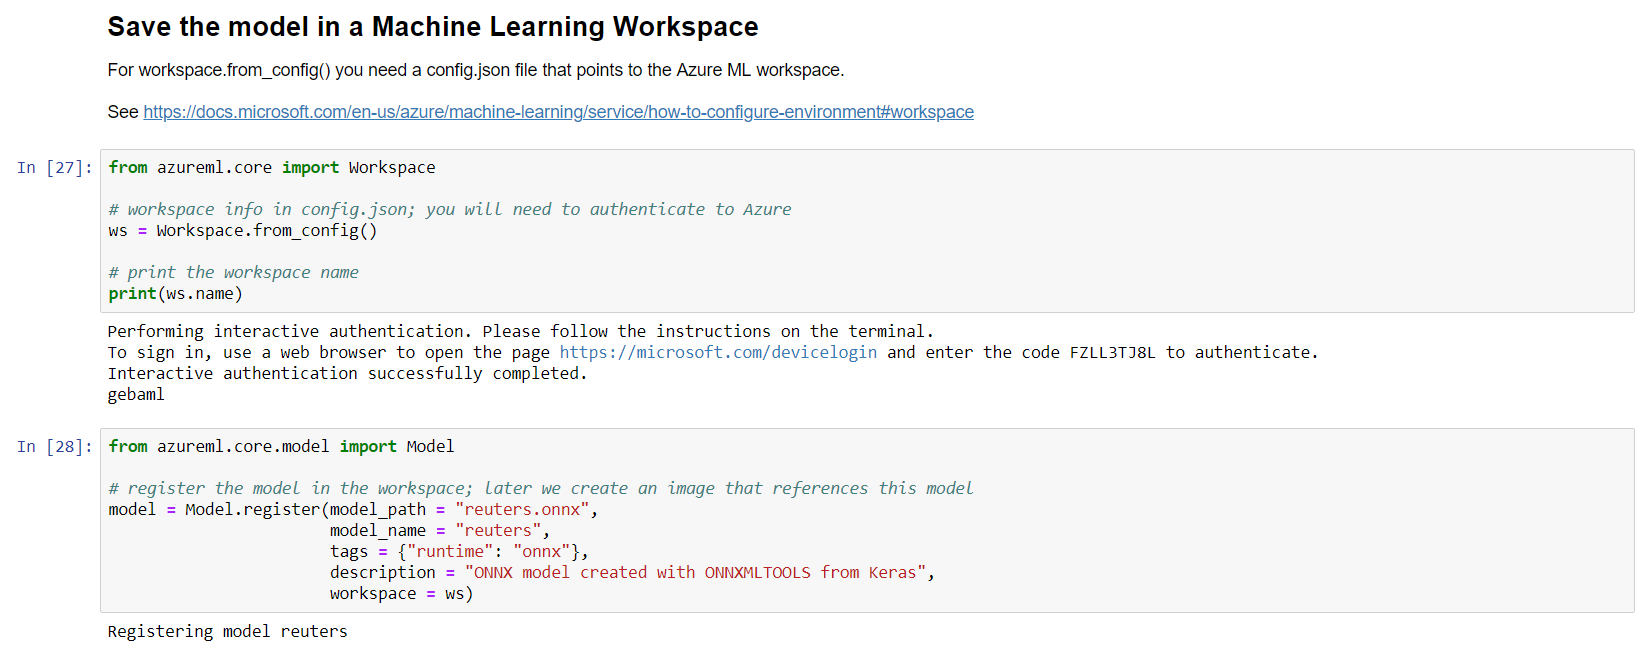
Saving the model to the workspace
With the model in reuters.onnx, we can add it to the workspace:
Saving the model in the workspace
You will need a file in your Azure Notebook project called config.json with the following contents:
With that file in place, when you run cell 27 (see above), you will need to authenticate to Azure to be able to interact with the workspace. The code is pretty self-explanatory: the reuters.onnx model will be added to the workspace:
Models added to the workspace
As you can see, you can save multiple versions of the model. This happens automatically when you save a model with the same name.
Creating the scoring container image
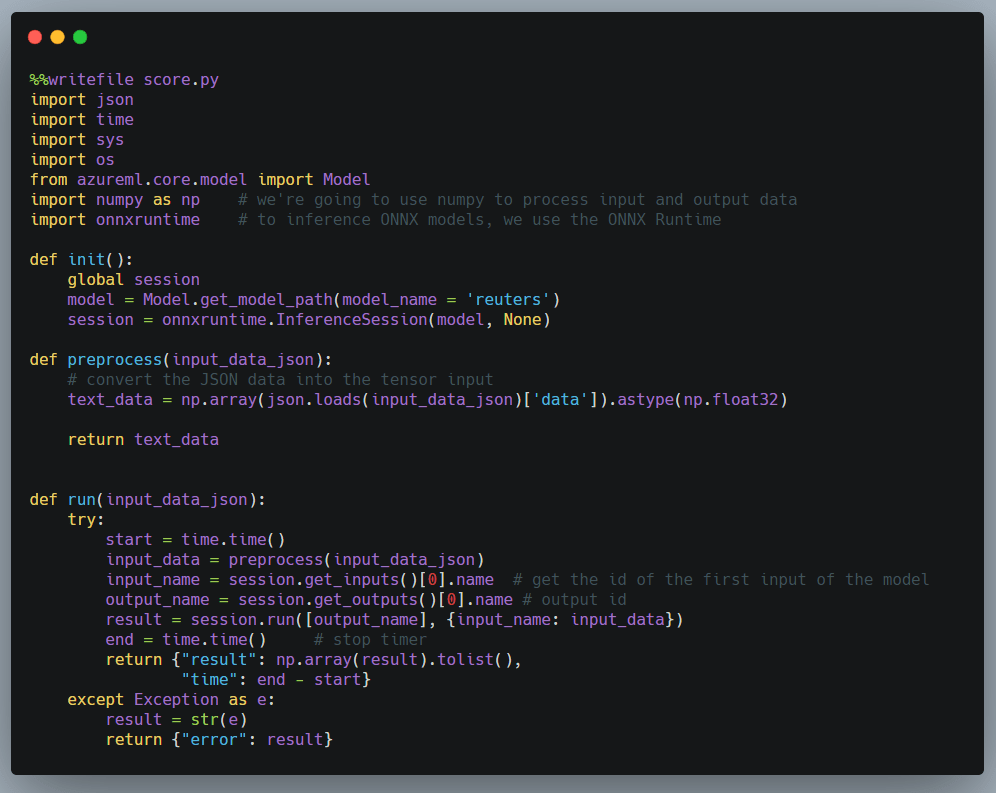
The scoring (or inference) container image is used to expose an API to predict categories of newswires. Obviously, you will need to give some instructions how scoring needs to be done. This is done via score.py:
score.py
The code is similar to the code we wrote earlier to test the ONNX model. score.py needs an init() and run() function. The other functions are helper functions. In init(), we need to grab a reference to the ONNX model. The ONNX model file will be placed in the container during the build process. Next, we start an InferenceSession via the ONNX runtime. In run(), the code is similar to our earlier example. It predicts via session.run and returns the result as JSON. We do not have to worry about the rest of the code that runs the API. That is handled by Machine Learning service.
Note: using ONNX is not a requirement; we could have persisted and used the native Keras model for instance
In this post, we only need score.py since we do not train our model via Azure Machine learning service. If you train a model with the service, you would create a train.py file to instruct how training should be done based on data in a storage account for instance. You would also provision compute resources for training. In our case, that is not required so we train, save and export the model directly from the notebook.
Training and scoring with Machine Learning service
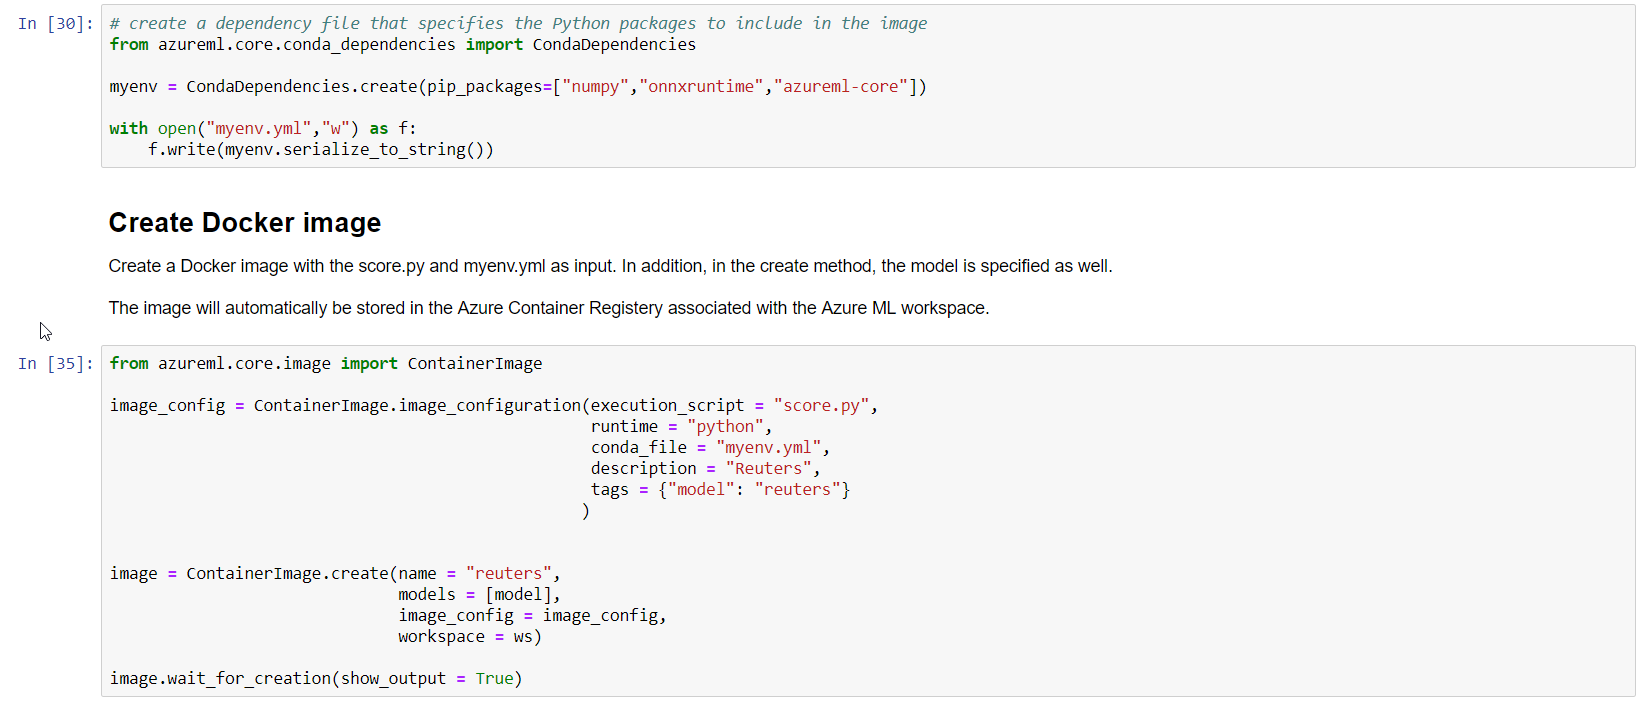
Now we need to create an environment file to indicate the required Python packages and start the image build process:
Create an environment yml file via the API and build the container
The build process is handled by the service and makes sure the model file is in the container, in addition to score.py and myenv.yml. The result is a fully functional container that exposes an API that takes an input (a newswire) and outputs an array of probabilities. Of course, it is up to you to define what the input and output should be. In this case, you are expected to provide a one-hot encoded article as input.
The container image will be listed in the workspace, potentially multiple versions of it:
Container images for the reuters ONNX model
Deploy to Azure Container Instances
When the image is ready, you can deploy it via the Machine Learning service to Azure Container Instances (ACI) or Azure Kubernetes Service (AKS). To deploy to ACI:
Deploying to ACI
When the deployment is finished, the deployment will be listed:
Deployment (ACI)
When you click on the deployment, the scoring URI will be shown (e.g. http://IPADDRESS:80/score). You can now use Postman or any other method to score an article. To quickly test the service from the notebook:
Testing the service
The helper method run of aci_service will post the JSON in test_sample to the service. It knows the scoring URI from the deployment earlier.
Conclusion
Containerizing a machine learning model and exposing it as an API is made surprisingly simple with Azure Machine learning service. It saves time so you can focus on the hard work of creating a model that performs well in the field. In this post, we used a sample dataset and a simple dense neural network to illustrate how you can build such a model, convert it to ONNX format and use the ONNX runtime for scoring.
In an earlier post, I discussed using a TensorFlow model from a Go application. With the TensorFlow bindings for Go, you can load a model that was exported with TensorFlow’s SavedModelBuilder module. That module saves a “snapshot” of a trained model which can be used for inference.
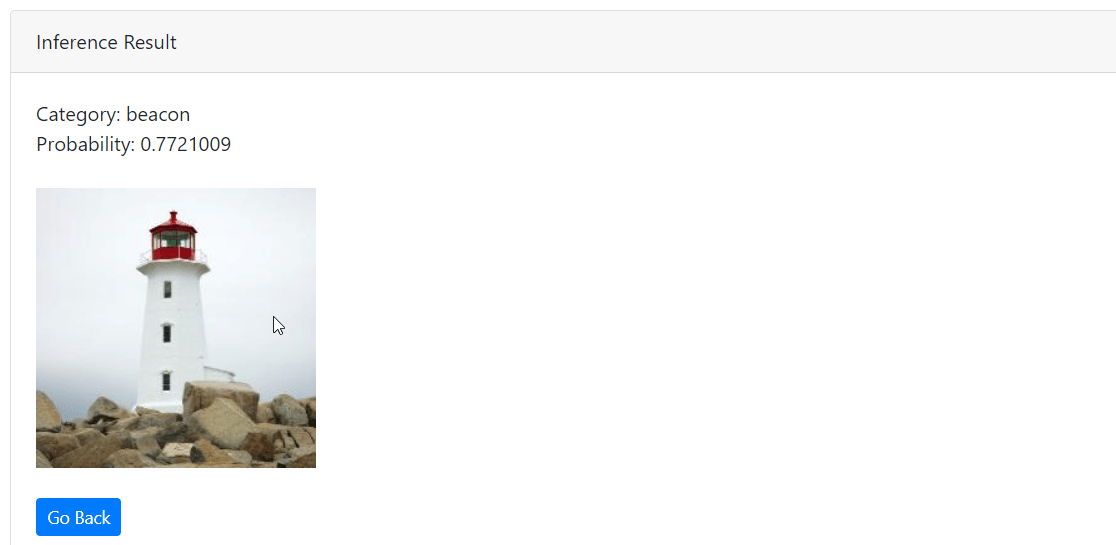
In this post, we will actually use the model in a web application. The application presents the user with a page to upload an image:
The upload page
The class and its probability is displayed, including the processed image:
Clearly a hen!
The source code of the application can be found at https://github.com/gbaeke/nasnet-go. If you just want to try the application, use Docker and issue the following command (replace port 80 with another port if there is a conflict):
docker run -p 80:9090 -d gbaeke/nasnet
The image is around 2.55GB in size so be patient when you first run the application. When the container has started, open your browser at http://localhost to see the upload page.
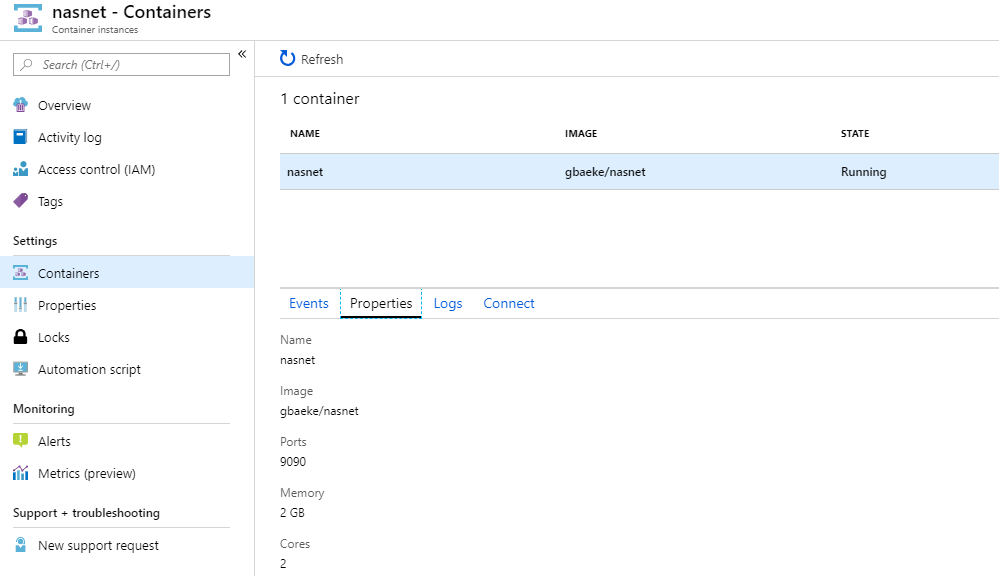
To quickly try it, you can run the container on Azure Container Instances. If you use the Portal, specify port 9090 as the container port.
Nasnet container in ACI
A closer look at the appN
**UPDATE**: since first publication, the http handler code was moved into from main.go to handlers/handlers.go
In the init() function, the nasnet model is loaded with tf.LoadSavedModel. The ImageNet categories are also loaded with a call to getCategories() and stored in categories which is a map of int to a string array.
In main(), we simply print the TensorFlow version (1.12). Next, http.HandleFunc is used to setup a handler (upload func) when users connect to the root of the web app.
Naturally, most of the logic is in the upload function. In summary, it does the following:
when users just navigate to the page (HTTP GET verb), render the upload.gtpl template; that template contains the upload form and uses a bit of bootstrap to make it just a bit better looking (and that’s already an overstatement); to learn more about Go web templates, see this link.
when users submit a file (POST), the following happens:
read the image
convert the image to a tensor with the getTensor function; getTensor returns a *tf.Tensor; the tensor is created from a [1][224][224][3] array; note that each pixel value gets normalized by subtracting by 127.5 and then dividing by 127.5 which is the same preprocessing applied as in Keras (divide by 127.5 and subtract 1)
run a session by inputting the tensor and getting the categories and probabilities as output
look for the highest probability and save it, together with the category name in a variable of type ResultPageData (a struct)
the struct data is used as input for the response.gtpl template
Note that the image is also shown in the output. The processed image (resized to 224×224) gets converted to a base64-encoded string. That string can be used in HTML image rendering as follows (where {{.Picture}} in the template will be replaced by the encoded string):
<img src="data:image/jpg;base64,{{.Picture}}">
Note that the application lacks sufficient error checking to gracefully handle the upload of non-image files. Maybe I’ll add that later! 😉
Containerization
To containerize the application, I used the Dockerfile from https://github.com/tinrab/go-tensorflow-image-recognition but removed the step that downloads the InceptionV3 model. My application contains a ready to use NasnetMobile model.
The container image is based on tensorflow/tensorflow:1.12.0. It is further modified as required with the TensorFlow C API and the installation of Go. As discussed earlier, I uploaded a working image on Docker Hub.
Conclusion
Once you know how to use TensorFlow models from Go applications, it is easy to embed them in any application, from command-line tools to APIs to web applications. Although this application does server-side processing, you can also use a model directly in the browser with TensorFlow.js or ONNX.js. For ONNX, try https://microsoft.github.io/onnxjs-demo/#/resnet50 to perform image classification with ResNet50 in the browser. You will notice that it will take a while to get started due to the model being downloaded. Once the model is downloaded, you can start classifying images. Personally, I prefer the server-side approach but it all depends on the scenario.
In earlier posts, I discussed hosting a deep learning model such as Resnet50 on Kubernetes or Azure Container Instances. The model can then be used as any API which receives input as JSON and returns a result as JSON.
Naturally, you can also run the model in offline scenarios and directly from your code. In this post, I will take a look at calling a TensorFlow model from Go. If you want to follow along, you will need Linux or MacOS because the Go module does not support Windows.
The virtual machine has all the required machine learning tools installed such as TensorFlow and Python. It also has Visual Studio Code. There are some extra requirements though:
Go: follow the instructions here to download and install Go
TensorFlow C API: follow the instructions here to download and install the C API; the TensorFlow package for Go requires this; it is recommended to also build and run the Hello from TensorFlow C program to verify that the library works (near the bottom of the instructions page)
After installing Go and the TensorFlow C API, install the TensorFlow Go package with the following command:
go get github.com/tensorflow/tensorflow/tensorflow/go
Test the package with go test:
go test github.com/tensorflow/tensorflow/tensorflow/go
The above command should return:
ok github.com/tensorflow/tensorflow/tensorflow/go 0.104s
The go get command installed the package in $HOME/go/src/github.com if you did not specify a custom $GOPATH (see this wiki page for more info).
Getting a model
A model describes how the input (e.g. an image for image classification) gets translated to an output (e.g. a list of classes with probabilities). The model contains thousands or even millions of parameters which means a model can be quite large. In this example, we will use NASNetMobile which can be used to classify images.
Now we need some code to save the model in TensorFlow format so that it can be used from a Go program. The code below is based on the sample code on the NASNetMobile page from modeldepot.io. It also does a quick test inference on a cat image.
import keras
from keras.applications.nasnet import NASNetMobile
from keras.preprocessing import image
from keras.applications.xception import preprocess_input, decode_predictions
import numpy as np
import tensorflow as tf
from keras import backend as K

sess = tf.Session()
K.set_session(sess)

model = NASNetMobile(weights="imagenet")
img = image.load_img('cat.jpg', target_size=(224,224))
img_arr = np.expand_dims(image.img_to_array(img), axis=0)
x = preprocess_input(img_arr)
preds = model.predict(x)
print('Prediction:', decode_predictions(preds, top=5)[0])

#save the model for use with TensorFlow
builder = tf.saved_model.builder.SavedModelBuilder("nasnet")

#Tag the model, required for Go
builder.add_meta_graph_and_variables(sess, ["atag"])
builder.save()
sess.close()
On the Ubuntu Data Science Virtual Machine, the above code should execute without any issues because all Python packages are already installed. I used the py35conda environment. Use activate py35 to make sure you are in that environment.
The above code results in a nasnet folder, which contains the saved_model.pb file for the graph structure. The actual weights are in the variables subfolder. In total, the nasnet folder is around 38MB.
Great! Now we need a way to use the model from our Go program.
Using the saved model from Go
The model can be loaded with the LoadSavedModel function of the TensorFlow package. That package is imported like so:
The above code simply tries to load the model from the nasnet folder. We also need to specify the tag.
Next, we need to load an image and convert the image to a tensor with the following dimensions [1][224][224][3]. This is similar to my earlier ResNet50 post.
Now we need to pass the tensor to the model as input, and retrieve the class predictions as output. The following code achieves this:
When you build a model, you can give names to tensors and operations. In this case the input tensor (of dimensions [1][224][224][3]) is called input_1 and needs to be specified as a map. The inference operation is called predictions/Softmax and the output needs to be specified as an array.
The actual predictions can be retrieved from the output variable:
predictions, ok := output[0].Value().([][]float32)
if !ok {
         log.Fatal(fmt.Sprintf("output has unexpected type %T", output[0].Value()))
}
If you are not very familiar with Go, the code above uses type assertion to verify that predictions is a 2-dimensional array of float32. If the type assertion succeeds, the predictions variable will contain the actual predictions: [[<probability class 1 (tench)>, <probability class 2 (goldfish)>, …]]
You can now simply find the top prediction(s) in the array and match them with the list of classes for NASNet (actually the ImageNet classes). I get the following output with a cat image:
Yep, it’s a tabby!
If you are wondering what image I used:
Tabby?
Conclusion
With Go’s TensorFlow bindings, you can load TensorFlow models from disk and use them for inference locally, without having to call a remote API. We used Python to prepare the model with some help from Keras.
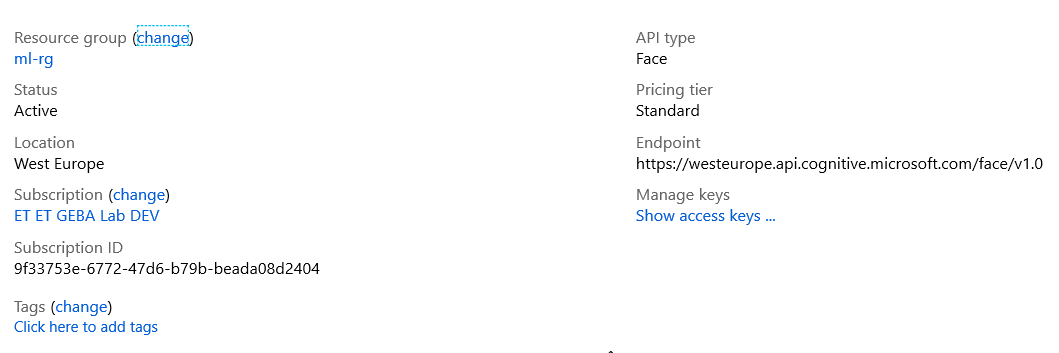
A few days ago, I obtained access to the Face container. It provides access to the Face API via a container you can run where you want: on your pc, at the network edge or in your datacenter. You should allocate 6 GB or RAM and 2 cores for the container to run well. Note that you still need to create a Face API resource in the Azure Portal. The container needs to be associated with the Azure Face API via the endpoint and access key:
Face API with a West Europe (Amsterdam) endpoint
I used the Standard tier, which charges 0.84 euros per 1000 calls. As noted, the container will not function without associating it with an Azure Face API resource.
When you gain access to the container registry, you can pull the container:
The container will start. You will see the output (–it):
Running Face API container
And here’s the spec:
API spec Face API v1
Before showing how to use the detection feature, note that the container needs Internet access for billing purposes. You will not be able to run the container in fully offline scenarios.
Over at https://github.com/gbaeke/msface-go, you can find a simple example in Go that uses the container. The Face API can take a byte stream of an image or a URL to an image. The example takes the first approach and loads an image from disk as specified by the -image parameter. The resulting io.Reader is passed to the getFace function which does the actual call to the API (uri = http://localhost:5000/face/v1.0/detect):
request, err := http.NewRequest("POST", uri+"?returnFaceAttributes="+params, m)
request.Header.Add("Content-Type", "application/octet-stream")

// Send the request to the local web service
resp, err := client.Do(request)
if err != nil {
    return "", err
}
The response contains a Body attribute and that attribute is unmarshalled to a variable of type interface. That one is marshalled with indentation to a byte slice (b) which is returned by the function as a string:
⚠️ IMPORTANT: the Face API container was retired early 2021. The container image is not available anymore.
In a previous post, I blogged about detecting emotions with the ONNX FER+ model. As an alternative, you can use cloud models hosted by major cloud providers such as Microsoft, Amazon and Google. Besides those, there are many other services to choose from.
To detect facial emotions with Azure, there is a Face API in two flavours:
Cloud: API calls are sent to a cloud-hosted endpoint in the selected deployment region
Container: API calls are sent to a container that you deploy anywhere, including the edge (e.g. IoT Edge device)
To use the container version, you need to request access via this link. In another blog post, I already used the Text Analytics container to detect sentiment in a piece of text.
Note that the container version is not free and needs to be configured with an API key. The API key is obtained by deploying the Face API in the cloud. Doing so generates a primary and secondary key. Be aware that the Face API container, like the Text Analytics container, needs connectivity to the cloud to ensure proper billing. It cannot be used in completely offline scenarios. In short, no matter the flavour you use, you need to deploy the Face API. It will appear in the portal as shown below:
Deployed Face API (part of Cognitive Services)
Using the API is a simple matter. An image can be delivered to the API in two ways:
Link: just provide a URL to an image
Octet-stream: POST binary data (the image’s bytes) to the API
In the Go example you can find on GitHub, the second approach is used. You simply open the image file (e.g. a jpg or png) and pass the byte array to the endpoint. The endpoint is in the following form for emotion detection:
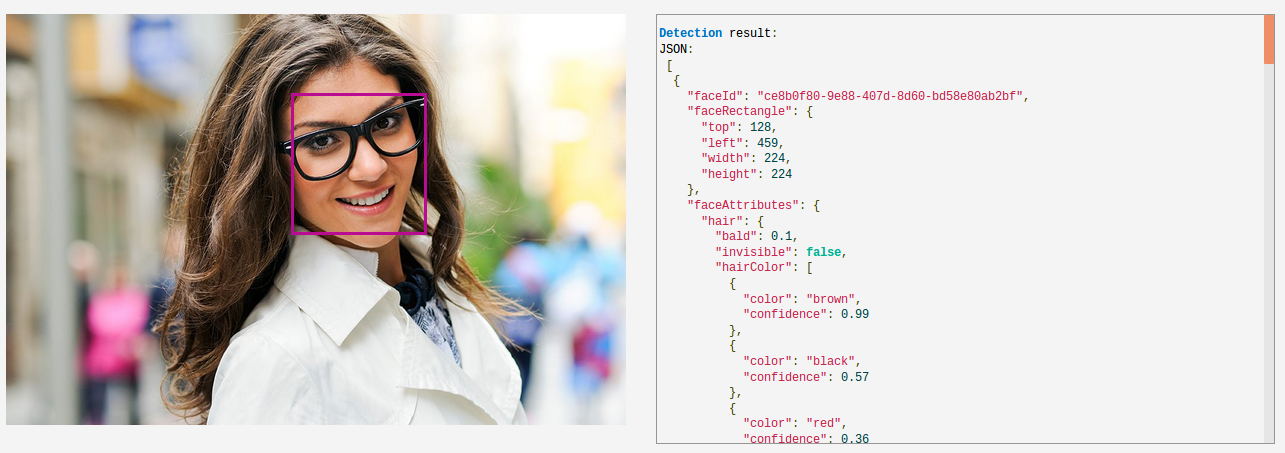
Instead of emotion, you can ask for other attributes or a combination of attributes: age, gender, headPose, smile, facialHair, glasses, emotion, hair, makeup, occlusion, accessories, blur, exposure and noise. You simply add them together with +’s (e.g. emotion+age+gender). When you add attributes, the cost per call will increase slightly as will the response time. With the additional attributes, the Face API is much more useful than the simple FER+ model. The Face API has several additional features such as storing and comparing faces. Check out the documentation for full details.
To detect emotion in a video, the sample at https://github.com/gbaeke/emotion/blob/master/main.go contains some commented out code in the import section and around line 100 so you can use the Face API via the github.com/gbaeke/emotion/faceapi/msface package’s GetEmotion() function instead of the GetEmotion() function in the code. Because we have the full webcam image and face in an OpenCV mat, some extra code is needed to serialize it to a byte stream in a format the Face API understands:
In the above example, the face region detected by OpenCV is encoded to a JPG format as a byte slice. The byte slice is simply converted to an io.Reader and handed to the GetEmotion() function in the msface package.
When you use the Face API to detect emotions in a video stream from a webcam (or a video file), you will be hitting the API quite hard. You will surely need the standard tier of the API which allows you to do 10 transactions per second. To add face and emotion detection to video, the solution discussed in Detecting Emotions in FER+ is a better option.
Continuing on that theme, I created a container image that uses the ONNX FER+ model that can detect emotions in an image. The container image also uses the ONNX Runtime for scoring.
You might wonder why you would want to detect emotions this way when there are many services available that can do this for you with a simple API call! You could use Microsoft’s Face API or Amazon’s Rekognition for example. While those services are easy to use and provide additional features, they do come at a cost. If all you need is basic detection of emotions, using this FER+ container is sufficient and cost effective.
Azure Face API (image from Microsoft website)
A notebook to create the image and deploy a container to Azure Container Instances (ACI) can be found here. The notebook uses the Azure Machine Learning SDK to register the model to an Azure Machine Learning workspace, build a container image from that model and deploy the container to ACI. The scoring script score.py is shown below.
score.py
The model expects an 64×64 gray scale image of a face in an array with the following dimensions: [1][1][64][64]. The output is JSON with a results array that contains the probabilities for each emotion and a time field with the inference time.
To actually capture the emotions, I wrote a small demo program in Go that uses OpenCV (via GoCV). You can find it on GitHub: https://github.com/gbaeke/emotion. You will need to install OpenCV and GoCV. Find the instructions here: https://gocv.io/getting-started/linux/. There are similar instructions for Mac and Windows but I have not tried those
The program is still a little rough around the edges but it does the trick. The scoring URI is hard coded to http://localhost:5002/score. With Docker installed, use the following command to install the scoring container:
To quickly go to the code, go here. Otherwise, keep reading…
In a previous blog post, I wrote about classifying images with the ResNet50v2 model from the ONNX Model Zoo. In that post, the container ran on a Kubernetes cluster with GPU nodes. The nodes had an NVIDIA v100 GPU. The actual classification was done with a simple Python script with help from Keras and Numpy. Each inference took around 25 milliseconds.
In this post, we will do two things:
run the scoring container (CPU) on a local machine that runs Docker
Note that in the previous post, Azure Machine Learning deployed two containers: the scoring container (the one described above) and a front-end container. In that scenario, the front-end container handles the HTTP POST requests (optionally with SSL) and route the request to the actual scoring container.
The scoring container accepts the same payload as the front-end container. That means it can be used on its own, as we are doing now.
Note that you can also use IoT Edge, as explained in an earlier post. That actually shows how easy it is to push AI models to the edge and use them locally, befitting your business case.
Scoring with Go
To actually classify images, I wrote a small Go program to do just that. Although there are some scientific libraries for Go, they are not really needed in this case. That means we do have to create the 4D tensor payload and interpret the softmax result manually. If you check the code, you will see that is not awfully difficult.
Remember that this model expects the input as a 4D tensor with the following dimensions:
dimension 0: batch (we only send one image here)
dimension 1: channels (one for each; RGB)
dimension 2: height
dimension 3: width
The 4D tensor needs to be serialized to JSON in a field called data. We send that data with HTTP POST to the scoring URI at http://localhost:5001/score.
The response from the container will be JSON with two fields: a result field with the 1000 softmax values and a time field with the inference time. We can use the following two structs for marshaling and unmarshaling
Input and output of the model
Note that this model expects pictures to be scaled to 224 by 224 as reflected by the height and width dimensions of the uint8 array. The rest of the code is summarized below:
read the image; the path of the image is passed to the code via the -image command line parameter
the 4D tensor is populated by iterating over all pixels of the image, extracting r,g and b and placing them in the BCHW array; note that the r,g and b values are uint16 and scaled to fit in a uint8
construct the input which is a struct of type InputData
marshal the InputData struct to JSON
POST the JSON to the local scoring URI
read the HTTP response and unmarshal the response in a struct of type OutputData
find the highest probability in the result and note the index where it was found
read the 1000 ImageNet categories from imagenet_class_index.json and marshal the JSON into a map of string arrays
print the category using the index with the highest probability and the map
What happens when we score the image below?
What is this thing?
Running the code gives the following result:
$ ./class -image images/cassette.jpg

Highest prob is 0.9981583952903748 at 481 (inference time: 0.3309464454650879 )
Probably  [n02978881 cassette
The inference time is 1/3 of a second on my older Linux laptop with a dual-core i7.
Try it yourself by running the container and the class program. Download it from here (Linux).