Using Bing Search to ground LLM responses

We often get the question to build an assistant based on the content of a website. These assistants often get implemented in one of two ways:

  • Turn-based chat assistant: user can ask a question and follow-up questions
  • Enhanced search: user asks a questions without the option to ask follow-up questions; this is often used to replace the built-in search functionalities of a website

In both cases, you have to make a decision about how to ground the LLM with your website content. There are several approaches:

  • Use the website’s content management system (CMS): extract the content from the CMS, chunk it optimally and store it in a vector database like Azure AI Search
  • Crawl the website and scrape the pages: the scraped content can then be chunked and vectorized just as in the first option
  • Use a search engine: use Google or Bing to search for answers and optionally scrape pages in real time

In the first two approaches, you need a pipeline and a vector database to properly store and update your vectorized chunks. It is often underestimated that creating and maintaining such a pipeline is a complex matter. You have to add new content, update existing content and remove content that is not required anymore. You need to run that pipeline on a schedule or based on user demand. You have to add proper logging to know when it goes wrong etc… It is a never ending story.

The search engine approach is much simpler and might be the easiest to implement, depending on your use case. Let’s take a look at how this works. We will look at two approaches:

  • Custom: call the Bing API from your code and use the output in your prompt; you have full control
  • Azure AI Agent Service: use the Bing grounding tool that is part of the knowledge tools of the agent service; the grounding tool is somewhat of a black box which means less control but easier to use

Calling the Bing API from your code

To use the Bing API and make it work on a subset of websites, you should use a Bing Custom Search resource in Azure:

Bing Custom Search in Azure

To customize the search, you can go to the instructions on Microsoft Learn. They explain how to go to the Bing custom search portal to create a custom search instance. The screenshot below shows a custom instance named baeke.info:

Bing Custom Search Instance

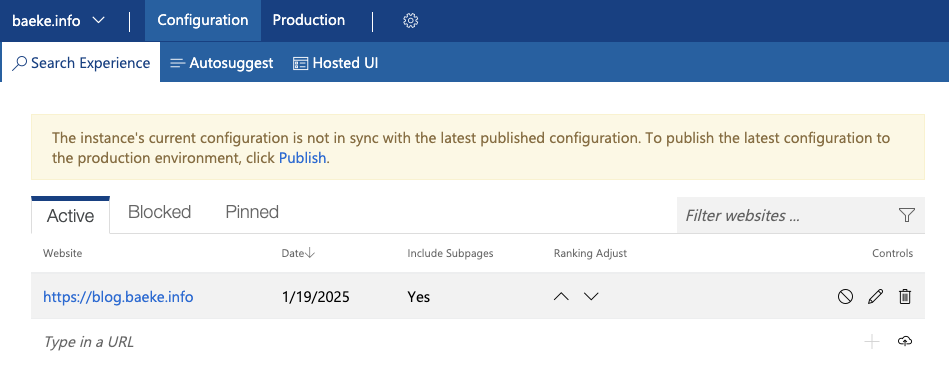
This custom instance contains my blog because I want the custom search resource to only return results from my blog and not any other website.

When you create a custom instance, you get a Custom Configuration ID you can provide to the search API. Ensure to publish the custom instance before using it in your code.

To search using a custom configuration ID, you can use the following code. I used the REST API below:

bing_endpoint = 'https://api.bing.microsoft.com/v7.0/custom/search'

headers = {
    'Ocp-Apim-Subscription-Key': bing_subscription_key
}
params = {
    'q': query,
    'customconfig': 'YOUR_CUSTOM_CONFIG_KEY',
    'mkt': 'en-US'
}
response = requests.get(bing_endpoint, headers=headers, params=params)
web_data = response.json()

The bing_subscription_keycan be found in your Bing Custom Search resource in Azure. The query q was provided by the user. The customconfig field is the custom configuration ID of the custom search instance.

The response, web_data, should contain a webPages field that has a value field. The value field is an array of search results. In each result is a url and a snippet field. The snippet should be relevant to the user’s query and can be used as grounding information. Below is the first result for the query “What is the OpenAI Assistants API” from my blog:

{
"id": "https://api.bing.microsoft.com/api/v7/#WebPages.0",
"name": "Using tools with the Azure OpenAI Assistants API – baeke.info",
"url": "https://atomic-temporary-16150886.wpcomstaging.com/2024/02/09/using-tools-with-the-azure-openai-assistants-api/",
"urlPingSuffix": "DevEx,5113.1",
"datePublished": "2024-02-09T00:00:00.0000000",
"datePublishedDisplayText": "9 Feb 2024",
"isFamilyFriendly": true,
"displayUrl": "https://atomic-temporary-16150886.wpcomstaging.com/2024/02/09/using-tools-with-the-azure-openai-assistants-api",
"snippet": "In this post, we will provide the assistant with custom tools. These custom tools use the function calling features of more recent GPT models. As a result, these custom tools are called functions in the Assistants API. What’s in a name right? There are a couple of steps you need to take for this to work: Create an assistant and give it a name ...",
"deepLinks": [],
"dateLastCrawled": "2025-01-14T18:08:00.0000000Z",
"openGraphImage": {
    "contentUrl": "https://i0.wp.com/atomic-temporary-16150886.wpcomstaging.com/wp-content/uploads/2024/02/dallc2b7e-2024-02-09-16.49.38-visualize-a-cozy-and-inviting-office-space-where-a-charming-ai-assistant-is-the-heart-of-interaction-taking-the-form-of-a-small-adorable-robot-with-.webp?resize=1200%2C1024&ssl=1",
    "width": 0,
    "height": 0
},
"fixedPosition": false,
"language": "en",
"isNavigational": true,
"noCache": true,
"siteName": "baeke.info"
}

Above, the first result is actually not the most relevant. However, the query returns 10 results by default and all 10 snippets can be provided as context to your LLM. Typically, a default search with 10 results takes under a second to complete.

Of course, the snippets are relatively short. They are snippets after all. If the snippets do not provide enough context, you can scrape one or more pages from the results and add that to your context.

To scrape web pages, you have several options:

  • Use a simple HTTP request: this if not sufficient to retrieve content from dynamic websites that use Javascript to load content; if the website is fully static, you can use this approach
  • Use scraping services: scraping services like Jina Reader (https://jina.ai/) or Firecrawl (https://www.firecrawl.dev/); although they have a free tier, most production applications will require paying extra for these services
  • Use open source solutions: there are many available solutions; Crawl4AI (https://crawl4ai.com/mkdocs/) is a service with many options; it is a bit harder to use and there are lots of dependencies because the crawler relies on headless browsers and tools like Playwright.

Below is a basic class that uses Jina to scrape URLs in parallel:

import os
import asyncio
import logging
import aiohttp
from typing import List, Dict, Any
from dotenv import load_dotenv

load_dotenv()

logging.basicConfig(level=logging.INFO, format='%(asctime)s - %(name)s - %(levelname)s - %(message)s')
logger = logging.getLogger(__name__)

class ParallelCrawler:
    def __init__(self, urls: List[str], max_concurrent: int = 3, api_key: str = None):
        logger.info(f"Initializing crawler with {len(urls)} URLs and max_concurrent={max_concurrent}")
        self.urls = urls
        self.max_concurrent = max_concurrent
        self.api_key = api_key or os.environ.get('JINA_API_KEY')
        self.base_url = 'https://r.jina.ai/'

    async def fetch_url(self, session: aiohttp.ClientSession, url: str) -> Dict[str, Any]:
        jina_url = f"{self.base_url}{url}"
        logger.debug(f"Fetching URL: {jina_url}")
        headers = {
            "Accept": "application/json",
            "Authorization": f"Bearer {self.api_key}",
            "X-Retain-Images": "none",
            "X-Return-Format": "markdown"
        }
        
        try:
            async with session.get(jina_url, headers=headers) as response:
                logger.info(f"Response status for {url}: {response.status}")
                if response.status != 200:
                    logger.error(f"Error fetching {url}: HTTP {response.status}")
                    return None
                return await response.json()
        except Exception as e:
            logger.error(f"Exception while fetching {url}: {str(e)}")
            raise

    async def crawl(self):
        logger.info(f"Starting parallel crawling of {len(self.urls)} URLs")
        all_results = []
        
        async with aiohttp.ClientSession() as session:
            tasks = []
            for url in self.urls:
                logger.debug(f"Creating task for URL: {url}")
                tasks.append(self.fetch_url(session, url))
            
            logger.info(f"Executing {len(tasks)} tasks concurrently")
            responses = await asyncio.gather(*tasks, return_exceptions=True)
            
            for i, response in enumerate(responses):
                if isinstance(response, Exception):
                    logger.error(f"Failed to process {self.urls[i]}: {response}")
                    continue
                if response and response.get('data'):
                    logger.info(f"Successfully processed {self.urls[i]}")
                    all_results.append(response['data']['content'])
                else:
                    logger.warning(f"No data returned for {self.urls[i]}")

        logger.info(f"Crawling complete. Processed {len(all_results)} URLs successfully")
        return all_results

    def run(self):
        logger.info("Starting crawler run")
        result = asyncio.run(self.crawl())
        logger.info("Crawler run completed")
        return result

With the combination of Bing snippets and, optionally, the full content from the top articles, you can create a prompt with the original user query and the context from Bing and scraping. Below is an example web app, that uses these features:

Answering questions about baeke.info

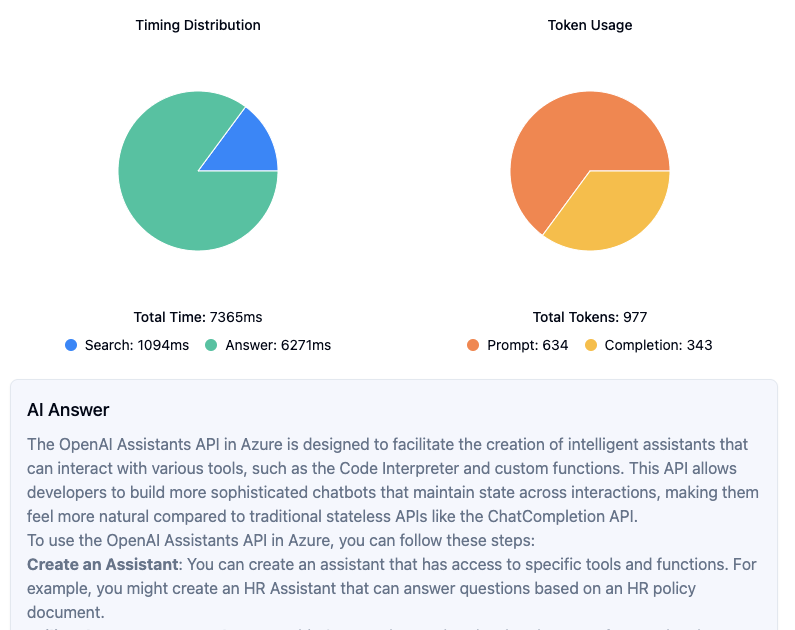
Above, fetch mode was enabled to add the full content of the first three Bing results to the prompt. The Bing search takes about a second. The time to answer, which includes scraping and an Azure OpenAI chat completion, takes quite a bit of time. Most of the time is consumed by the chat completion. Although you could optimize the scraper by introducing caching, that will only result in modest time savings.

The prompt is rather large because it contains markdown for three of my blog posts. If we limit the search to Bing only, the result is as follows:

Same query but answer only from Bing snippets

In this case, the answer is a bit more generic. The snippets contain information relevant to the query of the user but they do not contain enough information. This is especially true for more complex questions. The upside is faster speed and much less token consumption.

To keep the amount of tokens to a minimum, you could chunk the scraped websites in real time, filter out the relevant chunks using similarity metrics and only feed those chunks to the prompt. You can use the snippet to find relevant chunks or the user’s original query.

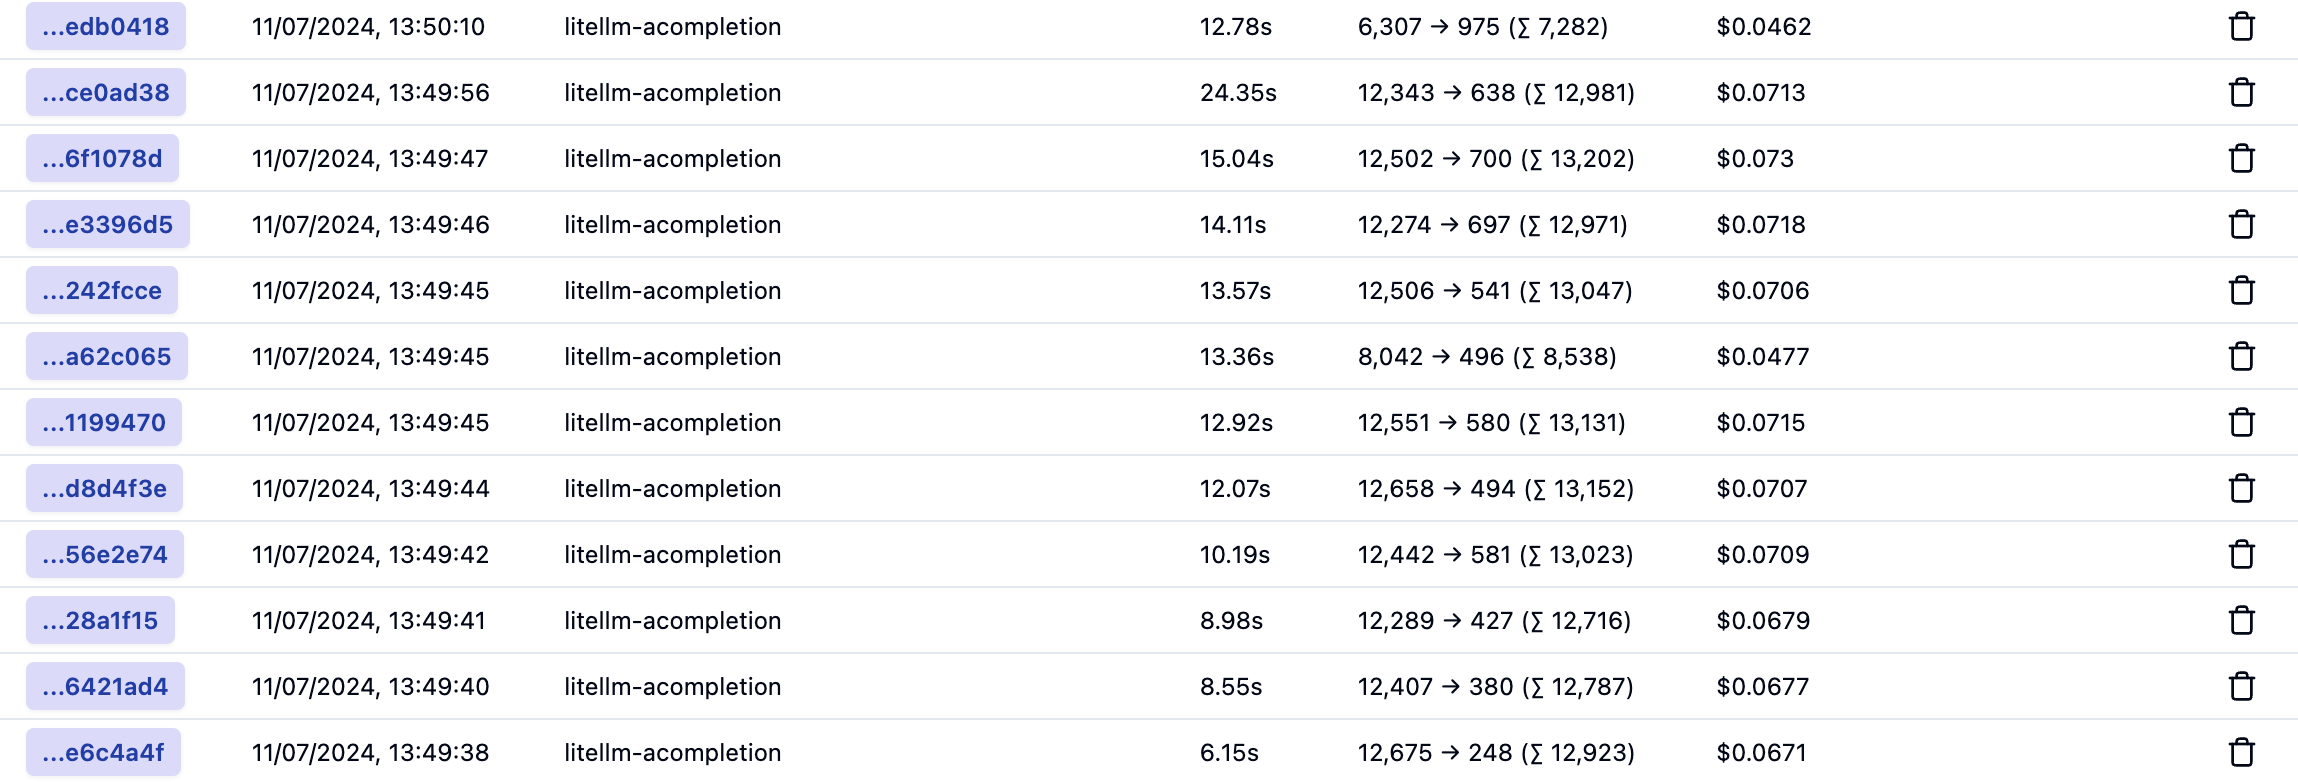
To really speed things up, you could implement prompt caching. The screenshot below shows the cache in action:

Answering from cache

In this case, we store previous questions and answers in Redis. When a new question comes in, we check if there are similar questions based on vector similarity. When the similarity score is above 0.95, a threshold we configure, we use the cache. Otherwise, we search, scrape and use OpenAI as before. Needless to say that this is very fast.

You need to write quite some code to implement the searching, scraping and caching features. The web application above uses this code via a web API you have to write and host yourself. Depending on your needs, there might be an easier solution by using the Azure AI Agent Service with built-in Bing grounding.

Using the Azure AI Agent Service with Bing Grounding

The new Azure AI Agent Service supports grounding with Bing Search out of the box as documented here: https://learn.microsoft.com/en-us/azure/ai-services/agents/how-to/tools/bing-grounding.

When you ask the agent a question by adding a message to a thread and running the thread, the agent will automatically use Bing to ground its answer.

It works by adding a Bing connection to an Azure AI Foundry project and providing the grounding tool to the agent. Take a look at the sample code below:

import os
from azure.ai.projects import AIProjectClient
from azure.identity import DefaultAzureCredential
from azure.ai.projects.models import BingGroundingTool
from dotenv import load_dotenv

load_dotenv()

project_client = AIProjectClient.from_connection_string(
    credential=DefaultAzureCredential(),
    conn_str=os.environ["PROJECT_CONNECTION_STRING"],
)

bing_connection = project_client.connections.get(
    connection_name=os.environ["BING_CONNECTION_NAME"]
)
conn_id = bing_connection.id

print(conn_id)

# Initialize agent bing tool and add the connection id
bing = BingGroundingTool(connection_id=conn_id)

# Create agent with the bing tool and process assistant run
with project_client:
    agent = project_client.agents.create_agent(
        model="gpt-4o-global",
        name="my-assistant",
        instructions="You are a helpful assistant",
        tools=bing.definitions,
        headers={"x-ms-enable-preview": "true"}
    )

Above, we connect to an Azure AI Foundry project with Entra ID. Next, we grab the connection identified by the value of the BING_CONNECTION_NAME environment variable. With the id of the connection, we can create the BingGroundingTool and add it to the tools property of our agent.

The advantage of this approach is that it is easy to use and configure. However, there are several drawbacks:

  • The tool does not surface all the URLs it found so you cannot display them nicely in a client application
  • It is currently not possible to provide a custom configuration key to search a subset of sites (e.g., only https://baeke.info for instance)

At the time of writing, the Azure AI Agent Service SDK was in preview so some or all of the drawbacks might be solved before or at general availability.

Sample implementation

You can find an easy to use example in this gist: https://gist.github.com/gbaeke/97afb88da56d59e1b6ca460653fc8700. To make it work, do the following:

  • In a new folder, save the script as app.py
  • Create a .env file with two environment variables: OPENAI_API_KEY, BING_API_KEY
  • Install packages: pip install fastapi python-dotenv uvicorn requests beautifulsoup4 openai sentence-transformers scikit-learn numpy
  • Run the api with python app.py

The example uses a simple chunking technique in addition to the all-MiniLM-L6-v2 SentenceTranformer to vectorize chunks and return the top 3 results to include in the OpenAI prompt’s context. To scrape web pages, we use a simple HTTP GET with BeautifulSoup. As discussed above, that will not yield good results with dynamic web pages. Most web pages will be fine though.

Conclusion

When you want to create an AI assistant or AI-based search feature based on a website using the site’s content, using Bing Search for grounding is one of the options. We discussed two approaches:

  • Fully custom code with the Bing custom search API
  • Azure AI Agents with the Bing grounding service

The first approach gives you full control over how you perform the search and process the results. You can rely on just the snippets provided by Bing or add the full content of the top URLs to your prompt with scraping. To improve response times you can add scrape caching or prompt caching. Prompt caching will provide you with almost instantaneous results when the prompt and answer was previously cached. You do not need to implement a pipeline to keep your vector database up-to-date.

Although built-in Bing grounding with the Azure AI Agent service is much easier, it has some limitations for the use case that I described. However, if you need to add general grounding to augment LLM responses, the Bing Grounding tool is definitely the one to go for. And although not discussed in this article, if you can use Copilot Studio, Bing grounding based on specific websites is available and is even easier to implement with just a few clicks!

Using WebRTC with the OpenAI Realtime API

In October 2024, OpenAI introduced the Realtime API. It enables developers to integrate low-latency, multimodal conversational experiences into their applications. It supports both text and audio inputs and outputs, facilitating natural speech-to-speech interactions without the need for multiple models.

It addresses the following problems:

  • Simplified Integration: Combines speech recognition, language processing, and speech synthesis into a single API call, eliminating the need for multiple models.
  • Reduced Latency: Streams audio inputs and outputs directly, enabling more natural and responsive conversational experiences.
  • Enhanced Nuance: Preserves emotional tone, emphasis, and accents in speech interactions.

If you have used Advanced Voice Mode in ChatGPT, the Realtime API offers a similar experience for developers to integrate into their applications.

The initial release of the API required WebSockets to support the continuous exchange of messages, including audio. Although that worked, using a protocol like WebRTC is much more interesting:

  • Low latency: WebRTC is optimized for realtime media like audio and video with features such as congestion control and bandwidth optimization built in
  • Proven in the real world: many applications use WebRTC, including Microsoft Teams, Google Meet and many more
  • Native support for audio streaming: compared to WebSockets, as a developer, you don’t have to handle the audio streaming part. WebRTC takes care of that for you.
  • Data channels: suitable for low-latency data exchange between peers; these channels are used to send and receive messages between yourself and the Realtime API.

In December 2024, OpenAI announced support for WebRTC in their Realtime API. It makes using the API much simpler and more robust.

Instead of talking about it, let’s look at an example.

Note: full source code is in https://github.com/gbaeke/realtime-webrtc. It is example code without features like user authentication, robust error handling, etc… It’s meant to get you started.

Helper API

To use the Realtime API from the browser, you need to connect to OpenAI with a token. You do not want to use your OpenAI token in the browser as that is not secure. Instead, you should have an API endpoint in a helper API that gets an ephemeral token. In app.py, the helper API, the endpoint looks as follows:

@app.get("/session")
async def get_session():
    async with httpx.AsyncClient() as client:
        response = await client.post(
            'https://api.openai.com/v1/realtime/sessions',
            headers={
                'Authorization': f'Bearer {OPENAI_API_KEY}',
                'Content-Type': 'application/json'
            },
            json={
                "model": "gpt-4o-realtime-preview-2024-12-17",
                "voice": "echo"
            }
        )
        return response.json()

Above, we ask the realtime’s API sessions endpoint for a session. The session includes the ephemeral token. You need an OpenAI key to ask for that session which is known to the helper API via an environment variable. Note the realtime model and voice are set as options. Other options, such as tools, temperature and others can be set here. In this example we will set some of these settings from the browser client by updating the session.

In index.html, the following JavaScript code is used to obtain the session. The ephemeral key or token is in client_secret.value:

const tokenResponse = await fetch("http://localhost:8888/session");
const data = await tokenResponse.json();
const EPHEMERAL_KEY = data.client_secret.value;

In addition to fetching a token via a session, the helper API has another endpoint called weather. The weather endpoint is called with a location parameter to get the current temperature at that location. This endpoint is called when the model detects a function call is needed. For example, when the user says “What is the weather in Amsterdam?”, code in the client will call the weather endpoint with Amsterdam as a parameter and provide the model with the results.

@app.get("/weather/{location}")
async def get_weather(location: str):
    # First get coordinates for the location
    try:
        async with httpx.AsyncClient() as client:
            # Get coordinates for location
            geocoding_response = await client.get(
                f"https://geocoding-api.open-meteo.com/v1/search?name={location}&count=1"
            )
            geocoding_data = geocoding_response.json()
            
            if not geocoding_data.get("results"):
                return {"error": f"Could not find coordinates for {location}"}
                
            lat = geocoding_data["results"][0]["latitude"]
            lon = geocoding_data["results"][0]["longitude"]
            
            # Get weather data
            weather_response = await client.get(
                f"https://api.open-meteo.com/v1/forecast?latitude={lat}&longitude={lon}&current=temperature_2m"
            )
            weather_data = weather_response.json()
            
            temperature = weather_data["current"]["temperature_2m"]
            return WeatherResponse(temperature=temperature, unit="celsius")
            
    except Exception as e:
        return {"error": f"Could not get weather data: {str(e)}"}

The weather API does not require authentication so we could have called it from the web client as well. I do not consider that a best practice so it is better to call an API separate from the client code.

The client

The client is an HTML web page with plain JavaScript code. The code to interact with the realtime API is all part of the client. Our helper API simply provides the ephemeral secret.

Let’s look at the code step-by-step. Full code is on GitHub. But first, here is the user interface:

The fabulous UI

Whenever you ask a question, the transcript of the audio response is updated in the text box. Only the responses are added, not the user questions. I will leave that as an exercise for you! πŸ˜‰

When you click the Start button, the init function gets called:

async function init() {
    startButton.disabled = true;
    
    try {
        updateStatus('Initializing...');
        
        const tokenResponse = await fetch("http://localhost:8888/session");
        const data = await tokenResponse.json();
        const EPHEMERAL_KEY = data.client_secret.value;

        peerConnection = new RTCPeerConnection();
        await setupAudio();
        setupDataChannel();

        const offer = await peerConnection.createOffer();
        await peerConnection.setLocalDescription(offer);

        const baseUrl = "https://api.openai.com/v1/realtime";
        const model = "gpt-4o-realtime-preview-2024-12-17";
        const sdpResponse = await fetch(`${baseUrl}?model=${model}`, {
            method: "POST",
            body: offer.sdp,
            headers: {
                Authorization: `Bearer ${EPHEMERAL_KEY}`,
                "Content-Type": "application/sdp"
            },
        });

        const answer = {
            type: "answer",
            sdp: await sdpResponse.text(),
        };
        await peerConnection.setRemoteDescription(answer);

        updateStatus('Connected');
        stopButton.disabled = false;
        hideError();

    } catch (error) {
        startButton.disabled = false;
        stopButton.disabled = true;
        showError('Error: ' + error.message);
        console.error('Initialization error:', error);
        updateStatus('Failed to connect');
    }
}

In the init function, we get the ephemeral key as explained before and then setup the WebRTC peer-to-peer connection. The setupAudio function creates an autoplay audio element and connects the audio stream to the peer-to-peer connection.

The setupDataChannel function sets up a data channel for the peer-to-peer connection and gives it a name. The name is oai-events. Once we have a data channel, we can use it to connect an onopen handler and add an event listener to handle messages sent by the remote peer.

Below are the setupAudio and setupDataChannel functions:

async function setupAudio() {
    const audioEl = document.createElement("audio");
    audioEl.autoplay = true;
    peerConnection.ontrack = e => audioEl.srcObject = e.streams[0];
    
    audioStream = await navigator.mediaDevices.getUserMedia({ audio: true });
    peerConnection.addTrack(audioStream.getTracks()[0]);
}

function setupDataChannel() {
    dataChannel = peerConnection.createDataChannel("oai-events");
    dataChannel.onopen = onDataChannelOpen;
    dataChannel.addEventListener("message", handleMessage);
}

When the audio and data channel is setup, we can now proceed to negotiate communication parameters between the two peers: your client and OpenAI. WebRTC uses the session description protocol (SDP) to do so. First, an offer is created describing the local peer capabilities like audio codecs etc… The offer is then sent to the server over at OpenAI. Authentication is with the ephemeral key. The response is a description of the remote peer’s capabilities, which is needed to complete the handshake process. With the handshake complete, the peers can now exchange audio and messages. The code below does the handshake:

const offer = await peerConnection.createOffer();
await peerConnection.setLocalDescription(offer);

const baseUrl = "https://api.openai.com/v1/realtime";
const model = "gpt-4o-realtime-preview-2024-12-17";
const sdpResponse = await fetch(`${baseUrl}?model=${model}`, {
    method: "POST",
    body: offer.sdp,
    headers: {
        Authorization: `Bearer ${EPHEMERAL_KEY}`,
        "Content-Type": "application/sdp"
    },
});

const answer = {
    type: "answer",
    sdp: await sdpResponse.text(),
};
await peerConnection.setRemoteDescription(answer);

The diagram below summarizes the steps:

Simplified overview of the setup process

What happens when the channel opens?

After the creation of the data channel, we set up an onopen handler. In this case, the handler does two things:

  • Update the session
  • Send an initial message

The session is updated with a description of available functions. This is very similar to function calling in the chat completion API. To update the session, you need to send a message of type session.update. The sendMessage helper functions sends messages to the remote peer:

function sendSessionUpdate() {
    const sessionUpdateEvent = {
        "event_id": "event_" + Date.now(),
        "type": "session.update",
        "session": {
            "tools": [{
                "type": "function",
                "name": "get_weather",
                "description": "Get the current weather. Works only for Earth",
                "parameters": {
                    "type": "object",
                    "properties": {
                        "location": { "type": "string" }
                    },
                    "required": ["location"]
                }
            }],
            "tool_choice": "auto"
        }
    };
    sendMessage(sessionUpdateEvent);
}

Although I added an event_id above, that is optional. In the session property we can update the list of tools and set the tool_choice to auto. In this case, that means that the model will select a function if it thinks it is needed. If you ask something like “What is the weather?”, it will first ask for a location and then indicate that the function get_weather needs to be called.

We also send an initial message when the channel opens. The message is of type conversation.item.create and says “MY NAME IS GEERT”.

Check the session update and conversation item code below:

function sendSessionUpdate() {
    const sessionUpdateEvent = {
        "event_id": "event_" + Date.now(),
        "type": "session.update",
        "session": {
            "tools": [{
                "type": "function",
                "name": "get_weather",
                "description": "Get the current weather. Works only for Earth",
                "parameters": {
                    "type": "object",
                    "properties": {
                        "location": { "type": "string" }
                    },
                    "required": ["location"]
                }
            }],
            "tool_choice": "auto"
        }
    };
    sendMessage(sessionUpdateEvent);
}

function sendInitialMessage() {
    const conversationMessage = {
        "event_id": "event_" + Date.now(),
        "type": "conversation.item.create",
        "previous_item_id": null,
        "item": {
            "id": "msg_" + Date.now(),
            "type": "message",
            "role": "user",
            "content": [{
                "type": "input_text",
                "text": "MY NAME IS GEERT"
            }]
        }
    };
    sendMessage(conversationMessage);
}

Note that the above is optional. Without that code, we could start talking with the model. However, it’s a bit more interesting to add function calling to the mix. That does mean we have to check incoming messages from the data channel to find out if we need to call a function.

Handling messages

The function handleMessage is called whenever a new message is sent on the data channel. In that function, we log all messages and check for a specific type of message: response.done.

We do two different things:

  • if there is a transcript of the audio: display it
  • if the response is a function call, handle the function call

To handle the function call, we check the payload of the response for an output of type function_call and also check the function name and call_id of the message that identified the function call in the first place.

If the function with name get_weather is identified, the weather endpoint of the API is called and the response is sent to the model.

The message handler is shown below:

function handleMessage(event) {
    try {
        const message = JSON.parse(event.data);
        console.log('Received message:', message);
        
        switch (message.type) {
            case "response.done":
                handleTranscript(message);
                const output = message.response?.output?.[0];
                if (output) handleFunctionCall(output);
                break;
            default:
                console.log('Unhandled message type:', message.type);
        }
    } catch (error) {
        showError('Error processing message: ' + error.message);
    }
}

The function call check is in handleFunctionCall:

function handleFunctionCall(output) {
    if (output?.type === "function_call" && 
        output?.name === "get_weather" && 
        output?.call_id) {
        console.log('Function call found:', output);
        handleWeatherFunction(output);
    }
}

You can check the full source code for the code of handleWeatherFunction and its helpers sendFunctionOutput and sendResponseCreate. They are responsible for:

  • parsing the arguments from the function call output and calling the API
  • sending the output of the function back to the model and linking it to the message that identified the function call in the first place
  • getting a response from the model to tell us about the result of the function call

Conclusion

With WebRTC support, a W3C standard, it has become significantly easier to utilize the OpenAI Realtime API from a browser that natively supports it. All widely recognized desktop and mobile browsers, including Chrome, Safari, Firefox, and Edge, provide WebRTC capabilities.

WebRTC has become the preferred method for browser-based realtime API usage. WebSockets are exclusively recommended for server-to-server applications.

The advent of WebRTC has the potential to catalyze the development of numerous applications that leverage this API. What interesting applications do you intend to build?

Create a Copilot declarative agent that calls an API with authentication

In a previous post, we looked at creating a Copilot declarative agent. The agent had one custom action that called the JSONPlaceholder API. Check that post for an introduction to what these agents can do. Using a dummy, unauthenticated API is not much fun so let’s take a look at doing the same for a custom API that requires authentication.

Python API with authentication

The API we will create has one endpoint: GET /sales. It’s implemented as follows:

@app.get("/sales/", dependencies=[Depends(verify_token)])
async def get_sales():
    """
    Retrieve sales data.
    Requires Bearer token authentication.
    """
    return {
        "status": "success",
        "data": generate_sample_sales_data()
    }

The data is generated by the generate_sample_sales_data function. It just generates random sales data. You can check the full code on GitHub. The important thing here is that we use bearer authentication with a key.

When I hit the /sales endpoint with a wrong key, a 401 Unauthorized is raised:

401 Unauthorized (via REST client VS Code plugin)

With the correct key, the /sales endpoint returns the random data:

GET /sales returns random data

Running the API

To make things easy, we will run the API on the local machine and expose it with ngrok. Install ngrok using the instructions on their website. If you cloned the repo, go to the api folder and run the commands below. Run the last command from a different terminal window.

pip install -r requirements.txt
python app.py
ngrok http 8000

Note: you can also use local port forwarding in VS Code. I prefer ngrok but if you do not want to install it, simply use the VS Code feature.

In the terminal where you ran ngrok, you should see something like below:

ngrok tunnel is active

Ngrok has a nice UI to inspect the calls via the web interface at http://localhost:4040:

ngrok web interface

Before continuing, ensure that the ngrok forwarding URL (https://xyz.ngrok-free.app) responds when you hit the /sales endpoint.

Getting the OpenAPI document

When you create a FastAPI API, it generates OpenAPI documentation that describes all the endpoints. The declarative agent needs that documentation to configure actions.

For the above API, that looks like below. Note that this is not the default document. It was changed in code.

{
  "openapi": "3.0.0",
  "info": {
    "title": "Sales API",
    "description": "API for retrieving sales data",
    "version": "1.0.0"
  },
  "paths": {
    "/sales/": {
      "get": {
        "summary": "Get Sales",
        "description": "Retrieve sales data.\nRequires Bearer token authentication.",
        "operationId": "get_sales_sales__get",
        "responses": {
          "200": {
            "description": "Successful Response",
            "content": {
              "application/json": {
                "schema": {

                }
              }
            }
          }
        }
      }
    },
    "/": {
      "get": {
        "summary": "Root",
        "description": "Root endpoint - provides API information",
        "operationId": "root__get",
        "responses": {
          "200": {
            "description": "Successful Response",
            "content": {
              "application/json": {
                "schema": {

                }
              }
            }
          }
        }
      }
    }
  },
  "components": {
    "securitySchemes": {
      "BearerAuth": {
        "type": "http",
        "scheme": "bearer"
      }
    }
  },
  "servers": [
    {
      "url": "https://627d-94-143-189-241.ngrok-free.app",
      "description": "Production server"
    }
  ]
}

The Teams Toolkit requires OpenAPI 3.0.x instead of 3.1.x. By default, recent versions of FastAPI generate 3.1.x docs. You can change that in the API’s code by adding the following:

def custom_openapi():
    if app.openapi_schema:
        return app.openapi_schema
    
    openapi_schema = get_openapi(
        title="Sales API",
        version="1.0.0",
        description="API for retrieving sales data",
        routes=app.routes,
    )
    
    # Set OpenAPI version
    openapi_schema["openapi"] = "3.0.0"
    
    # Add servers
    openapi_schema["servers"] = [
        {
            "url": "https://REPLACE_THIS.ngrok-free.app",  # Replace with your production URL
            "description": "Production server"
        }
    ]
    
    # Add security scheme
    openapi_schema["components"] = {
        "securitySchemes": {
            "BearerAuth": {
                "type": "http",
                "scheme": "bearer"
            }
        }
    }
    
    # Remove endpoint-specific security requirements
    for path in openapi_schema["paths"].values():
        for operation in path.values():
            if "security" in operation:
                del operation["security"]
    
    app.openapi_schema = openapi_schema
    return app.openapi_schema

app.openapi = custom_openapi

In the code, we switch to OpenAPI 3.0.0, add our server (the ngrok forwarding URL), add the security scheme and more. Now, when you go to https://your_ngrok_url/openapi.json, the JSON shown above should be returned.

Creating the Copilot Agent

Now we can create a new declarative agent like we did in the previous post. When you are asked for the OpenAPI document, you can retrieve it from the live server via the ngrok forwarding URL.

After creating the agent, declarativeAgent.json should contain the following action:

"actions": [
    {
        "id": "action_1",
        "file": "ai-plugin.json"
    }

In ai-plugin.json, in functions and runtimes, you should see the function description and a reference to the OpenAPI operation.

That’s all fine but of course, but the API will not work because a key needs to be provided. You create the key in the Teams developer portal at https://dev.teams.microsoft.com/tools:

Adding an API key for Bearer auth

You create the key by clicking New API key and filling in the form. Ensure you add a key that matches the key in the API. Also ensure that the URL to your API is correct (the ngrok forwarding URL). With an incorrect URL, the key will not be accepted.

Now we need to add a reference to the key. The agent can use that reference to retrieve the key and use it when it calls your API. Copy the key’s registration ID and then open ai-plugin.json. Add the following to the runtimes array:

"runtimes": [
    {
        "type": "OpenApi",
        "auth": {
            "type": "ApiKeyPluginVault",
            "reference_id": "KEY_REGISTRATION_ID"
        },
        "spec": {
            "url": "apiSpecificationFile/openapi.json"
        },
        "run_for_functions": [
            "get_sales_sales__get"
        ]
    }
]

The above code ensures that HTTP bearer authentication is used with the stored key when the agent calls the get_sales_sales__get endpoint.

Now you are ready to provision your agent. After provisioning, locate the agent in Teams:

Find the agent

Now either use a starter (if you added some; above that is (2)) or type the question in the chat box.

Getting laptop sales in 2024

Note that I did not do anything fancy with the adaptive card. It just says success.

If you turned on developer mode in Copilot, you can check the raw response:

Viewing the raw response, right from within Microsoft 365 Chat

Conclusion

In this post, we created a Copilot agent that calls a custom API secured with HTTP bearer authentication. The “trick” to get this to work is to add the key to the Teams dev portal and reference it in the json file that defines the API call.

HTTP bearer authentication is the easiest to implement. In another post, we will look at using OAuth to protect the API. There’s a bit more to that, as expected.

Creating a Copilot declarative agent with VS Code and the Teams Toolkit

If you are a Microsoft 365 Copilot user, you have probably seen that the words “agent” and “Copilot agent” are popping up here and there. For example, if you chat with Copilot there is an Agents section in the top right corner:

Copilot Chat with agents

Above, there is a Visual Creator agent that’s built-in. It’s an agent dedicated to generating images. Below Visual Creator, there are agents deployed to your organisation and ways to add and create agents.

A Copilot agent in this context, runs on top of Microsoft 365 Copilot and uses the Copilot orchestrator and underlying model. An agent is dedicated to a specific task and has the following properties. Some of these properties are optional:

  • Name: name of the agent
  • Description: you guessed it, the description of the agent
  • Instructions: instructions for the agent about how to do its work and respond to the user; you can compare this to a system prompt you give an LLM to guide its responses
  • Conversation starters: prompts to get started like the Learn More and Generate Ideas in the screenshot above
  • Documents: documents the agent can use to provide the user with answers; this will typically be a SharePoint site or a OneDrive location
  • Actions: actions the agents can take to provide the user with an answer; these actions will be API calls that can fetch information from databases, create tickets in a ticketing system and much more…

There are several ways to create these agents:

  • Start from SharePoint and create an agent based on the documents you select
  • Start from Microsoft 365 Copilot chat
  • Start from Copilot Studio
  • Start from Visual Studio Code

Whatever you choose, you are creating the agent declaratively. You do not have to write code to create the agent. Depending on the tool you use, not all capabilities are exposed. For example, if you want to add actions to your agent, you need Copilot Studio or Visual Studio Code. You could start creating the agent from SharePoint and then add actions with Copilot Studio.

In this post, we will focus on creating a declarative agent with Visual Studio Code.

Getting Started

You need Visual Studio Code or a compatible editor and add the Teams Toolkit extension. Check Microsoft Learn to learn about all requirements. After installing it in VS Code, click the extension. You will be presented with the options below:

Teams Toolkit extension in VS Code

To create a declarative agent, click Create a New App. Select Copilot Agent.

Copilot Agent in Teams Toolkit

Next, select Declarative Agent. You will be presented with the choices below:

Creating an agent with API plugin so we can call APIs

To make this post more useful, we will add actions to the agent. Although the word “action” is not mentioned above, selecting Add plugin will give us that functionality.

We will create our actions from an OpenAPI 3.0.x specification. Select Start with an OpenAPI Description Document as shown below.

When you select the above option, you can either:

  • Use a URL that returns the OpenAPI document
  • Browse for an OpenAPI file (json or yaml) on your file system

I downloaded the OpenAPI specification for JSON Placeholder from https://arnu515.github.io/jsonplaceholder-api-docs/. JSON Placeholder is an online dummy API that provides information about blog posts. After downloading the OpenAPI spec, browse for the swagger.json file via the Browse for an OpenAPI file option. In the next screen, you can select the API operations you want to expose:

Select the operations you want the agent to use

I only selected the GET /posts operation (getPosts). Next, you will be asked for a folder location and a name for your project. I called mine DemoAgent. After specifying the name, a new VS Code window will pop up:

Declarative Agent opens in a new Window

You might get questions about installing additional extensions and even to provision the app.

How does it work?

Before explaining some of the internals, let’s look at the end result in Copilot chat. Below is the provisioned app, provisioned only to my own account. This is the app as created by the extension, without modifications on my part.

Agent in Copilot Chat; sample API we use returns Latin πŸ˜‰

Above, I have asked for three posts. Copilot matches my intent to the GET /posts API call and makes the call. The JSONPlaceholder API does not require authentication so that’s easy. Authentication is supported but that’s for another post. If it’s the first time the API is used, you will be asked for permission to use it.

In Copilot, I turned on developer mode by typing -developer on in the chat box. When you click Show plugin developer info, you will see something like the below screenshot:

Copilot developer mode

Above, the Copilot orchestrator has matched the function getPosts from the DemoAgent plugin. Plugin is just the general name for Copilot extensions that can perform actions (or functions). Yes, naming is hard. The Copilot orchestrator selected the getPosts function to execute. The result was a 200 OK from the underlying API. If you click the 200 OK message, you see the raw results returned from the API.

Now let’s look at some of the files that are used to create this agent. The main file, from the agent’s point of view, is declarativeAgent.json in the appPackage folder. It contains the name, description, instructions and actions of the agent:

{
    "$schema": "https://developer.microsoft.com/json-schemas/copilot/declarative-agent/v1.0/schema.json",
    "version": "v1.0",
    "name": "DemoAgent",
    "description": "Declarative agent created with Teams Toolkit",
    "instructions": "$[file('instruction.txt')]",
    "actions": [
        {
            "id": "action_1",
            "file": "ai-plugin.json"
        }
    ]
}

The instructions property references another file which contains the instructions for the agent. One of the instructions is: You should start every response and answer to the user with “Thanks for using Teams Toolkit to create your declarative agent!”. That’s the reason why my question had that in the response to start with.

Of course, the actions are where the magic is. You can provide your agent with multiple actions. Here, we only have one. These actions are defined in a file that references the OpenAPI spec. Above, that file is ai-plugin.json. This file tells the agent what API call to make. It contains a functions array with only one function in this case: getPosts. It’s important you provide a good description for the function because Copilot selects the function to call based on its description. See the Matched functions list in the plugin developer info section.

Below the functions array is a runtimes array. It specifies what operation to call from the referenced OpenAPI specification. In here, you also specify the authentication to the API. In this case, the auth type is None but agents support HTTP bearer authentication with a simple key or OAuth.

Here’s the entire file:

{
    "$schema": "https://developer.microsoft.com/json-schemas/copilot/plugin/v2.1/schema.json",
    "schema_version": "v2.1",
    "name_for_human": "DemoAgent",
    "description_for_human": "Free fake API for testing and prototyping.",
    "namespace": "demoagent",
    "functions": [
        {
            "name": "getPosts",
            "description": "Returns all posts",
            "capabilities": {
                "response_semantics": {
                    "data_path": "$",
                    "properties": {
                        "title": "$.title",
                        "subtitle": "$.id"
                    },
                    "static_template": {
                        "type": "AdaptiveCard",
                        "$schema": "http://adaptivecards.io/schemas/adaptive-card.json",
                        "version": "1.5",
                        "body": [
                            {
                                "type": "TextBlock",
                                "text": "id: ${if(id, id, 'N/A')}",
                                "wrap": true
                            },
                            {
                                "type": "TextBlock",
                                "text": "title: ${if(title, title, 'N/A')}",
                                "wrap": true
                            },
                            {
                                "type": "TextBlock",
                                "text": "body: ${if(body, body, 'N/A')}",
                                "wrap": true
                            },
                            {
                                "type": "TextBlock",
                                "text": "userId: ${if(userId, userId, 'N/A')}",
                                "wrap": true
                            }
                        ]
                    }
                }
            }
        }
    ],
    "runtimes": [
        {
            "type": "OpenApi",
            "auth": {
                "type": "None"
            },
            "spec": {
                "url": "apiSpecificationFile/openapi.json"
            },
            "run_for_functions": [
                "getPosts"
            ]
        }
    ],
    "capabilities": {
        "localization": {},
        "conversation_starters": [
            {
                "text": "Returns all posts"
            }
        ]
    }
}

As you can see, you can also control how the agent responds by providing an adaptive card. Teams toolkit decided on the format above based on the API specification and the data returned by the getPosts operation. In this case, the card looks like this:

Addaptive card showing the response from the API: id, title, body and userId of the fake blog post

Adding extra capabilities

You can add conversation starters to the agent in declarativeAgent.json. They are shown in the opening screen of your agent:

Conversation Starters

These starters are added to declarativeAgent.json:

{
    "$schema": "https://developer.microsoft.com/json-schemas/copilot/declarative-agent/v1.0/schema.json",
    "version": "v1.0",
    "name": "DemoAgent",
    "description": "Declarative agent created with Teams Toolkit",
    "instructions": "$[file('instruction.txt')]",
    "actions": [
        ...
    ],
    "conversation_starters": [
    {
        "title": "Recent posts",
        "text": "Show me recent posts"
    },
    {
        "title": "Last post",
        "text": "Show me the last post"
    }
]
}

In addition to conversation starters, you can also enable web searches. Simply add the following to the file above,

"capabilities": [
    {
        "name": "WebSearch"
    }
]

With this feature enabled, the agent can search the web for answers via Bing. It will do so when it thinks it needs to or when you tell it to. For instance: “Search the web for recent news about AI” gets you something like this:

Agent with WebSearch turned on

In the plugin developer info, you will see that none of your functions were executed. Developer info does not provide additional information about the web search.

Next to starter prompts and WebSearch, here are some of the other things you can do:

  • Add OneDrive and SharePoint content: extra capability with name OneDriveAndSharePoint; the user using the agent needs access to these files or they cannot be used to generate an answer
  • Add Microsoft Graph Connectors content: extra capability with name GraphConnectors; Graph Connectors pull in data from other sources in Microsoft Graph; by specifying the connector Ids, that data can then be retrieved by the agent

More information about the above settings can be found here: https://learn.microsoft.com/en-us/microsoft-365-copilot/extensibility/declarative-agent-manifest.

Provisioning

To provision the agent just for you, open VS Code’s command palette and search for Teams: Provision. You will be asked to log on to Microsoft 365. When all goes well, you should see the messages below in the Output pane:

Output after provisioning an app

If you are familiar with app deployment to Teams in general, you will notice that this is the same.

When the app is provisioned, it should appear in the developer portal at https://dev.teams.microsoft.com/apps:

DemoAgent in the Teams dev portal

Note that the extension adds dev to the agent when you provision the app. When you publish the app, this is different. You can also see this in VS Code in the build folder:

App package for provisioning in VS Code

Note: we did not discuss the manifest.json file which is used to configure the Teams app as a whole. Use it to set developer info, icons, name, description and more.

There are more steps to take to publish the app and make it available to your organisation. See https://learn.microsoft.com/en-us/microsoftteams/platform/toolkit/publish for more information

Conclusion

The goal of this blogpost was to show how easy it is to create a declarative agent on top of Microsoft 365 Copilot in VS Code. Remember that these agents use the underlying Copilot orchestrator and model and that is something you cannot change. If you need more freedom (e.g., control over LLM, its parameters, advanced prompting techniques etc…) and you want to create such an app in Teams, there’s always the Custom Engine Agent.

Declarative agents don’t require you to code although you do need to edit multiple files to get it to work?

In a follow-up post, we will take a look at adding a custom API with authentication. I will also show you how to easily add additional actions to an agent without too much manual editing. Stay tuned!

Writing an multi-service document extractor with the help of Diagrid’s Catalyst

Many enterprises have systems in place that take documents, possibly handwritten, that contain data that needs to be extracted. In this post, we will create an application that can extract data from documents that you upload. We will make use of an LLM, in this case gpt-4o. We will use model version 2024-08-06 and its new structured output capabilities. Other LLMs can be used as well.

The core of the application is illustrated in the diagram below. The application uses more services than in the diagram. We will get to them later in this post.

Application Diagram

Note: the LLM-based extraction logic in this project is pretty basic. In production, you need to do quite a bit more to get the extraction just right.

The flow of the application is as follows:

  • A user or process submits a document to the upload service. This can be a pdf but other formats are supported as well.
  • In addition to the document, a template is specified by name. A template contains the fields to extract, together with their type (str, bool, float). For example: customer_name (str), invoice_total (float).
  • The upload service uploads the document to an Azure Storage account using a unique filename and preserves the extension.
  • The upload service publishes a message to a topic on a pub/sub message broker. The message contains data such as the document url and the name of the template.
  • The process service subscribes to the topic on the message broker and retrieves the message.
  • It downloads the file from the storage account and sends it to Azure Document Intelligence to convert it to plain text.
  • Using a configurable extractor, an LLM is used to extract the fields in the template from the document text. The sample code contains an OpenAI and a Groq extractor.
  • The extracted fields are written to a configurable output handler. The sample code contains a CSV and JSONL handler.

In addition to a pub-sub broker, templates are stored in a state store. The upload service is the only service that interfaces with the state store. It provides an HTTP method that the process service can use to retrieve a template from the state store.

To implement pub-sub, the state store and method invocations, we will use Diagrid’s Catalyst instead of doing this all by ourselves.

What is Catalyst?

If you are familiar with Dapr, the distributed application runtime, Catalyst will be easy to understand. Catalyst provides you with a set of APIs, hosted in the cloud and compatible with Dapr to support you in building cloud-native, distributed applications. It provides several building blocks. The ones we use are below:

  • request/reply: to support synchronous communication between services in a secure fashion
  • publish/subscribe: to support asynchronous communication between services using either a broker provided by Catalyst or other supported brokers like Azure Service Bus
  • key/value: allows services to save state in a key/value store. You can use the state store provided by Catalyst or other supported state stores like Azure Cosmos DB or an Azure Storage Account

The key to these building blocks is that your code stays the same if you swap the underlying message broker or key/value store. For example, you can start with Catalyst’s key/value store and later switch to Cosmos DB very easily. There is no need to add Cosmos DB libraries to your code. Catalyst will handle the Cosmos DB connectivity for you.

Important: I am referring mainly to Azure services here but Catalyst (and Dapr) support many services in other clouds as well!

Note that you do not need to install Dapr on your local machine or on platforms like Kubernetes when you use Catalyst. You only use the Dapr SDKs in your code and, when configured to do so, the SDK will connect to the proper APIs hosted in the cloud by Catalyst. In fact, you do not even need an SDK because the APIs can be used with plain HTTP or GRPC. Of course, using an SDK makes things a lot easier.

If you want to learn more about Catalyst, take a look at the following playlist: https://www.youtube.com/watch?v=7D7rMwJEMsk&list=PLdl4NkEiMsJscq00RLRrN4ip_VpzvuwUC. Lots of good stuff in there!

By doing all of the above in Catalyst we have a standardised approach that remains the same no matter the service behind it. We also get implementation best practices, for example for pub/sub. In addition, we are also provided with golden metrics and a UI to see how the application performs. All API calls are logged to aid in troubleshooting.

Let’s now take a look at the inner loop development process!

Scaffolding a new project

You need to sign up for Catalyst first. At the time of writing, Catalyst was in preview and not supported for production workloads. When you have an account, you should install the Diagrid CLI. The CLI is not just for Catalyst. It’s also used with Diagrid’s other products, such as Conductor.

With the CLI, you can create a new project, create services and application identities. For this post, we will use the UI instead.

In the Catalyst dashboard, I created a project called idpdemo:

List of projects; use Create Project to create a new one

Next, for each of my services (upload and process), we create an App ID. Each App ID has its own token. Services use the token to authenticate to the Catalyst APIs and use the services they are allowed to use.

The process App ID has the following configuration (partial view):

process App ID API configuration

The process service interacts with both the Catalyst key/value store (kvstore) and the pub/sub broker (pubsub). These services need to be enabled as well. We will show that later. We can also see that the process service has a pub/sub subscription called process-consumer. Via that subscription, we have pub/sub messages delivered to the process service whenever the upload service sends a message to the pub/sub topic.

In Diagrid Services, you can click on the pub/sub and key/value store to see what is going on. For example, in the pub/sub service you can see the topics, the subscribers to these topics and the message count.

pub/sub topics

In Connections, you can see your services (represented by App ID upload and process) and their scope. In this case, all App IDs have access to all services. That can easily be changed:

changing the scope: access by App IDs to the pubsub service; default All

Now that we have some understanding of App IDs, Diagrid services and connections, we can take a look at how to connect to Catalyst from code.

Important: in this post we only look at using request/reply, Diagrid pub/sub and key/value. Catalyst also supports workflow and bindings but they are not used in this post.

Connecting your code

All code is available on GitHub: https://github.com/gbaeke/catalyst

The upload service needs to connect to both the pub/sub broker and key/value store:

  • Whenever a document is uploaded, it is uploaded to Azure Storage. When that succeeds, a message is put on the broker with the path of the file and a template name.
  • Templates are created and validated by the upload service so that you can only upload files with a template that exists. Templates are written and read in the key/value store.

Before we write code, we need to provide the Dapr SDK for Python (we’ll only use the Python SDK here) the necessary connection information. It needs to know it should not connect to a Dapr sidecar but to Catalyst. You set these via environment variables:

These environment variables are automatically picked up and used by SDK to interact with the Catalyst APIs. The following code can be used to put a message on the pub/sub broker:

with DaprClient() as d:
    try:
        result = d.publish_event(
            pubsub_name=pubsub_name,
            topic_name=topic_name,
            data=invoice.model_dump_json(),
            data_content_type='application/json',
        )
        logging.info('Publish Successful. Invoice published: %s' %
                        invoice.path)
        return True
    except grpc.RpcError as err:
        logging.error(f"Failed to publish invoice: {err}")
        return False

This is the same code that you would use with Dapr on your local machine or in Kubernetes or Azure Container Apps. Like with Dapr, you need to specify the pubsub name and topic. Here that is pubsub and invoices as previously shown in the Catalyst UI. The data in the message is an instance of a Pydantic class that holds the path and template but converted to JSON.

The code below shows how to write to the state store (key/value store):

with DaprClient() as d:
    try:
        d.save_state(store_name=kvstore_name,
                        key=template_name, value=str(invoice_data))
    except grpc.RpcError as err:
        logging.error(f"Dapr state store error: {err.details()}")
        raise HTTPException(status_code=500, detail="Failed to save template")

This is of course very similar. We use the save_state method here and provide the store name (kvstore), key (template name) and value.

Let’s now turn to the process service. It needs to:

  • be notified when there is a new message on the invoices topic
    • check and retrieve the template by calling a method on the upload service

We only use two building blocks here: pub/sub and request/reply. The process service does not interact directly with the state store.

To receive a message, Catalyst needs a handler to call. In the pub/sub subscription, the handler (default route to be correct) is configured to be /process:

Configuration of default route on subscription

Our code that implements the handler is as follows (FastAPI):

@app.post('/process')  # called by pub/sub when a new invoice is uploaded
async def consume_orders(event: CloudEvent):
    # your code here

As you can see, when Catalyst calls the handler, it passes in a CloudEvent. The event has a data field that holds the path to our document and the template name. The CloudEvent type is defined as follows:

# pub/sub uses CloudEvent; Invoice above is the data
class CloudEvent(BaseModel):
    datacontenttype: str
    source: str
    topic: str
    pubsubname: str
    data: dict
    id: str
    specversion: str
    tracestate: str
    type: str
    traceid: str

In the handler, you simply extract the expected data and use it to process the event. In our case:

  • extract path and template from the data field
  • download the file from blob storage
  • send the file to Azure Document Intelligence to convert to text
  • extract the details from the document based on the template; if the template contains fields like customer_name and invoice_total, the LLM will try to extract that and return that content in JSON.
  • write the extracted values to JSON or CSV or any other output handler

Of course, we do need to extract the full template because we only have the template name. Let’s use the request/reply APIs to do that and call the template GET endpoint of the upload service via Catalyst:

def retrieve_template_from_kvstore(template_name: str):

    headers = {'dapr-app-id': invoke_target_appid, 'dapr-api-token': dapr_api_token,
               'content-type': 'application/json'}  
    try:
        result = requests.get(
            url='%s/template/%s' % (base_url, template_name),
            headers=headers
        )

        if result.ok:
            logging.info('Invocation successful with status code: %s' %
                         result.status_code)
            logging.info(f"Template retrieved: {result.json()}")
            return result.json()

    except Exception as e:
        logging.error(f"An error occurred while retrieving template from Dapr KV store: {str(e)}")
        return None

As an example, we use the HTTP API here instead of the Dapr invoke API. It might not be immediately clear but Catalyst is involved in this process and will have information and metrics about these calls:

Call Graph

The full line represents request/reply (invoke) from process to upload as just explained. The dotted line represents pub/sub traffic where upload creates messages to be consumed by process.

Running the app

You can easily run your application locally using the Diagrid Dev CLI. Ensure you are logged in by running diagrid login. In the preview, with only one project, the default project should already be that one. Then simply run diagrid dev scaffold to generate a yaml file.

In my case, after some modification, my dev-{project-name}.yaml file looked like below:

project: idpdemo
apps:
- appId: process
  disabled: true
  appPort: 8001
  env:
    DAPR_API_TOKEN: ...
    DAPR_APP_ID: process
    DAPR_CLIENT_TIMEOUT_SECONDS: 10
    DAPR_GRPC_ENDPOINT: https://XYZ.api.cloud.diagrid.io:443
    DAPR_HTTP_ENDPOINT: https://XYZ.api.cloud.diagrid.io
    OTHER ENV VARS HERE

  workDir: process
  command: ["python", "app.py"]
- appId: upload
  appPort: 8000
  env:
    ... similar
  workDir: upload
  command: ["python", "app.py"]
appLogDestination: ""

Of course, the file was modified with environment variables required by the code. For example the storage account key, Azure Document Intelligence key, etc…

All you need to do now is to run diagrid dev start to start the apps. The result should be like below:

Local project startup

By default, your service logs are written to the console with a prefix for each service.

If you use the code in GitHub, check the README.md to configure the project and run the code properly. If you would rather run the code with Dapr on your local machine (e.g., if you do not have access to Catalyst) you can do that as well.

Conclusion

In this post, we have taken a look at Catalyst, a set of cloud APIs that help you to write distributed applications in a standard and secure fashion. These APIs are compatible with Dapr, a toolkit that has already gained quite some traction in the community. With Catalyst, we quickly built an application that can be used as a starter to implement an asynchronous LLM-based document extraction pipeline. I did not have to worry too much about pub/sub and key/value services because that’s all part of Catalyst.

What will you build with Catalyst?

Token consumption in Microsoft’s Graph RAG

In the previous post, we discussed Microsoft’s Graph RAG implementation. In this post, we will take a look at token consumption to query the knowledge graph, both for local and global queries.

Note: this test was performed with gpt-4o. A few days after this blog post, OpenAI released gpt-4o-mini. Initital tests with gpt-4o-mini show that index creation and querying work well with a significantly lower cost. You can replace gpt-4o with gpt-4o-mini in the setup below.

Setting up Langfuse logging

To make it easy to see the calls to the LLM, I used the following components:

  • LiteLLM: configured as a proxy; we configure Graph RAG to use this proxy instead of talking to OpenAI or Azure OpenAI directly; see https://www.litellm.ai/
  • Langfuse: an LLM engineering platform that can be used to trace LLM calls; see https://langfuse.com/

To setup LiteLLM, follow the instructions here: https://docs.litellm.ai/docs/proxy/quick_start. I created the following config.yaml for use with LiteLLM:

model_list:
 - model_name: gpt-4o
   litellm_params:
     model: gpt-4o
 - model_name: text-embedding-3-small
   litellm_params:
     model: text-embedding-3-small
litellm_settings:
  success_callback: ["langfuse"]

Before starting the proxy, set the following environment variables:

export OPENAI_API_KEY=my-api-key
export LANGFUSE_PUBLIC_KEY="pk_kk"
export LANGFUSE_SECRET_KEY="sk_ss"

You can obtain the values from both the OpenAI and Langfuse portals. Ensure you also install Langfuse with pip install langfuse.

Next, we can start the proxy with litellm --config config.yaml --debug.

To make Graph RAG work with the proxy, open Graph RAG’s settings.yaml and set the following value under the llm settings:

api_base: http://localhost:4000

LiteLLM is listening for incoming OpenAI requests on that port.

Running a local query

A local query creates an embedding of your question and finds related entities in the knowledge graph by doing a similarity search first. The embeddings are stored in LanceDB during indexing. Basically, the results of the similarity search are used as entrypoints into the graph.

That is the reason that you need to add the embedding model to LiteLLM’s config.yaml. Global queries do not require this setting.

After the similar entities have been found in LanceDB, they are put in a prompt to answer your original question together with related entities.

A local query can be handled with a single LLM call. Let’s look at the trace:

Trace from local query

The query took about 10 seconds and 11500 tokens. The system prompt starts as follows:

First part of local query system prompt

The actual data it works with (called data tables) are listed further in the prompt. You can find a few data points below:

Entity about Winston Smith, a character in the book 1984 (just a part of the text)
Entity for O’Brien, a character he interacts with

The prompt also contains sources from the book where the entities are mentioned. For example:

Relevant sources

The response to this prompt is something like the response below:

LLM response to local query

The response contains references to both the entities and sources with their ids.

Note that you can influence the number of entities retrieved and the number of consumed tokens. In Graph RAG’s settings.yaml, I modified the local search settings as follows:

local_search:
  # text_unit_prop: 0.5
  # community_prop: 0.1
  # conversation_history_max_turns: 5
  top_k_mapped_entities: 5
  top_k_relationships: 5
  max_tokens: 6000

The trace results are clear: token consumption is lower and the latency is lower as well.

Lower token cost

Of course, there will be a bit less detail in the answer. You will have to experiment with these values to see what works best in your scenario.

Global Queries

Global queries are great for broad questions about your dataset. For example: “What are the top themes in 1984?”. A global query is not a single LLM call and is more expensive than a local query.

Let’s take a look at the traces for a global query. Every trace is an LLM call to answer the global query:

Traces for a global query

The last one in the list is where it starts:

First call of many to answer a global query

As you can probably tell, the call above is not returned directly to the user. The system prompt does not contain entities from the graph but community reports. Community reports are created during indexing. First, communities are detected using the Leiden algorithm and then summarized. You can have many communities and summaries in the dataset.

This first trace asks the LLM to answer the question: “What are the top themes in 1984?” to a first set of community reports and generates intermediate answers. These intermediate answers are saved until a last call used to answer the question based on all the intermediate answers. It is entirely possible that community reports are used that are not relevant to the query.

Here is that last call:

Answer the question based on the intermediate answers

I am not showing the whole prompt here. Above, you see the data that is fed to the final prompt: the intermediate answers from the community reports. This then results in the final answer:

Final answer to the global query

Below is the list with all calls again:

All calls to answer a global query

In total, and based on default settings, 12 LLM calls were made consuming around 150K tokens. The total latency cannot be calculated from this list because the calls are made in parallel. That total cost is around 80 cents.

The number of calls and token cost can be reduced by tweaking the default parameters in settings.yaml. For example, I made the following changes:

global_search:
  max_tokens: 6000 # was 12000
  data_max_tokens: 500 # was 1000
  map_max_tokens: 500 # was 1000
  # reduce_max_tokens: 2000
  # concurrency: 32

However, this resulted in more calls with around 140K tokens. Not a big reduction. I tried setting lower values but then I got Python errors and many more LLM calls due to retries. I would need to dig into that further to explain why this happens.

Conclusion

From the above, it is clear that local queries are less intensive and costly than global queries. By tweaking the local query settings, you can get pretty close to the baseline RAG cost where you return 3-5 chunks of text of about 500 tokens each. Latency is pretty good as well. Of course, depending on your data, it’s not guaranteed that the responses of local search will be better that baseline RAG.

Global queries are more costly but do allow you to ask broad questions about your dataset. I would not use these global queries in a chat assistant scenario consistently. However, you could start with a global query and then process follow-up questions with a local query or baseline RAG.

Trying out Microsoft’s Graph RAG

Whenever we build applications on top of LLMs such as OpenAI’s gpt-4o, we often use the RAG pattern. RAG stands for retrieval augmented generation. You use it to let the LLM answer questions about data it has never seen. To answer the question, you retrieve relevant information and hand it over to the LLM to generate the answer.

The diagram below illustrates both the data ingestion and querying part from a high level, using gtp-4 and a vector database in Azure, Azure AI Search.

RAG: ingestion and querying

Above, our documents are chunked and vectorized. These vectors are stored in Azure AI Search. Vectors allow us to find text chunks that are similar to the query of the user. When a user types a question, we vectorize the question, find similar vectors and hand the top n matches to the LLM. The text chunks that are found are put in the prompt together with the original question. Check out this page to learn more about vectors.

Note that above is the basic scenario in its simplest form. You can optimize this process in several ways, both in the indexing and the retrieval phase. Check out the RAG From Scratch series on YouTube to learn more about this.

Limitations of baseline RAG

Although you can get far with baseline RAG, it is not very good at answering global questions about an entire dataset. If you ask “What are the main themes in the dataset?” it will be hard to find text chunks that are relevant to the question unless you have the main themes described in the dataset itself. Essentially, this is a query-focused summarization task versus an explicit retrieval task.

In the paper,
From Local to Global: A Graph RAG Approach to Query-Focused Summarization, Microsoft proposes a solution that is based on knowledge graphs and intermediate community summaries to answer these global questions more effectively.

If it is somewhat unclear what the difference between baseline RAG and Graph RAG looks like, watch this video on YouTube where it is explained in more detail:

Differences between baseline RAG and Graph RAG

Getting started by creating an index

Microsoft has an open source, Python-based implementation of Graph RAG for both local and global queries. We’ll discuss local queries a bit later in this post and focus on global for now. Check out the GitHub repo for more information.

If you have Python on your local machine, it is easy to try it out:

  • Make a folder and create a Python virtual environment in it
  • Make sure the Python environment is active and run pip install graphrag
  • In the folder, create a folder called input and put some text files in it with your content
  • From the folder that contains the input folder, run the following command: python -m graphrag.index --init --root .
  • This creates a .env file and a settings.yaml file.
  • In the .env file, enter your OpenAI key. This can also be an Azure OpenAI key. Azure OpenAI requires additional settings in the settings.yaml file: api_base, api_version, deployment_name.
  • I used OpenAI directly and modified the model in settings.yaml. Find the model setting and set it to gpt-4o.

You are now ready to run the indexing pipeline. Before running it, know that this will do a lot of LLM calls depending on the data you put in the index folder. In my tests, with 800KB of text data, indexing cost between 10 and 15 euros. Here’s the command:

python -m graphrag.index --root .

To illustrate what happens, take a look at the diagram below:

Indexing and querying process

Above, let’s look at it from top to bottom, excluding the user query section for now:

  • Source documents in the input folder are split into pieces of 300 tokens with 100 tokens overlap. Microsoft uses the cl100k_base tokenizer which is the one used by gpt-4 and not gpt-4o. That should not have an impact. You can adjust the token size and overlap. With a larger token size, less LLM calls are made in subsequent steps but element extraction might be less precise.
  • With the help of gpt-4o, elements are extracted from each chunk. These elements are the entities and relationships between entities in the graph that is being built. In addition, claims about the entities are extracted. The paper and diagram above uses the term covariates. This is a costly operation if you have a lot of data in the input folder.
  • Text descriptions of the elements are generated.

After these steps, a graph is built that contains all the entities, relationships, claims and element descriptions that gpt-4o could find. But the process does not stop there. To support global queries, the following happens:

  • Detection of communities inside the graph. Communities are groups of closely related entities. They are detected using the Leiden algorithm. In my small dataset, about 250 communities were detected.
  • Per community, community summaries are created with gpt-4o and stored. These summaries can later be used in global queries.

To make all of the above work, a lot of LLM calls have to be made. The prompts that are used can be seen in the prompts folder:

Prompts used to build the graph and community descriptions

You can and probably should modify these prompts to match the domain of your documents. The entity extraction prompt contains examples to teach the LLM about the entities it should extract. By default, entities such as people, places, organizations, etc.. are detected. But if you work with building projects, buildings, bridges, construction materials, the prompt should be adjusted accordingly. The quality of the answers will depend greatly on those adjustments.

In addition to the graph, the solution uses the open source LanceDB to store embeddings for each text chuck. There is only one table in the database with four fields:

  • id: unique id for the chunk
  • text: the text in the chunk
  • vector: the vector of the chunk; by default the text-embedding-3-small model is used
  • attributes: e.g., {“title”: “\”title here\””}

The graph and related data is stored in parquet files in an artifacts folder inside another folder with a timestamp. For example:

Parquet files that contain the graph structure

If you have a parquet viewer, you can check the create_final_entities.parquet file to check the detected entities. You will find entity types like ORGANIZATION, PERSON, GEO, EVENT, CONCEPT, etc… Every entity has a description and links back to the text unit ids. The text units are the chunks.

Note that, if you want the graph in GraphML format, set snapshots.graphml to true in settings.yaml. Your artifacts folder will then contain .graphml files. You can load those in a viewer like Gephi:

Loading the graph in a viewer

If you already ran the indexer without setting this value, you can just run it again. Graph RAG has a caching layer so you will not incur costs when you run the indexer again simply to generate the .graphml files.

Global Search

Now let’s do a global query. A global query uses the generated community summaries to answer the question. The intermediate answers are used to generate the final answer.

A global query is not just one LLM call but several ones. The total token cost is relatively high compared to a typical similarity search that uses between 3 to 5 retrieved chunks. It’s not uncommon to see >10 LLM calls with 200K token. You can control the token usage in settings.yaml. See the global_search settings at the bottom.

To do a global query, run the command below. I have the book 1984 in the corpus so let’s ask for the main themes:

python -m graphrag.query \
--root . \
--method global \
"What are the top themes in 1984?"

Note that an LLM can answer this on its own since it knows about 1984. That’s not the point here. The answer you get will come from the index:

### Top Themes in *1984*

**1. Totalitarianism and Absolute Control**

The Party in Oceania exercises absolute control over its citizens, manipulating historical records, maintaining a state of perpetual conflict, and enforcing oppressive policies through purges, arrests, tortures, imprisonments, and vaporizations [Data: Reports (211)]. The regime's control extends to every aspect of life, including personal relationships, sexual behavior, and even thoughts, enforced by the Thought Police and the omnipresent Telescreen [Data: Reports (141, 183, 223, 185, 191, 181, 151, 116, 186)].

**2. Surveillance and Psychological Manipulation**

Surveillance is a pervasive theme, with the Telescreen and the Thought Police constantly monitoring individuals to ensure compliance and suppress dissent [Data: Reports (52, 141, 183, 223, 185, 191, 181, 151, 116, 186)]. The Party uses psychological manipulation techniques such as doublethink, Newspeak, and the alteration of historical records to control and limit the range of thought among its citizens [Data: Reports (141, 175, 183, 181, 215, 149, 179, 177, 178, 165, 58)].

**3. Manipulation of Truth and Reality**

The Party manipulates historical records and information to maintain its narrative and control over reality. This is evident in Winston's work at the Ministry of Truth and the concept of doublethink, which allows individuals to accept two contradictory beliefs simultaneously [Data: Reports (141, 175, 183, 181, 215, 149, 179, 177, 178, 165, 58)]. The Memory Hole is used to destroy documents, ensuring that information is permanently erased, highlighting the Party's control over historical narratives [Data: Reports (52)].

**4. Continuous Warfare**

Oceania is engaged in a perpetual state of war with Eastasia and Eurasia. This continuous warfare serves to maintain the Party's control over the population and justify its oppressive policies [Data: Reports (211, 178, 214)]. The war consumes surplus goods, maintains a hierarchical structure, and impacts the mental states of individuals, ensuring that the populace remains divided and distracted [Data: Reports (211, 178, 214, 208)].

**5. Rebellion and Resistance**

Despite the oppressive regime, themes of rebellion and resistance are present, as seen through characters like Winston and Julia. Winston's clandestine activities, such as his relationship with Julia and his hope in the Proles, reflect his desire to rebel against the Party's oppressive regime [Data: Reports (141, 183, 151, 182, 101, 186)]. The Brotherhood represents an underground network aiming to overthrow the state of Oceania, highlighting the existence of resistance within the oppressive regime [Data: Reports (211, 64, 152)].

**6. Class Struggle and Social Hierarchy**

The distinction between the Inner Party, Outer Party, and Proles highlights the rigid social hierarchy within Oceania. The Party's control over the Proles and the limited privileges of the Outer Party members emphasize the theme of class struggle [Data: Reports (141, 66, 185, 211, 182, 124)]. The Proles, despite their subjugation, are seen as a potential source of hope and rebellion [Data: Reports (182, 64)].

**7. Language as a Tool of Control**

Newspeak, a language created by The Party, is designed to limit the range of thought and eliminate any possibility of rebellious thoughts. By controlling language, The Party effectively controls thought, making it impossible for individuals to conceptualize or express subversive ideas [Data: Reports (177, 179, 181, 149, 114)].

**8. Fear and Psychological Torture**

The Party uses fear and psychological torture to maintain control, exemplified by the use of Room 101, where individuals are subjected to their worst fears. Winston's torture with the cage containing rats demonstrates the regime's ability to break individuals' spirits [Data: Reports (169, 145, 224, 220)].

These themes collectively illustrate the oppressive nature of the regime in *1984* and its impact on personal freedom, truth, and reality. The Party's extensive use of surveillance, psychological manipulation, and control over information ensures its dominance and the suppression of any potential dissent.

Local Search

A local search generates answers by combining data from the knowledge-graph with text chunks of the raw documents. This method is suitable for questions that require an understanding of specific entities mentioned in the documents (e.g. Who does Winston interact with?). The following notebook contains more information about a local search with Python: https://github.com/microsoft/graphrag/blob/a22003c302bf4ffeefec76a09533acaf114ae7bb/examples_notebooks/local_search.ipynb#L43

To do a local search from the CLI, use the following command:

python -m graphrag.query \
--root . \
--method local \
"Who is Winston? Who does he interact with and why?"

A local search uses similarity search to find entities in the graph as entry points. Once these entry points are found, the graph is used to find further entities of interest. A local search requires the LanceDB embeddings store while a global search does not.

The response to the above question:

### Who is Winston?

Winston is a complex character from George Orwell's novel "Nineteen Eighty-Four." He is a member of the Outer Party and works at the Ministry of Truth, where his job involves altering historical records to fit the Party's propaganda. Winston is deeply resentful of the Party and Big Brother, harboring a sense of intellectual inferiority and mental domination by figures like O'Brien. His life is marked by intense fear, paranoia, and physical and emotional suffering, particularly during his interactions with O'Brien, who tortures and interrogates him [Data: Entities (8, 3)].

Winston's reflections on reality, power, and the nature of suffering are central to his character. He contemplates the symbolic meaning of chess, the principles of Ingsoc, and the dominion of The Party. His dreams and memories, including the tragic death of his mother and sister, the bells of St. Clement's, and his early childhood, provide a poignant backdrop to his internal struggles [Data: Entities (8)].

### Interactions and Relationships

#### Julia
Winston's most significant relationship is with Julia, a fellow Party member. Despite the risks, they engage in a love affair, renting a room from Mr. Charrington for their secret meetings. Julia represents a source of intimacy and rebellion for Winston, as they navigate their dangerous liaison under the watchful eyes of The Party [Data: Entities (8)].

#### O'Brien
O'Brien is another crucial figure in Winston's life. Initially, Winston feels a sense of connection and admiration towards O'Brien, hoping that his political orthodoxy is not perfect. However, O'Brien ultimately becomes his torturer, subjecting Winston to severe psychological and physical pain. Despite this, Winston experiences moments of connection and even a peculiar intimacy with O'Brien [Data: Entities (8)].

#### Mr. Charrington
Mr. Charrington is the shop owner who rents a room to Winston and Julia for their secret meetings. Initially, he appears discreet and non-judgmental, but later reveals a more authoritative and alert persona, indicating his role in the Party's surveillance [Data: Entities (317)].

#### Other Characters
Winston also interacts with various other characters, such as Syme, Parsons, and the old man in the pub. These interactions reveal his curiosity about the past and the changes brought about by The Party. For instance, Syme is a colleague who discusses the principles of Newspeak with Winston, while Parsons is a fellow employee at the Ministry of Truth [Data: Entities (8, 83)].

### Conclusion

Winston is a deeply reflective and observant character, constantly grappling with the oppressive nature of The Party and his own internal conflicts. His interactions with Julia, O'Brien, Mr. Charrington, and others provide a multifaceted view of his struggles and the dystopian world he inhabits. Through these relationships, Winston's character is fleshed out, revealing the complexities of life under totalitarian rule.

Note that the output contains references to entities that were found. For example, the section about Mr. Charrington specifies entity 317. In the Gephi Data Laboratory, we can easily find that entity using the human_readable_id:

Finding referenced entities

When you are building an application, the UI could provide links to the entities for further inspection.

Conclusion

Retrieval-Augmented Generation (RAG) has emerged as a powerful technique for enhancing language models’ ability to answer questions about specific datasets. While baseline RAG excels at answering specific queries by retrieving relevant text chunks, it struggles with global questions that require a comprehensive understanding of the entire dataset. To address this limitation, Microsoft has introduced Graph RAG, an innovative approach that leverages knowledge graphs and community summaries to provide more effective answers to global queries.

Graph RAG’s indexing process involves chunking documents, extracting entities and relationships, building a graph structure, and generating community summaries. This approach allows for more nuanced and context-aware responses to both local and global queries. While Graph RAG offers significant advantages in handling complex, dataset-wide questions, it’s important to note that it comes with higher computational costs and requires careful prompt engineering to achieve optimal results. As the field of AI continues to evolve, techniques like Graph RAG represent an important step towards more comprehensive and insightful information retrieval and generation systems.

Embracing the Age of AI Transformation: A New Era for Innovation and Expertise

⚠️ This is an AI-generated article based on a video to transcript generator I created to summarise Microsoft Build sessions. This article is used as an example for a LinkedIn post.

This article is based on the Microsoft Build keynote delivered on Tuesday, May 21st, 2024. It was created with gpt-4o. The post is unedited and as such contains errors such as PHY models instead of Phi etc… Most errors come from errors in the transcription phase.

Here’s the generated content ⬇️

As the digital age advances, we’re witnessing an unprecedented transformation powered by artificial intelligence (AI). Three decades ago, the vision was “information at your fingertips.” Today, we stand on the cusp of a new era: “expertise at your fingertips.” This shift from mere access to information to access to actionable expertise is revolutionizing industries across the globe. From farms to classrooms, boardrooms to labs, AI is proving to be a universal tool for everyone, everywhere.

The Evolution of AI: From Information to Expertise

In the early days of computing, the primary challenge was to make computers understand us rather than us having to understand them. We dreamed of a world where vast amounts of data could be harnessed to help us reason, plan, and act more effectively. Fast forward 70 years, and we’re seeing those dreams realized through groundbreaking advancements in AI. This new generation of AI is reshaping every layer of technology, from data center infrastructures to edge devices, enabling distributed, synchronous data parallel workloads.

Scaling Laws: Driving the Intelligence Revolution

Much like Moore’s Law propelled the information revolution, the scaling laws of deep neural networks (DNNs) are now driving the intelligence revolution. These laws, combined with innovative model architectures and data utilization methods, are leading to rapid advancements in AI. The result is a natural, multimodal user interface that supports text, speech, images, and video, along with memory and reasoning capabilities that reduce cognitive load and enhance productivity.

AI in Action: Real-World Impact

The transformative power of AI is not just theoretical. Real-world applications are demonstrating its potential to change lives. Consider the rural Indian farmer who used AI to navigate government farm subsidies, or the developer in Thailand leveraging the latest AI models to optimize workflows. These examples highlight the democratization of AI, where cutting-edge technology developed on one side of the world can directly benefit individuals on the other.

Microsoft Copilot: Your Everyday AI Companion

One of the most exciting developments in this AI revolution is Microsoft Copilot. This platform brings knowledge and expertise directly to users, helping them act on it effectively. Microsoft has introduced several key components to enhance Copilot’s capabilities:

  1. Copilot Plus PCs: The fastest AI-first PCs, equipped with powerful NPUs for lightning-fast local inference, offering unprecedented speed and efficiency.
  2. Windows Copilot Runtime: Making Windows the best platform for building AI applications with local APIs, no-code integrations, and support for over 40 models out of the box.
  3. Azure AI Studio: An end-to-end development environment for building, training, and fine-tuning AI models, now generally available with built-in safety features.

Expanding Horizons: AI Infrastructure and Models

Microsoft is building the most comprehensive AI infrastructure with Azure, scaling AI capacity globally while ensuring sustainability. This includes partnerships with industry leaders like NVIDIA and AMD to provide the best performance and cost-efficiency for AI workloads. Additionally, Microsoft offers a broad selection of foundation models, including GPT-4, trained on Azure, and the new PHY family of small language models designed for efficient on-device inferencing.

Real-Time Intelligence and Fabric Integration

Microsoft Fabric is another game-changer, offering an integrated SaaS platform for data analytics and AI capabilities. With real-time intelligence, Fabric enables instant, actionable insights from streaming data, helping businesses stay proactive and make informed decisions. This platform’s seamless integration with tools like Esri for spatial analytics and Azure AI Search for retrieval-augmented generation (RAG) applications further extends its utility.

Empowering Developers: From Idea to Code

GitHub Copilot, the first major product of the generative AI age, is revolutionizing software development. With over 1.8 million subscribers, Copilot assists developers in their native languages, streamlining the coding process. The new GitHub Copilot extensions allow developers to customize and integrate third-party services, enhancing the overall development experience.

The Future of AI: A Call to Innovate

The advancements in AI are opening up new possibilities for innovation and transformation. As we continue to build and refine these platforms, the real impact will come from the developers and innovators who leverage this technology to create meaningful solutions. This is a call to all developers: embrace this special moment in history, take advantage of the tools at your disposal, and build the future.

Conclusion

The age of AI transformation is here, and it’s redefining how we interact with technology. From personal assistants to team collaborators, from education to healthcare, AI is poised to make a significant impact. Microsoft’s commitment to providing the infrastructure, tools, and platforms necessary for this revolution is clear. Now, it’s up to us to harness this power and drive the next wave of innovation. Welcome to the new era of AI.

So you want a chat bot to talk to your SharePoint data?

It’s a common request we hear from clients: “We want a chatbot that can interact with our data in SharePoint!” The idea is compelling β€“ instead of relying on traditional search methods or sifting through hundreds of pages and documents, users could simply ask the bot a question and receive an instant, accurate answer. It promises to be a much more efficient and user-friendly experience.

The appeal is clear:

  • Improved user experience
  • Time savings
  • Increased productivity

But how easy is it to implement a chatbot for SharePoint and what are some of the challenges? Let’s try and find out.

The easy way: Copilot Studio

I have talked about Copilot Studio in previous blog posts. One of the features of Copilot Studio is generative answers. With generative answers, your copilot can find and present information for different sources like web sites or SharePoint data. The high level steps to work with SharePoint data are below:

  • Configure your copilot to use Microsoft Entra ID authentication
  • In the Create generative answers node, in the Data sources field, add the SharePoint URLs you want to work with

From a high level, this is all you need to start asking questions. One advantage of using this feature is that the SharePoint data is accessed on behalf of the user. When generative answers searches for SharePoint data, it only returns information that the user has access to.

It is important to note that the search relies on a call to the Graph API search endpoint (https://graph.microsoft.com/v1.0/search/query) and that only the top three results that come back from this call are used. Generative answers only works with files up to 3MB in size. It is possible that the search returns documents that are larger than 3MB. They would not be processed. If all results are above 3MB, generative answers will return an empty response.

In addition, the user’s question is rewritten to only send the main keywords to the search. The type of search is a keyword search. It is not a similarity search based on vectors.

Note: the type of search will change when Microsoft enables Semantic Index for Copilot for your tenant. Other limitations, like the 3MB size limit, will be removed as well.

Pros:

  • easy to configure (UI)
  • uses only documents the user has access to (Entra ID integration)
  • no need to create a pipeline to process SharePoint data; simply point at SharePoint URLs πŸ”₯
  • an LLM is used “under the hood”; there is no need to setup an Azure OpenAI instance

Cons:

  • uses keyword search which can result in less relevant results
  • does not use vector search and/or semantic reranking (e.g., like in Azure AI Search)
  • number of search results that can provide context is not configurable (maximum 3)
  • documents are not chunked; search can not retrieve relevant pieces of text from a document
  • maximum size is 3MB; if the document is highly relevant to answer the user’s query, it might be dropped because of its size

Although your mileage may vary, the limitations make it hard to build a chat bot that provides relevant and qualitative answers. What can we do to fix that?

Copilot Studio with Azure OpenAI on your data

Copilot Studio has integration with Azure OpenAI on your data. Azure OpenAI on your data makes it easy to create an Azure AI Search index based on your documents. Such an index creates chunks of larger documents and uses vectors to match a user’s query to similar chunks. Such queries usually result in more relevant pieces of text from multiple documents. In addition to vector search, you can combine vector search with keyword search and optionally rerank the search results semantically. In most cases, you want these advanced search options because relevant context is key for the LLM to work with!

The diagram below shows the big picture:

Using AI Search to query documents with vectors

The diagram above shows documents in a storage account (not SharePoint, we will get to that). With Azure OpenAI on your data, you simply point to the storage account, allowing Azure AI Search to build an index that contains one or more document chunks per document. The index contains the text in the chunk and a vector of that text. Via the Azure OpenAI APIs, chat applications (including Copilot Studio) can send user questions to the service together with information about the index that contains relevant content. Behind the scenes, the API searches for similar chunks and uses them in the prompt to answer the user’s question. You can configure the number of chunks that should be put in the prompt. The number is only limited by the OpenAI model’s context limit (8k, 16k, 32k or 128k tokens).

You do not need to write code to create this index. Azure OpenAI on your data provides a wizard to create the index. The image below shows the wizard in Azure AI Studio (https://ai.azure.com):

Azure OpenAI add your data

Above, instead of pointing to a storage account, I selected the Upload files/folder feature. This allows you to upload files to a storage account first, and then create the index from that storage account.

Azure OpenAI on your data is great, but there is this one tiny issue: there is no easy way to point it to your SharePoint data!

It would be fantastic if SharePoint was a supported datasource. However, it is important to realise that SharePoint is not a simple datasource:

  • What credentials are used to create the index?
  • How do you ensure that queries use only the data the user has access to?
  • How do you keep the SharePoint data in sync with the Azure AI Search index? And not just the data, the ACLs (access control lists) too.
  • What SharePoint data do you support? Just documents? List items? Web pages?

The question now becomes: “How do you get SharePoint data into AI Search to improve search results?” Let’s find out.

Creating an AI Search index with SharePoint data

Azure AI Search offers support for SharePoint as a data source. However, it’s important to note that this feature is currently in preview and has been in that state for an extended period of time. Additionally, there are several limitations associated with this functionality:

  • SharePoint .ASPX site content is not supported.
  • Permissions are not automatically ingested into the index. To enable security trimming, you will need to add permission-related information to the index manually, which is a non-trivial task.

In the official documentation, Microsoft clearly states that if you require SharePoint content indexing in a production environment, you should consider creating a custom connector that utilizes SharePoint webhooks in conjunction with the Microsoft Graph API to export data to an Azure Blob container. Subsequently, you can leverage the Azure Blob indexer to index the exported content. This approach essentially means that you are responsible for developing and maintaining your own custom solution.

Note: we do not follow the approach with webhooks because of its limitations

What to do?

When developing chat applications that leverage retrieval-augmented generation (RAG) with SharePoint data, we typically use a Logic App or custom job to process the SharePoint data in bulk. This Logic App or job ingests various types of content, including documents and site pages.

To maintain data integrity and ensure that the system remains up-to-date, we also utilize a separate Logic App or job that monitors for changes within the SharePoint environment and updates the index accordingly.

However, implementing this solution in a production environment is not a trivial task, as there are numerous factors to consider:

  • Logic Apps have limitations when it comes to processing large volumes of data. Custom code can be used as a workaround.
  • Determining the appropriate account credentials for retrieving the data securely.
  • Identifying the types of changes to monitor: file modifications, additions, deletions, metadata updates, access control list (ACL) changes, and more.
  • Ensuring that the index is updated correctly based on the detected changes.
  • Implementing a mechanism to completely rebuild the index when the data chunking strategy changes, typically involving the creation of a new index and updating the bot to utilize the new index. Index aliases can be helpful in this regard.

In summary, building a custom solution to index SharePoint data for chat applications with RAG capabilities is a complex undertaking that requires careful consideration of various technical and operational aspects.

Security trimming

Azure AI Search does not provide document-level permissions. There is also no concept of user authentication. This means that you have to add security information to an Azure AI Search index yourself and, in code, ensure that AI Search only returns results that the logged on user has access to.

Full details are here with the gist of it below:

  • add a security field of type collection of strings to your index; the field should allow filtering
  • in that field, store group Ids (e.g., Entra ID group oid’s) in the array
  • while creating the index, retrieve the group Ids that have at least read access to the document you are indexing; add each group Id to the security field

When you query the index, retrieve the logged on user’s list of groups. In your query, use a filter like the one below:

{
"filter":"group_ids/any(g:search.in(g, 'group_id1, group_id2'))"
}

Above, group_ids is the security field and group_id1 etc… are the groups the user belongs to.

For more detailed steps and example C# code, see https://learn.microsoft.com/en-us/azure/search/search-security-trimming-for-azure-search-with-aad.

If you want changes in ACLs in SharePoint to be reflected in your index as quickly as possible, you need a process to update the security field in your index that is triggered by ACL changes.

Conclusion

Crafting a chat bot that seamlessly works with SharePoint data to deliver precise answers is no simple feat. Should you manage to obtain satisfactory outcomes leveraging generative responses within Copilot Studio, it’s advisable to proceed with that route. Even if you do not use Copilot Studio, you can use Graph API search within custom code.

If you want more accurate search results and switch to Azure AI Search, be mindful that establishing and maintaining the Azure AI Search index, encompassing both SharePoint data and access control lists, can be quite involved.

It seems Microsoft is relying on the upcoming Semantic Index capability to tackle these hurdles, potentially in combination with Copilot for Microsoft 365. When Semantic Index ultimately becomes available, executing a search through the Graph API could potentially fulfill your requirements.

Embedding flows created with Microsoft Prompt Flow in your own applications

A while ago, I wrote about creating your first Prompt Flow in Visual Studio Code. In this post, we will embed such a flow in a Python application built with Streamlit. The application allows you to search for images based on a description. Check the screenshot below:

Streamlit app to search for images based on a description

There are a few things we need to make this work:

  • An index in Azure AI Search that contains descriptions of images, a vector of these descriptions and a link to the image
  • A flow in Prompt Flow that takes a description as input and returns the image link or the entire image as output
  • A Python application (the Streamlit app above) that uses the flow to return an image based on the description

Let’s look at each component in turn.

Azure AI Search Index

Azure AI Search is a search index that supports keyword search, vector search and semantic reranking. You can combine keyword and vector search in what is called a hybrid search. The hybrid search results can optionally be reranked further using a state-of-the-art semantic reranker.

The index we use is represented below:

Index in Azure AI Search
  • Description: contains the description of the image; the image description was generated with the gpt-4-vision model and is larger than just a few words
  • URL: the link to the actual image; the image is not stored in the index, it’s just shown for reference
  • Vector: vector generated by the Azure OpenAI embedding model; it generates 1536 floating point numbers that represent the meaning of the description

Using vectors and vector search allows us to search not just for cat but also for words like kat (in Dutch) or even feline creature.

The flow we will create in Prompt Flow uses the Azure AI Search index to find the URL based on the description. However, because Azure AI Search might return images that are not relevant, we also use a GPT model to make the final call about what image to return.

Flow

In Prompt Flow in Visual Studio Code, we will create the flow below:

Flow we will embed in the Streamlit app

It all starts from the input node:

Input node

The flow takes one input: description. In order to search for this description, we need to convert it to a vector. Note that we could skip this and just do a text search. However, that will not get us the best results.

To embed the input, we use the embedding node:

Embedding node

The embedding node uses a connection called open_ai_connection. This connection contains connection information to an Azure OpenAI resource that hosts the embedding model. The model deployment’s name is embedding. The input to the embedding node is the description from the input. The output is a vector:

Output of embedding node

Now that we have the embedding, we can use a Vector DB Lookup node to perform a vector search in Azure AI Search:

Azure AI Search

Above, we use another connection (acs-geba) that holds the credentials to connect to the Azure AI Search resource. We specify the following to perform the search:

  • index name to search: images-sdk here
  • what text to put in the text_field: the description from the input; this search will be a hybrid search; we search with both text and a vector
  • vector field: the name of the field that holds the vector (textVector field in the images-sdk index)
  • search_params: here we specify the fields we want to return in the search results; name, description and url
  • vector to find similar vectors for: the output from the embedding node
  • the number of similar items to return: top_k is 3

The result of the search node is shown below:

Search results

The result contains three entries from the search index. The first result is the closest to the description from our input node. In this case, we could just take the first result and be done with it. But what if we get results that do not match the description?

To make the final judgement about what picture to return, let’s add an LLM node:

LLM Node

The LLM node uses the same OpenAI connection and is configured to use the chat completions API with the gpt-4 model. We want this node to return proper JSON by setting the response_format to json_object. We also need a prompt, which is a ninja2 template best_image.jinja2:

system:
You return the url to an image that best matches the user's question. Use the provided context to select the image. Return the URL in JSON like so:
{ "url": "the_url_from_search" }

Only return an image when the user question matches the context. If not found, return JSON with the url empty like { "url": "" }

user question:
{{description}}

context : {{search_results}}

The template above sets the system prompt and specifically asks to return JSON. With the response format set to JSON, the word JSON (in uppercase) needs to be in the prompt or you will get an error.

The prompt defines two parameters:

  • description: we connect the description from the input to this parameter
  • search_results: we connect the results from the aisearch node to this parameter

In the screenshot above, you can see this mapping being made. It’s all done in the UI, no code required.

When this node returns an output, it will be in the JSON format we specified. However, that does still not mean that the URL will be correct. The model might still return an incorrect url, although we try to mitigate that in the prompt.

Below is an example of the LLM output when the description is cat:

Model picked the cat picture

Now that we have the URL, I want the flow to output two values:

  • the URL: the URL as a string, not wrapped in JSON
  • the base-64 representation of the image that can we used directly in an HTML IMG tag

We use two Python tools for this and bring the results to the output node. Python tools use custom Python code:

Setting the output

The code in get_image is below:

from promptflow import tool
import json, base64, requests

def url_to_base64(image_url):
    response = requests.get(image_url)
    return 'data:image/jpg;base64,' + base64.b64encode(response.content).decode('utf-8')

@tool
def my_python_tool(image_json: str) -> str:
    url = json.loads(image_json)["url"]

    if url:
        base64_string = url_to_base64(url)
    else:
        base64_string = url_to_base64("https://placehold.co/400/jpg?text=No+image")

    return base64_string

The node executes the function that is marked with the @tool decorator and sends it the output from the LLM node. The code grabs the url and downloads and transforms the image to its base64 representation. You can see how the output from the LLM node is mapped to the image_json parameter below:

linking the function parameter to the LLM output

The code in get_url is similar. It just extracts the url as a string from the input JSON coming from the url.

The output node is the following:

Output node

The output has two properties: data (the base64-encoded image) and the url to the image. Later, in the Python code that uses this flow, the output will be a Python dict with a data and url entry.

Using the flow in your application

Although you can host this flow as an API using either an Azure Machine Learning endpoint or a Docker container, we will simply embed the flow in our Python application and call it like a regular Python function.

Here is the code, which uses Streamlit for the UI:

from promptflow import load_flow
import streamlit as st

# load Prompt Flow from parent folder
flow_path = "../."
f = load_flow(flow_path)

# Streamlit UI
st.title('Search for an image')

# User input
user_query = st.text_input('Enter your query and press enter:')

if user_query:
    # extract url from dict and wrap in img tag
    flow_result = f(description=user_query)
    image = flow_result["data"]
    url = flow_result["url"]

    img_tag = f'<a href="{url}"><img src="{image}" alt="image" width="300"></a>'
     
    # just use markdown to display the image
    st.markdown(f"πŸŒ† Image URL: {url}")
    st.markdown(img_tag, unsafe_allow_html=True)

To load the flow in your Python app as a function:

  • import load_flow from the promptflow module
  • set a path to your flow (relative or absolute): here we load the flow that is in the parent directory that contains flow.dag.yaml.
  • use load_flow to create the function: above the function is called f

When the user enters the query, you can simply use f(description="user's query...") to obtain the output. The output is a Python dict with a data and url entry.

In Streamlit, we can use markdown to display HTML directly using unsafe_allow_html=True. The HTML is simply an <img> tag with the src attribute set to the base64 representation of the image.

Connections

Note that the flow on my system uses two connections: one to connect to OpenAI and one to connect to Azure AI Search. By default, Prompt Flow stores these connections in a SQLite database in the .promptflow folder of your home folder. This means that the Streamlit app work on my machine but will not work anywhere else.

To solve this, you can override the connections in your app. See https://github.com/microsoft/promptflow/blob/main/examples/tutorials/get-started/flow-as-function.ipynb for more information about these overrides.

Conclusion

Embedding a flow as a function in a Python app is one of the easiest ways to use a flow in your applications. Although we used a straightforward Streamlit app here, you could build a FastAPI server that provides endpoints to multiple flows from one API. Such an API can easily be hosted as a container on Container Apps or Kubernetes as part of a larger application.

Give it a try and let me know what you think! πŸ˜‰