Deploying AI Foundry Agents and Azure Container Apps to support an Agent2Agent solution

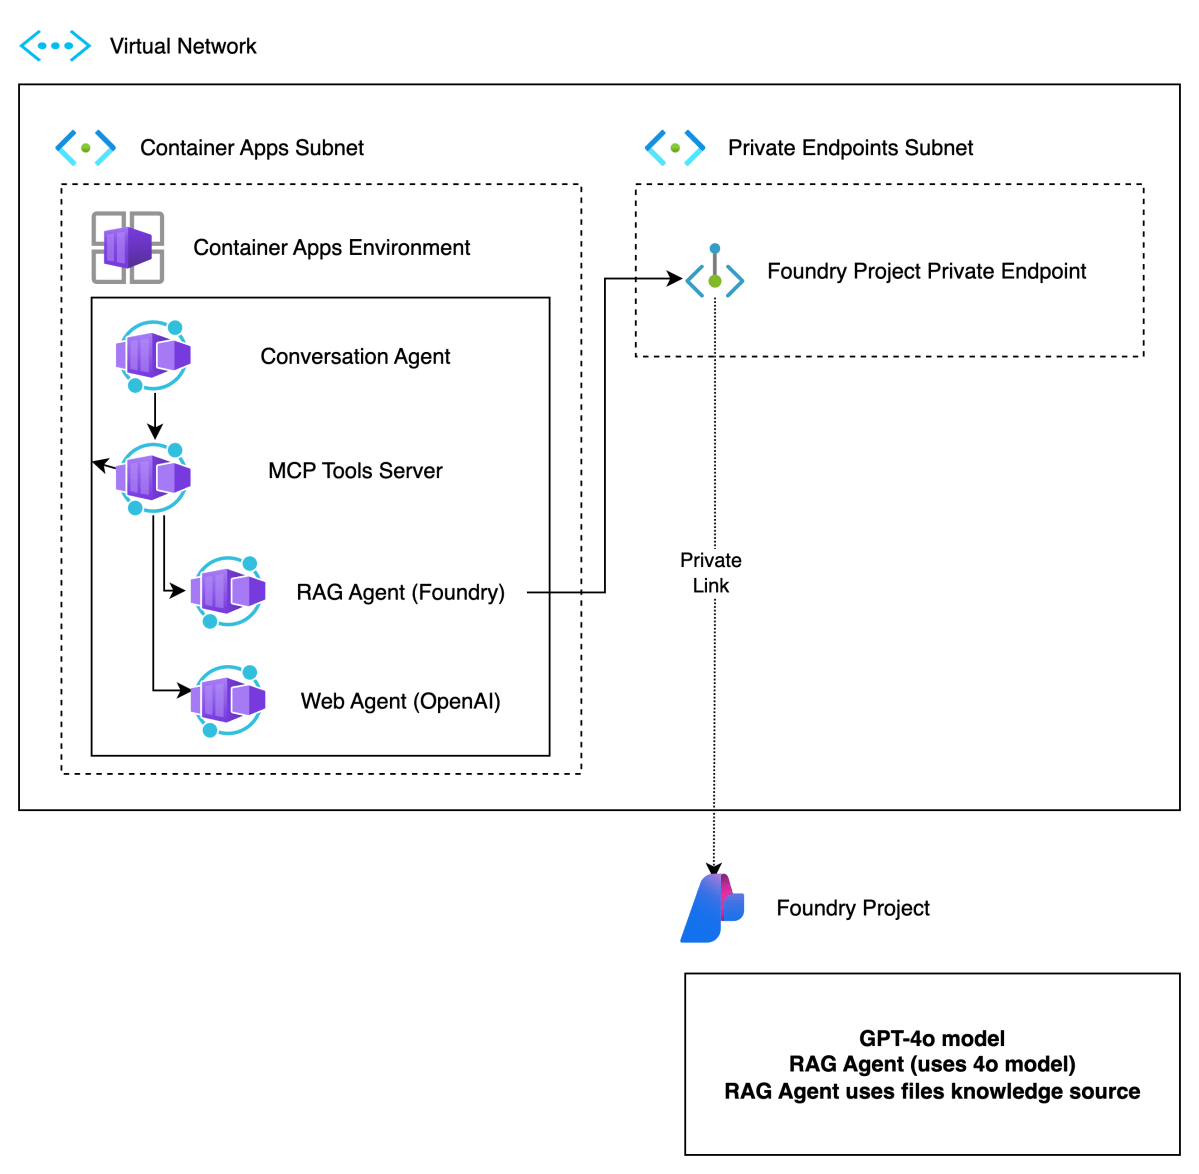
In previous posts, I discussed multi-agent solutions and the potential use of Google’s Agent2Agent protocol (A2A). In this post, we will deploy the infrastructure for an end-to-end solution like follows:

Multi-agent solution in Azure

Here’s a short description of the components.

ComponentDescription
Foundry ProjectBasic Foundry project with a private endpoint. The private endpoint ensures private communication between the RAG Agent container and the Azure Foundry agent.
Virtual NetworkProvides subnet to integrate Azure Container Apps Environment in a private network. This allows container apps to connect to Azure AI Foundry privately.
Container Apps EnvironmentIntegrated in our private network. Hosts Container Apps.
Container AppsContainer apps for conversation agent, MCP server, RAG agent and web agent. Only the conversation agent is publicly available.
Main components of the deployment

In what follows, we will first provide more information about Azure AI Foundry and then proceed to deploy all components except the Azure Container Apps themselves. We will deploy the actual app components in a follow-up post.

Azure AI Foundry Project

Azure AI Foundry is Microsoft’s enterprise platform for building, deploying, and managing AI applications—especially those using large language models (LLMs) and generative AI. It brings together everything you need: production-ready infrastructure, access to powerful models from providers like OpenAI, Mistral, and Meta, and tools for customization, monitoring, and scaling—all in one unified environment.

It’s designed to support the full AI development lifecycle:

  • Explore and test models and services
  • Build and customize applications or agents
  • Deploy to production
  • Monitor, evaluate, and improve performance

You can work either through the Azure AI Foundry portal or directly via SDKs in your preferred development environment.

You will do your work in a project. When you create a project in Azure AI Foundry, you’ll choose between two types:

Foundry Project

This type is recommended for most cases and is what we will use to define our RAG agent. Agents in projects are generally available (GA). You deploy models like gpt-4o directly to the project. There is no need to create a connection to an Azure OpenAI resource. It can be configured with a private endpoint to ensure private communication.

This matches exactly with our needs. Note that we will deploy a basic Foundry environment with a private endpoint and not a standard environment. For more information about basic versus standard, check the Foundry documentation.

Later, when we create the resources via Bicep, two resources will be created:

  • The Azure AI Foundry resource: with private endpoint
  • The Azure AI Foundry Project: used to create our RAG agent

Hub-based Project

This type has some additional options like Prompt Flow. However, agents in hub-based projects are not generally available at the time of writing. A hub-based project is not the best match for our needs here.

⚠️ In general, always use an Foundry Project versus a Hub-based Project unless you need a specific feature that, at the time of creation, is not yet available in Foundry projects.

As explained above, a Foundry project is part of an AI Foundry resource. Here is the resource in the portal (hub-based projects are under AI Hubs):

AI Foundry resource

Inside the resource, you can create a project. The above resource has one project:

Projects in the Foundry resource: your Foundry Project

To work with your project, you can click Go to Azure AI Foundry portal in the Overview tab:

In the Foundry Portal, you can proceed to create agents. However, if you have enabled a private endpoint, ensure you can access your Azure virtual network via a jump host or VPN. If that is not possible, allow your IP to access the Foundry resource in the Networking section of the resource. When you do not have access, you will see the following error:

No access to manage agents in the project

⚠️ Even after giving access, it will take a while for the change to propagate.

If you have access, you will see the following screen to add and configure agents:

Creating and debugging agents in your AI Foundry Project

Deployment with Bicep

You can check https://github.com/gbaeke/multi_agent_aca/tree/main/bicep to find Bicep files together with a shell script to deploy the resources. Also check the README for more information.

In Bicep, you first create an account (type is Microsoft.CognitiveServices/accounts). This matches the fndry-a2a resource in one of the screenshots above. In a later step, you add the project. The snippet below shows how the account gets created:

resource account 'Microsoft.CognitiveServices/accounts@2025-04-01-preview' = {
  name: aiFoundryName
  location: location
  identity: {
    type: 'SystemAssigned'
  }
  kind: 'AIServices'
  sku: {
    name: 'S0'
  }
  properties: {
    // Networking
    publicNetworkAccess: 'Enabled'
    
    networkAcls: {
      bypass: 'AzureServices'
      defaultAction: 'Deny'
      ipRules: [
        {
          value: 'IP address'
        }
      ]
    }

    // Specifies whether this resource support project management as child resources, used as containers for access management, data isolation, and cost in AI Foundry.
    allowProjectManagement: true

    // Defines developer API endpoint subdomain
    customSubDomainName: aiFoundryName

    // Auth
    disableLocalAuth: false
  }
}

It’s at this level you block public network access. The private endpoint and related network resources are created in other sections of the Bicep file.

Once you have this account, you can create the project. This matches with the fndry-a2a-proj project in one of the screenshots above. Here is the Bicep snippet:

resource project 'Microsoft.CognitiveServices/accounts/projects@2025-04-01-preview' = {
  name: defaultProjectName
  parent: account
  location: location
  identity: {
    type: 'SystemAssigned'
  }
  properties: {}
}

Later, we will create agents in this project. However, an agent needs a supported model. In this case, we will use gpt-4o-mini so we need to deploy it:

resource modelDeployment 'Microsoft.CognitiveServices/accounts/deployments@2024-10-01'= {
  parent: account
  name: 'gpt-4o-mini'
  sku : {
    capacity: 1
    name: 'GlobalStandard'
  }
  properties: {
    model:{
      name: 'gpt-4o-mini'
      format: 'OpenAI'
      version: '2024-07-18'
    }
  }
}

⚠️ Above, a capacity of 1 only allows for 1000 tokens per minute. You will probably want to increase that. If not, you run into issues when you test your agents because you will quickly hit the limit.

In the Foundry Portal, the model is shown as follows:

gpt-4o-mini deployment (next to manually deployed gpt-4o)

I will not go into the rest of the Bicep code. Most of it is network related (network, subnets, private endpoint, private DNS, DNS network links, etc..).

Creating the RAG Agent

Although we can create the agent using the Foundry SDK, we will create and test it via the Foundry Portal. As a first step, create or modify an agent. You might get a question first about the model you want to use with your agents.

In your agent, do the following:

  • give the agent a name
  • select a model from the list of deployed models
  • set instructions

I used the following instructions:

You retrieve information about Contoso projects using your knowledge tools. Always use your knowledge tools to answer the user. If you cannot find the answer via tools, respond you do not know.

Name, model and instructions

Next, scroll down and click + Add next to Knowledge. You will see the following screen:

List of agent knowledge tool

Select the Files tool and upload the files from https://github.com/gbaeke/multi_agent_aca/tree/main/project_descriptions. Use git clone https://github.com/gbaeke/multi_agent_aca.git to grab those files.

After selecting the local files, click Upload and Save to upload these files so the agent can search them. Behind the scenes, the files are chunked, chunks are vectorized and stored in a vector database. However, this is all hidden from you. Your agent configuration should now show the knowledge tool:

Knowledge tool added to agent

You should now test your agent. At the top of the configuration section, there is a Try in Playground link.

When I ask about EduForge, I get the following:

Asking about EduForge with a reponse from the files tool (+ annotation)

When you click View Run Info (at the end of the response), the use of the tool should be shown in the trace:

Tracing shows the tool calls and the file_search tool

If this works, you have a simple agent in Foundry that has access to a file_search tool to perform RAG (retrieval-augmented generation).

Wrapping up

We have now deployed the RAG agent with Azure AI Foundry. We created a Foundry resource in Azure with a private endpoint. The Foundry resource has one project within it. The project contains our RAG agent.

But remember, we want to wrap this agent with Google’s Agent2Agent. To achieve that, we will deploy the A2A server that uses the Foundry agent as a container in the Container Apps Environment.

We will take a look at how that works in a next post. In that post, we will use these agents as tools via MCP and provide the MCP tools to our conversation agent. The conversation agent will use Semantic Kernel.

Stay tuned! 😊

Using tasks with streaming in Google Agent2Agent (A2A)

In a previous post we created a simple A2A agent that uses synchronous message exchange. An A2A client sends a message and the A2A server, via the Agent Executor, responds with a message.

But what if you have a longer running task to perform and you want to inform the client that the task in ongoing? In that case, you can enable streaming on the A2A server and use a task that streams updates and the final result to the client.

The sequence diagram illustrates the flow of messages. It is based on the streaming example in the A2A specification.

A2A tasks with streaming updates

In this case, the A2A client needs to perform a streaming request which is sent to the /message/stream endpoint of the A2A server. The code in the AgentExecutor will need to create a task and provide updates to the client at regular intervals.

⚠️ If you want to skip directly to the code, check out the example on GitHub.

Let’s get into the details in the following order:

  • Writing an agent that provides updates while it is doing work: I will use the OpenAI Agents SDK with its support for agent hooks
  • Writing an AgentExecutor that accepts a message, creates a task and provides updates to the client
  • Updating the A2A Server to support streaming
  • Updating the A2A Client to support streaming

AI Agent that provides updates

Although streaming updates is an integral part of A2A, the agent that does the actual work needs to provide feedback about its progress. That work is up to you, the developer.

In my example, I use an agent created with the OpenAI Agents SDK. This SDK supports AgentHooks that execute at certain events:

  • Agent started/finished
  • Tool call started/finished

The agent class in agent.py on GitHub uses an asyncio queue to emit both the hook events and the agent’s reponse to the caller. The A2A AgentExecutor uses the invoke_stream() method which returns an AsyncGenerator.

You can run python agent.py independently. This should result in the following:

The agent has a tool that returns the current date. The hooks emit the events as shown above followed by the final result.

We can now use this agent from the AgentExecutor and stream the events and final result from the agent to the A2A Client.

AgentExecutor Tasks and Streaming

Instead of simply returning a message to the A2A client, we now need to initiate a long-running task that sends intermediate updates to the client.. Under the hood this uses SSE (Server Sent Events) between the A2A Client and A2A Server.

The file agent_executor.py on GitHub contains the code that makes this happen. Let’s step through it:

message_text = context.get_user_input()  # helper method to extract the user input from the context
        logger.info(f"Message text: {message_text}")

        task = context.current_task
        if not task:
            task = new_task(context.message)
            await event_queue.enqueue_event(task)

Above, we extract the user’s input from the incoming message and we check if the context already contains a task. If not, we create the task and we queue it. This informs the client a task was created and that sse can be used to obtain intermediate results.

Now that we have a task (a new or existing one), the following code is used:

updater = TaskUpdater(event_queue, task.id, task.contextId)
async for event in self.agent.invoke_stream(message_text):
    if event.event_type == StreamEventType.RESPONSE:
        # send the result as an artifact
        await updater.add_artifact(
            [Part(root=TextPart(text=event.data['response']))],
            name='calculator_result',
        )

        await updater.complete()
            
    else:
        await updater.update_status(
        TaskState.working,
        new_agent_text_message(
            event.data.get('message', ''),
            task.contextId,
            task.id,
        ),
    )

We first create a TaskUpdater instance that has the event queue, current task Id and contextId. The task updater is used to provide status updates, complete or even cancel a task.

We then call invoke_stream(query) on our agent and grab the events it emits. If we get a event type of RESPONSE, we create an artifact with the agent response as text and mask the task as complete. In all other cases, we send a status event with updater.update_status(). A status update contains a task state (working in this case) and a message about the state. The message we send is part of the event that is emitted from invoke_stream() and includes things like agent started, tool started, etc…

So in short, to send streaming updates:

  • Ensure your agents emit events of some sort
  • Use those events in the AgentExecutor and create a task that sends intermediate updates until the agent has finished

However, our work is not finished. The A2A Server needs to be updated to support streaming.

A2A Server streaming support

The A2A server code in is main.py on GitHub. To support streaming, we need to update the capabilities of the server:

capabilities = AgentCapabilities(streaming=True, pushNotifications=True)

⚠️ pushNotifications=True is not required for streaming. I include it here to show that sending a push notification to a web hook is also an option.

That’s it! The A2A Server now supports streaming. Easy! 😊

Streaming with the A2A Client

Instead of sending a message to the non-streaming endpoint, the client should now use the streaming endpoint. Here is the code to do that (check test_client.py for the full code):

message_payload = Message(
            role=Role.user,
            messageId=str(uuid.uuid4()),
            parts=[Part(root=TextPart(text=question))],
        )
        streaming_request = SendStreamingMessageRequest(
            id=str(uuid.uuid4()),
            params=MessageSendParams(
                message=message_payload,
            ),
        )
        print("Sending message")

        stream_response = client.send_message_streaming(streaming_request)

To send to the streaming endpoint, the SendStreamingMessageRequest() function is your friend, together with client.send_message_streaming()

We can now grab the responses as they come in:

async for chunk in stream_response:
            # Only print status updates and text responses
            chunk_dict = chunk.model_dump(mode='json', exclude_none=True)
            
            if 'result' in chunk_dict:
                result = chunk_dict['result']
                
                # Handle status updates
                if result.get('kind') == 'status-update':
                    status = result.get('status', {})
                    state = status.get('state', 'unknown')
                    
                    if 'message' in status:
                        message = status['message']
                        if 'parts' in message:
                            for part in message['parts']:
                                if part.get('kind') == 'text':
                                    print(f"[{state.upper()}] {part.get('text', '')}")
                    else:
                        print(f"[{state.upper()}]")
                
                # Handle artifact updates (contain actual responses)
                elif result.get('kind') == 'artifact-update':
                    artifact = result.get('artifact', {})
                    if 'parts' in artifact:
                        for part in artifact['parts']:
                            if part.get('kind') == 'text':
                                print(f"[RESPONSE] {part.get('text', '')}")
                
                # Handle initial task submission
                elif result.get('kind') == 'task':
                    print(f"[TASK SUBMITTED] ID: {result.get('id', 'unknown')}")
                    
                # Handle final completion
                elif result.get('final') is True:
                    print("[TASK COMPLETED]")

This code checks the the type of content coming in:

  • status-update: when AgentExecutor sends a status update
  • artifact-update: when AgentExecutor sends an artifact with the agent’s response
  • task: when tasks are submitted and completed

Running the client and asking what today’s date is, results in the following response:

Streaming is working as intended! But what if you use a client that does not support streaming? That actually works and results in a full response with the agent’s answer in the result field. You would also get a history field that contains the initial user question, including all the task updates.

Here’s a snippet of that result:

{
  "id": "...",
  "jsonrpc": "2.0",
  "result": {
    "artifacts": [
      {
        "artifactId": "...",
        "name": "calculator_result",
        "parts": [
          {
            "kind": "text",
            "text": "Today's date is July 13, 2025."
          }
        ]
      }
    ],
    "contextId": "...",
    "history": [
      {
        "role": "user",
        "parts": [
          {
            "kind": "text",
            "text": "What is today's date?"
          }
        ]
      },
      {
        "role": "agent",
        "parts": [
          {
            "kind": "text",
            "text": "Agent 'CalculatorAgent' is starting..."
          }
        ]
      }
    ],
    "id": "...",
    "kind": "task",
    "status": {
      "state": "completed"
    }
  }
}

Wrapping up

You have now seen how to run longer running tasks and provide updates along the way via streaming. As long as your agent code provides status updates, the AgentExecutor can create a task and provide task updates and the task result to the A2A Server which uses SSE to send them to the A2A Client.

In an upcoming post, we will take a look at running a multi-agent solution in the Azure cloud.