In my previous post, I wrote about App Services with Private Link and used Azure Front Door to publish the web app. Azure Front Door Premium (in preview), can create a Private Endpoint and link it to your web app via Azure Private Link. When that happens, you need to approve the pending connection in Private Link Center.
The pending connection would be shown here, ready for approval
Although this is easy to do, you might want to automate this approval. Automation is possible via a REST API but it is easier via Azure CLI.
To do so, first list the private endpoint connections of your resource, in my case that is a web app:
az network private-endpoint-connection list --id /subscriptions/SUBID/resourceGroups/RGNAME/providers/Microsoft.Web/sites/APPSERVICENAME
The above command will return all private endpoint connections of the resource. For each connection, you get the following information:
 {
    "id": "PE CONNECTION ID",
    "location": "East US",
    "name": "NAME",
    "properties": {
      "ipAddresses": [],
      "privateEndpoint": {
        "id": "PE ID",
        "resourceGroup": "RESOURCE GROUP NAME OF PE"
      },
      "privateLinkServiceConnectionState": {
        "actionsRequired": "None",
        "description": "Please approve this connection.",
        "status": "Pending"
      },
      "provisioningState": "Pending"
    },
    "resourceGroup": "RESOURCE GROUP NAME OF YOUR RESOURCE",
    "type": "YOUR RESOURCE TYPE"
  }
To approve the above connection, use the following command:
az network private-endpoint-connection approve --id PE CONNECTION ID --description "Approved"
The –id in the approve command refers to the private endpoint connection ID, which looks like below for a web app:
/subscriptions/YOUR SUB ID/resourceGroups/YOUR RESOURCE GROUP/providers/Microsoft.Web/sites/YOUR APP SERVICE NAME/privateEndpointConnections/YOUR PRIVATE ENDPOINT CONNECTION NAME
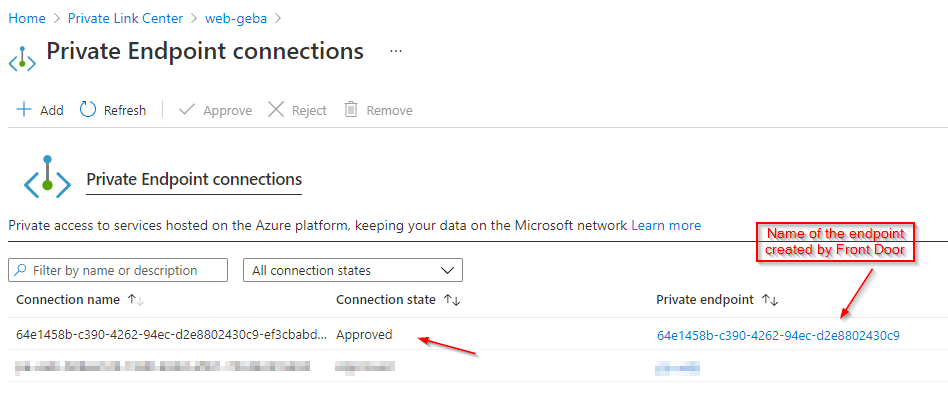
After running the above command, the connection should show as approved:
Approved private endpoint connection
When you automate this in a pipeline, you can first list the private endpoint connections of your resource and filter on provisioningState=”Pending” to find the ones you need to approve.
If you want to jump straight to the video, here it is:
In the rest of this blog post, I provide some more background information on the different pieces of the solution.
Azure App Service
Azure App Service is a great way to host web application and APIs on Azure. It’s PaaS (platform as a service), so you do not have to deal with the underlying Windows or Linux servers as they are managed by the platform. I often see AKS (Azure Kubernetes Service) implementations to host just a couple of web APIs and web apps. In most cases, that is overkill and you still have to deal with Kubernetes upgrades, node patching or image replacements, draining and rebooting the nodes, etc… And then I did not even discuss controlling ingress and egress traffic. Even if you standardize on packaging your app in a container, Azure App Service will gladly accept the container and serve it for you.
By default, Azure App Service gives you a public IP address and FQDN (Fully Qualified Domain Name) to reach your app securely over the Internet. The default name ends with azurewebsites.net but you can easily add custom domains and certificates.
Things get a bit more complicated when you want a private IP address for your app, reachable from Azure virtual networks and on-premises networks. One solution is to use an App Service Environment. It provides a fully isolated and dedicated environment to run App Service apps such as web apps and APIs, Docker containers and Functions. You can create an internal ASE which results in an Internal Load Balancer in front of your apps that is configured in a subnet of your choice. There is no need to configure Private Endpoints to make use of Private Link. This is often called native virtual network integration.
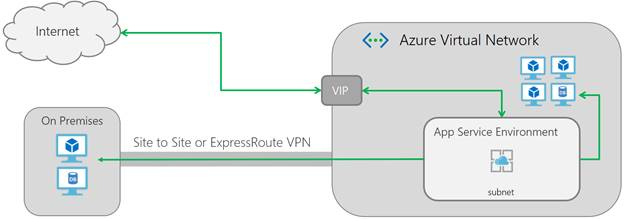
At the network level, an App Service Environment v2, works as follows:
ASE networking (from Microsoft website)
Looking at the above diagram, an ILB ASE (but also an External ASE) also makes it easy to connect to back-end systems such as on-premises databases. The outbound connection to internal resources originates from an IP in the chosen integration subnet.
The downside to ASE is that its isolated instances (I1, I2, I3) are rather expensive. It also takes a long time to provision an ASE but that is less of an issue. In reality though , I would like to see App Service Environments go away and replaced by “regular” App Services with toggles that give you the options you require. You would just deploy App Services and set the options you require. In any case, native virtual network integration should not depend on dedicated or shared compute. One can only dream right? 😉
As an alternative to an ASE for a private app, consider a non-ASE App Service that, in production, uses Premium V2 or V3 instances. The question then becomes: “How do you get a private IP address?” That’s where Private Link comes in…
Azure Private Link with App Service
Azure Private Link provides connectivity to Azure services (such as App Service) via a Private Endpoint. The Private Endpoint creates a virtual network interface card (NIC) on a subnet of your choice. Connections to the NICs IP address end up at the Private Link service the Private Endpoint is connected to. Below is an example with Azure SQL Database where one Private Endpoint is mapped, via Azure Private Link, to one database. The other databases are not reachable via the endpoint.
Private Endpoint connected to Azure SQL Database (PaaS) via Private Link (source: Microsoft website)
To create a regular App Service that is accessible via a private IP, we can do the same thing:
create a private endpoint in the subnet of your choice
connect the private endpoint to your App Service using Private Link
Both actions can be performed at the same time from the portal. In the Networking section of your App Service, click Configure your private endpoint connections. You will see the following screen:
Private Endpoint connection of App Service
Now click Add to create the Private Endpoint:
Creating the private endpoint
The above creates the private endpoint in the default subnet of the selected VNET. When the creation is finished, the private endpoint will be connected to App Service and automatically approved. There are scenarios, such as connecting private endpoints from other tenants, that require you to approve the connection first:
Automatically approved connection
When you click on the private endpoint, you will see the subnet and NIC that was created:
Private Endpoint
From the above, you can click the link to the network interface (NIC):
Network interface created by the private endpoint
Note that when your delete the Private Endpoint, the interface gets deleted as well.
Great! Now we have an IP address that we can use to reach the App Service. If you use the default name of the web app, in my case https://web-geba.azurewebsites.net, you will get:
Oops, no access on the public name (resolves to public IP)
Indeed, when you enable Private Link on App Service, you cannot access the website using its public IP. To solve this, you will need to do something at the DNS level. For the default domain, azurewebsites.net, it is recommended to use Azure Private DNS. During the creation of my Private Endpoint, I turned on that feature which resulted in:
Private DNS Zone for privatelink.azurewebsites.net
You might wonder why this is a private DNS zone for privatelink.azurewebsites.net? From the moment you enable private link on your web app, Microsoft modifies the response to the DNS query for the public name of your app. For example, if the app is web-geba.azurewebsites.net and you query DNS for that name, it will respond with a CNAME of web-geba.privatelink.azurewebsites.net. If that cannot be resolved, you will still get the public IP but that will result in a 403.
In my case, as long as the DNS servers I use can resolve web-geba.privatelink.azurewebsites.net and I can connect to 10.240.0.4, I am good to go. Note however that the DNS story, including Private DNS and your own DNS servers, is a bit more complex that just checking a box! However, that is not the focus of this blogpost so moving on… 😉
One of the features of App Service Environments, is the ability to connect to back-end systems in Azure VNETs or on-premises. That is the result of native VNET integration.
When you enable Private Link on a regular App Service, you do not get that. Private Link only enables private inbound connectivity but does nothing for outbound. You will need to configure something else to make outbound connections from the Web App to resources such as internal SQL Servers work.
In the network configuration of you App Service, there is another option for outbound connectivity to internal resources – VNet integration.
VNET Integration
In the Networking section of App Service, find the VNet integration section and click Click here to configure. From there, you can add a VNet to integrate with. You will need to select a subnet in that VNet for this integration to work:
Outbound connectivity for App Service to Azure VNets
There are quite some things to know when it comes to VNet integration for App Service so be sure to check the docs.
Private Link with Azure Front Door
Often, a web app is made private because you want to put a Web Application Firewall (WAF) in front of the app. Typically, that goal is achieved by putting Azure Application Gateway (AG) with WAF in front of an internal App Services Environment. As as alternative to AG, you can also use virtual appliances such as Barracuda WAF for Azure. This works because the App Services Environment is a first-class citizen of your Azure virtual network.
There are multiple ways to put a WAF in front of a (non-ASE) App Service. You can use Front Door with the App Service as the origin, as long as you restrict direct access to the origin. To that end, App Services support access restrictions.
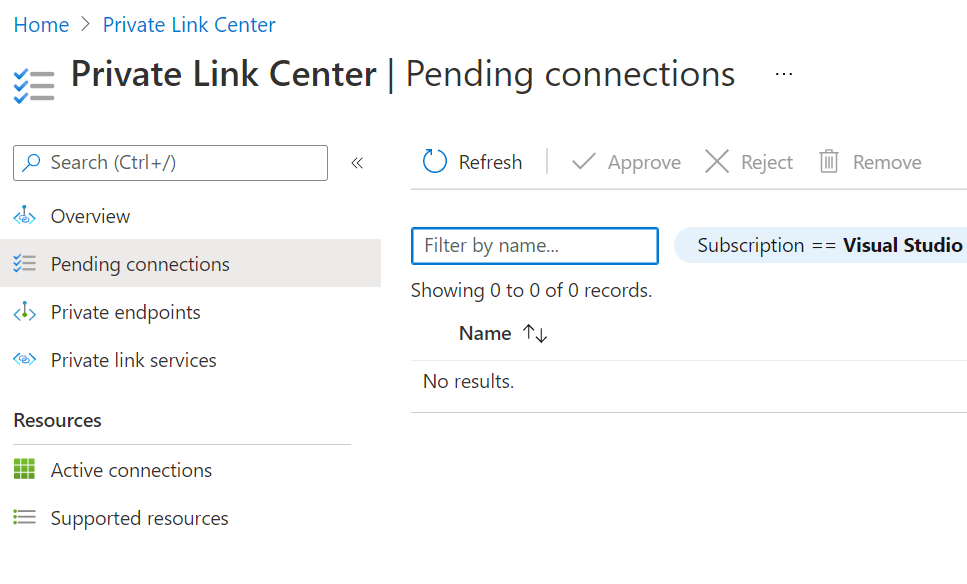
With Azure Front Door Premium, in preview at the time of this writing (June 2021), you can use Private Link as well. In that case, Azure Front Door creates a private endpoint. You cannot control or see that private endpoint because it is managed by Front Door. Because the private endpoint is not in your tenant, you will need to approve the connection from the private endpoint to your App Service. You can do that in multiple ways. One way is Private Link Center Pending Connections:
Pending Connections
If you check the video at the top of this page, this is shown here.
Conclusion
The combination of Azure networking with App Services Environments (ASE) and “regular” App Services (non-ASE) can be pretty confusing. You have native network integration for ASE, private access with private link and private endpoints for non-ASE, private DNS for private link domains, virtual network service endpoints, VNet outbound configuration for non-ASE etc… Most of the time, when I am asked for the easiest and most cost-effective option for a private web app in PaaS, I go for a regular non-ASE App Service and use Private Link to make the app accessible from the internal network.
I have talked about and demonstrated the use of kubelogin in previous posts and videos. Because I often get questions about logging on to Azure Kubernetes Services (AKS) integrated with Azure AD (AAD) in a non-interactive fashion, I decided to write this separate post about it.
What is kubelogin?
Kubelogin is a client-go credential plugin that implements Azure AD authentication. Kubernetes and its CLI, kubectl, are written in Go and client-go is a package or library that allows you to talk to Kubernetes from the Go language. Client-go supports credentials plugins to integrate with authentication protocols that are not supported by default by kubectl. Do not confuse azure/kubelogin with int128/kubelogin. The latter is a generic credential plugin that supports OpenID Connect in general, while the former was specifically created for Azure.
Why use it?
When you integrate an AKS cluster with Azure AD, you can grant users and groups in Azure AD, access rights to your cluster. You do that via Kubernetes RBAC or Azure RBAC for Kubernetes. Once you have assigned the necessary access rights to the user or group, a user can login by first obtaining credentials with the Azure CLI:
az aks get-credentials -n CLUSTERNAME -g RESOURCEGROUP
After running the above command, the user will not be asked to authenticate yet. However, when a command such as kubectl get nodes is run, the user will need to authenticate to Azure AD by opening a browser and entering a code:
Prompted to enter a code
When the code is entered, and the user has the necessary role to run the command, the output will appear.
This is great when you are working interactively on the command line but not so great in a pipeline. Often, engineers circumvent this by using:
az aks get-credentials -n CLUSTERNAME -g RESOURCEGROUP --admin
The use of –admin switches to client certificate authentication and gives you full control of the cluster. In general, this is not recommended. It is worth noting that, at the time of this writing, there is also a preview feature that can disable the use of local accounts.
What to do in a pipeline?
In a pipeline, the easiest way to login with an Azure AD account is as follows:
Use the Azure CLI and logon with an account that has the required role on the Kubernetes cluster
Use az aks get-credentials to obtain cluster credentials and DO NOT use –admin; this creates a kube config file on the CI/CD agent (e.g. GitHub runner, Azure DevOps agent, etc…)
Download kubelogin if required (mostly, that will be needed)
Use kubelogin to update the kube config file with the token of the Azure CLI user; this is one of the options and has been added in March of 2021
Check out the following sample Azure DevOps pipeline below:
trigger: none

pool:
  vmImage: ubuntu-latest

steps:
- task: KubectlInstaller@0
  inputs:
    kubectlVersion: 'latest'

- task: AzureCLI@2
  inputs:
    azureSubscription: 'NAME OF AZURE DEVOPS SERVICE CONNECTION'
    scriptType: 'bash'
    scriptLocation: 'inlineScript'
    inlineScript: |
      az aks get-credentials -n CLUSTERNAME -g CLUSTERRESOURCEGROUP

      # get kubelogin
      wget https://github.com/Azure/kubelogin/releases/download/v0.0.9/kubelogin-linux-amd64.zip
      unzip kubelogin-linux-amd64.zip
      sudo mv bin/linux_amd64/kubelogin /usr/bin
      kubelogin convert-kubeconfig -l azurecli

      kubectl get nodes
In Azure DevOps, you can specify a name of a service connection in the azureSubscription parameter of the AzureCLI@2 task. The account used by the service connection needs access rights to the Kubernetes cluster.
The command kubelogin convert-kubeconfig -l azurecli modifies the kube config obtained with az aks get-credentials with a token for the account used by the Azure CLI. To use the Azure CLI credential, you have to use managed AAD integration.
Although the above is for Azure DevOps, the process is similar for other CI/CD systems such as GitHub workflows. In GitHub, you can use the azure/CLI action, which requires an azure/login action first. The azure/login action uses a service principal to connect. That service principal needs access rights to the Kubernetes cluster.
Note that there are many other ways to obtain the token. You are not restricted to use the Azure CLI credentials. You can also use your own service principal or a managed service identity (MSI). Check the README of azure/kubelogin for more info.
While I was investigating Kyverno, I wanted to check my Kubernetes deployments for compliance with Kyverno policies. The Kyverno CLI can be used to do that with the following command:
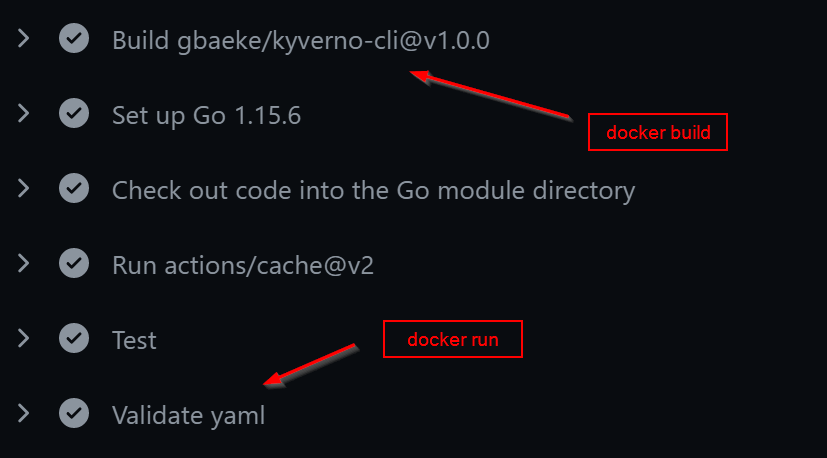
To do this easily from a GitHub workflow, I created an action called gbaeke/kyverno-cli. The action uses a Docker container. It can be used in a workflow as follows:
# run kyverno cli and use v1 instead of v1.0.0
- name: Validate policies
  uses: gbaeke/kyverno-action@v1
  with:
    command: |
      kyverno apply ./policies --resource=./deploy/deployment.yaml
You can find the full workflow here. In the next section, we will take a look at how you build such an action.
If you want a video instead, here it is:
GitHub Actions
A GitHub Action is used inside a GitHub workflow. An action can be built with Javascript or with Docker. To use an action in a workflow, you use uses: followed by a reference to the action, which is just a GitHub repository. In the above action, we used uses: gbaeke/kyverno-action@v1. The repository is gbaeke/kyverno-action and the version is v1. The version can refer to a release but also a branch. In this case v1 refers to a branch. In a later section, we will take a look at versioning with releases and branches.
Create a repository
An action consists of several files that live in a git repository. Go ahead and create such a repository on GitHub. I presume you know how to do that. We will add several files to it:
Dockerfile and all the files that are needed to build the Docker image
action.yml: to set the name of our action, its description, inputs and outputs and how it should run
Docker image
Remember that we want a Docker image that can run the Kyverno CLI. That means we have to include the CLI in the image that we build. In this case, we will build the CLI with Go as instructed on https://kyverno.io. Here is the Dockerfile (should be in the root of your git repo):
FROM golang:1.15
COPY src/ /
RUN git clone https://github.com/kyverno/kyverno.git
WORKDIR kyverno
RUN make cli
RUN mv ./cmd/cli/kubectl-kyverno/kyverno /usr/bin/kyverno
ENTRYPOINT ["/entrypoint.sh"]
We start from a golang image because we need the go tools to build the executable. The result of the build is the kyverno executable in /usr/bin. The Docker image uses a shell script as its entrypoint, entrypoint.sh. We copy that shell script from the src folder in our repository.
So go ahead and create the src folder and add a file called entrypoint.sh. Here is the script:
#!/usr/bin/env bash
set -e
set -o pipefail
echo ">>> Running command"
echo ""
bash -c "set -e;  set -o pipefail; $1"
This is just a bash script. We use the set commands in the main script to ensure that, when an error occurs, the script exits with the exit code from the command or pipeline that failed. Because we want to run a command like kyverno apply, we need a way to execute that. That’s why we run bash again at the end with the same options and use $1 to represent the argument we will pass to our container. Our GitHub Action will need a way to require an input and pass that input as the argument to the Docker container.
Note: make sure the script is executable; use chmod +x entrypoint.sh
The action.yml
Action.yml defines our action and should be in the root of the git repo. Here is the action.yml for our Docker action:
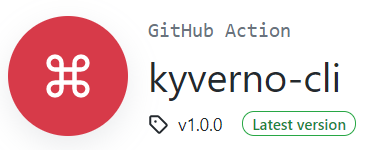
Above, we give the action a name and description. We also set an icon and color. The icon and color is used on the GitHub Marketplace:
command icon and color as defined in action.yml (note that this is the REAL action; in this post we call the action kyverno-action as an example)
As stated earlier, we need to pass arguments to the container when it starts. To achieve that, we define a required input to the action. The input is called command but you can use any name.
In the run: section, we specify that this action uses Docker. When you use image: Dockerfile, the workflow will build the Docker image for you with a random name and then run it for you. When it runs the container, it passes the command input as an argument with args: Multiple arguments can be passed, but we only pass one.
Note: the use of a Dockerfile makes running the action quite slow because the image needs to be built every time the action runs. In a moment, we will see how to fix that.
Verify that the image works
On your machine that has Docker installed, build and run the container to verify that you can run the CLI. Run the commands below from the folder containing the Dockerfile:
docker build -t DOCKER_HUB_USER/kyverno-action:v1.0.0 .

docker run DOCKER_HUB_USER/kyverno-action:v1.0.0 "kyverno version"
Above, I presume you have an account on Docker Hub so that you can later push the image to it. Substitute DOCKER_HUB_USER with your Docker Hub username. You can of course use any registry you want.
The result of docker run should be similar to the result below:
Note: if you want to build a specific version of the Kyverno CLI, you will need to modify the Dockerfile; the instructions I used build the latest version and includes release candidates
If docker run was successful, push the image to Docker Hub (or your registry):
docker push DOCKER_HUB_USER/kyverno-action:v1.0.0
Note: later, it will become clear why we push this container to a public registry
Publish to the marketplace
You are now ready to publish your action to the marketplace. One thing to be sure of is that the name of your action should be unique. Above, we used kyverno-action. When you run through the publishing steps, GitHub will check if the name is unique.
To see how to publish the action, check the following video:
video starts at the marketplace publishing step
Note that publishing to the marketplace is optional. Our action can still be used without it being published. Publishing just makes our action easier to discover.
Using the action
At this point, you can already use the action when you specify the exact release version. In the video, we created a release called v1.0.0 and optionally published it. The snippet below illustrates its use:
Running this action results in a docker build, followed by a docker run in the workflow:
The build step takes quite some time, which is somewhat annoying. Let’s fix that! In addition, we will let users use v1 instead of having to specify v1.0.0 or v1.0.1 etc…
Creating a v1 branch
By creating a branch called v1 and modifying action.yml to use a Docker image from a registry, we can make the action quicker and easier to use. Just create a branch in GitHub and call it v1. We’ll use the UI:
create the branch here; if it does not exist there will be a create option (here it exists already)
Make the v1 branch active and modify action.yml:
In action.yml, instead of image: ‘Dockerfile’, use the following:
When you use the above statement, the image will be pulled instead of built from scratch. You can now use the action with @v1 at the end:
# run kyverno cli and use v1 instead of v1.0.0
- name: Validate policies
  uses: gbaeke/kyverno-action@v1
  with:
    command: |
      kyverno apply ./policies --resource=./deploy/deployment.yaml
In the worflow logs, you will see:
The action now pulls the image from Docker Hub and later runs it
Conclusion
We can conclude that building GitHub Actions with Docker is quick and fun. You can build your action any way you want, using the tools you like. Want to create a tool with Go, or Python or just Bash… just do it! If you do want to build a GitHub Action with JavaScript, then be sure to check out this article on devblogs.microsoft.com.
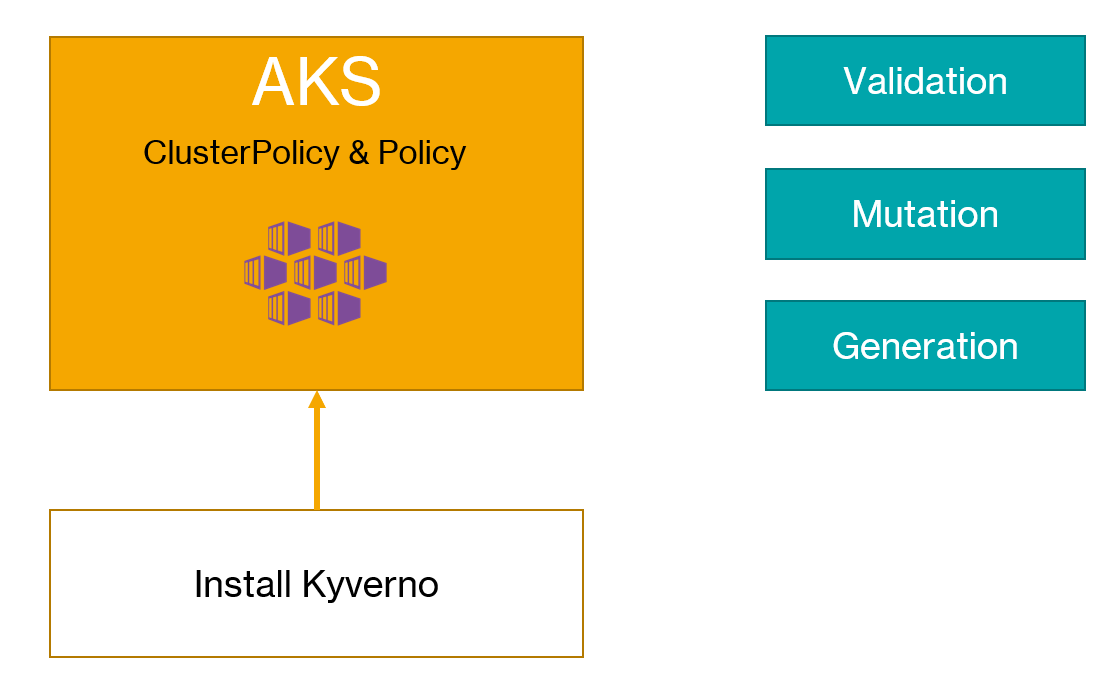
In an earlier blogpost, I wrote about Kubernetes Policies on Azure Kubernetes Service with the Azure Policy add-on. The add-on installs Gatekeeper v3 on AKS, which relies on Open Policy Agent to define your policies. Open Policy Agent is a general cloud-native solution for policy-based control, which goes beyond Kubernetes. Defining custom policies for OPA (and thus Gatekeeper), requires knowledge of rego, their policy language. Rego is very powerful and flexible but can be a bit daunting. As always, there’s a learning curve but the feedback I get is that it can be quite steep.
When you are using Azure Policy with the AKS add-on, you can only use the built-in Azure policies. If you want custom policies, you should install Gatekeeper v3 on AKS yourself and write your own ConstraintTemplates that contain the policy logic written in rego.
If you only need policies for Kubernetes and you want to express the policies in YAML, Kyverno is a good alternative. It makes it relatively easy to write validation policies. In addition to validation policies, Kyverno supports mutation and generation policies. More about that later.
Installation
Installation is very easy via a raw YAML manifest or a Helm chart. Because the Kyverno policy engine runs as an admission webhook, it requires secure communication from the Kubernetes API server. By default, the installation uses self-signed certificates.
The simplest way to install it is via the command below:
Always check the raw YAML before submitting it to your cluster! By default, the admission webhook is installed in the kyverno namespace, via a deployment that deploys 1 replica of ghcr.io/kyverno/kyverno:v1.3.5-rc2 (or whatever is in the install.yaml at the time of installation). This install.yaml always refers to the latest release, which includes release candidates. You should change the version of the image to the latest stable release in production scenarios. At the time of writing, the latest stable release was 1.3.4.
Creating policies
As discussed above, you can write three types of policies:
validation: write rules to deny the creation of resources and enforce them in realtime or audit them
mutation: patch incoming JSON requests to modify them before validation and submission to etcd
generation: creating additional objects; e.g., when you create a namespace, add roles to the namespace or add a default-deny network policy
To illustrate the creation of these types of policies, I created a video on my YouTube channel:
CI/CD Policy Check
Before you deploy workloads to Kubernetes, it is a good idea to check if your manifests pass your policy rules before you deploy. For OPA, you can do that with conftest. On GitHub Marketplace, you will find several actions that can run conftest in a workflow.
To check your manifests with Kyverno, there is the Kyverno CLI. You simply put the same policies you submit to your cluster in a folder (e.g., policies) and then run the CLI as shown below (in the folder containing the policies and deploy folders):
Above, the policies are applied to just one manifest (deployment.yaml). It works with multiple manifests as well. When there is an issue, you will see it in the output:
policy require-run-as-non-root -> resource default/Deployment/go-template-deployment failed:
1. autogen-check-containers: validation error: Running as root is not allowed. The fields spec.securityContext.runAsNonRoot, spec.containers[*].securityContext.runAsNonRoot, and spec.initContainers[*].securityContext.runAsNonRoot must be `true`. Rule autogen-check-containers[0] failed at path /spec/template/spec/containers/0/securityContext/runAsNonRoot/. Rule autogen-check-containers[1] failed at path /spec/template/spec/containers/0/securityContext/runAsNonRoot/.

pass: 14, fail: 1, warn: 0, error: 0, skip: 0
Above, kyverno apply found that my deployment has securityContext.runAsNonRoot: false set, which is not allowed.
To run this check in a GitHub workflow, I created a GitHub action that does exactly that. Apparently, such an action did not exist. Drop me a comment if there is another way. You can find the GitHub Action on the marketplace: https://github.com/marketplace/actions/kyverno-cli.
To use the action in a workflow, drop in a snippet similar to the one below:
There’s more you can do with the CLI so be sure to check out the documentation.
Conclusion
Although we only scratched the surface in this post and the above video, in my opinion Kyverno is somewhat easier to get started with than OPA Gatekeeper. Having the ability to create mutation and generation policies opens up all kinds of interesting scenarios as well. The documentation is clear and the examples are a good way to get you started. If you only need policies on Kubernetes and not the wide capabilities of OPA, give it a try and tell me what you think!
When I create docker images for a Go application, I often use the scratch image. Scratch is an empty image, so it is ideal for statically linked binaries that do not require libc. Go, Rust and other languages can compile to such binaries.
Because I like the pattern of building the binary in a container, I prefer a multi-stage build . An example of a Dockerfile for such a build can be found here and below (with some comments removed to make it shorter).
ARG GO_VERSION=1.15.6

# STAGE 1: building the executable
FROM golang:${GO_VERSION}-alpine AS build
RUN apk add --no-cache git
RUN apk --no-cache add ca-certificates

# add a user here because addgroup and adduser are not available in scratch
RUN addgroup -S myapp \
    && adduser -S -u 10000 -g myapp myapp

WORKDIR /src
COPY ./go.mod ./go.sum ./
RUN go mod download

COPY ./ ./

# Run tests
RUN CGO_ENABLED=0 go test -timeout 30s -v github.com/gbaeke/go-template/pkg/api

# Build the executable
RUN CGO_ENABLED=0 go build \
	-installsuffix 'static' \
	-o /app ./cmd/app

# STAGE 2: build the container to run
FROM scratch AS final
LABEL maintainer="gbaeke"
COPY --from=build /app /app

# copy ca certs
COPY --from=build /etc/ssl/certs/ca-certificates.crt /etc/ssl/certs/

# copy users from builder (use from=0 for illustration purposes)
COPY --from=0 /etc/passwd /etc/passwd

USER myapp

ENTRYPOINT ["/app"]
Because the scratch image is empty, there are several things missing:
CA (certificate authority) certificates
/etc/passwd with users and groups
In order to add the certificates, they are installed in the first stage and later copied. Similarly, if you want to create explicit users and groups and use them in the scratch image, you create them in the first stage and copy /etc/passwd in the later stage. Instead of copying /etc/passwd, you can also skip that and just set the USER with a uid like USER 10000. I all comes down to what you need exactly or how explicit you want to be.
Although this works, you can also use distroless static. The distroless static image is over at grc.io, at gcr.io/distroless/static. This image is ideal for Go apps that do not need libc. It is not completely empty and includes the following:
CA certs: no need to copy them from stage 1
/etc/passwd: contains users and groups such as nonroot
/tmp
tzdata: in case you want to set the timezone other than UTC
Creating a Docker image based on distroless static is easy to do:
# argument for Go version
ARG GO_VERSION=1.15.6

# STAGE 1: building the executable
FROM golang:${GO_VERSION}-alpine AS build

RUN apk add --no-cache git
WORKDIR /src
COPY ./go.mod ./go.sum ./
RUN go mod download
COPY ./ ./
# Run tests
RUN CGO_ENABLED=0 go test -timeout 30s -v github.com/gbaeke/go-template/pkg/api
# Build the executable
RUN CGO_ENABLED=0 go build \
	-installsuffix 'static' \
	-o /app ./cmd/app

# STAGE 2: build the container to run
FROM gcr.io/distroless/static AS final

LABEL maintainer="gbaeke"
USER nonroot:nonroot

# copy compiled app
COPY --from=build --chown=nonroot:nonroot /app /app

# run binary; use vector form
ENTRYPOINT ["/app"]
In the above Dockerfile, there is no need to copy CA certs or etc/passwd in stage 2. The CA certs are already in the image and /etc/passwd contains a nonroot user and group. Although you can set the user and group in your Kubernetes manifest, I find it a good practice to also add it to the Dockerfile.
The size of the above distroless image is around 30MB. When I use the scratch image, the size is around 29MB. Hardly a difference which makes total sense.
So what should you do? I would recommend to look at distroless images in general. They are available in several flavors and it’s certainly the right trend. Before you do, be sure to check this informative post as well.
When it comes to Go and the scratch image, I prefer using distroless static. The difference with scratch is of course very small but the inclusion of CA certs and some default users make things a tiny bit easier.
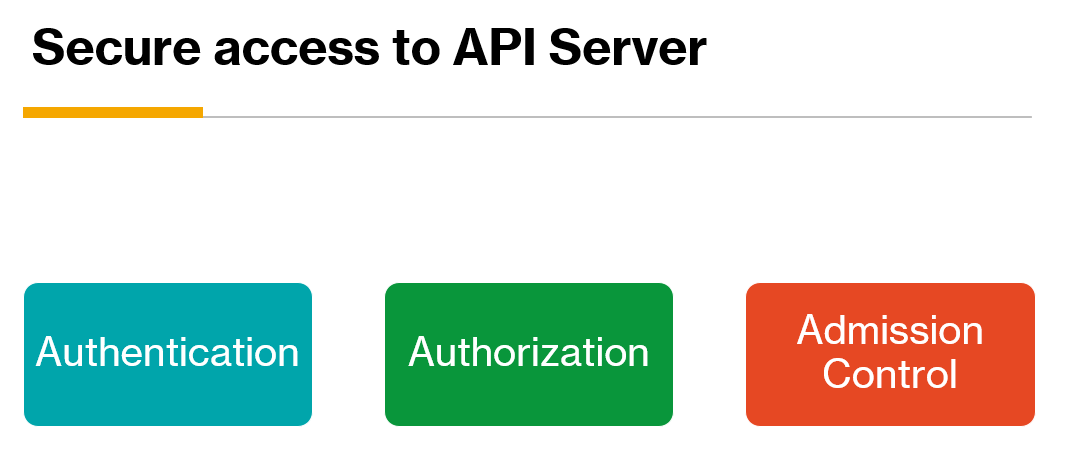
To secure access to the Kubernetes API server, you need to be authenticated and properly authorized to do what you need to do. The third mechanism to secure access is admission control. Simply put, admission control allows you to inspect requests to the API server and accept or deny the request based on rules you set. You will need an admission controller, which is just code that intercepts the request after authentication and authorization.
There is a list of admission controllers that are compiled-in with two special ones (check the docs):
MutatingAdmissionWebhook
ValidatingAdmissionWebhook
With the two admission controllers above, you can develop admission plugins as extensions and configure them at runtime. In this post, we will look at a ValidatingAdmissionWebhook that is used together with Azure Policy to inspect requests to the AKS API Server and either deny or audit these requests.
Note that I already have a post about Azure Policy and pod security policies here. There is some overlap between that post and this one. In this post, we will look more closely at what happens on the cluster.
Want a video instead?
Azure Policy
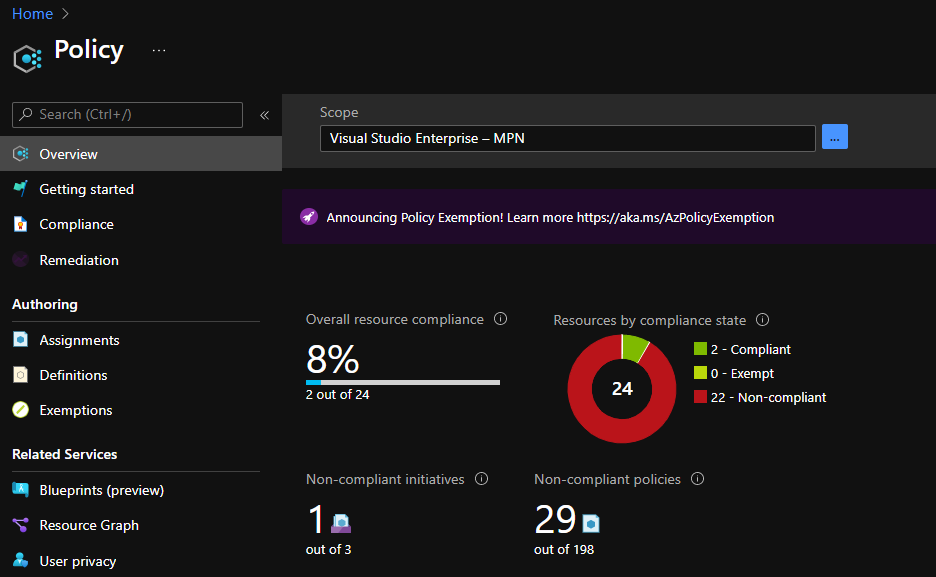
Azure has its own policy engine to control the Azure Resource Manager (ARM) requests you can make. A common rule in many organizations for instance is the prohibition of creation of expensive resources or even creating resources in unapproved regions. For example, a European company might want to only create resources in West Europe or North Europe. Azure Policy is the engine that can enforce such a rule. For more information, see Overview of Azure Policy. In short, you select from an ever growing list of policies or you create your own. Policies can be grouped in policy initiatives. A single policy or an initiative gets assigned to a scope, which can be a management group, a subscription or a resource group. In the portal, you then check for compliance:
Compliancy? What do I care? It’s just my personal subscription 😁
Besides checking for compliance, you can deny the requests in real time. There are also policies that can create resources when they are missing.
Azure Policy for Kubernetes
Although Azure Policy works great with Azure Resource Manager (ARM), which is basically the API that allows you to interact with Azure resources, it does not work with Kubernetes out of the box. We will need an admission controller (see above) that understands how to interpret Kubernetes API requests in addition to another component that can sync policies in Azure Policy to Kubernetes for the admission controller to pick up. There is a built-in list of supported Kubernetes policies.
For the admission controller, Microsoft uses Gatekeeper v3. There is a lot, and I do mean a LOT, to say about Gatekeeper and its history. We will not go down that path here. Check out this post for more information if you are truly curious. For us it’s enough to know that Gatekeeper v3 needs to be installed on AKS. In order to do that, we can use an AKS add-on. In fact, you should use the add-on if you want to work with Azure Policy. Installing Gatekeeper v3 on its own will not work.
Note: there are ways to configure Azure Policy to work with Azure Arc for Kubernetes and AKS Engine. In this post, we only focus on the managed Azure Kubernetes Service (AKS)
So how do we install the add-on? It is very easy to do with the portal or the Azure CLI. For all details, check out the docs. With the Azure CLI, it is as simple as:
az aks enable-addons --addons azure-policy --name CLUSTERNAME --resource-group RESOURCEGROUP
If you want to do it from an ARM template, just add the add-on to the template as shown here.
What happens after installing the add-on?
I installed the add-on without active policies. In kube-system, you will find the two pods below:
azure-policy and azure-policy-webhook
The above pods are part of the add-on. I am not entirely sure what the azure-policy-webhook does, but the azure-policy pod is responsible for checking Azure Policy for new assignments and translating that to resources that Gatekeeper v3 understands (hint: constraints). It also checks policies on the cluster and reports results back to Azure Policy. In the logs, you will see things like:
No audit results found
Schedule running
Creating constraint
…
The last line creates a constraint but what exactly is that? Constraints tell GateKeeper v3 what to check for when a request comes to the API server. An example of a constraint is that a container should not run privileged. Constraints are backed by constraint templates that contain the schema and logic of the constraint. Good to know, but where are the Gatekeeper v3 pods?
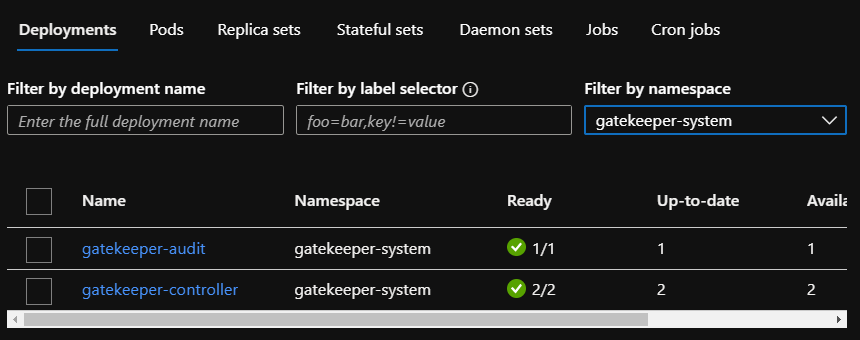
Gatekeeper pods in the gatekeeper-system namespace
Gatekeeper was automatically installed by the Azure Policy add-on and will work with the constraints created by the add-on, synced from Azure Policy. When you remove these pods, the add-on will install them again.
Creating a policy
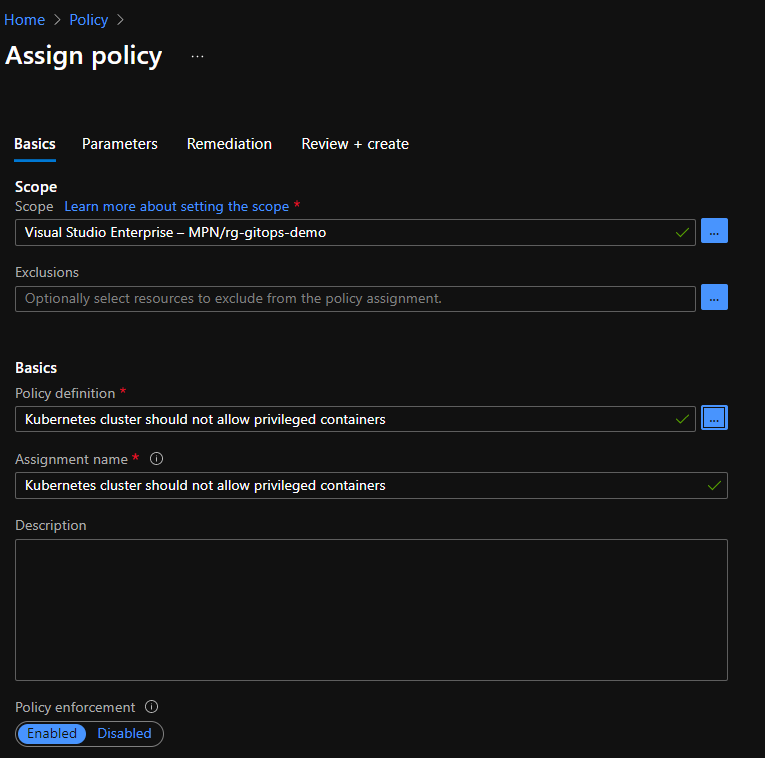
Although you normally create policy initiatives, we will create a single policy and see what happens on the cluster. In Azure Policy, choose Assign Policy and scope the policy to the resource group of your cluster. In Policy definition, select Kubernetes cluster should not allow privileged containers. As discussed, that is one of the built-in policies:
Creating a policy that does not allow privileged containers
In the next step, set the effect to deny. This will deny requests in real time. Note that the three namespaces in Namespace exclusions are automatically added. You can add extra namespaces there. You can also specifically target a policy to one or more namespaces or even use a label selector.
Policy parameters
You can now select Review and create and then select Create to create the policy assignment. This is the result:
Policy assigned
Now we have to wait a while for the change to be picked up by the add-on on the cluster. This can take several minutes. After a while, you will see the following log entry in the azure-policy pod:
You can see the constraint when you run k get constraints. The constraint is based on a constraint template. You can list the templates with k get constrainttemplates. This is the result:
constraint templates
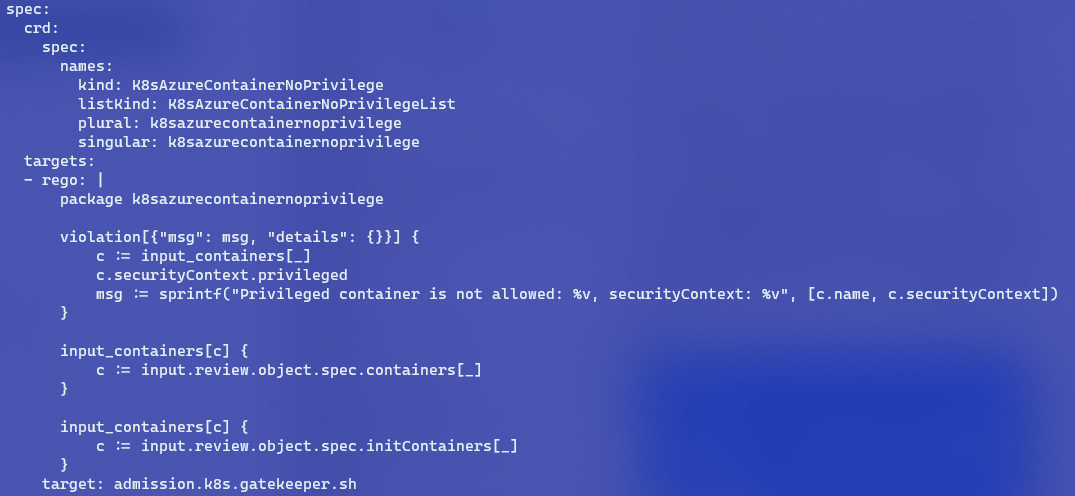
With k get constrainttemplates k8sazurecontainernoprivilege -o yaml, you will find that the template contains some logic:
the template’s logic
The block of rego contains the logic of this template. Without knowing rego, which is the policy language used by Open Policy Agent (OPA) which is used by Gatekeeper v3 on our cluster, you can actually guess that the privileged field inside securityContext is checked. If that field is true, that’s a violation of policy. Although it is useful to understand more details about OPA and rego, Azure Policy hides the complexity for you.
Does it work?
Let’s try to deploy the following deployment.yaml:
After running kubectl apply -f deployment.yaml, everything seems fine. But when we run kubectl get deploy:
Pods are not coming up
Let’s run kubectl get events:
Oops…
Notice that validation.gatekeeper.sh denied the request because privileged was set to true.
Adding more policies
Azure Security Center comes with a large initiative, Azure Security Benchmark, that also includes many Kubernetes policies. All of these policies are set to audit for compliance. On my system, the initiative is assigned at the subscription level:
Azure Security Benchmark assigned at subscription level with name Security Center
The Azure Policy add-on on our cluster will pick up the Kubernetes policies and create the templates and constraints:
Several new templates created
Now we have two constraints for k8sazurecontainernoprivilege:
Two constraints: one deny and the other audit
The new constraint comes from the larger initiative. In the spec, the enforcementAction is set to dryrun (audit). Although I do not have pods that violate k8sazurecontainernoprivilege, I do have pods that violate another policy that checks for host path mapping. That is reported back by the add-on in the compliance report:
Yes, akv2k8s maps to /etc/kubernetes on the host
Conclusion
In this post, you have seen what happens when you install the AKS policy add-on and enable a Kubernetes policy in Azure Policy. The add-on creates constraints and constraint templates that Gatekeeper v3 understands. The rego in a constraint template contains logic used to define the policy. When the policy is set to deny, Gatekeeper v3, which is an admission controller denies the request in real-time. When the policy is set to audit (or dry run at the constraint level), audit results are reported by the add-on to Azure Policy.
If you have ever installed Kubernetes on your own hardware or you have worked with Kubernetes on the desktop with a tool like kind, you probably know that you need a config file that tells the Kubernetes CLI (kubectl) how to talk to the Kubernetes API server. It contains the address of the API server, the cert of the CA that issued the API Server’s SSL certificate and more. Check the docs for more information. Tools like kind make it very easy because they create the file automatically or merge connection information into an existing config file.
For example, when you run kind create cluster, you will see the following message at the end:
kind output
The message Set kubectl context to kind-kind indicates that the config file in $HOME/.kube was modified. If you were to check the config file, you would find a client certificate and client key to authenticate to kind. Client certificate authentication is a very common way to authenticate to Kubernetes.
Azure AD authentication
In an enterprise context, you should not rely on client certificate authentication. It would be too cumbersome to create and manage all these client certificates. The level of control over these certificates is limited as well. In a Microsoft context with users, groups and service principals (think service accounts) in Azure Active Directory, Kubernetes should be integrated with that. If you are using Azure-managed Kubernetes with AKS, that is very easy to do with AKS-managed AAD authentication. There is also a manual method of integrating with AAD but you should not use that anymore. There is still some time to move away from that method though. 😀
To illustrate how you logon with Azure AD and how to bypass AAD, I created a video on my YouTube channel:
Azure AD Authentication in a pipeline
If you watched the video, you know you need to interactively provide your credentials when you perform an action that needs to be authenticated. After providing your credentials, kubectl has an access token (JWT) to pass to the Kubernetes API server.
In a pipeline or other automated process, you want to logon non-interactively. That is possible via the client-go credentials plugin kubelogin. When you search for kubelogin, you will find several of those plugins. You will want to use Azure/kubelogin to logon to Azure AD. In the video above, I demonstrate the use of kubelogin around the 14:40 mark.
When you deploy Azure Kubernetes Service (AKS) in an enterprise context, you will probably be asked about policies that can be applied to AKS for compliance and security. In this post, we will discuss Azure Policy for Kubernetes briefly and then proceed to explaining a group of policies that implement baseline security settings.
Azure Policy for Kubernetes
To apply policies to Kubernetes, Microsoft decided to integrate their existing Azure Policy solution with Gatekeeper v3. Gatekeeper is an admission controller webhook for Open Policy Agent (OPA). An admission controller webhook is a piece of software, running in Kubernetes, that can inspect incoming requests to the Kubernetes API server and decide to either allow or deny it. Open Policy Agent is a general solution for policy based control that goes way beyond just Kubernetes. It uses a language, called rego, that allows you to write policies that allow or deny requests. You can check the gatekeeper library for examples.
Although you can install Gatekeeper v3 on Kubernetes yourself, Microsoft provides an add-on to AKS that installs Gatekeeper for you. Be aware that you either install it yourself or let the add-on do it, but not both. The AKS add-on can be installed via the Azure CLI or an ARM template. It can also be enabled via the Azure Portal:
The policy add-on can easily be enabled and disabled via the Azure Portal; above it is enabled
When you enable the add-on, there will be an extra namespace on your cluster called gatekeeper-system. It contains the following workloads:
Gatekeeper v3 workloads
If, for some reason, you were to remove the above deployments, the add-on would add them back.
Enabling policies
Once the add-on is installed, you can enable Kubernetes policies via Azure Policy. Before we get started, keep in mind the following:
Policies can be applied at scale to multiple clusters: Azure Policy can be attached to resource groups, a subscription or management groups. When there are multiple AKS clusters at those levels, policy can be applied to all of those clusters
Linux nodes only
You can only use built-in policies provided by Azure
That last point is an important one. Microsoft provides several policies out of the box that are written with rego as discussed earlier. However, writing your own policies with rego is not supported.
Let’s add a policy initiative, which is just a fancy name for a group of policies. We will apply the policy to the resource group that contains my AKS cluster. From Azure Policy, click assignments:
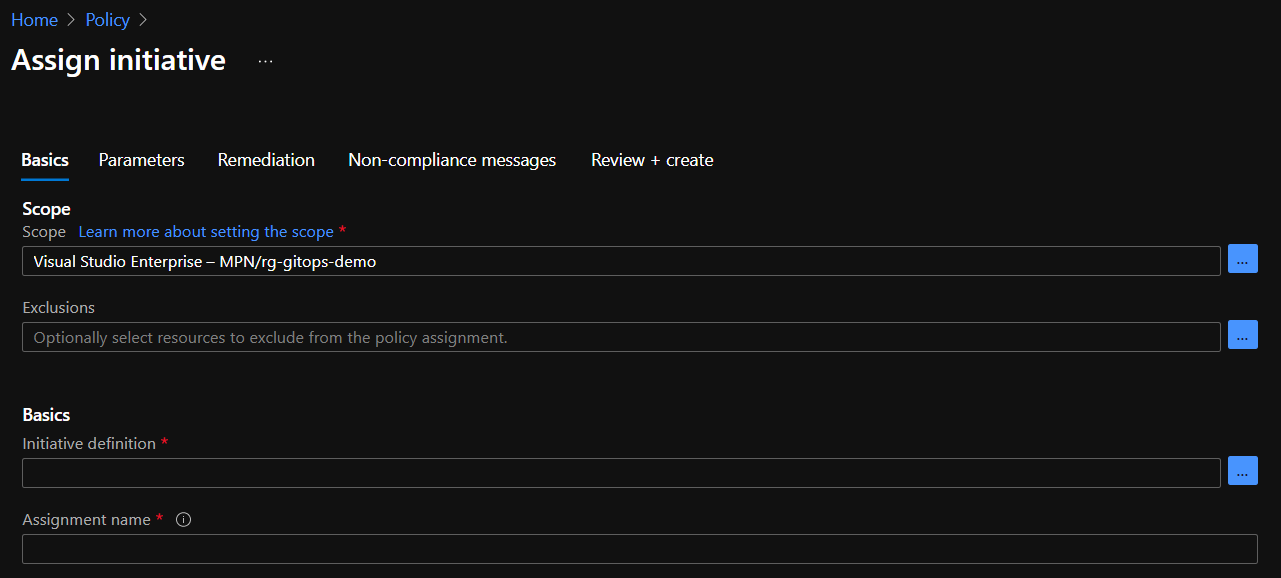
Click Assign Initiative. The following screen is shown:
Above, the imitative will be linked to the rg-gitops-demo resource group. You can change the scope to the subscription or a management group as well. Click the three dots (…) next to Basics – Initiative definition. In the Search box, type kubernetes. You should see two initiatives:
We will apply the baseline standards. The restricted standards include extra policies. Click the baseline standards and click Select. A bit lower in the screen, make sure Policy Enforcement is enabled:
Now click Next. Because we want to deny the policy in real-time, select the denyeffect:
Note that several namespaces are excluded by default. You can add namespaces here that you trust but run pods that will throw policy violations. On my cluster, there is a piece of software that will definitely cause a violation. You can now follow the wizard till the end and create the assignment. The assignment should be listed on the main Azure Policy screen:
You should now give Azure Policy some time to evaluate the policies. After a while, in the Overview screen, you can check the compliance state:
Above, you can see that the Kubernetes policies report non-compliance. In the next section, we will describe some of the policies in more detail.
Note that although these policies are set to deny, they will not kill existing workloads that violate the policy. If you were to kill a running pod that violates the policies, it will not come back up!
Important: in this article, we apply the default initiative. As a best practice however, you should duplicate the initiative. You can then change the policy parameters specific to your organization. For instance, you might want to allow host paths, allow capabilities and more. Host paths and capabilities are explained a bit more below.
Policy details
Let’s look at the non-compliant policy first, by clicking on the policy. This is what I see:
The first policy, Kubernetes cluster pod hostPath volumes should only use allowed host paths, results in non-compliance. This policy requires you to set the paths on the host that can be mapped to the pod. Because we did not specify any host paths, any pod that mounts a host path in any of the namespaces that policy applies too will generate a violation. In my case, I deployed Azure Key Vault to Kubernetes, which mounts the /etc/kubernetes/azure.json file. That file contains the AKS cluster service principal credentials! Indeed, the policy prohibits this.
To learn more about a policy, you can click it and then select View Definition. The definition in JSON will be shown. Close to the end of the JSON, you will find a link to a contraintTemplate:
When you click the link, you will find the rego behind this policy. Here is a snippet:
Even if you have never worked with rego, it’s pretty clear that it checks an array of allowed paths and then checks for host paths that are not in the list. There are other helper functions in the template.
Let’s look at another policy, Do not allow privileged containers in Kubernetes cluster. This one is pretty clear. It prevents you from creating a pod that has privileged: true in its securityContext. Suppose you have the following YAML:
If you try to apply the above YAML, the following error will be thrown:
Oops, privileged: true is not allowed (don’t look at the capabilities yet 😀)
As you can see, because we set the initiative to deny, the requests are denied in real-time by the Gatekeeper admission controller!
Let’s look at one more policy: Kubernetes cluster containers should only use allowed capabilities. With this policy, you can limit the Linux capabilities that can be added to your pod. An example of a capability is NET_BIND_SERVICE, which allows you to bind to a port below 1024, something a non-root user cannot do. By default, there is an array of allowedCapabilities which is empty. In addition, there is an array of requiredDropCapabilities which is empty as well. Note that this policy does not impact the default capabilities you pods will get. It does impact the additional ones you want to add. For example, if you use the securityContext below, you are adding additional capabilities NET_ADMIN and SYS_TIME:
By checking the contraint policy of the other templates, it will be quite straightforward to see what the policy checks for.
Note: when I export the policy initiative to GitHub (preview feature) I do see the default capabilities; see the snippet below (capabilities match the list that Gatekeeper reports above)
In most cases, you will want to enable Azure Policy for Kubernetes to control what workloads can do. We have only scratched the surface here. Next to the two initiatives, there are several other policies to control things such as GitOps configurations, the creation of external load balancers, require pod requests and limits and much much more!
In this post, I will provide some more information about the pipelines. Again, many thanks to this post on which the solution is based.
The YAML pipelines can be found in my go-template repository. The application is basically a starter template to create a Go web app or API with full configuration, zap logging, OpenAPI spec and more. The Azure DevOps pipelines are in the azdo folder.
The big picture
Yes, this is the big picture
The pipelines are designed to deploy to a qa environment and subsequently to production after an approval is given. The ci pipeline builds a container image and a Helm chart and stores both in Azure Container Registry (ACR). When that is finished, a pipeline artifact is stored that contains the image tag and chart version in a JSON file.
The cd pipeline triggers on the ci pipeline artifact and deploys to qa and production. It waits for approval before deployment to production. It uses environments to achieve that.
CI pipeline
In the “ci” pipeline, the following steps are taken:
Retrieve the git commit SHA with $(build.SourceVersion) and store it in a variable called imageTag. To version the images, we simply use git commit SHAs which is a valid approach. Imho you do not need to use semantic versioning tags with pipelines that deploy often.
Build the container image. Note that the Dockerfile is a two stage build and that go test is used in the first stage. Unit tests are not run outside the image building process but you could of course do that as well to fail faster in case there is an issue.
Scan the image for vulnerabilities with Snyk. This step is just for reference because Snyk will not find issues with the image as it is based on the scratch image.
Push the container image to Azure Container Registry (ACR). Pipeline variables $(registryLogin) and $(registryPassword) are used with docker login instead of the Azure DevOps task.
Run helm lint to check the chart in /charts/go-template
Run helm package to package the chart (this is not required before pushing the chart to ACR; it is just an example)
When the above steps have finished, we are ready to push the chart to ACR. It is important to realize that storing charts in OCI compliant registries is an experimental feature of Helm. You need to turn on these features with:
export HELM_EXPERIMENTAL_OCI=1
After turning on this support, we can login to ACR and push the chart. These are the steps:
Use helm registry login and use the same login and password as with docker login
Save the chart in the checked out sources (/charts/go-template) locally with helm chart save. This is similar to building and storing a container image locally as you also use the full name to the chart. For example: myacr.azurecr.io/helm/go-template:0.0.1. In our pipeline, the below command is used:
chartVersion=`helm chart save charts/go-template $(registryServerName)/helm/$(projectName) | grep version | awk -F ': ' '{print $2}'`
Above, we run the helm chart save command but we also want to retrieve the version of the chart. That version is inside /charts/go-template/Chart.yaml and is output as version. With grep and awk, we grab the version and store it in the chartVersion variable. This is a “shell variable”, not a pipeline variable.
With the chart saved locally, we can now push the chart to ACR with:
Do you have to do it this way? Of course not and there are many alternatives. For instance, because OCI support is experimental in helm and storing charts in ACR is in preview, you might want to install your chart directly from your source files. In that case, you can just build the container image and push it to ACR. The deployment pipeline can then checkout the sources and use /charts/go-template as the source for the helm install or helm upgrade command. The deployment pipeline could be triggered on the image push event.
Note that the pipeline uses templates for both the variables and the steps. The entire pipeline is the three files below:
azdo/ci.yaml
azdo/common/ci-vars.yaml
azdo/common/ci-steps.yaml
The ci-vars template defines and accepts a parameter called projectName which is go-template in my case. To call the template and set the parameter:
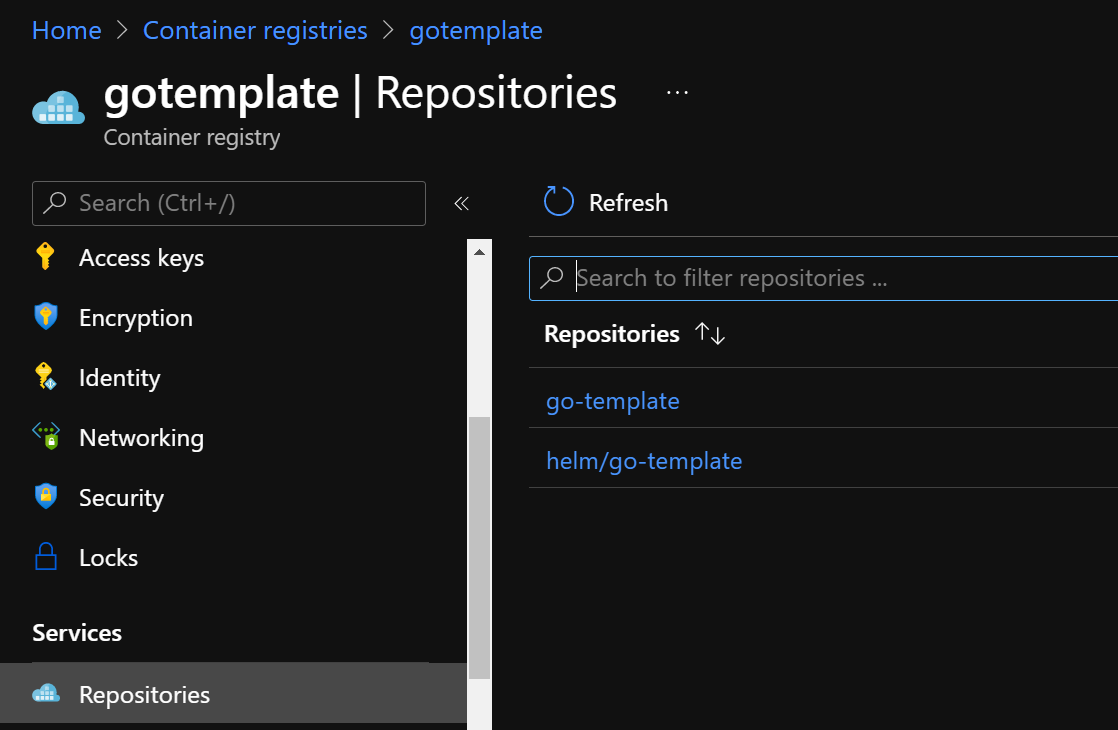
Now that we have both the chart and the container image in ACR, we can start our deployment. The screenshot below shows the repositories in ACR:
ACR repos for both the image and Helm chart
The deployment pipeline is defined in cd.yaml and uses cd-vars.yaml and cd-steps.yaml as templates. It pays off to use a template here because we execute the same steps in each environment.
The deployment pipeline triggers on the pipeline artifact from ci, by using resources as below:
resources:
  pipelines:
  - pipeline: ci
    source: ci
    trigger:
      enabled: true
      branches:
        include:
          - main
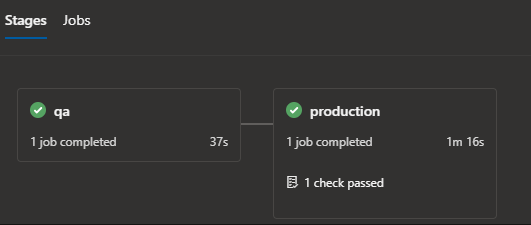
When the pipeline is triggered, the stages can be started, beginning with the qa stage:
This pipeline deploys both qa and production to the same cluster but uses different namespaces. The namespace is defined in the stage’s variables, next to a replicas variable. Note that we are using an environment here. We’ll come back to that.
The actual magic (well, sort of…) happens in cd-steps.yaml:
Do not checkout the source files; we do not need them
Install helm with the HelmInstaller task
Download the pipeline artifact
After the download of the pipeline artifact, there is one final bash script that logs on to Kubernetes and deploys the chart:
Use az login to login with Azure CLI. You can also use an AzureCLI task with a service connection to authenticate. I often just use bash but that is personal preference.
az login uses a service principal; the Id and secret of the service principal are in pipeline secrets
In my case, the service principal is member of a group that was used as an admin group for managed AAD integration with AKS; as such the account has full access to the AKS cluster; that also means I can obtain a kube config using –admin in az aks get-credentials without any issue
If you want to use a custom RBAC role for the service principal and an account that cannot use –admin, you will need to use kubelogin to obtain the AAD tokens to modify your kube config; see the comments in the bash script for more information
Phew, with the login out of the way, we can grab the Helm chart and install it:
Use export HELM_EXPERIMENTAL_OCI=1 to turn on the experimental support
Login to ACR with helm registry login
Grab the chart version and image version from the pipeline artifact:
Of course, to install the chart, we use helm upgrade but fall back to installation if this is the first time we run the command (–install). Note that we have to set some parameters at install time such as:
image.repository: in the values.yaml file, the image refers to ghcr.io; we need to change this to myacr.azurecr.io/go-template
image.tag: set this to the git commit SHA we grabbed from variables.json
replicaCount: set this to the stage variable replicas
namespace: set this to the stage variable k8sNamespace and use –create-namespace to create it if it does not exist; in many environments, this will not work as the namespaces are created by other teams with network policies, budgets, RBAC, etc…
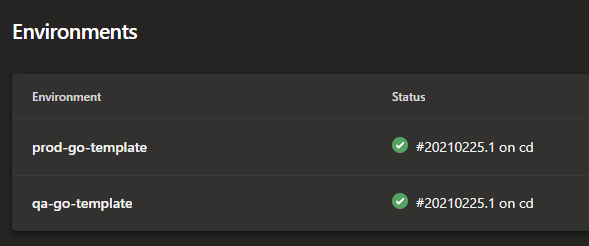
Environments
As discussed earlier, the stages use environments. This shows up in Azure DevOps as follows:
Environments in Azure DevOps
You can track the deployments per environment:
Deployments per environment
And of course, you can set approvals and checks on an environment:
Approvals and checks; above we only configured an approval check on production
When you deploy, you will need to approve manually to deploy to production. You can do that from the screen that shows the stages of the pipeline run:
This now shows the check is passed; but this is the place where you can approve the stage
Note that you do not have to create environments before you use them in a pipeline. They will be dynamically created by the pipeline Usually though, they are created in advance with the appropriate settings such as approvals and checks.
You can also add resources to the environment such as your Kubernetes cluster. This gives you a view on Kubernetes, directly from Azure DevOps. However, if you deploy a private cluster, as many enterprises do, that will not work. Azure DevOps needs line of sight to the API server to show the resources properly.
Summary
What can I say? 😀 I hope that this post, the video and the sample project and pipelines can get you started with deployments to Kubernetes using Helm. If you have questions, feel free to drop them in the comments.