Create a Copilot declarative agent that calls an API with authentication

In a previous post, we looked at creating a Copilot declarative agent. The agent had one custom action that called the JSONPlaceholder API. Check that post for an introduction to what these agents can do. Using a dummy, unauthenticated API is not much fun so let’s take a look at doing the same for a custom API that requires authentication.

Python API with authentication

The API we will create has one endpoint: GET /sales. It’s implemented as follows:

@app.get("/sales/", dependencies=[Depends(verify_token)])
async def get_sales():
    """
    Retrieve sales data.
    Requires Bearer token authentication.
    """
    return {
        "status": "success",
        "data": generate_sample_sales_data()
    }

The data is generated by the generate_sample_sales_data function. It just generates random sales data. You can check the full code on GitHub. The important thing here is that we use bearer authentication with a key.

When I hit the /sales endpoint with a wrong key, a 401 Unauthorized is raised:

401 Unauthorized (via REST client VS Code plugin)

With the correct key, the /sales endpoint returns the random data:

GET /sales returns random data

Running the API

To make things easy, we will run the API on the local machine and expose it with ngrok. Install ngrok using the instructions on their website. If you cloned the repo, go to the api folder and run the commands below. Run the last command from a different terminal window.

pip install -r requirements.txt
python app.py
ngrok http 8000

Note: you can also use local port forwarding in VS Code. I prefer ngrok but if you do not want to install it, simply use the VS Code feature.

In the terminal where you ran ngrok, you should see something like below:

ngrok tunnel is active

Ngrok has a nice UI to inspect the calls via the web interface at http://localhost:4040:

ngrok web interface

Before continuing, ensure that the ngrok forwarding URL (https://xyz.ngrok-free.app) responds when you hit the /sales endpoint.

Getting the OpenAPI document

When you create a FastAPI API, it generates OpenAPI documentation that describes all the endpoints. The declarative agent needs that documentation to configure actions.

For the above API, that looks like below. Note that this is not the default document. It was changed in code.

{
  "openapi": "3.0.0",
  "info": {
    "title": "Sales API",
    "description": "API for retrieving sales data",
    "version": "1.0.0"
  },
  "paths": {
    "/sales/": {
      "get": {
        "summary": "Get Sales",
        "description": "Retrieve sales data.\nRequires Bearer token authentication.",
        "operationId": "get_sales_sales__get",
        "responses": {
          "200": {
            "description": "Successful Response",
            "content": {
              "application/json": {
                "schema": {

                }
              }
            }
          }
        }
      }
    },
    "/": {
      "get": {
        "summary": "Root",
        "description": "Root endpoint - provides API information",
        "operationId": "root__get",
        "responses": {
          "200": {
            "description": "Successful Response",
            "content": {
              "application/json": {
                "schema": {

                }
              }
            }
          }
        }
      }
    }
  },
  "components": {
    "securitySchemes": {
      "BearerAuth": {
        "type": "http",
        "scheme": "bearer"
      }
    }
  },
  "servers": [
    {
      "url": "https://627d-94-143-189-241.ngrok-free.app",
      "description": "Production server"
    }
  ]
}

The Teams Toolkit requires OpenAPI 3.0.x instead of 3.1.x. By default, recent versions of FastAPI generate 3.1.x docs. You can change that in the API’s code by adding the following:

def custom_openapi():
    if app.openapi_schema:
        return app.openapi_schema
    
    openapi_schema = get_openapi(
        title="Sales API",
        version="1.0.0",
        description="API for retrieving sales data",
        routes=app.routes,
    )
    
    # Set OpenAPI version
    openapi_schema["openapi"] = "3.0.0"
    
    # Add servers
    openapi_schema["servers"] = [
        {
            "url": "https://REPLACE_THIS.ngrok-free.app",  # Replace with your production URL
            "description": "Production server"
        }
    ]
    
    # Add security scheme
    openapi_schema["components"] = {
        "securitySchemes": {
            "BearerAuth": {
                "type": "http",
                "scheme": "bearer"
            }
        }
    }
    
    # Remove endpoint-specific security requirements
    for path in openapi_schema["paths"].values():
        for operation in path.values():
            if "security" in operation:
                del operation["security"]
    
    app.openapi_schema = openapi_schema
    return app.openapi_schema

app.openapi = custom_openapi

In the code, we switch to OpenAPI 3.0.0, add our server (the ngrok forwarding URL), add the security scheme and more. Now, when you go to https://your_ngrok_url/openapi.json, the JSON shown above should be returned.

Creating the Copilot Agent

Now we can create a new declarative agent like we did in the previous post. When you are asked for the OpenAPI document, you can retrieve it from the live server via the ngrok forwarding URL.

After creating the agent, declarativeAgent.json should contain the following action:

"actions": [
    {
        "id": "action_1",
        "file": "ai-plugin.json"
    }

In ai-plugin.json, in functions and runtimes, you should see the function description and a reference to the OpenAPI operation.

That’s all fine but of course, but the API will not work because a key needs to be provided. You create the key in the Teams developer portal at https://dev.teams.microsoft.com/tools:

Adding an API key for Bearer auth

You create the key by clicking New API key and filling in the form. Ensure you add a key that matches the key in the API. Also ensure that the URL to your API is correct (the ngrok forwarding URL). With an incorrect URL, the key will not be accepted.

Now we need to add a reference to the key. The agent can use that reference to retrieve the key and use it when it calls your API. Copy the key’s registration ID and then open ai-plugin.json. Add the following to the runtimes array:

"runtimes": [
    {
        "type": "OpenApi",
        "auth": {
            "type": "ApiKeyPluginVault",
            "reference_id": "KEY_REGISTRATION_ID"
        },
        "spec": {
            "url": "apiSpecificationFile/openapi.json"
        },
        "run_for_functions": [
            "get_sales_sales__get"
        ]
    }
]

The above code ensures that HTTP bearer authentication is used with the stored key when the agent calls the get_sales_sales__get endpoint.

Now you are ready to provision your agent. After provisioning, locate the agent in Teams:

Find the agent

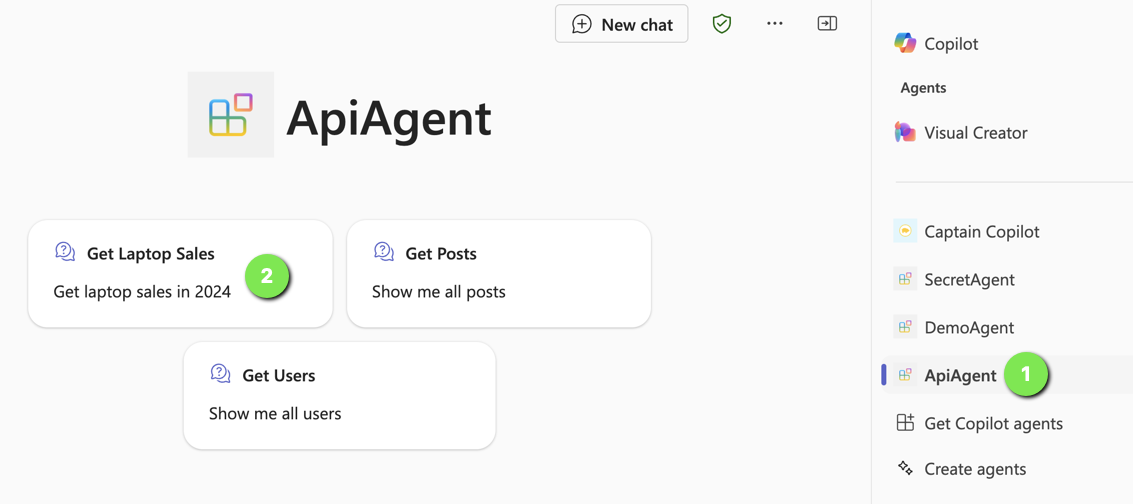
Now either use a starter (if you added some; above that is (2)) or type the question in the chat box.

Getting laptop sales in 2024

Note that I did not do anything fancy with the adaptive card. It just says success.

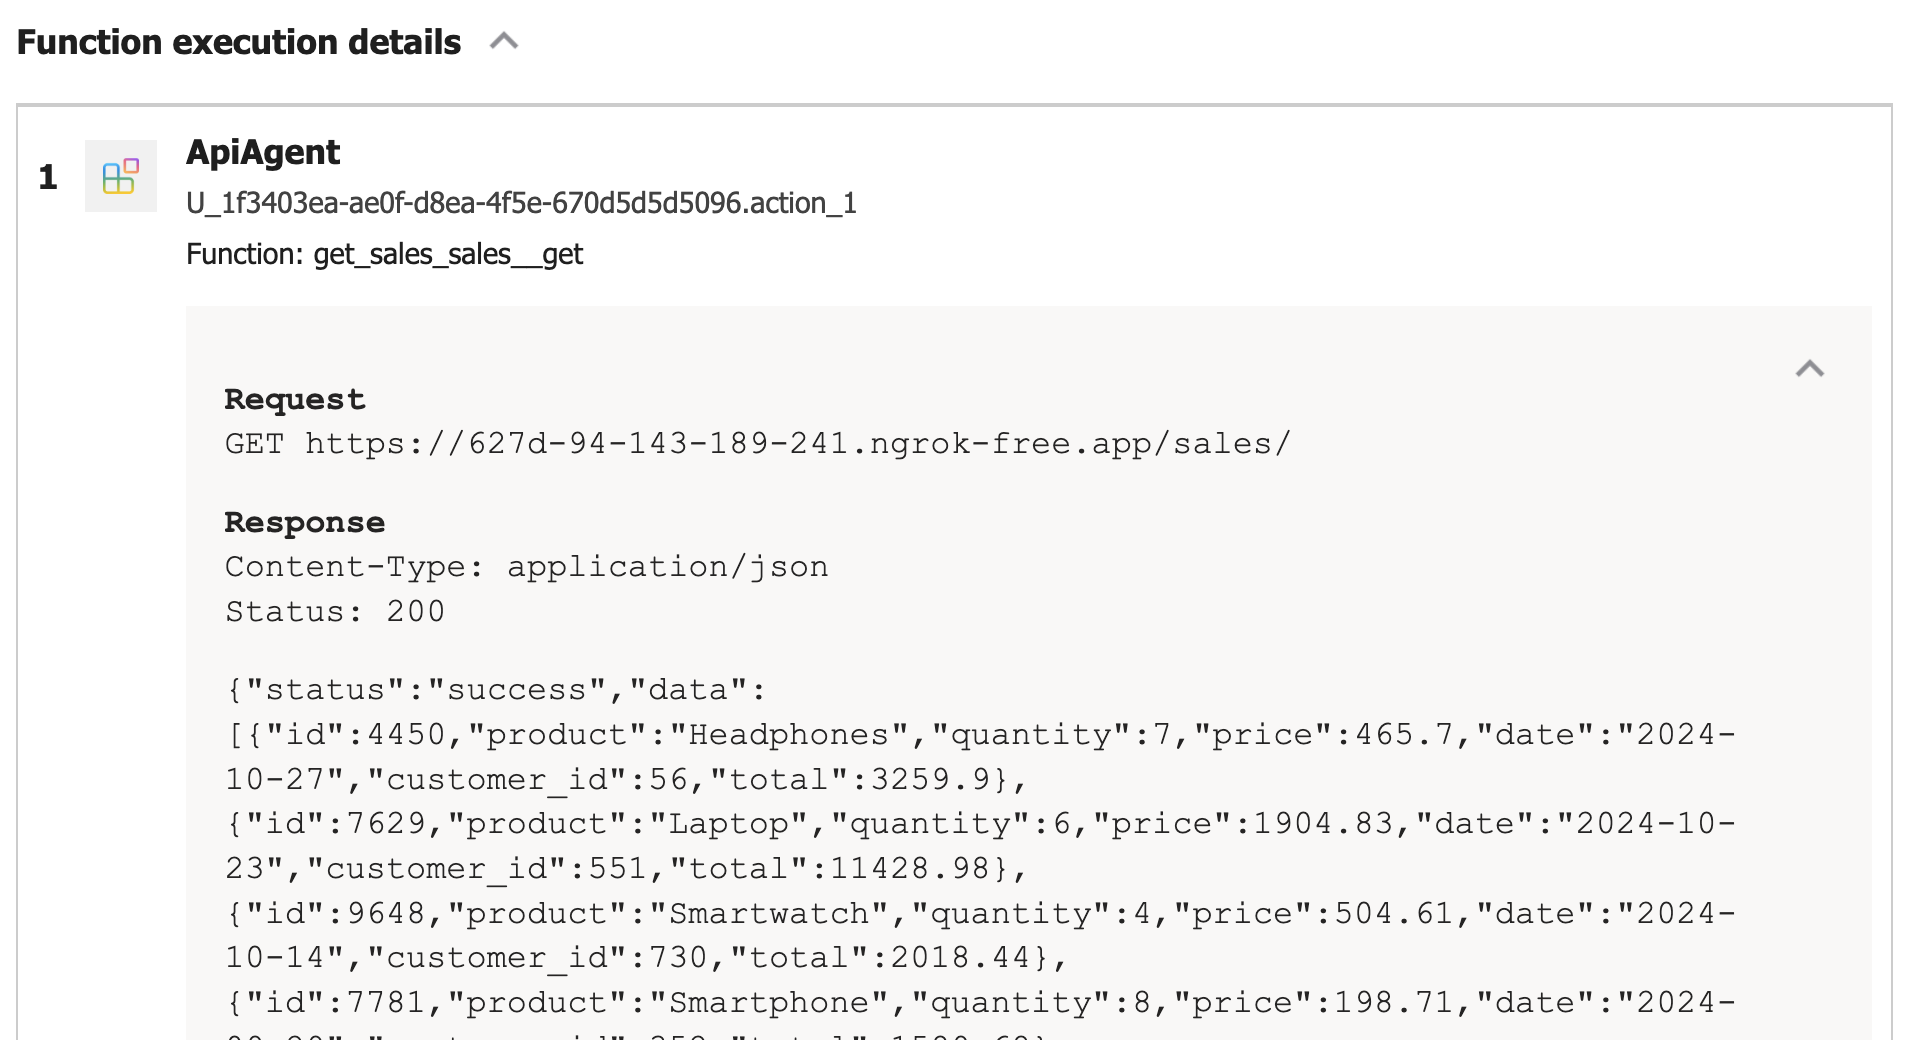
If you turned on developer mode in Copilot, you can check the raw response:

Viewing the raw response, right from within Microsoft 365 Chat

Conclusion

In this post, we created a Copilot agent that calls a custom API secured with HTTP bearer authentication. The “trick” to get this to work is to add the key to the Teams dev portal and reference it in the json file that defines the API call.

HTTP bearer authentication is the easiest to implement. In another post, we will look at using OAuth to protect the API. There’s a bit more to that, as expected.

So you want a chat bot to talk to your SharePoint data?

It’s a common request we hear from clients: “We want a chatbot that can interact with our data in SharePoint!” The idea is compelling – instead of relying on traditional search methods or sifting through hundreds of pages and documents, users could simply ask the bot a question and receive an instant, accurate answer. It promises to be a much more efficient and user-friendly experience.

The appeal is clear:

  • Improved user experience
  • Time savings
  • Increased productivity

But how easy is it to implement a chatbot for SharePoint and what are some of the challenges? Let’s try and find out.

The easy way: Copilot Studio

I have talked about Copilot Studio in previous blog posts. One of the features of Copilot Studio is generative answers. With generative answers, your copilot can find and present information for different sources like web sites or SharePoint data. The high level steps to work with SharePoint data are below:

  • Configure your copilot to use Microsoft Entra ID authentication
  • In the Create generative answers node, in the Data sources field, add the SharePoint URLs you want to work with

From a high level, this is all you need to start asking questions. One advantage of using this feature is that the SharePoint data is accessed on behalf of the user. When generative answers searches for SharePoint data, it only returns information that the user has access to.

It is important to note that the search relies on a call to the Graph API search endpoint (https://graph.microsoft.com/v1.0/search/query) and that only the top three results that come back from this call are used. Generative answers only works with files up to 3MB in size. It is possible that the search returns documents that are larger than 3MB. They would not be processed. If all results are above 3MB, generative answers will return an empty response.

In addition, the user’s question is rewritten to only send the main keywords to the search. The type of search is a keyword search. It is not a similarity search based on vectors.

Note: the type of search will change when Microsoft enables Semantic Index for Copilot for your tenant. Other limitations, like the 3MB size limit, will be removed as well.

Pros:

  • easy to configure (UI)
  • uses only documents the user has access to (Entra ID integration)
  • no need to create a pipeline to process SharePoint data; simply point at SharePoint URLs 🔥
  • an LLM is used “under the hood”; there is no need to setup an Azure OpenAI instance

Cons:

  • uses keyword search which can result in less relevant results
  • does not use vector search and/or semantic reranking (e.g., like in Azure AI Search)
  • number of search results that can provide context is not configurable (maximum 3)
  • documents are not chunked; search can not retrieve relevant pieces of text from a document
  • maximum size is 3MB; if the document is highly relevant to answer the user’s query, it might be dropped because of its size

Although your mileage may vary, the limitations make it hard to build a chat bot that provides relevant and qualitative answers. What can we do to fix that?

Copilot Studio with Azure OpenAI on your data

Copilot Studio has integration with Azure OpenAI on your data. Azure OpenAI on your data makes it easy to create an Azure AI Search index based on your documents. Such an index creates chunks of larger documents and uses vectors to match a user’s query to similar chunks. Such queries usually result in more relevant pieces of text from multiple documents. In addition to vector search, you can combine vector search with keyword search and optionally rerank the search results semantically. In most cases, you want these advanced search options because relevant context is key for the LLM to work with!

The diagram below shows the big picture:

Using AI Search to query documents with vectors

The diagram above shows documents in a storage account (not SharePoint, we will get to that). With Azure OpenAI on your data, you simply point to the storage account, allowing Azure AI Search to build an index that contains one or more document chunks per document. The index contains the text in the chunk and a vector of that text. Via the Azure OpenAI APIs, chat applications (including Copilot Studio) can send user questions to the service together with information about the index that contains relevant content. Behind the scenes, the API searches for similar chunks and uses them in the prompt to answer the user’s question. You can configure the number of chunks that should be put in the prompt. The number is only limited by the OpenAI model’s context limit (8k, 16k, 32k or 128k tokens).

You do not need to write code to create this index. Azure OpenAI on your data provides a wizard to create the index. The image below shows the wizard in Azure AI Studio (https://ai.azure.com):

Azure OpenAI add your data

Above, instead of pointing to a storage account, I selected the Upload files/folder feature. This allows you to upload files to a storage account first, and then create the index from that storage account.

Azure OpenAI on your data is great, but there is this one tiny issue: there is no easy way to point it to your SharePoint data!

It would be fantastic if SharePoint was a supported datasource. However, it is important to realise that SharePoint is not a simple datasource:

  • What credentials are used to create the index?
  • How do you ensure that queries use only the data the user has access to?
  • How do you keep the SharePoint data in sync with the Azure AI Search index? And not just the data, the ACLs (access control lists) too.
  • What SharePoint data do you support? Just documents? List items? Web pages?

The question now becomes: “How do you get SharePoint data into AI Search to improve search results?” Let’s find out.

Creating an AI Search index with SharePoint data

Azure AI Search offers support for SharePoint as a data source. However, it’s important to note that this feature is currently in preview and has been in that state for an extended period of time. Additionally, there are several limitations associated with this functionality:

  • SharePoint .ASPX site content is not supported.
  • Permissions are not automatically ingested into the index. To enable security trimming, you will need to add permission-related information to the index manually, which is a non-trivial task.

In the official documentation, Microsoft clearly states that if you require SharePoint content indexing in a production environment, you should consider creating a custom connector that utilizes SharePoint webhooks in conjunction with the Microsoft Graph API to export data to an Azure Blob container. Subsequently, you can leverage the Azure Blob indexer to index the exported content. This approach essentially means that you are responsible for developing and maintaining your own custom solution.

Note: we do not follow the approach with webhooks because of its limitations

What to do?

When developing chat applications that leverage retrieval-augmented generation (RAG) with SharePoint data, we typically use a Logic App or custom job to process the SharePoint data in bulk. This Logic App or job ingests various types of content, including documents and site pages.

To maintain data integrity and ensure that the system remains up-to-date, we also utilize a separate Logic App or job that monitors for changes within the SharePoint environment and updates the index accordingly.

However, implementing this solution in a production environment is not a trivial task, as there are numerous factors to consider:

  • Logic Apps have limitations when it comes to processing large volumes of data. Custom code can be used as a workaround.
  • Determining the appropriate account credentials for retrieving the data securely.
  • Identifying the types of changes to monitor: file modifications, additions, deletions, metadata updates, access control list (ACL) changes, and more.
  • Ensuring that the index is updated correctly based on the detected changes.
  • Implementing a mechanism to completely rebuild the index when the data chunking strategy changes, typically involving the creation of a new index and updating the bot to utilize the new index. Index aliases can be helpful in this regard.

In summary, building a custom solution to index SharePoint data for chat applications with RAG capabilities is a complex undertaking that requires careful consideration of various technical and operational aspects.

Security trimming

Azure AI Search does not provide document-level permissions. There is also no concept of user authentication. This means that you have to add security information to an Azure AI Search index yourself and, in code, ensure that AI Search only returns results that the logged on user has access to.

Full details are here with the gist of it below:

  • add a security field of type collection of strings to your index; the field should allow filtering
  • in that field, store group Ids (e.g., Entra ID group oid’s) in the array
  • while creating the index, retrieve the group Ids that have at least read access to the document you are indexing; add each group Id to the security field

When you query the index, retrieve the logged on user’s list of groups. In your query, use a filter like the one below:

{
"filter":"group_ids/any(g:search.in(g, 'group_id1, group_id2'))"
}

Above, group_ids is the security field and group_id1 etc… are the groups the user belongs to.

For more detailed steps and example C# code, see https://learn.microsoft.com/en-us/azure/search/search-security-trimming-for-azure-search-with-aad.

If you want changes in ACLs in SharePoint to be reflected in your index as quickly as possible, you need a process to update the security field in your index that is triggered by ACL changes.

Conclusion

Crafting a chat bot that seamlessly works with SharePoint data to deliver precise answers is no simple feat. Should you manage to obtain satisfactory outcomes leveraging generative responses within Copilot Studio, it’s advisable to proceed with that route. Even if you do not use Copilot Studio, you can use Graph API search within custom code.

If you want more accurate search results and switch to Azure AI Search, be mindful that establishing and maintaining the Azure AI Search index, encompassing both SharePoint data and access control lists, can be quite involved.

It seems Microsoft is relying on the upcoming Semantic Index capability to tackle these hurdles, potentially in combination with Copilot for Microsoft 365. When Semantic Index ultimately becomes available, executing a search through the Graph API could potentially fulfill your requirements.

Azure SQL, Azure Active Directory and Seamless SSO: An Overview

Instead of pure lift-and-shift migrations to the cloud, we often encounter lift-shift-tinker migrations. In such a migration, you modify some of the application components to take advantage of cloud services. Often, that’s the database but it could also be your web servers (e.g. replaced by Azure Web App). When you replace SQL Server on-premises with SQL Server or Managed Instance on Azure, we often get the following questions:

  • How does Azure SQL Database or Managed Instance integrate with Active Directory?
  • How do you authenticate to these databases with an Azure Active Directory account?
  • Is MFA (multi-factor authentication) supported?
  • If the user is logged on with an Active Directory account on a domain-joined computer, is single sign-on possible?

In this post, we will look at two distinct configuration options that can be used together if required:

  • Azure AD authentication to SQL Database
  • Single sign-on to Azure SQL Database from a domain-joined computer via Azure AD Seamless SSO

In what follows, I will provide an overview of the steps. Use the links to the Microsoft documentation for the details. There are many!!! 😉

Visually, it looks a bit like below. In the image, there’s an actual domain controller in Azure (extra Active Directory site) for local authentication to Active Directory. Later in this post, there is an example Python app that was run on a WVD host joined to this AD.

Azure AD Authentication

Both Azure SQL Database and Managed Instances can be integrated with Azure Active Directory. They cannot be integrated with on-premises Active Directory (ADDS) or Azure Active Directory Domain Services.

For Azure SQL Database, the configuration is at the SQL Server level:

SQL Database Azure AD integration

You should read the full documentation because there are many details to understand. The account you set as admin can be a cloud-only account. It does not need a specific role. When the account is set, you can logon with that account from Management Studio:

Authentication from Management Studio

There are several authentication schemes supported by Management Studio but the Universal with MFA option typically works best. If your account has MFA enabled, you will be challenged for a second factor as usual.

Once connected with the Azure AD “admin”, you can create contained database users with the following syntax:

CREATE USER [user@domain.com] FROM EXTERNAL PROVIDER;

Note that instead of a single user, you can work with groups here. Just use the group name instead of the user principal name. In the database, the user or group appears in Management Studio like so:

Azure AD user (or group) in list of database users

From an administration perspective, the integration steps are straightforward but you create your users differently. When you migrate databases to the cloud, you will have to replace the references to on-premises ADDS users with references to Azure AD users!

Seamless SSO

Now that Azure AD is integrated with Azure SQL Database, we can configure single sign-on for users that are logged on with Active Directory credentials on a domain-joined computer. Note that I am not discussing Azure AD joined or hybrid Azure AD joined devices. The case I am discussing applies to Windows Virtual Desktop (WVD) as well. WVD devices are domain-joined and need line-of-sight to Active Directory domain controllers.

Note: seamless SSO is of course optional but it is a great way to make it easier for users to connect to your application after the migration to Azure

To enable single sign-on to Azure SQL Database, we will use the Seamless SSO feature of Active Directory. That feature works with both password-synchronization and pass-through authentication. All of this is configured via Azure AD Connect. Azure AD Connect takes care of the synchronization of on-premises identities in Active Directory to an Azure Active Directory tenant. If you are not familiar with Azure AD Connect, please check the documentation as that discussion is beyond the scope of this post.

When Seamless SSO is configured, you will see a new computer account in Active Directory, called AZUREADSSOACC$. You will need to turn on advanced settings in Active Directory Users and Computers to see it. That account is important as it is used to provide a Kerberos ticket to Azure AD. For full details, check the documentation. Understanding the flow depicted below is important:

Seamless Single Sign On - Web app flow
Seamless SSO flow (from Microsoft @ https://docs.microsoft.com/en-us/azure/active-directory/hybrid/how-to-connect-sso-how-it-works)

You should also understand the security implications and rotate the Kerberos secret as discussed in the FAQ.

Before trying SSO to Azure SQL Database, log on to a domain-joined device with an identity that is synced to the cloud. Make sure, Internet Explorer is configured as follows:

Add https://autologon.microsoftazuread-sso.com to the Local Intranet zone

Check the docs for more information about the Internet Explorer setting and considerations for other browsers.

Note: you do not need to configure the Local Intranet zone if you want SSO to Azure SQL Database via ODBC (discussed below)

With the Local Intranet zone configured, you should be able to go to https://myapps.microsoft.com and only provide your Azure AD principal (e.g. first.last@yourdomain.com). You should not be asked to provide your password. If you use https://myapps.microsoft.com/yourdomain.com, you will not even be asked your username.

With that out of the way, let’s see if we can connect to Azure SQL Database using an ODBC connection. Make sure you have installed the latest ODBC Driver for SQL Server on the machine (in my case, ODBC Driver 17). Create an ODBC connection with the Azure SQL Server name. In the next step, you see the following authentication options:

ODBC Driver 17 authentication options

Although all the options for Azure Active Directory should work, we are interested in integrated authentication, based on the credentials of the logged on user. In the next steps, I only set the database name and accepted all the other options as default. Now you can test the data source:

Testing the connection

Great, but what about your applications? Depending on the application, there still might be quite some work to do and some code to change. Instead of opening that can of worms 🥫, let’s see how this integrated connection works from a sample Pyhton application.

Integrated Authentication test with Python

The following Python program uses pyodbc to connect with integrated authentication:

import pyodbc 

server = 'tcp:AZURESQLSERVER.database.windows.net' 
database = 'AZURESQLDATABASE' 

cnxn = pyodbc.connect('DRIVER={ODBC Driver 17 for SQL Server};SERVER='+server+';DATABASE='+database+';authentication=ActiveDirectoryIntegrated')
cursor = cnxn.cursor()

cursor.execute("SELECT * from TEST;") 
row = cursor.fetchone() 
while row: 
    print(row[0])
    row = cursor.fetchone()

My SQL Database contains a simple table called test. The logged on user has read and write access. As you can see, there is no user and password specified. In the connection string, “authentication=ActiveDirectoryIntegrated” is doing the trick. The result is just my name (hey, it’s a test):

Result returned from table

Conclusion

In this post, I have highlighted how single sign-on works for domain-joined devices when you use Azure AD Connect password synchronization in combination with the Seamless SSO feature. This scenario is supported by SQL Server ODBC driver version 17 as shown with the Python code. Although I used SQL Database as an example, this scenario also applies to a managed instance.

Office 365 Identity Management with DirSync without Exchange Server On-Premises

This post describes how users, groups and contact are provisioned in Office 365 from the on-premises Active Directory. By using DirSync, these objects are created in and synchronized to Office 365. Without an Exchange Server and Exchange Management tools in place, it is not always obvious how these objects should be created.

The following sections describe the procedures you can follow without Exchange or the Exchange management tools in place.

IMPORTANT NOTE
The sections below only specify the basic actions you need to perform in Active Directory to have the object appear in the right place in Office 365 (user, security group, mailbox, distribution group, contact). Note that almost all properties of these objects need to be set in Active Directory. If you want to hide a distribution group from the address book or you want to configure moderation for a distribution group, you have to know the property in Active Directory that’s responsible for the setting, set the value and perform directory synchronization. You will also need to upgrade the Active Directory schema with Exchange Server 2010 schema updates. You cannot use the Exchange Server 2010 System Manager without having at least one Exchange Server 2010 role installed on-premises.

Create a user account

Create a regular user account in Active Directory. This user account will be replicated by DirSync and it will appear in the Users list in the portal (https://portal.microsoftonline.com).

Important: set the user logon name to a value with a suffix that matches the suffix used for logging on to Office 365. For instance, if you logon with first.last@xylos.com in Office 365, set the UPN to that value:
clip_image002

User accounts without a mailbox (or any other license) can be used in Office 365 to grant permissions such as Billing Administrator or Global Administrator. A user account like this is typically used to create a DirSync service account.

Create a user account for a user that needs a mailbox

Create a user account as above. Set the user’s primary e-mail address in the email attribute or you will get an onmicrosoft.com address only:

clip_image004

When this user is synchronized and an Exchange Online license is added in the portal, a mailbox will be created that has the E-mail address in the E-mail field as primary SMTP address. Automatically, a secondary SMTP address is created with prefix@tenantid.onmicrosoft.com:

clip_image006

What if the user needs extra SMTP addresses?

  • You cannot set extra SMTP addresses in Exchange Control Panel (or Remote PowerShell) because the object is synchronized with DirSync.
  • In the on-premises Active Directory you need to populate the proxyAddresses attribute of the user object. You can set the values in this field with ADSIEdit or Active Directory Users and Computers (Windows Server 2008 ADUC and higher with Advanced Features turned on)
  • In the proxyAddresses field, make sure that you also list the primary SMTP address with SMTP: (in uppercase) in front of the address. Secondary addresses need smtp: (in lowercase) in front of the address.
    clip_image008

Note: instead of editing the proxyAddresses field directly, you can use a free (but at this point in time beta) product: http://www.messageops.com/software/office-365-tools-and-utilities/office-365-active-directory-addin. The tool adds the following tabs to Active Directory Users and Computers:

  • O365 Exchange General: set display name, Email address, additional Email addresses and even a Target Email Address (for mail redirection)
  • O365 Custom Attributes: set custom attributes in AD for replication to Office 365
  • O365 Delivery Restrictions: accept messages from, reject messages from
  • O365 Photo: this photo will appear on the user’s profile and will be used by Lync Online as well
  • O365 Delegates: to set the publicDelegates property

When a user is created in AD, you can use the additional tabs this tool provides to set all needed properties at once.

To summarize the actions for a mailbox:

  • Create a user in ADUC with the user logon name (UPN) and e-mail address to the primary e-mail address of the user (UPN and e-mail address do not have to match but it’s the most common case)
  • Make sure the user has a display name (done automatically for users if you specify first, last and full name in the AD wizard)
  • Set proxyAddresses manually or with the MessageOps add-in to specify additional e-mail addresses (with smtp: in the front) and make sure you also specify the primary e-mail address with SMTP: in the front.
  • Let DirSync create and sync the user to Office 365
  • Assign an Exchange Online license to the user. A mailbox will be created with the correct e-mail addresses.

Create a security group

Create a security group in Active Directory. The group will be synchronized by DirSync and appear in the Security Groups in the portal. The group will not appear in the Distribution Groups in Exchange Online (obviously).

Create a distribution group

Create a distribution group in Active Directory. In the properties of the group set the primary e-mail address in the E-mail address field:

clip_image010

In addition to the e-mail address, the group object also needs a display name (displayname attribute). If the distribution group in AD has an e-mail address and a display name, the group will appear in the Distribution Groups list in Exchange Online after synchronization.

Note that specifying members and alternate e-mail addresses has to be done in the local Active Directory as well. If you have installed the MessageOps add-in, you can set easily set those properties.

Create a mail-enabled distribution group

You can add a display name and e-mail address to a standard security group to mail-enable the group. After stamping those two properties, the group will appear in the list of Distribution Groups in Exchange Online. When you list groups with the Get-Group cmdlet, you will see the following:

clip_image012

You can stamp the properties manually or use the MessageOps add-in to set these properties easily.

Create a contact

Create a contact object in Active Directory. In the properties of the created object, fill in the E-mail field in the General tab.

Conclusion

Although DirSync makes it easy to create directory objects in Office 365, without an Exchange Server and the Exchange management tools it is not always obvious how to set the needed properties in order to correctly synch these objects. If you find it too much of a hassle to set the required properties on your local Active Directory objects, there are basically two things you can do:

  • Turn off Directory Synchronization and start mastering directory objects in the cloud
  • Install at least one Exchange Server 2010 SP1 so that you can use the Exchange management tools

Issue with meeting invites during Office 365 staged migration

During a recent migration project, we migrated several mailboxes to Office 365 using the staged migration approach. Naturally, during the migration, users that had been migrated still sent meeting invites to on-premises users and meeting rooms. The problem was that meeting invites were actually received as clear text and stripped of the necessary attributes that make it a meeting request. The on-premises server was Exchange Server 2003 SP2.

As you might know, during a staged migration, DirSync creates MEUs (mail-enabled users) in the cloud. These MEUs actually represent on-premises users that have not been migrated yet and they make sure that the global address list in Office 365 matches the on-premises global address list.

When a user with a cloud mailbox sends a meeting invite to an on-premises user, he actually sends the invite to the MEU. The MEU has a TargetAddress that points back to the on-premises user. The MEU also has settings that control how mail should be formatted when sent to the actual on-premises user. The solution to the problem was to change the UseMapiRichTextFormat  to a value of Never using the following PowerShell command:

set-MailUser MEUname -UseMapiRichTextFormat Never

For all MailUser objects, use:

get-mailuser | set-MailUser -UseMapiRichTextFormat Never

After running this command, cloud users could successfully send meeting requests to on-premises users. Hope it helps!

Enabling and disabling DirSync in BPOS and Office 365

If you have some experience with BPOS or the Office 365 Beta, you know there’s a tool called DirSync that allows you to synchronize your Active Directory with Microsoft’s Online Services. During a course last week, I was asked if you can use DirSync temporarily to sync users, contacts and groups and, after migration, turn it off.

In BPOS, you can certainly do the above and essentially use DirSync as just a migration tool. It is in fact the easiest way to load users, contacts and groups into BPOS if you don’t mind setting up the software. When you turn off DirSync in the BPOS Administration website, all synchronized users become normal users which means their properties become editable. Turning off DirSync is done from the Migration / Directory Synchronization tab:

image

In Office 365, it’s a totally different story because DirSync is intended as a tool for permanent coexistence. As a result, you will not find a Disable button in the UI and there’s also no PowerShell cmdlet to turn it off. If you just want to migrate your users, contacts and distribution groups to Office 365 you should use other means such as CSV, PowerShell, etc…

Office 365 and Identity

imageMicrosoft has provided more details about Office 365 and the different identity options in a service description document (link at the bottom of this post).

There are two types of identities:

  • Cloud Identity: credentials are separate from your corporate credentials
  • Federated Identity: users can sign in with their corporate Active Directory credentials

With BPOS, there was only one type: cloud identity. Users had to logon using a Sign-In Assistant that stored the cloud credentials (name and password) and used those credentials to sign in in the background. For larger organizations, the Sign-In Assistant was a pain to install and manage so it’s a good thing it is going away.

With the new identity solution, as stated above, the Sign-In Assistant goes away and the logon experience is determined by the type of identity and how you access the service. The table below summarizes the sign-in experience:

image

1 The password can be saved to avoid continuous prompting
2 During the beta, with Federated IDs, you will be prompted when first accessing the services
3 Outlook 2007 will be updated to give the same experience as Outlook 2010

Note that it is required to install some components and updates on user’s workstations if rich clients are used to access Office 365. Although you can manually install these updates, the Office 365 Desktop Setup package does all that is needed. Office 365 Desktop Setup was formerly called the Microsoft Online Services Connector. Office 365 Desktop Setup supports Windows XP (SP2) and higher.

A couple of other things that are good to know:

  • Office 365 supports two-factor authentication if you implement SSO with Active Directory Federation Services 2.0. There are two options to enforce two-factor auth: on the ADFS 2.0 proxy logon page or at the ForeFront UAG SP1 level.
  • Active Directory synchronization is supported with the Microsoft Online Services Directory Synchronization tool. The tool is basically the same as with BPOS although there are some changes to support new features: security group replication, write back (which also enables some extra features), etc…
  • Note that the synchronization tool still does not support multiple forests.
  • The synchronization tool is required in migration scenarios like rich coexistence, simple coexistence and staged migration with simple coexistence.

The full details can be downloaded from the Microsoft website. If you are involved in Office 365 projects, this is considered required reading!

Office 365 SharePoint Online Storage

imageMicrosoft has recently published updated Office 365 Service Descriptions at http://www.microsoft.com/downloads/en/details.aspx?FamilyID=6c6ecc6c-64f5-490a-bca3-8835c9a4a2ea.

The SharePoint Online service description contains some interesting information, some of which I did not know yet. We typically receive a lot of questions about SharePoint online and storage. The list below summarizes the storage related features:

  • The storage pool starts at 10GB with 500MB of extra storage per user account (talking about enterprise user accounts here).
  • Maximum amount of storage is 5TB.
  • File upload limit is 250MB.
  • Storage can be allocated to a maximum of 300 site collections. The maximum amount of storage for a site collection is 100GB.
  • My Sites are available and each My Site is set at 500MB (this is not the 500MB noted above, in essence this is extra storage for each user’s personal data).
  • A My Site is not counted as a site collection. In other words, you can have 300 normal site collections and many more My Sites.
  • Extra storage can be purchased (as before) at $2,5USD/GB per month.

When it comes to external users (for extranet scenarios), the document states that final cost information is not available yet. It is the intention of Microsoft to sell these licenses in packs.

Check out the SharePoint Online service description for full details.

BPOS PowerShell Commands

While I am delivering BPOS courses for Microsoft partners, there’s always a lot of interest in using commands to control directory synchronization, the migration tools, provisioning users and so on. Microsoft actually provides several PowerShell cmdlets with the two main tools that come with BPOS:

  • Directory synchronization cmdlets become available when you install the directory synchronization software
  • Migration and configuration cmdlets become available when you install the migration tools

There is one directory synchronization cmdlet of interest and that is the Start-OnlineCoexistenceSync cmdlet. That cmdlet starts a synchronization run from the on-premises Active Directory to the customer’s BPOS environment. When you start c:\program files\microsoft online directory sync\dirsyncconfigshell.psc1, a PowerShell session is started that allows you to run the cmdlet. If you just want to run the command from an existing PowerShell session, first load the Directory Synchronization snapin with the following command:

Add-PSSnapin Coexistence-Configuration

After the snapin is loaded, you can use the Start-OnlineCoexistenceSync cmdlet to start a synchronization run. Although I have not yet seen the next version of DirSync for use with Office 365, I presume that the above cmdlet will still be available since the DirSync tools will be very similar.

The cmdlets that come with the migration tools are much more interesting because they can be used to provision users, enable users, enable POP3 access for users, grant Send As or Full Mailbox Access and so forth. When the migration tools are installed, you will have a shortcut in the Start Menu in Microsoft Online Services > Migration > Migration Command Shell. When you click that shortcut, a PowerShell session is started with the Microsoft Exchange Transporter snapin loaded. You can ask for the list of cmdlets loaded by this snapin using the following command:

get-command -PSSnapin Microsoft.Exchange.Transporter

Some interesting cmdlets:

  • Add-MSOnlineUser: can be used to add users to BPOS from a script; note that the users are added as synchronized disabled users; you will have to use Enable-MSOnlineUser to enable the user in a separate step
  • Add-MSOnlineMailPermission: can be used to grant Send As, Full Mailbox access or Send On Behalf Of rights on a mailbox
  • Enable-MSOnlinePOPAccess: can be used to enable POP3 access on a mailbox
  • Set-MSOnlineAlternateRecipient: can be used to set an alternate recipient on an Exchange Online mailbox; you can configure the mailbox to deliver e-mails to both the Exchange Online inbox and the alternate recipient
  • Set-MSOnlineUserPassword: can be used to set a password on an online user

Note that there are no cmdlets to create contacts and distribution lists in the Exchange Online global address lists. You can also see that these cmdlets are specifically created for use with Exchange Online in BPOS and that they have no relation at all with Exchange Server 2007 or Exchange Server 2010 cmdlets in an on-premise solution. To fix those issues and provide many more options, Exchange Online in Office 365 will actually allow full use of Exchange Server 2010 SP1 cmdlets over the Internet. Naturally, not all cmdlets will be available and some cmdlets will not support all parameters.

By the way, if you don’t like to work with PowerShell commands, a company called MessageOps has a free tool called BPOS PowerShell GUI. You need to install that tool on a system that has the Microsoft migration tools installed. The tool looks like this:

image

The tool provides easy access to allmost all the available PowerShell cmdlets using the above GUI. Highly recommended!

Enabling Forefront Administration and Quarantine in BPOS

Exchange Online, standalone or as part of BPOS (Business Productivity Online Suite), always comes with antivirus and anti-spam protection delivered by Forefront Online Protection for Exchange or FOPE. Mails are always scanned for viruses and, depending on your settings, checked for spam.

As a BPOS administrator you can control the anti-spam checking behavior by configuring safe and blocked senders in the BPOS Administration Center. E-mail addresses, IP addresses or domains added to the safe senders for instance are not checked for spam by the FOPE infrastructure.

When e-mail is marked as spam, it is held by FOPE. By default, a BPOS user gets an e-mail every three days (from FOPE) with a list of e-mails marked as spam. The user can then decide to move the e-mail to the inbox.

If you want more control and visibility into what FOPE does, and you want to grant users access to the quarantine website at FOPE for immediate action on blocked mails, you will need to ask support to enable the following for you:

You can initially ask that the BPOS administration account you are using is granted access to both. From the FOPE administration website, you can add other users so that they have access to their quarantine. Note that the password to access FOPE admin and quarantine is different from the BPOS password!

Now the question is: “What can you do in the FOPE administration website?”. The answer is simple: “Not that much.” Basically, you get read-only access to most settings. However, you can generate reports and, as stated above, add other users so that they can access the quarantine website. The screenshot below shows an example of a report (in Dutch):

image

A user with access to the quarantine, sees the following:

image

The user can easily select the e-mails that are not spam and move them to the inbox (or mark them as not spam).

If we look forward to how things will be in Office 365, administrators will have more control over the settings in FOPE. That, for sure, will be a welcome addition to the capabilities of Exchange Online and the administrative control customers will have over it.