Giving Argo CD a spin

If you have followed my blog a little, you have seen a few posts about GitOps with Flux CD. This time, I am taking a look at Argo CD which, like Flux CD, is a GitOps tool to deploy applications from manifests in a git repository.

Don’t want to read this whole thing?

Here’s the video version of this post

There are several differences between the two tools:

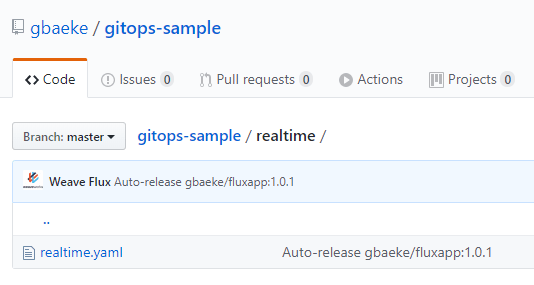
  • At first glance, Flux appears to use a single git repo for your cluster where Argo immediately introduces the concept of apps. Each app can be connected to a different git repo. However Flux can also use multiple git repositories in the same cluster. See https://github.com/fluxcd/multi-tenancy for more information
  • Flux has the concept of workloads which can be automated. This means that image repositories are scanned for updates. When an update is available (say from tag v1.0.0 to v1.0.1), Flux will update your application based on filters you specify. As far as I can see, Argo requires you to drive the update from your CI process, which might be preferred.
  • By default, Argo deploys an administrative UI (next to a CLI) with a full view on your deployment and its dependencies
  • Argo supports RBAC and integrates with external identity providers (e.g. Azure Active Directory)

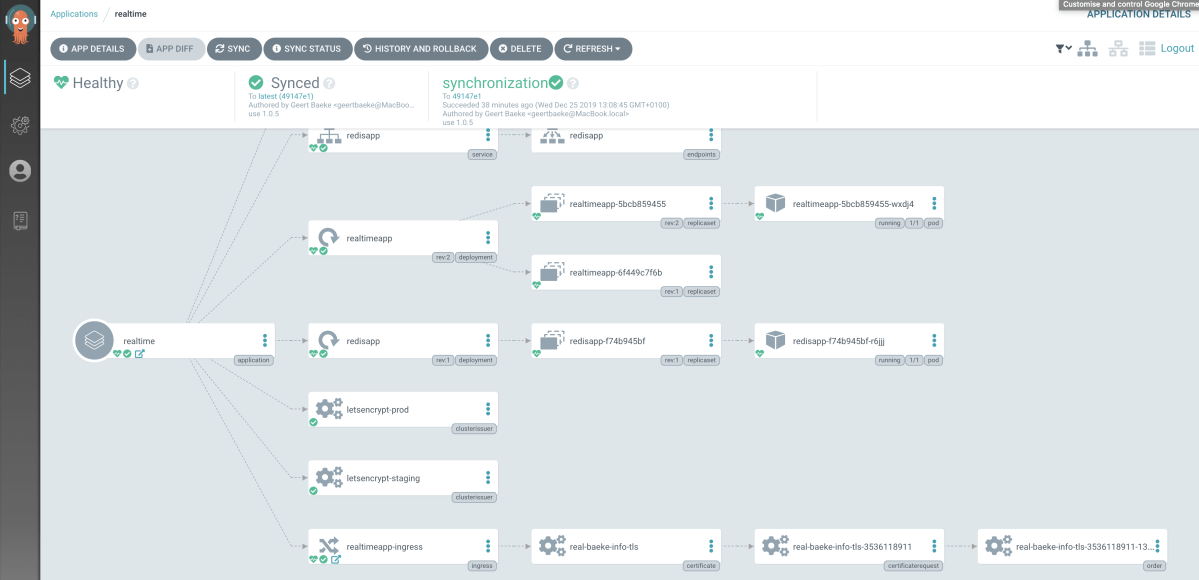
The Argo CD admin interface is shown below:

Argo CD admin interface… not too shabby

Let’s take a look at how to deploy Argo and deploy the app you see above. The app is deployed using a single yaml file. Nothing fancy yet such as kustomize or jsonnet.

Deployment

The getting started guide is pretty clear, so do have a look over there as well. To install, just run (with a deployed Kubernetes cluster and kubectl pointing at the cluster):

kubectl create namespace argocd 

kubectl apply -n argocd -f https://raw.githubusercontent.com/argoproj/argo-cd/stable/manifests/install.yaml

Note that I installed Argo CD on Azure (AKS).

Next, install the CLI. On a Mac, that is simple (with Homebrew):

brew tap argoproj/tap

brew install argoproj/tap/argocd

You will need access to the API server, which is not exposed over the Internet by default. For testing, port forwarding is easiest. In a separate shell, run the following command:

kubectl port-forward svc/argocd-server -n argocd 8080:443

You can now connect to https://localhost:8080 to get to the UI. You will need the admin password by running:

kubectl get pods -n argocd -l app.kubernetes.io/name=argocd-server -o name | cut -d'/' -f 2

You can now login to the UI with the user admin and the displayed password. You should also login from the CLI and change the password with the following commands:

argocd login localhost:8080

argocd account update-password

Great! You are all set now to deploy an application.

Deploying an application

We will deploy an application that has a couple of dependencies. Normally, you would install those dependencies with Argo CD as well but since I am using a cluster that has these dependencies installed via Azure DevOps, I will just list what you need (Helm commands):

helm upgrade --namespace kube-system --install --set controller.service.loadBalancerIP=<IPADDRESS>,controller.publishService.enabled=true --wait nginx stable/nginx-ingress 

helm upgrade --namespace kube-system --install --values /home/vsts/work/1/s/externaldns/values.yaml --set cloudflare.apiToken=<CF_SECRET> --wait externaldns stable/external-dns

kubectl create ns cert-manager

helm upgrade --namespace cert-manager --install --wait --version v0.12.0 cert-manager jetstack/cert-manager

To know more about these dependencies and use an Azure DevOps YAML pipeline to deploy them, see this post. If you want, you can skip the externaldns installation and create a DNS record yourself that resolves to the public IP address of Nginx Ingress. If you do not want to use an Azure static IP address, you can remove the loadBalancerIP parameter from the first command.

The manifests we will deploy with Argo CD can be found in the following public git repository: https://github.com/gbaeke/argo-demo. The application is in three YAML files:

  • Two YAML files that create a certificate cluster issuer based on custom resource definitions (CRDs) from cert-manager
  • realtime.yaml: Redis deployment, Redis service (ClusterIP), realtime web app deployment (based on this), realtime web app service (ClusterIP), ingress resource for https://real.baeke.info (record automatically created by externaldns)

It’s best that you fork my repo and modify realtime.yaml’s ingress resource with your own DNS name.

Create the Argo app

Now you can create the Argo app based on my forked repo. I used the following command with my original repo:

argocd app create realtime \   
--repo https://github.com/gbaeke/argo-demo.git \
--path manifests \
--dest-server https://kubernetes.default.svc \
--dest-namespace default

The command above creates an app called realtime based on the specified repo. The app should use the manifests folder and apply (kubectl apply) all the manifests in that folder. The manifests are deployed to the cluster that Argo CD runs in. Note that you can run Argo CD in one cluster and deploy to totally different clusters.

The above command does not configure the repository to be synced automatically, although that is an option. To sync manually, use the following command:

argocd app sync realtime

The application should now be synced and viewable in the UI:

Application installed and synced

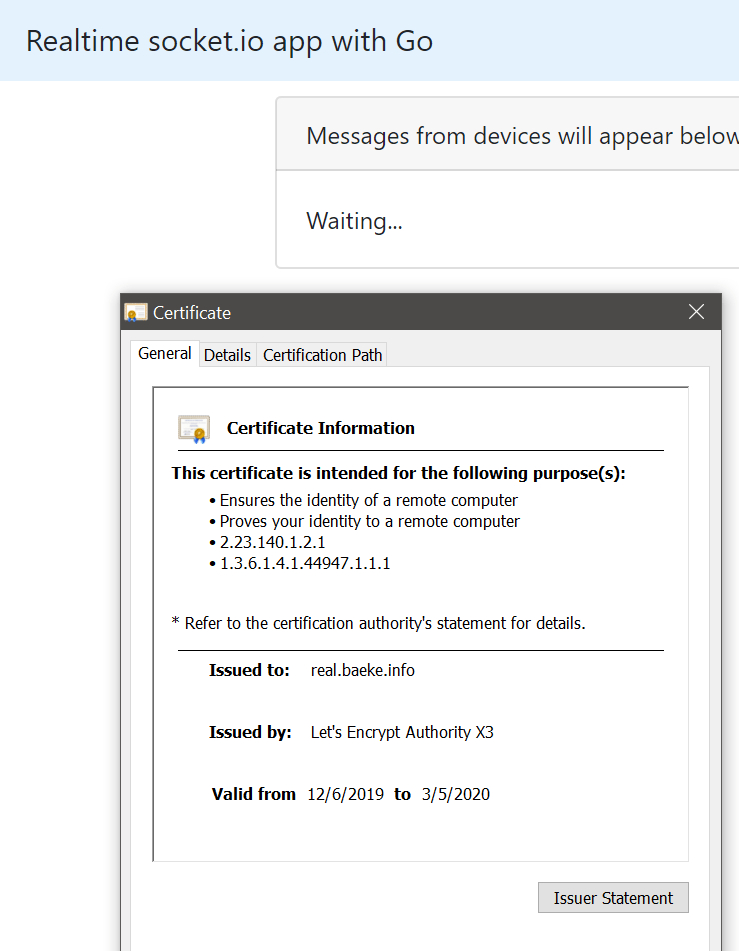
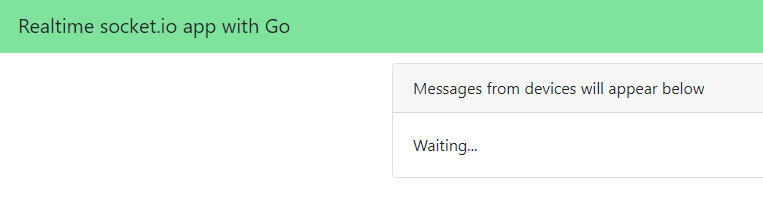
In my case, this results in the following application at https://real.baeke.info:

Not Secure because we use Let’s Encrypt staging for this app

Set up auto-sync

Let’s set up this app to automatically sync with the repo (default = every 3 minutes). This can be done from both the CLI and the UI. Let’s do it from the UI. Click on the app and then click App Details. You will find a Sync Policy in the app details where you can enable auto-sync

Setting up auto-sync from the UI

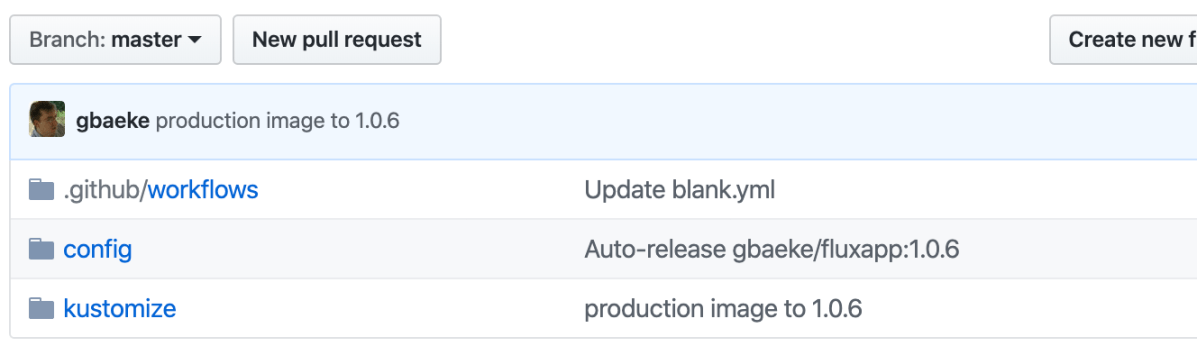
You can now make changes to the git repo like changing the image tag for gbaeke/fluxapp (yes, I used this image with the Flux posts as well 😊 ) to 1.0.6 and wait for the sync to happen. Or sync manually from the CLI or the UI.

Conclusion

This was a quick tour of Argo CD. There is much more you can do but the above should get you started quickly. I must say I quite like the solution and am eager to see what the collaboration of Flux CD, Argo CD and Amazon comes up with in the future.

Kustomize and Flux

Flux has a feature called manifest generation that works together with Kustomize. Instead of just picking YAML files from a git repo and applying them, customisation is performed with the kustomize build command. The resulting YAML then gets applied to your cluster.

If you don’t know how customisation works (without Flux), take a look at the article I wrote earlier. Or look at the core docs.

You need to be aware of a few things before you get started. In order for Flux to use this method, you need to turn on manifest generation. With the Flux Helm chart, just pass the following parameter:

--set manifestGeneration=true

In my case, I have plain YAML files without customisation in a config folder. I want the files that use customisation in a different folder, say kustomize, like so:

Two folders to pass as git.path

To pass these folders to the Helm chart, use the following parameter:

--set git.path="config\,kustomize"

The kustomize folder contains the following files:

base files with environments dev and prod

There is nothing special about the base folder here. It is as explained in my previous post. The dev and prod folders are similar so I will focus only on dev.

The dev folder contains a .flux.yaml file, which is required by Flux. In this simple example, it contains the following:

version: 1
patchUpdated:
  generators:
    - command: kustomize build .
  patchFile: flux-patch.yaml

The file specifies the generator to use, in this case Kustomize. The kustomize executable is in the Flux image. I specify one patchFile which contains patches for several resources separated by —:

---
apiVersion: apps/v1
kind: Deployment
metadata:
  annotations:
    flux.weave.works/automated: "true"
    flux.weave.works/tag.realtime: semver:~1
  name: realtime
  namespace: realtime-dev
spec:
  template:
    spec:
      $setElementOrder/containers:
      - name: realtime
      containers:
      - image: gbaeke/fluxapp:1.0.6
        name: realtime
---
apiVersion: extensions/v1beta1
kind: Ingress
metadata:
  name: realtime-ingress
  namespace: realtime-dev
spec:
  rules:
  - host: realdev.baeke.info
    http:
      paths:
      - backend:
          serviceName: realtime
          servicePort: 80
        path: /
  tls:
  - hosts:
    - realdev.baeke.info
    secretName: real-dev-baeke-info-tls

Above, you see the patches for the dev environment:

  • the workload should be automated by Flux, installing new images based on the semantic version filter ~1
  • the ingress should use host realdev.baeke.info with a different name for the secret as well (the secret will be created by cert-manager)

The prod folder contains a similar configuration. Perhaps naively, I thought that specifying the kustomize folder in git.path was sufficient for Flux to scan the folders and run customisation wherever a .flux.yaml file was found. Sadly, that is not the case. ☹️With just the kustomization folder specified, Flux find conflicts between base, dev and prod folders because they contain similar files. That is expected behaviour for regular YAML files but , in my opinion, should not happen in this case. There is a bit of a clunky way to make this work though. Just specify the following as git.path:

--set git.path="config\,kustomize/dev\,kustomize/prod"

With the above parameter, Flux will find no conflicts and will happily apply the customisations.

As a side note, you should also specify the namespace in the patch file explicitly. It is not added automatically even though kustomization.yaml contains the namespace.

Let’s look at the cluster when Flux has applied the changes.

Namespaces for dev and prod created via Flux & Kustomize

And here is the deployed “production app”:

Who chose that ugly colour!

The way customisations are handled could be improved. It’s unwieldy to specify every “customisation” folder in the git.path parameter. Just give me a –git-kustomize-path parameter and scan the paths in that parameter for .flux.yaml files. On the other hand, maybe I am missing something here so remarks are welcome.

A quick tour of Kustomize

Image above from: https://kustomize.io/

When you have to deploy an application to multiple environments like dev, test and production there are many solutions available to you. You can manually deploy the app (Nooooooo! 😉), use a CI/CD system like Azure DevOps and its release pipelines (with or without Helm) or maybe even a “GitOps” approach where deployments are driven by a tool such as Flux or Argo based on a git repository.

In the latter case, you probably want to use a configuration management tool like Kustomize for environment management. Instead of explaining what it does, let’s take a look at an example. Suppose I have an app that can be deployed with the following yaml files:

  • redis-deployment.yaml: simple deployment of Redis
  • redis-service.yaml: service to connect to Redis on port 6379 (Cluster IP)
  • realtime-deployment.yaml: application that uses the socket.io library to display real-time updates coming from a Redis channel
  • realtime-service.yaml: service to connect to the socket.io application on port 80 (Cluster IP)
  • realtime-ingress.yaml: ingress resource that defines the hostname and TLS certificate for the socket.io application (works with nginx ingress controller)

Let’s call this collection of files the base and put them all in a folder:

Base files for the application

Now I would like to modify these files just a bit, to install them in a dev namespace called realtime-dev. In the ingress definition I want to change the name of the host to realdev.baeke.info instead of real.baeke.info for production. We can use Kustomize to reach that goal.

In the base folder, we can add a kustomization.yaml file like so:

apiVersion: kustomize.config.k8s.io/v1beta1
kind: Kustomization
resources:
- realtime-ingress.yaml
- realtime-service.yaml
- redis-deployment.yaml
- redis-service.yaml
- realtime-deployment.yaml

This lists all the resources we would like to deploy.

Now we can create a folder for our patches. The patches define the changes to the base. Create a folder called dev (next to base). We will add the following files (one file blurred because it’s not relevant to this post):

kustomization.yaml contains the following:

apiVersion: kustomize.config.k8s.io/v1beta1
kind: Kustomization
namespace: realtime-dev
resources:
- ./namespace.yaml
bases:
- ../base
patchesStrategicMerge:
- realtime-ingress.yaml
 

The namespace: realtime-dev ensures that our base resource definitions are updated with that namespace. In resources, we ensure that namespace gets created. The file namespace.yaml contains the following:

apiVersion: v1
kind: Namespace
metadata:
  name: realtime-dev 

With patchesStrategicMerge we specify the file(s) that contain(s) our patches, in this case just realtime-ingress.yaml to modify the hostname:

apiVersion: extensions/v1beta1
kind: Ingress
metadata:
  annotations:
    cert-manager.io/cluster-issuer: letsencrypt-prod
    kubernetes.io/ingress.class: nginx
  name: realtime-ingress
spec:
  rules:
  - host: realdev.baeke.info
    http:
      paths:
      - backend:
          serviceName: realtime
          servicePort: 80
        path: /
  tls:
  - hosts:
    - realdev.baeke.info
    secretName: real-dev-baeke-info-tls

Note that we also use certmanager here to issue a certificate to use on the ingress. For dev environments, it is better to use the Let’s Encrypt staging issuer instead of the production issuer.

We are now ready to generate the manifests for the dev environment. From the parent folder of base and dev, run the following command:

kubectl kustomize dev

The above command generates the patched manifests like so:

apiVersion: v1 
kind: Namespace
metadata:      
  name: realtime-dev
---
apiVersion: v1
kind: Service
metadata:
  labels:
    app: realtime
  name: realtime
  namespace: realtime-dev
spec:
  ports:
  - port: 80
    targetPort: 8080
  selector:
    app: realtime
---
apiVersion: v1
kind: Service
metadata:
  labels:
    app: redis
  name: redis
  namespace: realtime-dev
spec:
  ports:
  - port: 6379
    targetPort: 6379
  selector:
    app: redis
---
apiVersion: apps/v1
kind: Deployment
metadata:
  labels:
    app: realtime
  name: realtime
  namespace: realtime-dev
spec:
  replicas: 1
  selector:
    matchLabels:
      app: realtime
  template:
    metadata:
      labels:
        app: realtime
    spec:
      containers:
      - env:
        - name: REDISHOST
          value: redis:6379
        image: gbaeke/fluxapp:1.0.5
        name: realtime
        ports:
        - containerPort: 8080
        resources:
          limits:
            cpu: 150m
            memory: 150Mi
          requests:
            cpu: 25m
            memory: 50Mi
---
apiVersion: apps/v1
kind: Deployment
metadata:
  labels:
    app: redis
  name: redis
  namespace: realtime-dev
spec:
  replicas: 1
  selector:
    matchLabels:
      app: redis
  template:
    metadata:
      labels:
        app: redis
    spec:
      containers:
      - image: redis:4-32bit
        name: redis
        ports:
        - containerPort: 6379
        resources:
          requests:
            cpu: 200m
            memory: 100Mi
---
apiVersion: extensions/v1beta1
kind: Ingress
metadata:
  annotations:
    cert-manager.io/cluster-issuer: letsencrypt-prod
    kubernetes.io/ingress.class: nginx
  name: realtime-ingress
  namespace: realtime-dev
spec:
  rules:
  - host: realdev.baeke.info
    http:
      paths:
      - backend:
          serviceName: realtime
          servicePort: 80
        path: /
  tls:
  - hosts:
    - realdev.baeke.info
    secretName: real-dev-baeke-info-tls

Note that namespace realtime-dev is used everywhere and that the Ingress resource uses realdev.baeke.info. The original Ingress resource looked like below:

apiVersion: extensions/v1beta1
kind: Ingress
metadata:
  name: realtime-ingress
  annotations:
    kubernetes.io/ingress.class: nginx
    cert-manager.io/cluster-issuer: "letsencrypt-prod"
spec:
  tls:
  - hosts:
    - real.baeke.info
    secretName: real-baeke-info-tls
  rules:
  - host: real.baeke.info
    http:
      paths:
      - path: /
        backend:
          serviceName: realtime
          servicePort: 80 

As you can see, Kustomize has updated the host in tls: and rules: and also modified the secret name (which will be created by certmanager).

You have probably seen that Kustomize is integrated with kubectl. It’s also available as a standalone executable.

To directly apply the patched manifests to your cluster, run kubectl apply -k dev. The result:

namespace/realtime-dev created
service/realtime created
service/redis created
deployment.apps/realtime created
deployment.apps/redis created
ingress.extensions/realtime-ingress created

In another post, we will look at using Kustomize with Flux. Stay tuned!

Creating a Kubernetes operator on Windows and WSL

I have always wanted to create a Kubernetes operator with the operator framework and tried to give that a go on my Windows 10 system. Note that the emphasis is on creating an operator, not necessarily writing a useful one 😁. All I am doing is using the boilerplate that is generated by the framework. If you have never even seen how this is done, then this post if for you. 👍

An operator is an application-specific controller. A controller is a piece of software that implements a control loop, watching the state of the Kubernetes cluster via the API. It makes changes to the state to drive it towards the desired state.

An operator uses Kubernetes to create and manage complex applications. Many operators can be found here: https://operatorhub.io/. The Cassandra operator for instance, has domain-specific knowledge embedded in it, that knows how to deploy and configure this database. That’s great because that means some of the burden is shifted from you to the operator.

Installation

I installed the Operator SDK CLI from the GitHub releases in WSL, Windows Subsystem for Linux. I am using WSL 1, not WSL 2 as I am not running a Windows Insiders release. The commands to run:

RELEASE_VERSION=v0.13.0 

curl -LO https://github.com/operator-framework/operator-sdk/releases/download/${RELEASE_VERSION}/operator-sdk-${RELEASE_VERSION}-x86_64-linux-gnu 

chmod +x operator-sdk-${RELEASE_VERSION}-x86_64-linux-gnu && sudo mkdir -p /usr/local/bin/ && sudo cp operator-sdk-${RELEASE_VERSION}-x86_64-linux-gnu /usr/local/bin/operator-sdk && rm operator-sdk-${RELEASE_VERSION}-x86_64-linux-gnu 

You should now be able to run operator-sdk in WSL 1.

Creating an operator

In WSL, you should have installed Go. I am using version 1.13.5. Although not required, I used my Go path on Windows to generate the operator and not the %GOPATH set in WSL. My working directory was:

/mnt/c/Users/geert/go/src/github.com/baeke.info

To create the operator, I ran the following commands (one line):

export GO111MODULE=on

operator-sdk new fun-operator --repo github.com/baeke.info/fun-operator

This creates a folder, fun-operator, under baeke.info and sets up the project:

Project structure in VS Code

Before continuing, cd into fun-operator and run go mod tidy. Now we can run the following command:

operator-sdk add api --api-version=fun.baeke.info/v1alpha1 --kind FunOp

This creates a new CRD (Custom Resource Definition) API called FunOp. The API version is fun.baeke.info/v1alpha1 which you choose yourself. With the above you can create CRDs like below that the operator acts upon:

apiVersion: fun.baeke.info/v1alpha1
kind: FunOp
metadata:
  name: example-funop 

Now we can add a controller that watches for the above CRD resource:

operator-sdk add controller --api-version=fun.baeke.info/v1alpha1 --kind=FunOp

The above will generate a file, funop_controller.go, that contains some boilerplate code that creates a busybox pod. The Reconcile function is responsible for doing this work:

Reconcile function in the controller (incomplete)

As stated above, I will just use the boilerplate code and build the project:

operator-sdk build gbaeke/fun-operator

In WSL 1, you cannot run Docker so the above command will build the operator from the Go code but fail while building the container image. Can’t wait for WSL 2! The build creates the following artifact:

fun-operator in _output/bin

The supplied Dockerfile can be used to build the container images in Windows. In Windows, copy the Dockerfile from the build folder to the root of the operator project (in my case C:\Users\geert\go\src\github.com\baeke.info\fun-operator) and run docker build and push:

docker build -t gbaeke/fun-operator .

docker push gbaeke/fun-operator

Deploying the operator

The project folder structure contains a bunch of yaml in the deploy folder:

Great! Some YAML to deploy

The service account, role and role binding make sure your code can create (or delete/update) resources in the cluster. The operator.yaml actually deploys the operator on your cluster. You just need to update the container spec with the name of your image (here gbaeke/fun-operator).

Before you deploy the operator, make sure you deploy the CRD manifest (here fun.baeke.info_funops_crd.yaml).

As always, just use kubectl apply -f with the above YAML files.

Testing the operator

With the operator deployed, create a resource based on the CRD. For instance:

apiVersion: fun.baeke.info/v1alpha1
kind: FunOp
metadata:
  name: example-funop  

From the moment you create this resource with kubectl apply, a pod will be created by the operator.

pod created upon submitting the custom resource

When you delete example-funop, the pod will be removed by the operator.

That’s it! We created a Kubernetes operator with the boilerplate code supplied by the operator-sdk cli. Another time, maybe we’ll create an operator that actually does something useful! 😉

Check your yaml files with kubeval and GitHub Actions

In the previous post, I deployed AKS, Nginx, External DNS, Helm Operator and Flux with a YAML pipeline in Azure DevOps. Flux got linked to a git repo that contains a bunch of yaml files that deploy applications to the cluster but also configures Azure Monitor. Flux essentially synchronizes your cluster with the configuration in the git repository.

In production, it is not a good idea to simply drop in some yaml and let Flux do its job. Similar to traditional software development, you want to run some tests before you deploy. For Kubernetes yaml files, kubeval is a tool that can run those tests.

I refactored the git repository to have all yaml files in a config folder. To check all yaml files in that folder, the following command can be used:

kubeval -d config --strict --ignore-missing-schemas 

With -d you specify the folder (and all its subfolders) where kubeval should look for yaml files. The –strict option checks for properties in your yaml file that are not part of the official schema. If you know you need those, you can leave out –strict. With –ignore-missing-schemas, kubeval will ignore yaml files that use custom schemas not in the Kubernetes OpenAPI spec. In my case for instance, the yaml file that deploys a Helm chart (of kind HelmRelease) is such a file. You can also instruct kubeval to ignore specific “kinds” with –skip-kinds. Here’s the result of running the command:

Result of kubeval

Using a GitHub action

To automate the testing of your files, you can use any CI system like Azure DevOps, CircleCI, etc… In my case, I decided to use a GitHub action. See the getting started for more information about the basics of GitHub Actions. The action I created is easy (hey, it’s my first time using Actions 😊):

GitHub Action to validate YAML with kubeval

An action is defined in yaml 😉 and consists of jobs and steps, similarly to Azure DevOps and the likes. The action is run on Ubuntu (hosted by GitHub) and uses an action from the marketplace called Kubernetes toolset. You can easily search for actions in the editor:

Actions in the marketplace

The first step uses an action to checkout your code. Indeed, you need to do that explicitly. Then we use the Kubernetes Toolset to give us access to all kinds of Kubernetes related tools such as kubectl and kubeval. The toolset is just a container which you’ll see getting pulled at runtime. After that, we simple run kubeval in the container which will have mounted the working directory which also contains your checked out code.

In the repository settings, I added a branch protection rule that requires a pull request review before merging plus a status check that must pass (the action):

Branch protection rules

The pull request below shows a check that did not pass, a violation of the –strict setting in error.yaml:

Failed status check before merging

There are many other tools and techniques that can be used to validate your configuration but this should get you started with some simple checks on yaml files.

As a last note, know that kubeval generates schemas from the Kubernetes OpenAPI specs. You can set the version of Kubernetes with the -v option.

Happy validating!!!

Deploy AKS with Nginx, External DNS, Helm Operator and Flux

A while ago, I blogged about an Azure YAML pipeline to deploy AKS together with Traefik. As a variation on that theme, this post talks about deploying AKS together with Nginx, External DNS, a Helm Operator and Flux CD. I blogged about Flux before if you want to know what it does.

Video version (1.5x speed recommended)

I added the Azure DevOps pipeline to the existing GitHub repo, in the nginx-dns-helm-flux folder.

Let’s break the pipeline down a little. In what follows, replace AzureMPN with a reference to your own subscription. The first two tasks, AKS deployment and IP address deployment are ARM templates that deploy these resources in Azure. Nothing too special there. Note that the AKS cluster is one with default networking, no Azure AD integration and without VMSS (so no multiple node pools either).

Note: I modified the pipeline to deploy a VMSS-based cluster with a standard load balancer, which is recommended instead of a cluster based on an availability set with a basic load balancer.

The third task takes the output of the IP address deployment and parses out the IP address using jq (last echo statement on one line):

task: Bash@3
      name: GetIP
      inputs:
        targetType: 'inline'
        script: |
          echo "##vso[task.setvariable variable=test-ip;]$(echo '$(armoutputs)' | jq .ipaddress.value -r)"

The IP address is saved in a variable test-ip for easy reuse later.

Next, we install kubectl and Helm v3. Indeed, Azure DevOps now supports installation of Helm v3 with:

- task: HelmInstaller@1
      inputs:
        helmVersionToInstall: 'latest'

Next, we need to run a script to achieve a couple of things:

  • Get AKS credentials with Azure CLI
  • Add Helm repositories
  • Install a custom resource definition (CRD) for the Helm operator

This is achieved with the following inline Bash script:

- task: AzureCLI@1
      inputs:
        azureSubscription: 'AzureMPN'
        scriptLocation: 'inlineScript'
        inlineScript: |
          az aks get-credentials -g $(aksTestRG) -n $(aksTest) --admin
          helm repo add stable https://kubernetes-charts.storage.googleapis.com/
          helm repo add fluxcd https://charts.fluxcd.io
          helm repo update
          kubectl apply -f https://raw.githubusercontent.com/fluxcd/helm-operator/master/deploy/flux-helm-release-crd.yaml

Next, we create a Kubernetes namespace called fluxcd. I create the namespace with some inline YAML in the Kubernetes@1 task:

- task: Kubernetes@1
      inputs:
        connectionType: 'None'
        command: 'apply'
        useConfigurationFile: true
        configurationType: 'inline'
        inline: |
          apiVersion: v1
          kind: Namespace
          metadata:
            name: fluxcd

It’s best to use the approach above instead of kubectl create ns. If the namespace already exists, you will not get an error.

Now we are ready to deploy Nginx, External DNS, Helm operator and Flux CD

Nginx

This is a pretty basic installation with the Azure DevOps Helm task:

- task: HelmDeploy@0
      inputs:
        connectionType: 'None'
        namespace: 'kube-system'
        command: 'upgrade'
        chartType: 'Name'
        chartName: 'stable/nginx-ingress'
        releaseName: 'nginx'
        overrideValues: 'controller.service.loadBalancerIP=$(test-ip),controller.publishService.enabled=true,controller.metrics.enabled=true'

For External DNS to work, I found I had to set controller.publishService.enabled=true. As you can see, the Nginx service is configured to use the IP we created earlier. Azure will create a load balancer with a front end IP configuration that uses this address. This all happens automatically.

Note: controller.metrics.enabled enables a Prometheus scraping endpoint; that is not discussed further in this blog

External DNS

External DNS can automatically add DNS records for ingresses and services you add to Kubernetes. For instance, if I create an ingress for test.baeke.info, External DNS can create this record in the baeke.info zone and use the IP address of the Ingress Controller (nginx here). Installation is pretty straightforward but you need to provide credentials to your DNS provider. In my case, I use CloudFlare. Many others are available. Here is the task:

- task: HelmDeploy@0
      inputs:
        connectionType: 'None'
        namespace: 'kube-system'
        command: 'upgrade'
        chartType: 'Name'
        chartName: 'stable/external-dns'
        releaseName: 'externaldns'
        overrideValues: 'cloudflare.apiToken=$(CFAPIToken)'
        valueFile: 'externaldns/values.yaml'

On CloudFlare, I created a token that has the required access rights to my zone (read, edit). I provide that token to the chart via the CFAPIToken variable defined as a secret on the pipeline. The valueFile looks like this:

rbac:
  create: true

provider: cloudflare

logLevel: debug

cloudflare:
  apiToken: CFAPIToken
  email: email address
  proxied: false

interval: "1m"

policy: sync # or upsert-only

domainFilters: [ 'baeke.info' ]

In the beginning, it’s best to set the logLevel to debug in case things go wrong. With interval 1m, External DNS checks for ingresses and services every minute and syncs with your DNS zone. Note that External DNS only touches the records it created. It does so by creating TXT records that provide a record that External DNS is indeed the owner.

With External DNS in place, you just need to create an ingress like below to have the A record real.baeke.info created:

apiVersion: extensions/v1beta1
kind: Ingress
metadata:
  name: realtime-ingress
  annotations:
    kubernetes.io/ingress.class: nginx
spec:
  rules:
  - host: real.baeke.info
    http:
      paths:
      - path: /
        backend:
          serviceName: realtime
          servicePort: 80

Helm Operator

The Helm Operator allows us to install Helm chart by simply using a yaml file. First, we install the operator:

- task: HelmDeploy@0
      name: HelmOp
      displayName: Install Flux CD Helm Operator
      inputs:
        connectionType: 'None'
        namespace: 'kube-system'
        command: 'upgrade'
        chartType: 'Name'
        chartName: 'fluxcd/helm-operator'
        releaseName: 'helm-operator'
        overrideValues: 'extraEnvs[0].name=HELM_VERSION,extraEnvs[0].value=v3,image.repository=docker.io/fluxcd/helm-operator-prerelease,image.tag=helm-v3-dev-53b6a21d'
        arguments: '--namespace fluxcd'

This installs the latest version of the operator at the time of this writing (image.repository and image.tag) and also sets Helm to v3. With this installed, you can install a Helm chart by submitting files like below:

apiVersion: helm.fluxcd.io/v1
kind: HelmRelease
metadata:
  name: influxdb
  namespace: default
spec:
  releaseName: influxdb
  chart:
    repository: https://charts.bitnami.com/bitnami
    name: influxdb
    version: 0.2.4

You can create files that use kind HelmRelease (HR) because we installed the Helm Operator CRD before. To check installed Helm releases in a namespace, you can run kubectl get hr.

The Helm operator is useful if you want to install Helm charts from a git repository with the help of Flux CD.

Flux CD

Deploy Flux CD with the following task:

- task: HelmDeploy@0
      name: FluxCD
      displayName: Install Flux CD
      inputs:
        connectionType: 'None'
        namespace: 'fluxcd'
        command: 'upgrade'
        chartType: 'Name'
        chartName: 'fluxcd/flux'
        releaseName: 'flux'
        overrideValues: 'git.url=git@github.com:$(gitURL),git.pollInterval=1m'

The gitURL variable should be set to a git repo that contains your cluster configuration. For instance: gbaeke/demo-clu-flux. Flux will check the repo for changes every minute. Note that we are using a public repo here. Private repos and systems other than GitHub are supported.

Take a look at GitOps with Weaveworks Flux for further instructions. Some things you need to do:

  • Install fluxctl
  • Use fluxctl identity to obtain the public key from the key pair created by Flux (when you do not use your own)
  • Set the public key as a deploy key on the git repo
GitHub deploy key

By connecting the https://github.com/gbaeke/demo-clu-flux repo to Flux CD (as done here), the following is done based on the content of the repo (the complete repo is scanned:

  • Install InfluxDB Helm chart
  • Add a simple app that uses a Go socket.io implementation to provide realtime updates based on Redis channel content; this app is published via nginx and real.baeke.info is created in DNS (by External DNS)
  • Adds a ConfigMap that is used to configure Azure Monitor to enable Prometheus endpoint scraping (to show this can be used for any object you need to add to Kubernetes)

Note that the ingress of the Go app has an annotation (in realtime.yaml, in the git repo) to issue a certificate via cert-manager. If you want to make that work, add an extra task to the pipeline that installs cert-manager:

- task: HelmDeploy@0
      inputs:
        connectionType: 'None'
        namespace: 'cert-manager'
        command: 'upgrade'
        chartType: 'Name'
        chartName: 'jetstack/cert-manager'
        releaseName: 'cert-manager'
        arguments: '--version v0.12.0'

You will also need to create another namespace, cert-manager, just like we created the fluxcd namespace.

In order to make the above work, you will need Issuers or ClusterIssuers. The repo used by Flux CD contains two ClusterIssuers, one for Let’s Encrypt staging and one for production. The ingress resource uses the production issuer due to the following annotation:

cert-manager.io/cluster-issuer: "letsencrypt-prod" 

The Go app that is deployed by Flux now has TLS enabled by default:

https on the Go app

I often use this deployment in demo’s of all sorts. I hope it is helpful for you too in that way!

Trying out k3sup

k3sup is a utility created by Alex Ellis to easily deploy k3s to any local or remote VM. In this post, I am giving the tool a try on a Civo cloud Ubuntu VM. You can of course pick any cloud provider you want or use a local system.

Deploying a VM on Civo Cloud

There’s not much to say here. Civo cloud is super simple to use and deploys VMs very fast. Just get an account and launch a new instance. Make sure you can access the VM over SSH. I deployed a simple Ubuntu 18.04 VM with 2 GBs of RAM:

VM deployed on Civo Cloud

Note: make sure you enable SSH via private/public key pair; use ssh-keygen to create the key pair and upload the contents of id_rsa.pub to Civo (SSH Keys section)

After deployment, check that you can access the VM with ssh chosen-user@IP-of-VM

Getting k3sup

On my Windows box, I used the Ubuntu shell to install k3sup:

curl -sLS https://get.k3sup.dev | sh 
sudo install k3sup /usr/local/bin/ 

You can now run the k3sup command as follows:

k3sup install --ip PUBLIC-IP-OF-CLOUD-VM --user root

And off it goes…

k3s installation via k3sup over SSH

At the end of the installation, you will see:

Saving file to: /home/gbaeke/kubeconfig

This means you can now use kubectl to interact with k3s. Just make sure kubectl knows where to find your kubeconfig file with (in my case in /home/gbaeke):

export KUBECONFIG=/home/gbaeke/kubeconfig

Before continuing, make sure your cloud VM allows access to TCP port 6443!

Now you can run something like kubectl get nodes:

kubectl running in Ubuntu shell on laptop to access k3s on remote VM

Installing applications

k3sup allows you to install the following applications to k3s via k3sup app install:

To install OpenFaas, just run k3sup app install openfaas. And off it goes….

Installing OpenFaas via k3sup

To install other applications, just use YAML files or any other method you prefer. It’s still Kubernetes! 😊

Conclusion

This was just a quick post (or note to self 😊) about k3sup which allows you to install k3s to any VM over SSH. It really is a great and simple to use tool so highly recommended. Note that Civo has a k3s service as well which is currently in beta. That service makes it easy to provision k3s from the Civo portal, similar to how you deploy AKS or GKE!

GitOps with Weaveworks Flux – Installing and Updating Applications

In a previous post, we installed Weaveworks Flux. Flux synchronizes the contents of a git repository with your Kubernetes cluster. Flux can easily be installed via a Helm chart. As an example, we installed Traefik by adding the following yaml to the synced repository:

apiVersion: helm.fluxcd.io/v1
kind: HelmRelease
metadata:
  name: traefik
  namespace: default
  annotations:
    fluxcd.io/ignore: "false"
spec:
  releaseName: traefik
  chart:
    repository: https://kubernetes-charts.storage.googleapis.com/
    name: traefik
    version: 1.78.0
  values:
    serviceType: LoadBalancer
    rbac:
      enabled: true
    dashboard:
      enabled: true   

It does not matter where you put this file because Flux scans the complete repository. I added the file to a folder called traefik.

If you look more closely at the YAML file, you’ll notice its kind is HelmRelease. You need an operator that can handle this type of file, which is this one. In the previous post, we installed the custom resource definition and the operator manually.

Adding a custom application

Now it’s time to add our own application. You do not need to use Helm packages or the Helm operator to install applications. Regular yaml will do just fine.

The application we will deploy needs a Redis backend. Let’s deploy that first. Add the following yaml file to your repository:

---
apiVersion: apps/v1
kind: Deployment
metadata:
  name: redis
  labels:
    app: redis       
spec:
  selector:
    matchLabels:     
      app: redis
  replicas: 1        
  template:          
    metadata:
      labels:        
        app: redis
    spec:            
      containers:
      - name: redis
        image: redis
        resources:
          requests:
            cpu: 200m
            memory: 100Mi
        ports:
        - containerPort: 6379
---        
apiVersion: v1
kind: Service        
metadata:
  name: redis
  labels:            
    app: redis
spec:
  ports:
  - port: 6379       
    targetPort: 6379
  selector:          
    app: redis

After committing this file, wait a moment or run fluxctl sync. When you run kubectl get pods for the default namespace, you should see the Redis pod:

Redis is running — yay!!!

Now it’s time to add the application. I will use an image, based on the following code: https://github.com/gbaeke/realtime-go (httponly branch because master contains code to automatically request a certificate with Let’s Encrypt). I pushed the image to Docker Hub as gbaeke/fluxapp:1.0.0. Now let’s deploy the app with the following yaml:

---
apiVersion: apps/v1
kind: Deployment
metadata:
  name: realtime
  labels:
    app: realtime       
spec:
  selector:
    matchLabels:     
      app: realtime
  replicas: 1        
  template:          
    metadata:
      labels:        
        app: realtime
    spec:            
      containers:
      - name: realtime
        image: gbaeke/fluxapp:1.0.0
        env:
        - name: REDISHOST
          value: "redis:6379"
        resources:
          requests:
            cpu: 50m
            memory: 50Mi
          limits:
            cpu: 150m
            memory: 150Mi
        ports:
        - containerPort: 8080
---        
apiVersion: v1
kind: Service        
metadata:
  name: realtime
  labels:            
    app: realtime
spec:
  ports:
  - port: 80       
    targetPort: 8080
  selector:          
    app: realtime
---
apiVersion: networking.k8s.io/v1beta1
kind: Ingress
metadata:
  name: realtime-ingress
spec:
  rules:
  - host: realtime.IP.xip.io
    http:
      paths:
      - path: /
        backend:
          serviceName: realtime
          servicePort: 80

In the above yaml, replace IP in the Ingress specification to the IP of the external load balancer used by your Ingress Controller. Once you add the yaml to the git repository and you run fluxctl sync the application should be deployed. You see the following page when you browse to http://realtime.IP.xip.io:

Web app deployed via Flux and standard yaml

Great, v1.0.0 of the app is deployed using the gbaeke/fluxapp:1.0.0 image. But what if I have a new version of the image and the yaml specification does not change? Read on…

Upgrading the application

If you have been following along, you can now run the following command:

fluxctl list-workloads -a

This will list all workloads on the cluster, including the ones that were not installed by Flux. If you check the list, none of the workloads are automated. When a workload is automated, it can automatically upgrade the application when a new image appears. Let’s try to automate the fluxapp. To do so, you can either add annotations to your yaml or use fluxctl. Let’s use the yaml approach by adding the following to our deployment:

annotations:
    flux.weave.works/automated: "true"
    flux.weave.works/tag.realtime: semver:~1.0

Note: Flux only works with immutable tags; do not use latest

After committing the file and running fluxctl sync, you can run fluxctl list-workloads -a again. The deployment should now be automated:

fluxapp is now automated

Now let’s see what happens when we add a new version of the image with tag 1.0.1. That image uses a different header color to show the difference. Flux monitors the repository for changes. When it detects a new version of the image that matches the semver filter, it will modify the deployment. Let’s check with fluxctl list-workloads -a:

new image deployed

And here’s the new color:

New color in version 1.0.1. Exciting! 😊

But wait… what about the git repo?

With the configuration of a deploy key, Flux has access to the git repository. When a deployment is automated and the image is changed, that change is also reflected in the git repo:

Weave Flux updated the realtime yaml file

In the yaml, version 1.0.1 is now used:

Flux updated the yaml file

What if I don’t like this release? With fluxctl, you can rollback to a previous version like so:

Rolling back a release – will also update the git repo

Although this works, the deployment will be updated to 1.0.1 again since it is automated. To avoid that, first lock the deployment (or workload) and then force the release of the old image:

fluxctl lock -w=deployment/realtime

fluxctl release -n default --workload=deployment/realtime --update-image=gbaeke/fluxapp:1.0.0 --force

In your yaml, there will be an additional annotation: fluxcd.io/locked: ‘true’ and the image will be set to 1.0.0.

Conclusion

In this post, we looked at deploying and updating an application via Flux automation. You only need a couple of annotations to make this work. This was just a simple example. For an example with dev, staging and production branches and promotion from staging to production, be sure to look at https://github.com/fluxcd/helm-operator-get-started as well.

GitOps with Weaveworks Flux

If you have ever deployed applications to Kubernetes or other platforms, you are probably used to the following approach:

  • developers check in code which triggers CI (continuous integration) and eventually results in deployable artifacts
  • a release process deploys the artifacts to one or more environments such as a development and a production environment

In the case of Kubernetes, the artifact is usually a combination of a container image and a Helm chart. The release process then authenticates to the Kubernetes cluster and deploys the artifacts. Although this approach works, I have always found this deployment process overly complicated with many release pipelines configured to trigger on specific conditions.

What if you could store your entire cluster configuration in a git repository as the single source of truth and use simple git operations (is there such a thing? 😁) to change your configuration? Obviously, you would need some extra tooling that synchronizes the configuration with the cluster, which is exactly what Weaveworks Flux is designed to do. Also check the Flux git repo.

In this post, we will run through a simple example to illustrate the functionality. We will do the following over two posts:

Post one:

  • Create a git repo for our configuration
  • Install Flux and use the git repo as our configuration source
  • Install an Ingress Controller with a Helm chart

Post two:

  • Install an application using standard YAML (including ingress definition)
  • Update the application automatically when a new version of the application image is available

Let’s get started!

Create a git repository

To keep things simple, make sure you have an account on GitHub and create a new repository. You can also clone my demo repository. To clone it, use the following command:

git clone https://github.com/gbaeke/gitops-sample.git

Note: if you clone my repo and use it in later steps, the resources I defined will get created automatically; if you want to follow the steps, use your own empty repo

Install Flux

Flux needs to be installed on Kubernetes, so make sure you have a cluster at your disposal. In this post, I use Azure Kubernetes Services (AKS). Make sure kubectl points to that cluster. If you have kubectl installed, obtain the credentials to the cluster with the Azure CLI and then run kubectl get nodes or kubectl cluster-info to make sure you are connected to the right cluster.

az aks get-credentials -n CLUSTER_NAME -g RESOURCE_GROUP

It is easy to install Flux with Helm and in this post, I will use Helm v3 which is currently in beta. You will need to install Helm v3 on your system. I installed it in Windows 10’s Ubuntu shell. Use the following command to download and unpack it:

curl -sSL "https://get.helm.sh/helm-v3.0.0-beta.3-linux-amd64.tar.gz" | tar xvz

This results in a folder linux-amd64 which contains the helm executable. Make the file executable with chmod +x and copy it to your path as helmv3. Next, run helmv3. You should see the help text:

The Kubernetes package manager
 
Common actions for Helm:

- helm search:    search for charts
- helm fetch:     download a chart to your local directory to view
- helm install:   upload the chart to Kubernetes
- helm list:      list releases of charts 
...

Now you are ready to install Flux. First, add the FLux Helm repository to allow helmv3 to find the chart:

helmv3 repo add fluxcd https://charts.fluxcd.io

Create a namespace for Flux:

kubectl create ns flux

Install Flux in the namespace with Helm v3:

helmv3 upgrade -i flux fluxcd/flux --wait \
 --namespace flux \
 --set registry.pollInterval=1m \
 --set git.pollInterval=1m \
 --set git.url=git@github.com:GITHUBUSERNAME/gitops-sample

The above command upgrades Flux but installs it if it is missing (-i). The chart to install is fluxcd/flux. With –wait, we wait until the installation is finished. We will not go into the first two –set options for now. The last option defines the git repository Flux should use to sync the configuration to the cluster. Currently, Flux supports one repository. Because we use a public repository, Flux can easily read its contents. At times, Flux needs to update the git repository. To support that, you can add a deploy key to the repository. First, install the fluxctl tool:

curl -sL https://fluxcd.io/install | sh
export PATH=$PATH:$HOME/.fluxcd/bin

Now run the following commands to obtain the public key to use as deploy key:

export FLUX_FORWARD_NAMESPACE=flux
fluxctl identity

The output of the command is something like:

ssh-rsa AAAAB3NzaC1yc2EAAAA...

Copy and paste this key as a deploy key for your github repo:

git repo deploy key

Phew… Flux should now be installed on your cluster. Time to install some applications to the cluster from the git repo.

Note: Flux also supports private repos; it just so happens I used a public one here

Install an Ingress Controller

Let’s try to install Traefik via its Helm chart. Since I am not using traditional CD with pipelines that run helm commands, we will need something else. Luckily, there’s a Flux Helm Operator that allows us to declaratively install Helm charts. The Helm Operator installs a Helm chart when it detects a custom resource definition (CRD) of type helm.fluxcd.io/v1. Let’s first create the CRD for Helm v3:

kubectl apply -f https://raw.githubusercontent.com/fluxcd/helm-operator/master/deploy/flux-helm-release-crd.yaml

Next, install the operator:

helmv3 upgrade -i helm-operator flux/helm-operator --wait \
 --namespace fluxcd \
 --set git.ssh.secretName=flux-git-deploy \
 --set git.pollInterval=1m \
 --set chartsSyncInterval=1m \
 --set configureRepositories.enable=true \
 --set configureRepositories.repositories[0].name=stable \
 --set configureRepositories.repositories[0].url=https://kubernetes-charts.storage.googleapis.com \
 --set extraEnvs[0].name=HELM_VERSION \
 --set extraEnvs[0].value=v3 \
 --set image.repository=docker.io/fluxcd/helm-operator-prerelease \
 --set image.tag=helm-v3-71bc9d62

You didn’t think I found the above myself did you? 😁 It’s from an excellent tutorial here.

When the operator is installed, you should be able to install Traefik with the following YAML:

apiVersion: helm.fluxcd.io/v1
kind: HelmRelease
metadata:
  name: traefik
  namespace: default
  annotations:
    fluxcd.io/ignore: "false"
spec:
  releaseName: traefik
  chart:
    repository: https://kubernetes-charts.storage.googleapis.com/
    name: traefik
    version: 1.78.0
  values:
    serviceType: LoadBalancer
    rbac:
      enabled: true
    dashboard:
      enabled: true   

Just add the above YAML to the GitHub repository. I added it to the ingress folder:

traefik.yaml added to the GitHub repo

If you wait a while, or run fluxctl sync, the repo gets synced and the resources created. When the helm.fluxcd.io/v1 object is created, the Helm Operator will install the chart in the default namespace. Traefik will be exposed via an Azure Load Balancer. You can check the release with the following command:

kubectl get helmreleases.helm.fluxcd.io

NAME      RELEASE   STATUS     MESSAGE                  AGE
traefik   traefik   deployed   helm install succeeded   15m

Also check that the Traefik pod is created in the default namespace (only 1 replica; the default):

kubectl get po

NAME                       READY   STATUS    RESTARTS   AGE
traefik-86f4c5f9c9-gcxdb   1/1     Running   0          21m

Also check the public IP of Traefik:

kubectl get svc
 
NAME                TYPE           CLUSTER-IP     EXTERNAL-IP 
traefik             LoadBalancer   10.0.8.59      41.44.245.234   

We will later use that IP when we define the ingress for our web application.

Conclusion

In this post, you learned a tiny bit about GitOps with WeaveWorks Flux. The concept is simple enough: store your cluster config in a git repo as the single source of truth and use git operations to initiate (or rollback) cluster operations. To start, we simply installed Traefik via the Flux Helm Operator. In a later post, we will add an application and look at image management. There’s much more you can do so stay tuned!

The basics of meshing Traefik 2.0 with Linkerd

A while ago, I blogged about Linkerd 2.x. In that post, I used a simple calculator API, reachable via an Azure Load Balancer. When you look at that traffic in Linkerd, you see the following:

Incoming load balancer traffic to a meshed deployment (in this case Traefik 2.0)

Above, you do not see this is Azure Load Balancer traffic. The traffic reaches the meshed service via the Azure CNI pods.

In this post, we will install Traefik 2.0, mesh the Traefik deployment and make the calculator service reachable via Traefik and the new IngressRoute. Let’s get started!

Install Traefik 2.0

We will install Traefik 2.0 with http support only. There’s an excellent blog that covers the installation over here. In short, you do the following:

  • deploy prerequisites such as custom resource definitions (CRDs), ClusterRole, ClusterRoleBinding, ServiceAccount
  • deploy Traefik 2.0: it’s just a Kubernetes deployment
  • deploy a service to expose the Traefik HTTP endpoint via a Load Balancer; I used an Azure Load Balancer automatically deployed via Azure Kubernetes Service (AKS)
  • deploy a service to expose the Traefik admin endpoint via an IngressRoute

Here are the prerequisites for easy copy and pasting:

apiVersion: apiextensions.k8s.io/v1beta1
kind: CustomResourceDefinition
metadata:
  name: ingressroutes.traefik.containo.us

spec:
  group: traefik.containo.us
  version: v1alpha1
  names:
    kind: IngressRoute
    plural: ingressroutes
    singular: ingressroute
  scope: Namespaced

---
apiVersion: apiextensions.k8s.io/v1beta1
kind: CustomResourceDefinition
metadata:
  name: ingressroutetcps.traefik.containo.us

spec:
  group: traefik.containo.us
  version: v1alpha1
  names:
    kind: IngressRouteTCP
    plural: ingressroutetcps
    singular: ingressroutetcp
  scope: Namespaced

---
apiVersion: apiextensions.k8s.io/v1beta1
kind: CustomResourceDefinition
metadata:
  name: middlewares.traefik.containo.us

spec:
  group: traefik.containo.us
  version: v1alpha1
  names:
    kind: Middleware
    plural: middlewares
    singular: middleware
  scope: Namespaced

---
apiVersion: apiextensions.k8s.io/v1beta1
kind: CustomResourceDefinition
metadata:
  name: tlsoptions.traefik.containo.us

spec:
  group: traefik.containo.us
  version: v1alpha1
  names:
    kind: TLSOption
    plural: tlsoptions
    singular: tlsoption
  scope: Namespaced

---
kind: ClusterRole
apiVersion: rbac.authorization.k8s.io/v1beta1
metadata:
  name: traefik-ingress-controller

rules:
  - apiGroups:
      - ""
    resources:
      - services
      - endpoints
      - secrets
    verbs:
      - get
      - list
      - watch
  - apiGroups:
      - extensions
    resources:
      - ingresses
    verbs:
      - get
      - list
      - watch
  - apiGroups:
      - extensions
    resources:
      - ingresses/status
    verbs:
      - update
  - apiGroups:
      - traefik.containo.us
    resources:
      - middlewares
    verbs:
      - get
      - list
      - watch
  - apiGroups:
      - traefik.containo.us
    resources:
      - ingressroutes
    verbs:
      - get
      - list
      - watch
  - apiGroups:
      - traefik.containo.us
    resources:
      - ingressroutetcps
    verbs:
      - get
      - list
      - watch
  - apiGroups:
      - traefik.containo.us
    resources:
      - tlsoptions
    verbs:
      - get
      - list
      - watch

---
kind: ClusterRoleBinding
apiVersion: rbac.authorization.k8s.io/v1beta1
metadata:
  name: traefik-ingress-controller

roleRef:
  apiGroup: rbac.authorization.k8s.io
  kind: ClusterRole
  name: traefik-ingress-controller
subjects:
  - kind: ServiceAccount
    name: traefik-ingress-controller
    namespace: default

---
apiVersion: v1
kind: ServiceAccount
metadata:
  namespace: default
  name: traefik-ingress-controller

Save this to a file and then use kubectl apply -f filename.yaml. Here’s the deployment:

kind: Deployment
apiVersion: extensions/v1beta1
metadata:
  namespace: default
  name: traefik
  labels:
    app: traefik

spec:
  replicas: 2
  selector:
    matchLabels:
      app: traefik
  template:
    metadata:
      labels:
        app: traefik
    spec:
      serviceAccountName: traefik-ingress-controller
      containers:
        - name: traefik
          image: traefik:v2.0
          args:
            - --api
            - --accesslog
            - --entrypoints.web.Address=:8000
            - --entrypoints.web.forwardedheaders.insecure=true
            - --providers.kubernetescrd
            - --ping
            - --accesslog=true
            - --log=true
          ports:
            - name: web
              containerPort: 8000
            - name: admin
              containerPort: 8080

Here’s the service to expose Traefik’s web endpoint. This is different from the post I referred to because that post used DigitalOcean. I am using Azure here.

apiVersion: v1
kind: Service
metadata:
  name: traefik
spec:
  type: LoadBalancer
  ports:
    - protocol: TCP
      name: web
      port: 80
      targetPort: 8000
  selector:
    app: traefik

The above service definition will give you a public IP. Traffic destined to port 80 on that IP goes to the Traefik pods on port 8000.

Now we can expose the Traefik admin interface via Traefik itself. Note that I am not using any security here. Check the original post for basic auth config via middleware.

apiVersion: v1
kind: Service
metadata:
  name: traefik-admin
spec:
  type: ClusterIP
  ports:
    - protocol: TCP
      name: admin
      port: 8080
  selector:
    app: traefik
---
apiVersion: traefik.containo.us/v1alpha1
kind: IngressRoute
metadata:
  name: traefik-admin
spec:
  entryPoints:
    - web
  routes:
  - match: Host(`somehost.somedomain.com`) && PathPrefix(`/`)
    kind: Rule
    priority: 1
    services:
    - name: traefik-admin
      port: 8080

Traefik’s admin site is first exposed as a ClusterIP service on port 8080. Next, an object of kind IngressRoute is defined, which is new for Traefik 2.0. You don’t need to create standard Ingress objects and configure Traefik with custom annotations. This new approach is cleaner. Of course, substitute the host with a host that points to the public IP of the load balancer. Or use the IP address with the xip.io domain. If your IP would be 1.1.1.1 then you could use something like admin.1.1.1.1.xip.io. That name automatically resolves to the IP in the name.

Let’s see if we can reach the admin interface:

The new Traefik 2 admin UI

Traefik 2.0 is now installed in a basic way and working properly. We exposed the admin interface but now it is time to expose the calculator API.

Exposing the calculator API

The API is deployed as 5 pods in the add namespace:

Calculator API exposed

The API is exposed as a service of type ClusterIP with only an internal Kubernetes IP. To expose it via Traefik, we create the following object in the add namespace:

apiVersion: traefik.containo.us/v1alpha1
kind: IngressRoute
metadata:
  name: calc-svc
  namespace: add  
spec:
  entryPoints:
    - web
  routes:
  - match: Host(`calc.1.1.1.1.xip.io`) && PathPrefix(`/`)
    kind: Rule
    priority: 1
    middlewares:
      - name: calcheader
    services:
    - name: add-svc
      port: 80

I am using xip.io above. Change 1.1.1.1 to the public IP of Traefik’s Azure Load Balancer. The add-svc that exposes the calculator API on port 80 is exposed via Traefik. We can easily call the service via:

curl http://calc.1.1.1.1.xip.io/add/10/10

20

Great! But what is that calcheader middleware? Middlewares modify the requests and responses to and from Traefik 2.0. There are all sorts of middelwares as explained here. You can set headers, configure authentication, perform rate limiting and much much more. In this case we create the following middleware object in the add namespace:

apiVersion: traefik.containo.us/v1alpha1
kind: Middleware
metadata:
  name: calcheader
  namespace: add
spec:
  headers:
    customRequestHeaders:
      l5d-dst-override: "add-svc.add.svc.cluster.local:80"

This middleware adds a header to the request before it comes in to Traefik. The header overrides the destination and sets it to the internal DNS name of the add-svc service that exposes the calculator API. This requirement is documented by Linkerd here.

Meshing the Traefik deployment

Because we want to mesh Traefik to get Linkerd metrics and more, we need to inject the Linkerd proxy in the Traefik pods. In my case, Traefik is deployed in the default namespace so the command below can be used:

kubectl get deploy -o yaml | linkerd inject - | kubectl apply -f - 

Make sure you run the command on a system with the linkerd executable in your path and kubectl homed to the cluster that has Linkerd installed.

Checking the traffic in the Linkerd dashboard

With some traffic generated, this is what you should see when you check the meshed deployment that runs the calculator API (deploy/add):

Both the traffic generator (add-cli) and Traefik are meshed which results in a more detailed view of the traffic

If you are wondering what these services are and do, check this post. In the above diagram, we can clearly see we are receiving traffic to the calculator API from Traefik. When I click on Traefik, I see the following:

A view on the meshed Traefik deployment

From the above, we see Traefik receives traffic via the Azure Load Balancer and that it forwards traffic to the calculator service. The live calls are coming from the admin UI which refreshes regularly.

In Grafana, we can get more information about the Traefik deployment:

Linkerd metrics for Traefik in the Grafana dashboard that comes with Linkerd
More metrics

Conclusion

This was just a brief look at both Traefik 2 and “meshing” Traefik with Linkerd. There is much more to say and I have much more to explore. Hopefully, this can get you started!