Enhancing Semantic Search with a Streamlit UI

In a previous blog post, we discussed two Python programs, upload_vectors.py and search_vectors.py. These programs were used to create and search vectors, respectively. The upload_vectors.py script created vectors from chunks of a larger text and stored them in Pinecone, while the search_vectors.py script enabled semantic search on the text. In this blog post, we will discuss how to create a user interface (UI) for these two programs using Streamlit.

🚀 I kickstarted the Streamlit app by handing over the text-based version to ChatGPT and asking it to work its magic ✨💻. Yes, it was that easy! Afterwards, I made several manual changes to make it look the way I wanted.

Pinecone, Vectors, Embeddings, and Semantic Search: What’s all that about?

Pinecone is a vector database service that allows for easy storage and retrieval of high-dimensional vectors. It is optimized for similarity search, which makes it a perfect fit for tasks like semantic search. Our script stores vectors in Pinecone by parsing an RSS feed, chunking the blog posts, and creating the vectors with OpenAI’s embedding APIs.

Vectors are mathematical representations of data in the form of an array of numbers. In our case, we use vectors to represent chunks of text retrieved from blog posts. These vectors are generated using a process called embedding, which is a way of representing complex data, like text, in a lower-dimensional space while preserving the essential information.

Semantic search is a type of search that goes beyond keyword matching to understand the meaning and context of the query. By using vector embeddings, we can compare the similarity between queries and stored texts to find the most relevant results. Pinecone does that search for us and simply returns a number of matching chunks (pieces of text).

What is Streamlit?

Streamlit is a Python library that makes it easy to create custom web apps for machine learning and data science projects. You can build interactive UIs with minimal code, allowing you to focus on the core logic of your application.

Here’s an example of creating an extremely simple Streamlit app:

import streamlit as st

st.title('Hello, Streamlit!')
st.write('This is a simple Streamlit app.')

This code would generate a web app with a title and a text output. You can also create more complex UIs with user input, like sliders, text inputs, and buttons.

Creating a Streamlit UI for Semantic Search

Now let’s examine the provided code for creating a Streamlit UI for the search_vectors.py program. The code can be broken down into the following sections:

  1. Import necessary libraries and check environment variables.
  2. Set up the tokenizer and define the tiktoken_len function.
  3. Create the UI elements, including the title, text input, dropdown, sliders, and buttons.
  4. Define the main search functionality that is triggered when the user clicks the “Search” button.

Here is the full code:

import os
import pinecone
import openai
import tiktoken
import streamlit as st

# check environment variables
if os.getenv('PINECONE_API_KEY') is None:
    st.error("PINECONE_API_KEY not set. Please set this environment variable and restart the app.")
if os.getenv('PINECONE_ENVIRONMENT') is None:
    st.error("PINECONE_ENVIRONMENT not set. Please set this environment variable and restart the app.")
if os.getenv('OPENAI_API_KEY') is None:
    st.error("OPENAI_API_KEY not set. Please set this environment variable and restart the app.")

# use cl100k_base tokenizer for gpt-3.5-turbo and gpt-4
tokenizer = tiktoken.get_encoding('cl100k_base')


def tiktoken_len(text):
    tokens = tokenizer.encode(
        text,
        disallowed_special=()
    )
    return len(tokens)

# create a title for the app
st.title("Search blog feed 🔎")

# create a text input for the user query
your_query = st.text_input("What would you like to know?")
model = st.selectbox("Model", ["gpt-3.5-turbo", "gpt-4"])

with st.expander("Options"):

    max_chunks = 5
    if model == "gpt-4":
        max_chunks = 15

    max_reply_tokens = 1250
    if model == "gpt-4":
        max_reply_tokens = 2000

    col1, col2 = st.columns(2)

    # model dropdown
    with col1:
        chunks = st.slider("Number of chunks", 1, max_chunks, 5)
        temperature = st.slider("Temperature", 0.0, 1.0, 0.0)

    with col2:
        reply_tokens = st.slider("Reply tokens", 750, max_reply_tokens, 750)
    

# create a submit button
if st.button("Search"):
    # get the Pinecone API key and environment
    pinecone_api = os.getenv('PINECONE_API_KEY')
    pinecone_env = os.getenv('PINECONE_ENVIRONMENT')

    pinecone.init(api_key=pinecone_api, environment=pinecone_env)

    # set index
    index = pinecone.Index('blog-index')


    # vectorize your query with openai
    try:
        query_vector = openai.Embedding.create(
            input=your_query,
            model="text-embedding-ada-002"
        )["data"][0]["embedding"]
    except Exception as e:
        st.error(f"Error calling OpenAI Embedding API: {e}")
        st.stop()

    # search for the most similar vector in Pinecone
    search_response = index.query(
        top_k=chunks,
        vector=query_vector,
        include_metadata=True)

    # create a list of urls from search_response['matches']['metadata']['url']
    urls = [item["metadata"]['url'] for item in search_response['matches']]

    # make urls unique
    urls = list(set(urls))

    # create a list of texts from search_response['matches']['metadata']['text']
    chunk_texts = [item["metadata"]['text'] for item in search_response['matches']]

    # combine texts into one string to insert in prompt
    all_chunks = "\n".join(chunk_texts)

    # show urls of the chunks
    with st.expander("URLs", expanded=True):
        for url in urls:
            st.markdown(f"* {url}")
    

    with st.expander("Chunks"):
        for i, t in enumerate(chunk_texts):
            # remove newlines from chunk
            tokens = tiktoken_len(t)
            t = t.replace("\n", " ")
            st.write("Chunk ", i, "(Tokens: ", tokens, ") - ", t[:50] + "...")
    with st.spinner("Summarizing..."):
        try:
            prompt = f"""Answer the following query based on the context below ---: {your_query}
                                                        Do not answer beyond this context!
                                                        ---
                                                        {all_chunks}"""


            # openai chatgpt with article as context
            # chat api is cheaper than gpt: 0.002 / 1000 tokens
            response = openai.ChatCompletion.create(
                model=model,
                messages=[
                    { "role": "system", "content":  "You are a truthful assistant!" },
                    { "role": "user", "content": prompt }
                ],
                temperature=temperature,
                max_tokens=max_reply_tokens
            )

            st.markdown("### Answer:")
            st.write(response.choices[0]['message']['content'])

            with st.expander("More information"):
                st.write("Query: ", your_query)
                st.write("Full Response: ", response)

            with st.expander("Full Prompt"):
                st.write(prompt)

            st.balloons()
        except Exception as e:
            st.error(f"Error with OpenAI Completion: {e}")

A closer look

The code first imports the necessary libraries and checks if the required environment variables are set, displaying an error message if they are not. The libraries you need are in requirements.txt on GitHub. You can install them with:

pip3 install -r requirements.txt

ℹ️ I recommend using a Python virtual environment when you install these dependencies; see poetry (just one example)

The tiktoken_len function calculates the token length of a given text using the tokenizer. This is used to display the tokens of each chunk of text we set to the ChatCompletion API. Depending on the model, 4096 or 8192 tokens are supported.

The UI is built using Streamlit functions, such as st.title, st.text_input, st.selectbox, and st.columns. These functions create various UI elements that the user can interact with to input their query and set search parameters. If you look at the code, you will see how easy it is to add those elements.

With the UI elements, you can set:

  • the number of text chunks to return from Pinecone and to forward to the ChatCompletion API (using st.slider)
  • the number of tokens to reply with (using st.slider)
  • the model: gpt-3.5-turbo or gpt-4 (ensure you have access to the gpt-4 API)
  • the temperature (using st-slider)

The options are shown in two columns with st.columns.

The main search functionality is triggered when the user clicks the “Search” button. The code then vectorizes the query, searches for the most similar vectors in Pinecone, and displays the URLs and chunks found. Finally, the selected model is used to generate an answer based on the chunks found and the user’s query. Often, gpt-4 will provide the best answer. It seems to be able to better understand all the chunks of text thrown at it.

Running the code

To run the code you need the following:

  • A Pinecode API key and environment
  • An OpenAI API key

It is easiest to run the code with Docker. If you have it installed, run the following command:

docker run -p 8501:8501 -e OPENAI_API_KEY="YOURKEY" \
    -e PINECONE_API_KEY="YOURKEY" \
    -e PINECONE_ENVIRONMENT="YOURENV" gbaeke/blogsearch

The gbaeke/blogsearch image is available on Docker Hub. You can also build your own with the Dockerfile provided on GitHub.

After running the image, go to http://localhost:8501 and first use the Upload page to create your Pinecode index and store vectors in it. You can use my blog’s feed or any other feed. You can experiment with the chunk size and chunk overlap.

Upload to Pinecone

You can add multiple RSS feeds one-by-one as long as you turn off Recreate index before each new upload. After you have populated the index, use the Search page to start searching:

Searching

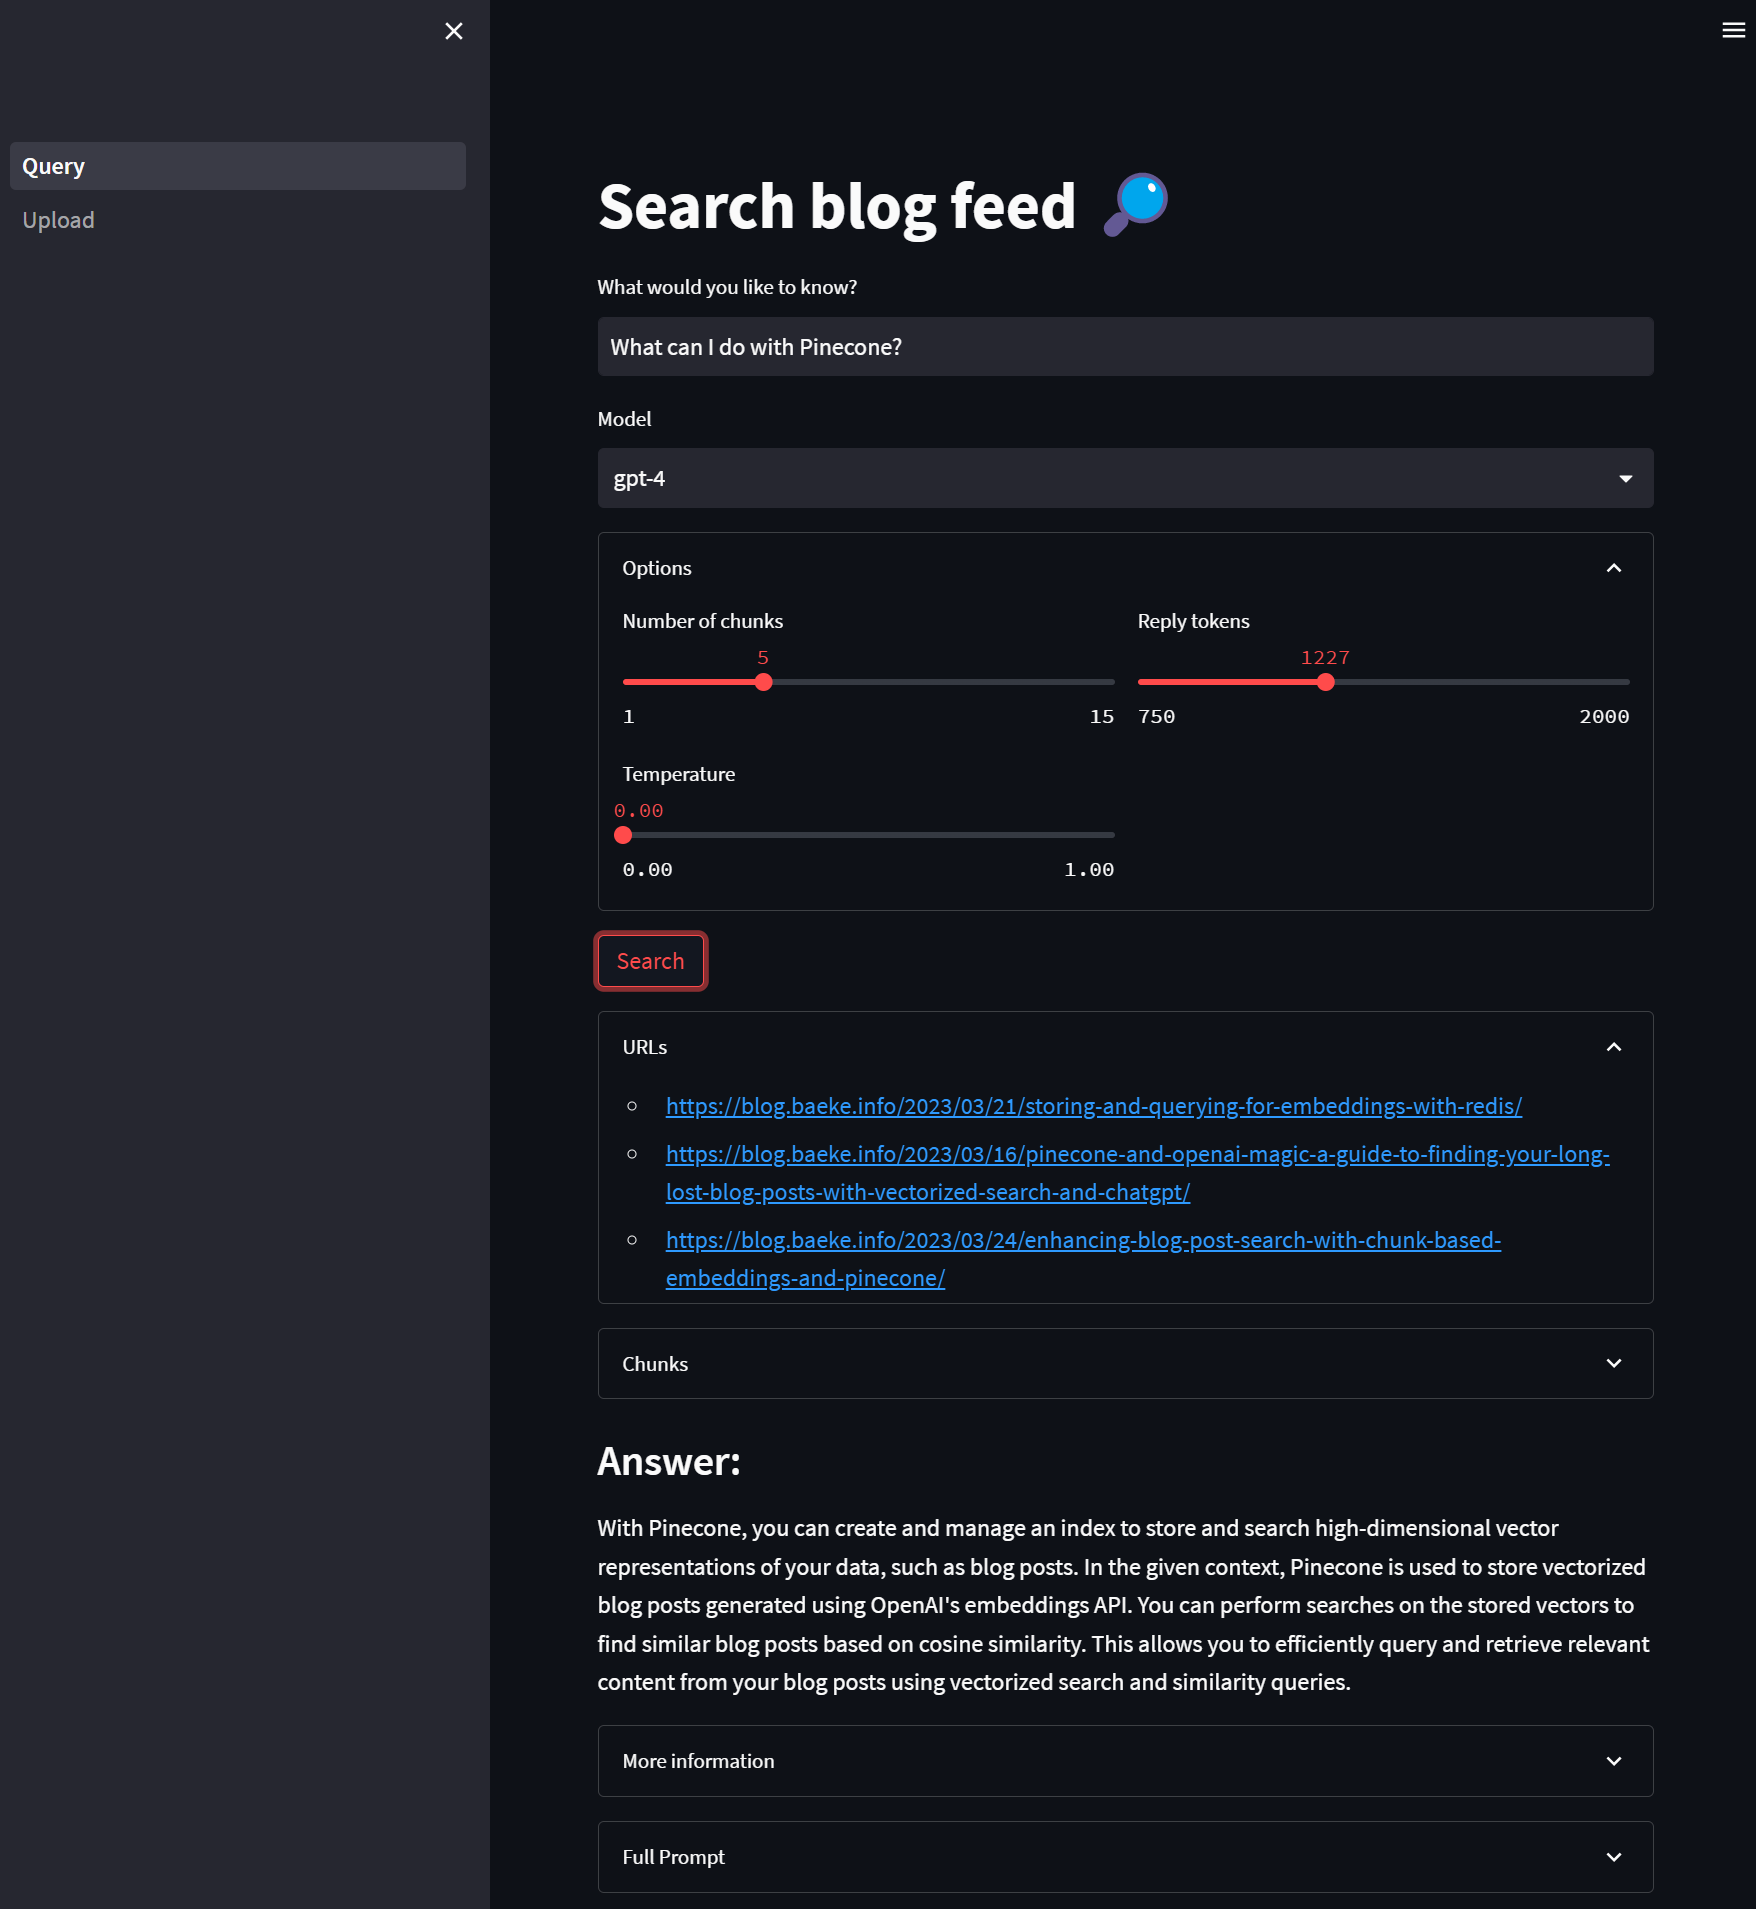
Above, we ask what we can do with Pinecone and let gpt-4 do the answering. The similarity search will search for 5 similar items and return them. We show the original URLs these results come from. In the Chunks section, you can see the original chunks because they are also in Pinecone as metadata. After the answer, you can find the full JSON returned by the ChatCompletion API and the full prompt we sent to that API.

Conclusion

In this blog post, we showed you how to create a Streamlit UI for the search_vectors.py script we talked about in a previous post. Streamlit allows you to easily build interactive web applications for your machine learning and data science projects. We also created a UI to upload posts to Pinecone. The full program allows you to add as much data as you want and query that data with semantic search, summarized and synthesized by the GPT model of choice. Give it a try and let me know what you think.

Storing and querying for embeddings with Redis

In a previous post, we wrote about using vectorized search and cosine similarity to quickly query a database of blog posts and retrieve the most relevant content to a natural language query. This is achieved using OpenAI’s embeddings API, Pinecone (a vector database), and OpenAI ChatCompletions. For reference, here’s the rough architecture:

Vectorized search with Pinecone

The steps above do the following:

  1. A console app retrieves blog post URLs from an RSS feed and reads all the posts one by one
  2. For each post, create an embedding with OpenAI which results in a vector of 1536 dimensions to store in Pinecone
  3. After the embedding is created, store the embedding in a Pinecone index; we created the index from the Pinecone portal
  4. A web app asks the user for a query (e.g., “How do I create a chat bot?”) and creates an embedding for the query
  5. Perform a vectorized search, finding the closest post vectors to the query vector using cosine similarity and keep the one with the highest score
  6. Use the ChatCompletion API and submit the same query but add the highest scoring post as context to the user question. The post text is injected into the prompt

ℹ️ See Pinecone and OpenAI magic: A guide to finding your long lost blog posts with vectorized search and ChatGPT – baeke.info for more information.

We can replace Pinecone with Redis, a popular open-source, in-memory data store that can be used as a database, cache, and message broker. Redis is well-suited for this task as it can also store vector representations of our blog posts and has the capability to perform vector queries efficiently.

You can easily run Redis with Docker for local development. In addition, Redis is available in Azure, although you will need the Enterprise version. Only Azure Cache for Redis Enterprise supports the RediSearch functionality and that’s what we need here! Note that the Enterprise version is quite costly.

By leveraging Redis for vector storage and querying, we can harness its high performance, flexibility, and reliability in our solution while maintaining the core functionality of quickly querying and retrieving the most relevant blog post content using vectorized search and similarity queries.

ℹ️ The code below shows snippets. Full samples (yes, samples 😀) are on GitHub: check upload_vectors_redis.py to upload posts to a local Redis instance and search_vectors_redis.py to test the query functionality.

Run Redis with Docker

If you have Docker on your machine, use the following command:

docker run --name redis-stack-server -p 6380:6379 redis/redis-stack-server:latest

ℹ️ I already had another instance of Redis running on port 6379 so I mapped port 6380 on localhost to port 6379 of the redis-stack-server container.

If you want a GUI to explore your Redis instance, install RedisInsight. The screenshot below shows the blog posts after uploading them as Redis hashes.

RedisInsight in action

Let’s look at creating the hashes next!

Storing post data in Redis hashes

We will create several Redis hashes, one for each post. Hashes are records structured as collections of field-value pairs. Each hash we store, has the following fields:

  • url: url to the blog post
  • embedding: embedding of the blog post (a vector), created with the OpenAI embeddings API and the text-embedding-ada-002 model

We need the URL to retrieve the entire post after a closest match has been found. In Pinecone, the URL would be metadata to the vector. In Redis, it’s just a field in a hash, just like the vector itself.

In RedisInsight, a hash is shown as below:

Redis hash for post 0 with url and embedding fields

The embedding field in the hash has no special properties. The vector is simply stored as a series of bytes. To store the urls and embeddings of posts, we can use the following code:

import redis
import openai
import os
import requests
from bs4 import BeautifulSoup
import feedparser


# OpenAI API key
openai.api_key = os.getenv('OPENAI_API_KEY')

# Redis connection details
redis_host = os.getenv('REDIS_HOST')
redis_port = os.getenv('REDIS_PORT')
redis_password = os.getenv('REDIS_PASSWORD')

# Connect to the Redis server
conn = redis.Redis(host=redis_host, port=redis_port, password=redis_password, encoding='utf-8', decode_responses=True)

# URL of the RSS feed to parse
url = 'https://atomic-temporary-16150886.wpcomstaging.com/feed/'

# Parse the RSS feed with feedparser
feed = feedparser.parse(url)

p = conn.pipeline(transaction=False)
for i, entry in enumerate(feed.entries[:50]):
    # report progress
    print("Create embedding and save for entry ", i, " of ", entries)

    r = requests.get(entry.link)
    soup = BeautifulSoup(r.text, 'html.parser')
    article = soup.find('div', {'class': 'entry-content'}).text

    # vectorize with OpenAI text-emebdding-ada-002
    embedding = openai.Embedding.create(
        input=article,
        model="text-embedding-ada-002"
    )

    # print the embedding (length = 1536)
    vector = embedding["data"][0]["embedding"]

    # convert to numpy array and bytes
    vector = np.array(vector).astype(np.float32).tobytes()

    # Create a new hash with url and embedding
    post_hash = {
        "url": entry.link,
        "embedding": vector
    }

    # create hash
    conn.hset(name=f"post:{i}", mapping=post_hash)

p.execute()

In the above code, note the following:

  • The OpenAI embeddings API returns a JSON document that contains the embedding for each post; the embedding is retrieved with vector = embedding["data"][0]["embedding"]
  • The resulting vector is converted to bytes with vector = np.array(vector).astype(np.float32).tobytes(); serializing the vector this way is required to store the vector in the Redis hash
  • the Redis hset command is used to store the field-value pairs (these pairs are in a Python dictionary called post_hash) with a key that is prefixed with post: followed by the document number. The prefix will be used later by the search index we will create

Now we have our post information in Redis hashes, we want to use RediSearch functionality to match an input query with one or more of our posts. RediSearch supports vector similarity semantic search. For such a search to work, we will need to create an index that knows there is a vector field. On such indexes, we can perform vector similarity searches.

Creating an index

To create an index with Python code, check the code below:

import redis
from redis.commands.search.field import VectorField, TextField
from redis.commands.search.query import Query
from redis.commands.search.indexDefinition import IndexDefinition, IndexType

# Redis connection details
redis_host = os.getenv('REDIS_HOST')
redis_port = os.getenv('REDIS_PORT')
redis_password = os.getenv('REDIS_PASSWORD')

# Connect to the Redis server
conn = redis.Redis(host=redis_host, port=redis_port, password=redis_password, encoding='utf-8', decode_responses=True)


SCHEMA = [
    TextField("url"),
    VectorField("embedding", "HNSW", {"TYPE": "FLOAT32", "DIM": 1536, "DISTANCE_METRIC": "COSINE"}),
]

# Create the index
try:
    conn.ft("posts").create_index(fields=SCHEMA, definition=IndexDefinition(prefix=["post:"], index_type=IndexType.HASH))
except Exception as e:
    print("Index already exists")


When creating an index, you define the fields to index based on a schema. Above, we include both the text field (url) and the vector field (embedding). The VectorField class is used to construct the vector field and takes several parameters:

  • Name: the name of the field (“embedding” here but could be anything)
  • Algorithm: “FLAT” or “HNSW”; use “FLAT” when search quality is of high priority and search speed is less important; “HNSW” gives you faster querying; for more information see this article
  • Attributes: a Python dictionary that specifies the data type, the number of dimensions of the vector (1536 for text-embedding-ada-002) and the distance metric; here we use COSINE for cosine similarity, which is recommended by OpenAI with their embedding model

ℹ️ It’s important to get the dimensions right or your index will fail to build properly. It will not be immediately clear that it failed, unless you run FT.INFO <indexname> with redis-cli.

With the schema out of the way, we can now create the index with:

conn.ft("posts").create_index(fields=SCHEMA, definition=IndexDefinition(prefix=["post:"], index_type=IndexType.HASH))

The index we create is called posts. We index the fields defined in SCHEMA and only index hashes with a key prefix of post:. The hashes we created earlier, all have this prefix. With the index created and our existing hashes, the index should be populated with them. Ensure you can see that in RedisInsight:

posts index populated with hashes that were added earlier

Redis vector queries

With the hashes and the index created, we can now perform a similarity search. We will ask the user for a query string (use natural language) and then check the posts that are similar to the query string. The query string will need to be vectorized as well. We will return several post and rank them.

import numpy as np
from redis.commands.search.query import Query
import redis
import openai
import os

openai.api_key = os.getenv('OPENAI_API_KEY')

def search_vectors(query_vector, client, top_k=5):
    base_query = "*=>[KNN 5 @embedding $vector AS vector_score]"
    query = Query(base_query).return_fields("url", "vector_score").sort_by("vector_score").dialect(2)    

    try:
        results = client.ft("posts").search(query, query_params={"vector": query_vector})
    except Exception as e:
        print("Error calling Redis search: ", e)
        return None

    return results

# Redis connection details
redis_host = os.getenv('REDIS_HOST')
redis_port = os.getenv('REDIS_PORT')
redis_password = os.getenv('REDIS_PASSWORD')

# Connect to the Redis server
conn = redis.Redis(host=redis_host, port=redis_port, password=redis_password, encoding='utf-8', decode_responses=True)

if conn.ping():
    print("Connected to Redis")

# Enter a query
query = input("Enter your query: ")

# Vectorize the query using OpenAI's text-embedding-ada-002 model
print("Vectorizing query...")
embedding = openai.Embedding.create(input=query, model="text-embedding-ada-002")
query_vector = embedding["data"][0]["embedding"]

# Convert the vector to a numpy array
query_vector = np.array(query_vector).astype(np.float32).tobytes()

# Perform the similarity search
print("Searching for similar posts...")
results = search_vectors(query_vector, conn)

if results:
    print(f"Found {results.total} results:")
    for i, post in enumerate(results.docs):
        score = 1 - float(post.vector_score)
        print(f"\t{i}. {post.url} (Score: {round(score ,3) })")
else:
    print("No results found")

In the above code, the following happens:

  • Set OpenAI API key: needed to create the embedding for the query typed by the user
  • Connect to Redis based on the environment variables and check the connection with ping().
  • Ask the user for a query
  • Create the embedding from the query string and convert the array to bytes
  • Call the search_vectors function with the vectorized query string and Redis connection as parameters

The search_vectors function uses RediSearch capabilities to query over our hashes and calculate the 5 nearest neighbors to our query vector. Querying is explained in detail in the Redis documentation but it can be a bit dense. You start with the base query:

 base_query = "*=>[KNN 5 @embedding $vector AS vector_score]"

This is just a string with the query format that Redis expects to pass to the Query class in the next step. We are looking for the 5 nearest neighbors of $vector in the embedding fields of the hashes. You use @ to denote the embedding field and $ to denote the vector we will pass in later. That vector is our vectorized query string. With AS vector_score, we add the score to later rank the results from high to low.

The actual query is built with the Query class (one line):

query = Query(base_query).return_fields("url", "vector_score").sort_by("vector_score").dialect(2)    

We return the url and the vector_score and sort on this score. Dialect is just the version of the query language. Here we use dialect 2 as that matches the query syntax. Using an earlier dialect would not work here.

Of course, this still does not pass the query vector to the query. That only happens when we run the query in Redis with:

results = client.ft("posts").search(query, query_params={"vector": query_vector})

The above code performs a search query on the posts index. In the call to the search method, we pass the query we built earlier and a list of query parameters. We only have one parameter, the vector parameter ($vector in base_query) and the value for this parameter is the embedding created from the user query string.

When I query for bot, I get the following results:

Our 5 query results

The results are ranked with the closest match first. We could use that match to grab the post from the URL and send the query to OpenAI ChatCompletion API to answer the question more precisely. For better results, use a better query like “How do I build a chat bot in Python with OpenAI?”. To get an idea of how to do that, check my previous post.

Conclusion

In this post we discussed storing embeddings in Redis and querying embeddings with a similarity search. If you combine this with my previous post, you can use Redis instead of Pinecone as the vector database and query engine. This can be useful for Azure customers because Azure has Azure Cache for Redis Enterprise, a fully managed service that supports the functionality discussed in this post. In addition, it is useful for local development purposes because you can easily run Redis with Docker.

Pinecone and OpenAI magic: A guide to finding your long lost blog posts with vectorized search and ChatGPT

Searching through a large database of blog posts can be a daunting task, especially if there are thousands of articles. However, using vectorized search and cosine similarity, you can quickly query your blog posts and retrieve the most relevant content.

In this blog post, we’ll show you how to query a list of blog posts (from this blog) using a combination of vectorized search with cosine similarity and OpenAI ChatCompletions. We’ll be using OpenAI’s embeddings API to vectorize the blog post articles and Pinecone, a vector database, to store and query the vectors. We’ll also show you how to retrieve the contents of the article, create a prompt using the ChatCompletion API, and return the result to a web page.

ℹ️ Sample code is on GitHub: https://github.com/gbaeke/gpt-vectors

ℹ️ If you want an introduction to embeddings and cosine similarity, watch the video on YouTube by Part Time Larry.

Setting Up Pinecone

Before we can start querying our blog posts, we need to set up Pinecone. Pinecone is a vector database that makes it easy to store and query high-dimensional data. It’s perfect for our use case since we’ll be working with high-dimensional vectors.

ℹ️ Using a vector database is not strictly required. The GitHub repo contains app.py, which uses scikit-learn to create the vectors and perform a cosine similarity search. Many other approaches are possible. Pinecone just makes storing and querying the vectors super easy.

ℹ️ If you want more information about Pinecone and the concept of a vector database, watch this introduction video.

First, we’ll need to create an account with Pinecone and get the API key and environment name. In the Pinecone UI, you will find these as shown below. There will be a Show Key and Copy Key button in the Actions section next to the key.

Key and environment for Pinecone

Once we have an API key and the environment, we can use the Pinecone Python library to create and use indexes. Install the Pinecone library with pip install pinecone-client.

Although you can create a Pinecone index from code, we will create the index in the Pinecone portal. Go to Indexes and select Create Index. Create the index using cosine as metric and 1536 dimensions:

blog-index in Pinecone

The embedding model we will use to create the vectors, text-embedding-ada-002, outputs vectors with 1536 dimensions. For more info see OpenAI’s blog post of December 15, 2022.

To use the Pinecode index from code, look at the snippet below:

import pinecone

pinecone_api = "<your_api_key>"
pinecone_env = "<your_environment>"

pinecone.init(api_key=pinecone_api, environment=pinecone_env)

index = pinecone.Index('blog-index')

We create an instance of the Index class with the name “blog-index” and store this in index. This index will be used to store our blog post vectors or to perform searches on.

Vectorizing Blog Posts with OpenAI’s Embeddings API

Next, we’ll need to vectorize our blog post articles. We’ll be using OpenAI’s embeddings API to do this. The embeddings API takes a piece of text and returns a high-dimensional vector representation of that text. Here’s an example of how to do that for one article or string:

import openai

openai.api_key = "<your_api_key>"

article = "Some text from a blog post"

vector = openai.Embedding.create(
    input=article,
    model="text-embedding-ada-002"
)["data"][0]["embedding"]

We create a vector representation of our blog post article by calling the Embedding class’s create method. We pass in the article text as input and the text-embedding-ada-002 model, which is a pre-trained language model that can generate high-quality embeddings.

Storing Vectors in Pinecone

Once we have the vector representations of our blog post articles, we can store them in Pinecone. Instead of storing vector per vector, we can use upsert to store a list of vectors. The code below uses the feed of this blog to grab the URLs for 50 posts, every post is vectorized and the vector is added to a Python list of tuples, as expected by the upsert method. The list is then added to Pinecone at once. The tuple that Pinecone expects is:

(id, vector, metadata dictionary)

e.g. (0, vector for post 1, {"url": url to post 1}

Here is the code that uploads the first 50 posts of baeke.info to Pinecone. You need to set the Pinecone key and environment and the OpenAI key as environment variables. The code uses feedparser to grab the blog feed, and BeatifulSoup to parse the retrieved HTML. The code serves as an example only. It is not very robust when it comes to error checking etc…

import feedparser
import os
import pinecone
import numpy as np
import openai
import requests
from bs4 import BeautifulSoup

# OpenAI API key
openai.api_key = os.getenv('OPENAI_API_KEY')

# get the Pinecone API key and environment
pinecone_api = os.getenv('PINECONE_API_KEY')
pinecone_env = os.getenv('PINECONE_ENVIRONMENT')

pinecone.init(api_key=pinecone_api, environment=pinecone_env)

# set index; must exist
index = pinecone.Index('blog-index')

# URL of the RSS feed to parse
url = 'https://atomic-temporary-16150886.wpcomstaging.com/feed/'

# Parse the RSS feed with feedparser
feed = feedparser.parse(url)

# get number of entries in feed
entries = len(feed.entries)
print("Number of entries: ", entries)

post_texts = []
pinecone_vectors = []
for i, entry in enumerate(feed.entries[:50]):
    # report progress
    print("Processing entry ", i, " of ", entries)

    r = requests.get(entry.link)
    soup = BeautifulSoup(r.text, 'html.parser')
    article = soup.find('div', {'class': 'entry-content'}).text

    # vectorize with OpenAI text-emebdding-ada-002
    embedding = openai.Embedding.create(
        input=article,
        model="text-embedding-ada-002"
    )

    # print the embedding (length = 1536)
    vector = embedding["data"][0]["embedding"]

    # append tuple to pinecone_vectors list
    pinecone_vectors.append((str(i), vector, {"url": entry.link}))

# all vectors can be upserted to pinecode in one go
upsert_response = index.upsert(vectors=pinecone_vectors)

print("Vector upload complete.")

Querying Vectors with Pinecone

Now that we have stored our blog post vectors in Pinecone, we can start querying them. We’ll use cosine similarity to find the closest matching blog post. Here is some code that does just that:

query_vector = <vector representation of query>  # vector created with OpenAI as well

search_response = index.query(
    top_k=5,
    vector=query_vector,
    include_metadata=True
)

url = get_highest_score_url(search_response['matches'])

def get_highest_score_url(items):
    highest_score_item = max(items, key=lambda item: item["score"])

    if highest_score_item["score"] > 0.8:
        return highest_score_item["metadata"]['url']
    else:
        return ""

We create a vector representation of our query (you don’t see that here but it’s the same code used to vectorize the blog posts) and pass it to the query method of the Pinecone Index class. We set top_k=5 to retrieve the top 5 matching blog posts. We also set include_metadata=True to include the metadata associated with each vector in our response. That way, we also have the URL of the top 5 matching posts.

The query method returns a dictionary that contains a matches key. The matches value is a list of dictionaries, with each dictionary representing a matching blog post. The score key in each dictionary represents the cosine similarity score between the query vector and the blog post vector. We use the get_highest_score_url function to find the blog post with the highest cosine similarity score.

The function contains some code to only return the highest scoring URL if the score is > 0.8. It’s of course up to you to accept lower matching results. There is a potential for the vector query to deliver an article that’s not highly relevant which results in an irrelevant context for the OpenAI ChatCompletion API call we will do later.

Retrieving the Contents of the Blog Post

Once we have the URL of the closest matching blog post, we can retrieve the contents of the article using the Python requests library and the BeautifulSoup library.

import requests
from bs4 import BeautifulSoup

r = requests.get(url)
soup = BeautifulSoup(r.text, 'html.parser')

article = soup.find('div', {'class': 'entry-content'}).text

We send a GET request to the URL of the closest matching blog post and retrieve the HTML content. We use the BeautifulSoup library to parse the HTML and extract the contents of the <div> element with the class “entry-content”.

Creating a Prompt for the ChatCompletion API

Now that we have the contents of the blog post, we can create a prompt for the ChatCompletion API. The crucial part here is that our OpenAI query should include the blog post we just retrieved!

response = openai.ChatCompletion.create(
    model="gpt-3.5-turbo",
    messages=[
        { "role": "system", "content": "You are a polite assistant" },
        { "role": "user", "content": "Based on the article below, answer the following question: " + your_query +
            "\nAnswer as follows:" +
            "\nHere is the answer directly from the article:" +
            "\nHere is the answer from other sources:" +
             "\n---\n" + article }
           
    ],
    temperature=0,
    max_tokens=200
)

response_text=f"\n{response.choices[0]['message']['content']}"

We use the ChatCompletion API with the gpt-3.5-turbo model to ask our question. This is the same as using ChatGPT on the web with that model. At this point in time, the GPT-4 model was not available yet.

Instead of one prompt, we send a number of dictionaries in a messages list. The first item in the list sets the system message. The second item is the actual user question. We ask to answer the question based on the blog post we stored in the article variable and we provide some instructions on how to answer. We add the contents of the article to our query.

If the article is long, you run the risk of using too many tokens. If that happens, the ChatCompletion call will fail. You can use the tiktoken library to count the tokens and prevent the call to happen in the first place. Or you can catch the exception and tell the user. In the above code, there is no error handling. We only include the core code that’s required.

Returning the Result to a Web Page

If you are running the search code in an HTTP handler as the result of the user typing a query in a web page, you can return the result to the caller:

return jsonify({
    'url': url,
    'response': response_text
})

The full example, including an HTML page and Flask code can be found on GitHub.

The result could look like this:

Query results in the closest URL using vectorized search and ChatGPT answering the question based on the contents the URL points at

Conclusion

Using vectorized search and cosine similarity, we can quickly query a database of blog posts and retrieve the most relevant post. By combining OpenAI’s embeddings API, Pinecone, and the ChatCompletion API, we can create a powerful tool for searching and retrieving blog post content using natural language.

Note that there are some potential issues as well. The code we show is merely a starting point:

  • Limitations of cosine similarity: it does not take into account all properties of the vectors, which can lead to misleading results
  • Prompt engineering: the prompt we use works but there might be prompts that just work better. Experimentation with different prompts is crucial!
  • Embeddings: OpenAI embeddings are trained on a large corpus of text, which may not be representative of the domain-specific language in the posts
  • Performance might not be sufficient if the size of the database grows large. For my blog, that’s not really an issue. 😀

Step-by-Step Guide: How to Build Your Own Chatbot with the ChatGPT API

In this blog post, we will be discussing how to build your own chat bot using the ChatGPT API. It’s worth mentioning that we will be using the OpenAI APIs directly and not the Azure OpenAI APIs, and the code will be written in Python. A crucial aspect of creating a chat bot is maintaining context in the conversation, which we will achieve by storing and sending previous messages to the API at each request. If you are just starting with AI and chat bots, this post will guide you through the step-by-step process of building your own simple chat bot using the ChatGPT API.

Python setup

Ensure Python is installed. I am using version 3.10.8. For editing code, I am using Visual Studio code as the editor. For the text-based chat bot, you will need the following Python packages:

  • openai: make sure the version is 0.27.0 or higher; earlier versions do not support the ChatCompletion APIs
  • tiktoken: a library to count the number of tokens of your chat bot messages

Install the above packages with your package manager. For example: pip install openai.

All code can be found on GitHub.

Getting an account at OpenAI

We will write a text-based chat bot that asks for user input indefinitely. The first thing you need to do is sign up for API access at https://platform.openai.com/signup. Access is not free but for personal use, while writing and testing the chat bot, the price will be very low. Here is a screenshot from my account:

Oh no, $0.13 dollars

When you have your account, generate an API key from https://platform.openai.com/account/api-keys. Click the Create new secret key button and store the key somewhere.

Writing the bot

Now create a new Python file called app.py and add the following lines:

import os
import openai
import tiktoken

openai.api_key = os.getenv("OPENAI_KEY")

We already discussed the openai and tiktoken libraries. We will also use the builtin os library to read environment variables.

In the last line, we read the environment variable OPENAI_KEY. If you use Linux, in your shell, use the following command to store the OpenAI key in an environment variable: export OPENAI_KEY=your-OpenAI-key. We use this approach to avoid storing the API key in your code and accidentally uploading it to GitHub.

To implement the core chat functionality, we will use a Python class. I was following a Udemy course about ChatGPT and it used a similar approach, which I liked. By the way, I can highly recommend that course. Check it out here.

Let’s start with the class constructor:

class ChatBot:

    def __init__(self, message):
        self.messages = [
            { "role": "system", "content": message }
        ]

In the constructor, we define a messages list and set the first item in that list to a configurable dictionary: { "role": "system", "content": message }. In the ChatGPT API calls, the messages list provides context to the API because it contains all the previous messages. With this initial system message, we can instruct the API to behave in a certain way. For example, later in the code, you will find this code to create an instance of the ChatBot class:

bot = ChatBot("You are an assistant that always answers correctly. If not sure, say 'I don't know'.")

But you could also do:

bot = ChatBot("You are an assistant that always answers wrongly.Always contradict the user")

In practice, ChatGPT does not follow the system instruction to strongly. User messages are more important. So it could be that, after some back and forth, the answers will not follow the system instruction anymore.

Let’s continue with another method in the class, the chat method:

def chat(self):
        prompt = input("You: ")
        
        self.messages.append(
            { "role": "user", "content": prompt}
        )
        
        response = openai.ChatCompletion.create(
            model="gpt-3.5-turbo",
            messages = self.messages,
            temperature = 0.8
        )
        
        answer = response.choices[0]['message']['content']
        
        print(answer)
        
        self.messages.append(
           { "role": "assistant", "content": answer} 
        )

        tokens = self.num_tokens_from_messages(self.messages)
        print(f"Total tokens: {tokens}")

        if tokens > 4000:
            print("WARNING: Number of tokens exceeds 4000. Truncating messages.")
            self.messages = self.messages[2:]

The chat method is where the action happens. It does the following:

  • It prompts the user to enter some input.
  • The user’s input is stored in a dictionary as a message with a “user” role and appended to a list of messages called self.messages. If this is the first input, we now have two messages in the list, a system message and a user message.
  • It then creates a response using OpenAI’s gpt-3.5-turbo model, passing in the self.messages list and a temperature of 0.8 as parameters. We use the ChatCompletion API versus the Completion API that you use with other models such as text-davinci-003.
  • The generated response is stored in a variable named answer. The full response contains a lot of information. We are only interested in the first response (there is only one) and grab the content.
  • The answer is printed to the console.
  • The answer is also added to the self.messages list as a message with an “assistant” role. If this is the first input, we now have three messages in the list: a system message, the first user message (the input) and the assistant’s response.
  • The total number of tokens in the self.messages list is computed using a separate function called num_tokens_from_messages() and printed to the console.
  • If the number of tokens exceeds 4000, a warning message is printed and the self.messages list is truncated to remove the first two messages. We will talk about these tokens later.

It’s important to realize we are using the Chat completions here. You can find more information about Chat completions here.

If you did not quite get how the text response gets extracted, here is an example of a full response from the Chat completion API:

{
 'id': 'chatcmpl-6p9XYPYSTTRi0xEviKjjilqrWU2Ve',
 'object': 'chat.completion',
 'created': 1677649420,
 'model': 'gpt-3.5-turbo',
 'usage': {'prompt_tokens': 56, 'completion_tokens': 31, 'total_tokens': 87},
 'choices': [
   {
    'message': {
      'role': 'assistant',
      'content': 'The 2020 World Series was played in Arlington, Texas at the Globe Life Field, which was the new home stadium for the Texas Rangers.'},
    'finish_reason': 'stop',
    'index': 0
   }
  ]
}

The response is indeed in choices[0][‘message’][‘content’].

To make this rudimentary chat bot work, we will repeatedly call the chat method like so:

bot = ChatBot("You are an assistant that always answers correctly. If not sure, say 'I don't know'.")
    while True:
        bot.chat()

Every time you input a question, the API answers and both the question and answer is added to the messages list. Of course, that makes the messages list grow larger and larger, up to a point where it gets to large. The question is: “What is too large?”. Let’s answer that in the next section.

Counting tokens

A language model does not work with text as humans do. Instead, they use tokens. It’s not important how this exactly works but it is important to know that you get billed based on these tokens. You pay per token.

In addition, the model we use here (gpt-3.5-turbo) has a maximum limit of 4096 tokens. This might change in the future. With our code, we cannot keep adding messages to the messages list because, eventually, we will pass the limit and the API call will fail.

To have an idea about the tokens in our messages list, we have this function:

def num_tokens_from_messages(self, messages, model="gpt-3.5-turbo"):
        try:
            encoding = tiktoken.encoding_for_model(model)
        except KeyError:
            encoding = tiktoken.get_encoding("cl100k_base")
        if model == "gpt-3.5-turbo":  # note: future models may deviate from this
            num_tokens = 0
            for message in messages:
                num_tokens += 4  # every message follows <im_start>{role/name}\n{content}<im_end>\n
                for key, value in message.items():
                    num_tokens += len(encoding.encode(value))
                    if key == "name":  # if there's a name, the role is omitted
                        num_tokens += -1  # role is always required and always 1 token
            num_tokens += 2  # every reply is primed with <im_start>assistant
            return num_tokens
        else:
            raise NotImplementedError(f"""num_tokens_from_messages() is not presently implemented for model {model}.""")

The above function comes from the OpenAI cookbook on GitHub. In my code, the function is used to count tokens in the messages list and, if the number of tokens is above a certain limit, we remove the first two messages from the list. The code also prints the tokens so you now how many you will be sending to the API.

The function contains references to <im_start> and <im_end>. This is ChatML and is discussed here. Because you use the ChatCompletion API, you do not have to worry about this. You just use the messages list and the API will transform it all to ChatML. But when you count tokens, ChatML needs to be taken into account for the total token count.

Note that Microsoft examples for Azure OpenAI, do use ChatML in the prompt, in combination with the default Completion APIs. See Microsoft Learn for more information. You will quickly see that using the ChatCompletion API with the messages list is much simpler.

To see, and download, the full code, see GitHub.

Running the code

To run the code, just run app.py. On my system, I need to use python3 app.py. I set the system message to You are an assistant that always answers wrongly. Contradict the user. 😀

Here’s an example conversation:

Although, at the start, the responses follow the system message, the assistant starts to correct itself and answers correctly. As stated, user messages eventually carry more weight.

Summary

In this post, we discussed how to build a chat bot using the ChatGPT API and Python. We went through the setup process, created an OpenAI account, and wrote the chat bot code using the OpenAI API. The bot used the ChatCompletion API and maintained context in the conversation by storing and sending previous messages to the API at each request. We also discussed counting tokens and truncating the message list to avoid exceeding the maximum token limit for the model. The full code is available on GitHub, and we provided an example conversation between the bot and the user. The post aimed to guide both beginning developers and beginners in AI and chat bot development through the step-by-step process of building their chat bot using the ChatGPT API and keep it as simple as possible.

Hope you liked it!

Authenticate to Azure Resources with Azure Managed Identities

In this post, we will take a look at managed identities in general and system-assigned managed identity in particular. Managed identities can be used by your code to authenticate to Azure AD resources from Azure compute resources that support it, like virtual machines and containers.

But first, let’s look at the other option and why you should avoid it if you can: service principals.

Service Principals

If you have code that needs to authenticate to Azure AD-protected resources such as Azure Key Vault, you can always create a service principal. It’s the option that always works. It has some caveats that will be explained further in this post.

The easiest way to create a service principal is with the single Azure CLI command below:

az ad sp create-for-rbac

The command results in the following output:

{
  "appId": "APP_ID",
  "displayName": "azure-cli-2023-01-06-11-18-45",
  "password": "PASSWORD",
  "tenant": "TENANT_ID"
}

If the service principal needs access to, let’s say, Azure Key Vault, you could use the following command to grant that access:

APP_ID="appId from output above"
$SUBSCRIPTION_ID="your subscription id"
$RESOURCE_GROUP="your resource group"
$KEYVAULT_NAME="short name of your key vault"

az role assignment create --assignee $APP_ID \
  --role "Key Vault Secrets User" \
  --scope "/subscriptions/$SUBSCRIPTION_ID/resourceGroups/$RESOURCE_GROUP/providers/Microsoft.KeyVault/vaults/$KEYVAULT_NAME"

The next step is to configure your application to use the service principal and its secret to obtain an Azure AD token (or credential) that can be passed to Azure Key Vault to retrieve secrets or keys. That means you need to find a secure way to store the service principal secret with your application, which is something you want to avoid.

In a Python app, you can use the ClientSecretCredential class and pass your Azure tenant id, the service principal appId (or client Id) and the secret. You can then use the secret with a SecretClient like in the snippet below.

# Create a credential object
credential = ClientSecretCredential(tenant_id, client_id, client_secret)

# Create a SecretClient using the credential
client = SecretClient(vault_url=VAULT_URL, credential=credential)

Other languages and frameworks have similar libraries to reach the same result. For instance JavaScript and C#.

This is quite easy to do but again, where do you store the service principal’s secret securely?

The command az ad sp create-for-rbac also creates an App Registration (and Enterprise application) in Azure AD:

Azure AD App Registration

The secret (or password) for our service principal is partly displayed above. As you can see, it expires a year from now (blog post written on January 6th, 2023). You will need to update the secret and your application when that time comes, preferably before that. We all know what expiring secrets and certificates give us: an app that’s not working because we forgot to update the secret or certificate!

💡 Note that one year is the default. You can set the number of years with the --years parameter in az ad sp create-for-rbac.

💡 There will always be cases where managed identities are not supported such as connecting 3rd party systems to Azure. However, it should be clear that whenever managed identity is supported, use it to provide your app with the credentials it needs.

In what follows, we will explain managed identities in general, and system-assigned managed identity in particular. Another blog post will discuss user-assigned managed identity.

Managed Identities Explained

Azure Managed Identities allow you to authenticate to Azure resources without the need to store credentials or secrets in your code or configuration files.

There are two types of Managed Identities:

  • system-assigned
  • user-assigned

System-assigned Managed Identities are tied to a specific Azure resource, such as a virtual machine or Azure Container App. When you enable a system-assigned identity for a resource, Azure creates a corresponding identity in the Azure Active Directory (AD) for that resource, similar to what you have seen above. This identity can be used to authenticate to any service that supports Azure AD authentication. The lifecycle of a system-assigned identity is tied to the lifecycle of the Azure resource. When the resource is deleted, the corresponding identity is also deleted. Via a special token endpoint, your code can request an access token for the resource it wants to access.

User-assigned Managed Identities, on the other hand, are standalone identities that can be associated with one or more Azure resources. This allows you to use the same identity across multiple resources and manage the identity’s lifecycle independently from the resources it is associated with. In your code, you can request an access token via the same special token endpoint. You will have to specify the appId (client Id) of the user-managed identity when you request the token because multiple identities could be assigned to your Azure resource.

In summary, system-assigned Managed Identities are tied to a specific resource and are deleted when the resource is deleted, while user-assigned Managed Identities are standalone identities that can be associated with multiple resources and have a separate lifecycle.

System-assigned managed identity

Virtual machines support system and user-assigned managed identity and make it easy to demonstrate some of the internals.

Let’s create a Linux virtual machine and enable a system-assigned managed identity. You will need an Azure subscription and be logged on with the Azure CLI. I use a Linux virtual machine here to demonstrate how it works with bash. Remember that this also works on Windows VMs and many other Azure resources such as App Services, Container Apps, and more.

Run the code below. Adapt the variables for your environment.

RG="rg-mi"
LOCATION="westeurope"
PASSWORD="oE2@pl9hwmtM"

az group create --name $RG --location $LOCATION

az vm create \
  --name vm-demo \
  --resource-group $RG \
  --image UbuntuLTS \
  --size Standard_B1s \
  --admin-username azureuser \
  --admin-password $PASSWORD \
  --assign-identity


After the creation of the resource group and virtual machine, the portal shows the system assigned managed identity in the virtual machine’s Identity section:

System assigned managed identity

We can now run some code on the virtual machine to obtain an Azure AD token for this identity that allows access to a Key Vault. Key Vault is just an example here.

We will first need to create a Key Vault and a secret. After that we will grant the managed identity access to this Key Vault. Run these commands on your own machine, not the virtual machine you just created:

# generate a somewhat random name for the key vault
KVNAME=kvdemo$RANDOM

# create with vault access policy which grants creator full access
az keyvault create --name $KVNAME --resource-group $RG

# with full access, current user can create a secret
az keyvault secret set --vault-name $KVNAME --name mysecret --value "TOPSECRET"

# show the secret; should reveal TOPSECRET
az keyvault secret show --vault-name $KVNAME --name mysecret

# switch the Key Vault to AAD authentication
az keyvault update --name $KVNAME --enable-rbac-authorization

Now we can grant the system assigned managed identity access to Key Vault via Azure RBAC. Let’s look at the identity with the command below:

az vm identity show --resource-group $RG --name vm-demo

This returns the information below. Note that principalId was also visible in the portal as Object (principal) ID. Yes, not confusing at all… 🤷‍♂️

{
  "principalId": "YOUR_PRINCIPAL_ID",
  "tenantId": "YOUR_TENANT_ID",
  "type": "SystemAssigned",
  "userAssignedIdentities": null
}

Now assign the Key Vault Secrets User role to this identity:

PRI_ID="principal ID above"
SUB_ID="Azure subscription ID"

# below, scope is the Azure Id of the Key Vault 

az role assignment create --assignee $PRI_ID \
  --role "Key Vault Secrets User" \
  --scope "/subscriptions/$SUB_ID/resourceGroups/$RG/providers/Micr
osoft.KeyVault/vaults/$KVNAME"

If you check the Key Vault in the portal, in IAM, you should see:

System assigned identity of VM has Secrets User role

Now we can run some code on the VM to obtain an Azure AD token to read the secret from Key Vault. SSH into the virtual machine using its public IP address with ssh azureuser@IPADDRESS. Next, use the commands below:

# install jq on the vm for better formatting; you will be asked for your password
sudo snap install jq

curl 'http://169.254.169.254/metadata/identity/oauth2/token?api-version=2018-02-01&resource=https%3A%2F%2Fvault.azure.net' -H Metadata:true | jq

It might look weird but by sending the curl request to that special IP address on the VM, you actually request an access token to access Key Vault resources (in this case, it could also be another type of resource). There’s more to know about this special IP address and the other services it provides. Check Microsoft Learn for more information.

The result of the curl command is JSON below (nicely formatted with jq):

{
  "access_token": "ACCESS_TOKEN",
  "client_id": "CLIENT_ID",
  "expires_in": "86038",
  "expires_on": "1673095093",
  "ext_expires_in": "86399",
  "not_before": "1673008393",
  "resource": "https://vault.azure.net",
  "token_type": "Bearer"
}

Note that you did not need any secret to obtain the token. Great!

Now run the following code but first replace <YOUR VAULT NAME> with the short name of your Key Vault:

# build full URL to your Key Vault
VAULTURL="https://<YOUR VAULT NAME>.vault.azure.net"

ACCESS_TOKEN=$(curl 'http://169.254.169.254/metadata/identity/oauth2/token?api-version=2018-02-01&resource=https%3A%2F%2Fvault.azure.net' -H Metadata:true | jq -r .access_token)

curl -s "$VAULTURL/secrets/mysecret?api-version=2016-10-01" -H "Authorization: Bearer $ACCESS_TOKEN" | jq -r .value

First, we set the vault URL to the full URL including https://. Next, we retrieve the full JSON token response but use jq to only grab the access token. The -r option strips the " from the response. Next, we use the Azure Key Vault REST API to read the secret with the access token for authorization. The result should be TOPSECRET! 😀

Instead of this raw curl code, which is great for understanding how it works under the hood, you can use Microsoft’s identity libraries for many popular languages. For example in Python:

from azure.identity import DefaultAzureCredential
from azure.keyvault.secrets import SecretClient

# Authenticate using a system-assigned managed identity
credential = DefaultAzureCredential()

# Create a SecretClient using the credential and the key vault URL
secret_client = SecretClient(vault_url="https://YOURKVNAME.vault.azure.net", credential=credential)

# Retrieve the secret
secret = secret_client.get_secret("mysecret")

# Print the value of the secret
print(secret.value)

If you are somewhat used to Python, you know you will need to install azure-identity and azure-keyvault-secrets with pip. The DefaultAzureCredential class used in the code automatically works with system managed identity in virtual machines but also other compute such as Azure Container Apps. The capabilities of this class are well explained in the docs: https://learn.microsoft.com/en-us/python/api/overview/azure/identity-readme?view=azure-python. The identity libraries for other languages work similarly.

What about Azure Arc-enabled servers?

Azure Arc-enabled servers also have a managed identity. It is used to update the properties of the Azure Arc resource in the portal. You can grant this identity access to other Azure resources such as Key Vault and then grab the token in a similar way. Similar but not quite identical. The code with curl looks like this (from the docs):

ChallengeTokenPath=$(curl -s -D - -H Metadata:true "http://127.0.0.1:40342/metadata/identity/oauth2/token?api-version=2019-11-01&resource=https%3A%2F%2Fvault.azure.net" | grep Www-Authenticate | cut -d "=" -f 2 | tr -d "[:cntrl:]")

ChallengeToken=$(cat $ChallengeTokenPath)

if [ $? -ne 0 ]; then
    echo "Could not retrieve challenge token, double check that this command is run with root privileges."
else
    curl -s -H Metadata:true -H "Authorization: Basic $ChallengeToken" "http://127.0.0.1:40342/metadata/identity/oauth2/token?api-version=2019-11-01&resource=https%3A%2F%2Fvault.azure.net"
fi

On an Azure Arc-enabled machine that runs on-premises or in other clouds, the special IP address 169.254.169.254 is not available. Instead, the token request is sent to http://localhost:40342. The call is designed to fail and respond with a Www-Authenticate header that contains the path to a file on the machine (created dynamically). Only specific users and groups on the machine are allowed to read the contents of that file. This step was added for extra security so that not every process can read the contents of this file.

The second command retrieves the contents of the file and uses it for basic authentication purposes in the second curl request. It’s the second curl request that will return the access token.

Note that this works for both Linux and Windows Azure Arc-enabled systems. It is further explained here: https://learn.microsoft.com/en-us/azure/azure-arc/servers/managed-identity-authentication.

In contrast with managed identity on Azure compute, I am not aware of support for Azure Arc in the Microsoft identity libraries. To obtain a token with Python, check the following gist with some sample code: https://gist.github.com/gbaeke/343b14305e468aa433fe90441da0cabd.

The great thing about this is that managed identity can work on servers not in Azure as long if you enable Azure Arc on them! 🎉

Conclusion

In this post, we looked at what managed identities are and zoomed in on system-assigned managed identity. Azure Managed Identities are a secure and convenient way to authenticate to Azure resources without having to store credentials in code or configuration files. Whenever you can, use managed identity instead of service principals. And as you have seen, it even works with compute that’s not in Azure, such as Azure Arc-enabled servers.

Stay tuned for the next post about user-assigned managed identity.

AKS Workload Identity Revisited

A while ago, I blogged about Workload Identity. Since then, Microsoft simplified the configuration steps and enabled Managed Identity, in addition to app registrations.

But first, let’s take a step back. Why do you need something like workload identity in the first place? Take a look at the diagram below.

Workloads (deployed in a container or not) often need to access Azure AD protected resources. In the diagram, the workload in the container wants to read secrets from Azure Key Vault. The recommended option is to use managed identity and grant that identity the required role in Azure Key Vault. Now your code just needs to obtain credentials for that managed identity.

In Kubernetes, that last part presents a challenge. There needs to be a mechanism to map such a managed identity to a pod and allow code in the container to obtain an Azure AD authentication token. The Azure AD Pod Identity project was a way to solve this but as of 24/10/2022, AAD Pod Identity is deprecated. It is now replaced by Workload Identity. It integrates with native Kubernetes capabilities to federate with external identity providers such as Azure AD. It has the following advantages:

  • Not an AKS feature, it’s a Kubernetes feature (other cloud, on-premises, edge); similar functionality exists for GKE for instance
  • Scales better than AAD Pod Identity
  • No need for custom resource definitions
  • No need to run pods that intercept IMDS (instance metadata service) traffic; instead, there are webhook pods that run when pods are created/updated

If the above does not make much sense, check https://learn.microsoft.com/en-us/azure/aks/use-azure-ad-pod-identity. But don’t use it OK? 😉

At a basic level, Workload Identity works as follows:

  • Your AKS cluster is configured to issue tokens. Via an OIDC (OpenID Connect) discovery document, published by AKS, Azure AD can validate the tokens it receives from the cluster.
  • A Kubernetes service account is created and properly annotated and labeled. Pods are configured to use the service account via the serviceAccount field.
  • The Azure Managed Identity is configured with Federated credentials. The federated credential contains a link to the OIDC discovery document (Cluster Issuer URL) and configures the namespace and service account used by the Kubernetes pod. That generates a subject identifier like system:serviceaccount:namespace_name:service_account_name.
  • Tokens can now be generated for the configured service account and swapped for an Azure AD token that can be picked up by your workload.
  • A Kubernetes mutating webhook is the glue that makes all of this work. It ensures the token is mapped to a file in your container and sets needed environment variables.

Creating a cluster with OIDC and Workload Identity

Create a basic cluster with one worker node and both features enabled. You need an Azure subscription and the Azure CLI. Ensure the prerequisites are met and that you are logged in with az login. Run the following in a Linux shell:

RG=your_resource_group
CLUSTER=your_cluster_name

az aks create -g $RG -n $CLUSTER --node-count 1 --enable-oidc-issuer \
  --enable-workload-identity --generate-ssh-keys

After deployment, find the OIDC Issuer URL with:

export AKS_OIDC_ISSUER="$(az aks show -n $CLUSTER -g $RG --query "oidcIssuerProfile.issuerUrl" -otsv)"

When you add /.well-known/openid-configuration to that URL, you will see something like:

OIDC discovery document

The field jwks_uri contains a link to key information, used by AAD to verify the tokens issued by Kubernetes.

In earlier versions of Workload Identity, you had to install a mutating admission webhook to project the Kubernetes token to a volume in your workload. In addition, the webhook also injected several environment variables:

  • AZURE_CLIENT_ID: client ID of an AAD application or user-assigned managed identity
  • AZURE_TENANT_ID: tenant ID of Azure subscription
  • AZURE_FEDERATED_TOKEN_FILE: the path to the federated token file; you can do cat $AZURE_FEDERATED_TOKEN_FILE to see the token. Note that this is the token issued by Kubernetes, not the exchanged AAD token (exchanging the token happens in your code). The token is a jwt. You can use https://jwt.io to examine it:
Decoded jwt issued by Kubernetes

But I am digressing… In the current implementation, you do not have to install the mutating webhook yourself. When you enable workload identity with the CLI, the webhook is installed automatically. In kube-system, you will find pods starting with azure-wi-webhook-controller-manager. The webhook kicks in whenever you create or update a pod. The end result is the same. You get the projected token + the environment variables.

Creating a service account

Ok, now we have a cluster with OIDC and workload identity enabled. We know how to retrieve the issuer URL and we learned we do not have to install anything else to make this work.

You will have to configure the pods you want a token for. Not every pod has containers that need to authenticate to Azure AD. To configure your pods, you first create a Kubernetes service account. This is a standard service account. To learn about service accounts, check my YouTube video.

apiVersion: v1
kind: ServiceAccount
metadata:
  annotations:
    azure.workload.identity/client-id: CLIENT ID OF MANAGED IDENTITY
  labels:
    azure.workload.identity/use: "true"
  name: sademo
  namespace: default

The label ensures that the mutating webhook will do its thing when a pod uses this service account. We also indicate the managed identity we want a token for by specifying its client ID in the annotation.

Note: you need to create the managed identity yourself and grab its client id. Use the following commands:

RG=your_resource_group
IDENTITY=your_chosen_identity_name
LOCATION=your_azure_location (e.g. westeurope)

export SUBSCRIPTION_ID="$(az account show --query "id" -otsv)"

az identity create --name $IDENTITY --resource-group $RG \
  --location $LOCATION --subscription $SUBSCRIPTION_ID

export USER_ASSIGNED_CLIENT_ID="$(az identity show -n $IDENTITY -g $RG --query "clientId" -otsv)"

echo $USER_ASSIGNED_CLIENT_ID

The last command prints the id to use in the service account azure.workload.identity/client-id annotation.

Creating a pod that uses the service account

Let’s create a deployment that deploys pods with an Azure CLI image:

apiVersion: apps/v1
kind: Deployment
metadata:
  name: azcli-deployment
  namespace: default
  labels:
    app: azcli
spec:
  replicas: 1
  selector:
    matchLabels:
      app: azcli
  template:
    metadata:
      labels:
        app: azcli
    spec:
      # needs to refer to service account used with federation
      serviceAccount: sademo
      containers:
        - name: azcli
          image: mcr.microsoft.com/azure-cli:latest
          command:
            - "/bin/bash"
            - "-c"
            - "sleep infinity"

Above, the important line is serviceAccount: sademo. When the pod is created or modified, the mutating webhook will check the service account and its annotations. If it is configured for workload identity, the webhook will do its thing: projecting the Kubernetes token file and setting the environment variables:

The webhook did its work 😉

How to verify it works?

We can use the Azure CLI support for federated tokens as follows:

az login --federated-token "$(cat $AZURE_FEDERATED_TOKEN_FILE)" \
--service-principal -u $AZURE_CLIENT_ID -t $AZURE_TENANT_ID

After running the command, the error below appears:

Oh no…

Clearly, something is wrong and there is. We have forgotten to configure the managed identity for federation. In other words, when we present our Kubernetes token, Azure AD needs information to validate it and return an AAD token.

Use the following command to create a federated credential on the user-assigned managed identity you created earlier:

RG=your_resource_group
IDENTITY=your_chosen_identity_name
AKD_OIDC_ISSUER=your_oidc_issuer
SANAME=sademo

az identity federated-credential create --name fic-sademo \
  --identity-name $IDENTITY \
  --resource-group $RG --issuer ${AKS_OIDC_ISSUER} \
  --subject system:serviceaccount:default:$SANAME

After running the above command, the Azure Managed Identity has the following configuration:

Federated credentials on the Managed Identity

More than one credential is possible. Click on the name of the federated credential. You will see:

Details of the federated credential

Above, the OIDC Issuer URL is set to point to our cluster. We expect a token with a subject identifier (sub) of system:serviceaccount:default:sademo. You can check the decoded jwt earlier in this post to see that the sub field in the token issued by Kubernetes matches the one above. It needs to match or the process will fail.

Now we can run the command again:

az login --federated-token "$(cat $AZURE_FEDERATED_TOKEN_FILE)" \
--service-principal -u $AZURE_CLIENT_ID -t $AZURE_TENANT_ID

You will be logged in to the Azure CLI with the managed identity credentials:

But what about your own apps?

Above, we used the Azure CLI. The most recent versions (>= 2.30.0) support federated credentials and use MSAL. But what about your custom code?

The code below is written in Python and uses the Python Azure identity client library with DefaultAzureCredential. This code works with managed identity in Azure Container Apps or Azure App Service and was not modified. Here’s the code for reference:

import threading
import os
import logging
import time
import signal
from azure.keyvault.secrets import SecretClient
from azure.identity import DefaultAzureCredential

from azure.appconfiguration.provider import (
    AzureAppConfigurationProvider,
    SettingSelector,
    AzureAppConfigurationKeyVaultOptions
)

logging.basicConfig(encoding='utf-8', level=logging.WARNING)

def get_config(endpoint):
  selects = {SettingSelector(key_filter=f"myapp:*", label_filter="prd")}
  trimmed_key_prefixes = {f"myapp:"}
  key_vault_options = AzureAppConfigurationKeyVaultOptions(secret_resolver=retrieve_secret)
  app_config = {}
  try:
    app_config = AzureAppConfigurationProvider.load(
            endpoint=endpoint, credential=CREDENTIAL, selects=selects, key_vault_options=key_vault_options, 
            trimmed_key_prefixes=trimmed_key_prefixes)
  except Exception as ex:
    logging.error(f"error loading app config: {ex}")

  return app_config

def run():
    try:
      global CREDENTIAL 
      CREDENTIAL = DefaultAzureCredential(exclude_visual_studio_code_credential=True)
    except Exception as ex:
      logging.error(f"error setting credentials: {ex}")

    endpoint = os.getenv('AZURE_APPCONFIGURATION_ENDPOINT')

    if not endpoint:
        logging.error("Environment variable 'AZURE_APPCONFIGURATION_ENDPOINT' not set")

    app_config =  {}
    while True:
        if not app_config:
            logging.warning("trying to load app config")
            app_config = get_config(endpoint)
        else:
            config_value=app_config['appkey']
            logging.warning(f"doing useful work with {config_value}")
            # if key exists in app_config, do something with it
            if 'mysecret' in app_config:
                logging.warning(f"and hush hush, there's a secret: {app_config['mysecret']}")
        time.sleep(5)


class GracefulKiller:
  kill_now = False
  def __init__(self):
    signal.signal(signal.SIGINT, self.exit_gracefully)
    signal.signal(signal.SIGTERM, self.exit_gracefully)

  def exit_gracefully(self, *args):
    self.kill_now = True


def retrieve_secret(uri):
    try:
        # uri is in format: https://<keyvaultname>.vault.azure.net/secrets/<secretname>
        # retrieve key vault uri and secret name from uri
        vault_uri = "https://" + uri.split('/')[2]
        secret_name = uri.split('/')[-1]
        logging.warning(f"Retrieving secret {secret_name} from {vault_uri}...")

        # retrieve the secret from Key Vault; CREDENTIAL was set globally
        secret_client = SecretClient(vault_url=vault_uri, credential=CREDENTIAL)

        # get secret value from Key Vault
        secret_value = secret_client.get_secret(secret_name).value

    except Exception as ex:
        print(f"retrieving secret: {ex}")
    
    return secret_value

# main function
def main():
    # create a Daemon tread
    t = threading.Thread(daemon=True, target=run, name="worker")
    t.start()
    

    killer = GracefulKiller()
    while not killer.kill_now:
        time.sleep(1)

    logging.info("Doing some important cleanup before exiting")
    logging.info("Gracefully exiting")


if __name__ == "__main__":
    main()

On Docker Hub, the gbaeke/worker:1.0.0 image runs this code. The following manifest runs the code on Kubernetes with the same managed identity as the Azure CLI example (same service account):

apiVersion: apps/v1
kind: Deployment
metadata:
  name: worker
  namespace: default
  labels:
    app: worker
spec:
  replicas: 1
  selector:
    matchLabels:
      app: worker
  template:
    metadata:
      labels:
        app: worker
    spec:
      # needs to refer to service account used with federation
      serviceAccount: sademo
      containers:
        - name: worker
          image: gbaeke/worker:1.0.0
          env:
            - name: AZURE_APPCONFIGURATION_ENDPOINT
              value: https://ac-appconfig-vr6774lz3bh4i.azconfig.io

Note that the code tries to connect to Azure App Configuration. The managed identity has been given the App Configuration Data Reader role on a specific instance. The code tries to read the value of key myapp:appkey with label prd from that instance:

App Config key and values

To make the code work, the environment variable AZURE_APPCONFIGURATION_ENDPOINT is set to the URL of the App Config instance.

In the container logs, we can see that the value was successfully retrieved:

Log stream of worker

And yes, the code just works! It successfully connected to App Config and retrieved the value. The environment variables, set by the webhook discussed earlier, make this work, together with the Python Azure identity library!

Conclusion

Workload Identity works like a charm and is relatively easy to configure. At the time of writing (end of November 2022), I guess we are pretty close to general availability and we finally will have a fully supported managed identity solution for AKS and beyond!

A quick look at Azure App Configuration and the Python Provider

When developing an application, it is highly likely that it needs to be configured with all sorts of settings. A simple list of key/value pairs is usually all you need. Some of the values can be read by anyone (e.g., a public URL) while some values should be treated as secrets (e.g., a connection string).

Azure App Configuration is a service to centrally manage these settings in addition to feature flags. In this post, we will look at storing and retrieving application settings and keeping feature flags for another time. I will also say App Config instead of App Configuration to save some keystrokes. 😉

We will do the following:

  • Retrieve key-value pairs for multiple applications and environments from one App Config instance
  • Use Key Vault references in App Config and retrieve these from Key Vault directly
  • Use the Python provider client to retrieve key-value pairs and store them in a Python dictionary

Why use App Configuration at all?

App Configuration helps by providing a fully managed service to store configuration settings for your applications separately from your code. Storing configuration separate from code is a best practice that most developers should follow.

Although you could store configuration values in files, using a service like App Config provides some standardization within or across developer teams.

Some developers store both configuration values and secrets in Key Vault. Although that works, App Config is way more flexible in organizing the settings and retrieving lists of settings with key and label filters. If you need to work with more than a few settings, I would recommend using a combination of App Config and Key Vault.

In what follows, I will show how we store settings for multiple applications and environments in the same App Config instance. Some of these settings will be Key Vault references.

Read https://learn.microsoft.com/en-us/azure/azure-app-configuration/overview before continuing to know more about App Config.

Provisioning App Config

Provisioning App Configuration is very easy from the portal or the Azure CLI. With the Azure CLI, use the following commands to create a resource group and an App Configuration instance in that group:

az group create -n RESOURCEGROUP -l LOCATION
az appconfig create -g RESOURCEGROUP  -n APPCONFIGNAME -l LOCATION

After deployment, we can check the portal and navigate to Configuration Explorer.

App Configuration in the Azure Portal

In Configuration Explorer, you can add the configuration values for your apps. They are just key/value pairs but they can be further enriched with labels, content types, and tags.

Note that there is a Free and a Standard tier of App Config. See https://azure.microsoft.com/en-us/pricing/details/app-configuration/ for more information. In production, you should use the Standard tier.

Storing configuration and secrets for multiple apps and environments

To store configuration values for multiple applications, you will have to identify the application in the key. App Configuration, oddly, has no knowledge of applications. For example, a key could be app1:setting1. You decide on the separator between the app name (app1 here) and its setting (setting1). In your code, you can easily query all settings for your app with a key filter (e.g. “app1:”. I will show an example of using a key filter later with the Python provider.

If you want to have different values for a key per environment (like dev, prd, etc…), you can add a label for each environment. To retrieve all settings for an environment, you can use a label filter. I will show an example of using a label filter later.

Suppose you want to use app1:setting1 in two environments: dev and prd. How do you create the key-value pairs? One way is to use the Azure CLI. You can also create them with the portal or from Python, C#, etc… With the CLI:

az appconfig kv set --name APPCONFIGNAME  --key app1:setting1 --value "value1" --label dev

APPCONFIG name is the name of your App Config instance. Just the name, not the full URL. For the prd environment:

az appconfig kv set --name APPCONFIGNAME  --key app1:setting1 --value "value2" --label prd

In Configuration Explorer, you will now see:

app1:setting1 for two environments (via labels)

For more examples of using the Azure CLI, see https://learn.microsoft.com/en-us/azure/azure-app-configuration/scripts/cli-work-with-keys.

In addition to these plain key-value pairs, you can also create Key Vault references. Let’s create one from the portal. In Configuration Explorer, click + Create and select Key Vault reference. You will get the following UI that allows you to create the reference. Make sure you have a Key Vault with a secret called dev-mysecret if you want to follow along. Below, set the label to dev. I forgot that in the screenshot below:

Creating a Key Vault Reference

Above, I am using the same naming convention for the key in App Config: app1:mysecret. Notice though that the secret I am referencing in Key Vault contains the environment and a dash (-) before the actual secret name. If you use one Key Vault per app instead of a Key Vault per app and environment, you will have to identify the environment in the secret name in some way.

After creating the reference, you will see the following in Configuration explorer:

Configuration explorer with one Key Vault reference

Note that the Key Vault reference has a content type. The content type is application/vnd.microsoft.appconfig.keyvaultref+json;charset=utf-8. You can use the content type in your code to know if the key contains a reference to a Key Vault secret. That reference will be something like https://kv-app1-geba.vault.azure.net/secrets/dev-mysecret. You can then use the Python SDK for Azure Key Vault to retrieve the secret from your code. Azure App Config will not do that for you.

You can use content types in other ways as well. For example, you could store a link to a storage account blob and use a content type that informs your code it needs to retrieve the blob from the account. Of course, you will need to write code to retrieve the blob. App Config only contains the reference.

Reading settings

There are many ways to read settings from App Config. If you need them in an Azure Pipeline, for instance, you can use the Azure App Configuration task to pull keys and values from App Config and set them as Azure pipeline variables.

If you deploy your app to Kubernetes and you do not want to read the settings from your code, you can integrate App Configuration with Helm. See https://learn.microsoft.com/en-us/azure/azure-app-configuration/integrate-kubernetes-deployment-helm for more information.

In most cases though, you will want to read the settings directly from your code. There is an SDK for several languages, including Python. The SDK has all the functionality you need to read and write settings.

Next to the Python SDK, there is also a Python provider which is optimized to read settings from App Config and store them in a Python dictionary. The provider has several options to automatically trim app names from keys and to automatically retrieve a secret from Key Vault if the setting in App Config is a Key Vault reference.

To authenticate to App Config, the default is access keys with a connection string. You can find the connection string in the Portal:

App Config Connection string for read/write or just read

You can also use Azure AD (it’s always enabled) and disable access keys. In this example, I will use a connection string to start with:

Before we connect and retrieve the values, ensure you install the provider first:

pip install azure-appconfiguration-provider

Above, use pip or pip3 depending on your installation of Python.

In your code, ensure the proper imports:

from azure.appconfiguration.provider import (
    AzureAppConfigurationProvider,
    SettingSelector,
    AzureAppConfigurationKeyVaultOptions
)
from azure.keyvault.secrets import SecretClient
from azure.identity import DefaultAzureCredential

To authenticate to Azure Key Vault with Azure AD, we can use DefaultAzureCredential():

try:
    CREDENTIAL = DefaultAzureCredential(exclude_visual_studio_code_credential=True)
except Exception as ex:
    print(f"error setting credentials: {ex}")

Note: on my machine, I had an issue with the VS Code credential feature so I turned that off.

Next, use a SettingSelector from the provider to provide a key filter and label filter. I want to retrieve key-value pairs for an app called app1 and an environment called dev:

app = 'app1'
env = 'dev'
selects = {SettingSelector(key_filter=f"{app}:*", label_filter=env)}

Next, when I retrieve the key-value pairs, I want to strip app1: from the keys:

trimmed_key_prefixes = {f"{app}:"}

In addition, I want the provider to automatically go to Key Vault and retrieve the secret:

key_vault_options = AzureAppConfigurationKeyVaultOptions(secret_resolver=retrieve_secret)

retrieve_secret refers to a function you need to write to retrieve the secret and add custom logic. There are other options as well.

def retrieve_secret(uri):
    try:
        # uri is in format: https://<keyvaultname>.vault.azure.net/secrets/<secretname>
        # retrieve key vault uri and secret name from uri
        vault_uri = "https://" + uri.split('/')[2]
        secret_name = uri.split('/')[-1]
        print(f"Retrieving secret {secret_name} from {vault_uri}...")
 
        # retrieve the secret from Key Vault; CREDENTIAL was set globally
        secret_client = SecretClient(vault_url=vault_uri, credential=CREDENTIAL)
 
        # get secret value from Key Vault
        secret_value = secret_client.get_secret(secret_name).value
 
    except Exception as ex:
        print(f"retrieving secret: {ex}", 1)

    return secret_value

Now that we have all the options, we can retrieve the key-value pairs.

connection_string = 'YOURCONNSTR'
app_config = AzureAppConfigurationProvider.load(
    connection_string=connection_string, selects=selects, key_vault_options=key_vault_options, 
    trimmed_key_prefixes=trimmed_key_prefixes)

print(app_config)

Now we have a Python dictionary app_config with all key-value pairs for app1 and environment dev. The key-value pairs are a mix of plain values from App Config and Key Vault.

You can now use this dictionary in your app in whatever way you like.

If you would like to use the same CREDENTIAL to connect to App Config, you can also use:

endpoint = 'APPCONFIGNAME.azconfig.io' # no https://
app_config = AzureAppConfigurationProvider.load(
    endpoint=endpoint, credential=CREDENTIAL, selects=selects, key_vault_options=key_vault_options, 
    trimmed_key_prefixes=trimmed_key_prefixes)

Ensure the credential you use has the App Configuration Data Reader role to read the key-value pairs.

Here’s all the code in a gist: https://gist.github.com/gbaeke/9b075a87a1198cdcbcc2b2028492085b. Ensure you have the key-value pairs as above and provide the connection string to the connection_string variable.

Conclusion

In this post, we showed how to retrieve key-value pairs with the Python provider from one App Config instance for multiple applications and environments.

The application is stored as a prefix in the key (app1:). The environment is a label (e.g., dev), allowing us to have the same setting with different values per environment.

Some keys can contain a reference to Key Vault to allow your application to retrieve secrets from Key Vault as well. I like this approach to have a list of all settings for an app and environment, where the value of the key can be an actual value or a reference to some other entity like a secret, a blob, or anything else.

Learn to use the Dapr authorization middleware

Based on a customer conversation, I decided to look into the Dapr middleware components. More specifically, I wanted to understand how the OAuth 2.0 middleware works that enables the Authorization Code flow.

In the Authorization Code flow, an authorization code is a temporary code that a client obtains after being redirected to an authorization URL (https://login.microsoftonline.com/{tenant}/oauth2/authorize) where you provide your credentials interactively (not useful for service-service non-interactive scenarios). That code is then handed to your app which exchanges it for an access token. With the access token, the authenticated user can access your app.

Instead of coding this OAuth flow in your app, we will let the Dapr middleware handle all of that work. Our app can then pickup the token from an HTTP header. When there is a token, access to the app is granted. Otherwise, Dapr (well, the Dapr sidecar next to your app) redirects your client to the authorization server to get a code.

Let’s take a look how this all works with Azure Active Directory. Other authorization servers are supported as well: Facebook, GitHub, Google, and more.

What we will build

Some experience with Kubernetes, deployments, ingresses, Ingress Controllers and Dapr is required.

If you think the explanation below can be improved, or I have made errors, do let me know. Let’s go…

Create an app registration

Using Azure AD means we need an app registration! Other platforms have similar requirements.

First, create an app registration following this quick start. In the first step, give the app a name and, for this demo, just select Accounts in this organizational directory only. The redirect URI will be configured later so just click Register.

After following the quick start, you should have:

  • the client ID and client secret: will be used in the Dapr component
  • the Azure AD tenant ID: used in the auth and token URLs in the Dapr component; Dapr needs to know where to redirect to and where to exchange the authorization code for an access token
App registration in my Azure AD Tenant

There is no need for your app to know about these values. All work is done by Dapr and Dapr only!

We will come back to the app registration later to create a redirect URI.

Install an Ingress Controller

We will use an Ingress Controller to provide access to our app’s Dapr sidecar from the Internet, using HTTP.

In this example, we will install ingress-nginx. Use the following commands (requires Helm):

helm upgrade --install ingress-nginx ingress-nginx \
  --repo https://kubernetes.github.io/ingress-nginx \
  --namespace ingress-nginx --create-namespace

Although you will find articles about daprizing your Ingress Controller, we will not do that here. We will use the Ingress Controller simply as a way to provide HTTP access to the Dapr sidecar of our app. We do not want Dapr-to-Dapr gRPC traffic between the Ingress Controller and our app.

When ingress-nginx is installed, grab the public IP address of the service that it uses. Use kubectl get svc -n ingress-nginx. I will use the IP address with nip.io to construct a host name like app.11.12.13.14.nip.io. The nip.io service resolves such a host name to the IP address in the name automatically.

The host name will be used in the ingress and the Dapr component. In addition, use the host name to set the redirect URI of the app registration: https://app.11.12.13.14.nip.io. For example:

Added a platform configuration for a web app and set the redirect URI

Note that we are using https here. We will configure TLS on the ingress later.

Install Dapr

Install the Dapr CLI on your machine and run dapr init -k. This requires a working Kubernetes context to install Dapr to your cluster. I am using a single-node AKS cluster in Azure.

Create the Dapr component and configuration

Below is the Dapr middleware component we need. The component is called myauth. Give it any name you want. The name will later be used in a Dapr configuration that is, in turn, used by the app.

apiVersion: dapr.io/v1alpha1
kind: Component
metadata:
  name: myauth
spec:
  type: middleware.http.oauth2
  version: v1
  metadata:
  - name: clientId
    value: "CLIENTID of your app reg"
  - name: clientSecret
    value: "CLIENTSECRET that you created on the app reg"
  - name: authURL
    value: "https://login.microsoftonline.com/TENANTID/oauth2/authorize"
  - name: tokenURL
    value: "https://login.microsoftonline.com/TENANTID/oauth2/token"
  - name: redirectURL
    value: "https://app.YOUR-IP.nip.io"
  - name: authHeaderName
    value: "authorization"
  - name: forceHTTPS
    value: "true"
scopes:
- super-api

Replace YOUR-IP with the public IP address of the Ingress Controller. Also replace the TENANTID.

With the information above, Dapr can exchange the authorization code for an access token. Note that the client secret is hard coded in the manifest. It is recommended to use a Kubernetes secret instead.

The component on its own is not enough. We need to create a Dapr configuration that references it:

piVersion: dapr.io/v1alpha1
kind: Configuration
metadata:
  name: auth
spec:
  tracing:
    samplingRate: "1"
  httpPipeline:
    handlers:
    - name: myauth # reference the oauth component here
      type: middleware.http.oauth2    

Note that the configuration is called auth. Our app will need to use this configuration later, via an annotation on the Kubernetes pods.

Both manifests can be submitted to the cluster using kubectl apply -f. It is OK to use the default namespace for this demo. Keep the configuration and component in the same namespace as your app.

Deploy the app

The app we will deploy is super-api, which has a /source endpoint to dump all HTTP headers. When authentication is successful, the authorization header will be in the list.

Here is deployment.yaml:

apiVersion: apps/v1
kind: Deployment
metadata:
  name: super-api-deployment
  labels:
    app: super-api
spec:
  replicas: 1
  selector:
    matchLabels:
      app: super-api
  template:
    metadata:
      labels:
        app: super-api
      annotations:
        dapr.io/enabled: "true"
        dapr.io/app-id: "super-api"
        dapr.io/app-port: "8080"
        dapr.io/config: "auth" # refer to Dapr config
        dapr.io/sidecar-listen-addresses: "0.0.0.0" # important
    spec:
      securityContext:
        runAsUser: 10000
        runAsNonRoot: true
      containers:
        - name: super-api
          image: ghcr.io/gbaeke/super:1.0.7
          securityContext:
            readOnlyRootFilesystem: true
            capabilities:
              drop:
                - all
          args: ["--port=8080"]
          ports:
            - name: http
              containerPort: 8080
              protocol: TCP
          env:
            - name: IPADDRESS
              valueFrom:
                fieldRef:
                  fieldPath: status.podIP
            - name: WELCOME
              value: "Hello from the Super API on AKS!!! IP is: $(IPADDRESS)"
            - name: LOG
              value: "true"       
          resources:
              requests:
                memory: "64Mi"
                cpu: "50m"
              limits:
                memory: "64Mi"
                cpu: "50m"
          livenessProbe:
            httpGet:
              path: /healthz
              port: 8080
            initialDelaySeconds: 5
            periodSeconds: 15
          readinessProbe:
              httpGet:
                path: /readyz
                port: 8080
              initialDelaySeconds: 5
              periodSeconds: 15

Note the annotations in the manifest above:

  • dapr.io/enabled: injects the Dapr sidecar in the pods
  • dapr.io/app-id: a Dapr app needs an id; a service will automatically be created with that id and -dapr appended; in our case the name will be super-api-dapr; our ingress will forward traffic to this service
  • dapr.io/app-port: Dapr will need to call endpoints in our app (after authentication in this case) so it needs the port that our app container uses
  • dapr.io/config: refers to the configuration we created above, which enables the http middleware defined by our OAuth component
  • dapr.io/sidecar-listen-addresses: ⚠️ needs to be set to “0.0.0.0”; without this setting, we will not be able to send requests to the Dapr sidecar directly from the Ingress Controller

Submit the app manifest with kubectl apply -f.

Check that the pod has two containers: the Dapr sidecar and your app container. Also check that there is a service called super-api-dapr. There is no need to create your own service. Our ingress will forward traffic to this service.

Create an ingress

In the same namespace as the app (default), create an ingress. This requires the ingress-nginx Ingress Controller we installed earlier:

apiVersion: networking.k8s.io/v1
kind: Ingress
metadata:
  name: super-api-ingress
  namespace: default
  annotations:
    nginx.ingress.kubernetes.io/rewrite-target: /
spec:
  ingressClassName: nginx
  tls:
    - hosts:
      - app.YOUR-IP.nip.io
      secretName: tls-secret 
  rules:
  - host: app.YOUR-IP.nip.io
    http:
      paths:
      - pathType: Prefix
        path: "/"
        backend:
          service:
            name: super-api-dapr
            port: 
              number: 80

Replace YOUR-IP with the public IP address of the Ingress Controller.

For this to work, you also need a secret with a certificate. Use the following commands:

openssl req -x509 -nodes -days 365 -newkey rsa:2048 -keyout tls.key -out tls.crt -subj "/CN=app.YOUR-IP.nip.io"
kubectl create secret tls tls-secret --key tls.key --cert tls.crt

Replace YOUR-IP as above.

Testing the configuration

Let’s use the browser to connect to the /source endpoint. You will need to use the Dapr invoke API because the request will be sent to the Dapr sidecar. You need to speak a language that Dapr understands! The sidecar will just call http://localhost:8080/source and send back the response. It will only call the endpoint when authentication has succeeded, otherwise you will be redirected.

Use the following URL in the browser. It’s best to use an incognito session or private window.

https://app.20.103.17.249.nip.io/v1.0/invoke/super-api/method/source

Your browser will warn you of security risks because the certificate is not trusted. Proceed anyway! 😉

Note: we could use some URL rewriting on the ingress to avoid having to use /v1.0/invoke etc… You can also use different URL formats. See the docs.

You should get an authentication screen which indicates that the Dapr configuration is doing its thing:

Redirection to the authorize URL

After successful authentication, you should see the response from the /source endpoint of super-api:

Response from /source

The response contains an Authorization header. The header contains a JWT after the word Bearer. You can paste that JWT in https://jwt.io to see its content. We can only access the app with a valid token. That’s all we do in this case, ensuring only authenticated users can access our app.

Conclusion

In this article, we used Dapr to secure access to an app without having to modify the app itself. The source code of super-api was not changed in any way to enable this functionality. Via a component and a configuration, we instructed our app’s Dapr sidecar to do all this work for us. App endpoints such as /source are only called when there is a valid token. When there is such a token, it is saved in a header of your choice.

It is important to note that we have to send HTTP requests to our app’s sidecar for this to work. To enable this, we instructed the sidecar to listen on all IP addresses of the pod, not just 127.0.0.1. That allows us to send HTTP requests to the service that Dapr creates for the app. The ingress forwards requests to the Dapr service directly. That also means that you have to call your endpoint via the Dapr invoke API. I admit that can be confusing in the beginning. 😉

Note that, at the time of this writing (June 2022), the OAuth2 middleware in Dapr is in an alpha state.

Quick Guide to Flux v2 on AKS

Now that the Flux v2 extension for Azure Kubernetes Service and Azure Arc is generally available, let’s do a quick guide on the topic. A Quick Guide, at least on this site 😉, is a look at the topic from a command-line perspective for easy reproduction and evaluation.

This Quick Guide is also on GitHub.

Requirements

You need the following to run the commands:

  • An Azure subscription with a deployed AKS cluster; a single node will do
  • Azure CLI and logged in to the subscription with owner access
  • All commands run in bash, in my case in WSL 2.0 on Windows 11
  • kubectl and a working kube config (use az aks get-credentials)

Step 1: Register AKS-ExtensionManager and configure Azure CLI

Flux v2 is installed via an extension. The extension takes care of installing Flux controllers in the cluster and keeping them up-to-date when there is a new version. For extensions to work with AKS, you need to register the AKS-ExtensionManager feature in the Microsoft.ContainerService namespace.

# register the feature
az feature register --namespace Microsoft.ContainerService --name AKS-ExtensionManager

# after a while, check if the feature is registered
# the command below should return "state": "Registered"
az feature show --namespace Microsoft.ContainerService --name AKS-ExtensionManager | grep Registered

# ensure you run Azure CLI 2.15 or later
# the command will show the version; mine showed 2.36.0
az version | grep '"azure-cli"'

# register the following providers; if these providers are already
# registered, it is safe to run the commands again

az provider register --namespace Microsoft.Kubernetes
az provider register --namespace Microsoft.ContainerService
az provider register --namespace Microsoft.KubernetesConfiguration

# enable CLI extensions or upgrade if there is a newer version
az extension add -n k8s-configuration --upgrade
az extension add -n k8s-extension --upgrade

# check your Azure CLI extensions
az extension list -o table

Step 2: Install Flux v2

We can now install Flux v2 on an existing cluster. There are two types of clusters:

  • managedClusters: AKS
  • connectedClusters: Azure Arc-enabled clusters

To install Flux v2 on AKS and check the configuration, run the following commands:

RG=rg-aks
CLUSTER=clu-pub

# list installed extensions
az k8s-extension list -g $RG -c $CLUSTER -t managedClusters

# install flux; note that the name (-n) is a name you choose for
# the extension instance; the command will take some time
# this extension will be installed with cluster-wide scope

az k8s-extension create -g $RG -c $CLUSTER -n flux --extension-type microsoft.flux -t managedClusters --auto-upgrade-minor-version true

# list Kubernetes namespaces; there should be a flux-system namespace
kubectl get ns

# get pods in the flux-system namespace
kubectl get pods -n flux-system

The last command shows all the pods in the flux-system namespace. If you have worked with Flux without the extension, you will notice four familiar pods (deployments):

  • Kustomize controller: installs manifests (.yaml files) from configured sources, optionally using kustomize
  • Helm controller: installs Helm charts
  • Source controller: configures sources such as git or Helm repositories
  • Notification controller: handles notifications such as those sent to Teams or Slack

Microsoft adds two other services:

  • Flux config agent: communication with the data plane (Azure); reports back information to Azure about the state of Flux such as reconciliations
  • Flux configuration controller: manages Flux on the cluster; checks for Flux Configurations that you create with the Azure CLI

Step 3: Create a Flux configuration

Now that Flux is installed, we can create a Flux configuration. Note that Flux configurations are not native to Flux. A Flux configuration is an abstraction, created by Microsoft, that configures Flux sources and customizations for you. You can create these configurations from the Azure CLI. The configuration below uses a git repository https://github.com/gbaeke/gitops-flux2-quick-guide. It is a fork of https://github.com/Azure/gitops-flux2-kustomize-helm-mt.

⚠️ In what follows, we create a Flux configuration based on the Microsoft sample repo. If you want to create a repo and resources from scratch, see the Quick Guides on GitHub.

# create the configuration; this will take some time
az k8s-configuration flux create -g $RG -c $CLUSTER \
  -n cluster-config --namespace cluster-config -t managedClusters \
  --scope cluster \
  -u https://github.com/gbaeke/gitops-flux2-quick-guide \
  --branch main  \
  --kustomization name=infra path=./infrastructure prune=true \
  --kustomization name=apps path=./apps/staging prune=true dependsOn=["infra"]

# check namespaces; there should be a cluster-config namespace
kubectl get ns

# check the configuration that was created in the cluster-config namespace
# this is a resource of type FluxConfig
# in the spec, you will find a gitRepository and two kustomizations

kubectl get fluxconfigs cluster-config -o yaml -n cluster-config

# the Microsoft flux controllers create the git repository source
# and the two kustomizations based on the flux config created above
# they also report status back to Azure

# check the git repository; this is a resource of kind GitRepository
# the Flux source controller uses the information in this
# resource to download the git repo locally

kubectl get gitrepo cluster-config -o yaml -n cluster-config

# check the kustomizations
# the infra kustomization uses folder ./infrastructure in the
# git repository to install redis and nginx with Helm charts
# this kustomization creates other Flux resources such as
# Helm repos and Helm Releases; the Helm Releases are used
# to install nginx and redis with their respective Helm
# charts

kubectl get kustomizations cluster-config-infra -o yaml -n cluster-config

# the app kustomization depends on infra and uses the ./apps
# folder in the repo to install the podinfo application via
# a kustomize overlay (staging)

kubectl get kustomizations cluster-config-apps -o yaml -n cluster-config

In the portal, you can check the configuration:

Flux config in the Azure Portal

The two kustomizations that you created, create other configuration objects such as Helm repositories and Helm releases. They too can be checked in the portal:

Configuration objects in the Azure Portal

Conclusion

With the Flux extension, you can install Flux on your cluster and keep it up-to-date. The extension not only installs the Flux open source components. It also installs Microsoft components that enable you to create Flux Configurations and report back status to the portal. Flux Configurations are an abstraction on top of Flux, that makes adding sources and kustomizations easier and more integrated with Azure.

Quick Guide to Azure Container Apps

Now that Azure Container Apps (ACA) is generally available, it is time for a quick guide. These quick guides illustrate how to work with a service from the command line and illustrate the main features.

Prerequisites

  • All commands are run from bash in WSL 2 (Windows Subsystem for Linux 2 on Windows 11)
  • Azure CLI and logged in to an Azure subscription with an Owner role (use az login)
  • ACA extension for Azure CLI: az extension add --name containerapp --upgrade
  • Microsoft.App namespace registered: az provider register --namespace Microsoft.App; this namespace is used since March
  • If you have never used Log Analytics, also register Microsoft.OperationalInsights: az provider register --namespace Microsoft.OperationalInsights
  • jq, curl, sed, git

With that out of the way, let’s go… 🚀

Step 1: Create an ACA environment

First, create a resource group, Log Analytics workspace, and the ACA environment. An ACA environment runs multiple container apps and these apps can talk to each other. You can create multiple environments, for example for different applications or customers. We will create an environment that will not integrate with an Azure Virtual Network.

RG=rg-aca
LOCATION=westeurope
ENVNAME=env-aca
LA=la-aca # log analytics workspace name

# create the resource group
az group create --name $RG --location $LOCATION

# create the log analytics workspace
az monitor log-analytics workspace create \
  --resource-group $RG \
  --workspace-name $LA

# retrieve workspace ID and secret
LA_ID=`az monitor log-analytics workspace show --query customerId -g $RG -n $LA -o tsv | tr -d '[:space:]'`

LA_SECRET=`az monitor log-analytics workspace get-shared-keys --query primarySharedKey -g $RG -n $LA -o tsv | tr -d '[:space:]'`

# check workspace ID and secret; if empty, something went wrong
# in previous two steps
echo $LA_ID
echo $LA_SECRET

# create the ACA environment; no integration with a virtual network
az containerapp env create \
  --name $ENVNAME \
  --resource-group $RG\
  --logs-workspace-id $LA_ID \
  --logs-workspace-key $LA_SECRET \
  --location $LOCATION \
  --tags env=test owner=geert

# check the ACA environment
az containerapp env list -o table

Step 2: Create a front-end container app

The front-end container app accepts requests that allow users to store some data. Data storage will be handled by a back-end container app that talks to Cosmos DB.

The front-end and back-end use Dapr. This does the following:

  • Name resolution: the front-end can find the back-end via the Dapr Id of the back-end
  • Encryption: traffic between the front-end and back-end is encrypted
  • Simplify saving state to Cosmos DB: using a Dapr component, the back-end can easily save state to Cosmos DB without getting bogged down in Cosmos DB specifics and libraries

Check the source code on GitHub. For example, the code that saves to Cosmos DB is here.

For a container app to use Dapr, two parameters are needed:

  • –enable-dapr: enables the Dapr sidecar container next to the application container
  • –dapr-app-id: provides a unique Dapr Id to your service
APPNAME=frontend
DAPRID=frontend # could be different
IMAGE="ghcr.io/gbaeke/super:1.0.5" # image to deploy
PORT=8080 # port that the container accepts requests on

# create the container app and make it available on the internet
# with --ingress external; the envoy proxy used by container apps
# will proxy incoming requests to port 8080

az containerapp create --name $APPNAME --resource-group $RG \
--environment $ENVNAME --image $IMAGE \
--min-replicas 0 --max-replicas 5 --enable-dapr \
--dapr-app-id $DAPRID --target-port $PORT --ingress external

# check the app
az containerapp list -g $RG -o table

# grab the resource id of the container app
APPID=$(az containerapp list -g $RG | jq .[].id -r)

# show the app via its id
az containerapp show --ids $APPID

# because the app has an ingress type of external, it has an FQDN
# let's grab the FQDN (fully qualified domain name)
FQDN=$(az containerapp show --ids $APPID | jq .properties.configuration.ingress.fqdn -r)

# curl the URL; it should return "Hello from Super API"
curl https://$FQDN

# container apps work with revisions; you are now at revision 1
az containerapp revision list -g $RG -n $APPNAME -o table

# let's deploy a newer version
IMAGE="ghcr.io/gbaeke/super:1.0.7"

# use update to change the image
# you could also run the create command again (same as above but image will be newer)
az containerapp update -g $RG --ids $APPID --image $IMAGE

# look at the revisions again; the new revision uses the new
# image and 100% of traffic
# NOTE: in the portal you would only see the last revision because
# by default, single revision mode is used; switch to multiple 
# revision mode and check "Show inactive revisions"

az containerapp revision list -g $RG -n $APPNAME -o table

Step 3: Deploy Cosmos DB

We will not get bogged down in Cosmos DB specifics and how Dapr interacts with it. The commands below create an account, database, and collection. Note that I switched the write replica to eastus because of capacity issues in westeurope at the time of writing. That’s ok. Our app will write data to Cosmos DB in that region.

uniqueId=$RANDOM
LOCATION=useast # changed because of capacity issues in westeurope at the time of writing

# create the account; will take some time
az cosmosdb create \
  --name aca-$uniqueId \
  --resource-group $RG \
  --locations regionName=$LOCATION \
  --default-consistency-level Strong

# create the database
az cosmosdb sql database create \
  -a aca-$uniqueId \
  -g $RG \
  -n aca-db

# create the collection; the partition key is set to a 
# field in the document called partitionKey; Dapr uses the
# document id as the partition key
az cosmosdb sql container create \
  -a aca-$uniqueId \
  -g $RG \
  -d aca-db \
  -n statestore \
  -p '/partitionKey' \
  --throughput 400

Step 4: Deploy the back-end

The back-end, like the front-end, uses Dapr. However, the back-end uses Dapr to connect to Cosmos DB and this requires extra information:

  • a Dapr Cosmos DB component
  • a secret with the connection string to Cosmos DB

Both the component and the secret are defined at the Container Apps environment level via a component file.

# grab the Cosmos DB documentEndpoint
ENDPOINT=$(az cosmosdb list -g $RG | jq .[0].documentEndpoint -r)

# grab the Cosmos DB primary key
KEY=$(az cosmosdb keys list -g $RG -n aca-$uniqueId | jq .primaryMasterKey -r)

# update variables, IMAGE and PORT are the same
APPNAME=backend
DAPRID=backend # could be different

# create the Cosmos DB component file
# it uses the ENDPOINT above + database name + collection name
# IMPORTANT: scopes is required so that you can scope components
# to the container apps that use them

cat << EOF > cosmosdb.yaml
componentType: state.azure.cosmosdb
version: v1
metadata:
- name: url
  value: "$ENDPOINT"
- name: masterkey
  secretRef: cosmoskey
- name: database
  value: aca-db
- name: collection
  value: statestore
secrets:
- name: cosmoskey
  value: "$KEY"
scopes:
- $DAPRID
EOF

# create Dapr component at the environment level
# this used to be at the container app level
az containerapp env dapr-component set \
    --name $ENVNAME --resource-group $RG \
    --dapr-component-name cosmosdb \
    --yaml cosmosdb.yaml

# create the container app; the app needs an environment 
# variable STATESTORE with a value that is equal to the 
# dapr-component-name used above
# ingress is internal; there is no need to connect to the backend from the internet

az containerapp create --name $APPNAME --resource-group $RG \
--environment $ENVNAME --image $IMAGE \
--min-replicas 1 --max-replicas 1 --enable-dapr \
--dapr-app-port $PORT --dapr-app-id $DAPRID \
--target-port $PORT --ingress internal \
--env-vars STATESTORE=cosmosdb


Step 5: Verify end-to-end connectivity

We will use curl to call the following endpoint on the front-end: /call. The endpoint expects the following JSON:

{
 "appId": <DAPR Id to call method on>,
 "method": <method to call>,
 "httpMethod": <HTTP method to use e.g., POST>,
 "payload": <payload with key and data field as expected by Dapr state component>
}
 

As you have noticed, both container apps use the same image. The app was written in Go and implements both the /call and /savestate endpoints. It uses the Dapr SDK to interface with the Dapr sidecar that Azure Container Apps has added to our deployment.

To make the curl commands less horrible, we will use jq to generate the JSON to send in the payload field. Do not pay too much attention to the details. The important thing is that we save some data to Cosmos DB and that you can use Cosmos DB Data Explorer to verify.

# create some string data to send
STRINGDATA="'$(jq --null-input --arg appId "backend" --arg method "savestate" --arg httpMethod "POST" --arg payload '{"key": "mykey", "data": "123"}' '{"appId": $appId, "method": $method, "httpMethod": $httpMethod, "payload": $payload}' -c -r)'"

# check the string data (double quotes should be escaped in payload)
# payload should be a string and not JSON, hence the quoting
echo $STRINGDATA

# call the front end to save some data
# in Cosmos DB data explorer, look for a document with id 
# backend||mykey; content is base64 encoded because 
# the data is not json

echo curl -X POST -d $STRINGDATA https://$FQDN/call | bash

# create some real JSON data to save; now we need to escape the
# double quotes and jq will add extra escapes
JSONDATA="'$(jq --null-input --arg appId "backend" --arg method "savestate" --arg httpMethod "POST" --arg payload '{"key": "myjson", "data": "{\"name\": \"geert\"}"}' '{"appId": $appId, "method": $method, "httpMethod": $httpMethod, "payload": $payload}' -c -r)'"

# call the front end to save the data
# look for a document id backend||myjson; data is json

echo curl -v -X POST -d $JSONDATA https://$FQDN/call | bash

Step 6: Check the logs

Although you can use the Log Stream option in the portal, let’s use the command line to check the logs of both containers.

# check frontend logs
az containerapp logs show -n frontend -g $RG

# I want to see the dapr logs of the container app
az containerapp logs show -n frontend -g $RG --container daprd

# if you do not see log entries about our earlier calls, save data again
# the log stream does not show all logs; log analytics contains more log data
echo curl -v -X POST -d $JSONDATA https://$FQDN/call | bash

# now let's check the logs again but show more earlier logs and follow
# there should be an entry method with custom content; that's the
# result of saving the JSON data

az containerapp logs show -n frontend -g $RG --tail 300 --follow


Step 7: Use az containerapp up

In the previous steps, we used a pre-built image stored in GitHub container registry. As a developer, you might want to quickly go from code to deployed container to verify if it all works in the cloud. The command az containerapp up lets you do that. It can do the following things automatically:

  • Create an Azure Container Registry (ACR) to store container images
  • Send your source code to ACR and build and push the image in the cloud; you do not need Docker on your computer
  • Alternatively, you can point to a GitHub repository and start from there; below, we first clone a repo and start from local sources with the –source parameter
  • Create the container app in a new environment or use an existing environment; below, we use the environment created in previous steps
# clone the super-api repo and cd into it
git clone https://github.com/gbaeke/super-api.git && cd super-api

# checkout the quickguide branch
git checkout quickguide

# bring up the app; container build will take some time
# add the --location parameter to allow az containerapp up to 
# create resources in the specified location; otherwise it uses
# the default location used by the Azure CLI
az containerapp up -n super-api --source . --ingress external --target-port 8080 --environment env-aca

# list apps; super-api has been added with a new external Fqdn
az containerapp list -g $RG -o table

# check ACR in the resource group
az acr list -g $RG -o table

# grab the ACR name
ACR=$(az acr list -g $RG | jq .[0].name -r)

# list repositories
az acr repository list --name $ACR

# more details about the repository
az acr repository show --name $ACR --repository super-api

# show tags; az containerapp up uses numbers based on date and time
az acr repository show-tags --name $ACR --repository super-api

# make a small change to the code; ensure you are still in the
# root of the cloned repo; instead of Hello from Super API we
# will say Hi from Super API when curl hits the /
sed -i s/Hello/Hi/g cmd/app/main.go

# run az containerapp up again; a new container image will be
# built and pushed to ACR and deployed to the container app
az containerapp up -n super-api --source . --ingress external --target-port 8080 --environment env-aca

# check the image tags; there are two
az acr repository show-tags --name $ACR --repository super-api

# curl the endpoint; should say "Hi from Super API"
curl https://$(az containerapp show -g $RG -n super-api | jq .properties.configuration.ingress.fqdn -r)

Conclusion

In this quick guide (well, maybe not 😉) you have seen how to create an Azure Container Apps environment, add two container apps that use Dapr and used az containerapp up for a great inner loop dev experience.

I hope this was useful. If you spot errors, please let me know. Also check the quick guides on GitHub: https://github.com/gbaeke/quick-guides