Load balancing OpenAI API calls with LiteLLM

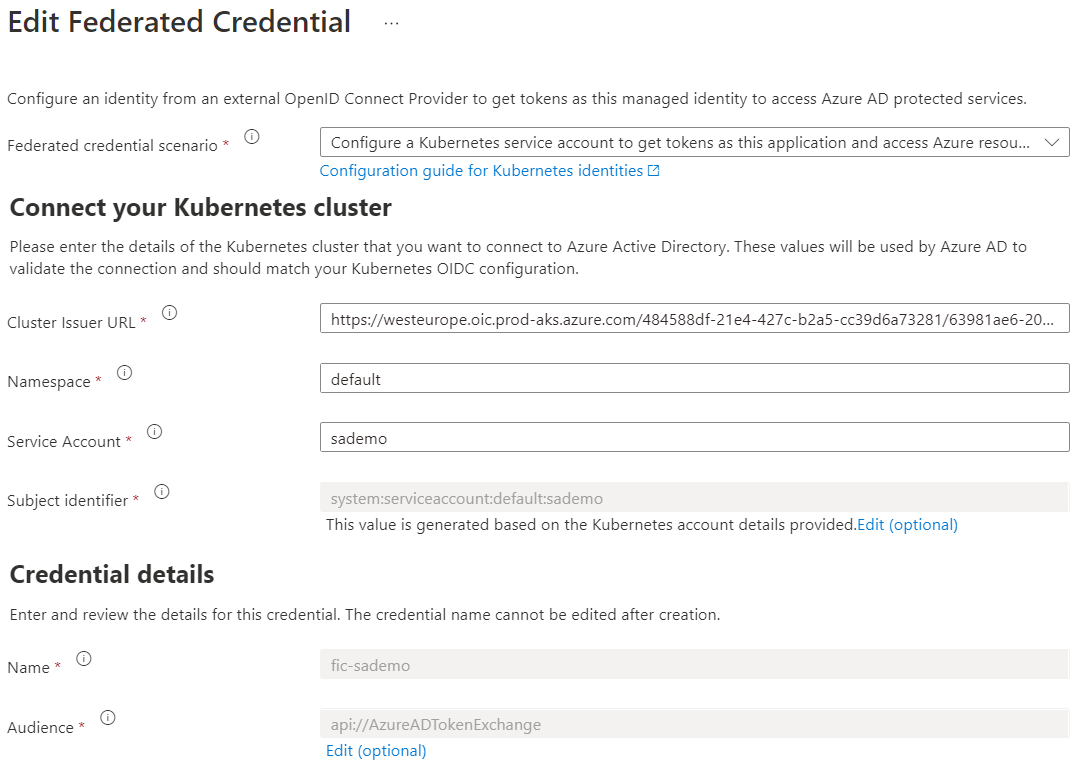
If you have ever created an application that makes calls to Azure OpenAI models, you know there are limits to the amount of calls you can make per minute. Take a look at the settings of a GPT model below:

GPT deployment settings

Above, the tokens per minute (TPM) rate limit is set to 60 000 tokens. This translates to about 360 requests per minute. When you exceed these limits, you get 429 Too Many Requests errors.

There are many ways to deal with these limits. A few of the main ones are listed below:

  • You can ask for a PAYGO quota increase: remember that high quotas do not necessarily lead to consistent lower-latency responses
  • You can use PTUs (provisioned throughput units): highly recommended if you want consistently quick responses with the lowest latency. Don’t we all? 😉
  • Your application can use retries with backoffs. Note that OpenAI libraries use automatic retries by default. For Python, it is set to two but that is configurable.
  • You can use multiple Azure OpenAI instances and load balance between them

In this post, we will take a look at implementing load balancing between OpenAI resources with an open source solution called LiteLLM. Note that, in Azure, you can also use Azure API Management. One example is discussed here. Use it if you must but know it is not simple to configure.

A look at LiteLLM

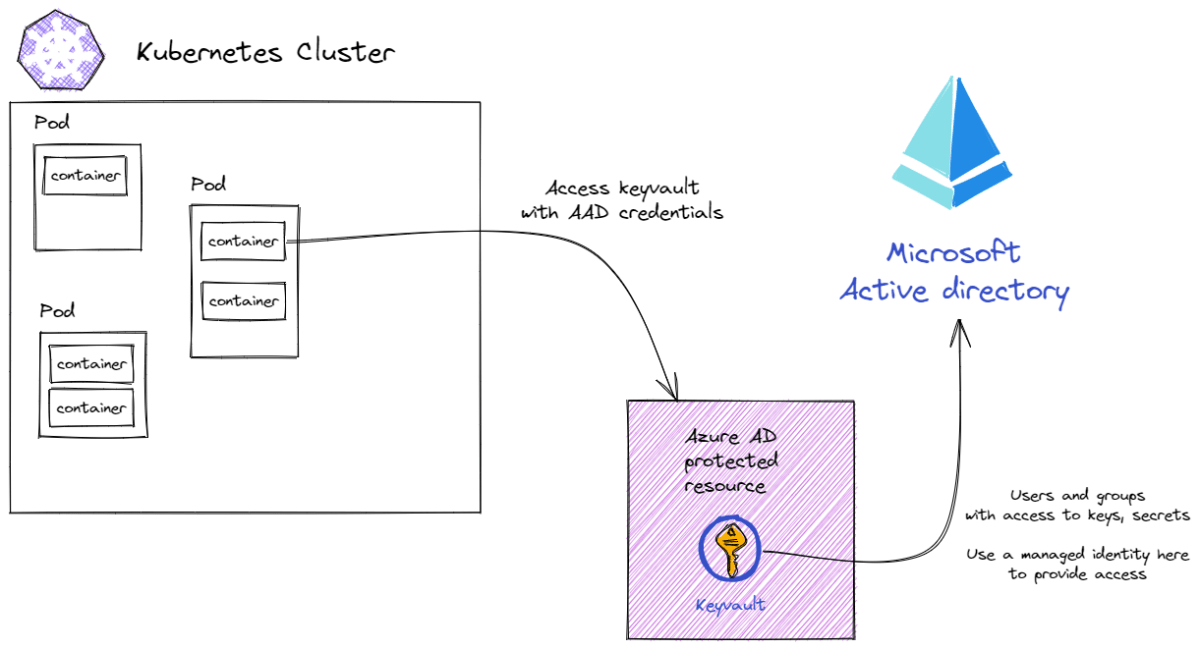
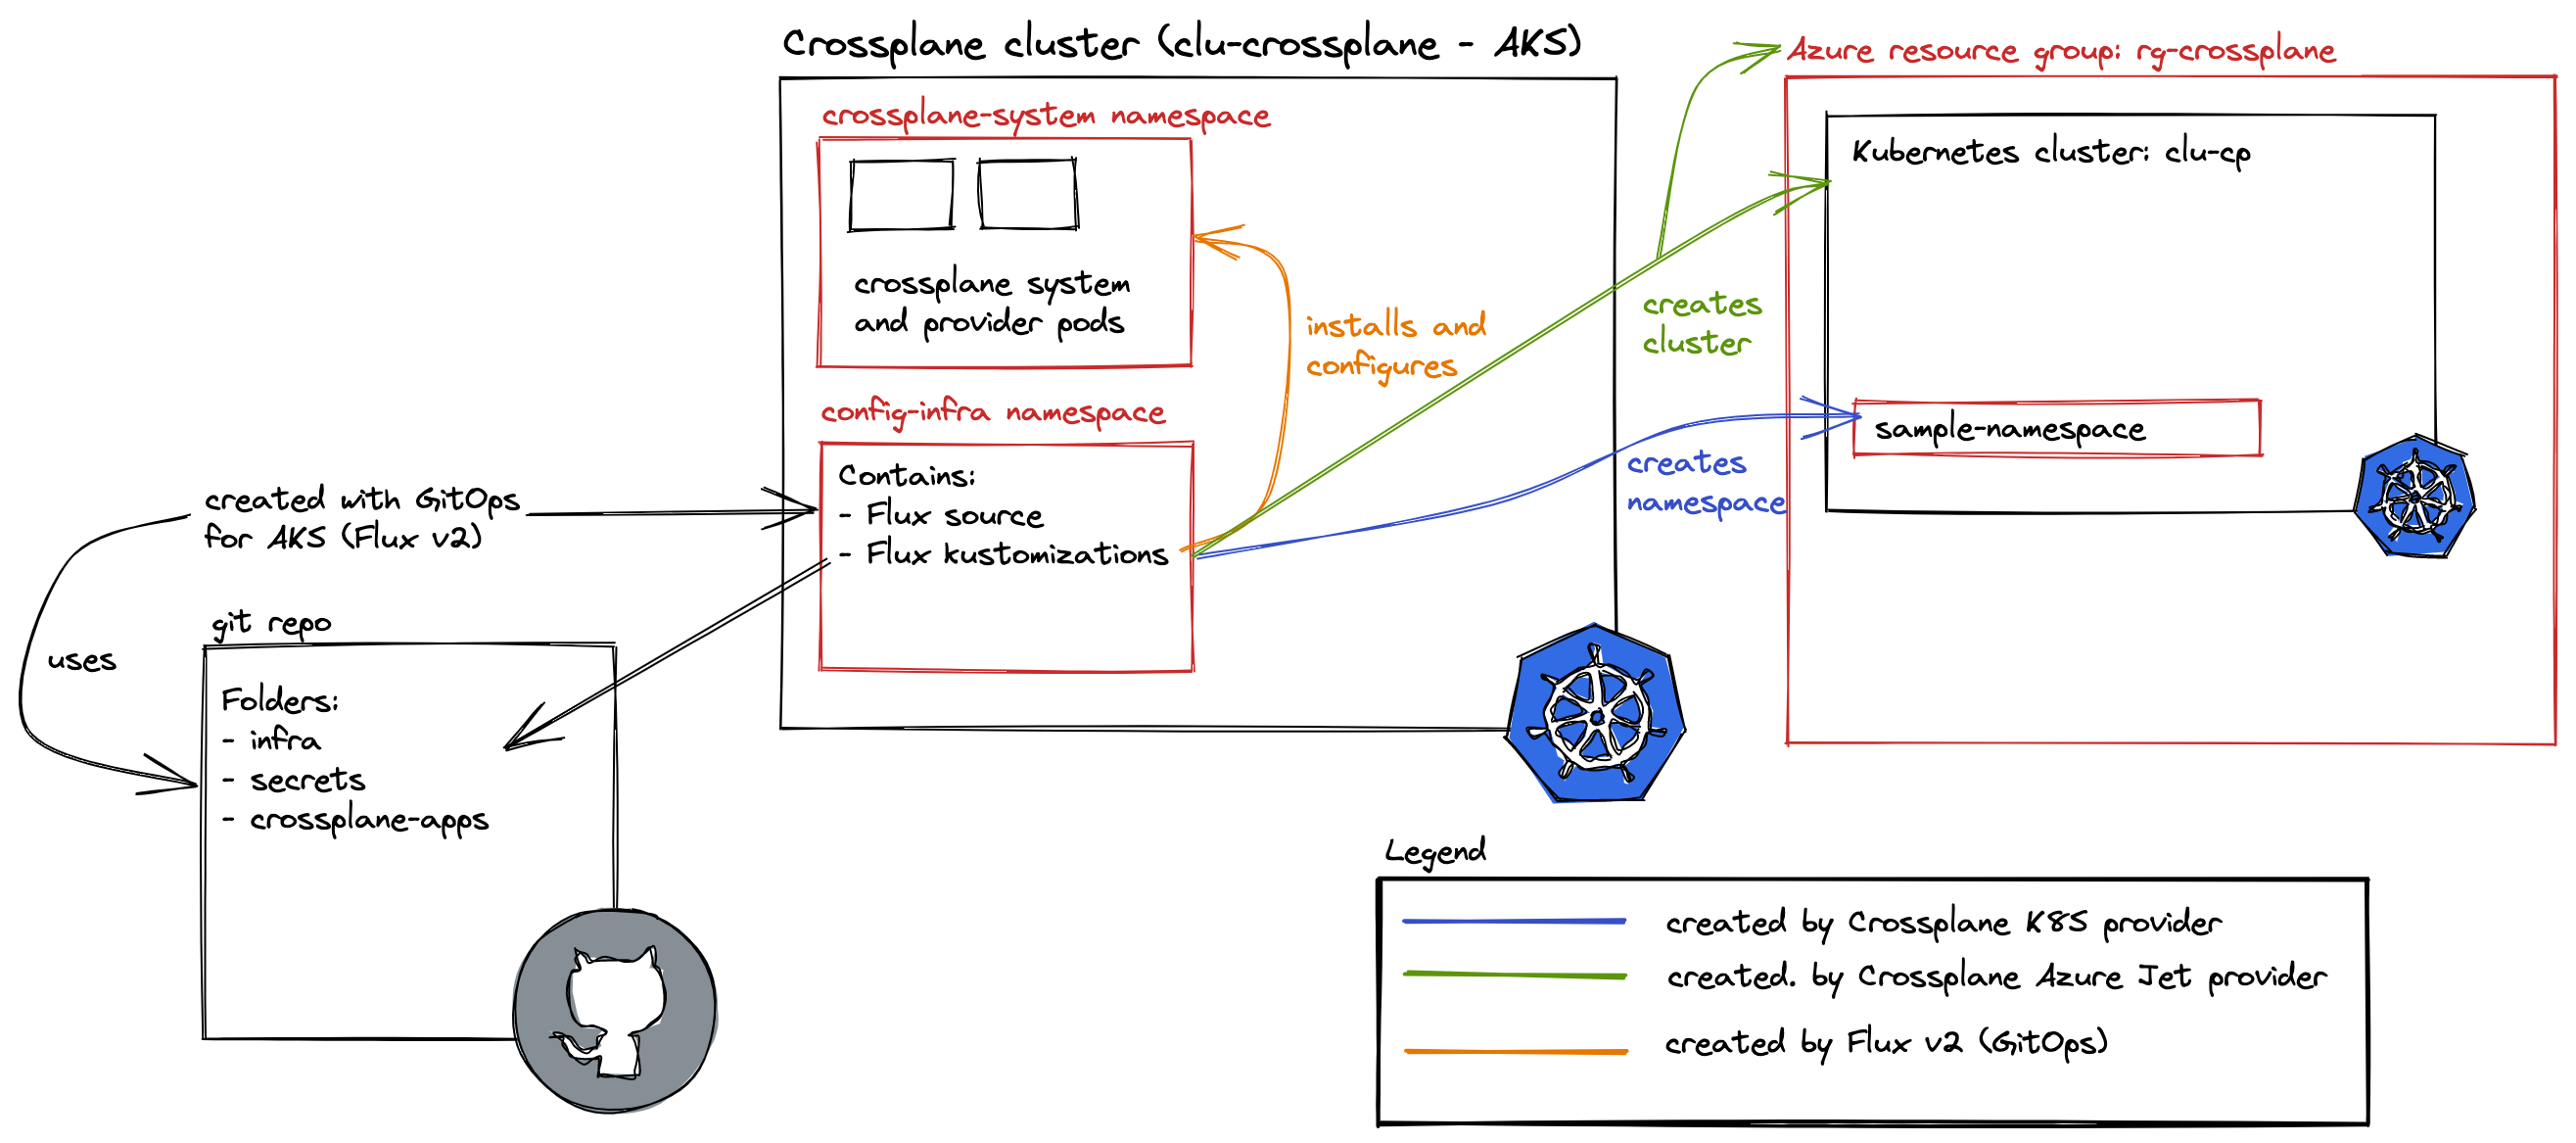
LiteLLM has many features. In this post, I will be implementing it as a standalone proxy, running as a container in Azure Kubernetes Service (AKS). The proxy is part of a larger application illustrated in the diagram below:

LLM-based document processor

The application above has an upload service that allows users to upload a PDF or other supported document. After storing the document in an Azure Storage Account container, the upload service sends a message to an Azure Service Bus topic. The process service uses those messages to process each file. One part of the process is the use of Azure OpenAI to extract fields from the document. For example, a supplier, document number or anything else.

To support the processing of many documents, multiple Azure OpenAI resources are used: one in France and one in Sweden. Both regions have the gpt-4-turbo model that we require.

The process service uses the Python OpenAI library in combination with the instructor library. Instructor is great for getting structured output from documents based on Pydantic classes. Below is a snippet of code:

from openai import OpenAI
import instructor

client = instructor.from_openai(OpenAI(
        base_url=azure_openai_endpoint,
        api_key=azure_openai_key
))

The only thing we need to do is to set the base_url to the LiteLLM proxy. The api_key is configurable. By default it is empty but you can configure a master key or even virtual keys for different teams and report on the use of these keys. More about that later.

The key point here is that LiteLLM is a transparent proxy that fully supports the OpenAI API. Your code does not have to change. The actual LLM does not have to be an OpenAI LLM. It can be Gemini, Claude and many others.

Let’s take a look at deploying the proxy in AKS.

Deploying LiteLLM on Kubernetes

Before deploying LiteLLM, we need to configure it via a config file. In true Kubernetes style, let’s do that with a ConfigMap:

apiVersion: v1
kind: ConfigMap
metadata:
  name: litellm-config-file
data:
  config.yaml: |
      model_list: 
        - model_name: gpt-4-preview
          litellm_params:
            model: azure/gpt-4-preview
            api_base: os.environ/SWE_AZURE_OPENAI_ENDPOINT
            api_key: os.environ/SWE_AZURE_OPENAI_KEY
          rpm: 300
        - model_name: gpt-4-preview
          litellm_params:
            model: azure/gpt-4-preview
            api_base: os.environ/FRA_AZURE_OPENAI_ENDPOINT
            api_key: os.environ/FRA_AZURE_OPENAI_KEY
          rpm: 360
      router_settings:
        routing_strategy: least-busy
        num_retries: 2
        timeout: 60                                  
        redis_host: redis
        redis_password: os.environ/REDIS_PASSWORD
        redis_port: 6379
      general_settings:
        master_key: os.environ/MASTER_KEY

The configuration contains a list of models. Above, there are two models with the same name: gpt-4-preview. Each model points to a deployed model in Azure with the same name (can be different) and its own API base and key. For example, the first model uses an API base and API key for my instance in Sweden. However, by using os.environ/ and appending an environment variable, we can tell LiteLLM to use an environment variable. Of course, that means we have to set these environment variables in the LiteLLM container. We will do that later.

When the code in the process service uses the gpt-4-preview model via the proxy, the proxy will perform load balancing based on the router settings.

To spin up more than one instance of LiteLLM, a Redis instance is required. Redis is used to share information between the instances to make routing decisions. The routing strategy is set to least-busy.

Note that retries is set to 2. You can turn off retries in your code and let the proxy handle this for you.

To support mounting the secrets as environment variables, I use a .env file in combination with a secretGenerator in Kustomize:

STORAGE_CONNECTION_STRING=<placeholder for storage connection string>
CONTAINER=<placeholder for container name>
AZURE_AI_ENDPOINT=<placeholder for Azure AI endpoint>
AZURE_AI_KEY=<placeholder for Azure AI key>
AZURE_OPENAI_ENDPOINT=<placeholder for Azure OpenAI endpoint>
AZURE_OPENAI_KEY=<placeholder for Azure OpenAI key>

LLM_LITE_SWE_AZURE_OPENAI_ENDPOINT=<placeholder for LLM Lite SWE Azure OpenAI endpoint>
LLM_LITE_SWE_AZURE_OPENAI_KEY=<placeholder for LLM Lite SWE Azure OpenAI key>

LLM_LITE_FRA_AZURE_OPENAI_ENDPOINT=<placeholder for LLM Lite FRA Azure OpenAI endpoint>
LLM_LITE_FRA_AZURE_OPENAI_KEY=<placeholder for LLM Lite FRA Azure OpenAI key>

TOPIC_KEY=<placeholder for topic key>
TOPIC_ENDPOINT=<placeholder for topic endpoint>
PUBSUB_NAME=<placeholder for pubsub name>
TOPIC_NAME=<placeholder for topic name>
SB_CONNECTION_STRING=<placeholder for Service Bus connection string>

REDIS_PASSWORD=<placeholder for Redis password>
MASTER_KEY=<placeholder for Cosmos DB master key>

POSTGRES_DB_URL=postgresql://USER:PASSWORD@SERVERNAME-pg.postgres.database.azure.com:5432/postgres

There are many secrets here. Some are for LiteLLM, although weirdly prefixed with LLM_LITE instead. I do that sometimes! The others are to support the upload and process services.

To get these values into secrets, I use the following kustomization.yaml:

apiVersion: kustomize.config.k8s.io/v1beta1
kind: Kustomization
namespace: inv-demo


resources:
- namespace.yaml
- pubsub.yaml
- upload.yaml
- process.yaml
- llmproxy.yaml
- redis.yaml

secretGenerator:
- name: invoices-secrets
  envs:
  - .env
  
generatorOptions:
  disableNameSuffixHash: true

The secretGenerator will create a secret called invoices-secrets in the inv-demo namespace. We can reference the secrets in the LiteLLM Kubernetes deployment:

apiVersion: apps/v1
kind: Deployment
metadata:
  name: litellm-deployment
  labels:
    app: litellm
spec:
  replicas: 2
  selector:
    matchLabels:
      app: litellm
  template:
    metadata:
      labels:
        app: litellm
    spec:
      containers:
      - name: litellm
        image: ghcr.io/berriai/litellm:main-latest
        args:
        - "--config"
        - "/app/proxy_server_config.yaml"
        ports:
        - containerPort: 4000
        volumeMounts:
        - name: config-volume
          mountPath: /app/proxy_server_config.yaml
          subPath: config.yaml
        env:
        - name: SWE_AZURE_OPENAI_ENDPOINT
          valueFrom:
            secretKeyRef:
              name: invoices-secrets
              key: LLM_LITE_SWE_AZURE_OPENAI_ENDPOINT
        - name: SWE_AZURE_OPENAI_KEY
          valueFrom:
            secretKeyRef:
              name: invoices-secrets
              key: LLM_LITE_SWE_AZURE_OPENAI_KEY
        - name: FRA_AZURE_OPENAI_ENDPOINT
          valueFrom:
            secretKeyRef:
              name: invoices-secrets
              key: LLM_LITE_FRA_AZURE_OPENAI_ENDPOINT
        - name: FRA_AZURE_OPENAI_KEY
          valueFrom:
            secretKeyRef:
              name: invoices-secrets
              key: LLM_LITE_FRA_AZURE_OPENAI_KEY
        - name: MASTER_KEY
          valueFrom:
            secretKeyRef:
              name: invoices-secrets
              key: MASTER_KEY
        - name: DATABASE_URL
          valueFrom:
            secretKeyRef:
              name: invoices-secrets
              key: POSTGRES_DB_URL
      volumes:
        - name: config-volume
          configMap:
            name: litellm-config-file

The ConfigMap content is mounted as /app/proxy_server_config.yaml. You need to specify the config file via the --config parameter, supplied in args.

Next, we simply mount all the environment variables that we need. The LiteLLM ConfigMap uses several of those via the os.environ references. There is also a DATABASE_URL that is not mentioned in the ConfigMap. The URL points to a PostgreSQL instance in Azure where information is kept to support the LiteLLM dashboard and other settings. If you do not want the dashboard feature, you can omit the database URL.

There’s one last thing: the process service needs to connect to LiteLLM via Kubernetes internal networking. Of course, that means we need a service:

apiVersion: v1
kind: Service
metadata:
  name: litellm-service
spec:
  selector:
    app: litellm
  ports:
  - protocol: TCP
    port: 80
    targetPort: 4000
  type: ClusterIP

With this service definition, the process service can set the OpenAI base URL as http://litellm-service to route all requests to the proxy via its internal IP address.

As you can probably tell from the kustomization.yaml file, the ConfigMap, Deployment and Service are in llmproxy.yaml. The other YAML files do the following:

  • namespace.yaml: creates the inv-demo namespace
  • upload.yaml: deploys the upload service (written in Python and uses FastAPI, 1 replica))
  • process.yaml: deploys the process service (written in Python as a Dapr grpc service, 2 replicas)
  • pubsub.yaml: creates a Dapr pubsub component that uses Azure Service Bus
  • redis.yaml: creates a standalone Redis instance to support multiple replicas of the LiteLLM proxy

To deploy all of the above, you just need to run the command below:

kubectl apply -k .

⚠️ Although this can be used in production, several shortcuts are taken. One thing that would be different is secrets management. Secrets would be in a Key Vault and made available to applications via the Secret Store CSI driver or other solutions.

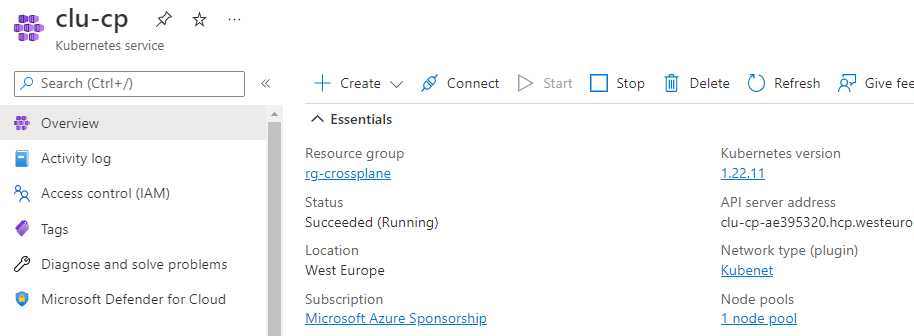
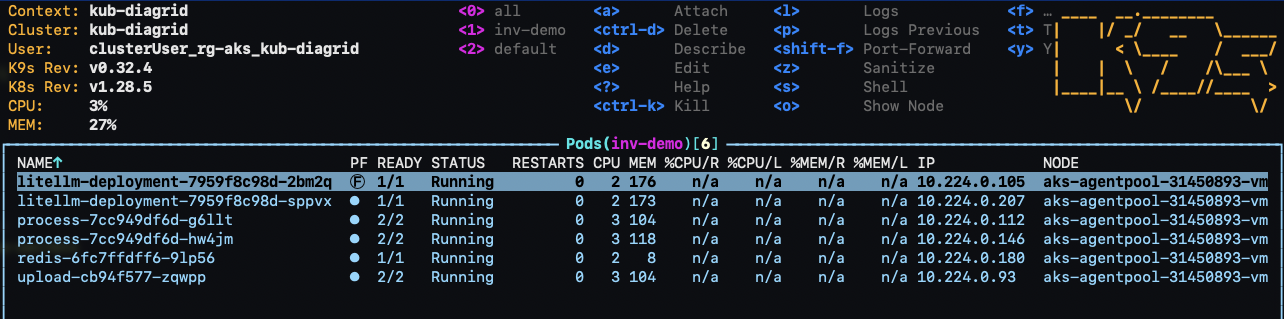
With everything deployed, I see the following in k9s:

The view from k9s

As a side note, I also use Diagrid to provide insights about the use of Dapr on the cluster:

upload and process are communicating via pubsub (Service Bus)

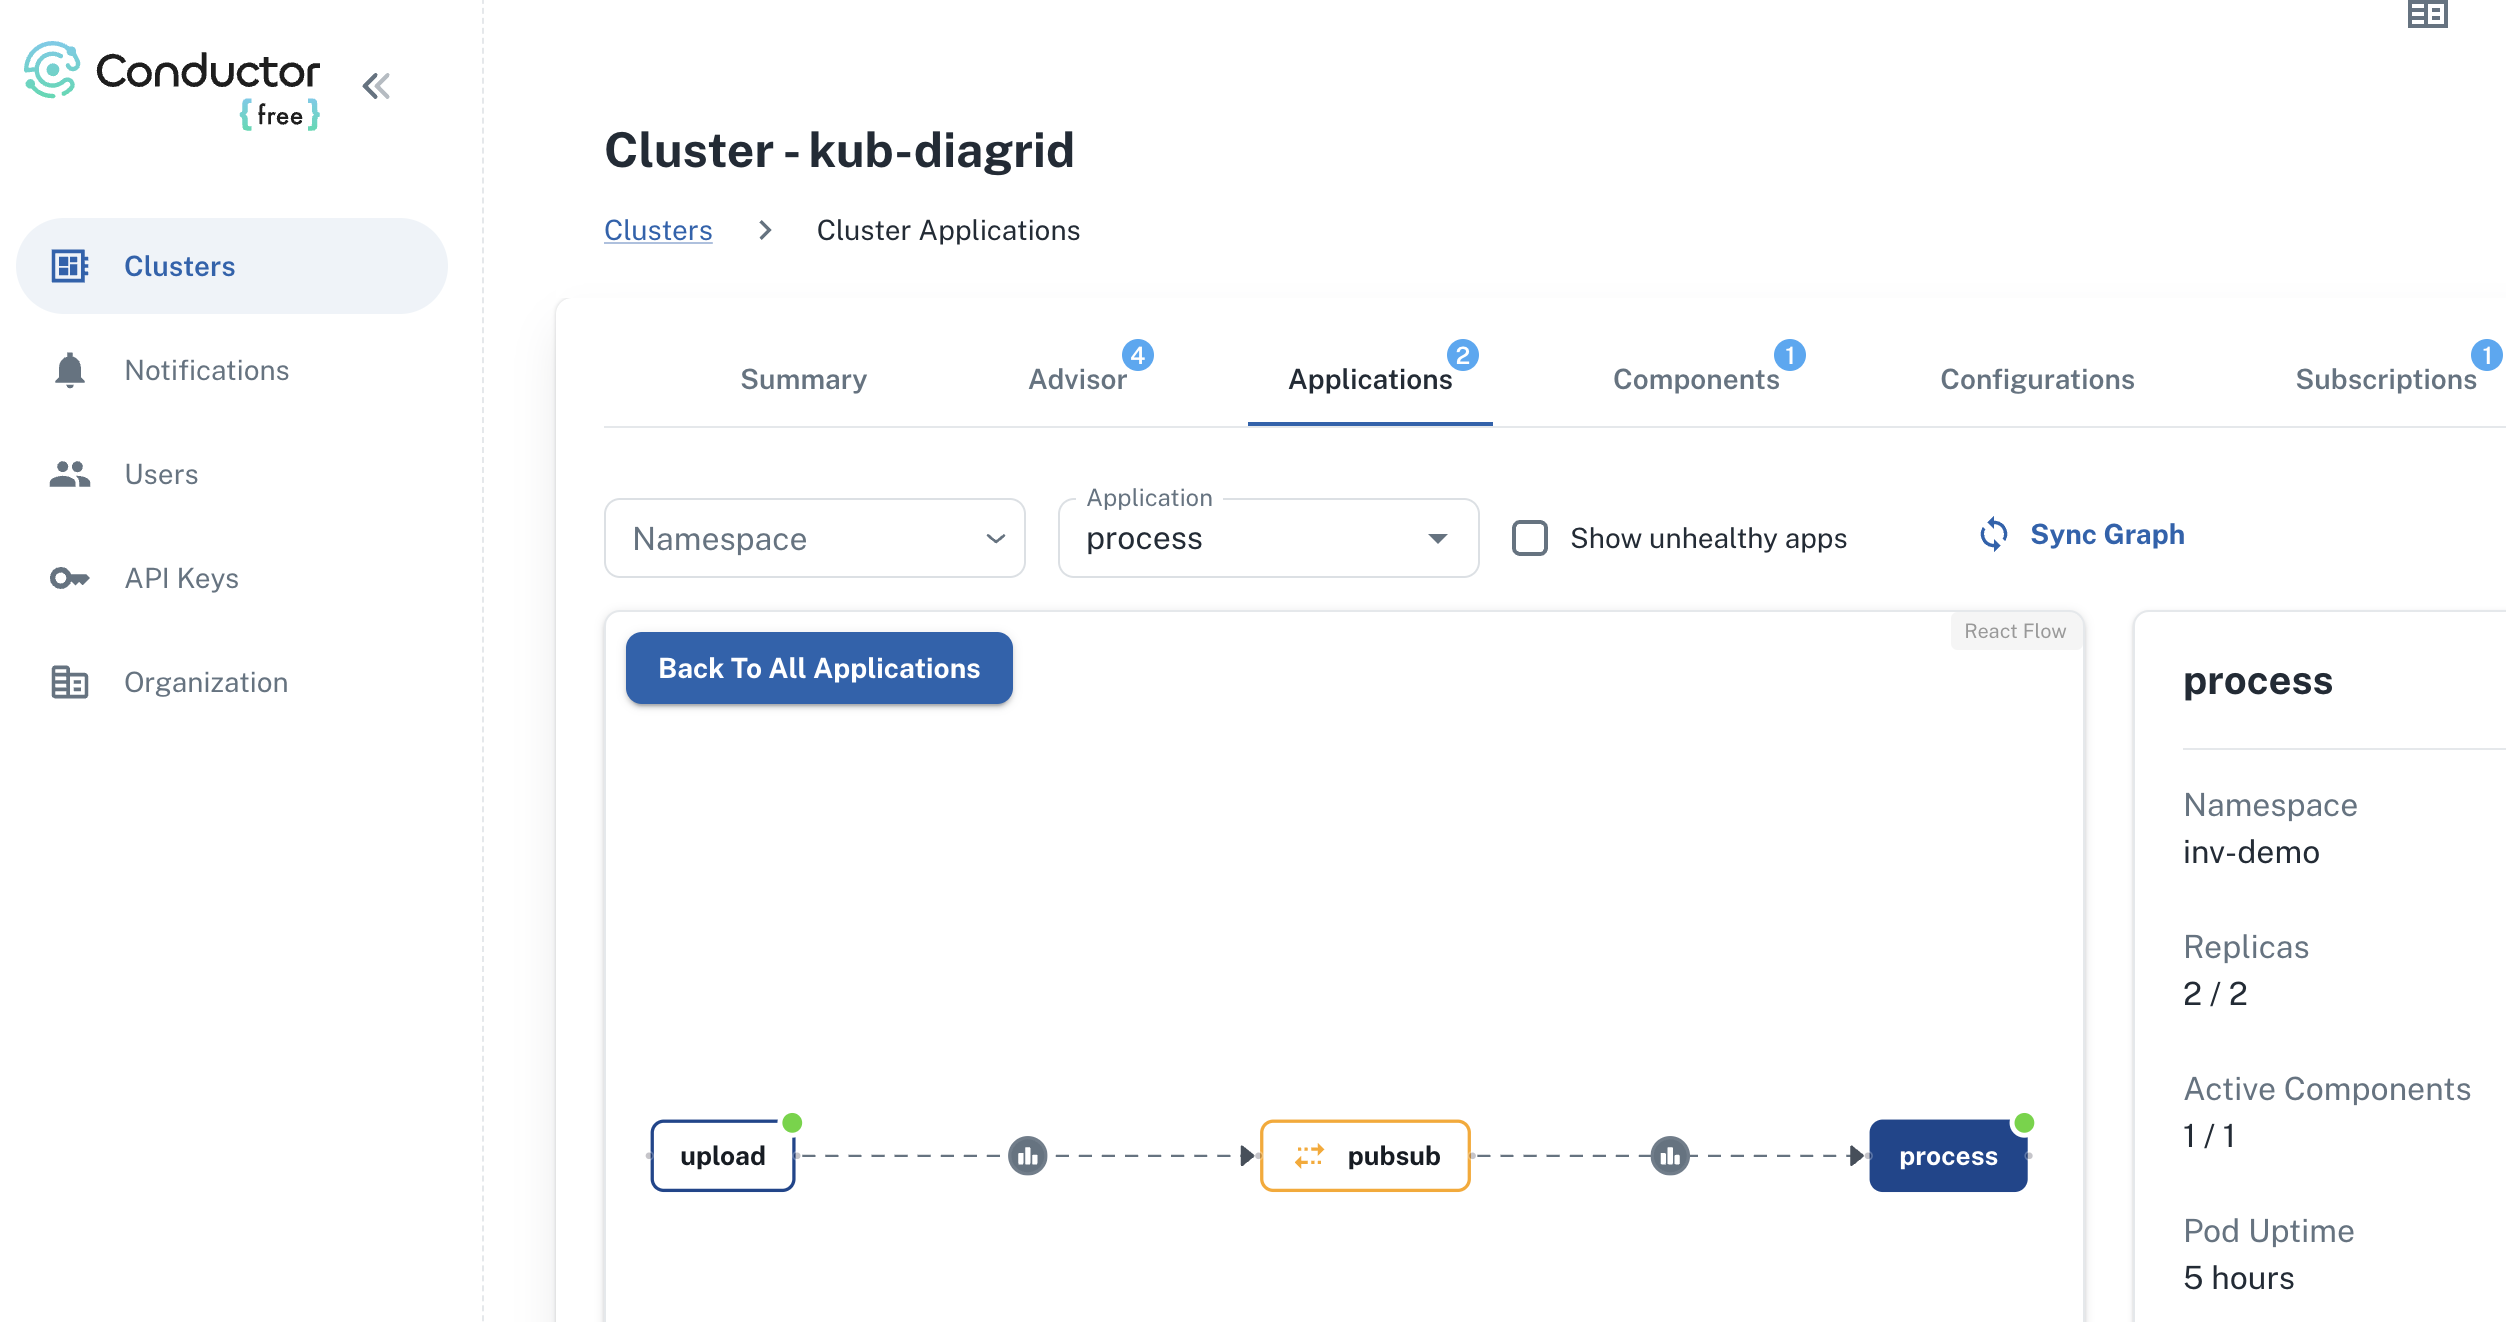
Dapr is only used between process and upload. The other services do not use Dapr and, as a result, are not visible here. The above is from Diagrid Conductor Free. As I said…. total side note! 🤷‍♂️

Back to the main topic…

The proxy in action

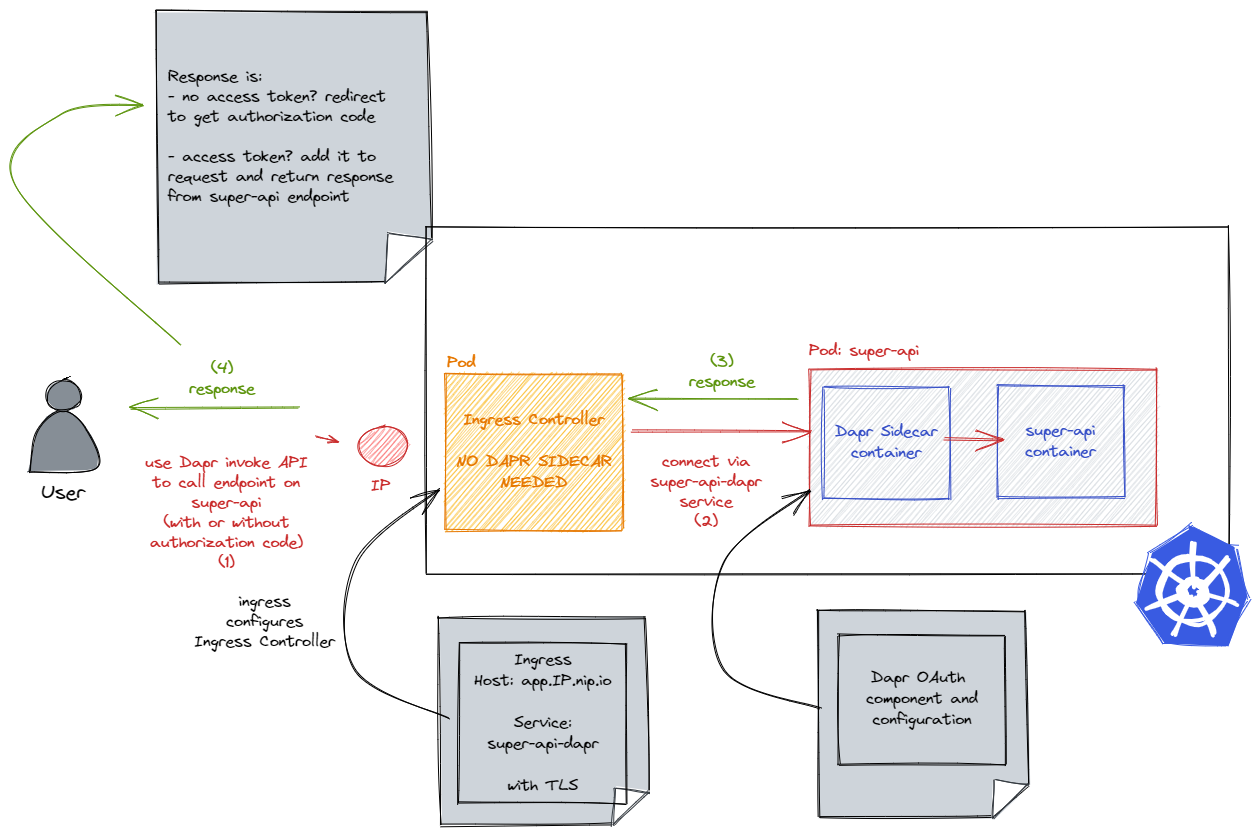
Let’s see if the proxy uses both Azure OpenAI instances. The dashboard below presents a view of the metrics after processing several documents:

OpenAI usage in France and Sweden

It’s clear that the proxy uses both resources. Remember that this is the least-busy routing option. It picks the deployment with the least number of ongoing calls. Both these instances are only used by the process service so the expectation is a more or less even distribution.

LiteLLM Dashboard

If you configured authentication in combination with providing a URL to a PostGreSQL database, you can access the dashboard. To see the dashboard in action without deploying it, see https://litellm.vercel.app/docs/proxy/demo.

One of the things you can do is creating teams. Below, you see a team called dev which has access to only the gpt-4-preview model with unlimited TPM and RPM:

dev team in LiteLLM

In addition to the team, a virtual key is created and assigned to the team. This virtual key starts with sk- and is used as the OpenAI API key in the process service:

LiteLLM virtual key for the dev team

We can now report on the use of OpenAI by the dev team:

Usage for the dev team

Above, there’s a small section that’s unassigned because I used LiteLLM without a key and a master key before switching to a team-based key.

The idea here is that you can deploy the LiteLLM proxy centrally and hand out virtual keys to teams so they can all access their models via the proxy. We have not tested this in a production setting yet but it is certainly something worth exploring.

Conclusion

I have only scratched the surface of LiteLLM here but my experience with it so far is pretty good. If you want to deploy it as a central proxy server that developers can use to access models, deployment to Kubernetes and other environments with the container image is straightforward.

In this post I used Kubernetes but that is not required. It runs in Container Apps and other container runtimes as well. In fact, you do not need to run it in a container at all. It also works as a standalone application or can be used directly in your Python apps.

There is much more to explore but for now, if you need a transparent OpenAI-based proxy that works with many different models, take a look at LiteLLM.

Deploy a flow created in Prompt Flow with Docker

Update: this post used an older version of Prompt Flow at the time. It had some issues with building and running the Docker image without issues. In version 1.5.0, it should work fine because the Dockerfile now also installs gcc.

In the previous post, we created a flow with Prompt Flow in Visual Studio Code. The Prompt Flow extension for VS Code has a visual flow editor to test the flow. You simply provide the input and click the Run button. When the flow is finished, the result can be seen in the Outputs node, including a trace of the flow:

Running a flow in Prompt Flow

Now it’s time to deploy the flow. One of the options is creating a container image with Docker.

Before we start, we will first convert this flow into a chat flow. Chat does not make much sense for this flow. However, the Docker container includes a UI to run your flow via a chat interface. You will also be able to test your flow locally in a web app.

Convert the flow to a chat flow

To convert the flow to a chat flow, enable chat mode and add chat_history to the Inputs node:

Enable chat

To include the chat history in your conversations, modify the .jinja2 template in the LLM node:

system:
You return the url to an image that best matches the user's question. Use the provided context to select the image. Only return the url. When no
matching url is found, simply return NO_IMAGE

{% for item in chat_history %}
user:
{{item.inputs.description}}
assistant:
{{item.outputs.url}}
{% endfor %}

user:
{{description}}

context : {{search_results}}

Enabling chat history allows you to loop over its content and reconstruct the user/assistant interactions before adding the most recent description. When you run the flow, you get:

Running a chat flow

The third option will give you a GUI to test your flow:

Interactive run

As you can probably tell, this requires Streamlit. The first time you run this flow, check the terminal for instructions about the packages to install. When you are finished, press CTRL-C in the terminal.

Now that we know the chat flow works, we can create the Docker image.

⚠️ Important: a chat flow is not required to build the Docker image; we only add it here to illustrate the user interface that the Docker image can present to the user; you can always call your flow using a HTTP endpoint, chat flow or not

Generating the Docker image

Before creating the Docker image, ensure your Python requirements.txt file in your flow’s folder has the following content:

promptflow
promptflow-tools
azure-search-documents

We need promptflow-tools to support tools like the embedding tool in the container. We also need azure-search-documents to use in the custom Python tool.

To build the flow as a Docker image, you should be able to use the build icon and select Build as Docker:

Build icon

However, in my case, that did not result in any output to build a Docker image. This is a temporary issue from the 1.6 version of the extension and will be fixed. For now, I recommend building the image with the command line tool:

pf flow build --source <path-to-your-flow-folder> --output <your-output-dir> --format docker

I ran the following command in my flow folder:

pf flow build --source .  --output ./docker --format docker

That resulted in a docker folder like below:

Output from pf flow build

Note that this copies your flow’s files to a flow folder under the docker folder. Ensure that requirements.txt in the docker/flow folder matches requirements.txt in your original flow folder (it should).

You can now cd into the Docker folder and run the following command. Don’t forget the . at the end:

docker build -t YOURTAG .

In my case, I used:

docker build -t gbaeke/pfimage .

After running the above command, you might get an error. I got: ERROR: failed to solve... I fixed that by modifying the Docker file. Move the RUN apt-get line above the RUN conda create line and add gcc:

# syntax=docker/dockerfile:1
FROM docker.io/continuumio/miniconda3:latest

WORKDIR /

COPY ./flow /flow

RUN apt-get update && apt-get install -y runit gcc

# create conda environment
RUN conda create -n promptflow-serve python=3.9.16 pip=23.0.1 -q -y && \
    conda run -n promptflow-serve \
.......

After this modification, the docker build command ran successfully.

Running the image

The image contains the connections you created. Remember we created an Azure OpenAI connection and a custom connection. Connections contain both config and secrets. Although the config is available in the image, the secrets are not. You need to provide the secrets as environment variables.

You can find the names of the environment variables in the settings.json file:

{
  "OPEN_AI_CONNECTION_API_KEY": "",
  "AZURE_AI_SEARCH_CONNECTION_KEY": ""
}

Run the container as shown below and replace OPENAIKEY and AISEARCHKEY with the key to your Azure OpenAI resource and Azure AI Search resource. In the container, the code listens on port 8080 so we map that port to port 8080 on the host:

docker run -itp 8080:8080 -e OPEN_AI_CONNECTION_API_KEY=OPENAIKEY \
  AZURE_AI_SEARCH_CONNECTION_KEY=AISEARCHKEY

When you run the above command, you get the following output (some parts removed):

finish  run  supervise
Azure_AI_Search_Connection.yaml  open_ai_connection.yaml
{
    "name": "open_ai_connection",
    "module": "promptflow.connections", 
    ......
    "api_type": "azure",
    "api_version": "2023-07-01-preview"
}
{
    "name": "Azure AI Search Connection",
    "module": "promptflow.connections",
    ....
    },
    "secrets": {
        "key": "******"
    }
}
start promptflow serving with worker_num: 8, worker_threads: 1
[2023-12-14 12:55:09 +0000] [51] [INFO] Starting gunicorn 20.1.0
[2023-12-14 12:55:09 +0000] [51] [INFO] Listening at: http://0.0.0.0:8080 (51)
[2023-12-14 12:55:09 +0000] [51] [INFO] Using worker: sync
...

You should now be able to send requests to the score endpoint. The screenshot below shows a .http file with the call config and result:

Calling the flow via the container’s score endpoint

When you browse to http://localhost:8080, you get a chat interface like the one below:

Chat UI served by Docker container

In my case, the chat UI did not work. Although I could enter a description and press ENTER, I did not see the response. In the background, the flow was triggered, just the response was missing. Remember that these features, and Prompt Flow on your local machine are still experimental at the time of writing (December 2023). They will probably change quite a lot in the future or have changed by the time you read this.

Conclusion

Although you can create a flow in the cloud and deploy that flow to an online endpoint, you might want more control over the deployment. Developing the flow locally and building a container image gives you that control. Once the image is built and pushed to a container registry, you can deploy to your environment of choice. That could be Kubernetes, Azure Container Apps or any other environment that supports containers.

Creating a custom GPT to query any knowledge base with actions

A while ago, OpenAI introduced GPTs. A GPT is a custom version of ChatGPT that combine instructions, extra knowledge, and any combination of skills.

In this tutorial, we are going to create a custom GPT that can answer questions about articles on this blog. In order to achieve that, we will do the following:

  • create an Azure AI Search index
  • populate the index with content of the last 50 blog posts (via its RSS feed)
  • create a custom API with FastAPI (Python) that uses the Azure OpenAI “add your data” APIs to provide relevant content to the user’s query
  • add the custom API as an action to the custom GPT

The image below shows the properties of the GPT. You need to be a ChatGPT Plus subscriber to create a GPT.

Part of the custom GPT definition

To implement a custom action for the GPT, you need an API with an OpenAPI spec. When you use FastAPI, an OpenAPI JSON document can easily be downloaded and provided to the GPT. You will need to modify the JSON document with a servers section to specify the URL the GPT has to use.

In what follows, we will look at all of the different pieces that make this work. Beware: long post! 😀

Azure AI Search Index

Azure AI Search is a search service you create in Azure. Although there is a free tier, I used the basic tier. The basic tiers allows you to use its semantic reranker to optimise search results.

To create the index and populate it with content, I used the following notebook: https://github.com/gbaeke/custom-gpt/blob/main/blog-index/website-index.ipynb.

The result is an index like below:

Index in Azure AI Search

The index contains 292 documents although I only retrieve the last 50 blog posts. This is the result of chunking each post into smaller pieces of about 500 tokens with 100 tokens of overlap for each chunk. We use smaller chunks because we do not want to send entire blog posts as content to the large language model (LLM).

Note that the index supports similarity searches using vectors. The contentVector field contains the OpenAI embedding of the text in the content field.

Although vectors are available, we do not have to use vector search. Azure AI search supports simple keyword search as well. Together with the semantic ranker, it can provide more relevant results than keyword search on its own.

Note: in general, vector search will provide better results, especially when combined with keyword search and the semantic ranker

Use the index with Azure OpenAI “add your data”

I have written about the Azure OpenAI “add your data” features before. It provides a wizard experience to add an Azure AI Search index to the Azure OpenAI playground and directly test your index with the model of your choice.

From you Azure OpenAI instance, first open Azure OpenAI Studio:

Go to OpenAI Studio from the Overview page of your Azure OpenAI instance

Note: you still need to complete a form to get access to Azure OpenAI. Currently, it can take around a day before you are allowed to create Azure OpenAI instances in your subscription.

In Azure OpenAI Studio, click Bring your own data from the Home screen:

Bring your own data

Select the Azure AI Search index and click Next.

Azure AI Search index selection

Note: I created the index using the generally available API that supports vector search. The Add your data wizard, at the time of writing, was not updated yet to support these new indexes. That is the reason why vector search cannot be enabled. We will use keyword + semantic search instead. I expect this functionality to be available soon (November/December 2023).

Next, provide field mappings:

Field Mappings

These mappings are required because the Add your data feature excepts these standard fields. You should have at least a content field to search. Above, I do not have a file name field because I have indexed blog posts. It’s ok to leave that field blank.

After clicking Next, we get to data management:

Data Management

Here, we specify the type of search. Semantic means keyword + semantic. In the dropdown list, you can also select keyword search on its own. However, that might give you less relevant results.

Note: for Semantic to work, you need to turn on the Semantic ranker on the Azure AI Search resource. Additionally, you need to create a semantic profile on the index.

Now you can click Next, followed by Save and close. The Azure OpenAI Chat Playground appears with the index added:

Index added as a data source

You can now start chatting with your data. Select a chat model like gpt-4 or gpt-35-turbo. In Azure OpenAI, you have to deploy these models first and give the deployment a name.

Chat session with your data

Above, I asked about the OpenAI Assistants API, which is one of the posts on my blog. In the background, the playground performs a search on the Azure AI Search index and provides the results as context to the model. The gpt-35-turbo model answers the user’s question, based on the context coming from the index.

When you are happy with the result, you can export this experience to an Azure Web App of CoPilot Studio (Power Virtual Agents):

Export the “chat with data” experience

In our case, we want to use this configuration from code and provide an API we can add to the custom GPT.

⚠️ It’s import to realise that, with this approach, we will send the final answer, generated by an Azure OpenAI model, to the custom GPT. An alternate approach would be to hand the results of the Azure AI Search query to the custom GPT and let it formulate the answer on its own. That would be faster and less costly. If you also provide the blog post’s URL, ChatGPT can refer to it. However, the focus here is on using any API with a custom GPT so let’s continue with the API that uses the “add your data” APIs.

If you want to hand over Azure AI search results directly to ChatGPT, check out the code in the azure-ai-search folder in the Github repo.

Creating the API

To create an API that uses the index with the model, as configured in the playground, we can use some code. In fact, the playground provides sample code to work with:

Sample code from the playground

‼️ Sadly, this code will not work due to changes to the openai Python package. However, the principle is still the same:

  • call the chat completion extension API which is specific to Azure; in the code you will see this is as a Python f-string: f"{openai.api_base}/openai/deployments/{deployment_id}/extensions/chat/completions?api-version={openai.api_version}"
  • the JSON payload for this API needs to include the Azure AI Search configuration in a dataSources array.

The extension API will query Azure AI Search for you and create the prompt for the chat completion with context from the search result.

To create a FastAPI API that does this for the custom GPT, I decided to not use the openai package and simply use the REST API. Here is the code:

from fastapi import FastAPI, HTTPException, Depends, Header
from pydantic import BaseModel
import httpx, os
import dotenv
import re

# Load environment variables
dotenv.load_dotenv()

# Initialize FastAPI app
app = FastAPI()

# Constants (replace with your actual values)
api_base = "https://oa-geba-france.openai.azure.com/"
api_key = os.getenv("OPENAI_API_KEY")
deployment_id = "gpt-35-turbo"
search_endpoint = "https://acs-geba.search.windows.net"
search_key = os.getenv("SEARCH_KEY")
search_index = "blog"
api_version = "2023-08-01-preview"

# Pydantic model for request body
class RequestBody(BaseModel):
    query: str

# Define the API key dependency
def get_api_key(api_key: str = Header(None)):
    if api_key is None or api_key != os.getenv("API_KEY"):
        raise HTTPException(status_code=401, detail="Invalid API Key")
    return api_key

# Endpoint to generate response
@app.post("/generate_response", dependencies=[Depends(get_api_key)])
async def generate_response(request_body: RequestBody):
    url = f"{api_base}openai/deployments/{deployment_id}/extensions/chat/completions?api-version={api_version}"
    headers = {
        "Content-Type": "application/json",
        "api-key": api_key
    }
    data = {
        "dataSources": [
            {
                "type": "AzureCognitiveSearch",
                "parameters": {
                    "endpoint": search_endpoint,
                    "key": search_key,
                    "indexName": search_index
                }
            }
        ],
        "messages": [
            {
                "role": "system",
                "content": "You are a helpful assistant"
            },
            {
                "role": "user",
                "content": request_body.query
            }
        ]
    }

    async with httpx.AsyncClient() as client:
        response = await client.post(url, json=data, headers=headers, timeout=60)

    if response.status_code != 200:
        raise HTTPException(status_code=response.status_code, detail=response.text)

    response_json = response.json()

    # get the assistant response
    assistant_content = response_json['choices'][0]['message']['content']
    assistant_content = re.sub(r'\[doc.\]', '', assistant_content)
    
    # return assistant_content as json
    return {
        "response": assistant_content
    }

# Run the server
if __name__ == "__main__":
    import uvicorn
    uvicorn.run(app, host="0.0.0.0", port=8000, timeout_keep_alive=60)

This API has one endpoint: /generate_response that takes { "query": "your query" }as input and returns { "response": assistant_content }as output. Note that the original response from the model contains references like [doc1], [doc2], etc… The regex in the code removes those references. I don not particularly like how the references are handled by the API so I decided to not include them and simplify the response.

The endpoint expects an api-key header. It it is not present, it returns an error.

The endpoint does a call to the Azure OpenAI chat completion extension API which looks very similar to a regular OpenAI chat completion. The request does however, contain a dataSources field with the Azure AI Search information.

The environment variables like the OPENAI_API_KEY and the SEARCH_KEY are retrieved from a .env file.

Note: to stress this again, this API returns the answer to the query as generated by the chosen Azure OpenAI model. This allows it to be used in any application, not just a custom GPT. For a custom GPT in ChatGPT, an alternate approach would be to hand over the search results from Azure AI search directly, allowing the model in the custom GPT to generate the response. It would be faster and avoid Azure OpenAI costs. We are effectively using the custom GPT as a UI and as a way to maintain history between action calls. 😀

If you want to see the code in GitHub, check this URL: https://github.com/gbaeke/custom-gpt.

Running the API in Azure Container Apps

To run the API in the cloud, I decided to use Azure Container Apps. That means we need a Dockerfile to build the container image locally or in the cloud:

# Use an official Python runtime as a parent image
FROM python:3.9-slim-buster

# Set the working directory in the container to /app
WORKDIR /app

# Add the current directory contents into the container at /app
ADD . /app

# Install any needed packages specified in requirements.txt
RUN pip install --no-cache-dir -r requirements.txt

# Run app.py when the container launches
CMD ["python3", "app.py"]

We also need a requirements.txt file:

fastapi==0.104.1
pydantic==2.5.2
pydantic_core==2.14.5
httpx==0.25.2
python-dotenv==1.0.0
uvicorn==0.24.0.post1

I use the following shell script to build and run the container locally. The script can also push the container to Azure Container Apps.

#!/bin/bash

# Load environment variables from .env file
export $(grep -v '^#' .env | xargs)

# Check the command line argument
if [ "$1" == "build" ]; then
    # Build the Docker image
    docker build -t myblog .
elif [ "$1" == "run" ]; then
    # Run the Docker container, mapping port 8000 to 8000 and setting environment variables
    docker run -p 8000:8000 -e OPENAI_API_KEY=$OPENAI_API_KEY -e SEARCH_KEY=$SEARCH_KEY -e API_KEY=$API_KEY myblog
elif [ "$1" == "up" ]; then
    az containerapp up -n myblog --ingress external --target-port 8000 \
        --env-vars OPENAI_API_KEY=$OPENAI_API_KEY SEARCH_KEY=$SEARCH_KEY API_KEY=$API_KEY \
        --source .
else
    echo "Usage: $0 {build|run|up}"
fi

The shell script extracts the environment variables defined in .env and sets them in the session. Next, we check the first parameter given to the script (Docker is required on your machine for build and run):

  • build: build the Docker image
  • run: run the Docker image locally on port 8000 and specify the environment variables to authenticate to Azure OpenAI and Azure AI Search
  • up: build the Docker image in the cloud and run it in Container Apps; if you do not have a Container Apps Environment or Azure Container Registry, they will be created for you. In the end, you will get an https endpoint to your API in the cloud.

Note: you should not put secrets in environment variables in Azure Container Apps directly; use Container Apps secrets or Key Vault instead; the above is just quick and easy to simplify the deployment

To test the API locally, use the REST Client extension in VS Code with an .http file:

POST http://localhost:8000/generate_response HTTP/1.1
Host: localhost:8000
Content-Type: application/json
api-key: API_KEY_FROM_DOTENV

{
  "query": "what is the openai assistants api?"
}

###

POST https://AZURE_CONTAINER_APPS_ENDPOINT/generate_response HTTP/1.1
Host: AZURE_CONTAINER_APPS_ENDPOINT
Content-Type: application/json
api-key: API_KEY_FROM_DOTENV

{
  "query": "Can I use Redis as a vector db?"
}

When you get something like below, you are good to go. Note again that we return a final answer and not the relevant chunks from Azure AI search.

Successful response from .http file

Getting the OpenAPI spec and adding it to the GPT

With your API running, you can go to its URL, like this one if the API runs locally: http://localhost:8000/openapi.json. The result is a JSON document you can copy to your GPT. I recommend to copy the JSON to VS Code and format it before you paste it in the GPT.

In the GPT, modify the OpenAPI spec with a servers section that includes your Azure Container Apps ingress URL:

Adding the URL to the GPT Action definition

If you want to give the ability to the user to trust the action to be called without approval (after a first call), also add the following:

Allowing the user to say Always Allow when action is used the first time

Take a look at the video below that shows how to create the GPT, including the configuration of the action and testing it.

Conclusion

Custom GPTs in ChatGPT open up a world of possibilities to offer personalised ChatGPT experiences. With custom actions, you can let the GPT do anything you want. In this tutorial, the custom action is an API call that answers the user’s question using Azure OpenAI with Azure AI Search as the provider of relevant context.

As long as you build and host an API and have an OpenAPI spec for your API, the possibilities are virtually limitless.

Note that custom GPTs with actions are not available in the ChatGPT app on mobile yet (end November, 2023). When that happens, it will open up all these capabilities on the go, including enabling voice chat. Fun stuff! 😀

Working with Recipes and Gateways in Microsoft’s Radius

In a previous post, we looked at the basics of deploying a multi-container app that uses Dapr with Radius. In this post, we will add two things:

  • a recipe that deploys Redis
  • a gateway: to make the app available to the outside world

Find the full code and app.bicep in the following branch: https://github.com/gbaeke/raddemo/tree/radius-step1.

Recipes

When a developer chooses a resource they would like to use in their app, like a database or queue, that type of resource needs to be deployed somehow. In my sample app, the api saves data to Redis.

From an operator point of view, and possibly depending on the environment, Redis needs to be deployed and configured properly. For instance in dev, you could opt for Redis in a container without a password. In production, you could go for Azure Redis Cache instead with TLS and authentication.

This is where recipes come in. They deploy the needed resources and provide the proper connections to allow applications to connect. Let’s look at a recipe that deploys Redis in Kubernetes:

resource redis 'Applications.Datastores/redisCaches@2023-10-01-preview' = {
  name: 'redis'
  properties: {
    application: app.id
    environment: environment
  }
}

Note: you can get a list of recipes with rad recipe list; next to Redis, there are recipes for sqlDatabases, rabbitMQQueues and more; depending on how you initialised Radius, the recipe list might be empty

The above recipe deploys Redis as a container to the underlying Kubernetes cluster. The deployment is linked to an environment. Just like in the previous blog post, we just use the default environment. Working with environments and workspaces will be for another post.

In fact, this recipe does not specify the recipe explicitly. This means that the default recipe is used, which in this case is a Redis container in Kubernetes.

Note that the above recipe actually deploys the resource. It is quite possible that your Redis Cache is already deployed without a recipe. In that case, you can set resourceProvisioning to manual and set hostname, port and other properties manually, via secret integration or with references to another Bicep resource. For example:

resource redis 'Applications.Datastores/redisCaches@2023-10-01-preview' = {
  name: 'redis'
  properties: {
    environment: environment
    application:app.id
    resourceProvisioning: 'manual'
    resources: [{
      id: azureRedis.id
    }]
    username: 'myusername'
    host: azureRedis.properties.hostName
    port: azureRedis.properties.port
    secrets: {
      password: azureRedis.listKeys().primaryKey
    }
  }
}

Note: above, references are made to azureRedis, a symbolic name for a Bicep resource, implying that Azure Redis Cache is deployed from the same Bicep file but without a recipe

In either case (deployment or reference), when a connection from a container is made to this Redis resource, a number of environment variables are set inside the container. For example:

  • CONNECTION_CONNECTIONNAME_HOSTNAME
  • CONNECTION_CONNECTIONNAME_PORT

Connecting the api to Redis

To connect the api container to Redis, we use the following app.bicep (please read the previous article for the full context):

import radius as radius

@description('Specifies the environment for resources.')
param environment string

resource app 'Applications.Core/applications@2023-10-01-preview' = {
  name: 'raddemo'
  properties: {
    environment: environment
  }
}

resource redis 'Applications.Datastores/redisCaches@2023-10-01-preview' = {
  name: 'redis'
  properties: {
    application: app.id
    environment: environment
  }
}

resource ui 'Applications.Core/containers@2023-10-01-preview' = {
  name: 'ui'
  properties: {
    application: app.id
    container: {
      image: 'gbaeke/radius-ui:latest'
      ports: {
        web: {
          containerPort: 8001
        }
      }
      env: {
        DAPR_APP: api.name  // api name is the same as the Dapr app id here
      }
    }
    extensions: [
      {
        kind: 'daprSidecar'
        appId: 'ui'
      }
    ]
  }
}

resource api 'Applications.Core/containers@2023-10-01-preview' = {
  name: 'api'
  properties: {
    application: app.id
    container: {
      image: 'gbaeke/radius-api:latest'
      ports: {
        web: {
          containerPort: 8000
        }
      }
      env: {
          REDIS_HOST: redis.properties.host
          REDIS_PORT: string(redis.properties.port)
      }
    }
    extensions: [
      {
        kind: 'daprSidecar'
        appId: 'api'
        appPort: 8000
      }
    ]
    connections: {
      redis: {
        source: redis.id  // this creates environment variables in the container
      }
    }
  }
}

Note the connections array in the api resource. In that array, we added redis and we reference the redis recipe’s id.

Because our api expects the Redis host and port in environment variables different from the ones provided by the connection, we set the variables the api expects ourselves and reference the Redis recipe’s properties.

The environment variables in the api container set by the connection will be CONNECTION_REDIS_HOSTNAME etc… but we do not use them here because that would require a code change.

When you run this app with rad run app.bicep, Redis will be deployed. When the user submits a question via the ui, the logs will show that the Redis call succeeded:

api-c8686c8ff-bwf7l api INFO:root:Stored result for question Hello in Redis

redis-hjo6ha3uqagio-64949758b7-td7c8 redis-monitor 1698071908.381740 [0 10.244.0.24:59750] "SET" "Hello" "This is a fake result for question Hello"

Because rad run streams all logs, the redis-monitor logs are also shown. They clearly state a Redis SET operation was performed.

There is much more to say about recipes. You can even create your own recipes. They are just bicep (or Terraform) modules you publish to a registry. See authoring recipes for more information.

Adding a gateway

So far, we have accessed the ui of our application via port forwarding. The ui listens on port 8001 which is mapped to http://localhost:8001 by rad run. What if we want to make the application available to the outside world?

To make the ui available to the outside world, we can add the following to app.bicep:

resource gateway 'Applications.Core/gateways@2023-10-01-preview' = {
  name: 'gateway'
  properties: {
    application: app.id
    routes: [
      {
        path: '/'
        destination: 'http://ui:8001'
      }
    ]
  }
}

The above adds a gateway to our app and adds one route: http://ui:8001.

During deployment of the Radius control plane, Radius deployed Contour. Contour uses Envoy as the data plane and a service of type LoadBalancer makes the data plane available to the outside world.

In k9s, you should see the following pods in the Radius control plane namespace (radius-system):

Contour

You will also find the service of type LoadBalancer:

LoadBalancer with public IP address

When you create a gateway with Radius, it creates a Kubernetes resource of kind HTTPProxy with apiVersion projectcontour.io/v1 in the same namespace as your app. The spec of the resource refers to another HTTPProxy (ui here) and sets the fqdn (fully qualified domain name) to gateway.raddemo.4.175.112.144.nip.io.

nip.io is a service that resolves a name to the IP address in that name, in this case 4.175.122.144. That IP address is the IP address used by the Azure Load Balancer.

The HTTPProxy ui defines the service and port it routes to. Here that is a service called ui and port 8001.

gateway and ui Contour HTTPProxy resources

You can set your own fully qualified domain name if you wish, in addition to specifying a certificate to enable TLS.

The HTTPProxy resources instruct Contour to configure itself to accept traffic on the configured FQDN and forward it to the ui service.

The full Bicep code to deploy the containers, Redis and the gateway is below:

import radius as radius

@description('Specifies the environment for resources.')
param environment string

resource app 'Applications.Core/applications@2023-10-01-preview' = {
  name: 'raddemo'
  properties: {
    environment: environment
  }
}

resource redis 'Applications.Datastores/redisCaches@2023-10-01-preview' = {
  name: 'redis'
  properties: {
    application: app.id
    environment: environment
  }
}

resource gateway 'Applications.Core/gateways@2023-10-01-preview' = {
  name: 'gateway'
  properties: {
    application: app.id
    routes: [
      {
        path: '/'
        destination: 'http://ui:8001'
      }
    ]
  }
}


resource ui 'Applications.Core/containers@2023-10-01-preview' = {
  name: 'ui'
  properties: {
    application: app.id
    container: {
      image: 'gbaeke/radius-ui:latest'
      ports: {
        web: {
          containerPort: 8001
        }
      }
      env: {
        DAPR_APP: api.name  // api name is the same as the Dapr app id here
      }
    }
    extensions: [
      {
        kind: 'daprSidecar'
        appId: 'ui'
      }
    ]
  }
}

resource api 'Applications.Core/containers@2023-10-01-preview' = {
  name: 'api'
  properties: {
    application: app.id
    container: {
      image: 'gbaeke/radius-api:latest'
      ports: {
        web: {
          containerPort: 8000
        }
      }
      env: {
          REDIS_HOST: redis.properties.host
          REDIS_PORT: string(redis.properties.port)
      }
    }
    extensions: [
      {
        kind: 'daprSidecar'
        appId: 'api'
        appPort: 8000
      }
    ]
    connections: {
      redis: {
        source: redis.id  // this creates environment variables in the container
      }
    }
  }
}

To see the app’s URL, use rad app status.

Note: there is a discussion ongoing to use recipes instead of a pre-installed ingress controller like Contour. With recipes, you could install the ingress solution you prefer such as nginx ingress or any other solution.

Conclusion

In this post we added a Redis database and connected the api to Redis via a connection. We did not use the environment variables that the connection creates. Instead, we provided values for the Redis host name and port to the environment variables the api expects.

To make the application available via the built-in Contour ingress, we created a gateway resource that routes to the ui service on port 8001. The gateway creates a nip.io hostname but you can set the hostname to something different as long as that name resolves to the IP address of the Contour LoadBalancer service.

Giving Microsoft’s Radius a spin

Microsoft recently announced Radius. As stated in their inaugural blog post, it is “a tool to describe, deploy, and manage your entire application”. With Radius, you describe your application in a bicep file. This can include containers, databases, the connections between those and much more. Radius is an open-source solution started from within Microsoft. The name is somewhat confusing because of RADIUS, a network authentication solution developed in 1991!

Starting point: app running locally

Instead of talking about it, let’s start with an application that runs locally on a development workstation and uses Dapr:

The ui is a Flask app that presents a text area and a button. When the user clicks the button, the code that handles the event calls the api using Dapr invoke. If you do not know what Dapr is, have a look at docs.dapr.io. The api saves the user’s question and a fake response to Redis. If Redis cannot be found, the api will simply log it could not save the data. The response is returned to the ui.

To run the application with Dapr on a development machine, I use a dapr.yaml file in combination with dapr run -f . See multi-app run for more details.

Here’s the yaml file:

version: 1
apps:
  - appID: ui
    appDirPath: ./ui
    appPort: 8001
    daprHTTPPort: 3510
    env:
      DAPR_APP: api
    command: ["python3","app.py"]
  - appID: api
    appDirPath: ./api
    appPort: 8000
    daprHTTPPort: 3511
    env:
      REDIS_HOST: localhost
      REDIS_PORT: 6379
      REDIS_DB: 0
    command: ["python3","app.py"]

Note that the api needs a couple of environment variables to find the Redis instance. The ui needs one environment variable DAPR_APP that holds the Dapr appId of the api. The Dapr invoke call needs this appId in order to find the api on the network.

In Python, the Dapr invoke call looks like this:

with DaprClient() as d:
        log.info(f"Making call to {dapr_app}")
        resp = d.invoke_method(dapr_app, 'generate', data=bytes_data,
                                 http_verb='POST', content_type='application/json')
        log.info(f"Response from API: {resp}")

The app runs fine locally if you have Python and the dependencies as listed in both the ui’s and api’s requirements.txt file. Let’s try to deploy the app with Radius.

Deploying the app with Radius

Before we can deploy the app with Radius, you need to install a couple of things:

  • rad CLI: I installed the CLI on MacOS; see the installation instructions for more details
  • VS Code extension: Radius uses a forked version of Bicep that is older than the current version of Bicep. The two will eventually converge but for now, you need to disable the official Bicep extension in VS Code and install the Radius Bicep extension. This is needed to support code like import radius as radius, which is not supported in the current version of Bicep.
  • Kubernetes cluster: Radius uses Kubernetes and requires the installation of the Radius control plane on that cluster. I deployed a test & dev AKS cluster in Azure and ensured it was set as my current context. Use kubectl config current-context to check that.
  • Install Dapr: our app uses Dapr and Radius supports it; however, Dapr needs to be manually installed on the cluster; if you have Dapr on your local machine, run dapr init -k to install it on Kubernetes

Now you can clone my raddemo repo. Use git clone https://github.com/gbaeke/raddemo.git. In the raddemo folder, you will see two folders: api and ui. In the root folder, run the following command:

rad init

Select Yes to use the current folder.

Running rad init does the following:

  • Installs Radius to the cluster in the radius-system namespace
  • Creates a new environment and workspace (called default)
  • Sets up a local-dev recipe pack: recipes allow you to install resources your app needs like Redis, MySQL, etc…

After installation, this is the view on the radius-system Kubernetes namespace with k9s:

Pods in the radius-system namespace

There should also be a .rad folder with a rad.yaml file:

workspace:
  application: "raddemo"

The file defines a workspace with our application name raddemo. raddemo is the name of the folder where I ran rad init. You can have multiple workspaces defined with one selected as the default. For instance, you could have a dev and prod workspace where each workspace uses a different Kubernetes cluster and environment. The default could be set to dev but you can easily switch to prod using the rad CLI. Check this overview of workspaces for more information. I am going to work with just one workspace called default, which uses an environment called default. When you just run rad init, those are the defaults.

You also get a default app.bicep file:

import radius as radius
param application string

resource demo 'Applications.Core/containers@2023-10-01-preview' = {
  name: 'demo'
  properties: {
    application: application
    container: {
      image: 'radius.azurecr.io/samples/demo:latest'
      ports: {
        web: {
          containerPort: 3000
        }
      }
    }
  }
}

This is deployable code. If you run rad run app.bicep, a Kubernetes pod will be deployed to your cluster, using the image above. Radius would also setup port forwarding to access the app on it’s containerPort (3000).

We will change this file to deploy the ui. We will remove the application parameter and define our own application. That application needs an environment which we will pass in via a parameter:

import radius as radius

@description('Specifies the environment for resources.')
param environment string

resource app 'Applications.Core/applications@2023-10-01-preview' = {
  name: 'raddemo'
  properties: {
    environment: environment
  }
}

resource ui 'Applications.Core/containers@2023-10-01-preview' = {
  name: 'ui'
  properties: {
    application: app.id
    container: {
      image: 'gbaeke/radius-ui:latest'
      ports: {
        web: {
          containerPort: 8001
        }
      }
    }
    extensions: [
      {
        kind: 'daprSidecar'
        appId: 'ui'
      }
    ]
  }
}

Above, we define the following:

  • a resource of type Applications.Core/applications: because applications run on Kubernetes, you can use a different namespace than the default and also set labels and annotations. All labels and annotations would be set on all resources belonging to the app, such as containers
  • the app resource needs an environment: the environment parameter is defined in the Bicep file and is set automatically by the rad CLI; it will match the environment used by your current workspace; environments can also have cloud credentials attached to deploy resources in Azure or AWS; we are not using that here
  • a resource of type Applications.Core/containers: this will create a pod in a Kubernetes namespace; the container belongs to the app we defined (application property) and uses the image gbaeke/ui-radius:latest on Docker Hub. Radius supports Dapr via extensions. The Dapr sidecar is added via these extensions with the app Id of ui.

In Kubernetes, this results in a pod with two containers: the ui container and the Dapr sidecar.

ui and Dapr sidecar

When you run rad run app.bicep, you should see the resources in namespace default-raddemo. The logs of all containers should stream to your console and local port 8001 should be mapped to the pod’s port 8001. http://localhost:8001 should show:

ui accessed via http://localhost:8001

We will end this post by also deploying the api. It also needs Dapr and we need to update the definition of the ui container by adding an environment variable:

import radius as radius

@description('Specifies the environment for resources.')
param environment string

resource app 'Applications.Core/applications@2023-10-01-preview' = {
  name: 'raddemo'
  properties: {
    environment: environment
  }
}

resource ui 'Applications.Core/containers@2023-10-01-preview' = {
  name: 'ui'
  properties: {
    application: app.id
    container: {
      image: 'gbaeke/radius-ui:latest'
      ports: {
        web: {
          containerPort: 8001
        }
      }
      env: {
        DAPR_APP: api.name  // api name is the same as the Dapr app id here
      }
    }
    extensions: [
      {
        kind: 'daprSidecar'
        appId: 'ui'
      }
    ]
  }
}

resource api 'Applications.Core/containers@2023-10-01-preview' = {
  name: 'api'
  properties: {
    application: app.id
    container: {
      image: 'gbaeke/radius-api:latest'
      ports: {
        web: {
          containerPort: 8000
        }
      }
    }
    extensions: [
      {
        kind: 'daprSidecar'
        appId: 'api'
        appPort: 8000
      }
    ]
  }
}

Above, we added the api container, enabled Dapr, and set the Dapr appId to api. In the ui, we set environment variable DAPR_APP to api.name. We can do this because the name of the api resource is the same as the appId. This also makes Radius deploy the api before the ui. Note that the api does not have Redis environment variables. It will default to finding Redis at localhost, which will fail. But that’s ok.

You now have two pods in your namespace:

Yes, there are three here but Redis will be added in a later post.

Note that instead of running rad run app.bicep, you can also run rad deploy app.bicep. The latter simply deploys the application. It does not forward ports or stream logs.

Summary

In this post, we touched on the basics of using Radius to deploy an application that uses Dapr. Under the hood, Radius uses Kubernetes to deploy container resources specified in the Bicep file. To run the application, simply run rad run app.bicep to deploy the app, stream all logs and set up port forwarding.

We barely scratched the surface here so in a next post, we will add Redis via a recipe, and make the application available publicly via a gateway. Stay tuned!

Enhancing Semantic Search with a Streamlit UI

In a previous blog post, we discussed two Python programs, upload_vectors.py and search_vectors.py. These programs were used to create and search vectors, respectively. The upload_vectors.py script created vectors from chunks of a larger text and stored them in Pinecone, while the search_vectors.py script enabled semantic search on the text. In this blog post, we will discuss how to create a user interface (UI) for these two programs using Streamlit.

🚀 I kickstarted the Streamlit app by handing over the text-based version to ChatGPT and asking it to work its magic ✨💻. Yes, it was that easy! Afterwards, I made several manual changes to make it look the way I wanted.

Pinecone, Vectors, Embeddings, and Semantic Search: What’s all that about?

Pinecone is a vector database service that allows for easy storage and retrieval of high-dimensional vectors. It is optimized for similarity search, which makes it a perfect fit for tasks like semantic search. Our script stores vectors in Pinecone by parsing an RSS feed, chunking the blog posts, and creating the vectors with OpenAI’s embedding APIs.

Vectors are mathematical representations of data in the form of an array of numbers. In our case, we use vectors to represent chunks of text retrieved from blog posts. These vectors are generated using a process called embedding, which is a way of representing complex data, like text, in a lower-dimensional space while preserving the essential information.

Semantic search is a type of search that goes beyond keyword matching to understand the meaning and context of the query. By using vector embeddings, we can compare the similarity between queries and stored texts to find the most relevant results. Pinecone does that search for us and simply returns a number of matching chunks (pieces of text).

What is Streamlit?

Streamlit is a Python library that makes it easy to create custom web apps for machine learning and data science projects. You can build interactive UIs with minimal code, allowing you to focus on the core logic of your application.

Here’s an example of creating an extremely simple Streamlit app:

import streamlit as st

st.title('Hello, Streamlit!')
st.write('This is a simple Streamlit app.')

This code would generate a web app with a title and a text output. You can also create more complex UIs with user input, like sliders, text inputs, and buttons.

Creating a Streamlit UI for Semantic Search

Now let’s examine the provided code for creating a Streamlit UI for the search_vectors.py program. The code can be broken down into the following sections:

  1. Import necessary libraries and check environment variables.
  2. Set up the tokenizer and define the tiktoken_len function.
  3. Create the UI elements, including the title, text input, dropdown, sliders, and buttons.
  4. Define the main search functionality that is triggered when the user clicks the “Search” button.

Here is the full code:

import os
import pinecone
import openai
import tiktoken
import streamlit as st

# check environment variables
if os.getenv('PINECONE_API_KEY') is None:
    st.error("PINECONE_API_KEY not set. Please set this environment variable and restart the app.")
if os.getenv('PINECONE_ENVIRONMENT') is None:
    st.error("PINECONE_ENVIRONMENT not set. Please set this environment variable and restart the app.")
if os.getenv('OPENAI_API_KEY') is None:
    st.error("OPENAI_API_KEY not set. Please set this environment variable and restart the app.")

# use cl100k_base tokenizer for gpt-3.5-turbo and gpt-4
tokenizer = tiktoken.get_encoding('cl100k_base')


def tiktoken_len(text):
    tokens = tokenizer.encode(
        text,
        disallowed_special=()
    )
    return len(tokens)

# create a title for the app
st.title("Search blog feed 🔎")

# create a text input for the user query
your_query = st.text_input("What would you like to know?")
model = st.selectbox("Model", ["gpt-3.5-turbo", "gpt-4"])

with st.expander("Options"):

    max_chunks = 5
    if model == "gpt-4":
        max_chunks = 15

    max_reply_tokens = 1250
    if model == "gpt-4":
        max_reply_tokens = 2000

    col1, col2 = st.columns(2)

    # model dropdown
    with col1:
        chunks = st.slider("Number of chunks", 1, max_chunks, 5)
        temperature = st.slider("Temperature", 0.0, 1.0, 0.0)

    with col2:
        reply_tokens = st.slider("Reply tokens", 750, max_reply_tokens, 750)
    

# create a submit button
if st.button("Search"):
    # get the Pinecone API key and environment
    pinecone_api = os.getenv('PINECONE_API_KEY')
    pinecone_env = os.getenv('PINECONE_ENVIRONMENT')

    pinecone.init(api_key=pinecone_api, environment=pinecone_env)

    # set index
    index = pinecone.Index('blog-index')


    # vectorize your query with openai
    try:
        query_vector = openai.Embedding.create(
            input=your_query,
            model="text-embedding-ada-002"
        )["data"][0]["embedding"]
    except Exception as e:
        st.error(f"Error calling OpenAI Embedding API: {e}")
        st.stop()

    # search for the most similar vector in Pinecone
    search_response = index.query(
        top_k=chunks,
        vector=query_vector,
        include_metadata=True)

    # create a list of urls from search_response['matches']['metadata']['url']
    urls = [item["metadata"]['url'] for item in search_response['matches']]

    # make urls unique
    urls = list(set(urls))

    # create a list of texts from search_response['matches']['metadata']['text']
    chunk_texts = [item["metadata"]['text'] for item in search_response['matches']]

    # combine texts into one string to insert in prompt
    all_chunks = "\n".join(chunk_texts)

    # show urls of the chunks
    with st.expander("URLs", expanded=True):
        for url in urls:
            st.markdown(f"* {url}")
    

    with st.expander("Chunks"):
        for i, t in enumerate(chunk_texts):
            # remove newlines from chunk
            tokens = tiktoken_len(t)
            t = t.replace("\n", " ")
            st.write("Chunk ", i, "(Tokens: ", tokens, ") - ", t[:50] + "...")
    with st.spinner("Summarizing..."):
        try:
            prompt = f"""Answer the following query based on the context below ---: {your_query}
                                                        Do not answer beyond this context!
                                                        ---
                                                        {all_chunks}"""


            # openai chatgpt with article as context
            # chat api is cheaper than gpt: 0.002 / 1000 tokens
            response = openai.ChatCompletion.create(
                model=model,
                messages=[
                    { "role": "system", "content":  "You are a truthful assistant!" },
                    { "role": "user", "content": prompt }
                ],
                temperature=temperature,
                max_tokens=max_reply_tokens
            )

            st.markdown("### Answer:")
            st.write(response.choices[0]['message']['content'])

            with st.expander("More information"):
                st.write("Query: ", your_query)
                st.write("Full Response: ", response)

            with st.expander("Full Prompt"):
                st.write(prompt)

            st.balloons()
        except Exception as e:
            st.error(f"Error with OpenAI Completion: {e}")

A closer look

The code first imports the necessary libraries and checks if the required environment variables are set, displaying an error message if they are not. The libraries you need are in requirements.txt on GitHub. You can install them with:

pip3 install -r requirements.txt

ℹ️ I recommend using a Python virtual environment when you install these dependencies; see poetry (just one example)

The tiktoken_len function calculates the token length of a given text using the tokenizer. This is used to display the tokens of each chunk of text we set to the ChatCompletion API. Depending on the model, 4096 or 8192 tokens are supported.

The UI is built using Streamlit functions, such as st.title, st.text_input, st.selectbox, and st.columns. These functions create various UI elements that the user can interact with to input their query and set search parameters. If you look at the code, you will see how easy it is to add those elements.

With the UI elements, you can set:

  • the number of text chunks to return from Pinecone and to forward to the ChatCompletion API (using st.slider)
  • the number of tokens to reply with (using st.slider)
  • the model: gpt-3.5-turbo or gpt-4 (ensure you have access to the gpt-4 API)
  • the temperature (using st-slider)

The options are shown in two columns with st.columns.

The main search functionality is triggered when the user clicks the “Search” button. The code then vectorizes the query, searches for the most similar vectors in Pinecone, and displays the URLs and chunks found. Finally, the selected model is used to generate an answer based on the chunks found and the user’s query. Often, gpt-4 will provide the best answer. It seems to be able to better understand all the chunks of text thrown at it.

Running the code

To run the code you need the following:

  • A Pinecode API key and environment
  • An OpenAI API key

It is easiest to run the code with Docker. If you have it installed, run the following command:

docker run -p 8501:8501 -e OPENAI_API_KEY="YOURKEY" \
    -e PINECONE_API_KEY="YOURKEY" \
    -e PINECONE_ENVIRONMENT="YOURENV" gbaeke/blogsearch

The gbaeke/blogsearch image is available on Docker Hub. You can also build your own with the Dockerfile provided on GitHub.

After running the image, go to http://localhost:8501 and first use the Upload page to create your Pinecode index and store vectors in it. You can use my blog’s feed or any other feed. You can experiment with the chunk size and chunk overlap.

Upload to Pinecone

You can add multiple RSS feeds one-by-one as long as you turn off Recreate index before each new upload. After you have populated the index, use the Search page to start searching:

Searching

Above, we ask what we can do with Pinecone and let gpt-4 do the answering. The similarity search will search for 5 similar items and return them. We show the original URLs these results come from. In the Chunks section, you can see the original chunks because they are also in Pinecone as metadata. After the answer, you can find the full JSON returned by the ChatCompletion API and the full prompt we sent to that API.

Conclusion

In this blog post, we showed you how to create a Streamlit UI for the search_vectors.py script we talked about in a previous post. Streamlit allows you to easily build interactive web applications for your machine learning and data science projects. We also created a UI to upload posts to Pinecone. The full program allows you to add as much data as you want and query that data with semantic search, summarized and synthesized by the GPT model of choice. Give it a try and let me know what you think.

Storing and querying for embeddings with Redis

In a previous post, we wrote about using vectorized search and cosine similarity to quickly query a database of blog posts and retrieve the most relevant content to a natural language query. This is achieved using OpenAI’s embeddings API, Pinecone (a vector database), and OpenAI ChatCompletions. For reference, here’s the rough architecture:

Vectorized search with Pinecone

The steps above do the following:

  1. A console app retrieves blog post URLs from an RSS feed and reads all the posts one by one
  2. For each post, create an embedding with OpenAI which results in a vector of 1536 dimensions to store in Pinecone
  3. After the embedding is created, store the embedding in a Pinecone index; we created the index from the Pinecone portal
  4. A web app asks the user for a query (e.g., “How do I create a chat bot?”) and creates an embedding for the query
  5. Perform a vectorized search, finding the closest post vectors to the query vector using cosine similarity and keep the one with the highest score
  6. Use the ChatCompletion API and submit the same query but add the highest scoring post as context to the user question. The post text is injected into the prompt

ℹ️ See Pinecone and OpenAI magic: A guide to finding your long lost blog posts with vectorized search and ChatGPT – baeke.info for more information.

We can replace Pinecone with Redis, a popular open-source, in-memory data store that can be used as a database, cache, and message broker. Redis is well-suited for this task as it can also store vector representations of our blog posts and has the capability to perform vector queries efficiently.

You can easily run Redis with Docker for local development. In addition, Redis is available in Azure, although you will need the Enterprise version. Only Azure Cache for Redis Enterprise supports the RediSearch functionality and that’s what we need here! Note that the Enterprise version is quite costly.

By leveraging Redis for vector storage and querying, we can harness its high performance, flexibility, and reliability in our solution while maintaining the core functionality of quickly querying and retrieving the most relevant blog post content using vectorized search and similarity queries.

ℹ️ The code below shows snippets. Full samples (yes, samples 😀) are on GitHub: check upload_vectors_redis.py to upload posts to a local Redis instance and search_vectors_redis.py to test the query functionality.

Run Redis with Docker

If you have Docker on your machine, use the following command:

docker run --name redis-stack-server -p 6380:6379 redis/redis-stack-server:latest

ℹ️ I already had another instance of Redis running on port 6379 so I mapped port 6380 on localhost to port 6379 of the redis-stack-server container.

If you want a GUI to explore your Redis instance, install RedisInsight. The screenshot below shows the blog posts after uploading them as Redis hashes.

RedisInsight in action

Let’s look at creating the hashes next!

Storing post data in Redis hashes

We will create several Redis hashes, one for each post. Hashes are records structured as collections of field-value pairs. Each hash we store, has the following fields:

  • url: url to the blog post
  • embedding: embedding of the blog post (a vector), created with the OpenAI embeddings API and the text-embedding-ada-002 model

We need the URL to retrieve the entire post after a closest match has been found. In Pinecone, the URL would be metadata to the vector. In Redis, it’s just a field in a hash, just like the vector itself.

In RedisInsight, a hash is shown as below:

Redis hash for post 0 with url and embedding fields

The embedding field in the hash has no special properties. The vector is simply stored as a series of bytes. To store the urls and embeddings of posts, we can use the following code:

import redis
import openai
import os
import requests
from bs4 import BeautifulSoup
import feedparser


# OpenAI API key
openai.api_key = os.getenv('OPENAI_API_KEY')

# Redis connection details
redis_host = os.getenv('REDIS_HOST')
redis_port = os.getenv('REDIS_PORT')
redis_password = os.getenv('REDIS_PASSWORD')

# Connect to the Redis server
conn = redis.Redis(host=redis_host, port=redis_port, password=redis_password, encoding='utf-8', decode_responses=True)

# URL of the RSS feed to parse
url = 'https://atomic-temporary-16150886.wpcomstaging.com/feed/'

# Parse the RSS feed with feedparser
feed = feedparser.parse(url)

p = conn.pipeline(transaction=False)
for i, entry in enumerate(feed.entries[:50]):
    # report progress
    print("Create embedding and save for entry ", i, " of ", entries)

    r = requests.get(entry.link)
    soup = BeautifulSoup(r.text, 'html.parser')
    article = soup.find('div', {'class': 'entry-content'}).text

    # vectorize with OpenAI text-emebdding-ada-002
    embedding = openai.Embedding.create(
        input=article,
        model="text-embedding-ada-002"
    )

    # print the embedding (length = 1536)
    vector = embedding["data"][0]["embedding"]

    # convert to numpy array and bytes
    vector = np.array(vector).astype(np.float32).tobytes()

    # Create a new hash with url and embedding
    post_hash = {
        "url": entry.link,
        "embedding": vector
    }

    # create hash
    conn.hset(name=f"post:{i}", mapping=post_hash)

p.execute()

In the above code, note the following:

  • The OpenAI embeddings API returns a JSON document that contains the embedding for each post; the embedding is retrieved with vector = embedding["data"][0]["embedding"]
  • The resulting vector is converted to bytes with vector = np.array(vector).astype(np.float32).tobytes(); serializing the vector this way is required to store the vector in the Redis hash
  • the Redis hset command is used to store the field-value pairs (these pairs are in a Python dictionary called post_hash) with a key that is prefixed with post: followed by the document number. The prefix will be used later by the search index we will create

Now we have our post information in Redis hashes, we want to use RediSearch functionality to match an input query with one or more of our posts. RediSearch supports vector similarity semantic search. For such a search to work, we will need to create an index that knows there is a vector field. On such indexes, we can perform vector similarity searches.

Creating an index

To create an index with Python code, check the code below:

import redis
from redis.commands.search.field import VectorField, TextField
from redis.commands.search.query import Query
from redis.commands.search.indexDefinition import IndexDefinition, IndexType

# Redis connection details
redis_host = os.getenv('REDIS_HOST')
redis_port = os.getenv('REDIS_PORT')
redis_password = os.getenv('REDIS_PASSWORD')

# Connect to the Redis server
conn = redis.Redis(host=redis_host, port=redis_port, password=redis_password, encoding='utf-8', decode_responses=True)


SCHEMA = [
    TextField("url"),
    VectorField("embedding", "HNSW", {"TYPE": "FLOAT32", "DIM": 1536, "DISTANCE_METRIC": "COSINE"}),
]

# Create the index
try:
    conn.ft("posts").create_index(fields=SCHEMA, definition=IndexDefinition(prefix=["post:"], index_type=IndexType.HASH))
except Exception as e:
    print("Index already exists")


When creating an index, you define the fields to index based on a schema. Above, we include both the text field (url) and the vector field (embedding). The VectorField class is used to construct the vector field and takes several parameters:

  • Name: the name of the field (“embedding” here but could be anything)
  • Algorithm: “FLAT” or “HNSW”; use “FLAT” when search quality is of high priority and search speed is less important; “HNSW” gives you faster querying; for more information see this article
  • Attributes: a Python dictionary that specifies the data type, the number of dimensions of the vector (1536 for text-embedding-ada-002) and the distance metric; here we use COSINE for cosine similarity, which is recommended by OpenAI with their embedding model

ℹ️ It’s important to get the dimensions right or your index will fail to build properly. It will not be immediately clear that it failed, unless you run FT.INFO <indexname> with redis-cli.

With the schema out of the way, we can now create the index with:

conn.ft("posts").create_index(fields=SCHEMA, definition=IndexDefinition(prefix=["post:"], index_type=IndexType.HASH))

The index we create is called posts. We index the fields defined in SCHEMA and only index hashes with a key prefix of post:. The hashes we created earlier, all have this prefix. With the index created and our existing hashes, the index should be populated with them. Ensure you can see that in RedisInsight:

posts index populated with hashes that were added earlier

Redis vector queries

With the hashes and the index created, we can now perform a similarity search. We will ask the user for a query string (use natural language) and then check the posts that are similar to the query string. The query string will need to be vectorized as well. We will return several post and rank them.

import numpy as np
from redis.commands.search.query import Query
import redis
import openai
import os

openai.api_key = os.getenv('OPENAI_API_KEY')

def search_vectors(query_vector, client, top_k=5):
    base_query = "*=>[KNN 5 @embedding $vector AS vector_score]"
    query = Query(base_query).return_fields("url", "vector_score").sort_by("vector_score").dialect(2)    

    try:
        results = client.ft("posts").search(query, query_params={"vector": query_vector})
    except Exception as e:
        print("Error calling Redis search: ", e)
        return None

    return results

# Redis connection details
redis_host = os.getenv('REDIS_HOST')
redis_port = os.getenv('REDIS_PORT')
redis_password = os.getenv('REDIS_PASSWORD')

# Connect to the Redis server
conn = redis.Redis(host=redis_host, port=redis_port, password=redis_password, encoding='utf-8', decode_responses=True)

if conn.ping():
    print("Connected to Redis")

# Enter a query
query = input("Enter your query: ")

# Vectorize the query using OpenAI's text-embedding-ada-002 model
print("Vectorizing query...")
embedding = openai.Embedding.create(input=query, model="text-embedding-ada-002")
query_vector = embedding["data"][0]["embedding"]

# Convert the vector to a numpy array
query_vector = np.array(query_vector).astype(np.float32).tobytes()

# Perform the similarity search
print("Searching for similar posts...")
results = search_vectors(query_vector, conn)

if results:
    print(f"Found {results.total} results:")
    for i, post in enumerate(results.docs):
        score = 1 - float(post.vector_score)
        print(f"\t{i}. {post.url} (Score: {round(score ,3) })")
else:
    print("No results found")

In the above code, the following happens:

  • Set OpenAI API key: needed to create the embedding for the query typed by the user
  • Connect to Redis based on the environment variables and check the connection with ping().
  • Ask the user for a query
  • Create the embedding from the query string and convert the array to bytes
  • Call the search_vectors function with the vectorized query string and Redis connection as parameters

The search_vectors function uses RediSearch capabilities to query over our hashes and calculate the 5 nearest neighbors to our query vector. Querying is explained in detail in the Redis documentation but it can be a bit dense. You start with the base query:

 base_query = "*=>[KNN 5 @embedding $vector AS vector_score]"

This is just a string with the query format that Redis expects to pass to the Query class in the next step. We are looking for the 5 nearest neighbors of $vector in the embedding fields of the hashes. You use @ to denote the embedding field and $ to denote the vector we will pass in later. That vector is our vectorized query string. With AS vector_score, we add the score to later rank the results from high to low.

The actual query is built with the Query class (one line):

query = Query(base_query).return_fields("url", "vector_score").sort_by("vector_score").dialect(2)    

We return the url and the vector_score and sort on this score. Dialect is just the version of the query language. Here we use dialect 2 as that matches the query syntax. Using an earlier dialect would not work here.

Of course, this still does not pass the query vector to the query. That only happens when we run the query in Redis with:

results = client.ft("posts").search(query, query_params={"vector": query_vector})

The above code performs a search query on the posts index. In the call to the search method, we pass the query we built earlier and a list of query parameters. We only have one parameter, the vector parameter ($vector in base_query) and the value for this parameter is the embedding created from the user query string.

When I query for bot, I get the following results:

Our 5 query results

The results are ranked with the closest match first. We could use that match to grab the post from the URL and send the query to OpenAI ChatCompletion API to answer the question more precisely. For better results, use a better query like “How do I build a chat bot in Python with OpenAI?”. To get an idea of how to do that, check my previous post.

Conclusion

In this post we discussed storing embeddings in Redis and querying embeddings with a similarity search. If you combine this with my previous post, you can use Redis instead of Pinecone as the vector database and query engine. This can be useful for Azure customers because Azure has Azure Cache for Redis Enterprise, a fully managed service that supports the functionality discussed in this post. In addition, it is useful for local development purposes because you can easily run Redis with Docker.

AKS Workload Identity Revisited

A while ago, I blogged about Workload Identity. Since then, Microsoft simplified the configuration steps and enabled Managed Identity, in addition to app registrations.

But first, let’s take a step back. Why do you need something like workload identity in the first place? Take a look at the diagram below.

Workloads (deployed in a container or not) often need to access Azure AD protected resources. In the diagram, the workload in the container wants to read secrets from Azure Key Vault. The recommended option is to use managed identity and grant that identity the required role in Azure Key Vault. Now your code just needs to obtain credentials for that managed identity.

In Kubernetes, that last part presents a challenge. There needs to be a mechanism to map such a managed identity to a pod and allow code in the container to obtain an Azure AD authentication token. The Azure AD Pod Identity project was a way to solve this but as of 24/10/2022, AAD Pod Identity is deprecated. It is now replaced by Workload Identity. It integrates with native Kubernetes capabilities to federate with external identity providers such as Azure AD. It has the following advantages:

  • Not an AKS feature, it’s a Kubernetes feature (other cloud, on-premises, edge); similar functionality exists for GKE for instance
  • Scales better than AAD Pod Identity
  • No need for custom resource definitions
  • No need to run pods that intercept IMDS (instance metadata service) traffic; instead, there are webhook pods that run when pods are created/updated

If the above does not make much sense, check https://learn.microsoft.com/en-us/azure/aks/use-azure-ad-pod-identity. But don’t use it OK? 😉

At a basic level, Workload Identity works as follows:

  • Your AKS cluster is configured to issue tokens. Via an OIDC (OpenID Connect) discovery document, published by AKS, Azure AD can validate the tokens it receives from the cluster.
  • A Kubernetes service account is created and properly annotated and labeled. Pods are configured to use the service account via the serviceAccount field.
  • The Azure Managed Identity is configured with Federated credentials. The federated credential contains a link to the OIDC discovery document (Cluster Issuer URL) and configures the namespace and service account used by the Kubernetes pod. That generates a subject identifier like system:serviceaccount:namespace_name:service_account_name.
  • Tokens can now be generated for the configured service account and swapped for an Azure AD token that can be picked up by your workload.
  • A Kubernetes mutating webhook is the glue that makes all of this work. It ensures the token is mapped to a file in your container and sets needed environment variables.

Creating a cluster with OIDC and Workload Identity

Create a basic cluster with one worker node and both features enabled. You need an Azure subscription and the Azure CLI. Ensure the prerequisites are met and that you are logged in with az login. Run the following in a Linux shell:

RG=your_resource_group
CLUSTER=your_cluster_name

az aks create -g $RG -n $CLUSTER --node-count 1 --enable-oidc-issuer \
  --enable-workload-identity --generate-ssh-keys

After deployment, find the OIDC Issuer URL with:

export AKS_OIDC_ISSUER="$(az aks show -n $CLUSTER -g $RG --query "oidcIssuerProfile.issuerUrl" -otsv)"

When you add /.well-known/openid-configuration to that URL, you will see something like:

OIDC discovery document

The field jwks_uri contains a link to key information, used by AAD to verify the tokens issued by Kubernetes.

In earlier versions of Workload Identity, you had to install a mutating admission webhook to project the Kubernetes token to a volume in your workload. In addition, the webhook also injected several environment variables:

  • AZURE_CLIENT_ID: client ID of an AAD application or user-assigned managed identity
  • AZURE_TENANT_ID: tenant ID of Azure subscription
  • AZURE_FEDERATED_TOKEN_FILE: the path to the federated token file; you can do cat $AZURE_FEDERATED_TOKEN_FILE to see the token. Note that this is the token issued by Kubernetes, not the exchanged AAD token (exchanging the token happens in your code). The token is a jwt. You can use https://jwt.io to examine it:
Decoded jwt issued by Kubernetes

But I am digressing… In the current implementation, you do not have to install the mutating webhook yourself. When you enable workload identity with the CLI, the webhook is installed automatically. In kube-system, you will find pods starting with azure-wi-webhook-controller-manager. The webhook kicks in whenever you create or update a pod. The end result is the same. You get the projected token + the environment variables.

Creating a service account

Ok, now we have a cluster with OIDC and workload identity enabled. We know how to retrieve the issuer URL and we learned we do not have to install anything else to make this work.

You will have to configure the pods you want a token for. Not every pod has containers that need to authenticate to Azure AD. To configure your pods, you first create a Kubernetes service account. This is a standard service account. To learn about service accounts, check my YouTube video.

apiVersion: v1
kind: ServiceAccount
metadata:
  annotations:
    azure.workload.identity/client-id: CLIENT ID OF MANAGED IDENTITY
  labels:
    azure.workload.identity/use: "true"
  name: sademo
  namespace: default

The label ensures that the mutating webhook will do its thing when a pod uses this service account. We also indicate the managed identity we want a token for by specifying its client ID in the annotation.

Note: you need to create the managed identity yourself and grab its client id. Use the following commands:

RG=your_resource_group
IDENTITY=your_chosen_identity_name
LOCATION=your_azure_location (e.g. westeurope)

export SUBSCRIPTION_ID="$(az account show --query "id" -otsv)"

az identity create --name $IDENTITY --resource-group $RG \
  --location $LOCATION --subscription $SUBSCRIPTION_ID

export USER_ASSIGNED_CLIENT_ID="$(az identity show -n $IDENTITY -g $RG --query "clientId" -otsv)"

echo $USER_ASSIGNED_CLIENT_ID

The last command prints the id to use in the service account azure.workload.identity/client-id annotation.

Creating a pod that uses the service account

Let’s create a deployment that deploys pods with an Azure CLI image:

apiVersion: apps/v1
kind: Deployment
metadata:
  name: azcli-deployment
  namespace: default
  labels:
    app: azcli
spec:
  replicas: 1
  selector:
    matchLabels:
      app: azcli
  template:
    metadata:
      labels:
        app: azcli
    spec:
      # needs to refer to service account used with federation
      serviceAccount: sademo
      containers:
        - name: azcli
          image: mcr.microsoft.com/azure-cli:latest
          command:
            - "/bin/bash"
            - "-c"
            - "sleep infinity"

Above, the important line is serviceAccount: sademo. When the pod is created or modified, the mutating webhook will check the service account and its annotations. If it is configured for workload identity, the webhook will do its thing: projecting the Kubernetes token file and setting the environment variables:

The webhook did its work 😉

How to verify it works?

We can use the Azure CLI support for federated tokens as follows:

az login --federated-token "$(cat $AZURE_FEDERATED_TOKEN_FILE)" \
--service-principal -u $AZURE_CLIENT_ID -t $AZURE_TENANT_ID

After running the command, the error below appears:

Oh no…

Clearly, something is wrong and there is. We have forgotten to configure the managed identity for federation. In other words, when we present our Kubernetes token, Azure AD needs information to validate it and return an AAD token.

Use the following command to create a federated credential on the user-assigned managed identity you created earlier:

RG=your_resource_group
IDENTITY=your_chosen_identity_name
AKD_OIDC_ISSUER=your_oidc_issuer
SANAME=sademo

az identity federated-credential create --name fic-sademo \
  --identity-name $IDENTITY \
  --resource-group $RG --issuer ${AKS_OIDC_ISSUER} \
  --subject system:serviceaccount:default:$SANAME

After running the above command, the Azure Managed Identity has the following configuration:

Federated credentials on the Managed Identity

More than one credential is possible. Click on the name of the federated credential. You will see:

Details of the federated credential

Above, the OIDC Issuer URL is set to point to our cluster. We expect a token with a subject identifier (sub) of system:serviceaccount:default:sademo. You can check the decoded jwt earlier in this post to see that the sub field in the token issued by Kubernetes matches the one above. It needs to match or the process will fail.

Now we can run the command again:

az login --federated-token "$(cat $AZURE_FEDERATED_TOKEN_FILE)" \
--service-principal -u $AZURE_CLIENT_ID -t $AZURE_TENANT_ID

You will be logged in to the Azure CLI with the managed identity credentials:

But what about your own apps?

Above, we used the Azure CLI. The most recent versions (>= 2.30.0) support federated credentials and use MSAL. But what about your custom code?

The code below is written in Python and uses the Python Azure identity client library with DefaultAzureCredential. This code works with managed identity in Azure Container Apps or Azure App Service and was not modified. Here’s the code for reference:

import threading
import os
import logging
import time
import signal
from azure.keyvault.secrets import SecretClient
from azure.identity import DefaultAzureCredential

from azure.appconfiguration.provider import (
    AzureAppConfigurationProvider,
    SettingSelector,
    AzureAppConfigurationKeyVaultOptions
)

logging.basicConfig(encoding='utf-8', level=logging.WARNING)

def get_config(endpoint):
  selects = {SettingSelector(key_filter=f"myapp:*", label_filter="prd")}
  trimmed_key_prefixes = {f"myapp:"}
  key_vault_options = AzureAppConfigurationKeyVaultOptions(secret_resolver=retrieve_secret)
  app_config = {}
  try:
    app_config = AzureAppConfigurationProvider.load(
            endpoint=endpoint, credential=CREDENTIAL, selects=selects, key_vault_options=key_vault_options, 
            trimmed_key_prefixes=trimmed_key_prefixes)
  except Exception as ex:
    logging.error(f"error loading app config: {ex}")

  return app_config

def run():
    try:
      global CREDENTIAL 
      CREDENTIAL = DefaultAzureCredential(exclude_visual_studio_code_credential=True)
    except Exception as ex:
      logging.error(f"error setting credentials: {ex}")

    endpoint = os.getenv('AZURE_APPCONFIGURATION_ENDPOINT')

    if not endpoint:
        logging.error("Environment variable 'AZURE_APPCONFIGURATION_ENDPOINT' not set")

    app_config =  {}
    while True:
        if not app_config:
            logging.warning("trying to load app config")
            app_config = get_config(endpoint)
        else:
            config_value=app_config['appkey']
            logging.warning(f"doing useful work with {config_value}")
            # if key exists in app_config, do something with it
            if 'mysecret' in app_config:
                logging.warning(f"and hush hush, there's a secret: {app_config['mysecret']}")
        time.sleep(5)


class GracefulKiller:
  kill_now = False
  def __init__(self):
    signal.signal(signal.SIGINT, self.exit_gracefully)
    signal.signal(signal.SIGTERM, self.exit_gracefully)

  def exit_gracefully(self, *args):
    self.kill_now = True


def retrieve_secret(uri):
    try:
        # uri is in format: https://<keyvaultname>.vault.azure.net/secrets/<secretname>
        # retrieve key vault uri and secret name from uri
        vault_uri = "https://" + uri.split('/')[2]
        secret_name = uri.split('/')[-1]
        logging.warning(f"Retrieving secret {secret_name} from {vault_uri}...")

        # retrieve the secret from Key Vault; CREDENTIAL was set globally
        secret_client = SecretClient(vault_url=vault_uri, credential=CREDENTIAL)

        # get secret value from Key Vault
        secret_value = secret_client.get_secret(secret_name).value

    except Exception as ex:
        print(f"retrieving secret: {ex}")
    
    return secret_value

# main function
def main():
    # create a Daemon tread
    t = threading.Thread(daemon=True, target=run, name="worker")
    t.start()
    

    killer = GracefulKiller()
    while not killer.kill_now:
        time.sleep(1)

    logging.info("Doing some important cleanup before exiting")
    logging.info("Gracefully exiting")


if __name__ == "__main__":
    main()

On Docker Hub, the gbaeke/worker:1.0.0 image runs this code. The following manifest runs the code on Kubernetes with the same managed identity as the Azure CLI example (same service account):

apiVersion: apps/v1
kind: Deployment
metadata:
  name: worker
  namespace: default
  labels:
    app: worker
spec:
  replicas: 1
  selector:
    matchLabels:
      app: worker
  template:
    metadata:
      labels:
        app: worker
    spec:
      # needs to refer to service account used with federation
      serviceAccount: sademo
      containers:
        - name: worker
          image: gbaeke/worker:1.0.0
          env:
            - name: AZURE_APPCONFIGURATION_ENDPOINT
              value: https://ac-appconfig-vr6774lz3bh4i.azconfig.io

Note that the code tries to connect to Azure App Configuration. The managed identity has been given the App Configuration Data Reader role on a specific instance. The code tries to read the value of key myapp:appkey with label prd from that instance:

App Config key and values

To make the code work, the environment variable AZURE_APPCONFIGURATION_ENDPOINT is set to the URL of the App Config instance.

In the container logs, we can see that the value was successfully retrieved:

Log stream of worker

And yes, the code just works! It successfully connected to App Config and retrieved the value. The environment variables, set by the webhook discussed earlier, make this work, together with the Python Azure identity library!

Conclusion

Workload Identity works like a charm and is relatively easy to configure. At the time of writing (end of November 2022), I guess we are pretty close to general availability and we finally will have a fully supported managed identity solution for AKS and beyond!

First steps with Crossplane

Image Source: crossplane.io

Although Crossplane has been around for a while, I never got around to trying it. Crossplane has many capabilities. However, in this post, I will focus on the following aspects:

  • Installing Crossplane on a Kubernetes cluster (AKS); you can install on a local cluster as well (e.g., k3s, kind, minikube, …) but then you would need Azure Arc for Kubernetes to install the microsoft.flux extension (I will be using GitOps with Flux via that extension)
  • Adding and configuring providers for Azure and Kubernetes: providers allow you to deploy to Azure and Kubernetes (and much more) from Crossplane
  • Deploying Azure infrastructure with Crossplane using a fully declarative GitOps approach

Introduction

Crossplane basically allows you to build a control plane that you or your teams can use to deploy infrastructure and applications. This control plane is built on Kubernetes. In short, suppose I want to deploy an Azure resource group with Crossplane, I would create the below YAML file and apply it with kubectl apply -f filename.yaml.

This is, in essence, a fully declarative approach to deploying Azure infrastructure using Kubernetes. There are other projects, such as the Azure Service Operator v2, that do something similar.

apiVersion: azure.jet.crossplane.io/v1alpha2
kind: ResourceGroup
metadata:
  name: rg-crossplane
spec:
  forProvider:
    location: "westeurope"
    tags:
      provisioner: crossplane
  providerConfigRef:
    name: default

In order to enable this functionality, you need the following:

  • Install Crossplane on your Kubernetes cluster
  • Add a provider that can create Azure resources; above the jet provider for Azure is used; more about providers later
  • Configure the provider with credentials; in this case Azure credentials

In a diagram:

Install Crossplane from git with Flux on AKS; deploy an Azure resource group and another AKS cluster from Crossplane; create a namespace on that new cluster

Combination with GitOps

Although you can install and configure Crossplane manually and just use kubectl to add custom resources, I wanted to add Crossplane and custom resources using GitOps. To that end, I am using Azure Kubernetes Service (AKS) with the microsoft.flux extension. For more information to enable and install the extension, see my Flux v2 quick guide.

⚠️ The git repository I am using with Flux v2 and Crossplane is here: https://github.com/gbaeke/crossplane/tree/blogpost. This refers to the blogpost branch, which should match the content of this post. Tbe main branch might be different.

The repo contains several folders that match Flux kustomizations:

  • infra folder: installs Crossplane and Azure Key Vault to Kubernetes; an infra kustomization will point to this folder
  • secrets folder: creates a secret with Azure Key Vault to Kubernetes from Azure Key Vault; the secrets kustomization will point to this folder
  • crossplane-apps folder: installs Azure resources and Kubernetes resources with the respective Crossplane providers; the apps kustomization will point to this folder

Note: if you do not know what Flux kustomizations are and how Flux works, do check my Flux playlist: https://www.youtube.com/playlist?list=PLG9qZAczREKmCq6on_LG8D0uiHMx1h3yn. The videos look at the open source version of Flux and not the microsoft.flux extension. To learn more about that extension, see https://www.youtube.com/watch?v=w_eoJbgDs3g.

Installing Crossplane

The infra customization installs Crossplane and Azure Key Vault to Kubernetes. The latter is used to sync a secret from Key Vault that contains credentials for the Crossplane Azure provider. More details are in the diagram below:

As noted above, the installation of Crossplane is done with Flux. First, there is the HelmRepository resource that adds the Crossplane Helm repository to Flux.

apiVersion: source.toolkit.fluxcd.io/v1beta2
kind: HelmRepository
metadata:
  namespace: config-infra
  name: crossplane
spec:
  interval: 1m0s
  url: https://charts.crossplane.io/stable

Next, there is the HelmRelease that installs Crossplane. Important: target namespace is crossplane-system (bottom line):

apiVersion: helm.toolkit.fluxcd.io/v2beta1
kind: HelmRelease
metadata:
  name: crossplane
  namespace: config-infra
spec:
  chart:
    spec:
      chart: crossplane
      reconcileStrategy: ChartVersion
      sourceRef:
        kind: HelmRepository
        name: crossplane
        namespace: config-infra
  install:
    createNamespace: true
  interval: 1m0s
  targetNamespace: crossplane-system

For best results, in the YAML above, set the namespace of the resource to the namespace you use with the AKS k8s-configuration. The resources to install Azure Key Vault to Kubernetes are similar.

To install the Crossplane jet provider for Azure:

---
apiVersion: pkg.crossplane.io/v1alpha1
kind: ControllerConfig
metadata:
  name: jet-azure-config
  labels:
    app: crossplane-provider-jet-azure
spec:
  image: crossplane/provider-jet-azure-controller:v0.9.0
  args: ["-d"]
---
apiVersion: pkg.crossplane.io/v1
kind: Provider
metadata:
  name: crossplane-provider-jet-azure
spec:
  package: crossplane/provider-jet-azure:v0.9.0
  controllerConfigRef:
    name: jet-azure-config

Above, debugging is turned on for the provider. This is optional. The provider actually runs in the crossplane-system namespace:

jet provider

The provider is added via the Provider resource (second resource in the YAML manifest).

We can now create the AKS k8s-configuration, which creates a Flux source and a kustomization:

RG=your AKS resource group
CLUSTER=your AKS cluster name (to install Crossplane to)

az k8s-configuration flux create -g $RG -c $CLUSTER \
  -n cluster-config --namespace config-infra -t managedClusters \
  --scope cluster -u https://github.com/gbaeke/crossplane \
  --branch main  \
  --kustomization name=infra path=./infra prune=true

The Flux source will be the repo specified with -u. There is one kustomization: infra. Pruning is turned on. With pruning, removing manifests from the repo results is removing them from Kubernetes.

The k8s-configuration should result in:

Don’t mind the other Kustomizations; will be added later; this is the GitOps view in the properties of the cluster in the Azure Portal

Crossplane is now installed with two providers. We can now configure the Azure provider with credentials.

Configuring Azure Credentials

You need to create a service principal by following the steps in https://crossplane.io/docs/v1.9/cloud-providers/azure/azure-provider.html. I compacted the resulting JSON with:

cat <path-to-JSON> | jq -c

The output of the above command was added to Key Vault:

Azure creds in Key Vault

The Key Vault I am using uses the Azure RBAC permission model. Ensure that the AKS cluster’s kubelet identity has at least the Key Vault Secrets User role. It is a user-assigned managed identity with a name like clustername-agentpool.

To actually create a Kubernetes secret from this Key Vault secret, the secrets folder in the git repo contains the manifest below:

apiVersion: spv.no/v2beta1
kind: AzureKeyVaultSecret
metadata:
  name: azure-creds 
  namespace: crossplane-system
spec:
  vault:
    name: kvgebadefault # name of key vault
    object:
      name: azure-creds # name of the akv object
      type: secret # akv object type
  output: 
    secret: 
      name: azure-creds # kubernetes secret name
      dataKey: creds # key to store object value in kubernetes secret

This creates a Kubernetes secret in the crossplane-system namespace with name azure-creds and a key creds that holds the credentials JSON.

Secret as seen in k9s
the decoded secret as shown in k9s

To add the secret(s) as an extra kustomization, run:

RG=your AKS resource group
CLUSTER=your AKS cluster name

az k8s-configuration flux create -g $RG -c $CLUSTER \
  -n cluster-config --namespace config-infra -t managedClusters \
  --scope cluster -u https://github.com/gbaeke/crossplane \
  --branch main  \
  --kustomization name=infra path=./infra prune=true \
  --kustomization name=secrets path=./secrets prune=true dependsOn=["infra"]

Note that the secrets kustomization is dependent on the infra kustomization. After running this command, ensure the secret is in the crossplane-system namespace. The k8s-configuration uses the same source but now has two kustomizations.

Deploying resources with the Jet provider for Azure

Before explaining how to create Azure resources, a note on providers. As a novice Crossplane user, I started with the following Azure provider: https://github.com/crossplane-contrib/provider-azure. This works well but it is not so simple for contributors to ensure the provider is up-to-date with the latest and greatest Azure features. For example, if you deploy AKS, you cannot use managed identity, the cluster uses availability sets etc…

To improve this, Terrajet was created. It is a code generation framework that can generate Crossplane CRDs (custom resource definitions) and sets up the provider to use Terraform. Building on top of Terraform is an advantage because it is more up-to-date with new cloud features. That is the reason why this post uses the jet provider. When we later create an AKS cluster, it will take advantage of managed identity and other newer features.

Note: there is also a Terraform provider that can take Terraform HCL to do anything you want; we are not using that in this post

Ok, let’s create a resource group and deploy AKS. First, we have to configure the provider with Azure credentials. The crossplane-apps folder contains a file called jet-provider-config.yaml:

apiVersion: azure.jet.crossplane.io/v1alpha1
kind: ProviderConfig
metadata:
  name: default
spec:
  credentials:
    source: Secret
    secretRef:
      namespace: crossplane-system
      name: azure-creds
      key: creds

The above ProviderConfig tells the provider to use the credentials in the Kubernetes secret we created earlier. We know we are configuring the jet provider from the apiVersion: azure.jet.crossplane.io/v1alpha1.

With that out of the way, we can create the resource group and AKS cluster. Earlier in this post, the YAML to create the resource group was already shown. To create a basic AKS cluster called clu-cp in this group, aks.yaml is used:

apiVersion: containerservice.azure.jet.crossplane.io/v1alpha2
kind: KubernetesCluster
metadata:
  name: clu-cp
spec:
  writeConnectionSecretToRef:
    name: example-kubeconfig
    namespace: crossplane-system
  forProvider:
    location: "westeurope"
    resourceGroupNameRef:
      name: rg-crossplane
    dnsPrefix: "clu-cp"
    defaultNodePool:
      - name: default
        nodeCount: 1
        vmSize: "Standard_D2_v2"
    identity:
      - type: "SystemAssigned"
    tags:
      environment: dev
  providerConfigRef:
    name: default

Above, we refer to our resource group by name (resourceGroupNameRef) and we write the credentials to our cluster to a secret (writeConnectionSecretToRef). That secret will contain keys with the certificate and private key, but also a kubeconfig key with a valid kubeconfig file. We can use that later to connect and deploy to the cluster.

To see an example of connecting to the deployed cluster and creating a namespace, see k8s-provider-config.yaml and k8s-namespace.yaml in the repo. The resource k8s-provider-config.yaml will use the example-kubeconfig secret created above to connect to the AKS cluster that we created in the previous steps.

To create a kustomization for the crossplane-apps folder, run the following command:

RG=your AKS resource group
CLUSTER=your AKS cluster name

az k8s-configuration flux create -g $RG -c $CLUSTER \
  -n cluster-config --namespace config-infra -t managedClusters \
  --scope cluster -u https://github.com/gbaeke/crossplane \
  --branch main  \
  --kustomization name=infra path=./infra prune=true \
  --kustomization name=secrets path=./secrets prune=true dependsOn=["infra"] \
  --kustomization name=apps path=./crossplane-apps prune=true dependsOn=["secrets"]

This folder does not contain a kustomization.yaml file. Any manifest you drop in it will be applied to the cluster! The k8s-kustomization now has the same source but three kustomizations:

infra, secrets and apps kustomizations

After a while, an AKS cluster clu-cp should be deployed to resource group rg-crossplane:

AKS deployed by Crossplane running on another AKS cluster

To play around with this, I recommend using Visual Studio Code and the GitOps extension. When you make a change locally and push to main, to speed things up, you can reconcile the git repository and the apps kustomization manually:

Reconcile the GitRepository source and kustomization from the GitOps extension for Visual Studio Code

Conclusion

In this post, we looked at installing and configuring Crossplane on AKS via GitOps and the microsoft.flux extension. In addition, we deployed a few Azure resources with Crossplane and its jet provider for Azure. We only scratched the surface here but I hope this gets you started quickly when evaluating Crossplane for yourself.

Learn to use the Dapr authorization middleware

Based on a customer conversation, I decided to look into the Dapr middleware components. More specifically, I wanted to understand how the OAuth 2.0 middleware works that enables the Authorization Code flow.

In the Authorization Code flow, an authorization code is a temporary code that a client obtains after being redirected to an authorization URL (https://login.microsoftonline.com/{tenant}/oauth2/authorize) where you provide your credentials interactively (not useful for service-service non-interactive scenarios). That code is then handed to your app which exchanges it for an access token. With the access token, the authenticated user can access your app.

Instead of coding this OAuth flow in your app, we will let the Dapr middleware handle all of that work. Our app can then pickup the token from an HTTP header. When there is a token, access to the app is granted. Otherwise, Dapr (well, the Dapr sidecar next to your app) redirects your client to the authorization server to get a code.

Let’s take a look how this all works with Azure Active Directory. Other authorization servers are supported as well: Facebook, GitHub, Google, and more.

What we will build

Some experience with Kubernetes, deployments, ingresses, Ingress Controllers and Dapr is required.

If you think the explanation below can be improved, or I have made errors, do let me know. Let’s go…

Create an app registration

Using Azure AD means we need an app registration! Other platforms have similar requirements.

First, create an app registration following this quick start. In the first step, give the app a name and, for this demo, just select Accounts in this organizational directory only. The redirect URI will be configured later so just click Register.

After following the quick start, you should have:

  • the client ID and client secret: will be used in the Dapr component
  • the Azure AD tenant ID: used in the auth and token URLs in the Dapr component; Dapr needs to know where to redirect to and where to exchange the authorization code for an access token
App registration in my Azure AD Tenant

There is no need for your app to know about these values. All work is done by Dapr and Dapr only!

We will come back to the app registration later to create a redirect URI.

Install an Ingress Controller

We will use an Ingress Controller to provide access to our app’s Dapr sidecar from the Internet, using HTTP.

In this example, we will install ingress-nginx. Use the following commands (requires Helm):

helm upgrade --install ingress-nginx ingress-nginx \
  --repo https://kubernetes.github.io/ingress-nginx \
  --namespace ingress-nginx --create-namespace

Although you will find articles about daprizing your Ingress Controller, we will not do that here. We will use the Ingress Controller simply as a way to provide HTTP access to the Dapr sidecar of our app. We do not want Dapr-to-Dapr gRPC traffic between the Ingress Controller and our app.

When ingress-nginx is installed, grab the public IP address of the service that it uses. Use kubectl get svc -n ingress-nginx. I will use the IP address with nip.io to construct a host name like app.11.12.13.14.nip.io. The nip.io service resolves such a host name to the IP address in the name automatically.

The host name will be used in the ingress and the Dapr component. In addition, use the host name to set the redirect URI of the app registration: https://app.11.12.13.14.nip.io. For example:

Added a platform configuration for a web app and set the redirect URI

Note that we are using https here. We will configure TLS on the ingress later.

Install Dapr

Install the Dapr CLI on your machine and run dapr init -k. This requires a working Kubernetes context to install Dapr to your cluster. I am using a single-node AKS cluster in Azure.

Create the Dapr component and configuration

Below is the Dapr middleware component we need. The component is called myauth. Give it any name you want. The name will later be used in a Dapr configuration that is, in turn, used by the app.

apiVersion: dapr.io/v1alpha1
kind: Component
metadata:
  name: myauth
spec:
  type: middleware.http.oauth2
  version: v1
  metadata:
  - name: clientId
    value: "CLIENTID of your app reg"
  - name: clientSecret
    value: "CLIENTSECRET that you created on the app reg"
  - name: authURL
    value: "https://login.microsoftonline.com/TENANTID/oauth2/authorize"
  - name: tokenURL
    value: "https://login.microsoftonline.com/TENANTID/oauth2/token"
  - name: redirectURL
    value: "https://app.YOUR-IP.nip.io"
  - name: authHeaderName
    value: "authorization"
  - name: forceHTTPS
    value: "true"
scopes:
- super-api

Replace YOUR-IP with the public IP address of the Ingress Controller. Also replace the TENANTID.

With the information above, Dapr can exchange the authorization code for an access token. Note that the client secret is hard coded in the manifest. It is recommended to use a Kubernetes secret instead.

The component on its own is not enough. We need to create a Dapr configuration that references it:

piVersion: dapr.io/v1alpha1
kind: Configuration
metadata:
  name: auth
spec:
  tracing:
    samplingRate: "1"
  httpPipeline:
    handlers:
    - name: myauth # reference the oauth component here
      type: middleware.http.oauth2    

Note that the configuration is called auth. Our app will need to use this configuration later, via an annotation on the Kubernetes pods.

Both manifests can be submitted to the cluster using kubectl apply -f. It is OK to use the default namespace for this demo. Keep the configuration and component in the same namespace as your app.

Deploy the app

The app we will deploy is super-api, which has a /source endpoint to dump all HTTP headers. When authentication is successful, the authorization header will be in the list.

Here is deployment.yaml:

apiVersion: apps/v1
kind: Deployment
metadata:
  name: super-api-deployment
  labels:
    app: super-api
spec:
  replicas: 1
  selector:
    matchLabels:
      app: super-api
  template:
    metadata:
      labels:
        app: super-api
      annotations:
        dapr.io/enabled: "true"
        dapr.io/app-id: "super-api"
        dapr.io/app-port: "8080"
        dapr.io/config: "auth" # refer to Dapr config
        dapr.io/sidecar-listen-addresses: "0.0.0.0" # important
    spec:
      securityContext:
        runAsUser: 10000
        runAsNonRoot: true
      containers:
        - name: super-api
          image: ghcr.io/gbaeke/super:1.0.7
          securityContext:
            readOnlyRootFilesystem: true
            capabilities:
              drop:
                - all
          args: ["--port=8080"]
          ports:
            - name: http
              containerPort: 8080
              protocol: TCP
          env:
            - name: IPADDRESS
              valueFrom:
                fieldRef:
                  fieldPath: status.podIP
            - name: WELCOME
              value: "Hello from the Super API on AKS!!! IP is: $(IPADDRESS)"
            - name: LOG
              value: "true"       
          resources:
              requests:
                memory: "64Mi"
                cpu: "50m"
              limits:
                memory: "64Mi"
                cpu: "50m"
          livenessProbe:
            httpGet:
              path: /healthz
              port: 8080
            initialDelaySeconds: 5
            periodSeconds: 15
          readinessProbe:
              httpGet:
                path: /readyz
                port: 8080
              initialDelaySeconds: 5
              periodSeconds: 15

Note the annotations in the manifest above:

  • dapr.io/enabled: injects the Dapr sidecar in the pods
  • dapr.io/app-id: a Dapr app needs an id; a service will automatically be created with that id and -dapr appended; in our case the name will be super-api-dapr; our ingress will forward traffic to this service
  • dapr.io/app-port: Dapr will need to call endpoints in our app (after authentication in this case) so it needs the port that our app container uses
  • dapr.io/config: refers to the configuration we created above, which enables the http middleware defined by our OAuth component
  • dapr.io/sidecar-listen-addresses: ⚠️ needs to be set to “0.0.0.0”; without this setting, we will not be able to send requests to the Dapr sidecar directly from the Ingress Controller

Submit the app manifest with kubectl apply -f.

Check that the pod has two containers: the Dapr sidecar and your app container. Also check that there is a service called super-api-dapr. There is no need to create your own service. Our ingress will forward traffic to this service.

Create an ingress

In the same namespace as the app (default), create an ingress. This requires the ingress-nginx Ingress Controller we installed earlier:

apiVersion: networking.k8s.io/v1
kind: Ingress
metadata:
  name: super-api-ingress
  namespace: default
  annotations:
    nginx.ingress.kubernetes.io/rewrite-target: /
spec:
  ingressClassName: nginx
  tls:
    - hosts:
      - app.YOUR-IP.nip.io
      secretName: tls-secret 
  rules:
  - host: app.YOUR-IP.nip.io
    http:
      paths:
      - pathType: Prefix
        path: "/"
        backend:
          service:
            name: super-api-dapr
            port: 
              number: 80

Replace YOUR-IP with the public IP address of the Ingress Controller.

For this to work, you also need a secret with a certificate. Use the following commands:

openssl req -x509 -nodes -days 365 -newkey rsa:2048 -keyout tls.key -out tls.crt -subj "/CN=app.YOUR-IP.nip.io"
kubectl create secret tls tls-secret --key tls.key --cert tls.crt

Replace YOUR-IP as above.

Testing the configuration

Let’s use the browser to connect to the /source endpoint. You will need to use the Dapr invoke API because the request will be sent to the Dapr sidecar. You need to speak a language that Dapr understands! The sidecar will just call http://localhost:8080/source and send back the response. It will only call the endpoint when authentication has succeeded, otherwise you will be redirected.

Use the following URL in the browser. It’s best to use an incognito session or private window.

https://app.20.103.17.249.nip.io/v1.0/invoke/super-api/method/source

Your browser will warn you of security risks because the certificate is not trusted. Proceed anyway! 😉

Note: we could use some URL rewriting on the ingress to avoid having to use /v1.0/invoke etc… You can also use different URL formats. See the docs.

You should get an authentication screen which indicates that the Dapr configuration is doing its thing:

Redirection to the authorize URL

After successful authentication, you should see the response from the /source endpoint of super-api:

Response from /source

The response contains an Authorization header. The header contains a JWT after the word Bearer. You can paste that JWT in https://jwt.io to see its content. We can only access the app with a valid token. That’s all we do in this case, ensuring only authenticated users can access our app.

Conclusion

In this article, we used Dapr to secure access to an app without having to modify the app itself. The source code of super-api was not changed in any way to enable this functionality. Via a component and a configuration, we instructed our app’s Dapr sidecar to do all this work for us. App endpoints such as /source are only called when there is a valid token. When there is such a token, it is saved in a header of your choice.

It is important to note that we have to send HTTP requests to our app’s sidecar for this to work. To enable this, we instructed the sidecar to listen on all IP addresses of the pod, not just 127.0.0.1. That allows us to send HTTP requests to the service that Dapr creates for the app. The ingress forwards requests to the Dapr service directly. That also means that you have to call your endpoint via the Dapr invoke API. I admit that can be confusing in the beginning. 😉

Note that, at the time of this writing (June 2022), the OAuth2 middleware in Dapr is in an alpha state.