Update: this post used an older version of Prompt Flow at the time. It had some issues with building and running the Docker image without issues. In version 1.5.0, it should work fine because the Dockerfile now also installs gcc.
In the previous post, we created a flow with Prompt Flow in Visual Studio Code. The Prompt Flow extension for VS Code has a visual flow editor to test the flow. You simply provide the input and click the Run button. When the flow is finished, the result can be seen in the Outputs node, including a trace of the flow:
Running a flow in Prompt Flow
Now it’s time to deploy the flow. One of the options is creating a container image with Docker.
Before we start, we will first convert this flow into a chat flow. Chat does not make much sense for this flow. However, the Docker container includes a UI to run your flow via a chat interface. You will also be able to test your flow locally in a web app.
Convert the flow to a chat flow
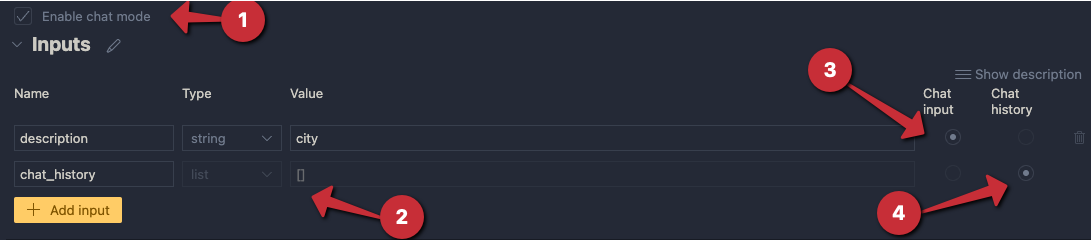
To convert the flow to a chat flow, enable chat mode and add chat_history to the Inputs node:
Enable chat
To include the chat history in your conversations, modify the .jinja2 template in the LLM node:
system:
You return the url to an image that best matches the user's question. Use the provided context to select the image. Only return the url. When no
matching url is found, simply return NO_IMAGE

{% for item in chat_history %}
user:
{{item.inputs.description}}
assistant:
{{item.outputs.url}}
{% endfor %}

user:
{{description}}

context : {{search_results}}
Enabling chat history allows you to loop over its content and reconstruct the user/assistant interactions before adding the most recent description. When you run the flow, you get:
Running a chat flow
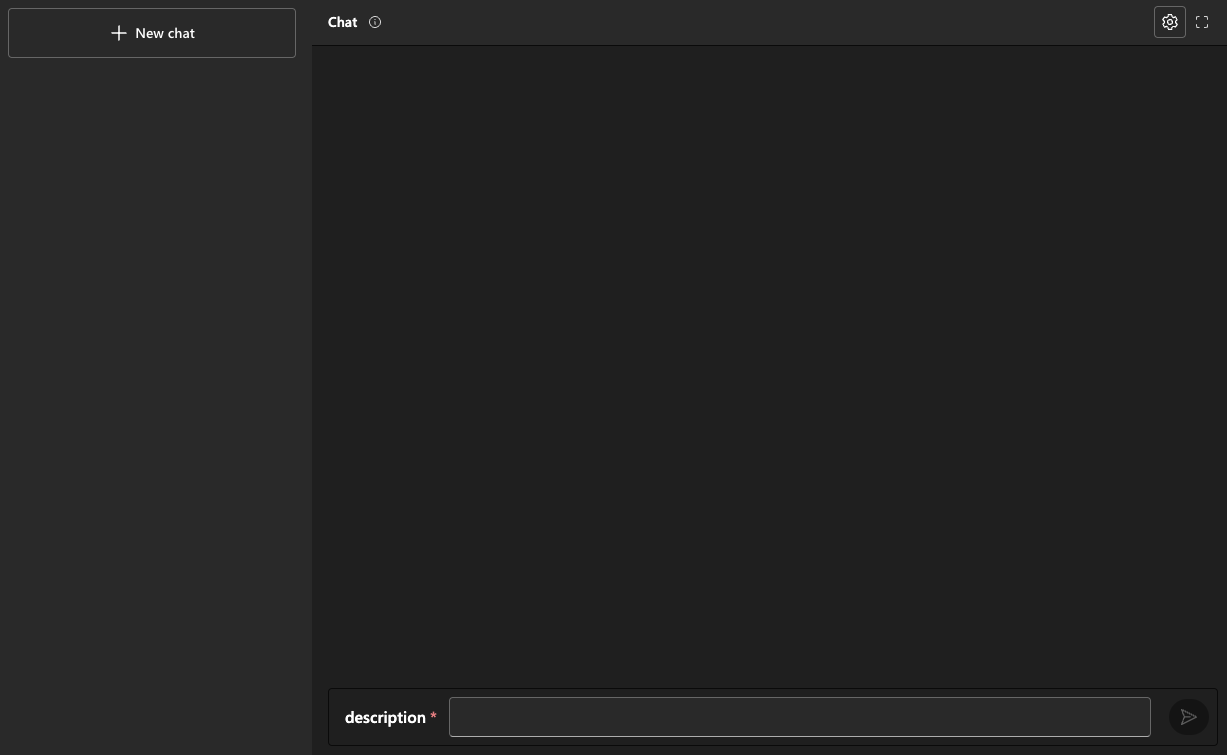
The third option will give you a GUI to test your flow:
Interactive run
As you can probably tell, this requires Streamlit. The first time you run this flow, check the terminal for instructions about the packages to install. When you are finished, press CTRL-C in the terminal.
Now that we know the chat flow works, we can create the Docker image.
⚠️ Important: a chat flow is not required to build the Docker image; we only add it here to illustrate the user interface that the Docker image can present to the user; you can always call your flow using a HTTP endpoint, chat flow or not
Generating the Docker image
Before creating the Docker image, ensure your Python requirements.txt file in your flow’s folder has the following content:
We need promptflow-tools to support tools like the embedding tool in the container. We also need azure-search-documents to use in the custom Python tool.
To build the flow as a Docker image, you should be able to use the build icon and select Build as Docker:
Build icon
However, in my case, that did not result in any output to build a Docker image. This is a temporary issue from the 1.6 version of the extension and will be fixed. For now, I recommend building the image with the command line tool:
Note that this copies your flow’s files to a flow folder under the docker folder. Ensure that requirements.txt in the docker/flow folder matches requirements.txt in your original flow folder (it should).
You can now cd into the Docker folder and run the following command. Don’t forget the . at the end:
docker build -t YOURTAG .
In my case, I used:
docker build -t gbaeke/pfimage .
After running the above command, you might get an error. I got: ERROR: failed to solve... I fixed that by modifying the Docker file. Move the RUN apt-get line above the RUN conda create line and add gcc:
# syntax=docker/dockerfile:1
FROM docker.io/continuumio/miniconda3:latest

WORKDIR /

COPY ./flow /flow

RUN apt-get update && apt-get install -y runit gcc

# create conda environment
RUN conda create -n promptflow-serve python=3.9.16 pip=23.0.1 -q -y && \
    conda run -n promptflow-serve \
.......
After this modification, the docker build command ran successfully.
Running the image
The image contains the connections you created. Remember we created an Azure OpenAI connection and a custom connection. Connections contain both config and secrets. Although the config is available in the image, the secrets are not. You need to provide the secrets as environment variables.
You can find the names of the environment variables in the settings.json file:
Run the container as shown below and replace OPENAIKEY and AISEARCHKEY with the key to your Azure OpenAI resource and Azure AI Search resource. In the container, the code listens on port 8080 so we map that port to port 8080 on the host:
docker run -itp 8080:8080 -e OPEN_AI_CONNECTION_API_KEY=OPENAIKEY \
  AZURE_AI_SEARCH_CONNECTION_KEY=AISEARCHKEY
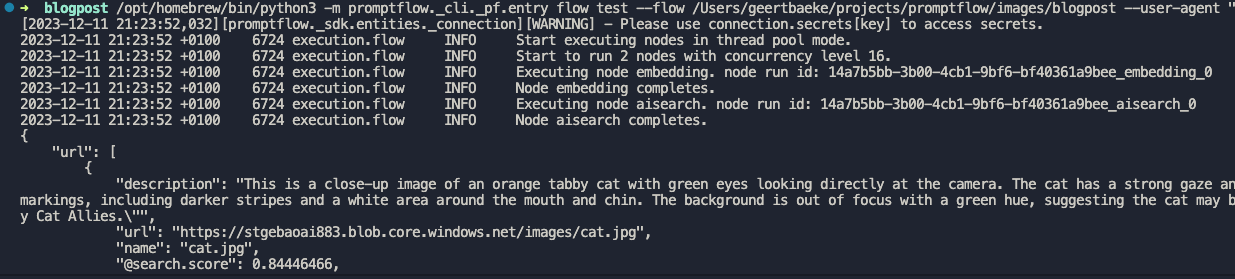
When you run the above command, you get the following output (some parts removed):
You should now be able to send requests to the score endpoint. The screenshot below shows a .http file with the call config and result:
Calling the flow via the container’s score endpoint
When you browse to http://localhost:8080, you get a chat interface like the one below:
Chat UI served by Docker container
In my case, the chat UI did not work. Although I could enter a description and press ENTER, I did not see the response. In the background, the flow was triggered, just the response was missing. Remember that these features, and Prompt Flow on your local machine are still experimental at the time of writing (December 2023). They will probably change quite a lot in the future or have changed by the time you read this.
Conclusion
Although you can create a flow in the cloud and deploy that flow to an online endpoint, you might want more control over the deployment. Developing the flow locally and building a container image gives you that control. Once the image is built and pushed to a container registry, you can deploy to your environment of choice. That could be Kubernetes, Azure Container Apps or any other environment that supports containers.
In this blog post, we will create a flow with Prompt Flow in Visual Studio Code. Prompt Flow is a suite of development tools to build LLM-based AI applications. It tries to cover the end-to-end development cycle, including prototyping, testing and deployment to production.
In Prompt Flow, you create flows. Flows link LLMs (large language models), prompts and tools together in an executable workflow. An example of such a flow is show below:
Sample flow
The flow above (basically a distributed acyclical graph – DAG – of functions) sends its input, a description to search for an image, to a tool that embeds the description with an Azure OpenAI embedding model. The embedding is used as input to a Python tool that does a similarity search in Azure AI Search. The search returns three results. The original input, together with the query results, are subsequently handed to an LLM (above, the final_result node) that hopefully picks the correct image url.
Although you could write your own API that does all of the above, Prompt Flow allows you to visually build, run and debug a flow that has input and output. When you are happy with the flow, you can convert it to an API. One of the ways to host the API is via a container.
We will build this flow on our local machine and host it as a container. Note that Prompt Flow can also be used from the portal using Azure Machine Learning or Azure AI Studio.
👉 Another blog post will describe how to build and run the container
Installing Prompt Flow on your machine
To install Prompt Flow you will need Python on your machine. Use Python 3.9 or higher. I use Python 3.11 on an Apple M2. Check the full installation instructions here. Without using a Python virtual environment, you can just run the following command to install Prompt Flow:
pip install promptflow promptflow-tools
Next, run pf -v to check the installation.
⚠️ Do not forget to install promptflow-tools because it enables the embedding tool, llm tool and other tools to be used as nodes in the flow; also ensure this package is installed in the container image that will be created for this flow
We will mainly use the Visual Code extension. Note that the pf command can be used to perform many of the tasks we will discuss below (e.g, creating connections, running a flow, etc…).
Creating an empty flow
In VS Code, ensure you opened an empty folder or create a new folder. Right click and select New flow in this directory. You will get the following question:
Flow selection
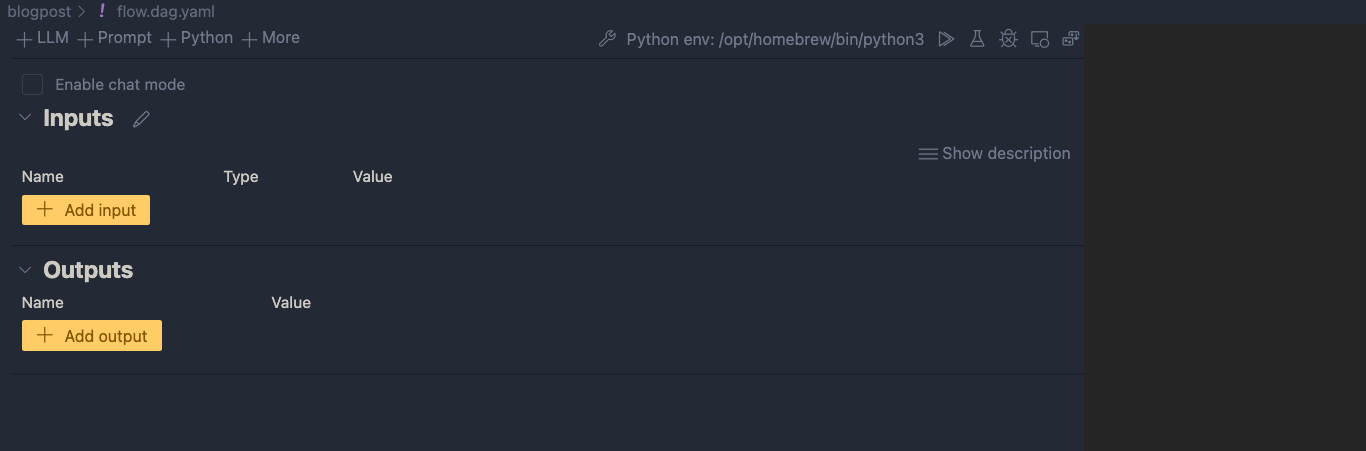
Select Empty Flow. This creates a file called flow.dag.yaml with the following content:
Empty flow.dag.yaml
If you look closely, you will see a link to open a Visual editor. Click that link:
Visual editor with empty input and output and blank canvas
We can now add input(s) and output(s) and add the nodes in between.
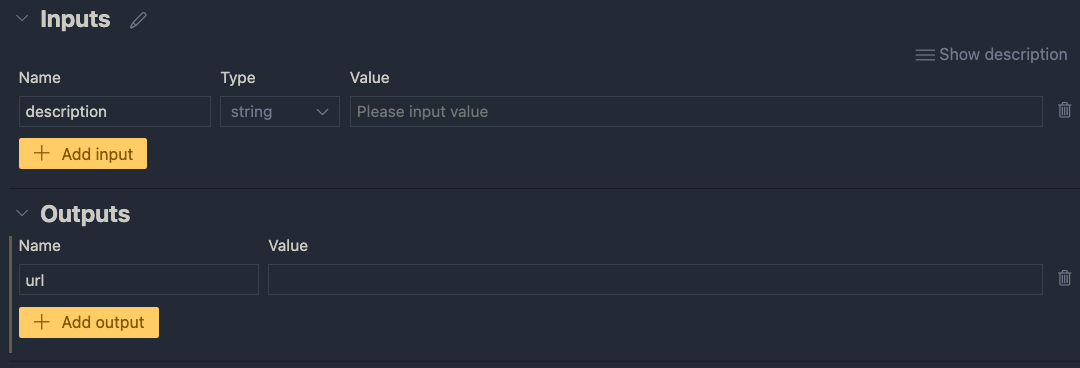
Inputs and outputs
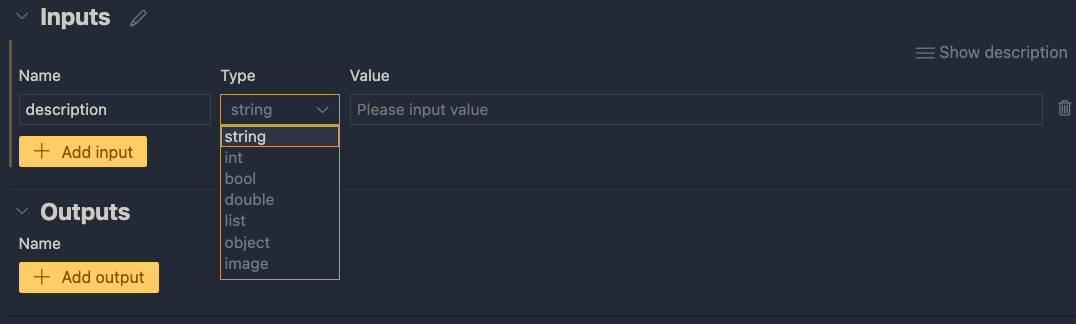
Inputs have a type and a value. Add a string input called description:
One string input: a description (of an image, like creature or fruit)
When you later run the flow, you can type the description in the Value textbox. When the flow is converted to an API, the API will except a description in the POST body.
Next, add an output called url. In the end, the flow returns a url to an image that matches the description:
One output: the url to a matching image
The value of the output will be the coming from another node. We still have to add those. If you click the Value dropdown list, you will only be able to select the input value for now. You can do that and click the run icon. Save your flow before running it.
Running the flow with output set to the input
When you click the run button, a command will be run in the terminal that runs the flow:
Output of the flow is JSON, here with just the url
Although this is not very useful, the flow runs and produces a result. The output is our input. We can now add nodes to do something useful.
Creating an embedding from the description
We need to embed the description to search for similar descriptions in an Azure AI Search index. If you are not sure what embeddings are, check Microsoft Learn for a quick intro. It short, it’s a bunch of numbers that represents the meaning of a piece of text. We can use the numbers of the description to compare it to the sets of numbers of image descriptions to see how close they are.
To create an embedding, we need access to an Azure OpenAI embedding model. Such a model takes text as input and returns the bunch of numbers we talked about. This model returns 1536 numbers, aka dimensions.
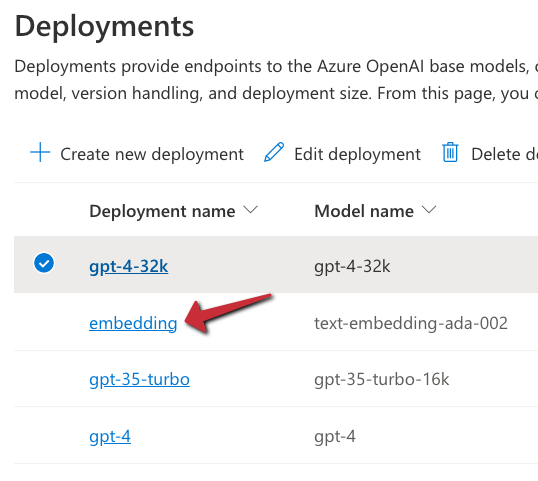
To use the model, we will need an Azure OpenAI resource’s endpoint and key. If you do not have an Azure OpenAI resource in Azure, create one and deploy the text-embedding-ada-002 model. In my example, the deployment is called embedding:
Embedding model in Azure OpenAI
With the Azure resources created, we can add a connection in Prompt Flow that holds the OpenAI endpoint and key:
Click the Prompt Flow extension icon and click + next to Azure OpenAI in the Connections section:
Azure OpenAI connection
A document will open that looks like the one below:
Connection information
Fill in the name and api_base only. The api_base is the https url to your Azure OpenAI instance. It’s something like https://OPENAIRESOURCENAME.openai.azure.com/. Do not provide the api_key. When you click Create connection (the smallish link at the bottom), you will be asked for the key.
After providing the key, the connection should appear under the Azure OpenAI section. You will need this connection in the embedding tool to point to the embedding model to use.
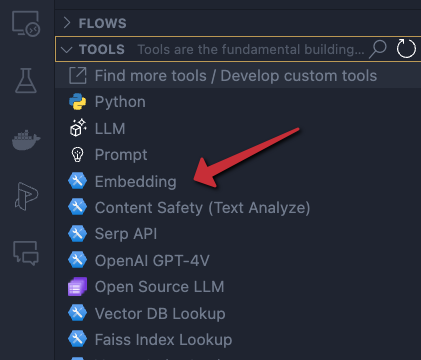
In the Prompt Flow extension pane, now click + next to Embedding in the TOOLS section:
Embedding tool
You will be asked for the tool’s name (top of VS Code window). Provide a name (e.g, embedding) and press enter. Select the connection you just created, the deployment name of your embedding model and the input. The input is the description we configured in the flow’s input node. We want to embed that description. The output of this tool will be a list of floating point numbers, a vector, of 1536 dimensions.
Embedding tool
The moment you set the input of the embedding, the input node will be connected to the embedding node on the canvas. To check if embedding works, you can connect the output of the embedding node to the url output and run the flow. You should then see the vector as output. The canvas looks like:
Show the embedding as output
Of course, we will need to supply the embedding to a vector search engine, not to the output. In our case, that is Azure AI Search. Let’s try that…
⚠️ Instead of connecting the embedding to the output, you can simply debug the embedding by clicking the debug icon in the embedding tool. The tool will be executed with the value of the input. The result should be a bunch of numbers in your terminal:
Although you can use a Vector DB Lookup tool that supports Azure AI Search, we will create a custom Python tool that does the same thing. The Python tool uses the azure-search-documents Python library to perform the search. Learning how to use Python tools is important to implement logic there is no specific tool for.
First, we will create a custom connection that holds the name of our Azure AI Search instance and a key to authenticate.
Similar to the Azure OpenAI connection, create a custom connection:
Custom connection
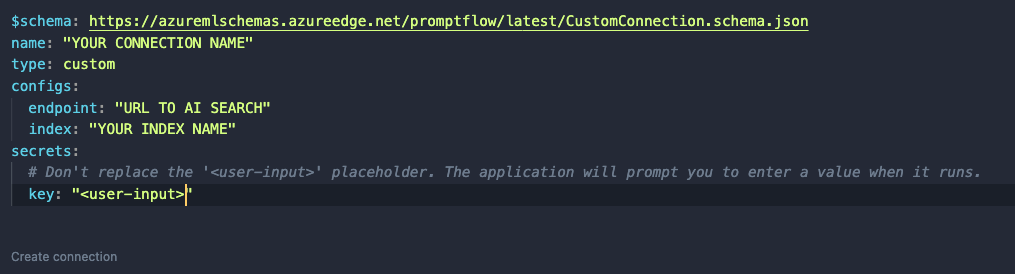
After clicking +, a document opens. Modify it as follows:
Custom connection content
Like before, set a name. In a custom connection, you can have configs and secrets. In configs add the Azure AI Search endpoint and index name. In the secrets set key to <user-input>. When you click Create connection, you will be asked to supply the key.
⚠️ Connection information is saved to a local SQLLite database in the .promtflow folder in your home folder
We can now add a Python tool. In TOOLS, next to Python click +. Give the tool a name and select new file. You should get a new Python file in your code with the filename set to <YOURTOOLNAME>.py. The code without comments is below:
This tool takes a string input and returns a string. The @tool decorator is required.
We need to change this code to get the custom connection information, query Azure AI Search and return search results as a list. The code is below:
from promptflow import tool
from promptflow.connections import CustomConnection
from azure.core.credentials import AzureKeyCredential
from azure.search.documents import SearchClient
from azure.search.documents.models import VectorizedQuery

@tool
def my_python_tool(vector: list, ai_conn: CustomConnection) -> list:
    ai_conn_dict = dict(ai_conn)
    endpoint = ai_conn_dict['endpoint']
    key = ai_conn_dict['key']
    index = ai_conn_dict['index']

    # query azure ai search
    credential = AzureKeyCredential(key)
    client = SearchClient(endpoint=endpoint,
                          index_name=index,
                          credential=credential)
    vector_query = VectorizedQuery(vector=vector, k_nearest_neighbors=3, fields="textVector", exhaustive=True)
    results = client.search(
        search_text=None,
        vector_queries=[vector_query],
        select=["name", "description", "url"]
    )

    # convert results to json list
    results = [dict(result) for result in results]

    return results
The function has two parameters: a vector of type list to match the output of the embedding tool, and a variable of type CustomConnection. The custom connection can be converted to a dict to retrieve both the configs and the secret.
Next, we use the configs and secret to perform the query with a SearchClient. The query only returns three fields from our index: name, description and url. The result returned from Azure AI Search is converted to a list and returned.
When you save the Python file and go back to your flow, you should see the Python tool (aisearch) with the vector and ai_conn field. If not, click the regenerate link. Set it as below:
Python tool
The input to the Python tool is the output from the embedding tool. We also pass in the custom connection to provide the configs and key to the tool.
You can set the output of the entire flow (url) to the output of the Python tool to check the results of the search when you run the flow:
Running the flow with Python tool’s output as output
I ran the flow with a description equal to cat. A list of three JSON objects is returned.The first search result is the url to cat.jpg but there are other results as well (not shown above).
Adding an LLM tool
Although we could just pick the first result from the search, that would not work very well. Azure AI Search will always return a result, even if it does not make much sense. In a search for nearest neighbors, your nearest neighbor could be very far away! 😀
For example, if I search for person with a hat, I will get a result even though I do not have such a picture in my index. It simply finds vectors that are “closest” but semantically “far” away from my description. That is bound to happen with just a few images in the index.
An LLM can look at the original description and see if it matches one of the search results. It might pick the 3rd result if it fits better. It might also decide to return nothing if there is no match. In order to do so, we will need a good prompt.
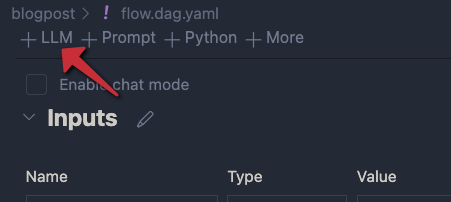
Click + LLM at the top left of the flow to add an LLM tool:
Adding an LLM
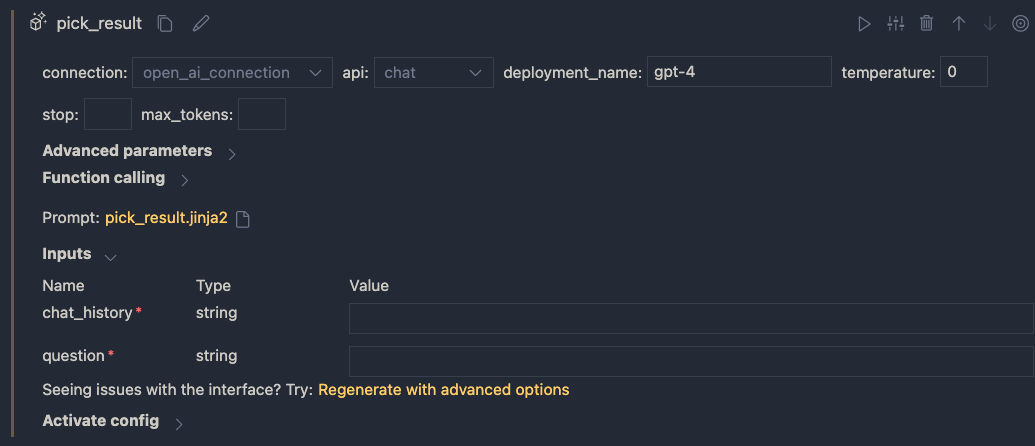
Give the LLM tool a name and select new file. In the flow editor, set the LLM model information:
LLM settings
You can reuse the connection that was used for the embedding. Ensure you have deployed a chat model in your Azure OpenAI resource. I deployed gpt-4 and called the deployment gpt-4 as well. I also set temperature to 0.
The inputs of the node do not make much sense. We do not need chat history for instance. The inputs come from a .jinja2 file that was created for you. The file has the name of the LLM tool. Following the example above, the name is pick_result.jinja2. Open that file and replace it with the following contents and save it:
system:
You return the url to an image that best matches the user's question. Use the provided context to select the image. Only return the url. When no
matching url is found, simply return NO_IMAGE

user:
{{description}}

context : {{search_results}}
The file defines a system message to tell the LLM what to do. The input from the user is the description from the input node. We provide extra context to the LLM as well (the output from search). The {{…}} serve as placeholders to inject data into the prompt.
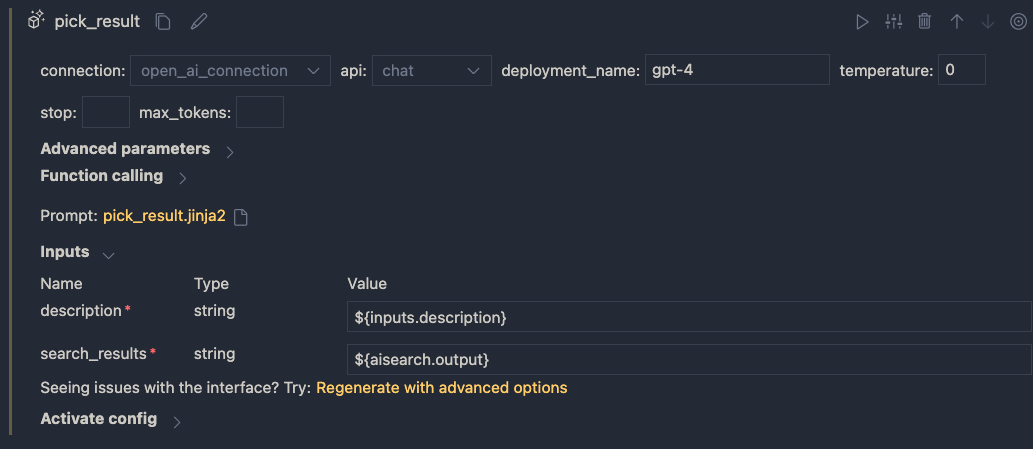
When you save the file and go back to the flow designer, you should see description and search_results as parameters. Set them as follows:
Inputs to the LLM node
In addition, set the output of the flow output node to the output of the LLM node:
Setting the output
Save your flow and run it. In my case, with a description of cat I get the following output:
Output is just a URL from the LLM node
It I use man with a hat as input, I get:
LLM did not find a URL to match the description
Using a prompt variant
Suppose we want to try a different prompt that returns JSON instead of text. To try that, we can create a prompt variant.
In the LLM node, click the variants icon:
Variants
You will see a + icon to create a new variant. Click it.
New variant
The variant appears under the original variant and is linked to a new file: pick_result_variant_1.jinja2. I have also set the variant as default. Let’s click the new file to open it. Add the following prompt:
system:
You return the url to an image that best matches the user's question. Use the provided context to select the image.
Return the url and name of the file as JSON. Here is an example of a response. Do not use markdown in the response. Use pure JSON.
{
  "url": "http://www.example.com/images/1.jpg",
  "name": "1.jpg"
}

If there is not matching image, return an empty string in the JSON:
{
  "url": ""
}

user:
{{description}}

context : {{search_results}}
This prompt should return JSON instead of just the url or NO_IMAGE. To test this, run the flow and select Use default variant for all nodes. When I run the flow with description cat, I get the following output:
JSON output
Because the flow’s output is already JSON, the string representation of the JSON result is used. Adding an extra Python tool that parses the JSON and outputs both the URL and file name might be a good idea here.
You can modify and switch between the prompts and see which one works best. This is especially handy when you are prototyping your flow.
Conclusion
On your local machine, Prompt Flow is easy to install and get started with. In this post we built a relatively simple flow that did not require a lot of custom code. We also touched on using variants, to test different prompts and their outcome.
In a follow-up post, we will take a look at turning this flow into a container. Stay tuned! 📺
In this post, we will take a look at building an Azure AI Search index with a custom skill. We will use the Azure AI Search Python SDK to do the following:
create a search index: a search index contains content to be searched
create a data source: a datasource tells an Azure AI Search indexer where to get input data
create a skillset: a skillset is a collection of skills that process the input data during the indexing process; you can use built-in skills but also build your own skills
create an indexer: the indexer creates a search index from input data in the data source; it can transform the data with skills
If you are more into videos, I already created a video about this topic. In the video, I use the REST API to define the resources above. In this post, I will use the Python SDK.
Azure AI Search with custom GPT-4 vision skill
What do we want to achieve?
We want to build an application that allows a user to search for images with text or a similar image like in the diagram below:
Search application
The application uses an Azure AI Search index to provide search results. An index is basically a collection of JSON documents that can be searched with various techniques.
The input data to create the index is just a bunch of .jpg files in Azure Blob Storage. The index will need fields to support the two different types of searches (text and image search):
a text description of the image: we will need to generate the description from the image; we will use GPT-4 Vision to do so; the description supports keyword-based searches
a text vector of the description: with text vectors, we can search for descriptions similar to the user’s query; it can provide better results than keyword-based searches alone
an image vector of the image: with image vectors, we can supply an image and search for similar images in the index
I described building this application in a previous blog post. In that post, we pushed the index content to the index. In this post, we create an indexer that pulls in the data, potentially on a schedule. Using an indexer is recommended.
Creating the index
If you have an Azure subscription, first create an Azure AI Search resource. The code we write requires at least the basic tier.
The notebook starts with the necessary imports and also loads environment variables via a .env file. See the README of the repo to learn about the required variables.
To create the index, we define a blog_index function that returns an index definition. Here’s the start of the function:
Above, we define an array of fields for the index. We will have 7 fields. The first three fields will be retrieved from blob storage metadata:
path: base64-encoded url of the file; will be used as unique key
name: name of the file
url: full url of the file in Azure blob storage
The link between these fields and the metadata is defined in the indexer we will create later.
Next, we have the description field. We will generate the image description via GPT-4 Vision during indexing. The indexer will use a custom skill to do so.
The enriched field is there for debugging. It will show the enrichments by custom or built-in skills. You can remove that field if you wish.
To finish, we have vector fields. These fields are designed to hold arrays of a specific size:
imageVector: a vector field that can hold 1024 values; the image vector model we use outputs 1024 dimensions
textVector: a vector field that can hold 1536 values; the text vector model we use outputs that number of dimensions
Note that the vector fields references a search profile. We create that in the next block of code in the blog_index function:
Above, vector_config is an instance of the VectorSearch object, which holds algorithms, profiles and vectorizers:
algorithms: Azure AI search supports both HNSW and exhaustive to search for nearest neighbors to an input vector; above, both algorithms are defined; they both use cosine similarity as the distance metric
vectorizers: this defines the integrated vectorizer and points to an Azure OpenAI resource and embedding model. You need to deploy that model in Azure OpenAI and give it a name; at the time of writing (December 2023), this feature was in public preview
profiles: a profile combines an algorithm and a vectorizer; we create two profiles, one for each algorithm; the vector fields use the myHnswProfile profile.
Note: using HNSW on a vector field, designed to perform approximate nearest neighbor searches, still allows you to do an exhaustive search; the notebook contains sample searches at the bottom, which use exhaustive searches to search the entire vector space; note that the reverse is not possible (using HNSW when index on field is set as exhaustive).
Above, we specify a semantic_config. It is used to inform the semantic reranker abiut the fields in our index with valuable data. Here, we use the description field. The config is used to create an instance of type Semantic_Settings. You also have to enable the semantic reranker in Azure AI Search to enable this feature.
The function ends by returning an instance of type SearchIndex, which contains the fields array, the vector configuration and the semantic configuration.
Now we can use the output of this function to create the index:
service_endpoint = "https://acs-geba.search.windows.net"
index_name = "images-sdk"
key = os.getenv("AZURE_AI_SEARCH_KEY")


index_client = SearchIndexClient(service_endpoint, AzureKeyCredential(key))
search_client = SearchClient(service_endpoint, index_name, AzureKeyCredential(key))
index = blog_index(index_name)

# create the index
try:
    index_client.create_or_update_index(index)
    print("Index created or updated successfully")
except Exception as e:
    print("Index creation error", e)
The important part here is the creation of a SearchIndexClient that authenticates to our Azure AI Search resource. We use that client to create_or_update our index. That function requires a SearchIndex parameter, provided by the blog_index function.
When that call succeeds, you should see the index in the portal. Text and vector fields are searchable.
Index in the portal
The vector profiles should be present:
Vector profiles
Click on an algorithm or vectorizer. It should match the definition in our code.
Now we can define the data source, skillset and indexer.
Data source
Our images are stored in Azure Blob Storage. The data source needs to point to that resource and specify a container. We can use the following code:
# Create a data source
ds_client = SearchIndexerClient(service_endpoint, AzureKeyCredential(key))
container = SearchIndexerDataContainer(name="images")
data_source_connection = SearchIndexerDataSourceConnection(
    name=f"{index_name}-blob",
    type="azureblob",
    connection_string=os.getenv("STORAGE_CONNNECTION_STRING"),
    container=container
)
data_source = ds_client.create_or_update_data_source_connection(data_source_connection)

print(f"Data source '{data_source.name}' created or updated")
The code is pretty self-explanatory. The data source is shown in the portal as below:
Azure AI Search data source
Skillset with two skills
Before we create the indexer, we define a skillset with two skills:
AzureOpenAIEmbeddingSkill: a built-in skill that uses an Azure OpenAI embedding model and takes text as input; it returns a vector (embedding) of 1536 dimensions; this skill is not free; you will be billed for the vectors you create via your Azure OpenAI resource
WebApiSkill: a custom skill that points to an endpoint that you need to build and host; you define the inputs and outputs of the custom skill; my custom skill runs in Azure Container Apps but it can run anywhere. Often, skills are implemented as an Azure Function.
Above, we define the skillset and the embedding_skill. The AzureOpenAIEmbeddingSkill points to a deployed text-embedding-ada-002 embedding model. Use the name of your deployment, not the model name.
A skillset operates within a context. The context above is the entire document (/document) but that’s not necessarily the case for other skills. The input to the embedding skill is our description field (/document/description). The output will be a vector. The target_name above is some sort of a temporary name used during the so-called enrichment process of the indexer. We will need to configure the indexer to write this field to the index.
The question is: “Where does the description come from?”. The description comes from the WebApiSkill. Because the embedding skill needs the description field generated by the WebApiSkill, the WebApiSkill will run first. Here is the custom web api skill:
custom_skill = WebApiSkill(
    description="A custom skill that creates an image vector and description",
    uri="YOUR_ENDPOINT",
    http_method="POST",
    timeout="PT60S",
    batch_size=4,
    degree_of_parallelism=4,
    context="/document",
    inputs=[
        InputFieldMappingEntry(name="url", source="/document/url"),
    ],
    outputs=[
        OutputFieldMappingEntry(name="embedding", target_name="imageVector"),
        OutputFieldMappingEntry(name="description", target_name="description"),
    ],
)
The input to the custom skill is the url to our image. That url is posted to the endpoint you define in the uri field. You can control how many inputs are sent in one batch and how many batches are sent concurrently. The inputs have to be sent in a specific format.
This skill also operates at the document level and creates two new fields. The contents of those fields are generated by your custom endpoint and returned as embedding and description. They are mapped to imageVector and description. Again, those fields are temporary and need to be written to the index by the indexer.
To see the code of the custom skill, check https://github.com/gbaeke/vision/tree/main/img_vector_skill. That skill is written for demo purposes and was not thoroughly vetted to be used in production. Use at your own risk. In addition, GPT-4 Vision requires an OpenAI key (not Azure OpenAI) and currently (December 2023) allows 100 calls per day! You currently cannot use this at scale. Azure also provides image captioning models that might fit the purpose.
Now we can create the skillset:
skillset = SearchIndexerSkillset(
    name=skillset_name,
    description="Skillset to generate embeddings",
    skills=[embedding_skill, custom_skill],
)

client = SearchIndexerClient(service_endpoint, AzureKeyCredential(key))
client.create_or_update_skillset(skillset)
print(f"Skillset '{skillset.name}' created or updated")
The above code results in the following:
skllset with two skills
Indexer
The indexer is the final piece of the puzzle and brings the data source, index and skillset together:
indexer_name = f"{index_name}-indexer"

indexer = SearchIndexer(
    name=indexer_name,
    description="Indexer to index documents and generate description and embeddings",
    skillset_name=skillset_name,
    target_index_name=index_name,
    parameters=IndexingParameters(
        max_failed_items=-1
    ),
    data_source_name=data_source.name,
    # Map the metadata_storage_name field to the title field in the index to display the PDF title in the search results
    field_mappings=[
        FieldMapping(source_field_name="metadata_storage_path", target_field_name="path",
            mapping_function=FieldMappingFunction(name="base64Encode")),
        FieldMapping(source_field_name="metadata_storage_name", target_field_name="name"),
        FieldMapping(source_field_name="metadata_storage_path", target_field_name="url"),
    ],
    output_field_mappings=[
        FieldMapping(source_field_name="/document/textVector", target_field_name="textVector"),
        FieldMapping(source_field_name="/document/imageVector", target_field_name="imageVector"),
        FieldMapping(source_field_name="/document/description", target_field_name="description"),
    ],
)

indexer_client = SearchIndexerClient(service_endpoint, AzureKeyCredential(key))
indexer_result = indexer_client.create_or_update_indexer(indexer)
Above, we create an instance of type SearchIndexer and set the indexer’s name, the data source name, the skillset name and the target index.
The most important parts are the field mappings and the output field mappings.
Field mappings take data from the indexer’s data source and map them to a field in the index. In our case, that’s content and metadata from Azure Blob Storage. The metadata fields in the code above are described in the documentation. In a field mapping, you can configure a mapping function. We use the base64Encode mapping function for the path field.
Output field mappings take new fields created during the enrichment process and map them to fields in the index. You can see that the fields created by the skills are mapped to fields in the index. Without these mappings, the skillsets would generate the data internally but the data would never appear in the index.
Once the indexer is defined, it gets created (or updated) using an instance of type SearchIndexerClient.
Note that we set a parameter in the index, max_failed_items, to -1. This means that the indexer process keeps going, no matter how many errors it produces. In the indexer screen below, you can see there was one error:
Indexer with one error
The error happened because the image vectorizer in the custom web skill threw an error on one of the images.
Using an indexer has several advantages:
Indexing is a background process and can run on a schedule; there is no need to schedule your own indexing process
Indexers keep track of what they indexed and can index only new data; with your own code, you have to maintain that state; failed documents like above are not reprocessed
Depending on the source, indexers see deletions and will remove entries from the index
Indexers can be easily reset to trigger a full index
Indexing errors are reported and errors can be sent to a debugger to inspect what went wrong
Testing the index
We can test the index by performing a text-based search that uses the integrated vectorizer:
# Pure Vector Search
query = "city"

search_client = SearchClient(service_endpoint, index_name, credential=AzureKeyCredential(key))
vector_query = VectorizableTextQuery(text=query, k=1, fields="textVector", exhaustive=True)


results = search_client.search(
    search_text=None,
    vector_queries= [vector_query],
    select=["name", "description", "url"],
    top=1
)

# print selected fields from dictionary
for result in results:
    print(result["name"])
    print(result["description"])
    print(result["url"])
    print("")
Above, we search for city (in the query variable). The VectorizableTextQuery class (in preview) takes the plain text in the query variable and vectorizes it for us with the embedding model defined in the integrated vectorizer. In addition, we specify how many results to return (1 nearest neighbors) and that we want to search all vectors (exhaustive).
Note: remember that the vector field was configured for HNSW; we can switch to exhaustive as shown above
Next, search_client.search performs the actual search. It only provides the vector query, which results in a pure similarity search with the query vector. search_text is set to None. Set search string to the query if you want to do a hybrid search. The notebook contains additional examples that also does a keyword and semantic search with highlighting.
The search gives the following result (selected fields: name, description, url):
city.jpg
This is an image of the London skyline, featuring a mix of modern skyscrapers and historical buildings. Prominent among the skyscrapers are the Leadenhall Building, also known as the "Cheesegrater," and the rounded, distinctive shape of 30 St Mary Axe, commonly referred to as "The Gherkin." Further in the background, the towers of Canary Wharf can be seen. The view is clear and taken on a day with excellent visibility.
https://stgebaoai883.blob.core.windows.net/images/city.jpg
The image the URL points to is:
yep, a city (London)
In the repo’s search-client folder, you can find a Streamlit app to search for and display images and dump the entire search result object. Make sure you install all the packages in requirements.txt and the preview Azure AI Search package from the whl folder. Simply type streamlit run app.py to run the app:
Streamlit Query app
Conclusion
In this post, we demonstrated the use of the Azure AI Search Python SDK to create an indexer that takes images as input, create new fields with skills, and write those fields + metadata to an index.
We touched on the advantages of using an indexer versus your own indexing code (pull versus push).
With this code and some sample images, you should be able to build an image search application yourself.