# Certificates with Azure Key Vault and Nginx Ingress Controller
- URL: https://baeke.info/2020/12/07/certificates-with-azure-key-vault-and-nginx-ingress-controller/
- Author: Geert Baeke
- Published: December 7, 2020
- Topics: containers, docker, kubernetes, web, certificates, ingress, security, x509
Let’s face it. If you deploy web applications and APIs of any sort, you need certificates. If you have been long enough in IT, there’s just no escape! In this article, we will take a look at getting a certificate from Azure Key Vault to Azure Kubernetes service. Next, we will use that certificate with Nginx Ingress Controller and check what happens when the certificate gets renewed.
If you are more into videos, check out the video below from my [channel](https://www.youtube.com/geertbaeke):
*Video from [https://youtube.com/geertbaeke](https://youtube.com/geertbaeke)*
## Prerequisites
What do you need to following along?
- Azure subscription: see [https://azure.microsoft.com/en-us/free/](https://azure.microsoft.com/en-us/free/)
- Azure Key Vault: see the [quickstart](https://docs.microsoft.com/en-us/azure/key-vault/general/quick-create-portal) to create it with the Azure Portal
- Azure Kubernetes Services (AKS): see the [quickstart](https://docs.microsoft.com/en-us/azure/aks/kubernetes-walkthrough-portal) to deploy it via the portal
- Azure CLI: see the [installation options](https://docs.microsoft.com/en-us/cli/azure/install-azure-cli)
- Kubectl: the Kubernetes administration tool; check the installation instructions [here](https://kubernetes.io/docs/tasks/tools/install-kubectl/); use a package manager such as [brew](https://brew.sh/index_nl) of [choco](https://chocolatey.org/) to easily install it
- Helm: required to install Helm charts; use a package manager such as brew of choco to install it; use v3 and higher
When AKS is up and running and you have authenticated with the Azure CLI using **az login**, get the credentials to AKS with:
```bash
az aks get-credentials -n -g
```
We can now proceed to install nginx ingress controller.
## Installing nginx ingress controller
Use the Helm chart to install nginx. First add the repo:
```bash
helm repo add https://kubernetes.github.io/ingress-nginx
helm repo update
```
Now install the chart:
```bash
helm install my-release ingress-nginx/ingress-nginx
```
More information can be found here: [https://kubernetes.github.io/ingress-nginx/deploy/](https://kubernetes.github.io/ingress-nginx/deploy/). The Helm chart will result in an nginx pod on your cluster. It will use a Kubernetes service exposed via an Azure Public Load Balancer. Later, we will publish an application on our cluster via this endpoint. We will do that by creating a resource of kind **Ingress**.
The procedure below works equally well with an ingress controller on an internal IP address and potentially, internal DNS names and certificates. We just happen to use an external IP address and a self-signed certificate here.
## Installing the akv2k8s controller
To sync a Key Vault certificate to Kubernetes, we need some extra software. You will often come across the [secrets store CSI driver](https://github.com/kubernetes-sigs/secrets-store-csi-driver), which has a provider for [Azure Key Vault](https://github.com/Azure/secrets-store-csi-driver-provider-azure#:~:text=Azure%20Key%20Vault%20provider%20for%20Secrets%20Store%20CSI%20driver%20allows,mount%20them%20into%20Kubernetes%20pods.). Although this works well and is probably the way forward in the future, I often use another solution that is just a bit easier to use: the Azure Key Vault to Kubernetes controller. Check out the documentation over at [https://akv2k8s.io](https://akv2k8s.io/).
The controller can be configured to sync a certificate in Azure Key Vault to a secret of type kubernetes.io/tls. Normally, you would create such a secret with the following command:
```bash
kubectl create secret tls my-tls-secret --cert=path/to/cert/file --key=path/to/key/file
```
Indeed, you would need the certificate and private key files to create such a secret. The akv2k8s controller does that work for you, grabbing the certificate and private key from Key Vault. Do note that what we are doing here is creating a regular Kubernetes secret. Such a secret contains the certificate and key in base64 encoded format. Anyone with the proper access rights on your cluster can easily decode the secret and use it as they please. Check out the following [document](https://kubernetes.io/docs/concepts/configuration/secret/#risks) about the risks of regular secrets in Kubernetes.
To install the controller, see [https://akv2k8s.io/installation/installing-with-helm](https://akv2k8s.io/installation/installing-with-helm/).
## Creating the certificate in Key Vault
There are many ways to generate certificates and store them in Key Vault. In general, you should automate as much as possible especially when it comes to renewing the certificate. However, this post focuses on getting a certificate to Kubernetes. That is the reason why we will generate a self-signed certificate in Key Vault.
In your Key Vault, navigate to Certificates and click Generate/Import:
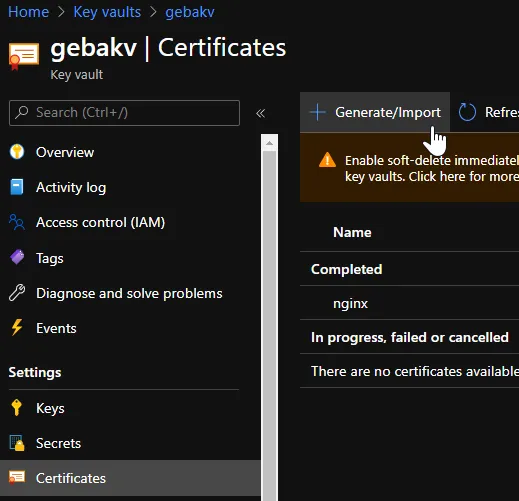
*Certificates in Key Vault*
In **Create a certificate**, fill in the blanks. If you want to use a real domain, make sure you specify it in the DNS Names. I used test.baeke.info with a validity of 12 months. The content type can either be PKCS #12 or PEM. The akv2k8s controller can handle both formats.
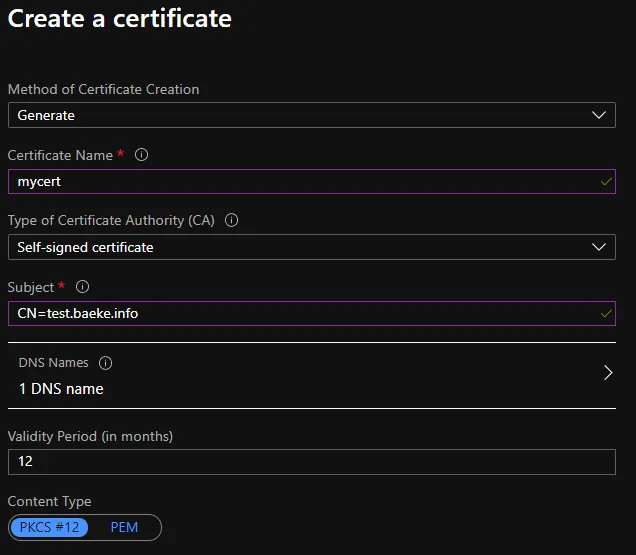
*New self-signed certificate*
After clicking **Create** and refreshing the list a few times, you should see the certificate listed:
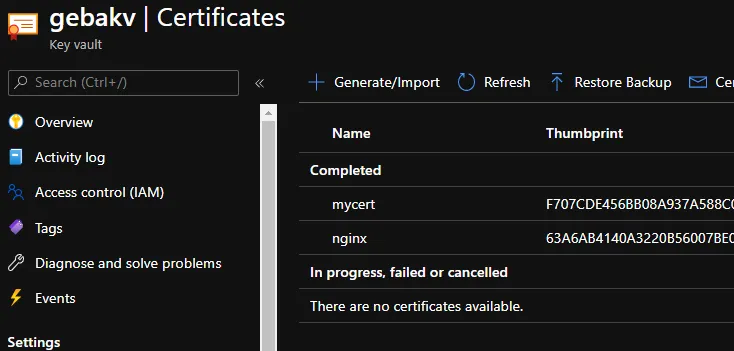
*mycert lis in the list*
**Note:** in what follows, I will use the nginx certificate in the list; it was created in the same way although it is valid for 24 months
## Access Policy
The akv2k8s controller needs access to your Key Vault to retrieve the certificate. It used the service principal or managed identity of the cluster to do so. My cluster was setup with managed identity. You can retrieve the identity with the Azure CLI:
```bash
az aks show -n -g | jq .identityProfile.kubeletidentity.objectId -r
```
jq is a tool to parse JSON content. We use it here to retrieve the objectId of the managed identity. Once you have the objectId, you can grant it the required access rights:
```bash
az keyvault set-policy --name --object-id --certificate-permissions get
```
The above Azure CLI command gives the objectId of our managed identity access to retrieve certificates from the specified Key Vault. You can use the short name of the Key Vault in --name.
## Syncing the certificate
With the controller installed and granted sufficient access rights, we can now instruct it to sync the certificate. We do so with the following YAML:
```yaml
apiVersion: spv.no/v1
kind: AzureKeyVaultSecret
metadata:
name: cert-sync
namespace: certsync
spec:
vault:
name: gebakv
object:
name: nginx
type: certificate
output:
secret:
name: nginx-cert
type: kubernetes.io/tls
```
Note that all the resources I deploy from now are in the **certsync** namespace. The above YAML is pretty clear: it syncs the nginx certificate in Key Vault to a Kubernetes secret called nginx-cert. The type of the secret is kubernetes.io/tls. After synchronization, it will appear in the namespace:
```
NAME TYPE DATA AGE
nginx-cert kubernetes.io/tls 2 19s
```
On my system, I have installed the [krew](https://github.com/kubernetes-sigs/krew) view-cert [plugin](https://github.com/lmolas/kubectl-view-cert). The command **kubectl view-cert** in the namespace certsync results in the following output (it enumerates all certs as a JSON array but there is only one):
```json
[
{
"SecretName": "nginx-cert",
"Namespace": "certsync",
"Version": 3,
"SerialNumber": "15fd15ed11384d31a0a21f96f5e457c6",
"Issuer": "CN=test.baeke.info",
"Validity": {
"NotBefore": "2020-12-05T14:09:53Z",
"NotAfter": "2022-12-05T14:19:53Z"
},
"Subject": "CN=test.baeke.info",
"IsCA": false
}
]
```
When I check the serial number in Key Vault, it matches with the serial number above. The certificate is valid for two years.
## Using the secret with nginx-ingress
In the certsync namespace, I installed a simple app that uses a service called realtime. We will expose that service on the Internet via the nginx ingress controller (version v0.41.2; image k8s.gcr.io/ingress-nginx/controller). We use the following Ingress definition:
```yaml
apiVersion: extensions/v1beta1
kind: Ingress
metadata:
name: testingress
namespace: certsync
annotations:
kubernetes.io/ingress.class: nginx
spec:
tls:
- hosts:
- test.baeke.info
secretName: nginx-cert
rules:
- host: test.baeke.info
http:
paths:
- path: /
backend:
serviceName: realtime
servicePort: 80
```
**Important:** my Kubernetes version is 1.18.8 so the above definition is still valid; for 1.19, check the [docs](https://kubernetes.io/docs/concepts/services-networking/ingress/)
The above creates an ingress for test.baeke.info and requires tls with the certificate in the nginx-cert secret. After a while, you will see the address and ports the ingress uses. Use **kubectl get ingress** to check:
```
NAME CLASS HOSTS ADDRESS PORTS AGE
testingress test.baeke.info 20.73.37.74 80, 443 41s
```
At [https://test.baeke.info](https://test.baeke.info), the following certificate is offered:
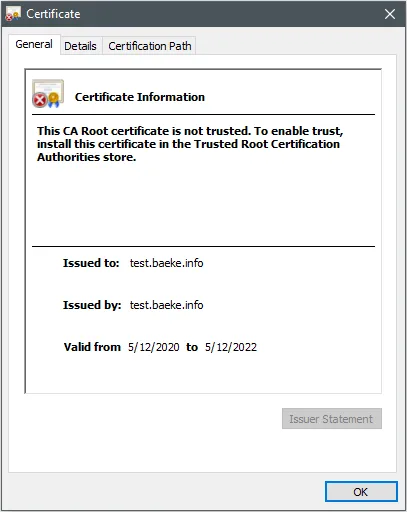
*Self-signed certificate offered by nginx ingress for test.baeke.info*
**Note:** you need to ensure the FQDN (test.baeke.info here) resolves to the IP of the ingress; on my cluster this is done automatically by [external dns](https://github.com/kubernetes-sigs/external-dns). Note that the certificate is valid for two years.
## Renewing the certificate
While the renewal process can be configured to be automatic, we will configure a new certificate from Azure Key Vault. Just navigate to your certificate and click **New Version**:
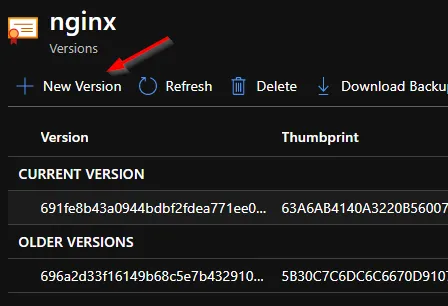
*Creating a new version of the certificate*
In the screen that follows, you can adjust the settings of the new certificate. I changed the lifetime back to 12 months. When you save your changes, the akv2k8s controller will pick up the change and modify the certificate in the Kubernetes secret. It will not delete and create a new secret. With **kubectl view-cert**, I now get the following output:
```json
[
{
"SecretName": "nginx-cert",
"Namespace": "certsync",
"Version": 3,
"SerialNumber": "27f95965e2644e0a58a878bc8a86f7d",
"Issuer": "CN=test.baeke.info",
"Validity": {
"NotBefore": "2020-12-07T09:05:27Z",
"NotAfter": "2021-12-07T09:15:27Z"
},
"Subject": "CN=test.baeke.info",
"IsCA": false
}
]
```
The serial number has changed. You can also see that the validity period has changed to 12 months.
## What about our ingress?
Nginx ingress controller is smart enough to detect the changed certificate and offer it to clients. I used SHIFT-F5 to refresh the page and ingore cached content. Here is the offered certificate:
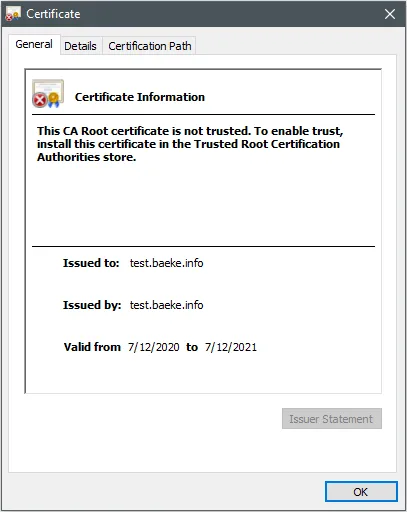
*New certificate with 12 month lifetime*
## Conclusion
When you work with certificates in Kubernetes, always automate as much as possible. You can do that with a solution such as [cert-manager](https://cert-manager.io/docs/) that can request certificates dynamically (e.g. from Let’s Encrypt). In many other cases though, there are other certificate management practices in place that might prevent you from using a tool like cert-manager. In that case, try to get the certificates into a system like Key Vault and create your automation from there.